
Page Summary
-
Google Maps Platform's Advanced Markers empower developers to craft dynamic map experiences by visually representing real-time data.
-
This document illustrates how to use Advanced Markers with real-time data using retail store wait times as an example, but the approach applies to various use cases like hotel availability, parking space availability, and restaurant hours.
-
Developers can connect to real-time data sources via approaches such as HTTP requests, Firebase Cloud Messaging, or WebSockets, tailoring the method to their needs.
-
Marker attributes like color and content can be dynamically updated to reflect real-time changes, providing users with current information directly on the map.
-
By integrating real-time data and Advanced Markers, developers can create interactive and informative map visualizations that enhance user experiences.
Google Maps Platform enables customers to develop unique experiences by customizing the visual design of their map markers using Advanced Markers. In this document we will explore how customers can go one step further and create markers that change dynamically based on real-time data.
Map markers are a useful tool to provide rich mapping experiences to users. Marker attributes such as size, coloring, and shape can convey additional information about each marked location. In some cases, this additional information may change dynamically and the developer may want the map visualization to update, maintaining a sense of freshness for the user.
In this document, we use an example for illustrative purposes: a retail chain wants to use a map to make store wait times available to users. However, this same architecture could be used for many other use cases. Here are a few additional ideas:
- Hotel Room Availability: on a map showing hotel search results, freshness of room availability is an important signal that can encourage users to make a reservation for a hotel as inventory decreases.
- Parking Space Availability: on a map of parking lots, give users confidence to select a destination that will have a space for them when they arrive.
- Restaurants Open, Closing Soon, and Closed: on a map showing restaurant search results, it's important that users are aware if a restaurant may be closed when they arrive.
The Dynamic Advanced Markers Solution
You can build out a map using advanced markers to visualize dynamic data. As mentioned earlier, the use case is a chain of retail stores leveraging their check-out queue management system to estimate and visualize wait times for users. This is the application architecture::

Step 1 - Determine Attributes to Define Visual Experience
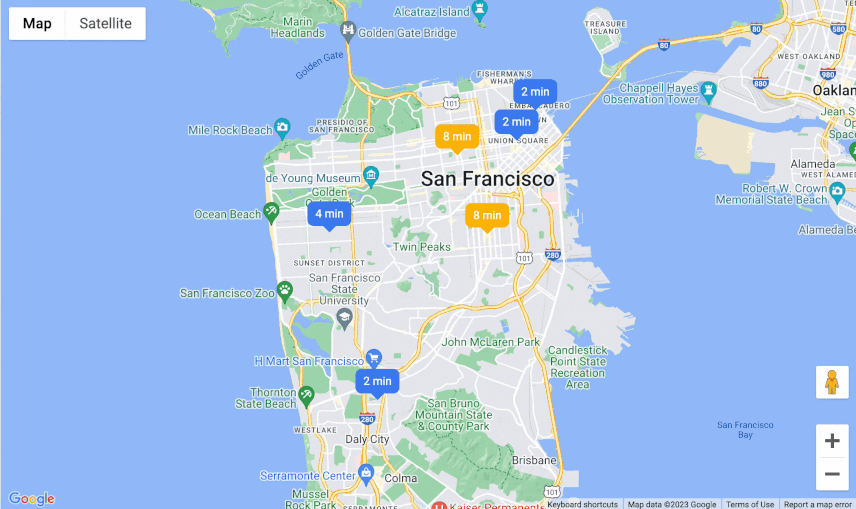
The first step is to determine one or more location properties to show to users. In this case, we are looking to show only one property: the current wait time at each store location, measured in minutes.
The next step is to select one or more corresponding marker attributes to visually annotate wait time on the map marker. The list of marker attributes is available out-of-the-box in the PinElement specification. You can also use custom HTML for more rich customization options.
For this example, we will be using two marker attributes to visualize wait time data:
- Marker color: blue for wait time less than 5 minutes, yellow for longer than 5 minutes
- Marker contents (requires custom HTML markers): we'll include the current wait time in minutes in the marker itself
Step 2 - Configure Connection to Real-Time Data Sources
There are multiple ways to connect to data sources, and the right solution depends on your use case and technical infrastructure. In this example, we're using a pull approach, where we request the updated wait time data using HTTP requests (REST) on a regular basis. In the following sections, you'll see alternative architectures leveraging push approaches.
To enable our application to access the wait time data from our server, our architecture leverages Cloud Functions for Firebase. Cloud Functions enable us to define a backend function to access and compute this data. We also include the Firebase library in our web application, enabling us to access our Cloud Function using an HTTP request.
The next step is to ensure we keep the data fresh for the user. To do so, we set
up a timer using the javascript setInterval function with a timeout of 30
seconds. Each time the timer is triggered, we request updated wait time data as
described above. Once we get the new data, we must refresh the appearance of the
map markers. The next step details how to make those changes.
Step 3 - Render Map Markers
We can now use Advanced Markers to render the stylized markers on the map. Advanced markers can be rendered on maps created by Google Maps Platform's Maps Javascript API. When using advanced markers, be sure to include the map ID parameter in the JS map request.
In the code snippet shown below, we create the markers, and define the marker's content by creating an HTML div element:
// Create the content div for the marker
storeWaitLabels[store_index] = document.createElement("div");

// Create the marker
markers.push(new google.maps.marker.AdvancedMarkerElement({
      map,
      position: { lat: latlngs[store_index][0], lng: latlngs[store_index][1] },
      content: storeWaitLabels[store_index]
    }));
The final step is to update the marker text and CSS styling for each store. The below code reads the updated wait times data and assigns styling to each store pin based on the wait time:
// Update the visual appearcance of a map marker
storeWaitLabels[store_index].textContent = waitTimes[store_index] + " min";
     if (waitTimes[store_index] > 5)
storeWaitLabels[store_index].className = "wait-over-5";
     else storeWaitLabels[store_index].className = "wait-under-5";
The map now uses our existing wait times API to visualize up-to-date wait times for users:
Alternative Ways to Connect to Real-Time Data Sources
There are various ways to connect to real-time data sources. Below, we review two alternative options, Firebase Cloud Messaging and Websockets. Whatever approach you select, be sure to consider the below factors so that your map tool remains performant:
- Frequency of updates
- Volume of data
- Number of markers in the map view
- Hardware and browser capabilities
Firebase Cloud Messaging
Firebase Cloud Messaging is a push approach. Using this approach, you'll send updates to the map application each time wait time data is updated on the backend. Update messages will trigger a callback function whose purpose is to update the marker appearance and contents.
One thing to consider before selecting this architecture is that it requires maintaining a persistent server connection for each browser running the map application. For that reason it may be more costly to run, and may be less robust in the context of connectivity issues.
WebSockets
WebSockets are another push-based approach to keeping data fresh. Similar to the previous scenario, you can use WebSockets to establish a persistent connection between your backend and your map application. The functional benefits of this approach are similar in nature to Firebase Cloud Messaging, however there may be additional work required to configure the necessary infrastructure.
Conclusion
Developers can combine real-time data sources with Advanced Markers to build intuitive visualizations on Google Maps. There are several ways to connect these data sources depending on the map requirements, user hardware and browser, and data volume. The integrated data can then be used to control the look-and-feel of the Advanced Markers in real-time, enabling a dynamic experience for users.
Next Actions
Further Reading:
- Advanced Markers - Google Developer Center
- Create Markers with Custom HTML
- Cloud Functions for Firebase
- Firebase Cloud Messaging
Contributors
Principal authors:
Jim Leflar | Google Maps Platform Solutions Engineer
John Branigan | Google Cloud Platform Sr. Customer Engineer
Steve Barrett | Google Maps Platform Solutions Engineer