
Page Summary
-
Google Maps Platform offers mobility-specific billing accounts and usage limits for ridesharing, delivery, and logistics solutions.
-
Before production, validate your integration by confirming trip/task reporting and aligning reported events with actual completions.
-
Link your Google Cloud project to the designated Mobility Billing Account provided in your Welcome Letter for production billing.
-
Monitor integration health using Cloud Logging and configure alerts for potential billing or operational issues.
-
Plan your production ramp-up, adhering to Google's Implementation Policy and optimizing API usage to manage costs effectively.
Before you implement a new Google Maps project in production, you want to make sure that your setup is correct so you pay the right amount for the products that you are using. In this document, we cover aspects to make sure you have (i) billing transparency - so usage can be verified before an invoice is generated and (ii) the right project setup - to ensure that you can use our products.
While this should be a relatively straightforward process, Maps Partners can work with you to ensure that your projects are moved correctly.
Concepts
In this section we want to make sure that you understand basic information about Google Maps billing and the different setups that can exist. There's no right or wrong in many situations, it depends on what type of result you are trying to achieve.
Throughout this document, we talk a lot about your Google Cloud project. This is because Google Maps products are available through it. This means that the configuration we cover in this document is made in your Google Cloud project.
Billing Accounts
Every company using Google Maps products today has a Google Cloud project associated with them. This project must have a billing account configured. The billing account is responsible for accruing all Google Maps usage and creating an invoice every month based on that usage.
For Mobility, a special billing account is provisioned. This billing account is meant to be used only with mobility related use cases such as: ridesharing, delivery and logistics.
A single billing account can be used by multiple Google Cloud projects or just one.
Single project pointing to the same billing account:
- Specific use case (ie. mobility use cases)
- Separate invoices
- Discount is made on the volume based of this single project
Multiple projects pointing to the same billing account:
- Same use case
- Take advantage of discount tiers by aggregating usage
- Single invoice
For extra information about billing accounts and other relevant information, check this link.
As said above, a single billing account can point to multiple projects. If you have more than a single project, you should identify which ones will use our mobility services and point them to a mobility billing account. Projects which do not have a mobility use case associated with them should continue pointing to the regular Google Maps Platform billing account that you are using today. To get a mobility billing account, a mobility deal must be signed with Google or through a partner. Below you can see how a billing account fits in the whole schema and the different possible setups:

Cloud resources, billing account and invoice generation
Talking about pricing, on Google Maps Platform there are different tiers of discounts, available through Maps Partners or directly with Google in some scenarios. These tiers are volume-based, so you pay less the more you use our products (discounts are applied to each SKU individually). Our billing system identifies your project(s) based on the credential that you have used to call our products, this can be an API key or a Service Account for some mobility APIs:
API keys
Google Maps Platform APIs are authenticated using an API key. Google identifies the corresponding Google Cloud project's billing account based on this API key, where consumption will happen.
Example of a request to the Geocoding API:
https://maps.googleapis.com/maps/api/geocode/json?place_id=ChIJeRpOeF67j4AR9ydy_PIzPuM&key=YOUR_API_KEY
JWT
Some APIs require a Google Cloud project ID in the URL and use a JWT to authenticate. Therefore, it is important to ensure that the right systems use the correct authentication method to ensure that billing happens properly.
Example of a request to the Fleet Engine API:
curl -X GET \ https://fleetengine.googleapis.com/v1/providers/project_id/deliveryVehicles/vehicle-1234 \
  -H 'authorization: Bearer eyJ0eXAiOi...' \
  -H 'cache-control: no-cache' \
  -H 'content-type: application/json' \
  -d '{
    "lastLocation": {
        "location": {
            "latitude": 37.432,
            "longitude": -122.094
        },
        "updateTime": "2022-11-13T17:55:00Z"
    }
}'
Costs
On Google Maps Platform, costs are calculated based on the volume of API requests. For the Mobility services, we charge based on the volume of billable mobility transactions, which are successfully completed trips or tasks (shipments, not pickups). This is defined before signing the contract. If you are a ridesharing or food delivery company, completing a ride or delivery is your success metric - this maps to a Trip. Tasks are used for logistics companies and retailers which must deliver parcels successfully.
We recognize that Mobility customers also use Google Maps Platform products in the execution of their trips and deliveries. Therefore, if you are using a mobility billing account you can call Google Maps Platform at no cost as long as predefined limits are respected within the same mobility use case.
As an example, if you are a food delivery company, for every successful trip you make you can call Geocoding API ten times. To learn more about these limits, see use limits in the mobility documentation. Any changes to caps require an amendment to your contract, so work with your Google or Partner representative to discuss your specific needs.
At the end of the month, an invoice will be generated based on (i) the number of succeeded trips or tasks reported in the system and (ii) any volume of Google Maps Platform API calls beyond pre-established limits ("overages"). Our limits are aligned to what we have broadly seen as needed in the market.
We suggest you carefully read through the official mobility billing documentation that can be found here.
Pilots and evaluation
Customers can run a small pilot (proof-of-concept, evaluation) of mobility services on a Google Maps Platform billing account for a limited duration of time before a contract is signed. If you want to run a pilot, talk to your Maps Partner or Google counterpart.
During the pilot phase, as mentioned, there is no mobility billing account available as the contract has not been signed yet. This means that whenever Google Maps Platform products are used, they are going to be charged, but mobility specific products will not. In other words, this means that during pilot phase billing is not Task or Trip based as a consequence of that, the use limits don't apply during this phase.
Once the pilot is launched officially to production it must be paid as per contract.
To summarize:
Pilot / development phase: you are charged only for the Google Maps APIs that are publicly available. APIs and SDKs that are not publicly available won't incur charges until a mobility billing account is used in the project. Keep in mind that Google offers free usage amounts for each Google Maps Platform SKU to any new billing account that is created. This should be sufficient for a controlled environment during the evaluation period.
Production phase: you are charged either by trips or tasks. Costs associated with Google Maps Platform will only incur if the usage exceeds the use limits ("caps") for the contract. If so, you are going to pay for overages. Overages are charged as defined here.
How to migrate to a mobility billing account
When you migrate to production, you typically have to create an additional Google Cloud projects to represent your different environments like QA (Quality Assurance) and Production. Before that, you probably have just a single environment, the development one.
Requirements
A person on your side who can:
- Manage billing accounts on Google Cloud, usually this is done by the Billing Account Administrator or Project Owner.
- Access to the new billing account ID that came as part of the Welcome letter that was generated after the contract was signed.
- Access to the Google Cloud project corresponding to the production environment where trips or tasks will be reported.
Use the following steps to set up new projects and configure billing for them.
New Project Setup
Project creation
- [You] Create a new Google Cloud project in the Google Cloud Console for each new environment. For example, production, staging, and quality assurance.
- [Partner or Google team] Add new projects to an allowlist to have access to the Mobility products. Work with your sales representative at Google or Partner, and provide the project ID created in the previous step.
- [You] Update Essential Contacts on your projects. This step is very important to ensure that Google support teams can reach the right people for your project if needed.
Project configuration
Complete the following steps in Google Cloud Console for the project created in previous steps:
[You] Create Service Accounts including association of correct Mobility Identify & Access Management (IAM) roles (trip based and task based)
- as it was done in the development environment or with a more structured segregation of access if needed - see this section.
[You] Create API keys - as it was done on the development environment or with a more structured segregation of access (e.g. per product, domain, etc) if needed.
[You] Enable APIs such as "Local Rides and Deliveries" and other Google Maps Platform APIs needed (i.e. Geocoding, Autocomplete, Address Validation).
[You] Quota: if you need QPM (queries per minutes) uplifts for certain APIs, open a ticket to support. See how to do it here. You must add a business justification stating why the uplift is needed. Predefined quotas can be seen here.
[You] If you have systems developed which were using credentials from the development environment, make sure that these systems are able to point to the new credentials that have been created for the new projects created. This includes pointing backend and frontend systems to the new credentials such as API keys, Service Accounts and making sure the right project ids are used in each respective environment.
Billing configuration
Here we assume you have already signed a contract with Google directly (where applicable) or through a partner. This is a prerequisite to receive the Mobility Billing Account in the Welcome Letter, which is going to be used in the next steps.
- [You] Verify if a mobility billing account id was received as part of the Welcome Letter which is sent from Google by email after the contract is signed and executed. Important: The Welcome Letter is sent to the technical and financial contacts named on the order form of your contract. Work with your project team to understand who might have received it and ask that person to provide you the billing account id which is a series of characters and numbers separated by hyphen.
- [You] Work with Google or Partner to make sure a billing validation is performed - this means that your systems are already properly reporting Trips or Tasks to Google. More details in the next section.
- [You] Point your Google Cloud projects to the new billing account using the Cloud Console - see Billing Account configuration section further in this document.
More details about billing in general can be found here and here.
Billing validation
Billing validation is important to make sure you are charged correctly. Sometimes companies accidentally implement APIs incorrectly leading to more charges or underreporting.
The billing validation consists of the following steps:
Verifying if requests to Google Maps Platform APIs have a tripId (or taskId) in the request header - more details here.
Verifying if trips (or tasks) are being properly reported. This depends on what Mobility Package is being used:
- Mobility Starter and Optimize, or Accelerate (Trip Based): Integration with ReportBillableEvent API is required. This means that whenever a trip is successfully completed, a request to this API has to be made. To validate whether this is happening properly, you must follow the steps described here.
- Mobility Accelerate (Task Based): billing does not have to be triggered by an API call. It happens automatically when a task outcome is set to SUCCEEDED on a delivery task. Therefore, it is very important that you properly set the task outcome to either FAILED or SUCCEEDED. Customer Engineers (Partners or Google) will work with you to verify that the implementation was properly done. Through Cloud Logging you can verify if tasks are getting updated properly by running the following Cloud Logging Query:
resource.type="fleetengine.googleapis.com/DeliveryFleet"
jsonPayload.@type="type.googleapis.com/maps.fleetengine.delivery.log.v1.UpdateTaskLog"
jsonPayload.request.task.taskOutcome="TASK_OUTCOME_LOG_SUCCEEDED"
jsonPayload.response.type="TASK_TYPE_LOG_DELIVERY"
If entries are displayed, it means that your backend systems are properly setting tasks to SUCCEEDED.
Note: it is important though to check if the count of actual trips or tasks successfully completed corresponds to the number of reported calls. Sometimes we see billing events being reported but they do not correspond to the total amount of trips or tasks that were actually completed in real-life (underreporting).
Integration health status
A successful migration to production should not only guarantee that billing is working properly, but that APIs are not failing to execute. When it comes to mobility services, it is important to verify if the integration with Fleet Engine (Local Rides and Deliveries API) has been properly implemented.
To do that, you can open Cloud Logging and use the following query:
jsonPayload.errorResponse.code:*
This should list all log entries with problems. For instance:

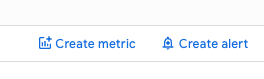
Those problems can be exported to other Cloud products like BigQuery. Metrics and alerts can be configured based on the Cloud Logging query:
As those are Google Cloud products, additional cost may incur. You can talk to your Partner or Google representative to get more clarity.
Billing account configuration
If all your systems are now properly reporting Trips or Tasks and no integration errors exist, it is time to point your project(s) to the billing account that you received as part of the Welcome Letter and which was covered in previous sections of this document.
Note: If you are working with a Maps Partner, they can assist you at this point and you don't have to follow the steps below alone. If you are working directly with Google, which can happen in some regions, you can follow the next steps:
To do that:
- Open the Google Cloud Console (https://console.cloud.google.com).
- Select the new project that will be used in Production.
- Go to the Billing section of that project. A shortcut can be accessing this link: https://console.cloud.google.com/billing
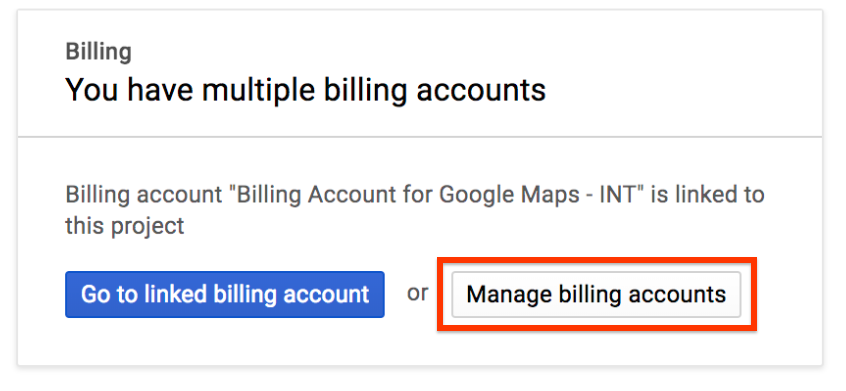
- Billing > Click "Manage billing accounts":
- On Billing > Click the 3 dots icon
 next to one to
the production project that has been created and choose "Change billing
account":
next to one to
the production project that has been created and choose "Change billing
account": 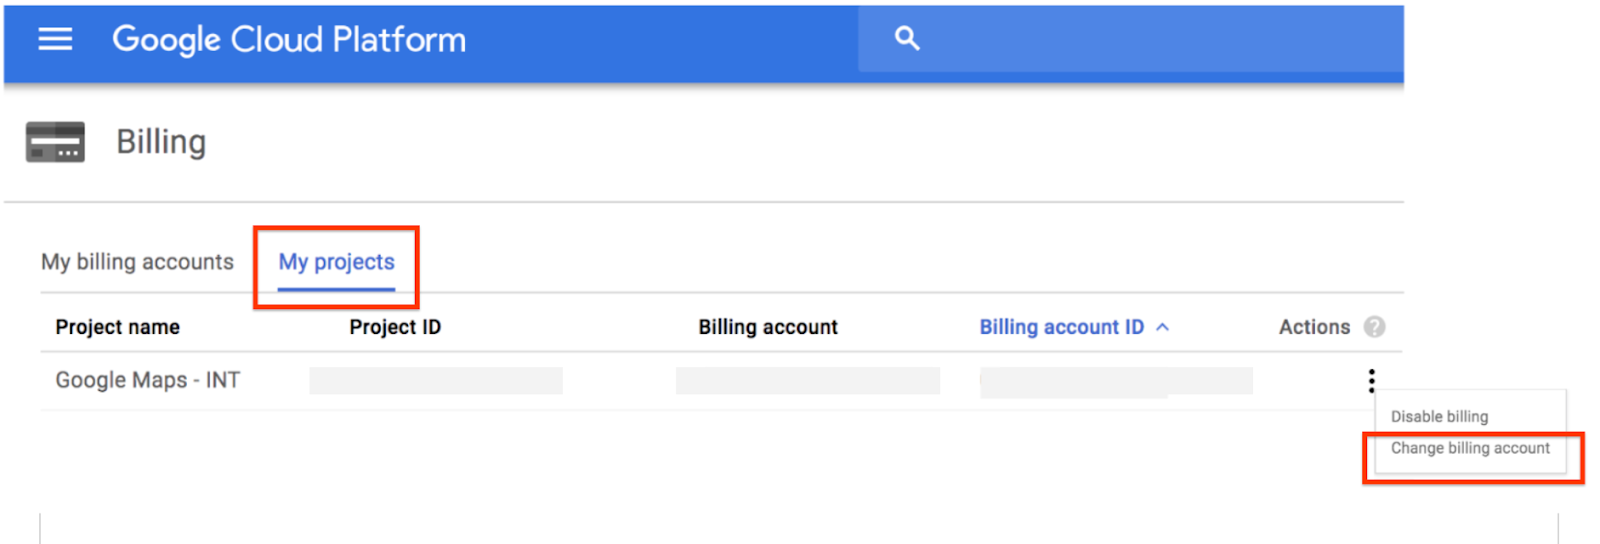
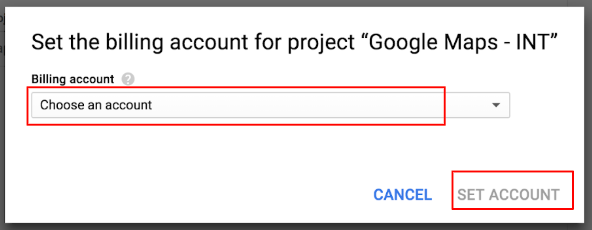
- Billing > on Billing account, choose the billing account code that you
received in the Welcome Letter in the drop-down list. Then, click "SET
ACCOUNT":
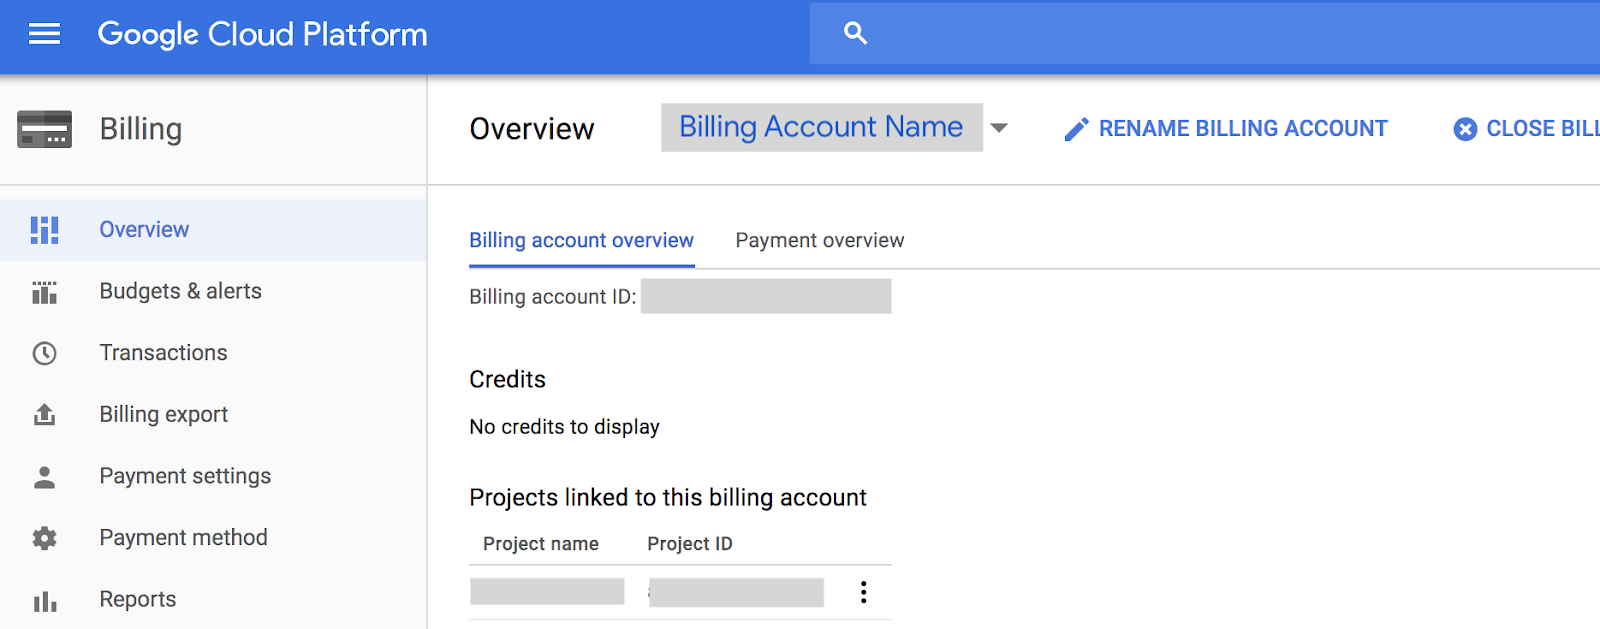
- The project will be linked to the new Billing Account:
- After the new billing method is added, go to "Overview > Payment overview" and "Payment Settings" to confirm if the information is correct. For more information on updating billing and payment, please refer to this link. For any issues related to billing, please file a billing support case or work with your Partner or Google representative.
Billing Reports
Billing Reports help you understand costs associated with the billing account that has been linked to the project.
Note: If you are working with a Maps Partner, please work with them to make sure that the relevant billing information that you need is provided to you.
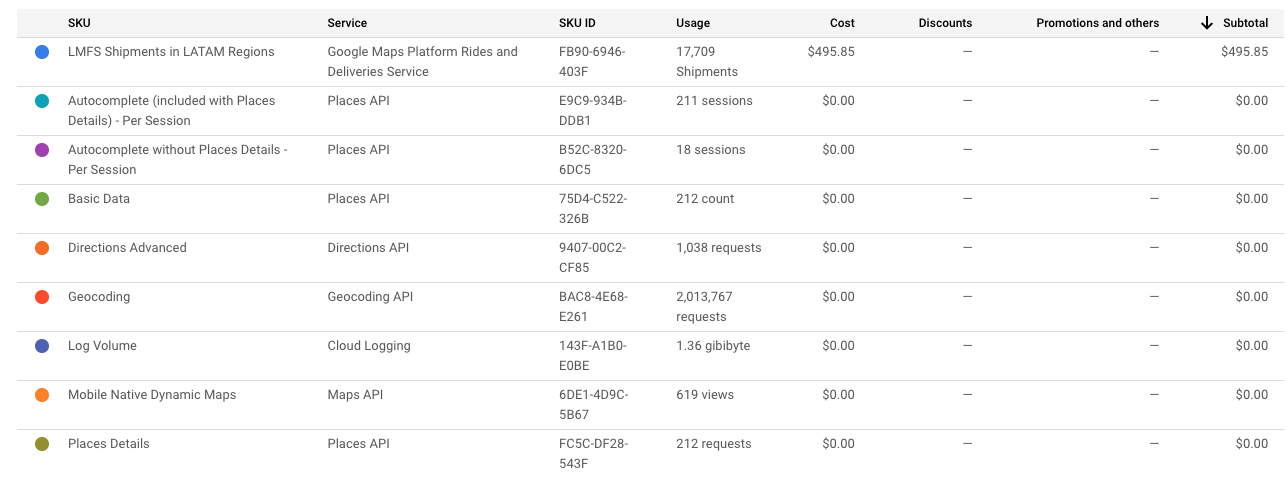
Open the linked Billing Account of the project, select Reports. Then you can use the following set of filters:
Here the main setting to have in mind is the Group by filter by SKU which will show detailed information about Trips and Tasks as well as other APIs if used, including whether there were overages or not, as explained previously:
Report information is refreshed daily. If intraday information is necessary, Cloud Logging queries can be used to see how many billable events happened during the day. See previous sections for this.
Ramp up plan
An important point to mention is your ramp up plan. It is common that not all traffic is migrated to the mobility project depending on the nature of your business. For instance, some companies take time to roll out the new solution to all their branches, franchises, stores, offices, etc, which means that part of the traffic will use the old systems and part of the traffic will go to the new project.
Also, in many cases, not all traffic will belong to a mobility use case, which is the case for store locators, curbside pickup, and other internal solutions. These should point to a Google Maps Platform billing account as traffic there should be kept separate from the mobility billing account.
It is important that you comply with the Implementation Policy:
- Trip Based Model - "The On-demand Rides and Deliveries Solution is intended for use in on-demand, commercial ride and delivery services. Such services typically include (a) consumers who submit requests for a ride to a given destination (or delivery of a specific item), and (b) drivers who are matched with requests, and who drive a vehicle to complete the services."
- Task Based Model - "The Google Maps Platform Last Mile Fleet Solution is intended for use in commercial last mile delivery and first mile pickup services. Such services typically include (a) a fleet of delivery Vehicles that are either owned or contracted by the Customer, (b) deliveries based on a pre-planned route, (c) a network of distribution centers with operational teams that support delivery execution, and (d) consumers who track and then receive shipments."
Therefore you should understand which of your systems should point to the Google Maps Platform billing account and which ones should point to the mobility billing account. It is common to have multiple projects and each pointing to the correct billing account.
As an example, consider that every Trip / Task includes 10 Geocoding requests today as per use limits. If your migration is going to take a few months and you start off reporting 100K Trips / Tasks in the first month, that means you could call Geocoding API 1M times. But if your business 5M Geocoding requests that difference (4M) might be reported as overages. Here two options are possible:
- You increase the amount of Trips / Tasks you are reporting to us (accelerate the ramp up plan), so higher limits apply, in this case you'd need to report 500K Trips / Tasks per month.
- You negotiate higher limits during contract negotiations as explained before.
- You point Geocoding API requests to a Google Maps Platform API to benefit from higher discount tiers and pay cheaper than overages.
We know cost estimation depending on the size and complexity of your business and use cases can be complex, please work with your Partner or Google counterpart to determine what is the best way to prepare for the production launch using your existing projects.
As a summary, in order to create a proper ramp up plan the following steps are required: 1. Identify which use cases are mobility related and which are not as per Implementation Policy. 2. Identify which Google Maps Platform APIs are used today for the relevant use cases and their volumes. 3. Identify if Google Maps Platform APIs will be still required after the mobility solution is implemented - for instance ETA calculation happens automatically on Fleet Engine, you might not need to calculate them with Directions API anymore. 4. Identify how long it will take to fully migrate mobility use cases to the new mobility platform at your side. 5. Double check if the Use Limits are enough to support your use cases. 6. Identify the inflection point of when all Google Maps Platform requests can be folded to the mobility billing account for mobility use cases.
Conclusion
In conclusion, properly configuring the billing account is essential for price predictability, transparency. By using our mobility technology that incorporates best in class location services, companies can be confident that their billing processes are accurate and efficient. This not only helps in reducing costs but also provides the necessary data and insights needed to make informed business decisions. Moreover, the transparency offered by such a system allows companies to have a clear understanding of their expenses, leading to better budget management.
Next Actions
- Setup your billing account in the Google Cloud console.
- More details about billing in general can be found at