
Page Summary
-
Explore communities in 3D using Google's Photorealistic 3D Tiles and APIs to discover points of interest.
-
Customize camera movements, POI density, and starting location through configuration files or URL parameters.
-
The Area Explorer can be set up using a hosted admin app or downloaded from GitHub for further customization.
-
Removing or altering features requires updating configuration files, HTML structure, and JavaScript functions for consistency.
-
Users can fine-tune parameters for camera behavior, zoom levels, and POI display to create tailored 3D exploration experiences.
3D Area Explorer is a solution that empowers you to explore communities in captivating 3D. The solution leverages: Google's Photorealistic 3D Tiles, Places Search, Place Details, and Autocomplete APIs.
Getting started:
Enable
Customize the experience
The 3D Area Explorer solution is highly customizable, allowing you to tailor
the experience to your customer journeys. You can either customize
using the control panel on the UI or using the config.json file.
Ready to customize? Here's how:
Location
Define starting point of your experience by adjusting the latitude and longitude
in the config.json file.
Camera Control
Take control of your journey by selecting the camera's orbit type: a classic circular path or an intriguing sine wave.
Fixed orbit:
This is a circular orbit at a fixed height and around a specific point of interest.
See a fixed orbit in action by exploring Google Sydney office.
Dynamic orbit:
The camera smoothly moves in a sine wave trajectory around a designated point of interest. This unique movement enables viewers to observe the point of interest from various heights and angles, offering a dynamic and immersive visual experience.
See a dynamic orbit in action by exploring the Eiffel tower.
Points of Interest (POIs):
- Customize your exploration by determining the types of places you want to
discover. Choose from museums, parks, schools, and more using the
typesarray inconfig.json. - Set the maximum number of Points of Interest displayed by adjusting the
densityparameter. - Modify the
searchRadius (in meters)to include nearby hidden gems or focus on specific areas. - Set the chosen speed for your camera's movement with the
speed (in
revolutions per minute)
parameter.
Pre-loading Your exploration: Dive Deeper with URL Customization
3D Area Explorer empowers you to pre-define your exploration with URL customization. This eliminates the need for manual configuration, streamlining the user experience.
Crafting the Perfect URL:
Simply append specific parameters to the Area Explorer URL to pre-set the location and other settings. For example:
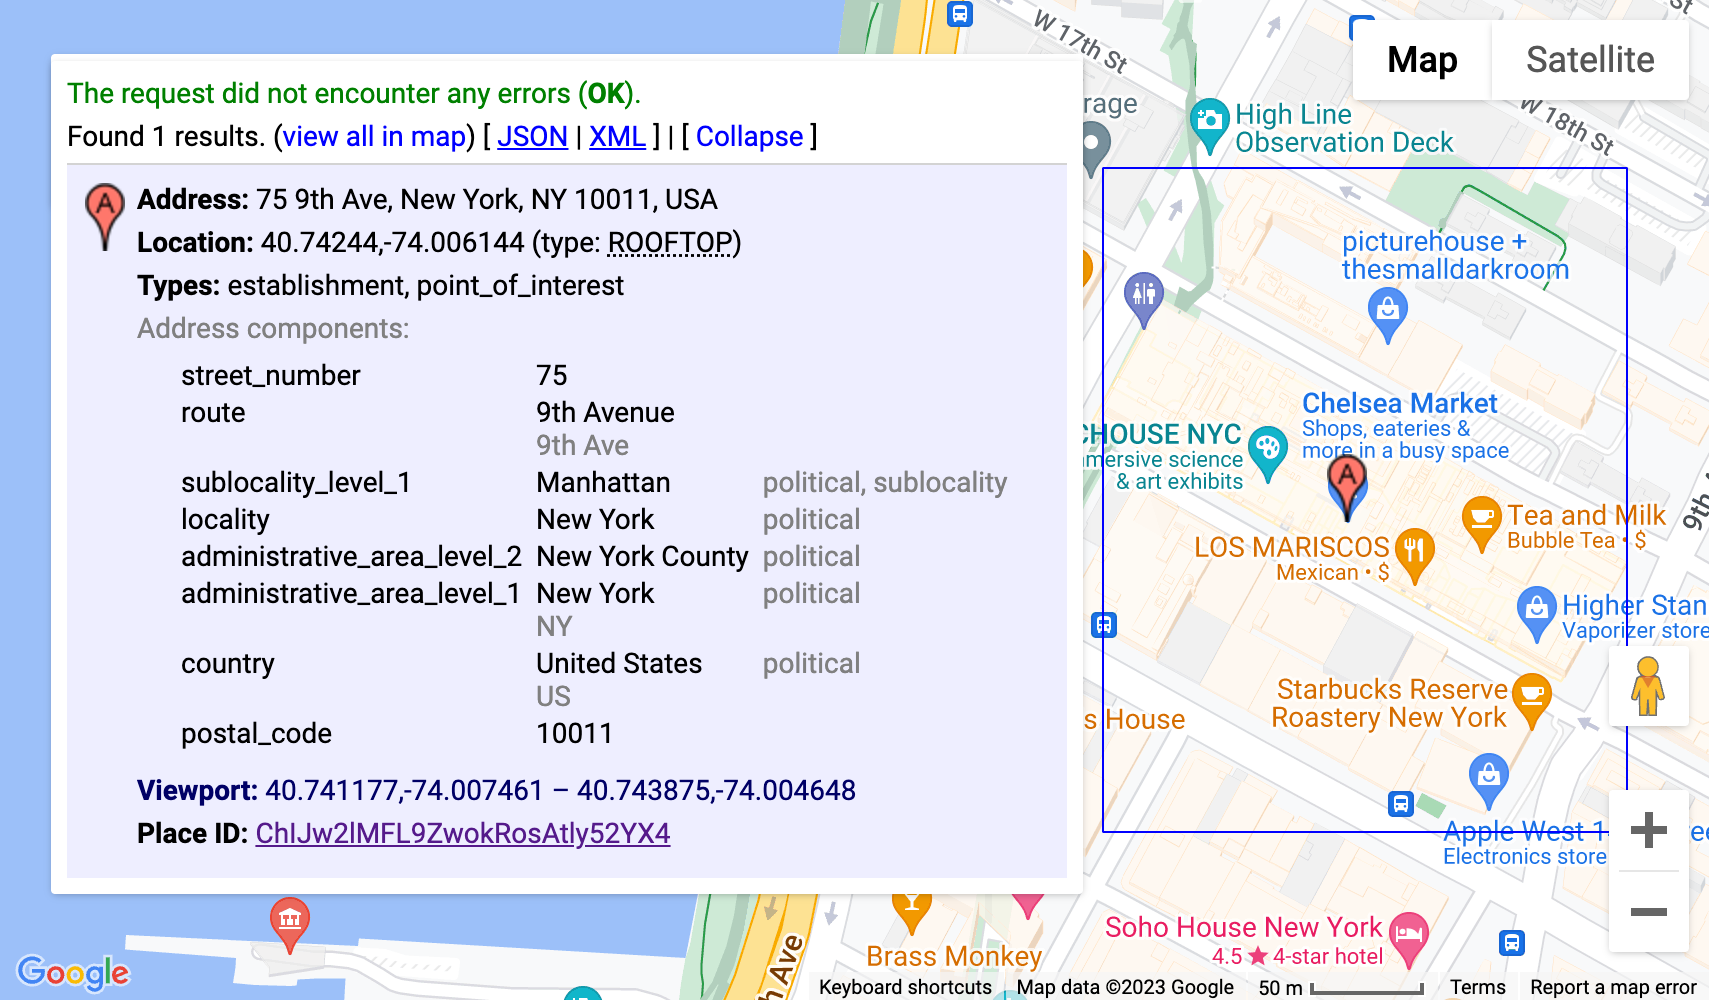
https://{base-url}/#location.coordinates.lat=40.7424396&location.coordinates.lng=-74.0061439
This URL sets the starting point to the latitude and longitude specified, instantly transporting you to the chosen location. Available Parameters:
location.coordinates.lat: Latitude of your chosen location.location.coordinates.lng: Longitude of your chosen location.poi.types: A comma-separated list of POI types to display.poi.density: The chosen maximum number of POIs.poi.searchRadius: The radius for searching nearby POIs.camera.speed: Camera orbit speed.camera.orbitType: Camera orbit type ("fixed-orbit" or "dynamic-orbit").
Benefits of URL Customization:
- Streamline user experience by pre-defining your chosen settings.
- Share targeted journeys with specific pre-loaded locations and POIs.
- Embed pre-configured Area Explorer experiences seamlessly within websites.
By leveraging URL customization, you can create tailor-made experiences and invite others to embark on curated adventures.
Further customizations
The previous section explored adjustments accessible through the UI or config file. However, there are also several other built-in parameters that you can modify to further customize the application.
To make these advanced customizations, you'll need to look at the code in the
src/utils/cesium.js file located in the src directory. The following
variables can be changed to alter the appearance and feel of the application
Camera height
Control how high the camera positions itself when flying towards a point by
adjusting the CAMERA_HEIGHT value. Higher values will provide a more
zoomed-out, panoramic view, while lower values will get you closer to the
details of the area
// Camera height (in meters) above the target when flying to a point.
const CAMERA_HEIGHT = 100;
- Setting:
CAMERA_HEIGHT - Default Value: 100
- Description: Defines the camera's height above the target location when flying to a point.
- Example Values:
- 50: Closer view, emphasizing details.
- 200: A more panoramic perspective.
Camera pitch
The initial tilt of the camera is defined by BASE_PITCH. Use negative values for a downward tilt and positive values for an upwards view. To add a subtle dynamic movement to your exploration, change the AUTO_ORBIT_PITCH_AMPLITUDE.
// Pitch 30 degrees downwards
const BASE_PITCH = -30;
// change the pitch by 10 degrees over time
const AUTO_ORBIT_PITCH_AMPLITUDE = 10;
- Setting:
BASE_PITCHandAUTO_ORBIT_PITCH_AMPLITUDE - Default Values:
BASE_PITCH: -30 (pitching 30 degrees downwards)AUTO_ORBIT_PITCH_AMPLITUDE: 10 (changing pitch by 10 degrees over time)
Description: Camera pitch is the visual tilt of a map, which is measured in degrees. It's also known as tilt. These settings define the camera's initial pitch and dynamic pitch adjustment during automatic rotations.
Example Values:
BASE_PITCH: 0 (level camera)AUTO_ORBIT_PITCH_AMPLITUDE: 0 (no pitch variation)
Camera Range and Zoom
These parameters set the amount of zoom applied when focusing on specific points. Smaller values mean a closer zoom.
// Distance variation relative to initial range.
const RANGE_AMPLITUDE_RELATIVE = 0.55;

// Determines how much the camera should zoom in or out
const ZOOM_FACTOR = 20;
Setting: RANGE_AMPLITUDE_RELATIVE and ZOOM_FACTOR
Default Values:
RANGE_AMPLITUDE_RELATIVE: 0.55 (relative distance variation)ZOOM_FACTOR: 20 (camera zoom factor)
Description: These settings define the range variation during camera movement and the zoom level for a closer look.
Example Values:
RANGE_AMPLITUDE_RELATIVE: 1 (full range variation)ZOOM_FACTOR: 10 (less zoom)
// Camera heading (rotation), pitch (tilt), and range (distance) for resetting view.
const CAMERA_OFFSET = {
  heading: 0, // No rotation offset.
  pitch: Cesium.Math.toRadians(BASE_PITCH),
  range: 800, // 800 meters from the center.
};
Camera Reset
When a user wants to reset the camera to the original position, the CAMERA_OFFSET values are used. This setting includes the heading (rotation), pitch (tilt), and range (how far the camera is from the center).
- Setting:
CAMERA_OFFSET - Default Values:
heading: 0 (no rotation offset)pitch: Cesium.Math.toRadians(-30) (pitching 30 degrees downwards)range: 800 (800 meters from the center)
- Description: Defines the camera heading, pitch, and range for resetting the view.
- Example Values:
heading: 45 (degrees, northwest view)range: 1500 meters (further from the center)
Start Coordinates:
The START_COORDINATES define the initial longitude, latitude, and height for the camera. This is where the exploration will begin, so set it to the area you want users to see first.
// Default camera start position in longitude, latitude, and altitude.
const START_COORDINATES = {
  longitude: 0,
  latitude: 60,
  height: 15000000, // 15,000 km above the surface
};
- Setting:
START_COORDINATES Default Values:
longitude: 0latitude: 60height: 15000000 (15,000 km above the surface)
Example Values:
longitude: -122.4934,latitude: 37.7951 (Golden Gate Bridge)height: 2000 (closer starting position)
Load a predefined location
The location object in config.json sets the center of the area. It's the
initial viewpoint of the camera in the Cesium viewer.coordinates: Defines the
latitude (lat) and longitude (lng) for the location you want the camera to
pan to first. Adjust these values to set the camera to any specific location on
the globe.
  {
  "location": {
    "coordinates": { "lat": null, "lng": null }
  },
This configuration lets you to start your 3D Place Navigator application zoomed in on a specific location of your choice. You can use Google's Geocoding tool to get the latitude and longitude coordinates of an address or place name by specifying it in the location object:
- Access the Geocoding Tool.
- Create a Geocoding Request Click the "Try It Yourself" section and enter your chosen location in the "Address" field. You can specify an address, place name, or even landmarks.
- Generate Coordinates Click the "Run" button to submit your request. The
tool will return a response containing various information about the location,
including its latitude and longitude coordinates displayed under the
geometry.locationsection. - Use geocodes Copy the retrieved latitude and longitude values from the
response and paste them into the
coordinatesobject within your configuration.
Note: Geocodes used this way must follow the terms outlined in Google Maps Platform Terms of Services section 3.4 that is they must not be cached for more than 30 days and must be refreshed after that.
This configuration would use the Geocoding tool to automatically determine the coordinates of Google's headquarters in Mountain View, California, and launch your 3D Place Navigator application with the camera centered on that location.
Advanced customizations
You can do additional customizations by diving deeper into the code. The following section walks you through some options
Add a new camera path
Out of the box the solution implements two different camera path:
fixed-orbit" | "dynamic-orbit"
But if you want you can create a new camera path you can implement it using the
/src/utils/cesium.js in the calculateAutoOrbitFrame function.
To use this new path calculation in the configuration panel,refer to the
implementation in demo/src/camera-settings.js.
Add more place types
The list of place types for the configuration can be adjusted in the file
demo/src/place-settings.js. Beginning on line 4 are the placetypes that are
available in the demo.
If you want to use specific place types without changing the demo source you
could just add them to the config.json file under poi.types
Customize the style (css)
For the styles we worked with CSS variables. They are supported in every major
browser and make it possible to change one line in a central place and update
specific CSS properties. Our CSS variables are defined in src/main.css. There
you can adjust colors, font settings and paddings or margins for the whole
application.
Overlay additional data
To overlay additional data you need to update the src/utils/cesium.js file and consult the cesium documentation on how to add GeoJSON or other geo referenced data to the globe.
Remove configuration sections
Our JavaScript application has three main sections in the
configuration file: demo/src/[config-panel.js](config-panel.js): location,
poi, and camera. Each of these sections provides configuration options for
different aspects of the application. Developers can customize these sections
based on their specific needs.
1.Remove a particular section from the configuration
- Location Section
To remove the location section, find the following line in your code and
comment or delete it:
const locationConfig = { ...config.location, ...customConfig.location };
- POI Section
To remove the poi section, find the following line in your code and comment
or delete it:
const poiConfig = { ...config.poi, ...customConfig.poi };
- Camera Section
To remove the camera section, find the following line in your code and comment
or delete it:
const cameraConfig = { ...config.camera, ...customConfig.camera };
2. Update Combined Configurations
After removing a section, it's essential to update the combined configuration
object. This object merges the default configuration with any customizations.
Remove the corresponding property from the combinedConfig object:
const combinedConfig = {
 location: { ...config.location, ...customConfig.location }, // Remove if location section is removed

 poi: { ...config.poi, ...customConfig.poi }, // Remove if poi section is removed
 camera: { ...config.camera, ...customConfig.camera }, // Remove if camera section is removed
};
3. Adjust UI Elements
If removing a section also means removing related UI elements, update the code accordingly in the html code. For example, if you want to remove a specific section from the Admin panel like camera speed, you have to update both the js and html code for that.
4. Remove Camera Settings Section
To remove the camera settings section from the UI, find the following line and comment or delete it:
const cameraSettingsSecgetCameraSettingsSection(cameraConfig);
Removing Location Section Summary
const locationSection = await getLocationSettingsSection(locationConfig);
Conclusion
In this document, we have explored the various customization options available in the Area Explorer to tailor your 3D exploration experience. By modifying camera behavior, adjusting visual tilt, and changing zoom levels, you can create unique and engaging experiences that showcase your selected settings and points of interest.
Remember to experiment with different configurations and fine-tune the parameters to suit your specific needs. By leveraging the power of customization, you can create immersive and personalized journeys that captivate your audience and bring your vision to life.