

目標
瞭解如何將 PlaceSearchElement 與 Google 地圖整合,協助使用者透過 Nearby Search 或 Text Search 尋找地點,提升探索搜尋點的能力。使用 Place Details 密集元素,提供應用程式中顯示地點的詳細資料。
什麼是 PlaceSearchElement?
PlaceSearchElement 是 Maps JavaScript API 中 Places UI Kit 的一部分。這項 HTML 元素可直接在應用程式中,以清單格式顯示 Place Search 結果。這個元素可簡化顯示 Nearby Search 或 Text Search 找到的地點,提供流暢的地點探索體驗。使用者從清單中選取地點後,您可以在地圖上顯示該地點的詳細資料,通常會使用資訊視窗和 Place Details 元素。
以視覺化方式呈現地點探索
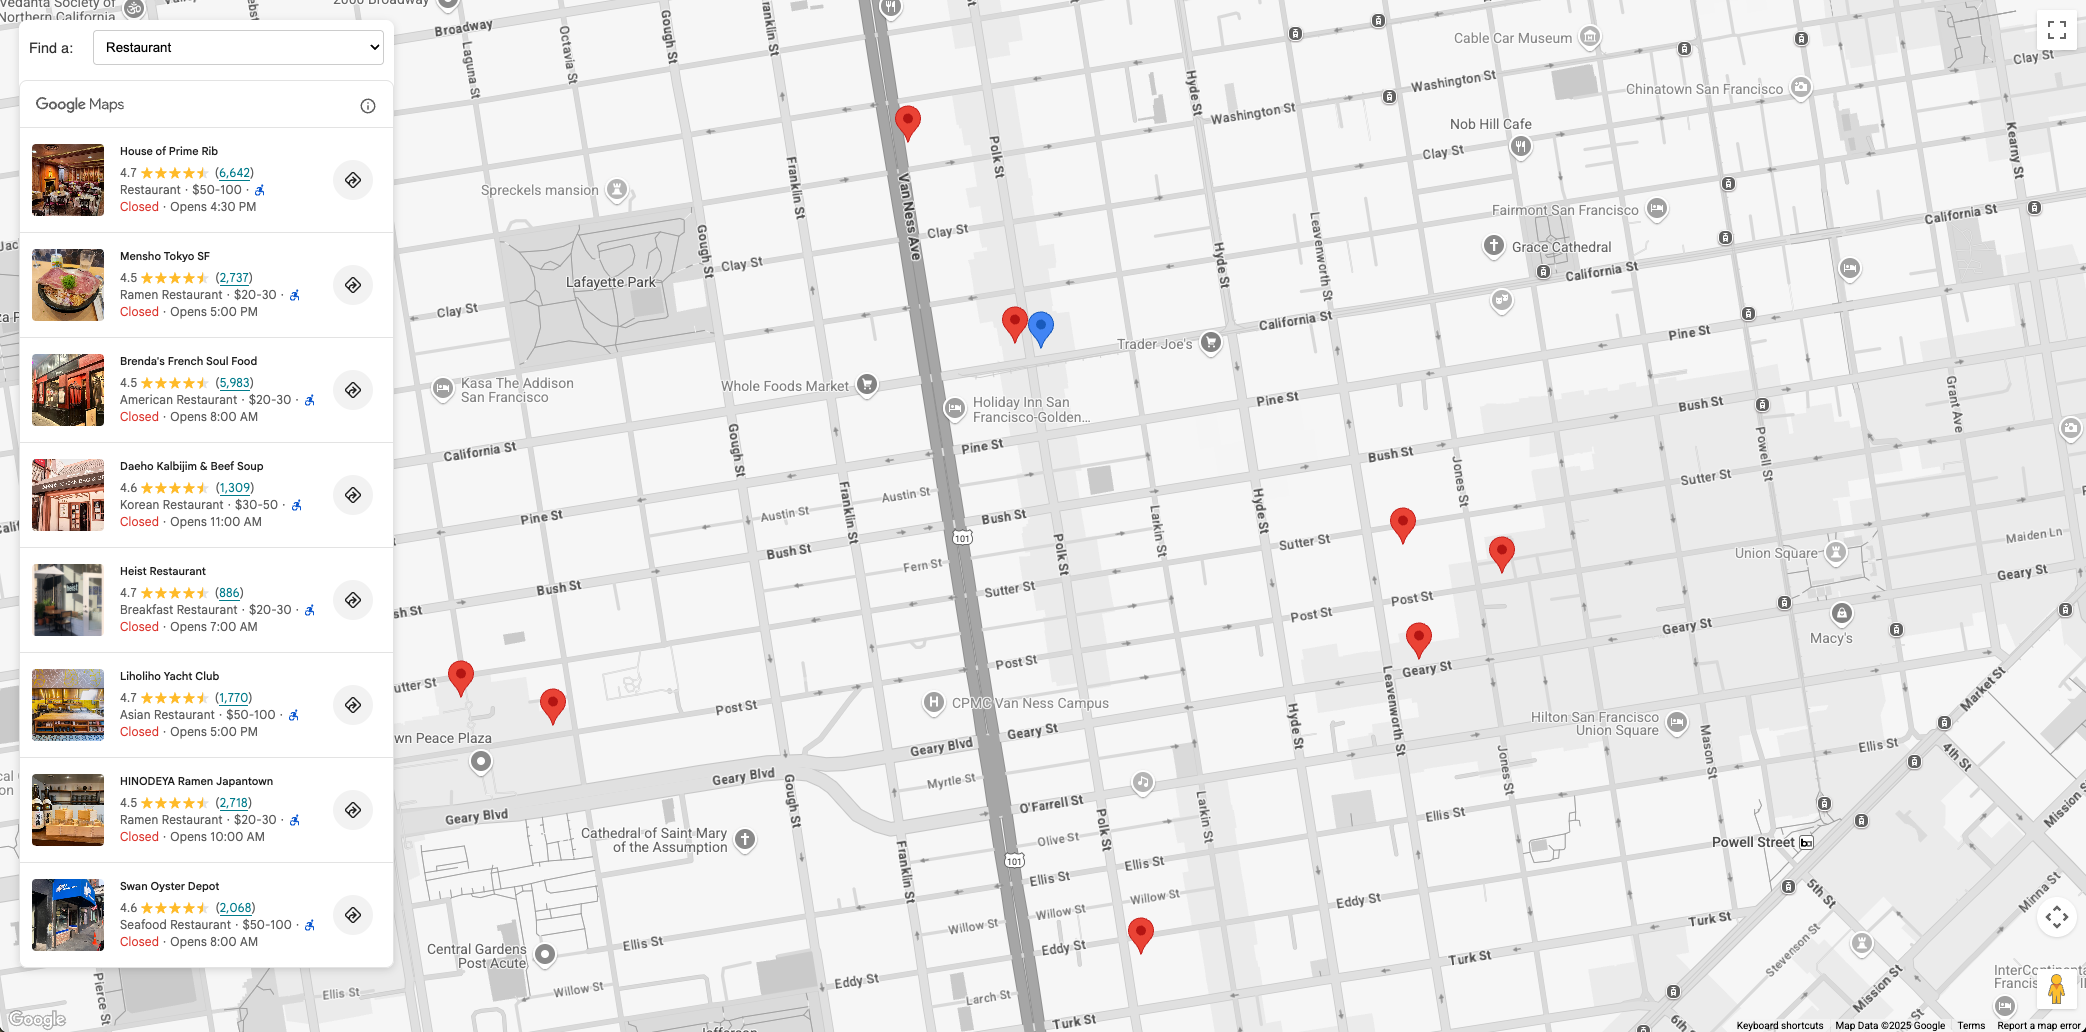
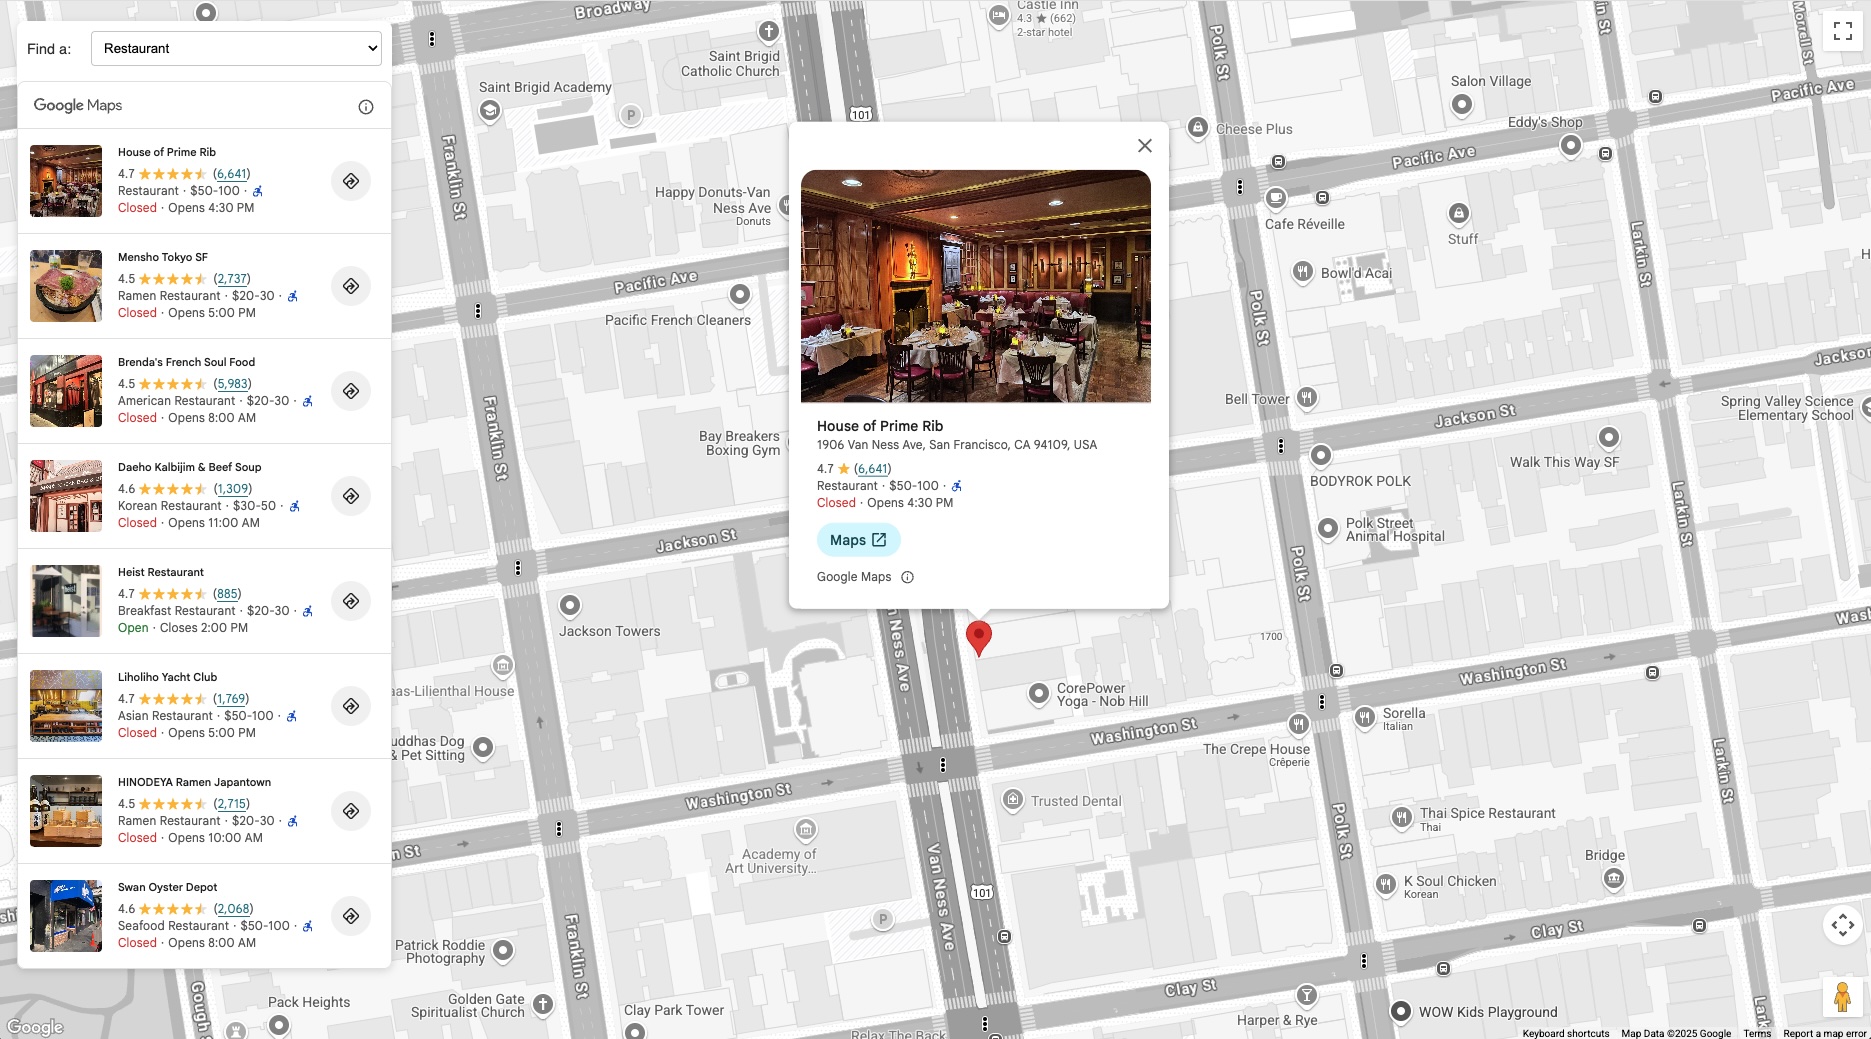
下圖顯示 PlaceSearchElement 的實際運作情形。左側會顯示餐廳清單 (PlaceSearchElement)。選取餐廳後,地圖上的資訊視窗會顯示餐廳詳細資料,且地圖會以餐廳位置為中心。
Place Discovery 的用途
整合 PlaceSearchElement 可強化各產業的多種應用:
- 旅遊與觀光:讓遊客搜尋特定區域的景點、飯店或特定類型的美食。
- 房地產:讓潛在買家或租客尋找附近的學校、超市或大眾運輸選項。
- 物流與服務:協助駕駛尋找電動車充電站、加油站或特定服務中心。
解決方案工作流程:導入 Place Discovery
本節將逐步說明如何整合 PlaceSearchElement,在地圖上探索地點,並提供與 Places UI Kit 互動的程式碼片段。瞭解如何初始化地圖,以及實作 Nearby Search 和 Text Search。最後,使用 Place Details 元素,在使用者點選地圖上的圖釘時,顯示地點的詳細資料。
必要條件
建議您熟悉下列說明文件:
PlaceSearchElement- 用於透過 Nearby Search 或 Text Search 顯示地點- Place Details 元素 - 用於顯示個別地點的詳細資料
- Maps JavaScript API:用於在網頁上顯示地圖,以及匯入 Places UI Kit
在專案中啟用 Maps JavaScript API 和 Places UI Kit。
開始前,請確認您已載入 Maps JavaScript API,並匯入必要程式庫。本文也假設您具備網頁開發的實務知識,包括 HTML、CSS 和 JavaScript。
在網頁中新增地圖
第一步是在網頁中加入地圖。這張地圖會以可選取的圖釘顯示 PlaceSearchElement 結果。
在網頁中加入地圖的方法有兩種:
- 使用
gmp-mapHTML 網頁元件。 - 使用 JavaScript。
本頁的程式碼片段是使用 JavaScript 對應產生。
地圖可以將中心點設在您希望使用者搜尋的地點 (例如飯店),或是在初始化時要求使用者提供目前位置,並將該位置設為中心點。在本文件中,我們將使用固定位置做為搜尋錨點。
如要以視覺化方式呈現固定位置 (例如飯店) 附近的地點,請在地圖上放置標記來代表該地點。例如:
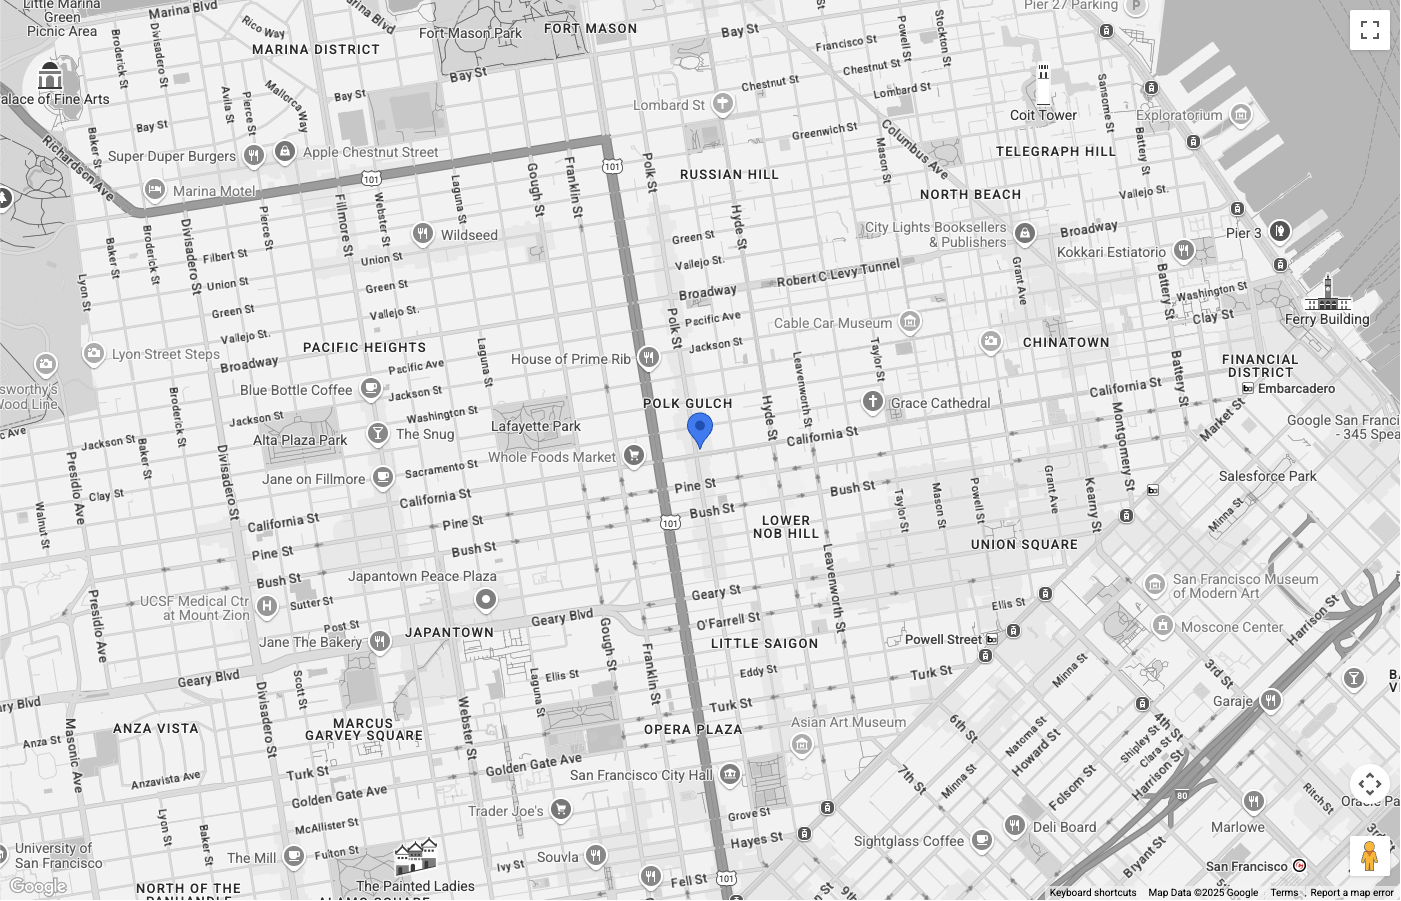
地圖以舊金山為中心,並以藍色圖釘代表要搜尋附近的地點。圖釘顏色已使用 PinElement 自訂。地圖類型控制項已從使用者介面中隱藏。
設定PlaceSearchElement
現在,請設定 HTML 和 CSS 來顯示 PlaceSearchElement。這個範例會讓元素浮動在地圖左側,但您可以嘗試不同的版面配置,找出最適合應用程式的設計。
PlaceSearchElement 採用宣告式做法。您不必完全在 JavaScript 中設定,而是直接在 HTML 中定義搜尋類型,方法是在主要 <gmp-place-search> 元件中巢狀結構要求元素,例如 <gmp-place-nearby-search-request>。
在 HTML 程式碼中,初始化 <gmp-place-search> 元素。使用 selectable 屬性,即可啟用結果的點擊事件。在其中加入 <gmp-place-nearby-search-request>,指定這個元素將用於 Nearby Search。
<gmp-place-search selectable>
  <gmp-place-nearby-search-request>
  </gmp-place-nearby-search-request>
</gmp-place-search>
為了執行初始搜尋並顯示結果,我們會使用 JavaScript 取得巢狀要求元素的參照,並設定其屬性。初始化要用做 locationRestriction 的圓形,並以上一步的標記位置做為中心點。接著,在要求元素上設定 locationRestriction 和 includedPrimaryTypes 屬性,觸發搜尋。
程式碼片段如下:
// Get references to the Place Search and its nested request element
const placeSearchElement = document.querySelector("gmp-place-search");
const placeSearchRequestElement = document.querySelector("gmp-place-nearby-search-request");

// Define the location restriction for the search
const circleRestriction = new Circle({
    center: marker.position,
    radius: 500
});

// Set the properties on the request element to perform an initial search for restaurants.
placeSearchRequestElement.locationRestriction = circleRestriction;
placeSearchRequestElement.includedPrimaryTypes = ['restaurant'];
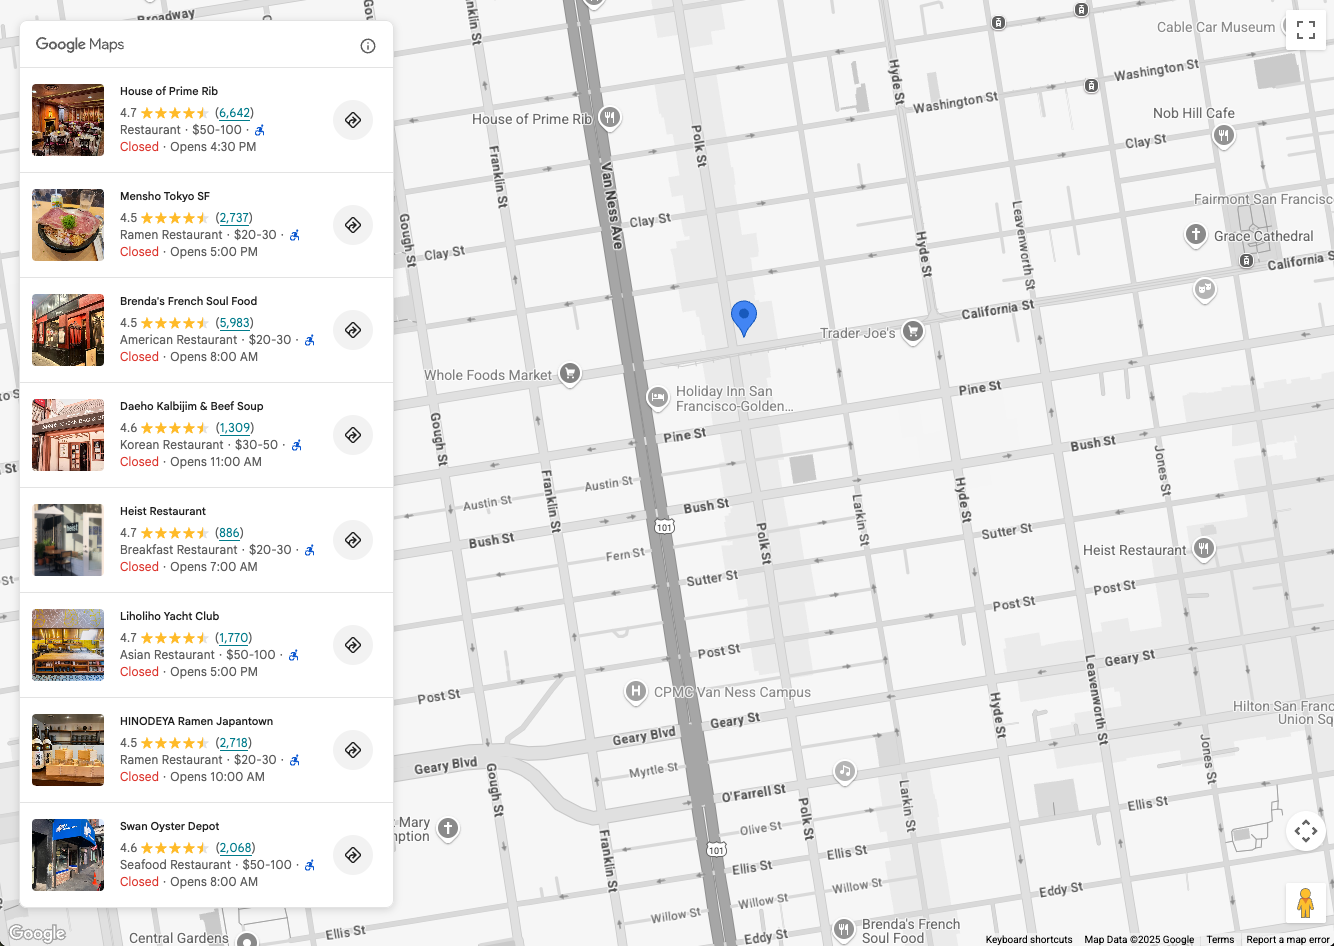
以下是應用程式在這個階段的可能樣貌:
允許使用者搜尋
PlaceSearchElement 提供兩種搜尋選項:
<gmp-place-nearby-search-request>:使用地點類型,轉譯 Places Nearby Search 的搜尋結果。<gmp-place-text-search-request>:使用自由文字輸入內容 (例如「舊金山的壽司」),顯示 Places Text Search 的搜尋結果。
這些是 <gmp-place-search> 內的巢狀元素。接著,您可以使用 JavaScript 設定該巢狀要求元素的屬性,觸發搜尋。
本節將說明如何實作這兩種方法。
Nearby Search
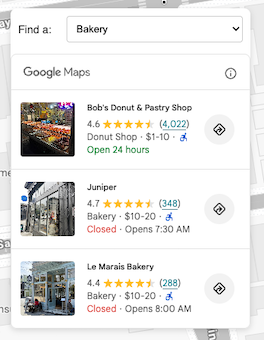
如要允許使用者執行 Nearby Search,您必須先提供 UI 元素,讓他們選取地點類型。請選擇最適合應用程式的選取方法,例如填入地點類型選項的下拉式選單。
建議您選擇與用途相關的類型子集。舉例來說,如果您正在開發一款應用程式,向遊客顯示飯店附近的景點,可以選擇:bakery、coffee_shop、museum、restaurant 和 tourist_attraction。
HTML 應包含 <gmp-place-search> 元素,並在其中巢狀嵌入 <gmp-place-nearby-search-request>。
<gmp-place-search selectable>
  <gmp-place-nearby-search-request>
  </gmp-place-nearby-search-request>
</gmp-place-search>
接著,在地點類型選取器上,為 change 事件建立 JavaScript 事件監聽器。這個事件監聽器會呼叫函式,更新 <gmp-place-nearby-search-request> 元素的屬性,進而自動觸發新的搜尋並更新清單。
// Get a reference to the nested request element
const placeSearchRequestElement = document.querySelector('gmp-place-nearby-search-request');

// Function to update the place search based on the selected type
function updatePlaceList() {
    const selectedType = placeTypeSelect.value;
    if (!selectedType) {
        // If no type is selected, don't perform a search.
        // You could optionally hide the list or clear previous results here.
        placeSearchElement.style.display = 'none';
        return;
    }
    placeSearchElement.style.display = 'block';

    // Set properties on the request element to trigger a new search
    placeSearchRequestElement.locationRestriction = searchCircle;
    placeSearchRequestElement.maxResultCount = 8;
    placeSearchRequestElement.includedPrimaryTypes = [selectedType];
}
locationRestriction 使用與設定步驟相同的 searchCircle。includedPrimaryTypes 屬性會設為使用者選取的值。您也可以設定選用的 maxResultCount,限制結果數量。
文字搜尋
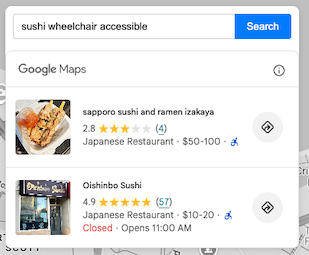
如要啟用 Text Search,您必須變更 HTML 設定。請改為巢狀結構 <gmp-place-text-search-request> 元素。
<gmp-place-search selectable>
  <gmp-place-text-search-request>
  </gmp-place-text-search-request>
</gmp-place-search>
在 UI 中新增文字輸入和搜尋按鈕。為按鈕的 click 事件建立 JavaScript 監聽器。事件處理常式會接收使用者輸入內容,並更新 <gmp-place-text-search-request> 元素的屬性,以執行搜尋。
// Get a reference to the text search request element
const placeTextSearchRequestElement = document.querySelector('gmp-place-text-search-request');
const textSearchInput = document.getElementById('textSearchInput');
const textSearchButton = document.getElementById('textSearchButton');

textSearchButton.addEventListener('click', performTextSearch);

function performTextSearch() {
    const query = textSearchInput.value.trim();
    if (!query) {
        console.log("Search query is empty.");
        return;
    }
    // Set properties on the request element to trigger a new search
    placeTextSearchRequestElement.textQuery = query;
    placeTextSearchRequestElement.locationBias = map.getBounds();
    placeTextSearchRequestElement.maxResultCount = 8;
}
在這裡,我們使用使用者的輸入內容設定 textQuery 屬性。我們也提供使用目前地圖範圍的 locationBias,指示 API 優先傳回該區域內的結果,但不會嚴格限制。選用的 maxResultCount 可限制傳回的結果數量。
顯示地點圖釘和詳細資料
現在,應用程式可以執行 Place Search 並填入元素。在下一個步驟中,我們將透過以下方式強化其功能:
- 在地圖上為
PlaceSearchElement中填入的每個地點顯示圖釘。 - 使用者可以點選圖釘或
PlaceSearchElement中的地點,查看該地點的詳細資料。
無論應用程式使用 Nearby Search 還是 Text Search,這個步驟的原理都相同。
首先,在 JavaScript 程式碼中加入全域變數,用來儲存地點標記。這樣一來,您就能在搜尋變更時移除這些標記,並處理點擊事件。
let markers = {};
建立函式,在地圖上新增標記。每當載入新的搜尋結果時,系統就會呼叫這個函式。這項功能會:
- 從地圖中移除任何現有的地點標記。
- 循環瀏覽
PlaceSearchElement的結果,並為每個結果新增標記。 - 調整地圖邊界,讓所有新標記都顯示在地圖上。
如要監聽搜尋結果何時可用,請在 <gmp-place-search> 元素中加入 gmp-load 事件監聽器。搜尋完成並顯示結果後,系統會觸發這個事件。
我們會在搜尋函式 (例如 updatePlaceList) 中新增事件監聽器,並使用 { once: true } 選項,確保只針對目前搜尋的結果觸發。
// In your search function, after setting the request properties:
placeSearchElement.addEventListener('gmp-load', addMarkers, { once: true });
addMarkers 函式如下所示:
async function addMarkers() {
    const { LatLngBounds } = await google.maps.importLibrary("core");
    const bounds = new LatLngBounds();

    if (placeSearchElement.places.length > 0) {
        // Remove existing markers
        for (const m in markers) {
            markers[m].map = null;
        }
        markers = {};

        // Loop through each place from the search results
        // and add a marker for each one.
        for (const place of placeSearchElement.places) {
            const marker = new google.maps.marker.AdvancedMarkerElement({
                map: map,
                position: place.location,
            });

            markers[place.id] = marker;
            bounds.extend(place.location);
            marker.collisionBehavior = google.maps.CollisionBehavior.REQUIRED_AND_HIDES_OPTIONAL;

            // Add a click listener for each marker.
            marker.addListener('gmp-click', (event) => {
                // The main logic for showing details will go here.
            });
        }
        // Position the map to display all markers.
        map.setCenter(bounds.getCenter());
        map.fitBounds(bounds);
    }
}
完成這個步驟後,應用程式會如下所示,並能為 PlaceSearchElement 傳回的每個地點顯示標記:
現在地圖上已有標記,最後一個步驟是處理標記和元素點擊事件,顯示含有 Place Details 元素所提供地點詳細資料的資訊視窗。在本例中,我們將使用地點詳情精簡元素。
在程式碼中加入 Place Details 密集元素 HTML,例如:
<gmp-place-details-compact orientation="vertical" style="display: none;">
    <gmp-place-all-content></gmp-place-all-content>
    <gmp-place-attribution light-scheme-color="gray" dark-scheme-color="white"></gmp-place-attribution>
</gmp-place-details-compact>
style 設為 display: none,因此在需要時才會顯示。系統會傳遞 gmp-place-all-content 來算繪所有元素內容。如要選擇要顯示的內容,請參閱「Place Details Compact Element」說明文件。
在 JavaScript 中建立全域變數,用於保留 Place Details 精簡版元素的參照,並在初始化程式碼中填入這個變數,例如:
let placeDetailsElement;
...
placeDetailsElement = document.querySelector('gmp-place-details-compact');
在 addMarkers 函式中,為每個標記新增 gmp-click 事件監聽器,並設定 Place Details 密集元素,傳遞目前標記的地點 ID 來顯示地點詳細資料。
完成後,系統會開啟資訊視窗,顯示錨定在標記上的 Place Details Compact 元素。
最後,地圖會定位到所選地點的可視區域,讓使用者看到該地點。
async function addMarkers() {
          ...
            marker.addListener('gmp-click', (event) => {
                //Set up Place Details Compact Widget
                placeDetailsElement.style.display = "block";
                // Remove any existing place request element
                const existingPlaceRequest = placeDetailsElement.querySelector('gmp-place-details-place-request');
                if (existingPlaceRequest) {
                    existingPlaceRequest.remove();
                }
                // Create and configure the new place request element
                const placeRequestElement = new google.maps.places.PlaceDetailsPlaceRequestElement({ place: place.id });
                // Prepend the new place request element to the main widget
                placeDetailsElement.prepend(placeRequestElement);
                if (infoWindow.isOpen) {
                    infoWindow.close();
                }
                infoWindow.setOptions({
                    content: placeDetailsElement
                });
                infoWindow.open({
                    anchor: marker,
                    map: map
                });
                // Position the map to show the selected place
                placeDetailsElement.addEventListener('gmp-load', () => {
                    map.fitBounds(place.viewport, { top: 500, left: 400 });
                });
            });
          ...
        });
    }
}
如要讓使用者點選「地點清單」元素中的地點,顯示「地點詳細資料精簡版」元素,請在呼叫 configureFromSearchNearbyRequest 後,將下列內容新增至 JavaScript 程式碼。
placeSearchElement.addEventListener("gmp-select", ({ place }) => {
    if (markers[place.id]) {
        markers[place.id].click();
    }
});
完成這個步驟後,應用程式就能使用 Nearby Search 或 Text Search,填入 Place List Element。地圖上會顯示圖釘,點選圖釘或地點清單元素中的地點,就會出現資訊視窗,顯示地點詳細資料精簡元素提供的地點詳細資料。
應用程式會如下所示:
結論
PlaceSearchElement 搭配 Place Details 密集元素,可讓您以簡便的方式,在 Google Maps Platform 應用程式中加入豐富的地點探索功能。
立即試用 Places UI Kit,讓使用者透過附近搜尋和文字搜尋功能,尋找及探索地點,並顯示豐富的地點詳細資料,提升他們與地點探索用途的互動。
貢獻者
Henrik Valve | 開發人員體驗工程師