Kể chuyện 3D: Sử dụng trình chỉnh sửa để xây dựng câu chuyện
Sử dụng bộ sưu tập để sắp xếp ngăn nắp các trang
Lưu và phân loại nội dung dựa trên lựa chọn ưu tiên của bạn.
Bạn đã sẵn sàng tạo những câu chuyện 3D hấp dẫn đưa người xem vào hành trình khám phá các địa điểm trong thế giới thực chưa? Hướng dẫn này sẽ cho bạn biết cách tạo một câu chuyện mới bằng trình chỉnh sửa tích hợp.
Sử dụng giao diện trực quan của chúng tôi để điều chỉnh tiêu đề, nội dung mô tả, hình ảnh và góc máy quay. Đây là một lựa chọn hoàn hảo cho người mới bắt đầu!
Mở trình chỉnh sửa câu chuyện
Giải pháp Kể chuyện 3D đi kèm với một Trình chỉnh sửa tích hợp, cho phép bạn xây dựng câu chuyện từ giao diện người dùng
Trình chỉnh sửa nằm ở bên trái trang. Mở bằng cách nhấp vào biểu tượng nhỏ này:
Bạn có thể truy cập vào trình chỉnh sửa bằng cách truy cập vào phiên bản được lưu trữ của ứng dụng Quản trị tính năng Kể chuyện 3D hoặc bằng cách tải xuống và cài đặt phiên bản Kể chuyện của riêng bạn từ GitHub
Tạo trang bìa
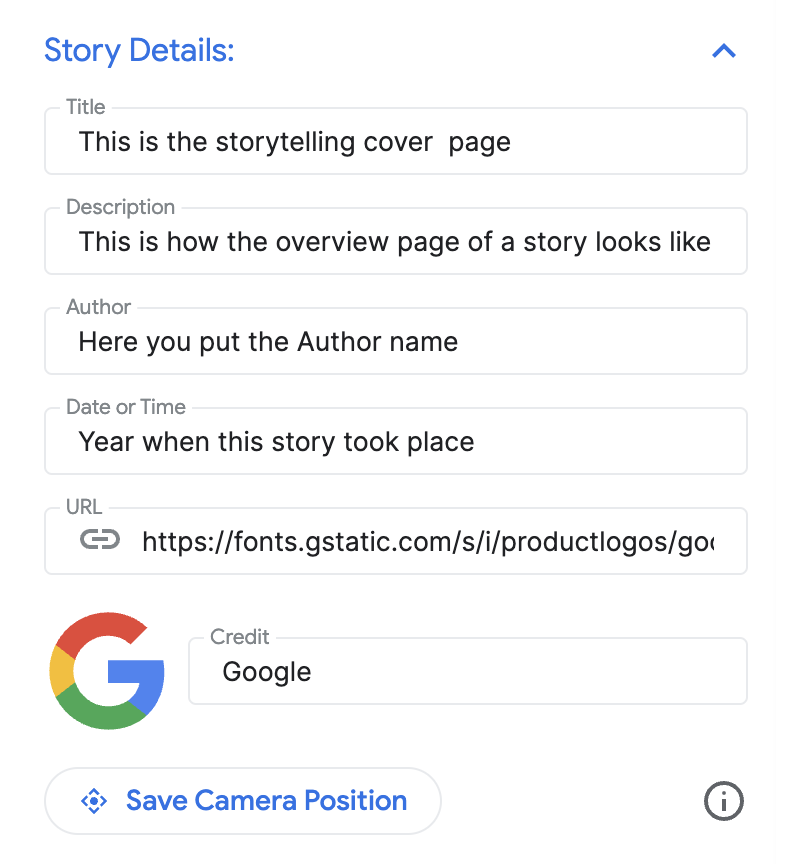
Sử dụng phần "Thông tin chi tiết về câu chuyện" để đặt tiêu đề, hình ảnh, nội dung mô tả và các thông tin chi tiết khác. Đây là phần giới thiệu câu chuyện của bạn cho người xem.
Thêm phân cảnh
Mỗi chương giống như một điểm dừng trong hành trình của bạn. Sau đây là cách thêm các thông tin này:
Tìm kiếm một vị trí bằng thanh tìm kiếm Tự động hoàn thành tích hợp.
Sau khi thêm một địa điểm, bạn có thể thêm thông tin chi tiết vào phân cảnh bằng cách nhấp vào nút Chỉnh sửa bên cạnh địa điểm:
Nhấp vào "Chỉnh sửa" để nhập tiêu đề, nội dung mô tả, hình ảnh và ngày cho phân cảnh của bạn.
Nếu muốn xoá một phân cảnh cụ thể, bạn có thể nhấn vào nút xoá ngay bên dưới nút Chỉnh sửa.
Bạn có thể sắp xếp lại các chương bằng cách kéo và di chuyển bằng biểu tượng dấu chấm ở bên trái:
Lưu chương
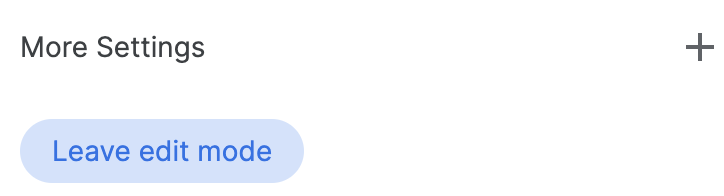
Để lưu một phân cảnh cụ thể, hãy nhấp vào nút "Thoát chế độ chỉnh sửa".
Nút Rời khỏi chế độ chỉnh sửa hoạt động như một nút lưu.
Tuỳ chỉnh chế độ cài đặt camera
Bạn có thể tuỳ chỉnh các chế độ cài đặt camera:
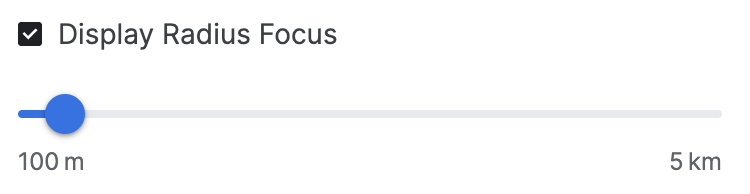
Hiện/ẩn điểm đánh dấu vị trí Bạn có thể không muốn hiển thị ghim ở một vị trí cụ thể mà muốn giới thiệu một khu vực chung.
Đánh dấu/bỏ đánh dấu hộp "Hiển thị điểm đánh dấu vị trí" để hiện hoặc ẩn một ghim.
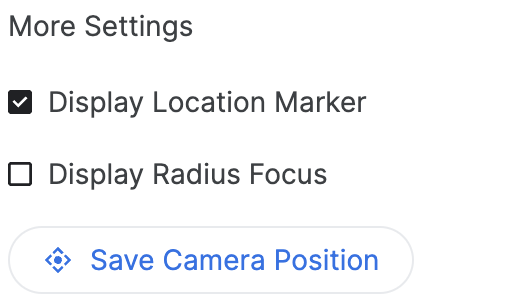
Hiển thị bán kính xung quanh một khu vực Bạn có thể chọn hiển thị một khu vực xung quanh một vị trí cụ thể bằng cách sử dụng tính năng "Hiển thị tiêu điểm bán kính". Khi được đánh dấu, chế độ này sẽ mở một thanh trượt bán kính cho phép bạn kiểm soát bán kính ranh giới của tiêu điểm camera.
Đoạn video này cho thấy các lựa chọn nâng cao của camera giúp tạo ra trải nghiệm phù hợp với người dùng.
Tuỳ chỉnh vị trí của camera Điều chỉnh góc camera cụ thể mà bạn muốn hiển thị bằng các chế độ điều khiển camera dễ sử dụng:
Nghiêng: Xem bản đồ từ trên cao hoặc ở ngang tầm mắt. Giữ phím Control (hoặc Cmd trên một số máy tính) trong khi nhấp và kéo lên hoặc xuống bằng chuột.
Xoay: Xoay bản đồ để xem ở chế độ 360 độ. Giữ phím Control (hoặc Cmd trên một số máy tính) trong khi nhấp và kéo chuột sang trái hoặc phải.
Thu phóng: Xem cận cảnh hoặc ở góc rộng. Sử dụng con lăn chuột hoặc các cử chỉ thu phóng quen thuộc.
Thử kết hợp các thao tác nghiêng, xoay và thu phóng để tìm góc chụp hoàn hảo cho từng vị trí. Các nút điều khiển có thể khác một chút tuỳ thuộc vào chế độ thiết lập của máy tính.
Tìm hiểu cách điều khiển canvas 3D để có được góc camera hoàn hảo.
Hoàn tất và tải xuống
Sau khi bạn tạo xong câu chuyện và các chương, hãy tải cấu hình xuống.
Nhấp vào "Tải xuống" để tải cấu hình tuỳ chỉnh ở định dạng JSON.
Bạn có thể dùng cấu hình này để tạo câu chuyện 3D của riêng mình bằng cách phân nhánh mã từ GitHub.
[[["Dễ hiểu","easyToUnderstand","thumb-up"],["Giúp tôi giải quyết được vấn đề","solvedMyProblem","thumb-up"],["Khác","otherUp","thumb-up"]],[["Thiếu thông tin tôi cần","missingTheInformationINeed","thumb-down"],["Quá phức tạp/quá nhiều bước","tooComplicatedTooManySteps","thumb-down"],["Đã lỗi thời","outOfDate","thumb-down"],["Vấn đề về bản dịch","translationIssue","thumb-down"],["Vấn đề về mẫu/mã","samplesCodeIssue","thumb-down"],["Khác","otherDown","thumb-down"]],["Cập nhật lần gần đây nhất: 2025-09-05 UTC."],[[["\u003cp\u003eCreate immersive 3D stories with real-world locations using the built-in editor to customize titles, descriptions, images, and camera angles for a captivating user journey.\u003c/p\u003e\n"],["\u003cp\u003eEasily add chapters to your story by searching for locations, providing details such as titles, descriptions, and images, and reordering them as needed.\u003c/p\u003e\n"],["\u003cp\u003eFine-tune the camera settings for each chapter by controlling the tilt, rotate, and zoom to achieve the perfect perspective and enhance the visual experience.\u003c/p\u003e\n"],["\u003cp\u003eDownload the story configuration in JSON format once finalized to integrate it with the 3D Storytelling solution and share it with your audience.\u003c/p\u003e\n"],["\u003cp\u003eAccess the 3D Storytelling Admin app either through the hosted version or by downloading the code from GitHub to get started building your stories.\u003c/p\u003e\n"]]],["The core process involves creating a 3D story using the built-in editor, accessible via a hosted app or downloaded code. Users set story details, add chapters by searching locations, and customize chapter elements like titles, descriptions, images, and dates. Chapters can be reordered and deleted. Camera settings are adjustable, including showing/hiding markers, displaying a radius, and fine-tuning the view via tilt, rotate, and zoom. Finally, the complete story configuration is downloadable as a JSON file.\n"],null,["Ready to create captivating 3D stories that take viewers on a journey through\nreal-world locations? This guide will show you how to build a new story using\nthe built-in editor.\n\nUse our intuitive interface to adjust titles, descriptions, images, and camera\nangles. It's perfect for beginners!\n| **Use the hosted** [3D Storytelling Admin app](https://js-3d-storytelling-admin-t6a6o7lkja-uc.a.run.app/)\n|\n| Or\n| [Get an API Key](https://console.cloud.google.com/google/maps-apis/credentials?utm_source=3d_solutions_storytelling). and **download** the code from [GitHub](https://github.com/googlemaps-samples/js-3d-storytelling).\n\nOpen the story editor\n\nThe 3D Storytelling solution comes with a built-in Editor which lets you to\nbuild the story from the UI\n\nThe editor is on the left side of the page. Open by clicking this small icon:\n\nYou can access the editor by visiting the hosted version\n[3D Storytelling Admin app](https://goo.gle/3d-storytelling-admin) or by\ndownloading and installing your own Storytelling instance from [GitHub](https://github.com/googlemaps-samples/js-3d-storytelling)\n\nCreate the cover page\n\nUse the \"Story details\" section to set a title, image, description, and other\ndetails. This introduces your story to the viewer.\n\nAdd chapters\n\nEach chapter is like a stop on your journey. Here's how to add them:\n\n1. Search for a location using the built-in Autocomplete search bar.\n\n2. Once a location is added you can add details to the chapter by clicking on the\n **Edit** button next to the location:\n\n3. Click \"**Edit**\" to enter the title, description, image, and date for your\n chapter.\n\n4. If you want to delete a particular chapter, there is a **delete** button right\n below the Edit button.\n\n5. You can **reorder** the chapters by dragging and moving using the left hand\n dotted icons:\n\nSave the chapter\n\nTo save a specific chapter just click the \"**Leave Edit mode**\" button.\nThe Leave Edit mode button acts as a save button.\n\nCustomize camera settings\n\nYou can customize different camera settings:\n\n- **Show/hide the location marker** You may not want\n to show the pin on a specific location rather want to showcase a general area.\n Check/uncheck the \"Display location marker\" box to show or hide a pin.\n\n- **Show a radius around an area** You can choose to show an area around a\n specific location using the \"Display Radius Focus\" feature. When checked\n it will open up a radius slider that will allow you to control the boundary\n radius of the camera focus.\n\n | **Note:** Make sure to click \"Save camera position\" to save the above settings before exiting.\n\nThis shows how advanced camera options help create a customized experience.\n\n- **Customize the camera location** Fine tune the specific camera angle you\n want to show with easy camera controls:\n\n- **Tilt:** See the map from above or at ground level. Hold down the Control\n key (or Cmd on some computers) while clicking and dragging up or down with\n your mouse.\n\n- **Rotate:** Spin the map for a 360-degree view. Hold down the Control key\n (or Cmd on some computers) while clicking and dragging left or right with your\n mouse.\n\n- **Zoom:** Get a close-up or a wide-angle view. Use scroll wheel of your mouse\n or familiar zoom in/out gestures.\n\nExperiment with combining tilt, rotate, and zoom to find the perfect angle for\neach location. The controls may vary slightly depending on your computer's\nsetup.\n\nCheck how to control the 3D canvas to get your perfect camera angle.\n\nFinalize and download\n\nOnce the story and the chapters are built, download the configuration.\n\nClick \"**Download**\" to get your customized config in JSON format.\n\nThis configuration can be used to create your own 3D Storytelling by forking the\ncode from [GitHub](https://github.com/googlemaps-samples/js-3d-storytelling)."]]