Storytelling 3D: utilizza l'editor per costruire una storia
Mantieni tutto organizzato con le raccolte
Salva e classifica i contenuti in base alle tue preferenze.
Vuoi creare storie 3D accattivanti che portino gli spettatori in un viaggio attraverso
luoghi del mondo reale? Questa guida ti mostrerà come creare una nuova storia utilizzando
l'editor integrato.
Utilizza la nostra interfaccia intuitiva per regolare titoli, descrizioni, immagini e angolazioni della videocamera. È perfetto per i principianti.
Apri l'editor di storie
La soluzione 3D Storytelling è dotata di un editor integrato che ti consente di
creare la storia dall'interfaccia utente
L'editor si trova sul lato sinistro della pagina. Apri facendo clic su questa piccola icona:
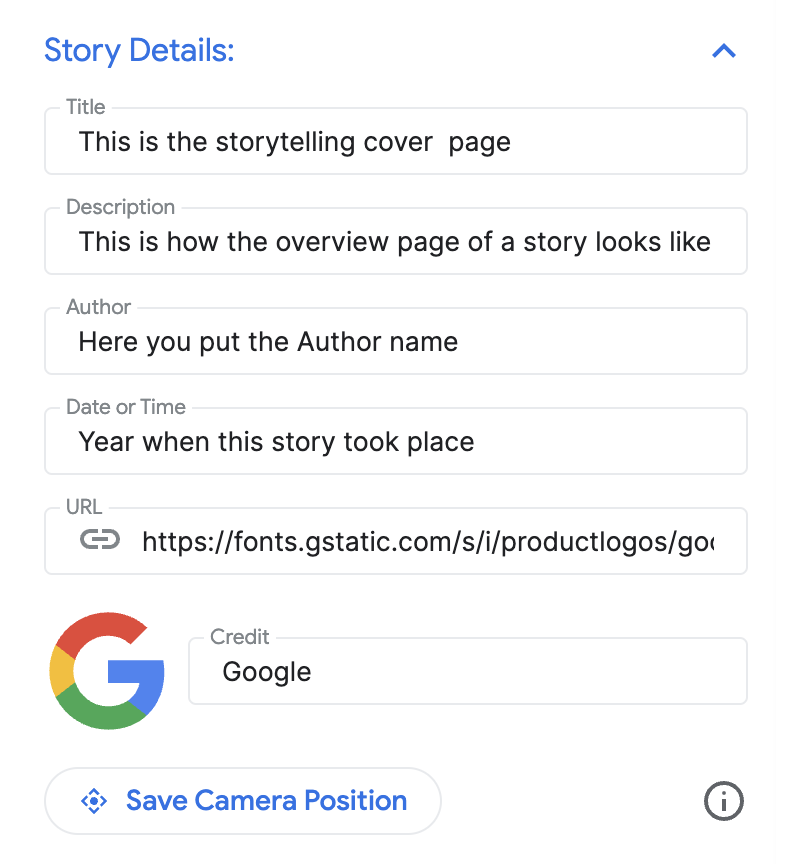
Utilizza la sezione "Dettagli della storia" per impostare un titolo, un'immagine, una descrizione e altri dettagli. In questo modo, lo spettatore viene introdotto alla tua storia.
Aggiungi capitoli
Ogni capitolo è come una fermata del tuo viaggio. Ecco come aggiungerli:
Cerca una località utilizzando la barra di ricerca con completamento automatico integrata.
Una volta aggiunta una posizione, puoi aggiungere dettagli al capitolo facendo clic sul pulsante
Modifica accanto alla posizione:
Fai clic su "Modifica" per inserire il titolo, la descrizione, l'immagine e la data del capitolo.
Se vuoi eliminare un capitolo specifico, c'è un pulsante Elimina
proprio sotto il pulsante Modifica.
Puoi riordinare i capitoli trascinandoli e spostandoli utilizzando le icone a punti sulla sinistra:
Salvare il capitolo
Per salvare un capitolo specifico, fai clic sul pulsante "Esci dalla modalità di modifica".
Il pulsante Esci dalla modalità di modifica funge da pulsante di salvataggio.
Personalizzare le impostazioni della videocamera
Puoi personalizzare diverse impostazioni della videocamera:
Mostra/nascondi l'indicatore di posizione. Potresti non voler
mostrare il segnaposto in una posizione specifica, ma preferire mostrare un'area generale.
Seleziona/deseleziona la casella "Mostra indicatore di posizione" per mostrare o nascondere un segnaposto.
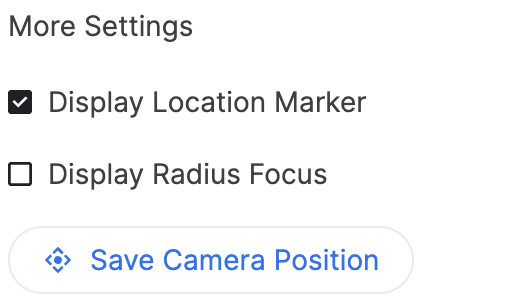
Mostra un raggio intorno a un'area. Puoi scegliere di mostrare un'area intorno a una
posizione specifica utilizzando la funzionalità "Mostra raggio di messa a fuoco". Se selezionata,
si aprirà un cursore del raggio che ti consentirà di controllare il raggio
del confine della messa a fuoco della videocamera.
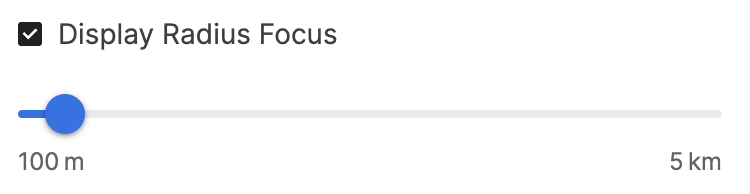
Questo mostra come le opzioni avanzate della videocamera contribuiscono a creare un'esperienza personalizzata.
Personalizza la posizione della videocamera Regola con precisione l'angolazione specifica della videocamera che
vuoi mostrare con semplici controlli della videocamera:
Inclinazione:visualizza la mappa dall'alto o a livello del suolo. Tieni premuto il tasto Controllo (o Cmd su alcuni computer) mentre fai clic e trascini verso l'alto o verso il basso con il mouse.
Ruota:ruota la mappa per una visualizzazione a 360 gradi. Tieni premuto il tasto Controllo
(o Cmd su alcuni computer) mentre fai clic e trascini verso sinistra o destra con il mouse.
Zoom:ottieni un'inquadratura ravvicinata o grandangolare. Utilizza la rotellina del mouse
o i gesti di zoom in/out che utilizzi di solito.
Sperimenta combinando inclinazione, rotazione e zoom per trovare l'angolazione perfetta per
ogni posizione. I controlli possono variare leggermente a seconda della configurazione del computer.
Scopri come controllare il canvas 3D per ottenere l'angolazione perfetta della videocamera.
Finalizza e scarica
Una volta create la storia e i capitoli, scarica la configurazione.
Fai clic su "Scarica" per ottenere la configurazione personalizzata in formato JSON.
Questa configurazione può essere utilizzata per creare la tua narrazione 3D eseguendo il fork del
codice da GitHub.
[[["Facile da capire","easyToUnderstand","thumb-up"],["Il problema è stato risolto","solvedMyProblem","thumb-up"],["Altra","otherUp","thumb-up"]],[["Mancano le informazioni di cui ho bisogno","missingTheInformationINeed","thumb-down"],["Troppo complicato/troppi passaggi","tooComplicatedTooManySteps","thumb-down"],["Obsoleti","outOfDate","thumb-down"],["Problema di traduzione","translationIssue","thumb-down"],["Problema relativo a esempi/codice","samplesCodeIssue","thumb-down"],["Altra","otherDown","thumb-down"]],["Ultimo aggiornamento 2025-09-05 UTC."],[[["\u003cp\u003eCreate immersive 3D stories with real-world locations using the built-in editor to customize titles, descriptions, images, and camera angles for a captivating user journey.\u003c/p\u003e\n"],["\u003cp\u003eEasily add chapters to your story by searching for locations, providing details such as titles, descriptions, and images, and reordering them as needed.\u003c/p\u003e\n"],["\u003cp\u003eFine-tune the camera settings for each chapter by controlling the tilt, rotate, and zoom to achieve the perfect perspective and enhance the visual experience.\u003c/p\u003e\n"],["\u003cp\u003eDownload the story configuration in JSON format once finalized to integrate it with the 3D Storytelling solution and share it with your audience.\u003c/p\u003e\n"],["\u003cp\u003eAccess the 3D Storytelling Admin app either through the hosted version or by downloading the code from GitHub to get started building your stories.\u003c/p\u003e\n"]]],["The core process involves creating a 3D story using the built-in editor, accessible via a hosted app or downloaded code. Users set story details, add chapters by searching locations, and customize chapter elements like titles, descriptions, images, and dates. Chapters can be reordered and deleted. Camera settings are adjustable, including showing/hiding markers, displaying a radius, and fine-tuning the view via tilt, rotate, and zoom. Finally, the complete story configuration is downloadable as a JSON file.\n"],null,["Ready to create captivating 3D stories that take viewers on a journey through\nreal-world locations? This guide will show you how to build a new story using\nthe built-in editor.\n\nUse our intuitive interface to adjust titles, descriptions, images, and camera\nangles. It's perfect for beginners!\n| **Use the hosted** [3D Storytelling Admin app](https://js-3d-storytelling-admin-t6a6o7lkja-uc.a.run.app/)\n|\n| Or\n| [Get an API Key](https://console.cloud.google.com/google/maps-apis/credentials?utm_source=3d_solutions_storytelling). and **download** the code from [GitHub](https://github.com/googlemaps-samples/js-3d-storytelling).\n\nOpen the story editor\n\nThe 3D Storytelling solution comes with a built-in Editor which lets you to\nbuild the story from the UI\n\nThe editor is on the left side of the page. Open by clicking this small icon:\n\nYou can access the editor by visiting the hosted version\n[3D Storytelling Admin app](https://goo.gle/3d-storytelling-admin) or by\ndownloading and installing your own Storytelling instance from [GitHub](https://github.com/googlemaps-samples/js-3d-storytelling)\n\nCreate the cover page\n\nUse the \"Story details\" section to set a title, image, description, and other\ndetails. This introduces your story to the viewer.\n\nAdd chapters\n\nEach chapter is like a stop on your journey. Here's how to add them:\n\n1. Search for a location using the built-in Autocomplete search bar.\n\n2. Once a location is added you can add details to the chapter by clicking on the\n **Edit** button next to the location:\n\n3. Click \"**Edit**\" to enter the title, description, image, and date for your\n chapter.\n\n4. If you want to delete a particular chapter, there is a **delete** button right\n below the Edit button.\n\n5. You can **reorder** the chapters by dragging and moving using the left hand\n dotted icons:\n\nSave the chapter\n\nTo save a specific chapter just click the \"**Leave Edit mode**\" button.\nThe Leave Edit mode button acts as a save button.\n\nCustomize camera settings\n\nYou can customize different camera settings:\n\n- **Show/hide the location marker** You may not want\n to show the pin on a specific location rather want to showcase a general area.\n Check/uncheck the \"Display location marker\" box to show or hide a pin.\n\n- **Show a radius around an area** You can choose to show an area around a\n specific location using the \"Display Radius Focus\" feature. When checked\n it will open up a radius slider that will allow you to control the boundary\n radius of the camera focus.\n\n | **Note:** Make sure to click \"Save camera position\" to save the above settings before exiting.\n\nThis shows how advanced camera options help create a customized experience.\n\n- **Customize the camera location** Fine tune the specific camera angle you\n want to show with easy camera controls:\n\n- **Tilt:** See the map from above or at ground level. Hold down the Control\n key (or Cmd on some computers) while clicking and dragging up or down with\n your mouse.\n\n- **Rotate:** Spin the map for a 360-degree view. Hold down the Control key\n (or Cmd on some computers) while clicking and dragging left or right with your\n mouse.\n\n- **Zoom:** Get a close-up or a wide-angle view. Use scroll wheel of your mouse\n or familiar zoom in/out gestures.\n\nExperiment with combining tilt, rotate, and zoom to find the perfect angle for\neach location. The controls may vary slightly depending on your computer's\nsetup.\n\nCheck how to control the 3D canvas to get your perfect camera angle.\n\nFinalize and download\n\nOnce the story and the chapters are built, download the configuration.\n\nClick \"**Download**\" to get your customized config in JSON format.\n\nThis configuration can be used to create your own 3D Storytelling by forking the\ncode from [GitHub](https://github.com/googlemaps-samples/js-3d-storytelling)."]]