

หน้านี้อธิบายวิธีสร้างแอป Chat ที่ รับเหตุการณ์จาก Chat โดยใช้ Pub/Sub สถาปัตยกรรมประเภทนี้สำหรับ แอป Chat มีประโยชน์หากองค์กรมี ไฟร์วอลล์ ซึ่งอาจป้องกันไม่ให้ Chat ส่งข้อความไปยัง แอป Chat หรือหากคุณต้องการส่งหรือรับเหตุการณ์ เกี่ยวกับพื้นที่ทำงานหรือผู้ใช้ Chat ด้วย Google Workspace Events API อย่างไรก็ตาม สถาปัตยกรรมนี้มีข้อจำกัดต่อไปนี้เนื่องจากแอป Chat เหล่านี้ส่งและรับได้เฉพาะข้อความแบบไม่พร้อมกัน
- ใช้กล่องโต้ตอบในข้อความไม่ได้ แต่ให้ใช้ข้อความการ์ดแทน
- อัปเดตการ์ดแต่ละใบด้วยการตอบกลับแบบซิงโครนัสไม่ได้ แต่ให้อัปเดต
ข้อความทั้งหมดโดยเรียกใช้เมธอด
patchแทน
แผนภาพต่อไปนี้แสดงสถาปัตยกรรมของ แอป Chat ที่สร้างด้วย Pub/Sub
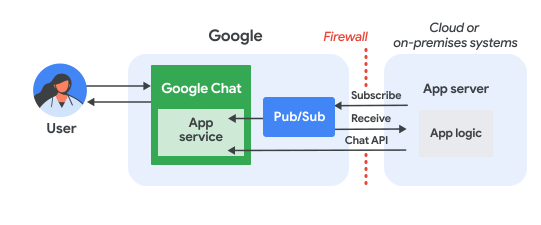
ในแผนภาพก่อนหน้า ผู้ใช้ที่โต้ตอบกับแอปแชท Pub/Sub จะมีโฟลว์ข้อมูลดังนี้
ผู้ใช้โต้ตอบกับแอป Chat โดยการส่งข้อความ ส่งคำสั่ง หรือเพิ่มหรือนำแอปออกจากพื้นที่ใน Chat หรือมีเหตุการณ์เกิดขึ้นในพื้นที่ใน Chat ซึ่งแอป Chat มีการติดตามที่ใช้งานอยู่
Chat จะส่งข้อความไปยังหัวข้อ Pub/Sub
เซิร์ฟเวอร์แอปพลิเคชันซึ่งเป็นระบบในระบบคลาวด์หรือในองค์กรที่มีตรรกะของแอป Chat จะสมัครใช้บริการหัวข้อ Pub/Sub เพื่อรับข้อความผ่านไฟร์วอลล์
แอป Chat สามารถเรียกใช้ Chat API เพื่อโพสต์ข้อความแบบไม่พร้อมกันหรือดำเนินการอื่นๆ ได้
ข้อกำหนดเบื้องต้น
Node.js
- บัญชี Google Workspace สำหรับธุรกิจหรือองค์กร ที่มีสิทธิ์เข้าถึง Google Chat
- โปรเจ็กต์ Google Cloud ที่เปิดใช้การเรียกเก็บเงิน หากต้องการตรวจสอบว่าโปรเจ็กต์ที่มีอยู่เปิดใช้การเรียกเก็บเงินหรือไม่ โปรดดูยืนยัน สถานะการเรียกเก็บเงินของโปรเจ็กต์ หากต้องการสร้างโปรเจ็กต์และตั้งค่าการเรียกเก็บเงิน โปรดดูสร้างโปรเจ็กต์ Google Cloud
- Node.js 14 ขึ้นไป
- เครื่องมือการจัดการแพ็กเกจ npm
-
โปรเจ็กต์ Node.js ที่เริ่มต้นแล้ว หากต้องการเริ่มต้นโปรเจ็กต์ใหม่ ให้สร้างและ
เปลี่ยนไปใช้โฟลเดอร์ใหม่ จากนั้นเรียกใช้คำสั่งต่อไปนี้ในอินเทอร์เฟซบรรทัดคำสั่ง
npm init
Python
- บัญชี Google Workspace สำหรับธุรกิจหรือองค์กร ที่มีสิทธิ์เข้าถึง Google Chat
- โปรเจ็กต์ Google Cloud ที่เปิดใช้การเรียกเก็บเงิน หากต้องการตรวจสอบว่าโปรเจ็กต์ที่มีอยู่เปิดใช้การเรียกเก็บเงินหรือไม่ โปรดดูยืนยัน สถานะการเรียกเก็บเงินของโปรเจ็กต์ หากต้องการสร้างโปรเจ็กต์และตั้งค่าการเรียกเก็บเงิน โปรดดูสร้างโปรเจ็กต์ Google Cloud
- Python 3.6 ขึ้นไป
- เครื่องมือการจัดการแพ็กเกจ pip
Java
- บัญชี Google Workspace สำหรับธุรกิจหรือองค์กร ที่มีสิทธิ์เข้าถึง Google Chat
- โปรเจ็กต์ Google Cloud ที่เปิดใช้การเรียกเก็บเงิน หากต้องการตรวจสอบว่าโปรเจ็กต์ที่มีอยู่เปิดใช้การเรียกเก็บเงินหรือไม่ โปรดดูยืนยัน สถานะการเรียกเก็บเงินของโปรเจ็กต์ หากต้องการสร้างโปรเจ็กต์และตั้งค่าการเรียกเก็บเงิน โปรดดูสร้างโปรเจ็กต์ Google Cloud
- Java 11 ขึ้นไป
- เครื่องมือการจัดการแพ็กเกจ Maven
ตั้งค่าสภาพแวดล้อม
ก่อนใช้ Google API คุณต้องเปิดใช้ API ในโปรเจ็กต์ที่อยู่ในระบบคลาวด์ของ Google คุณเปิด API อย่างน้อย 1 รายการในโปรเจ็กต์ Google Cloud เดียวได้ในคอนโซล Google Cloud ให้เปิดใช้ Google Chat API และ Pub/Sub API
ตั้งค่า Pub/Sub
สร้างหัวข้อ Pub/Sub ที่ Chat API สามารถส่งข้อความไปได้ เราขอแนะนำให้คุณใช้ หัวข้อเดียวต่อแอป Chat
สร้างบัญชีบริการ สำหรับแอป Chat เพื่อให้สิทธิ์กับ Pub/Sub และ Chat แล้วบันทึกไฟล์คีย์ส่วนตัวลงในไดเรกทอรีการทำงาน
สร้างการสมัครใช้บริการแบบดึงข้อมูล ไปยังหัวข้อ
มอบหมายบทบาทผู้สมัครใช้บริการ Pub/Sub ในการสมัครใช้บริการ สำหรับบัญชีบริการที่คุณสร้างไว้ก่อนหน้านี้
เขียนสคริปต์
ในส่วนนี้ คุณจะกำหนดตรรกะของแอปพลิเคชันสำหรับแอป Chat โดยเขียนสคริปต์ที่ตรวจสอบสิทธิ์กับ Google Cloud และสมัครใช้หัวข้อ Pub/Sub เพื่อรับเหตุการณ์จาก Chat เช่น เมื่อผู้ใช้ส่งข้อความไปยังแอป Chat ของคุณ
เมื่อสคริปต์ได้รับข้อความ สคริปต์จะประมวลผลข้อมูลเหตุการณ์และใช้ Google Chat API เพื่อโพสต์การตอบกลับไปยังผู้ใช้หรือพื้นที่ การตั้งค่านี้ช่วยให้แอป Chat ทำงานอยู่หลังไฟร์วอลล์ได้ในขณะที่ยังโต้ตอบกับผู้ใช้ Chat ได้
Node.js
ใน CLI ให้ระบุข้อมูลเข้าสู่ระบบของบัญชีบริการโดยทำดังนี้
export GOOGLE_APPLICATION_CREDENTIALS=SERVICE_ACCOUNT_FILE_PATHใน CLI ให้ระบุรหัสโปรเจ็กต์ Google Cloud ดังนี้
export PROJECT_ID=PROJECT_IDใน CLI ให้ระบุรหัสการสมัครใช้บริการสำหรับการสมัครใช้บริการ Pub/Sub ที่ คุณสร้างไว้ก่อนหน้านี้
export SUBSCRIPTION_ID=SUBSCRIPTION_IDสร้างไฟล์ชื่อ
package.jsonในไดเรกทอรีการทำงานวางโค้ดต่อไปนี้ในไฟล์
package.json{ "name": "pub-sub-app", "version": "1.0.0", "description": "Google Chat App that listens for messages via Cloud Pub/Sub", "main": "index.js", "scripts": { "start": "node index.js", "test": "echo \"Error: no test specified\" && exit 1" }, "dependencies": { "@google-apps/chat": "^0.4.0", "@google-cloud/pubsub": "^4.5.0" }, "license": "Apache-2.0" }สร้างไฟล์ชื่อ
index.jsในไดเรกทอรีการทำงานใน
index.jsให้วางโค้ดต่อไปนี้const {ChatServiceClient} = require('@google-apps/chat'); const {MessageReplyOption} = require('@google-apps/chat').protos.google.chat.v1.CreateMessageRequest; const {PubSub} = require('@google-cloud/pubsub'); const {SubscriberClient} = require('@google-cloud/pubsub/build/src/v1'); // Receives messages from a pull subscription. function receiveMessages() { const chat = new ChatServiceClient({ keyFile: process.env.GOOGLE_APPLICATION_CREDENTIALS, scopes: ['https://www.googleapis.com/auth/chat.bot'], }); const subscriptionPath = new SubscriberClient() .subscriptionPath(process.env.PROJECT_ID, process.env.SUBSCRIPTION_ID) const subscription = new PubSub() .subscription(subscriptionPath); // Handle incoming message, then acknowledge the received message const messageHandler = message => { console.log(`Id : ${message.id}`); const event = JSON.parse(message.data); console.log(`Data : ${JSON.stringify(event)}`); // Post the response to Google Chat. const request = formatRequest(event); if (request != null) { chat.createMessage(request); } // Acknowledge the message. message.ack(); } subscription.on('message', messageHandler); console.log(`Listening for messages on ${subscriptionPath}`); // Keep main thread from exiting while waiting for messages setTimeout(() => { subscription.removeListener('message', messageHandler); console.log(`Stopped listening for messages.`); }, 60 * 1000); } // Send message to Google Chat based on the type of event function formatRequest(event) { const chatEvent = event.chat || {}; // If the app was removed, we don't respond. if (chatEvent.removedFromSpacePayload) { console.log(`App removed from space.`); return null; } const payload = chatEvent.messagePayload || chatEvent.addedToSpacePayload; const spaceName = payload?.space?.name; if (!spaceName) { console.log('No space name in event.'); return null; } if (chatEvent.addedToSpacePayload) { // An app can also be added to a space by @mentioning it in a // message. In that case, we fall through to the message case // and let the app respond. If the app was added using the // invite flow, we just post a thank you message in the space. return { parent: spaceName, message: { text: 'Thank you for adding me!' }, }; } else if (chatEvent.messagePayload) { // In case of message, post the response in the same thread. const message = chatEvent.messagePayload.message; return { parent: spaceName, messageReplyOption: MessageReplyOption.REPLY_MESSAGE_FALLBACK_TO_NEW_THREAD, message: { text: 'You said: `' + message.text + '`', thread: { name: message.thread.name }, }, }; } } if (!process.env.PROJECT_ID) { console.log('Missing PROJECT_ID env var.'); process.exit(1); } if (!process.env.SUBSCRIPTION_ID) { console.log('Missing SUBSCRIPTION_ID env var.'); process.exit(1); } if (!process.env.GOOGLE_APPLICATION_CREDENTIALS) { console.log('Missing GOOGLE_APPLICATION_CREDENTIALS env var.'); process.exit(1); } receiveMessages();
Python
ใน CLI ให้ระบุข้อมูลเข้าสู่ระบบของบัญชีบริการโดยทำดังนี้
export GOOGLE_APPLICATION_CREDENTIALS=SERVICE_ACCOUNT_FILE_PATHใน CLI ให้ระบุรหัสโปรเจ็กต์ Google Cloud ดังนี้
export PROJECT_ID=PROJECT_IDใน CLI ให้ระบุรหัสการสมัครใช้บริการสำหรับการสมัครใช้บริการ Pub/Sub ที่ คุณสร้างไว้ก่อนหน้านี้
export SUBSCRIPTION_ID=SUBSCRIPTION_IDสร้างไฟล์ชื่อ
requirements.txtในไดเรกทอรีการทำงานวางโค้ดต่อไปนี้ในไฟล์
requirements.txtgoogle-cloud-pubsub>=2.23.0 google-apps-chat==0.1.9สร้างไฟล์ชื่อ
app.pyในไดเรกทอรีการทำงานใน
app.pyให้วางโค้ดต่อไปนี้import json import logging import os import sys import time from google.apps import chat_v1 as google_chat from google.cloud import pubsub_v1 from google.oauth2.service_account import Credentials def receive_messages(): """Receives messages from a pull subscription.""" scopes = ['https://www.googleapis.com/auth/chat.bot'] service_account_key_path = os.environ.get('GOOGLE_APPLICATION_CREDENTIALS') creds = Credentials.from_service_account_file(service_account_key_path) chat = google_chat.ChatServiceClient( credentials=creds, client_options={'scopes': scopes} ) project_id = os.environ.get('PROJECT_ID') subscription_id = os.environ.get('SUBSCRIPTION_ID') subscriber = pubsub_v1.SubscriberClient() subscription_path = subscriber.subscription_path(project_id, subscription_id) # Handle incoming message, then acknowledge the received message def callback(message): event = json.loads(message.data) logging.info('Data : %s', event) # Post the response to Google Chat. request = format_request(event) if request is not None: chat.create_message(request) # Acknowledge the message. message.ack() subscriber.subscribe(subscription_path, callback = callback) logging.info('Listening for messages on %s', subscription_path) # Keep main thread from exiting while waiting for messages while True: time.sleep(60) def format_request(event): """Send message to Google Chat based on the type of event. Args: event: A dictionary with the event data. """ chat_event = event.get('chat', {}) # If the app was removed, we don't respond. if 'removedFromSpacePayload' in chat_event: logging.info('App removed from space.') return payload = chat_event.get('messagePayload') or chat_event.get( 'addedToSpacePayload' ) space_name = payload.get('space', {}).get('name') if payload else None if not space_name: logging.warning('No space name in event.') return if 'addedToSpacePayload' in chat_event: # An app can also be added to a space by @mentioning it in a # message. In that case, we fall through to the message case # and let the app respond. If the app was added using the # invite flow, we just post a thank you message in the space. return google_chat.CreateMessageRequest( parent = space_name, message = { 'text': 'Thank you for adding me!' } ) elif 'messagePayload' in chat_event: # In case of message, post the response in the same thread. message = chat_event['messagePayload']['message'] return google_chat.CreateMessageRequest( parent = space_name, message_reply_option = google_chat.CreateMessageRequest.MessageReplyOption.REPLY_MESSAGE_FALLBACK_TO_NEW_THREAD, message = { 'text': 'You said: `' + message['text'] + '`', 'thread': { 'name': message['thread']['name'] } } ) if __name__ == '__main__': if 'PROJECT_ID' not in os.environ: logging.error('Missing PROJECT_ID env var.') sys.exit(1) if 'SUBSCRIPTION_ID' not in os.environ: logging.error('Missing SUBSCRIPTION_ID env var.') sys.exit(1) if 'GOOGLE_APPLICATION_CREDENTIALS' not in os.environ: logging.error('Missing GOOGLE_APPLICATION_CREDENTIALS env var.') sys.exit(1) logging.basicConfig( level=logging.INFO, style='{', format='{levelname:.1}{asctime} {filename}:{lineno}] {message}') receive_messages()
Java
ใน CLI ให้ระบุข้อมูลเข้าสู่ระบบของบัญชีบริการโดยทำดังนี้
export GOOGLE_APPLICATION_CREDENTIALS=SERVICE_ACCOUNT_FILE_PATHใน CLI ให้ระบุรหัสโปรเจ็กต์ Google Cloud ดังนี้
export PROJECT_ID=PROJECT_IDใน CLI ให้ระบุรหัสการสมัครใช้บริการสำหรับการสมัครใช้บริการ Pub/Sub ที่ คุณสร้างไว้ก่อนหน้านี้
export SUBSCRIPTION_ID=SUBSCRIPTION_IDสร้างไฟล์ชื่อ
pom.xmlในไดเรกทอรีการทำงานวางโค้ดต่อไปนี้ในไฟล์
pom.xml<project xmlns="http://maven.apache.org/POM/4.0.0" xmlns:xsi="http://www.w3.org/2001/XMLSchema-instance" xsi:schemaLocation="http://maven.apache.org/POM/4.0.0 http://maven.apache.org/xsd/maven-4.0.0.xsd"> <modelVersion>4.0.0</modelVersion> <groupId>com.google.chat.addon</groupId> <artifactId>pubsub-addon-chat-app</artifactId> <version>0.1.0</version> <name>pubsub-addon-chat-app-java</name> <properties> <maven.compiler.release>11</maven.compiler.release> <project.build.sourceEncoding>UTF-8</project.build.sourceEncoding> </properties> <dependencyManagement> <dependencies> <dependency> <groupId>com.google.cloud</groupId> <artifactId>libraries-bom</artifactId> <version>26.41.0</version> <!-- Use a recent BOM version --> <type>pom</type> <scope>import</scope> </dependency> </dependencies> </dependencyManagement> <dependencies> <!-- Google Chat GAPIC library --> <dependency> <groupId>com.google.cloud</groupId> <artifactId>google-cloud-chat</artifactId> </dependency> <!-- Google Cloud Pub/Sub library --> <dependency> <groupId>com.google.cloud</groupId> <artifactId>google-cloud-pubsub</artifactId> </dependency> <!-- Google Apps Add-ons Event Object --> <dependency> <groupId>com.google.apps.addons.v1</groupId> <artifactId>google-apps-addons-v1-java</artifactId> <version>0.2.0</version> <!-- Check for latest version --> </dependency> <!-- Protobuf JSON utility --> <dependency> <groupId>com.google.protobuf</groupId> <artifactId>protobuf-java-util</artifactId> </dependency> <!-- Google Auth Library --> <dependency> <groupId>com.google.auth</groupId> <artifactId>google-auth-library-oauth2-http</artifactId> </dependency> <dependency> <groupId>com.google.api</groupId> <artifactId>gax</artifactId> </dependency> <!-- JSON utilities for PubSub message (if needed, though protobuf-java-util is primary for EventObject) --> <dependency> <groupId>com.fasterxml.jackson.core</groupId> <artifactId>jackson-databind</artifactId> <version>2.14.2</version> </dependency> <dependency> <groupId>org.slf4j</groupId> <artifactId>slf4j-jdk14</artifactId> <version>1.7.36</version> <scope>runtime</scope> </dependency> </dependencies> <build> <plugins> <plugin> <groupId>org.apache.maven.plugins</groupId> <artifactId>maven-compiler-plugin</artifactId> <version>3.13.0</version> <configuration> <source>11</source> <target>11</target> </configuration> </plugin> <plugin> <groupId>org.codehaus.mojo</groupId> <artifactId>exec-maven-plugin</artifactId> <version>3.3.0</version> <configuration> <mainClass>Main</mainClass> </configuration> </plugin> </plugins> </build> </project>ในไดเรกทอรีการทำงาน ให้สร้างโครงสร้างไดเรกทอรี
src/main/javaในไดเรกทอรี
src/main/javaให้สร้างไฟล์ชื่อMain.javaใน
Main.javaให้วางโค้ดต่อไปนี้import com.fasterxml.jackson.databind.JsonNode; import com.fasterxml.jackson.databind.ObjectMapper; import com.google.api.gax.core.FixedCredentialsProvider; import com.google.auth.oauth2.GoogleCredentials; import com.google.chat.v1.ChatServiceClient; import com.google.chat.v1.ChatServiceSettings; import com.google.chat.v1.CreateMessageRequest; import com.google.chat.v1.CreateMessageRequest.MessageReplyOption; import com.google.chat.v1.Message; import com.google.chat.v1.Thread; import com.google.cloud.pubsub.v1.AckReplyConsumer; import com.google.cloud.pubsub.v1.MessageReceiver; import com.google.cloud.pubsub.v1.Subscriber; import com.google.pubsub.v1.ProjectSubscriptionName; import com.google.pubsub.v1.PubsubMessage; import java.io.FileInputStream; import java.util.Collections; public class Main { public static final String PROJECT_ID_ENV_PROPERTY = "PROJECT_ID"; public static final String SUBSCRIPTION_ID_ENV_PROPERTY = "SUBSCRIPTION_ID"; public static final String CREDENTIALS_PATH_ENV_PROPERTY = "GOOGLE_APPLICATION_CREDENTIALS"; public static void main(String[] args) throws Exception { ProjectSubscriptionName subscriptionName = ProjectSubscriptionName.of( System.getenv(Main.PROJECT_ID_ENV_PROPERTY), System.getenv(Main.SUBSCRIPTION_ID_ENV_PROPERTY)); // Instantiate app, which implements an asynchronous message receiver. EchoApp echoApp = new EchoApp(); // Create a subscriber for <var>SUBSCRIPTION_ID</var> bound to the message receiver final Subscriber subscriber = Subscriber.newBuilder(subscriptionName, echoApp).build(); System.out.println("Subscriber is listening to events..."); subscriber.startAsync(); // Wait for termination subscriber.awaitTerminated(); } } /** * A demo app which implements {@link MessageReceiver} to receive messages. * It echoes incoming messages. */ class EchoApp implements MessageReceiver { // Path to the private key JSON file of the service account to be used for posting response // messages to Google Chat. // In this demo, we are using the same service account for authorizing with Cloud Pub/Sub to // receive messages and authorizing with Google Chat to post messages. If you are using // different service accounts, set the path to the private key JSON file of the service // account used to post messages to Google Chat here. private static final String SERVICE_ACCOUNT_KEY_PATH = System.getenv(Main.CREDENTIALS_PATH_ENV_PROPERTY); // Developer code for Google Chat API scope. private static final String GOOGLE_CHAT_API_SCOPE = "https://www.googleapis.com/auth/chat.bot"; private static final String ADDED_RESPONSE = "Thank you for adding me!"; ChatServiceClient chatServiceClient; EchoApp() throws Exception { GoogleCredentials credential = GoogleCredentials.fromStream(new FileInputStream(SERVICE_ACCOUNT_KEY_PATH)) .createScoped(Collections.singleton(GOOGLE_CHAT_API_SCOPE)); // Create the ChatServiceSettings with the app credentials ChatServiceSettings chatServiceSettings = ChatServiceSettings.newBuilder() .setCredentialsProvider(FixedCredentialsProvider.create(credential)) .build(); // Set the Chat service client chatServiceClient = ChatServiceClient.create(chatServiceSettings); } // Called when a message is received by the subscriber. @Override public void receiveMessage(PubsubMessage pubsubMessage, AckReplyConsumer consumer) { System.out.println("Id : " + pubsubMessage.getMessageId()); // Handle incoming message, then acknowledge the received message try { ObjectMapper mapper = new ObjectMapper(); JsonNode dataJson = mapper.readTree(pubsubMessage.getData().toStringUtf8()); System.out.println("Data : " + dataJson.toString()); handle(dataJson); consumer.ack(); } catch (Exception e) { System.out.println(e); // Negative acknowledgement makes Pub/Sub redeliver the message. consumer.nack(); } } // Send message to Google Chat based on the type of event. public void handle(JsonNode eventJson) throws Exception { // Google Chat events for add-ons are wrapped in a 'chat' object. if (!eventJson.has("chat")) { System.out.println("Ignored: Not a Chat event (missing 'chat' field)."); return; } JsonNode chatNode = eventJson.get("chat"); CreateMessageRequest createMessageRequest = null; if (chatNode.has("messagePayload")) { // HANDLE MESSAGE JsonNode messagePayload = chatNode.get("messagePayload"); JsonNode message = messagePayload.get("message"); JsonNode space = messagePayload.get("space"); String spaceName = space.get("name").asText(); String userText = message.has("text") ? message.get("text").asText() : ""; String threadName = message.has("thread") ? message.get("thread").get("name").asText() : ""; System.out.println("Received message in " + spaceName + ": " + userText); createMessageRequest = CreateMessageRequest.newBuilder() .setParent(spaceName) .setMessageReplyOption(MessageReplyOption.REPLY_MESSAGE_FALLBACK_TO_NEW_THREAD) .setMessage( Message.newBuilder() .setText("You said: `" + userText + "`") .setThread(Thread.newBuilder().setName(threadName).build()) .build()) .build(); } else if (chatNode.has("addedToSpacePayload")) { // HANDLE ADDED TO SPACE JsonNode addedPayload = chatNode.get("addedToSpacePayload"); JsonNode space = addedPayload.get("space"); String spaceName = space.get("name").asText(); System.out.println("Added to space: " + spaceName); createMessageRequest = CreateMessageRequest.newBuilder() .setParent(spaceName) .setMessage(Message.newBuilder().setText(ADDED_RESPONSE).build()) .build(); } else if (chatNode.has("removedFromSpacePayload")) { System.out.println("Removed from space."); return; } else { System.out.println("Ignored: Unhandled Chat event type."); return; } if (createMessageRequest != null) { // Post the response to Google Chat. chatServiceClient.createMessage(createMessageRequest); System.out.println("Sent reply."); } } }
กำหนดค่าแอป Chat
กำหนดค่าแอป Chat ในคอนโซล Google Cloud เพื่อระบุรายละเอียด เช่น ชื่อและรูปโปรไฟล์ รวมถึงตั้งค่าการเชื่อมต่อกับหัวข้อ Pub/Sub
การเชื่อมต่อกับหัวข้อ Pub/Sub จะช่วยให้ Chat ส่งเหตุการณ์ไปยังแอปได้ จากนั้นสคริปต์ของคุณซึ่งติดตามหัวข้อนี้จะรับเหตุการณ์เหล่านี้และตอบกลับผู้ใช้ได้
ในคอนโซล Google Cloud ให้ไปที่เมนู > API และบริการ > API และบริการที่เปิดใช้ > Google Chat API > การกำหนดค่า
กำหนดค่าแอป Chat สำหรับ Pub/Sub โดยทำดังนี้
- ในส่วนชื่อแอป ให้ป้อน
Quickstart App - ใน URL อวตาร ให้ป้อน
https://developers.google.com/workspace/chat/images/quickstart-app-avatar.png - ในคำอธิบาย ให้ป้อน
Quickstart app - ในส่วนฟังก์ชันการทำงาน ให้เลือกเข้าร่วมพื้นที่ทำงานและการสนทนากลุ่ม
- ในส่วนการตั้งค่าการเชื่อมต่อ ให้เลือก Cloud Pub/Sub แล้ววาง ชื่อของหัวข้อ Pub/Sub ที่คุณสร้างไว้ก่อนหน้านี้
- ในส่วนระดับการมองเห็น ให้เลือกทำให้แอป Google Chat นี้พร้อมใช้งานสำหรับบุคคลและกลุ่มที่เฉพาะเจาะจงในโดเมนของคุณ แล้วป้อนอีเมล
- ในส่วนบันทึก ให้เลือกบันทึกข้อผิดพลาดไปยังการบันทึก
- ในส่วนชื่อแอป ให้ป้อน
คลิกบันทึก
เมื่อกำหนดค่าแอป Chat แล้ว คุณต้อง อัปเดตการกำหนดค่า Pub/Sub
- ใน หน้าการกำหนดค่า Chat API ภายใต้การตั้งค่าการเชื่อมต่อ ให้คัดลอกอีเมลบัญชีบริการ ซึ่งเป็น อีเมลที่ไม่ซ้ำกันซึ่งสร้างขึ้นสำหรับโปรเจ็กต์ที่อยู่ในระบบคลาวด์ของ Google ของคุณ
ให้สิทธิ์ Chat ในการเผยแพร่ ไปยังหัวข้อโดยการมอบหมายบทบาทผู้เผยแพร่ Pub/Sub ให้กับอีเมลบัญชีบริการ ที่คุณคัดลอกไว้ก่อนหน้านี้
แอปพร้อมรับและตอบกลับข้อความใน Chat แล้ว
เรียกใช้สคริปต์
ใน CLI ให้เปลี่ยนไปที่ไดเรกทอรีการทำงานแล้วเรียกใช้สคริปต์
Node.js
npm install
npm start
Python
python -m venv env
source env/bin/activate
pip install -r requirements.txt -U
python app.py
Java
mvn compile exec:java -Dexec.mainClass=Main
เมื่อเรียกใช้โค้ด แอปพลิเคชันจะเริ่มรับฟังข้อความที่เผยแพร่ไปยังหัวข้อ Pub/Sub
ทดสอบแอปใน Chat
หากต้องการทดสอบแอป Chat ให้เปิดพื้นที่ข้อความส่วนตัวด้วย แอป Chat แล้วส่งข้อความโดยทำดังนี้
เปิด Google Chat โดยใช้บัญชี Google Workspace ที่คุณ ระบุไว้เมื่อเพิ่มตัวเองเป็นผู้ทดสอบที่เชื่อถือได้
- คลิก แชทใหม่
- ในช่องเพิ่มบุคคลอย่างน้อย 1 คน ให้พิมพ์ชื่อแอป Chat
เลือกแอป Chat จากผลการค้นหา ข้อความส่วนตัวจะเปิดขึ้น
- ในข้อความส่วนตัวใหม่กับแอป ให้พิมพ์
Helloแล้วกดenter
หากต้องการเพิ่มผู้ทดสอบที่เชื่อถือได้และดูข้อมูลเพิ่มเติมเกี่ยวกับการทดสอบฟีเจอร์แบบอินเทอร์แอกทีฟ โปรดดูทดสอบฟีเจอร์แบบอินเทอร์แอกทีฟสำหรับแอป Google Chat
แก้ปัญหา
เมื่อแอป Google Chat หรือการ์ดแสดงข้อผิดพลาด อินเทอร์เฟซ Chat จะแสดงข้อความว่า "เกิดข้อผิดพลาด" หรือ "ดำเนินการตามคำขอของคุณไม่ได้" บางครั้ง UI ของ Chat อาจไม่แสดงข้อความแสดงข้อผิดพลาด แต่แอป Chat หรือ การ์ดอาจให้ผลลัพธ์ที่ไม่คาดคิด เช่น ข้อความในการ์ดอาจไม่ ปรากฏ
แม้ว่าข้อความแสดงข้อผิดพลาดอาจไม่ปรากฏใน UI ของ Chat แต่ข้อความแสดงข้อผิดพลาดและข้อมูลบันทึกที่อธิบายไว้จะช่วยคุณแก้ไขข้อผิดพลาดได้เมื่อเปิดการบันทึกข้อผิดพลาดสำหรับแอป Chat หากต้องการความช่วยเหลือในการดู การแก้ไขข้อบกพร่อง และการแก้ไขข้อผิดพลาด โปรดดู แก้ปัญหาและแก้ไขข้อผิดพลาดของ Google Chat
ล้างข้อมูล
เราขอแนะนำให้คุณลบโปรเจ็กต์ที่อยู่ในระบบคลาวด์เพื่อหลีกเลี่ยงการเรียกเก็บเงินจากบัญชี Google Cloud สำหรับทรัพยากรที่ใช้ในบทแนะนำนี้
- ในคอนโซล Google Cloud ให้ไปที่หน้าจัดการทรัพยากร คลิก เมนู > IAM และผู้ดูแลระบบ > จัดการทรัพยากร
- ในรายการโปรเจ็กต์ ให้เลือกโปรเจ็กต์ที่ต้องการลบ แล้วคลิก ลบ
- ในกล่องโต้ตอบ ให้พิมพ์รหัสโปรเจ็กต์ แล้วคลิกปิดเพื่อลบ โปรเจ็กต์
หัวข้อที่เกี่ยวข้อง
หากต้องการเพิ่มฟีเจอร์อื่นๆ ลงในแอป Chat ให้ดูข้อมูลต่อไปนี้
แอปใน Chat ที่ไม่ใช่ส่วนเสริม: สร้างแอป Google Chat ด้วย Pub/Sub
หากต้องการสร้างแอป Chat ที่ไม่ใช่ส่วนเสริมของ Google Workspace ด้วย Pub/Sub ให้ทำตามขั้นตอนต่อไปนี้เพื่อให้สิทธิ์การเผยแพร่ Pub/Sub เขียน สคริปต์ และกำหนดค่าแอป Chat ที่ไม่ใช่ ส่วนเสริม
ให้สิทธิ์ Chat ในการเผยแพร่ไปยังหัวข้อ
ให้สิทธิ์ Chat ในการเผยแพร่ ไปยังหัวข้อ Pub/Sub โดยการมอบหมายบทบาทผู้เผยแพร่ Pub/Sub ให้กับ บัญชีบริการต่อไปนี้
chat-api-push@system.gserviceaccount.com
เขียนสคริปต์สำหรับแอป Chat ที่ไม่ใช่ส่วนเสริม
Node.js
ใน CLI ให้ระบุข้อมูลเข้าสู่ระบบของบัญชีบริการโดยทำดังนี้
export GOOGLE_APPLICATION_CREDENTIALS=SERVICE_ACCOUNT_FILE_PATHใน CLI ให้ระบุรหัสโปรเจ็กต์ Google Cloud ดังนี้
export PROJECT_ID=PROJECT_IDใน CLI ให้ระบุรหัสการสมัครใช้บริการสำหรับการสมัครใช้บริการ Pub/Sub ที่ คุณสร้างไว้ก่อนหน้านี้
export SUBSCRIPTION_ID=SUBSCRIPTION_IDสร้างไฟล์ชื่อ
package.jsonในไดเรกทอรีการทำงานวางโค้ดต่อไปนี้ในไฟล์
package.jsonสร้างไฟล์ชื่อ
index.jsในไดเรกทอรีการทำงานใน
index.jsให้วางโค้ดต่อไปนี้
Python
ใน CLI ให้ระบุข้อมูลเข้าสู่ระบบของบัญชีบริการโดยทำดังนี้
export GOOGLE_APPLICATION_CREDENTIALS=SERVICE_ACCOUNT_FILE_PATHใน CLI ให้ระบุรหัสโปรเจ็กต์ Google Cloud ดังนี้
export PROJECT_ID=PROJECT_IDใน CLI ให้ระบุรหัสการสมัครใช้บริการสำหรับการสมัครใช้บริการ Pub/Sub ที่ คุณสร้างไว้ก่อนหน้านี้
export SUBSCRIPTION_ID=SUBSCRIPTION_IDสร้างไฟล์ชื่อ
requirements.txtในไดเรกทอรีการทำงานวางโค้ดต่อไปนี้ในไฟล์
requirements.txtสร้างไฟล์ชื่อ
app.pyในไดเรกทอรีการทำงานใน
app.pyให้วางโค้ดต่อไปนี้
Java
ใน CLI ให้ระบุข้อมูลเข้าสู่ระบบของบัญชีบริการโดยทำดังนี้
export GOOGLE_APPLICATION_CREDENTIALS=SERVICE_ACCOUNT_FILE_PATHใน CLI ให้ระบุรหัสโปรเจ็กต์ Google Cloud ดังนี้
export PROJECT_ID=PROJECT_IDใน CLI ให้ระบุรหัสการสมัครใช้บริการสำหรับการสมัครใช้บริการ Pub/Sub ที่ คุณสร้างไว้ก่อนหน้านี้
export SUBSCRIPTION_ID=SUBSCRIPTION_IDสร้างไฟล์ชื่อ
pom.xmlในไดเรกทอรีการทำงานวางโค้ดต่อไปนี้ในไฟล์
pom.xmlในไดเรกทอรีการทำงาน ให้สร้างโครงสร้างไดเรกทอรี
src/main/javaในไดเรกทอรี
src/main/javaให้สร้างไฟล์ชื่อMain.javaใน
Main.javaให้วางโค้ดต่อไปนี้
กำหนดค่าแอป Chat ที่ไม่ใช่ส่วนเสริม
ในคอนโซล Google Cloud ให้ไปที่เมนู > API และบริการ > API และบริการที่เปิดใช้ > Google Chat API > การกำหนดค่า
กำหนดค่าแอป Chat ที่ไม่ใช่ ส่วนเสริมสำหรับ Pub/Sub โดยทำดังนี้
- เลือกสร้างแอป Chat นี้เป็นส่วนเสริมของ Google Workspace กล่องโต้ตอบจะเปิดขึ้นเพื่อขอให้คุณยืนยัน คลิกปิดใช้ในกล่องโต้ตอบ
- ในส่วนชื่อแอป ให้ป้อน
Quickstart App - ใน URL อวตาร ให้ป้อน
https://developers.google.com/workspace/chat/images/quickstart-app-avatar.png - ในคำอธิบาย ให้ป้อน
Quickstart app - ในส่วนฟังก์ชันการทำงาน ให้เลือกเข้าร่วมพื้นที่ทำงานและการสนทนากลุ่ม
- ในส่วนการตั้งค่าการเชื่อมต่อ ให้เลือก Cloud Pub/Sub แล้ววาง ชื่อของหัวข้อ Pub/Sub ที่คุณสร้างไว้ก่อนหน้านี้
- ในส่วนระดับการมองเห็น ให้เลือกทำให้แอป Google Chat นี้พร้อมใช้งานสำหรับบุคคลและกลุ่มที่เฉพาะเจาะจงในโดเมนของคุณ แล้วป้อนอีเมล
- ในส่วนบันทึก ให้เลือกบันทึกข้อผิดพลาดไปยังการบันทึก
คลิกบันทึก