

本指南介绍了直接依赖方 (RP)(即个体商家、企业和应用开发者)如何集成 Digital Credentials API,以便在 Android 应用和网络中请求和验证数字身份凭证。
选择适合自己的学习方向 RP、Verifier Registrar 或 In-Person
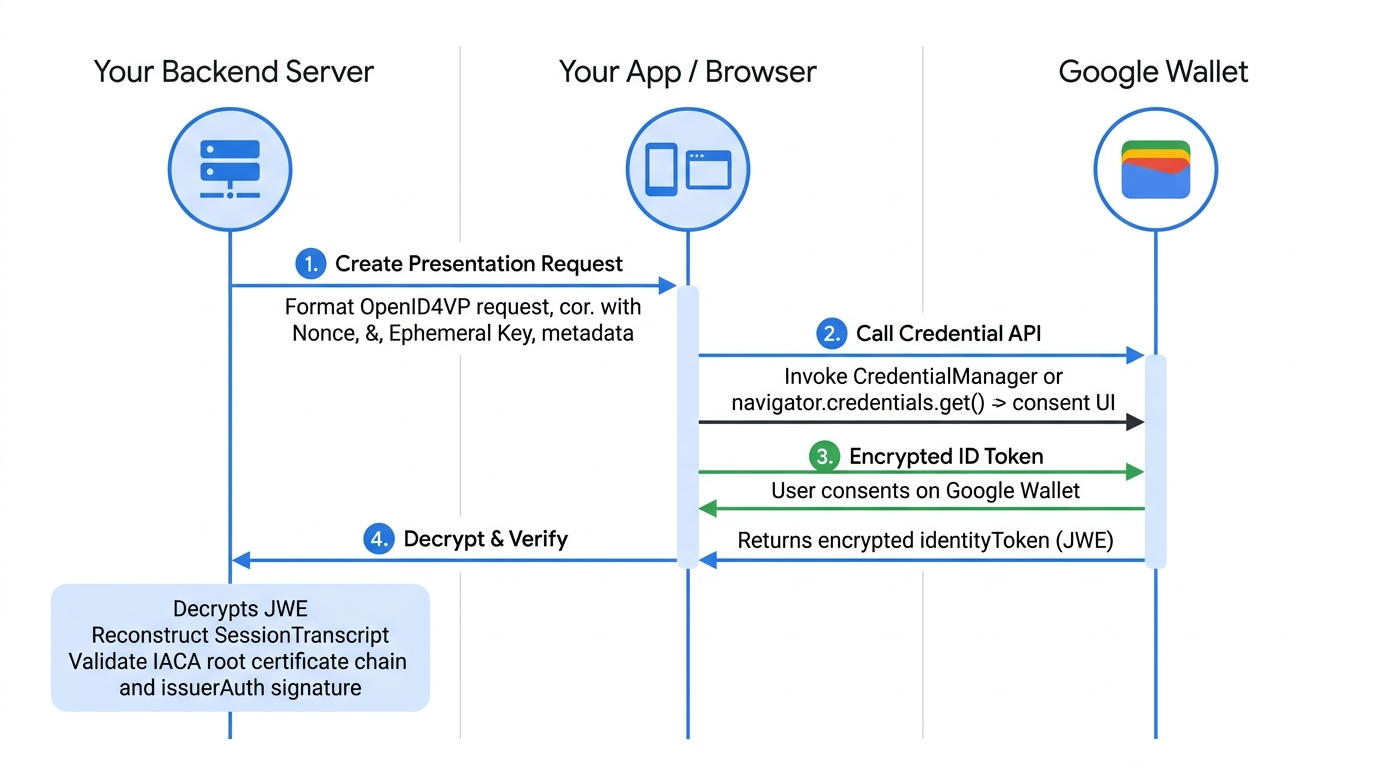
依赖方集成的工作原理
每个依赖方集成都遵循四个步骤。步骤 A 和 C 在您的服务器上运行;步骤 B 在您的 Android 应用或浏览器中运行。选择任意步骤即可跳转到其实现详情:
支持的格式、凭据和功能
Google 钱包支持在 Android 9(API 级别 28)及更高版本以及受支持的浏览器中,通过 OpenID4VP(1.0 版)使用基于 ISO mdoc 的数字身份证。
支持的凭证和属性
查找您可以向 Google 钱包请求的 doctype_value 标识符(mDL、身份证件、带照片的身份证件)和属性声明路径。
支持的发卡机构和 IACA 证书
下载美国各州、国际签发机构和 Sandbox Utopia 签发机构的官方 IACA 根证书,以验证 issuerAuth。
第 A 步:设置请求格式并签名(服务器端)
如需从任何钱包请求凭证,您必须在服务器上使用 OpenID4VP 设置请求格式。您可以在单个 dcql_query 对象中请求特定凭据或多个凭据。
JSON 请求示例
以下是一个 mdoc requestJson 请求示例,用于从 Android 设备或 Web 上的任何钱包获取身份凭证。
{
      "requests" : [
        {
          "protocol": "openid4vp-v1-signed",
          "data": {<signed_credential_request>} // This is an object, shouldn't be a string.
        }
      ]
}
请求加密
client_metadata 包含每个请求的加密公钥。
您需要为每个请求存储私钥,并使用这些私钥对您从钱包应用收到的令牌进行身份验证和授权。
集成的 OpenID4VP 元数据
设置凭证请求的格式时,您必须在 client_metadata 对象中添加 gw_rp_metadata_bytes 字段(如以下示例请求代码所示)。此字段包含 Google 钱包所需的 Base64URL 编码的依赖方元数据,用于验证您的身份并向用户显示您的品牌信息。
凭证请求载荷
requestJson 中的 credential_request 参数包含以下字段。
特定凭证
{
  "response_type": "vp_token",
  "response_mode": "dc_api.jwt", // change this to dc_api if you want to demo with a non encrypted response.
  "nonce": "1234",
  "dcql_query": {
    "credentials": [
      {
        "id": "cred1",
        "format": "mso_mdoc",
        "meta": {
          // Use org.iso.18013.5.1.mDL for mDL,
          // com.google.wallet.idcard.1 for ID pass, or
          // org.iso.23220.photoid.1 for ID pass (using photo ID document type)
          "doctype_value": "org.iso.18013.5.1.mDL"
        },
        "claims": [
          {
            "path": [
              "org.iso.18013.5.1",
              "family_name"
            ],
            "intent_to_retain": false // set this to true if you are saving the value of the field
          },
          {
            "path": [
              "org.iso.18013.5.1",
              "given_name"
            ],
            "intent_to_retain": false
          },
          {
            "path": [
              "org.iso.18013.5.1",
              "age_over_18"
            ],
            "intent_to_retain": false
          }
        ]
      }
    ]
  },
  "client_metadata": {
    "jwks": {
      "keys": [ // sample request encryption key
        {
          "kty": "EC",
          "crv": "P-256",
          "x": "pDe667JupOe9pXc8xQyf_H03jsQu24r5qXI25x_n1Zs",
          "y": "w-g0OrRBN7WFLX3zsngfCWD3zfor5-NLHxJPmzsSvqQ",
          "use": "enc",
          "kid" : "1",  // This is required
          "alg" : "ECDH-ES",  // This is required
        }
      ]
    },
    "vp_formats_supported": {
      "mso_mdoc": {
        "deviceauth_alg_values": [
          -7
        ],
        "issuerauth_alg_values": [
          -7
        ]
      }
    },
    "gw_rp_metadata_bytes": "<base64url encoded metadata string>"
  }
}
任何符合条件的凭证
以下是 mDL、身份证件和身份证件(使用带照片的身份证件文档类型)的示例请求。用户可以继续使用其中任何一个。
{
  "response_type": "vp_token",
  "response_mode": "dc_api.jwt", // change this to dc_api if you want to demo with a non encrypted response.
  "nonce": "1234",
  "dcql_query": {
    "credentials": [
      {
        "id": "mdl-request",
        "format": "mso_mdoc",
        "meta": {
          "doctype_value": "org.iso.18013.5.1.mDL"
        },
        "claims": [
          {
            "path": [
              "org.iso.18013.5.1",
              "family_name"
            ],
            "intent_to_retain": false // set this to true if you are saving the value of the field
          },
          {
            "path": [
              "org.iso.18013.5.1",
              "given_name"
            ],
            "intent_to_retain": false
          },
          {
            "path": [
              "org.iso.18013.5.1",
              "age_over_18"
            ],
            "intent_to_retain": false
          }
        ]
      },
      {  // Credential type 2: ID pass
        "id": "id_pass-request",
        "format": "mso_mdoc",
        "meta": {
          "doctype_value": "com.google.wallet.idcard.1"
        },
        "claims": [
          {
            "path": [
              "org.iso.18013.5.1",
              "family_name"
            ],
            "intent_to_retain": false // set this to true if you are saving the value of the field
          },
          {
            "path": [
              "org.iso.18013.5.1",
              "given_name"
            ],
            "intent_to_retain": false
          },
          {
            "path": [
              "org.iso.18013.5.1",
              "age_over_18"
            ],
            "intent_to_retain": false
          }
        ]
      },
      {  // Credential type 3: ID pass (using photo ID document type)
        "id": "photo_id-request",
        "format": "mso_mdoc",
        "meta": {
          "doctype_value": "org.iso.23220.photoid.1"
        },
        "claims": [
          {
            "path": [
              "org.iso.23220.1",
              "family_name"
            ],
            "intent_to_retain": false // set this to true if you are saving the value of the field
          },
          {
            "path": [
              "org.iso.23220.1",
              "given_name"
            ],
            "intent_to_retain": false
          },
          {
            "path": [
              "org.iso.23220.1",
              "age_over_18"
            ],
            "intent_to_retain": false
          }
        ]
      }
    ]
    credential_sets : [
      {
        "options": [
          [ "mdl-request" ],
          [ "id_pass-request" ],
          [ "photo_id-request" ]
        ]
      }
    ]
  },
  "client_metadata": {
    "jwks": {
      "keys": [ // sample request encryption key
        {
          "kty": "EC",
          "crv": "P-256",
          "x": "pDe667JupOe9pXc8xQyf_H03jsQu24r5qXI25x_n1Zs",
          "y": "w-g0OrRBN7WFLX3zsngfCWD3zfor5-NLHxJPmzsSvqQ",
          "use": "enc",
          "kid" : "1",  // This is required
          "alg" : "ECDH-ES",  // This is required
        }
      ]
    },
    "vp_formats_supported": {
      "mso_mdoc": {
        "deviceauth_alg_values": [
          -7
        ],
        "issuerauth_alg_values": [
          -7
        ]
      }
    },
    "gw_rp_metadata_bytes": "<base64url encoded metadata string>"
  }
}
您可以从 Google 钱包中存储的任何身份凭证中请求任意数量的受支持属性。
签名请求
签名请求(JWT 安全授权请求)使用您的 PKI 基础设施,将可验证的凭证请求封装在经过加密签名的 JSON Web 令牌 (JWT) 中,从而确保请求的完整性并向 Google 钱包证明您的身份。
前提条件
在针对签名请求实现代码更改之前,请确保您已:
- 私钥:您需要使用私钥(例如椭圆曲线
ES256)对请求进行签名,该私钥在您的服务器上进行管理。如需以信赖方身份进行沙盒测试,请使用沙盒测试私钥。 - 证书:您需要一个从密钥对派生的标准 X.509 证书。
- 注册:确保您的公开证书(或验证器注册机构的根 CA)受 Google 钱包信任。
请求构建逻辑
在构建和签署 OpenID4VP 请求时,请密切注意每个字段所需的确切编码格式,混淆 base64 和 base64url 或填充 (=) 会导致签名或来源验证失败:
| 字段 | 必需的编码 / 格式 | 字符和内边距 |
|---|---|---|
client_id (x509_hash:<hash>) |
base64url(不带填充) | 使用可在网址中安全使用的字母表(-、_);去除尾随的 = |
expected_origins (android:apk-key-hash:<hash>) |
标准 base64(不含填充) | 使用标准字母表(+、/);去除尾随 = |
expected_origins (https://...) |
小写网址,不含尾随斜杠 | 示例:https://example.com(末尾没有 /) |
x5c JWS 标头 |
标准 base64(带填充) | 使用标准字母表(+、/);保留尾随 = 填充 |
如需构建请求,请使用您的私钥并将载荷封装在 JWS 中:
def construct_openid4vp_request(
    doctypes: list[str],
    requested_fields: list[dict],
    nonce_base64: str,
    jwe_encryption_public_jwk: jwk.JWK,
    is_zkp_request: bool,
    is_signed_request: bool,
    state: dict,
    origin: str
) -> dict:

    # ... [Existing logic to build 'presentation_definition' and basic 'request_payload'] ...

    # ------------------------------------------------------------------
    # SIGNED REQUEST IMPLEMENTATION (JAR)
    # ------------------------------------------------------------------
    if is_signed_request:
        try:
            # 1. Load the Verifier's Certificate
            # We must load the PEM string into a cryptography x509 object
            verifier_cert_obj = x509.load_pem_x509_certificate(
                CERTIFICATE.encode('utf-8'),
                backend=default_backend()
            )

            # 2. Calculate Client ID (x509_hash)
            # We calculate the SHA-256 hash of the DER-encoded certificate.
            cert_der = verifier_cert_obj.public_bytes(serialization.Encoding.DER)
            verifier_fingerprint_bytes = hashlib.sha256(cert_der).digest()

            # Important: Use URL-safe Base64 (base64url: '-', '_') without padding ('=') for client_id
            verifier_fingerprint_b64 = base64.urlsafe_b64encode(verifier_fingerprint_bytes).decode('utf-8').rstrip("=")

            # Format the client_id as required by the spec
            client_id = f'x509_hash:{verifier_fingerprint_b64}'

            # 3. Update Request Payload with JAR specific fields
            request_payload["client_id"] = client_id

            # Explicitly set expected origins to prevent relay attacks
            # Important: Use standard Base64 (not URL-safe) without padding for android:apk-key-hash:
            # origin = f"android:apk-key-hash:{base64.b64encode(apk_cert_hash).decode('utf-8').rstrip('=')}"
            # Format for web origin (lowercase URL without trailing slash): origin = "https://example.com"
            if origin:
                request_payload["expected_origins"] = [origin]

            # 4. Create Signed JWT (JWS)
            # Load the signing private key
            signing_key = jwk.JWK.from_pem(PRIVATE_KEY.encode('utf-8'))

            # Initialize JWS with the JSON payload
            jws_token = jws.JWS(json.dumps(request_payload).encode('utf-8'))

            # Construct the JOSE Header
            # 'x5c' (X.509 Certificate Chain) is critical: it allows the wallet
            # to validate your key against the one registered in the console.
            # Important: Use standard Base64 ('+', '/') WITH padding ('=') for x5c
            x5c_value = base64.b64encode(cert_der).decode('utf-8')

            protected_header = {
                "alg": "ES256",                 # Algorithm (e.g., ES256 or RS256)
                "typ": "oauth-authz-req+jwt",   # Standard type for JAR
                "kid": "1",                     # Key ID
                "x5c": [x5c_value]              # Embed the certificate
            }

            # Sign the token
            jws_token.add_signature(
                key=signing_key,
                alg=None,
                protected=json_encode(protected_header)
            )

            # 5. Return the Request Object
            # Instead of returning the raw JSON, we return the signed JWT string
            # under the 'request' key.
            return {"request": jws_token.serialize(compact=True)}

        except Exception as e:
            print(f"Error signing OpenID4VP request: {e}")
            return None

    # ... [Fallback for unsigned requests] ...
    return request_payload
第 B 步:触发 API(客户端)
整个 API 请求应在服务器端生成。根据平台,将生成的 JSON 传递到平台 API。
应用内(Android)
如需从 Android 应用请求身份凭据,请按以下步骤操作:
更新依赖项
在项目的 build.gradle 中,更新您的依赖项以使用 Credential Manager(Beta 版):
dependencies {
    implementation("androidx.credentials:credentials:1.5.0-beta01")
    implementation("androidx.credentials:credentials-play-services-auth:1.5.0-beta01")
}
配置 Credential Manager
如需配置和初始化 CredentialManager 对象,请添加类似于以下内容的逻辑:
// Use your app or activity context to instantiate a client instance of CredentialManager.
val credentialManager = CredentialManager.create(context)
请求身份属性
应用不会为身份请求指定单独的参数,而是将这些参数作为 JSON 字符串一起提供给 CredentialOption。Credential Manager 会将此 JSON 字符串传递给可用的数字钱包,而不会检查其内容。然后,每个钱包负责:
- 解析 JSON 字符串以了解身份请求。
- 确定其存储的哪些凭据(如果有)满足请求。
我们建议合作伙伴在服务器上创建请求,即使是 Android 应用集成也是如此。
您将使用设置请求格式并为其签名中的 requestJson 作为 GetDigitalCredentialOption() 函数调用中的 request。
// The request in the JSON format to conform with
// the JSON-ified Digital Credentials API request definition.
val requestJson = generateRequestFromServer()
val digitalCredentialOption =
    GetDigitalCredentialOption(requestJson = requestJson)

// Use the option from the previous step to build the `GetCredentialRequest`.
val getCredRequest = GetCredentialRequest(
    listOf(digitalCredentialOption)
)

coroutineScope.launch {
    try {
        val result = credentialManager.getCredential(
            context = activityContext,
            request = getCredRequest
        )
        verifyResult(result)
    } catch (e : GetCredentialException) {
        handleFailure(e)
    }
}
处理凭证响应
收到钱包的响应后,验证响应是否成功并包含 credentialJson 响应:
// Handle the successfully returned credential.
fun verifyResult(result: GetCredentialResponse) {
    val credential = result.credential
    when (credential) {
        is DigitalCredential -> {
            val responseJson = credential.credentialJson
            validateResponseOnServer(responseJson) // make a server call to validate the response
        }
        else -> {
            // Catch any unrecognized credential type here.
            Log.e(TAG, "Unexpected type of credential ${credential.type}")
        }
    }
}

// Handle failure.
fun handleFailure(e: GetCredentialException) {
  when (e) {
        is GetCredentialCancellationException -> {
            // The user intentionally canceled the operation and chose not
            // to share the credential.
        }
        is GetCredentialInterruptedException -> {
            // Retry-able error. Consider retrying the call.
        }
        is NoCredentialException -> {
            // No credential was available.
        }
        else -> Log.w(TAG, "Unexpected exception type ${e::class.java}")
    }
}
credentialJson 响应包含由 W3C 定义的加密 identityToken (JWT)。钱包应用负责创建此响应。
示例:
{
  "protocol" : "openid4vp-v1-signed",
  "data" : {
    <encrypted_response>
  }
}
将此响应传回您的服务器,以验证其真实性。请参阅解密和验证响应。
Web
如需在 Chrome 或其他受支持的浏览器上使用 Digital Credentials API 请求身份凭证,请发出以下请求:
const credentialResponse = await navigator.credentials.get({
          digital : {
          requests : [
            {
              protocol: "openid4vp-v1-signed",
              data: {<credential_request>} // This is an object, shouldn't be a string.
            }
          ]
        }
      })
将此 API 的响应发送回您的服务器,以验证凭证响应。
第 C 步:解密并验证响应(服务器端)
钱包返回加密的 identityToken (JWT) 后,您必须先执行严格的服务器端验证,然后才能信任这些数据。
解密响应
使用与请求的 client_metadata 中发送的公钥对应的私钥来解密 JWE。这会产生 vp_token。
Python 示例:
from jwcrypto import jwe, jwk

# Retrieve the Private Key from Datastore
reader_private_jwk = jwk.JWK.from_json(jwe_private_key_json_str)
# Save public key thumbprint for session transcript
encryption_public_jwk_thumbprint = reader_private_jwk.thumbprint()


# Decrypt the JWE encrypted response from Google Wallet
jwe_object = jwe.JWE()
jwe_object.deserialize(encrypted_jwe_response_from_wallet)
jwe_object.decrypt(reader_private_jwk)
decrypted_payload_bytes = jwe_object.payload
decrypted_data = json.loads(decrypted_payload_bytes)
decrypted_data 将生成包含凭据的 vp_token JSON:
{
  "vp_token":
  {
    "cred1": ["<base64UrlNoPadding_encoded_credential>"] // This applies to OpenID4VP 1.0 spec.
  }
}
重构 SessionTranscript 并验证 DeviceResponse
- 使用 Android 或 Web 专用切换结构,根据 ISO/IEC 18013-5:2021 创建 SessionTranscript:
SessionTranscript = [
  null,                // DeviceEngagementBytes not available
  null,                // EReaderKeyBytes not available
  [
    "OpenID4VPDCAPIHandover",
    AndroidHandoverDataBytes   // BrowserHandoverDataBytes for Web
  ]
]
对于 Android 和 Web 切换,请使用您用于生成 credential_request 的同一 nonce。
Android 切换
AndroidHandoverData = [
  origin,             // "android:apk-key-hash:<base64SHA256_ofAppSigningCert>",
  nonce,           // nonce that was used to generate credential request,
  encryption_public_jwk_thumbprint,  // Encryption public key (JWK) Thumbprint
]

AndroidHandoverDataBytes = hashlib.sha256(cbor2.dumps(AndroidHandoverData)).digest()
浏览器切换
BrowserHandoverData =[
  origin,               // Origin URL
  nonce,               //  nonce that was used to generate credential request
  encryption_public_jwk_thumbprint,  // Encryption public key (JWK) Thumbprint
]

BrowserHandoverDataBytes = hashlib.sha256(cbor2.dumps(BrowserHandoverData)).digest()
使用 SessionTranscript 时,必须根据 ISO/IEC 18013-5:2021 第 9 条验证设备响应。
此验证包括四项检查:
- 检查颁发者证书:从
issuerAuth中提取颁发者的签名证书链,并根据可信 IACA 根证书对其进行验证。请参阅支持的签发机构和 IACA 证书(使用沙盒测试 ID 进行测试时,请添加 Utopia 沙盒证书)。 - 验证 MSO 签名(ISO/IEC 18013-5 第 9.1.2 节)。
- 计算并检查数据元素的
ValueDigests(ISO/IEC 18013-5 第 9.1.2 节)。 - 验证
deviceSignature签名(ISO/IEC 18013-5 第 9.1.3 节)。
{
  "version": "1.0",
  "documents": [
    {
      "docType": "org.iso.18013.5.1.mDL",
      "issuerSigned": {
        "nameSpaces": {...}, // contains data elements
        "issuerAuth": [...]  // COSE_Sign1 w/ issuer PK, mso + sig
      },
      "deviceSigned": {
        "nameSpaces": 24(<< {} >>), // empty
        "deviceAuth": {
          "deviceSignature": [...] // COSE_Sign1 w/ device signature
        }
      }
    }
  ],
  "status": 0
}
第 D 步(可选):可保护隐私的年龄验证 (ZKP)
如需支持零知识证明(例如,在不查看用户确切出生日期的情况下验证用户是否年满 18 周岁),请将请求格式更改为 mso_mdoc_zk,并提供所需的 zk_system_type 配置。
如需大致了解 ZKP 及其功能,请参阅常见问题解答。
  ...
  "dcql_query": {
    "credentials": [{
      "id": "cred1",
      "format": "mso_mdoc_zk",
      "meta": {
        "doctype_value": "org.iso.18013.5.1.mDL"
        "zk_system_type": [
        {
          "system": "longfellow-libzk-v1",
          "circuit_hash": "f88a39e561ec0be02bb3dfe38fb609ad154e98decbbe632887d850fc612fea6f", // This will differ if you need more than 1 attribute.
          "num_attributes": 1, // number of attributes (in claims) this has can support
          "version": 5,
          "block_enc_hash": 4096,
          "block_enc_sig": 2945,
        }
        {
          "system": "longfellow-libzk-v1",
          "circuit_hash": "137e5a75ce72735a37c8a72da1a8a0a5df8d13365c2ae3d2c2bd6a0e7197c7c6", // This will differ if you need more than 1 attribute.
          "num_attributes": 1, // number of attributes (in claims) this has can support
          "version": 6,
          "block_enc_hash": 4096,
          "block_enc_sig": 2945,
        }
       ],
       "verifier_message": "challenge"
      },
     "claims": [{
         ...
      "client_metadata": {
        "jwks": {
          "keys": [ // sample request encryption key
            {
              ...
您将从钱包中收到加密的零知识证明。您可以使用 Google 的 longfellow-zk 库,根据颁发机构 IACA 证书验证此证明。
verifier-service 包含一个基于 Docker 的服务器,该服务器已准备好部署,可让您根据颁发者 IACA 证书验证响应。
您可以修改 certs.pem,以管理您要信任的 IACA 颁发者证书。
SDK、参考实现和支持
使用我们的开源库、参考服务器和 Web 验证工具来加快实现速度:
| 资源 / 库 | 它提供什么 | 链接 |
|---|---|---|
| 身份验证器参考实现 | 示例服务器和客户端,演示了 OpenID4VP 请求生成、JWS 签名、JWE 解密和 mdoc 响应验证。 | GitHub 代码库 |
| Multipaz SDK | 开源库 (OpenWallet Foundation),包括用于 CBOR 解码、SessionTranscript 重构和 ISO/IEC 18013-5/7 签名验证的 DeviceResponseParser。 |
openwallet-foundation/multipaz |
| Longfellow ZKP 库和验证器服务 | 开源库和基于 Docker 的服务器,用于验证零知识证明 (mso_mdoc_zk) 年龄和属性断言。 |
google/longfellow-zk |
| 互动式网站验证工具 | 托管式 Web 验证器,用于针对 Google 钱包测试 W3C 数字凭据 API / OpenID4VP 请求。 | verifier.multipaz.org |
| OpenID4VP 1.0 规范 | 官方 OpenID for Verifiable Presentations 1.0 协议规范。 | OpenID4VP 规范 |
| 常见问题解答和开发者支持 | 有关技术集成常见问题的解答,或发送电子邮件至 wallet-identity-rp-support@google.com 寻求调试帮助。 |
技术集成常见问题解答 |