Page Summary
-
Learn to import, convert, and preview 3D models (OBJ, glTF, FBX) in Android Studio using the Sceneform plugin.
-
The Sceneform plugin automatically generates *.sfa and *.sfb files from your source asset, streamlining the workflow.
-
Utilize custom materials or Sceneform's built-in options for enhanced visual control over your 3D models.
-
Easily build and attach a ModelRenderable to integrate your converted 3D assets into your AR scene.
Learn how to import 3D models, convert them into Sceneform format, and preview them in Android Studio.
Import a new 3D asset
Sceneform supports 3D assets in the following formats:
- OBJ
- glTF (animations not supported)
- FBX, with or without animations.
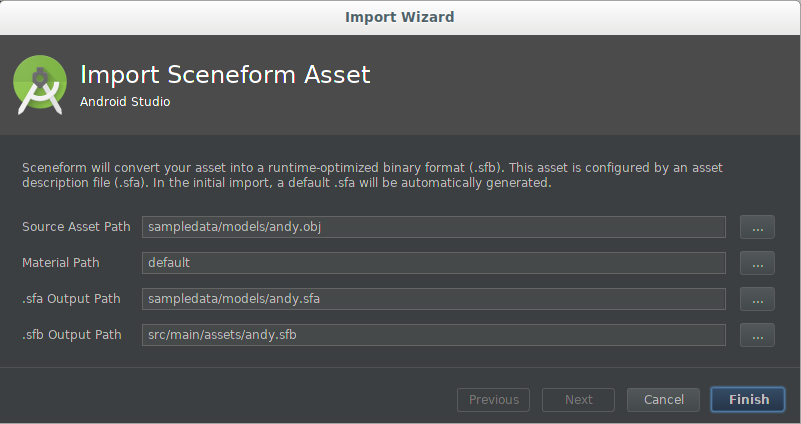
Follow these steps to import a new 3D asset:
Verify that your project's
appfolder contains asampledatafolder.To create the folder, right-click on the
appfolder in the Project window, then select New > Sample Data Directory.The
sampledatafolder is part of your Android Studio project, but its contents will not be included in your APK.Copy your 3D model source asset file (
*.obj,*.fbx, or*.gltf), and all of its dependencies (*.mtl,*.bin,*.png,*.jpg, etc.) into thesampledatafolder.Do not copy these source files into your project's
assetsorresfolder, as this will cause them to be included in your APK unnecessarily.Right click the 3D model source asset and select Import Sceneform Asset to begin the import process.
The values are used by the
sceneform.asset()entry in the app'sbuild.gradle, and determine where the*.sfaand*.sfbfiles will be generated in your project.If you're importing a model for the first time, use the default values.
Field Description Source Asset Path Filename of the OBJ, FBX, or glTF 3D model asset to import. Material Path defaulttells Sceneform's to use the built-in default material or the path to a custom material*.matfile.
.sfa Output Path Use the default, or specify another path under the sampledatafolder.The .sfa file is generated if missing. It can be modified to control some aspects of the import process.
This ensures that
*.sfaisn't included in your APK unncessarily..sfb Output Path By default the src/main/assets/folder is used, which allows the use of arbitrary asset filenames.If the filename (without file extension) is a valid resource identifier (e.g.
R.raw.filename), then you can instead use thesrc/main/res/raw/folder if you prefer.See Android's App resources overview for more on using the
assets/andres/folders in your app.Animation Files If you are importing
*.fbxanimation files, click the plus sign (+) and add the rest of the files individually.Click Finish to begin the import process.
To import your asset, the plugin does the following:
Adds the Sceneform gradle plugin to your project's
build.gradleif it doesn't already exist:dependencies { … classpath 'com.google.ar.sceneform:plugin:1.15.0' }Updates your app's
build.gradlefile to include anapply pluginline, and asceneform.asset()entry for the newly imported asset:apply plugin: 'com.google.ar.sceneform.plugin' sceneform.asset('sampledata/models/andy.obj', // 'Source Asset Path' specified during import. 'default', // 'Material Path' specified during import. 'sampledata/models/andy.sfa', // '.sfa Output Path' specified during import. 'src/main/res/raw/andy') // '.sfb Output Path' specified during import.These new entries in the app's
build.gradlecreate two gradle tasks:createAsset-<asset-name>creates a Sceneform asset definition (*.sfa) file if it does not yet exist.This task will not overwrite an existing
*.sfafile, which means any modifications you make to the SFA file after import won't be overwritten.The
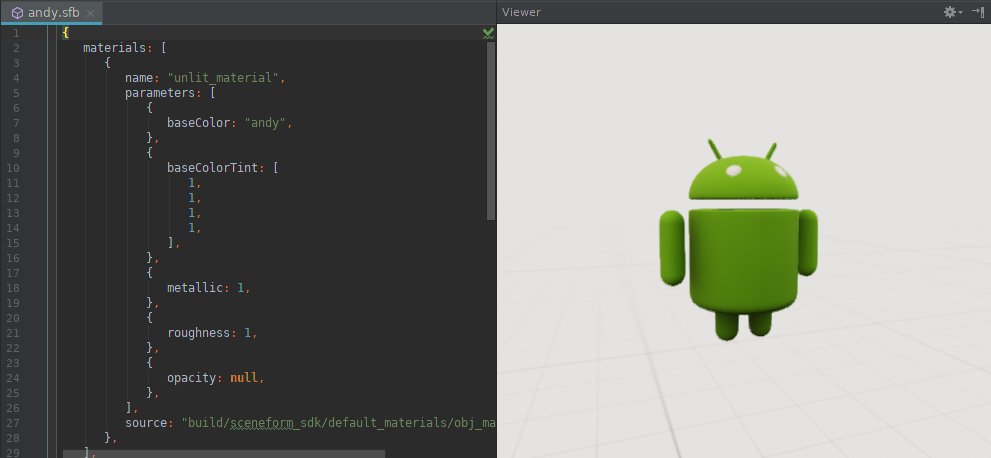
*.sfafile is a text file that contains a complete, human-readable description of the asset's import settings. It references the models and textures in your source asset, and also defines materials by providing material parameters for Sceneform's physically based materials.compileAsset-<asset-name>compiles the*.sfafile into a Sceneform binary asset (*.sfb) file.This
*.sfbfile gets built into your app's APK and is loaded at runtime to create the renderable.
For more information, see the Sceneform Gradle Plugin reference.
Opens the
*.sfain a text window and the*.sfbin a Viewer window.
Update a previously imported 3D asset
When you update a previously imported OBJ, FBX, or glTF model source asset file
(*.obj, *.fbx, or *.gltf), the corresponding sceneform.asset() entry in
your app's build.gradle causes the plugin to automatically generate an
updated *.sfb file, based on the current *.sfa parameters.
To iterate on the parameters for an already imported asset:
- Modify the
*.sfatext file, using the SFA file format reference as a guide. - Save your changes. This causes the asset to be recompiled and updates the
*.sfbfile. - Preview the updated asset by double-clicking the
*.sfbfile to open the asset Viewer window.
If you are updating a previously imported asset that includes animation data,
import each of the updated *.fbx files individually using the plus (+) sign
in the Animation Files section of the import dialog.
Gradle asset definitions
The import process adds any *.fbx animation files at the end of the
build.gradle file.
sceneform.asset('sampledata/models/andy_dance.fbx',
'default',
'sampledata/models/andy_dance.sfa',
'src/main/res/raw/andy_dance',
['sampledata/models/andy_wave_r.fbx',
'sampledata/models/andy_wave_l.fbx'])
Create the Renderable
Once the asset is compiled into *.sfb format, you can build a
ModelRenderable
and attach it to a node in the scene as follows:
ModelRenderable.builder()
    // To load as an asset from the 'assets' folder ('src/main/assets/andy.sfb'):
    .setSource(this, Uri.parse("andy.sfb"))

    // Instead, load as a resource from the 'res/raw' folder ('src/main/res/raw/andy.sfb'):
    //.setSource(this, R.raw.andy)

    .build()
    .thenAccept(renderable -> andyRenderable = renderable)
    .exceptionally(
        throwable -> {
          Log.e(TAG, "Unable to load Renderable.", throwable);
          return null;
    });
Using custom materials
Sceneform's default materials make it easy for developers to get great looking results. You can also use custom materials to deeply customize the way your assets look.
To assign a custom material to your asset:
Create a custom material definition (
*.mat) file, using the [Custom Material Reference](/sceneform/develop/custom-material as a guide.Apply the custom material to the asset:
When importing a new asset:
- Specify the custom material
*.matfile during the import process.
To update a previously imported asset:
If the
*.sfacontents have not been customized, delete the existing*.sfaand*.sfbfiles and thesceneform.asset()entry in the app'sbuild.gradle, then reimport the asset. This ensures that the regenerated*.sfaattributes and material parameters will match the ones supported by your custom material.To preserve any
*.sfacustomizations you've made, open the*.sfafile and change thesourceattribute to the path to your custom material*.matfile, then manually adjust the*.sfaattributes and material parameters to match your custom material.
- Specify the custom material