

Place Search कॉम्पोनेंट
जगहों की जानकारी देने वाली यूआई किट का Place Search कॉम्पोनेंट, किसी जगह की खोज के नतीजों को सूची में दिखाता है.
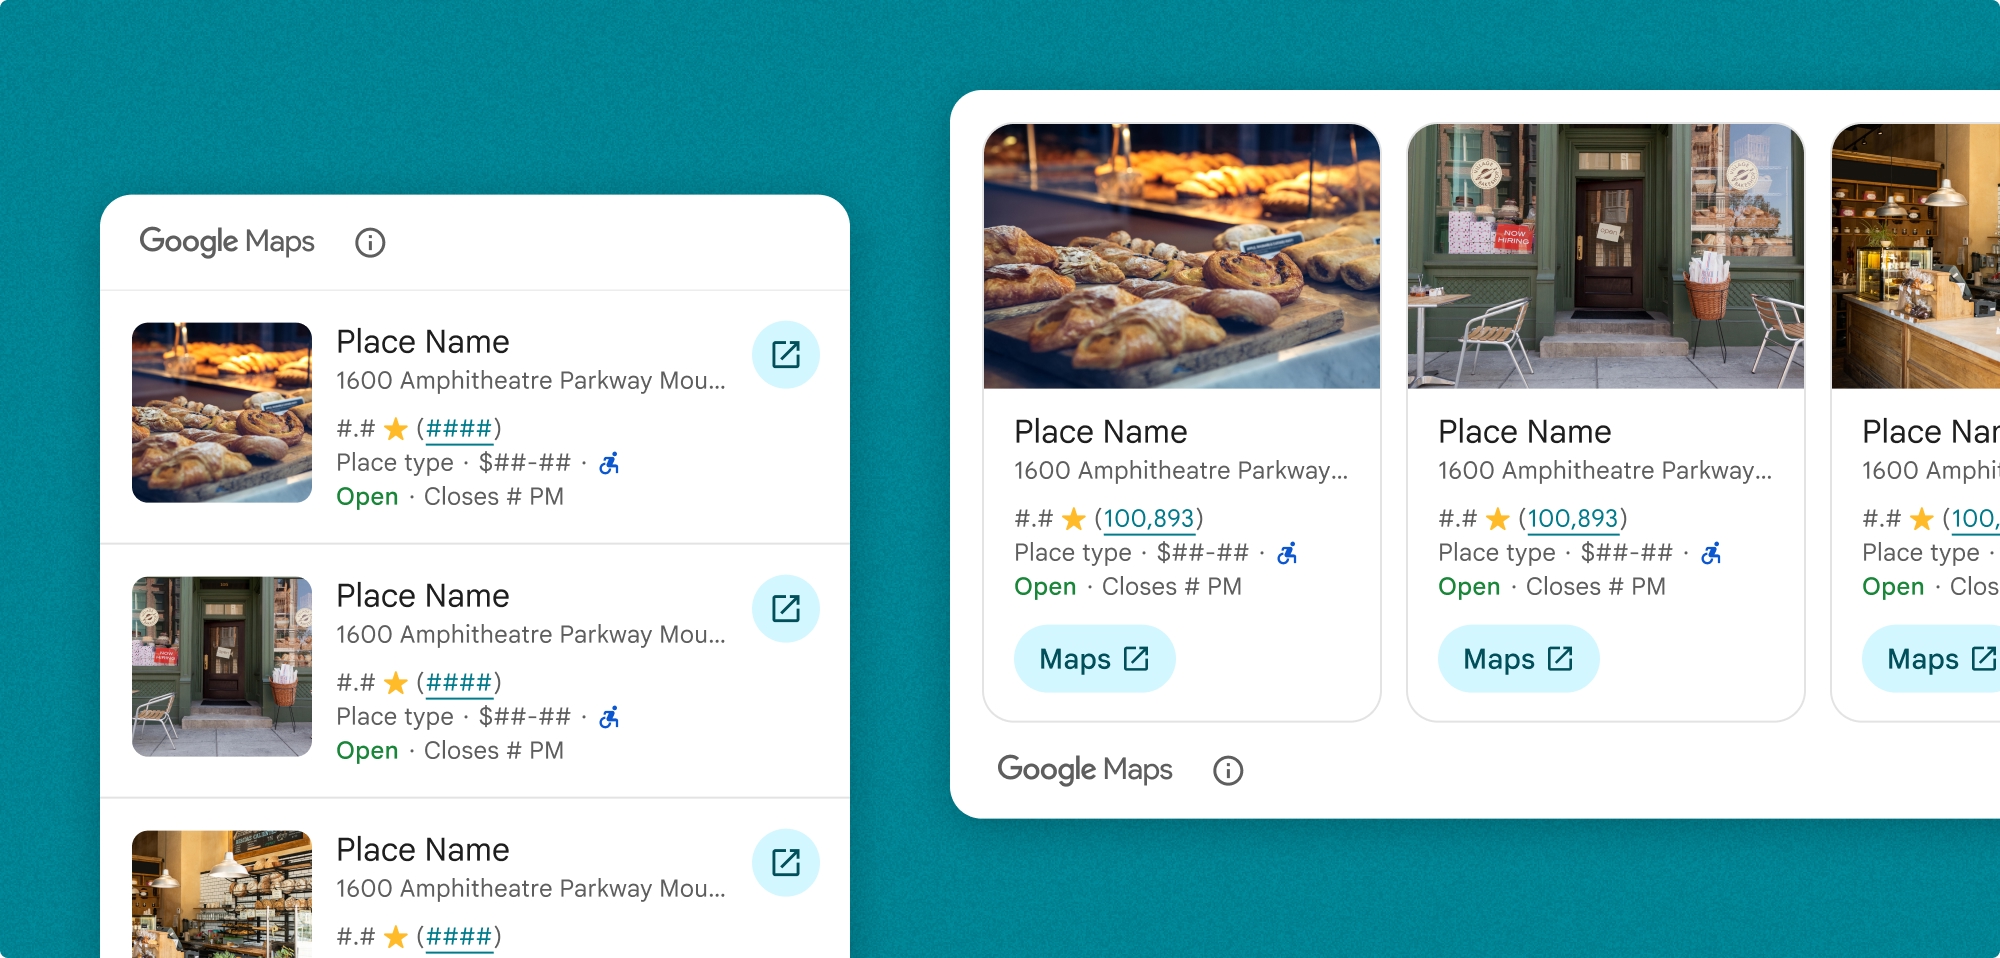
Place Search सूची को अपनी पसंद के मुताबिक बनाया जा सकता है. यह तय करने पर:
- दिखाया जाने वाला कॉन्टेंट
- वर्टिकल ओरिएंटेशन में मीडिया का साइज़
- टेक्स्ट में काट-छांट
- ओरिएंटेशन
- थीम को बदलने की सुविधा, जो आपके ब्रैंड और ऐप्लिकेशन की डिज़ाइन लैंग्वेज से मेल खाती हो
- एट्रिब्यूशन की पोज़िशन
- क्या किसी जगह को चुना जा सकता है
SearchByTextRequest या SearchNearbyRequest में से किसी एक को लागू करने के लिए, अनुरोध को अपनी पसंद के मुताबिक बनाया जा सकता है.
बिलिंग
SearchByTextRequest() या PlaceSearchViewRequest() एट्रिब्यूट की बाइंडिंग वैल्यू में बदलाव होने पर, आपसे हर बार शुल्क लिया जाता है.
अपने ऐप्लिकेशन में Place Search जोड़ना
PlaceSearchView class का इस्तेमाल करके, जगह की जानकारी खोजने वाला विजेट जोड़ें.
Swift
PlaceSearchView(
      orientation: .horizontal, // default is vertical
      request: $placeSearchViewRequest,
      configuration: configuration
)
जब आपको अपने ऐप्लिकेशन में टेक्स्ट खोज या आस-पास की जगह की खोज का नतीजा लोड करना हो, तब PlaceSearchViewRequest वैल्यू अपडेट करें.
Swift
// use placeSearchViewRequest = .searchNearby(...) to  configure a searchNearby request

  @State private var let placeSearchViewRequest = .searchByText(
    SearchByTextRequest(
      textQuery: "Googleplex",
      placeProperties: [.all],
      locationBias: CircularCoordinateRegion(
        center: CLLocationCoordinate2D(latitude: 0, longitude: 0),
        radius: 0
      )
    )
  )
इसके अलावा, कॉम्पोनेंट लोड होने, जगह चुने जाने या कॉम्पोनेंट लोड करने में गड़बड़ी होने पर, आपको कॉलबैक मिल सकते हैं. हालांकि, ऐसा करना ज़रूरी नहीं है.
Swift
.onLoad { places in
  print("places: \(places)")
}
.onRequestError { error in
  print("error: \(error)")
}
.onPlaceSelected { place in
  print("place: \(place)")
}
Place Search कॉम्पोनेंट को पसंद के मुताबिक बनाना
कॉन्टेंट को पसंद के मुताबिक बनाना
आपको यह तय करना होगा कि आपका कॉम्पोनेंट कौनसा कॉन्टेंट दिखाएगा.इस उदाहरण में, कॉम्पोनेंट को जगह का पता और रेटिंग दिखाने के लिए कॉन्फ़िगर किया गया है.
Swift
private let configuration = PlaceSearchConfiguration(
    content: [.address(), .rating()]
)
आपके पास, जगह के हिसाब से खोज करने की सुविधा वाले कॉम्पोनेंट में दिखने वाले कॉन्टेंट को अपनी पसंद के मुताबिक बनाने का विकल्प भी होता है. इसके लिए, इन पहलुओं को अपनी पसंद के मुताबिक बनाया जा सकता है:
content: कॉम्पोनेंट में दिखाया गया कॉन्टेंट.mediaSize: फ़्रैगमेंट के वर्टिकल ओरिएंटेशन में फ़ोटो का साइज़. डिफ़ॉल्ट रूप से, यह छोटा होता है. कॉन्टेंट में बताया गया हो.preferTruncation: इससे यह तय किया जाता है कि जगह की जानकारी वाले हर व्यू के टेक्स्ट को छोटा करना है या नहीं. डिफ़ॉल्ट वैल्यू, गलत पर सेट होती है.theme: आपकी कस्टम थीम, जो PlacesMaterialTheme से इनहेरिट करती है. थीम के बारे में ज़्यादा जानें.attributionPosition: Google Maps एट्रिब्यूशन को कॉम्पोनेंट के सबसे ऊपर या सबसे नीचे दिखाना है या नहीं. डिफ़ॉल्ट वैल्यू .top होती है.selectable: इससे पता चलता है कि सूची में मौजूद हर जगह को चुना जा सकता है या नहीं. अगर इसे चुना जा सकता है, तो किसी जगह को चुनने के बादonPlaceSelectedclosure को कॉल किया जाएगा. डिफ़ॉल्ट वैल्यू, गलत पर सेट होती है.
PlaceSearchConfiguration में, पसंद के मुताबिक बनाने के लिए कॉन्फ़िगरेशन जोड़ें.
Swift
private let configuration = PlaceSearchConfiguration(
    content: [.address, .rating, .media(size: .large)],
    preferTruncation: true, // default is false
    theme: PlacesMaterialTheme(),
    attributionPosition: .bottom, // default is top
    selectable: true // default is false
)
ओरिएंटेशन को पसंद के मुताबिक बनाना
डिफ़ॉल्ट ओरिएंटेशन वर्टिकल होता है. PlaceSearchView में हॉरिज़ॉन्टल ओरिएंटेशन तय किया जा सकता है.
Swift
PlaceSearchView(
      orientation: .horizontal, // default is vertical
      request: $placeSearchViewRequest,
      configuration: configuration
)
थीम को पसंद के मुताबिक बनाना
आपके पास ऐसी थीम तय करने का विकल्प होता है जो स्टाइल एट्रिब्यूट की किसी भी डिफ़ॉल्ट वैल्यू को बदल देती है. डिफ़ॉल्ट वैल्यू PlacesMaterialTheme है.
थीमिंग के बारे में ज़्यादा जानने के लिए, पसंद के मुताबिक स्टाइलिंग सेक्शन देखें.
जगहों की जानकारी देने वाली यूआई किट में, गहरे रंग वाली थीम डिफ़ॉल्ट रूप से उपलब्ध होती है. इसलिए, आपको गहरे और हल्के रंग वाली, दोनों थीम को पसंद के मुताबिक बनाना पड़ सकता है. गहरे रंग वाली थीम को पसंद के मुताबिक बनाने के लिए, कस्टम थीम में .dark और attribution.darkModeColor की वैल्यू जोड़ें.
उदाहरण
Place Search कॉम्पोनेंट जोड़ना
Swift
struct PlaceSearchDemoView: View {
  private let configuration = PlaceSearchConfiguration(
    content: [.address(), .rating(), .type(), .media(size: .large)],
    preferTruncation: true,  // default is false
    theme: PlacesMaterialTheme(),
    attributionPosition: .bottom,  // default is top
    selectable: true  // default is false
  )
  // can also do let placeSearchViewRequest = .searchNearby(...) to  configure a searchNearby request
  @State private var placeSearchViewRequest: PlaceSearchViewRequest = .searchByText(
    SearchByTextRequest(
      textQuery: "Googleplex",
      placeProperties: [.all],
      locationBias: CircularCoordinateRegion(
        center: CLLocationCoordinate2D(latitude: 0, longitude: 0),
        radius: 0
      )
    )
  )
  var body: some View {
    PlaceSearchView(
      orientation: .horizontal,  // default is vertical
      request: $placeSearchViewRequest,
      configuration: configuration
    )
    .onLoad { places in
      print("places: \(places)")
    }
    .onRequestError { error in
      print("error: \(error)")
    }
    .onPlaceSelected { place in
      print("place: \(place)")
    }
  }
}
थीम को पसंद के मुताबिक बनाना
जगहों की जानकारी देने वाली यूआई किट में, गहरे रंग वाली थीम डिफ़ॉल्ट रूप से उपलब्ध होती है. इसलिए, आपको गहरे और हल्के रंग वाली, दोनों थीम को पसंद के मुताबिक बनाना पड़ सकता है. गहरे रंग वाली थीम को पसंद के मुताबिक बनाने के लिए, अपनी कस्टम थीम में .dark और attribution.darkModeColor की वैल्यू जोड़ें.
Swift
@Environment(\.colorScheme) var colorScheme
var theme: PlacesMaterialTheme {
    if customTheme {
      var theme = PlacesMaterialTheme()
      var color = PlacesMaterialColor()
      color.surface = (colorScheme == .dark ? .blue : .gray)
      color.outlineDecorative = (colorScheme == .dark ? .white : .black)
      color.onSurface = (colorScheme == .dark ? .yellow : .red)
      color.onSurfaceVariant = (colorScheme == .dark ? .white : .blue)
      color.onSecondaryContainer = (colorScheme == .dark ? .white : .red)
      color.secondaryContainer = (colorScheme == .dark ? .green : .purple)
      color.positive = (colorScheme == .dark ? .yellow : .red)
      color.primary = (colorScheme == .dark ? .yellow : .purple)
      color.info = (colorScheme == .dark ? .yellow : .purple)
      var shape = PlacesMaterialShape()
      shape.cornerRadius = 10
      var font = PlacesMaterialFont()
      font.labelLarge = .system(size: UIFontMetrics.default.scaledValue(for: 18))
      font.headlineMedium = .system(size: UIFontMetrics.default.scaledValue(for: 15))
      font.bodyLarge = .system(size: UIFontMetrics.default.scaledValue(for: 15))
      font.bodyMedium = .system(size: UIFontMetrics.default.scaledValue(for: 12))
      font.bodySmall = .system(size: UIFontMetrics.default.scaledValue(for: 11))
      var attribution = PlacesMaterialAttribution()
      attribution.lightModeColor = .black
      attribution.darkModeColor = .white
      theme.color = color
      theme.shape = shape
      theme.font = font
      theme.attribution = attribution
    } else {
      return PlacesMaterialTheme()
    }
}