
Komponent Informacje o miejscu
Komponent Informacje o miejscu w Places UI Kit umożliwia dodanie do aplikacji pojedynczego komponentu interfejsu, który wyświetla szczegółowe informacje o miejscu. Ten komponent można dostosować.
Komponent Informacje o miejscu może być używany niezależnie lub w połączeniu z innymi interfejsami API i usługami Google Maps Platform. Komponent przyjmuje identyfikator miejsca, nazwę zasobu lub współrzędne geograficzne i zwraca wyrenderowane informacje o miejscu.
Komponent Informacje o miejscu jest w pełni konfigurowalny, co pozwala dostosować czcionki, kolory i promienie zaokrąglenia do konkretnego przypadku użycia i wytycznych dotyczących marki. Wygląd informacji o miejscu możesz dostosować, tworząc motyw, który rozszerza PlacesMaterialTheme i zastępuje atrybuty motywu. Możesz też dostosować, które pola informacji o miejscu mają być uwzględnione, określając listę wpisów Content, z których każdy odpowiada fragmentowi informacji wyświetlanych o miejscu.
Warianty układu
Komponent Informacje o miejscu obsługuje 2 główne warianty układu:
- Kompaktowy: układ do wyświetlania podglądu najważniejszych informacji.
- Pełny: kompleksowy układ wyświetlający wszystkie dostępne informacje o miejscu.
Układ kompaktowy można wyświetlać w orientacji pionowej lub poziomej. Dzięki temu możesz zintegrować komponent z różnymi układami i rozmiarami ekranu. Układ pełny można wyświetlać tylko w orientacji pionowej.

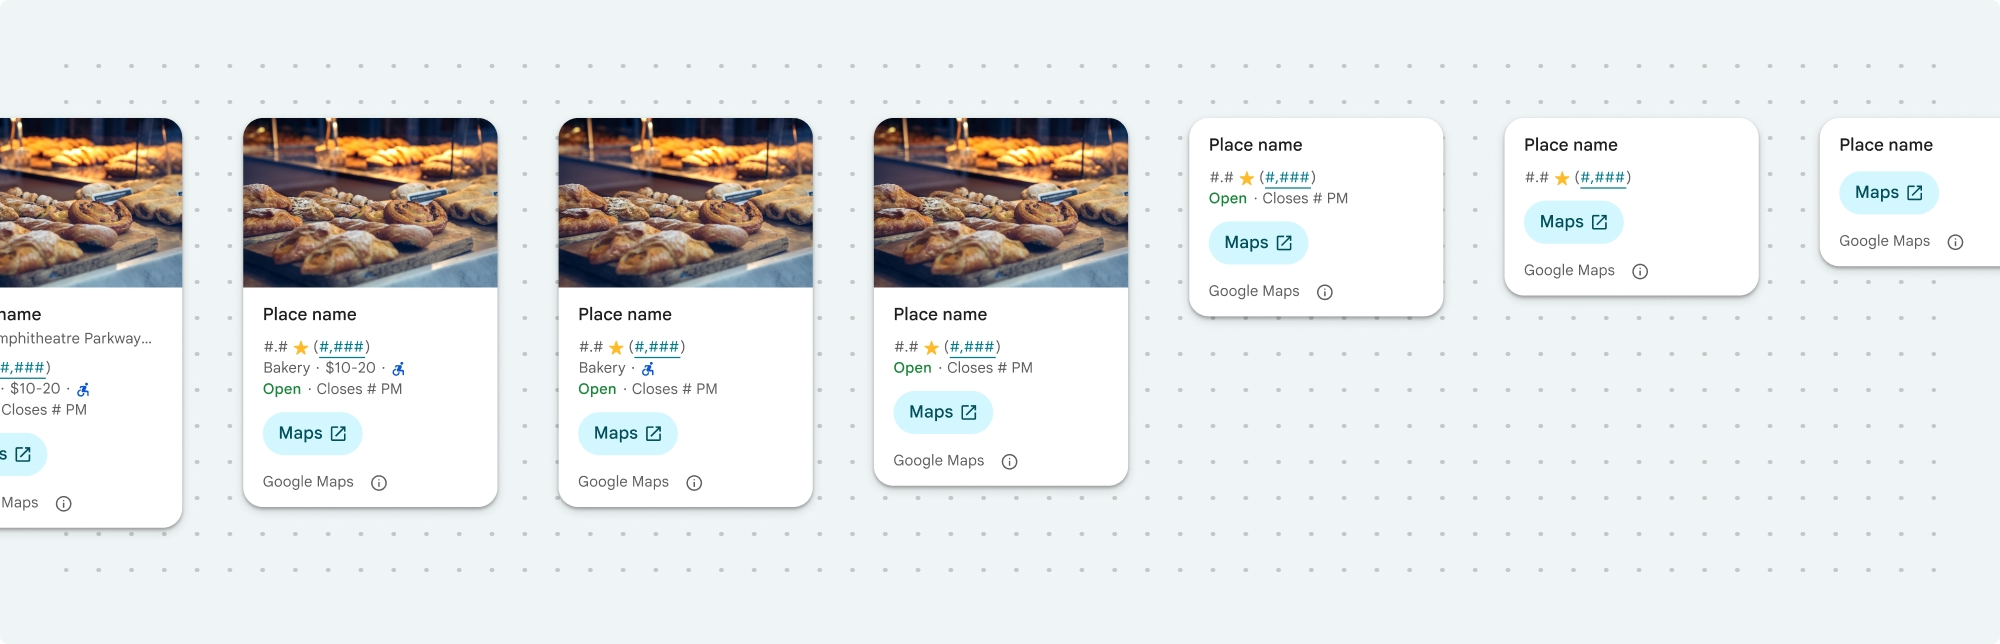
Komponent Informacje o miejscu umożliwia precyzyjne kontrolowanie treści wyświetlanych w komponencie. Każdy element (np. zdjęcia, opinie i informacje kontaktowe) można osobno wyświetlać lub ukrywać, co pozwala na dokładne dostosowanie wyglądu komponentu i gęstości informacji.
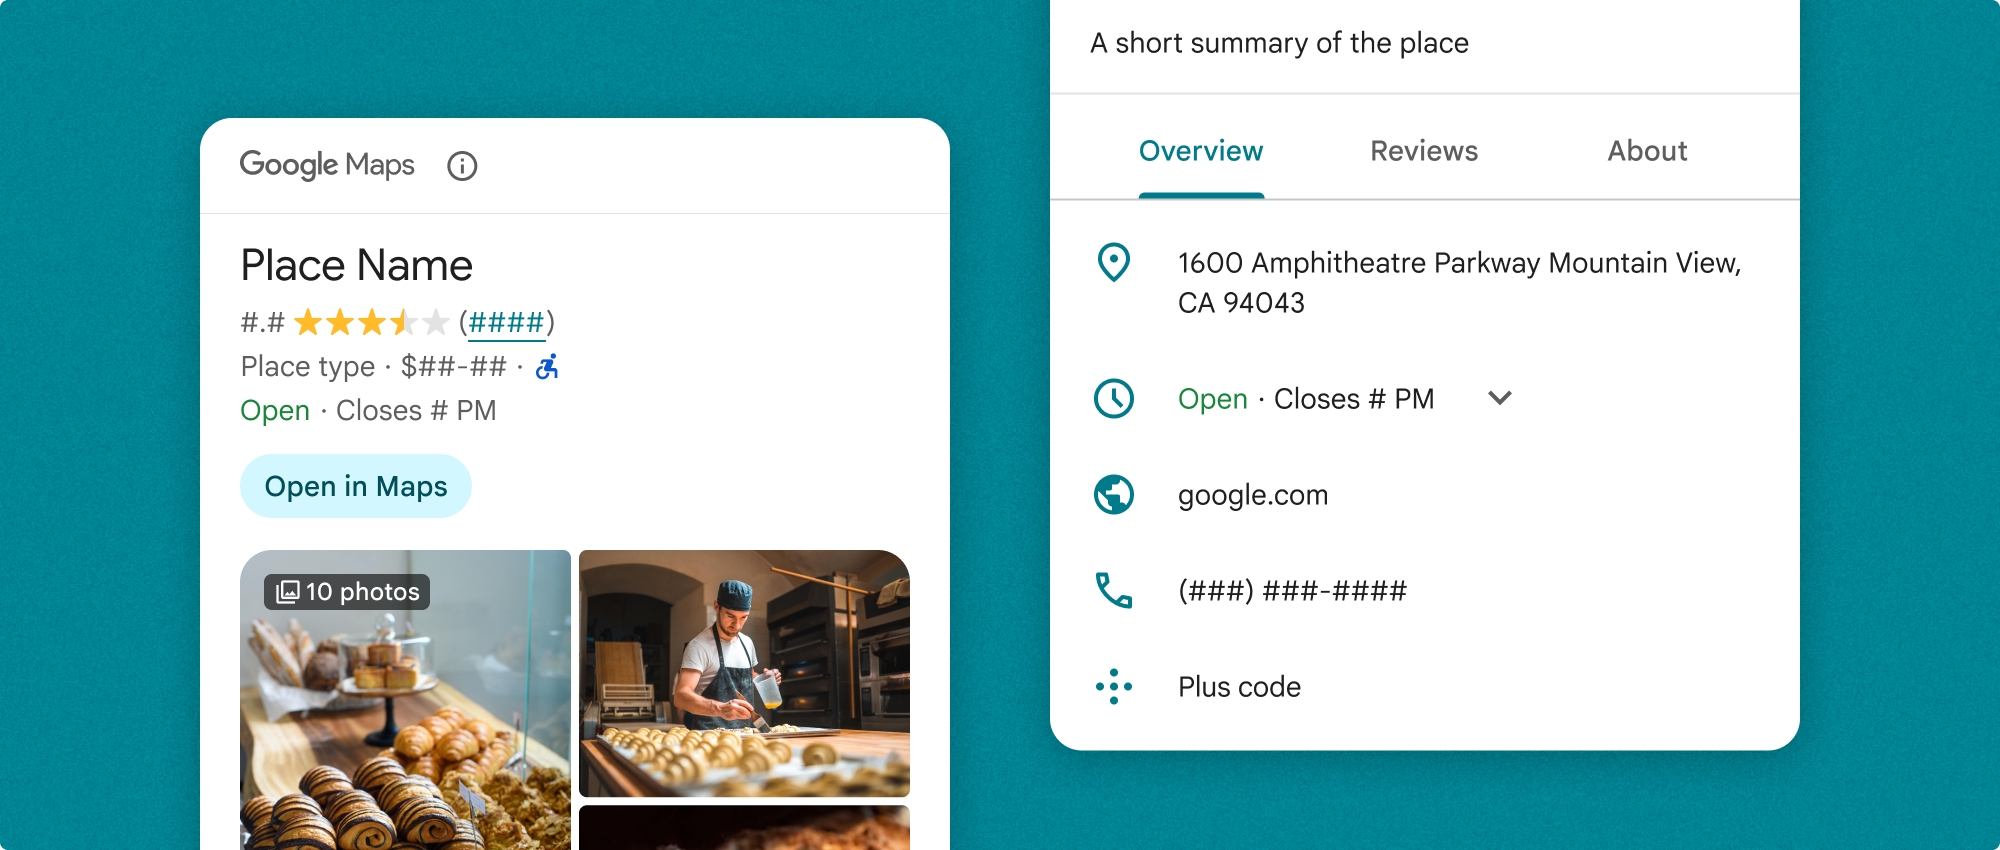
Widok kompaktowy informacji o miejscu
Kompaktowy fragment informacji o miejscu (PlaceDetailsCompactFragment) renderuje szczegóły wybranego miejsca, zajmując minimalną ilość miejsca. Może to być przydatne w oknie informacyjnym wyróżniającym miejsce na mapie, w mediach społecznościowych, np. podczas udostępniania lokalizacji na czacie, jako sugestia wyboru bieżącej lokalizacji lub w artykule w mediach, aby odwołać się do miejsca w Mapach Google.
Pełny widok informacji o miejscu
Pełny widok informacji o miejscu (PlaceDetailsFragment) zapewnia większą powierzchnię do wyświetlania szczegółowych informacji o miejscu i umożliwia wyświetlanie większej liczby typów informacji.
Opcje wyświetlania treści
Możesz określić, które treści mają być wyświetlane, używając wyliczeń w PlaceDetailsCompactFragment.Content lub PlaceDetailsFragment.Content.
| Widok kompaktowy | Pełny widok |
|---|---|
|
|
Płatności
Gdy używasz Places UI Kit, opłata jest naliczana za każdym razem, gdy wywoływana jest metoda .loadWithPlaceId(), .loadWithResourceName() lub loadWithCoordinates(). Jeśli to samo miejsce zostanie wczytane kilka razy, opłata zostanie naliczona za każde żądanie.
Aby uniknąć wielokrotnego naliczania opłat, nie dodawaj bezpośrednio metod .loadWithPlaceId() ani .loadWithResourceName() w metodach cyklu życia Androida. Na przykład nie wywołuj bezpośrednio metod .loadWithPlaceId() ani .loadWithResourceName() w metodzie onResume().
Dodawanie informacji o miejscu do aplikacji
Informacje o miejscu możesz dodać do aplikacji, dodając fragment do układu. Podczas tworzenia instancji fragmentu możesz dostosować wygląd informacji o miejscu do swoich potrzeb i wyglądu aplikacji. Więcej informacji o dostosowywaniu.
W Kotlinie i Javie masz do dyspozycji 3 metody: jedną do wczytywania fragmentu z identyfikatorem miejsca (loadWithPlaceId()), jedną do wczytywania fragmentu z nazwą zasobu (loadWithResourceName()) i jedną do wczytywania fragmentu ze współrzędnymi geograficznymi (loadWithCoordinates()). Możesz wybrać dowolną metodę lub kilka z nich.
Domyślna pozycja widoku kompaktowego to pionowa. Jeśli chcesz użyć układu poziomego, określ Orientation.HORIZONTAL. Możesz też opcjonalnie określić Orientation.VERTICAL w celu uniknięcia wątpliwości. Pełny widok można wyświetlać tylko w orientacji pionowej.
Przykłady znajdziesz w sekcji Przykłady komponentu Informacje o miejscu.
Dostosowywanie wyglądu
Dostosowywanie stylu
Możesz dostosować kolory, typografię, odstępy, obramowania i rogi komponentu Informacje o miejscu.
Places UI Kit oferuje podejście do dostosowywania wyglądu oparte na systemie projektowania, które jest oparte na Material Design (z pewnymi modyfikacjami specyficznymi dla Map Google). Informacje o kolorach i typografii znajdziesz w dokumentacji Material Design. Domyślnie styl jest zgodny z językiem wizualnym Map Google.
Places UI Kit domyślnie udostępnia ciemny motyw, więc może być konieczne dostosowanie zarówno ciemnego, jak i jasnego motywu. Aby dostosować ciemny motyw, dodaj wpis koloru w values-night/colors.xml.
Więcej informacji o stylach znajdziesz w sekcji Dostosowywanie stylu.
Dostosowywanie szerokości i wysokości
Widoki kompaktowe
Zalecane szerokości:
- Orientacja pionowa: od 180 dp do 300 dp.
- Orientacja pozioma: od 180 dp do 500 dp.
Szerokości mniejsze niż 160 dp mogą być wyświetlane nieprawidłowo.
Sprawdzoną metodą jest nieustawianie wysokości widoków kompaktowych. Dzięki temu wysokość okna będzie mogła być ustawiana przez treść, co umożliwi wyświetlenie wszystkich informacji.
Pełne widoki
W przypadku pełnych widoków zalecana szerokość to od 250 dp do 450 dp. Szerokość mniejsza niż 250 dp może być wyświetlana nieprawidłowo.
Możesz ustawić wysokość komponentu: pionowy widok informacji o miejscu będzie się przewijać w pionie w przydzielonym miejscu.
Sprawdzoną metodą jest ustawianie wysokości pełnych widoków. Dzięki temu treść w oknie będzie się prawidłowo przewijać.
Przykłady komponentu Informacje o miejscu
Tworzenie widoku kompaktowego lub pełnego
Kotlin
        // We create a new instance of the fragment using its factory method.
        // We can specify which content to show, the orientation, and a custom theme.
        val fragment = PlaceDetailsCompactFragment.newInstance(
            PlaceDetailsCompactFragment.ALL_CONTENT, // Show all available content.
            orientation,
            R.style.CustomizedPlaceDetailsTheme,
        ).apply {
            // The PlaceLoadListener provides callbacks for when the place data is successfully
            // loaded or when an error occurs. This is where we update our UI state.
            setPlaceLoadListener(object : PlaceLoadListener {
                override fun onSuccess(place: Place) {
                    Log.d(TAG, "Place loaded: ${place.id}")
                    // Once the data is loaded, we hide the loading indicator and show the fragment.
                    binding.loadingIndicatorMain.visibility = View.GONE
                    binding.placeDetailsContainer.visibility = View.VISIBLE
                    binding.dismissButton.visibility = View.VISIBLE
                }

                override fun onFailure(e: Exception) {
                    Log.e(TAG, "Place failed to load", e)
                    // On failure, we hide the UI and notify the user.
                    dismissPlaceDetails()
                    Toast.makeText(this@MainActivity, "Failed to load place details.", Toast.LENGTH_SHORT).show()
                }
            })
        }

        // We add the fragment to our layout's container view.
        // `commitNow()` is used to ensure the fragment is immediately added and available,
        // which is important because we need to call a method on it right after.
        supportFragmentManager
            .beginTransaction()
            .replace(binding.placeDetailsContainer.id, fragment)
            .commitNow()

        // **This is the key step**: After adding the fragment, we call `loadWithPlaceId`
        // to trigger the data loading process for the selected place.
        // We use `post` to ensure this runs after the layout has been measured,
        // which can prevent potential timing issues.
        binding.root.post {
            fragment.loadWithPlaceId(placeId)
        }
    }
Java
PlaceDetailsCompactFragment fragment =
  PlaceDetailsCompactFragment.newInstance(
        Orientation.HORIZONTAL,
        Arrays.asList(Content.ADDRESS, Content.TYPE, Content.RATING, Content.ACCESSIBLE_ENTRANCE_ICON),
        R.style.CustomizedPlaceDetailsTheme);

fragment.setPlaceLoadListener(
  new PlaceLoadListener() {
        @Override public void onSuccess(Place place) { ... }

        @Override public void onFailure(Exception e) { ... }
});

getSupportFragmentManager()
      .beginTransaction()
      .add(R.id.fragment_container, fragment)
      .commitNow();

// Load the fragment with a Place ID.
fragment.loadWithPlaceId(placeId);

// Load the fragment with a resource name.
fragment.loadWithResourceName(resourceName);
Ten pełny przykład kodu programowo określa orientację widoku kompaktowego na podstawie konfiguracji urządzenia użytkownika.
Kotlin
package com.example.placedetailsuikit

import android.Manifest
import android.annotation.SuppressLint
import android.content.pm.PackageManager
import android.content.res.Configuration
import android.location.Location
import android.os.Bundle
import android.util.Log
import android.view.View
import android.widget.Toast
import androidx.activity.enableEdgeToEdge
import androidx.activity.result.ActivityResultLauncher
import androidx.activity.result.contract.ActivityResultContracts
import androidx.activity.viewModels
import androidx.appcompat.app.AppCompatActivity
import androidx.core.app.ActivityCompat
import androidx.lifecycle.ViewModel
import com.example.placedetailsuikit.databinding.ActivityMainBinding
import com.google.android.gms.location.FusedLocationProviderClient
import com.google.android.gms.location.LocationServices
import com.google.android.gms.maps.CameraUpdateFactory
import com.google.android.gms.maps.GoogleMap
import com.google.android.gms.maps.OnMapReadyCallback
import com.google.android.gms.maps.SupportMapFragment
import com.google.android.gms.maps.model.LatLng
import com.google.android.gms.maps.model.PointOfInterest
import com.google.android.libraries.places.api.Places
import com.google.android.libraries.places.api.model.Place
import com.google.android.libraries.places.widget.PlaceDetailsCompactFragment
import com.google.android.libraries.places.widget.PlaceLoadListener
import com.google.android.libraries.places.widget.model.Orientation

private const val TAG = "PlacesUiKit"

/**
 * A simple ViewModel to store UI state that needs to survive configuration changes.
 * In this case, it holds the ID of the selected place. Using a ViewModel is good practice
 * as it prevents data loss during events like screen rotation, ensuring a
 * seamless user experience.
 */
class MainViewModel : ViewModel() {
    var selectedPlaceId: String? = null
}

/**
 * This activity serves as a basic example of integrating the Place Details UI Kit.
 * It demonstrates the fundamental steps required:
 * 1. Setting up a Google Map.
 * 2. Requesting location permissions to center the map.
 * 3. Handling clicks on Points of Interest (POIs) to get a Place ID.
 * 4. Using the Place ID to load and display place details in a [PlaceDetailsCompactFragment].
 */
class MainActivity : AppCompatActivity(), OnMapReadyCallback, GoogleMap.OnPoiClickListener {
    // ViewBinding provides type-safe access to views defined in the XML layout,
    // eliminating the need for `findViewById` and preventing null pointer exceptions.
    private lateinit var binding: ActivityMainBinding
    private var googleMap: GoogleMap? = null

    // The FusedLocationProviderClient is the main entry point for interacting with the
    // fused location provider, which intelligently manages the underlying location technologies.
    private lateinit var fusedLocationClient: FusedLocationProviderClient

    // Using registerForActivityResult is the modern, recommended approach for handling
    // permission requests. It decouples the request from the handling logic, making the
    // code cleaner and easier to manage compared to the older `onRequestPermissionsResult` callback.
    private lateinit var requestPermissionLauncher: ActivityResultLauncher<Array<String>>

    // The `by viewModels()` delegate provides a lazy-initialized ViewModel scoped to this Activity.
    // This ensures that we get the same ViewModel instance across configuration changes.
    private val viewModel: MainViewModel by viewModels()

    override fun onCreate(savedInstanceState: Bundle?) {
        super.onCreate(savedInstanceState)

        // The ActivityResultLauncher is initialized here. The lambda defines the callback
        // that will be executed once the user responds to the permission dialog.
        requestPermissionLauncher =
            registerForActivityResult(ActivityResultContracts.RequestMultiplePermissions()) { permissions ->
                // We check if either fine or coarse location permission was granted.
                if (permissions[Manifest.permission.ACCESS_FINE_LOCATION] == true || permissions[Manifest.permission.ACCESS_COARSE_LOCATION] == true) {
                    Log.d(TAG, "Location permission granted by user.")
                    fetchLastLocation()
                } else {
                    // If permission is denied, we inform the user and default to a known location.
                    // This ensures the app remains functional even without location access.
                    Log.d(TAG, "Location permission denied by user.")
                    Toast.makeText(
                        this,
                        "Location permission denied. Showing default location.",
                        Toast.LENGTH_LONG
                    ).show()
                    moveToSydney()
                }
            }

        // enableEdgeToEdge() allows the app to draw behind the system bars for a more immersive experience.
        enableEdgeToEdge()
        binding = ActivityMainBinding.inflate(layoutInflater)
        setContentView(binding.root)

        binding.dismissButton.setOnClickListener {
            dismissPlaceDetails()
        }

        // --- Crucial: Initialize Places SDK ---
        // It's essential to initialize the Places SDK before making any other Places API calls.
        // This should ideally be done once, for example, in the Application's `onCreate`.
        val apiKey = BuildConfig.PLACES_API_KEY
        if (apiKey.isEmpty() || apiKey == "YOUR_API_KEY") {
            // A valid API key is required for the Places SDK to function.
            Log.e(TAG, "No api key")
            Toast.makeText(
                this,
                "Add your own API_KEY in local.properties",
                Toast.LENGTH_LONG
            ).show()
            finish()
            return
        }

        // `initializeWithNewPlacesApiEnabled` is used to opt-in to the new SDK version.
        Places.initializeWithNewPlacesApiEnabled(applicationContext, apiKey)

        fusedLocationClient = LocationServices.getFusedLocationProviderClient(this)
        // ------------------------------------

        // The SupportMapFragment is the container for the map. `getMapAsync` allows us to
        // work with the GoogleMap object via a callback once it's fully initialized.
        val mapFragment =
            supportFragmentManager.findFragmentById(R.id.map_fragment) as SupportMapFragment?
        mapFragment?.getMapAsync(this)

        // This block handles restoration after a configuration change (e.g., screen rotation).
        // If a place was selected before the rotation, its ID is stored in the ViewModel.
        // We use this ID to immediately show the details fragment again.
        if (viewModel.selectedPlaceId != null) {
            viewModel.selectedPlaceId?.let { placeId ->
                Log.d(TAG, "Restoring PlaceDetailsFragment for place ID: $placeId")
                showPlaceDetailsFragment(placeId)
            }
        }
    }

    /**
     * This callback is triggered when the GoogleMap object is ready to be used.
     * All map setup logic should be placed here.
     */
    override fun onMapReady(map: GoogleMap) {
        Log.d(TAG, "Map is ready")
        googleMap = map
        // Setting the OnPoiClickListener allows us to capture user taps on points of interest.
        googleMap?.setOnPoiClickListener(this)

        // After the map is ready, we determine the initial camera position based on location permissions.
        if (isLocationPermissionGranted()) {
            fetchLastLocation()
        } else {
            requestLocationPermissions()
        }
    }

    /**
     * A helper function to centralize the check for location permissions.
     */
    private fun isLocationPermissionGranted(): Boolean {
        return ActivityCompat.checkSelfPermission(
            this,
            Manifest.permission.ACCESS_FINE_LOCATION
        ) == PackageManager.PERMISSION_GRANTED ||
                ActivityCompat.checkSelfPermission(
                    this,
                    Manifest.permission.ACCESS_COARSE_LOCATION
                ) == PackageManager.PERMISSION_GRANTED
    }

    /**
     * This function triggers the permission request flow. The result is handled by the
     * ActivityResultLauncher defined in `onCreate`.
     */
    private fun requestLocationPermissions() {
        Log.d(TAG, "Requesting location permissions.")
        requestPermissionLauncher.launch(
            arrayOf(
                Manifest.permission.ACCESS_FINE_LOCATION,
                Manifest.permission.ACCESS_COARSE_LOCATION
            )
        )
    }

    /**
     * Fetches the device's last known location. This is a fast and battery-efficient way
     * to get a location fix. It should only be called after verifying permissions.
     */
    @SuppressLint("MissingPermission")
    private fun fetchLastLocation() {
        // Double-checking permissions here is a good practice, although the call sites are already guarded.
        if (isLocationPermissionGranted()) {
            fusedLocationClient.lastLocation
                .addOnSuccessListener { location: Location? ->
                    if (location != null) {
                        val userLocation = LatLng(location.latitude, location.longitude)
                        googleMap?.moveCamera(CameraUpdateFactory.newLatLngZoom(userLocation, 13f))
                        Log.d(TAG, "Moved to user's last known location.")
                    } else {
                        // `lastLocation` can be null if the location has never been recorded.
                        // In this case, we fall back to a default location.
                        Log.d(TAG, "Last known location is null. Falling back to Sydney.")
                        moveToSydney()
                    }
                }
                .addOnFailureListener {
                    // This listener handles errors in the location fetching process.
                    Log.e(TAG, "Failed to get location.", it)
                    moveToSydney()
                }
        }
    }

    /**
     * Moves the map camera to a default, hardcoded location (Sydney).
     * This serves as a reliable fallback.
     */
    private fun moveToSydney() {
        val sydney = LatLng(-33.8688, 151.2093)
        googleMap?.moveCamera(CameraUpdateFactory.newLatLngZoom(sydney, 13f))
        Log.d(TAG, "Moved to Sydney")
    }

    /**
     * This is the callback for the `OnPoiClickListener`. It's triggered when a user
     * taps a POI on the map.
     */
    override fun onPoiClick(poi: PointOfInterest) {
        val placeId = poi.placeId
        Log.d(TAG, "Place ID: $placeId")

        // We save the selected place ID to the ViewModel. This is critical for surviving
        // configuration changes. If the user rotates the screen now, the `onCreate`
        // method will be able to restore the place details view.
        viewModel.selectedPlaceId = placeId
        showPlaceDetailsFragment(placeId)
    }

    /**
     * This function is the core of the integration. It creates, configures, and displays
     * the [PlaceDetailsCompactFragment].
     * @param placeId The unique identifier for the place to be displayed.
     */
    private fun showPlaceDetailsFragment(placeId: String) {
        Log.d(TAG, "Showing PlaceDetailsFragment for place ID: $placeId")

        // We manage the visibility of UI elements to provide feedback to the user.
        // The wrapper is shown, and a loading indicator is displayed while the data is fetched.
        binding.placeDetailsWrapper.visibility = View.VISIBLE
        binding.dismissButton.visibility = View.GONE
        binding.placeDetailsContainer.visibility = View.GONE
        binding.loadingIndicatorMain.visibility = View.VISIBLE

        // The Place Details widget can be displayed vertically or horizontally.
        // We dynamically choose the orientation based on the device's current configuration.
        val orientation =
            if (resources.configuration.orientation == Configuration.ORIENTATION_LANDSCAPE) {
                Orientation.HORIZONTAL
            } else {
                Orientation.VERTICAL
            }


        // We create a new instance of the fragment using its factory method.
        // We can specify which content to show, the orientation, and a custom theme.
        val fragment = PlaceDetailsCompactFragment.newInstance(
            PlaceDetailsCompactFragment.ALL_CONTENT, // Show all available content.
            orientation,
            R.style.CustomizedPlaceDetailsTheme,
        ).apply {
            // The PlaceLoadListener provides callbacks for when the place data is successfully
            // loaded or when an error occurs. This is where we update our UI state.
            setPlaceLoadListener(object : PlaceLoadListener {
                override fun onSuccess(place: Place) {
                    Log.d(TAG, "Place loaded: ${place.id}")
                    // Once the data is loaded, we hide the loading indicator and show the fragment.
                    binding.loadingIndicatorMain.visibility = View.GONE
                    binding.placeDetailsContainer.visibility = View.VISIBLE
                    binding.dismissButton.visibility = View.VISIBLE
                }

                override fun onFailure(e: Exception) {
                    Log.e(TAG, "Place failed to load", e)
                    // On failure, we hide the UI and notify the user.
                    dismissPlaceDetails()
                    Toast.makeText(this@MainActivity, "Failed to load place details.", Toast.LENGTH_SHORT).show()
                }
            })
        }

        // We add the fragment to our layout's container view.
        // `commitNow()` is used to ensure the fragment is immediately added and available,
        // which is important because we need to call a method on it right after.
        supportFragmentManager
            .beginTransaction()
            .replace(binding.placeDetailsContainer.id, fragment)
            .commitNow()

        // **This is the key step**: After adding the fragment, we call `loadWithPlaceId`
        // to trigger the data loading process for the selected place.
        // We use `post` to ensure this runs after the layout has been measured,
        // which can prevent potential timing issues.
        binding.root.post {
            fragment.loadWithPlaceId(placeId)
        }
    }


    /**
     * Hides the place details view and clears the selected place ID from the ViewModel.
     */
    private fun dismissPlaceDetails() {
        binding.placeDetailsWrapper.visibility = View.GONE
        // Clearing the ID in the ViewModel is important so that if the user rotates the
        // screen after dismissing, the details view doesn't reappear.
        viewModel.selectedPlaceId = null
    }

    override fun onDestroy() {
        super.onDestroy()
        // It's a good practice to nullify references to objects that have a lifecycle
        // tied to the activity, like the GoogleMap object, to prevent potential memory leaks.
        googleMap = null
    }
}
Tworzenie motywu
Podczas tworzenia instancji fragmentu możesz określić motyw, który zastąpi dowolne domyślne atrybuty stylu. Wszystkie atrybuty motywu, które nie są zastępowane, używają domyślnych stylów. Jeśli chcesz obsługiwać ciemny motyw, możesz dodać wpis koloru w values-night/colors.xml.
Places UI Kit domyślnie udostępnia ciemny motyw, więc może być konieczne dostosowanie zarówno ciemnego, jak i jasnego motywu. Aby dostosować ciemny motyw, dodaj wpis koloru w values-night/colors.xml.
  <style name="CustomizedPlaceDetailsTheme" parent="PlacesMaterialTheme">
    <item name="placesColorPrimary">@color/app_primary_color</item>
    <item name="placesColorOnSurface">@color/app_color_on_surface</item>
    <item name="placesColorOnSurfaceVariant">@color/app_color_on_surface</item>

    <item name="placesTextAppearanceBodySmall">@style/app_text_appearence_small</item>

    <item name="placesCornerRadius">20dp</item>
  </style>
Używanie standardowych treści
Ten przykład używa standardowych treści.
  val fragmentStandardContent = PlaceDetailsCompactFragment.newInstance(
    PlaceDetailsCompactFragment.STANDARD_CONTENT,
    orientation,
    R.style.CustomizedPlaceDetailsTheme
  )
Dostosowywanie konkretnych treści
Ten przykład wybiera tylko opcje Content adresu, wejścia dostępnego dla niepełnosprawnych i multimediów w widoku kompaktowym oraz renderuje je za pomocą CustomizedPlaceDetailsTheme.
  val placeDetailsFragment = PlaceDetailsCompactFragment.newInstance(
    orientation,
    listOf(
        Content.ADDRESS,
        Content.ACCESSIBLE_ENTRANCE,
        Content.MEDIA
    ),
    R.style.CustomizedPlaceDetailsTheme
)
Używanie wszystkich treści
Ten przykład używa wszystkich Content opcji widoku kompaktowego.
  val fragmentAllContent = PlaceDetailsCompactFragment.newInstance(
    orientation,
    PlaceDetailsCompactFragment.ALL_CONTENT,
    R.style.CustomizedPlaceDetailsTheme
  )