Styl mapy to zestaw wizualnych dostosowań elementów mapy, które możesz powiązać z identyfikatorem mapy. Następnie odwołujesz się do identyfikatora mapy w kodzie aplikacji, aby wyświetlić dostosowaną mapę.
Styl mapy możesz utworzyć przed uzyskaniem identyfikatora mapy, ale aby go używać, musisz powiązać go z identyfikatorem mapy. Aby użyć stylu mapy, musisz wykonać wszystkie te czynności:
W konsoli Google Cloud otwórz Style map i w razie potrzeby wybierz projekt.
W sekcji Style map kliknij Utwórz styl.
W oknie dialogowym na karcie Style Google wybierz jedną z tych opcji:
Jasny, aby utworzyć jasny styl mapy, w którym typ mapy to mapa drogowa.
scienceCiemny, aby utworzyć ciemny styl mapy, w którym typ mapy to ciemna mapa drogowa.
(Opcjonalnie) Aby zastosować monochromatyczną odmianę stylu mapy, kliknij Monochromatyczny.
Aby utworzyć nowy styl bez nazwy, kliknij Dostosuj.
Wybierz elementy mapy i zmień ich styl, aby utworzyć odpowiedni styl mapy.
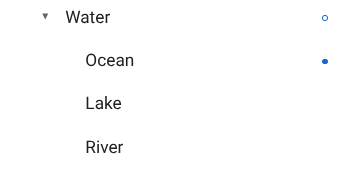
Funkcje mapy ze stylami niestandardowymi mają obok siebie niebieską kropkę. Jeśli dostosujesz styl podrzędny, styl nadrzędny będzie oznaczony niebieskim kółkiem. Więcej informacji o hierarchii stylów map znajdziesz w artykule Hierarchia i dziedziczenie stylów map.
Kliknij Zapisz.
W polu Zapisz i opublikuj styl mapy wpisz nazwę stylu i opcjonalnie opis, a następnie kliknij Zapisz.
Styl zostanie automatycznie opublikowany, a na ekranie pojawi się strona główna nowego stylu.
Duplikowanie stylu
Otwórz Style mapy i w razie potrzeby wybierz projekt.
Wybierz jeden z istniejących stylów.
Na stronie stylu kliknij Duplikuj.
W polu Duplicate Map Style (Duplikuj styl mapy) wpisz nową nazwę mapy i opcjonalnie opis.
Kliknij Zapisz.
Styl zostanie automatycznie opublikowany i zobaczysz stronę główną nowego stylu. Powiąż go z identyfikatorem mapy, aby używać go na swoich mapach. Szczegółowe informacje znajdziesz w artykule Powiązywanie identyfikatora mapy ze stylem mapy.
Jeśli chcesz zmodyfikować styl, kliknij Dostosuj, wprowadź zmiany i kliknij Zapisz.
Publikowanie stylu
Gdy po raz pierwszy utworzysz nowy styl mapy, pierwsza instancja nowego stylu mapy zostanie automatycznie opublikowana. Następnie zapisujesz zmiany jako wersję roboczą, a gdy uznasz, że są one odpowiednie, musisz je opublikować.
Wprowadź zmiany w stylu mapy lub zduplikowanym stylu mapy. Więcej informacji znajdziesz w artykule Zmiana stylu.
Aby zapisać zmiany jako wersję roboczą, kliknij Zapisz.
Gdy wszystko będzie gotowe do opublikowania i zastosowania zmian we wszystkich identyfikatorach map korzystających z tego stylu mapy, kliknij Opublikuj.
Opublikowane i robocze style mapy
Opublikowano: opublikowany styl mapy jest aktywny. Wszystkie mapy, które korzystają ze stylu mapy, wyświetlają jego opublikowaną wersję.
Wersja robocza: wersje robocze stylu mapy są w trakcie tworzenia i nie są wyświetlane na mapach, dopóki ich nie opublikujesz.
Zmienianie stylu
Jeśli chcesz wprowadzić zmiany w stylu mapy, możesz to zrobić bezpośrednio w edytorze stylów. Podczas aktualizowania stylu masz do wyboru 2 opcje:
Jeśli chcesz, aby zmiany zostały wprowadzone od razu, gdy będą gotowe: kliknij Dostosuj i wprowadź zmiany. Kliknij Zapisz, aby zapisać zmiany jako wersję roboczą, a potem kliknij Opublikuj, gdy wszystko będzie gotowe.
Jeśli chcesz najpierw przetestować zmiany w środowisku testowym: zamiast wprowadzać zmiany bezpośrednio w stylu mapy, najpierw go zduplikuj. Więcej informacji znajdziesz w sekcjach Duplikowanie stylu i Testowanie aktualizacji stylu mapy.
Po utworzeniu stylu mapy możesz wprowadzić w nim zmiany na stronie głównej stylu w jeden z tych sposobów:
Edytuj: kliknij Dostosuj.
Duplikuj: szczegółowe informacje znajdziesz w artykule Duplikowanie stylu.
Zmień nazwę: zmień nazwę stylu mapy.
Usuń: usuwa styl mapy.
Powiązywanie stylu z identyfikatorem mapy
Powiąż styl z identyfikatorem mapy, aby wyświetlać niestandardowy styl w witrynie i aplikacji. Z identyfikatorem mapy można powiązać tylko 1 jasny styl (typ mapy drogowej) i 1 scienceciemny styl (typ mapy drogowej w ciemnych kolorach).
Aby zmienić powiązany styl identyfikatora mapy, wykonaj te czynności w konsoli Google Cloud:
Kliknij Zarządzanie mapami i wybierz identyfikator mapy.
W sekcji Style mapy kliknij Zmień styl, aby wybrać jasny lub ciemny styl mapy.
W panelu wyświetlają się tylko style z jasnym typem mapy drogowej w przypadku jasnych stylów i tylko style z ciemnym typem mapy drogowej science w przypadku ciemnych stylów.
W panelu wybierz jeden ze stylów, który chcesz powiązać z tym identyfikatorem mapy.
Po mapie podglądu możesz poruszać się tak samo jak po każdej mapie Google:
Wpisz adres lub lokalizację w polu Wyszukaj adres.
Kliknij kompas, aby wyśrodkować mapę na swojej lokalizacji. Może być też konieczne przyznanie uprawnień do lokalizacji.
Przeciągnij, aby przenieść mapę.
Powiększ lub pomniejsz widok za pomocą przycisków plus (+) i minus (-).
Znajdowanie elementów mapy
Aby znaleźć element mapy, któremu chcesz nadać styl, możesz użyć filtra lub inspektora mapy.
Możesz też rozwijać i zwijać kategorie elementów mapy, aby znaleźć odpowiedni element. Przejrzyj listę elementów mapy, które możesz dostosować, na stronie Elementy mapy, które możesz dostosować.
Filtrowanie elementów mapy
Aby znaleźć funkcje mapy za pomocą filtra, w sekcji Funkcje mapy wpisz termin w polu Filtr.
Jeśli nie możesz znaleźć funkcji mapy:
Nie używaj liczby mnogiej. Wszystkie kategorie są w liczbie pojedynczej.
Spróbuj użyć bardziej ogólnego określenia funkcji. Na przykład zamiast „pizzeria” lub „fast food” wyszukaj „restauracja”.
Spróbuj użyć szerszej kategorii, a potem przejrzyj ją, aby znaleźć najbliższy element mapy. Na przykład zamiast „teatr” wyszukaj „rozrywka”.
Sprawdzanie elementów mapy
Aby znaleźć elementy mapy za pomocą inspektora mapy, wykonaj te czynności:
Kliknij lewym przyciskiem myszy dowolne miejsce na mapie, aby otworzyć inspektora mapy w tym punkcie.
Wybierz element mapy w inspektorze mapy, aby otworzyć go w panelu Funkcje mapy.
[[["Łatwo zrozumieć","easyToUnderstand","thumb-up"],["Rozwiązało to mój problem","solvedMyProblem","thumb-up"],["Inne","otherUp","thumb-up"]],[["Brak potrzebnych mi informacji","missingTheInformationINeed","thumb-down"],["Zbyt skomplikowane / zbyt wiele czynności do wykonania","tooComplicatedTooManySteps","thumb-down"],["Nieaktualne treści","outOfDate","thumb-down"],["Problem z tłumaczeniem","translationIssue","thumb-down"],["Problem z przykładami/kodem","samplesCodeIssue","thumb-down"],["Inne","otherDown","thumb-down"]],["Ostatnia aktualizacja: 2025-09-05 UTC."],[[["\u003cp\u003eA Map Style is a customizable set of visual elements applied to a map using a Map ID, which is referenced in your application code.\u003c/p\u003e\n"],["\u003cp\u003eMap Styles can be created by starting fresh, duplicating existing styles or versions, or importing JSON styling code.\u003c/p\u003e\n"],["\u003cp\u003eStyles exist as either published, live versions or drafts that can be edited and later published for use in your maps.\u003c/p\u003e\n"],["\u003cp\u003eYou can manage Map Styles by renaming, duplicating, deleting, associating with Map IDs, and restoring previous versions.\u003c/p\u003e\n"],["\u003cp\u003eTo utilize a Cloud-based Map Style in your application, associate the style with a Map ID and then add the Map ID to your app code.\u003c/p\u003e\n"]]],[],null,["Select platform: [Android](/maps/documentation/android-sdk/cloud-customization/map-styles \"View this page for the Android platform docs.\") [iOS](/maps/documentation/ios-sdk/cloud-customization/map-styles \"View this page for the iOS platform docs.\") [JavaScript](/maps/documentation/javascript/cloud-customization/map-styles \"View this page for the JavaScript platform docs.\") [Web Service](/maps/documentation/maps-static/cloud-customization/map-styles \"View this page for the Web Service platform docs.\")\n\n\u003cbr /\u003e\n\nA map style is a set of visual customizations to map features\nthat you associate with a map ID. You then reference the\nmap ID in your application code to display the customized map.\n\nYou can create a map style before you have a map ID; however, to use\nthe style, you must associate the style with a map ID. To use a map style,\nyou must take all of these steps:\n\n1. **Create and publish a map Style** . For details, see\n [Create a style](#create-style) and [Publish a style](#publish-style).\n\n2. **Create a map ID** . For details, see\n [Create a map ID](../map-ids/get-map-id).\n\n3. **Associate the map style with a map ID** . For details, see\n [Associate a map ID to a map style](#associate-style-with-map-id).\n\n4. **Add the map ID to your app** to display your style. For details, see\n [Add the map ID to your map](../map-ids/get-map-id#add-a-map-id-to-your-app).\n\n| **Tip**: Once the map ID is in your application code, you can change the map style without any changes in your application code, and your end users don't have to upgrade to see updated map styles. Instead, you edit the map style associated with the map ID, and changes show up in your application maps.\n\nThis document describes how to create, edit, and publish map styles and how to\nassociate them to a map ID.\n\nCreate a map style\n\nCreate a map style using one of these methods:\n\n- [Create](#create-new-style) a new style using the default Google map style.\n\n- [Duplicate](#duplicate-style) and modify an existing standard or customized style.\n\n- [Import a JSON map style](/maps/documentation/maps-static/cloud-customization/json#json-import) to use as a customized style.\n\nCreate a new style [Experimental](/maps/launch-stages#experimental) feature.\n\n1. In the Google Cloud console,\n go to [**Map Styles**](https://console.cloud.google.com/google/maps-apis/studio/styles), and select a project, if needed.\n\n2. In **Map styles** , click **Create style**.\n\n3. In the dialog, under the **Google styles** tab, select one of the following:\n\n - **Light** to create a light map style, where the map type is roadmap.\n - science **Dark** to create a dark map style, where the map type is roadmap dark.\n4. (Optional) To apply the monochrome variation to your map style, select **Monochrome**.\n\n5. Select **Customize** to create a new untitled style.\n\n6. Select map features and change their style to create the map style you want.\n\n Map features with custom styles have a solid blue dot next to them. If you\n customize a child style, the parent style displays a blue circle. For more\n information on map style hierarchy, see\n [Understand map style inheritance and hierarchy](/maps/documentation/maps-static/cloud-customization/map-hier).\n | **Note:** Not all styles appear at all zoom levels. For more information, see [Style zoom levels](/maps/documentation/maps-static/cloud-customization/zoom-levels).\n7. Click **Save**.\n\n8. In the **Save and publish map style** box, enter a name for your style and\n optionally a description, and click **Save**.\n\nThe style is automatically published, and you see your new style's\nmain page.\n| **Caution:** Making style changes but not explicitly saving them creates **Unsaved Changes** in your map style's version history. These versions are lost when you close the browser tab or when your Cloud console session ends.\n\nDuplicate a style\n\n1. Go to [**Map Styles**](https://console.cloud.google.com/google/maps-apis/studio/styles), and select a project, if needed.\n\n2. Select one of your existing styles.\n\n3. On the style page, click **Duplicate**.\n\n4. In the **Duplicate Map Style** box, enter a new map name and optionally\n a description.\n\n5. Click **Save**.\n\n The style is automatically published, and you can see your new style's\n main page. Associate it with a map ID to use it for your maps. For details,\n see [Associate a map ID to a map style](#associate-style-with-map-id).\n6. If you want to modify the style, click **Customize** , make changes,\n and click **Save**.\n\nPublish a style\n\nWhen you first create a new map style, that first instance of\nthe new map style is automatically published. After that, you save changes\nas a draft and when you're happy with the changes, you must publish.\n\n1. Make the changes to the map style or duplicated map style. For details, see\n [Change a style](#update-style).\n\n2. Click **Save** to save changes as a draft.\n\n3. When you're ready to publish and have your changes go live for any map IDs\n using that map style, click **Publish**.\n\nPublished versus Draft map styles\n\n**Published**: A published map style is live. Any maps that use the map style\ndisplay the published version of it.\n| **Note:** Style changes can take a few hours to propagate to your apps websites, and apps can take longer if the devices aren't connected to the internet. If you're still not seeing your style changes after a few hours, see [My style changes aren't updating](/maps/documentation/maps-static/cloud-customization/troubleshoot#style-delay).\n\n**Draft**: Draft versions of a map style are works in progress\nand aren't displayed in maps until you publish them.\n\nChange a style\n\nIf you want to make changes to your map style, you can make the changes right\nin the style editor. You have a couple of choices when you update a style:\n\n- **If you want changes to go live as soon as you're ready** : Click\n **Customize** and make your changes. Click **Save** to save your\n changes as a draft, and then click **Publish** when you are ready.\n\n- **If you want to test your changes in a test environment first** : Instead of\n making changes directly in the map style, duplicate the style first. For\n details, see [Duplicate a style](#duplicate-style) and\n [Test map style updates](/maps/documentation/maps-static/cloud-customization/test-style-updates).\n\nOnce you've created a map style, you can make changes to it on the style's\nmain page in any of the following ways:\n\n- **Edit** : Click **Customize**.\n\n- **Duplicate** : For details, see\n [Duplicate a style](/maps/documentation/maps-static/cloud-customization/map-styles#duplicate-style).\n\n- **Rename**: Rename the map style.\n\n- **Delete**: Delete the map style.\n\nAssociate your style to a map ID [Experimental](/maps/launch-stages#experimental) feature.\n\nAssociate your style to a map ID to display your custom style on your website\nand in your app. A map ID can have only one light style (roadmap type) and one\nscience dark style (roadmap dark type) associated with it.\n\nTo change the associated style for a map ID, do the following in the\nGoogle Cloud console:\n\n1. Go to **Map Management** and select a map ID.\n\n2. In the Map styles section, click **Change style** for a light or dark map style.\n\n The panel displays only styles with a roadmap map type for light styles, and\n only styles with a science roadmap dark map type for dark styles.\n3. In the panel, select one of the styles to associate to this map ID.\n\n4. Click **Done**.\n\n5. Click **Save** to apply all changes.\n\nTo use your cloud-based map style,\n[add the map ID to your app](../map-ids/get-map-id#add-a-map-id-to-your-app).\n\nNavigate on the preview map\n\nYou navigate on the preview map in the same way you navigate on any Google map:\n\n- Enter an address or location in the **Search Address** box.\n\n- Click the compass to center on your location. You may also have to grant\n location permissions.\n\n- Drag to move the map.\n\n- Zoom in or out using the plus (+) and minus (-).\n\nFind map features\n\nTo find a map feature that you want to style, you can use the filter or the map\ninspector.\n\nYou can also expand and collapse map feature categories to find the map\nfeature you want. Browse the list of map features at [What you can style on a map](/maps/documentation/maps-static/cloud-customization/taxonomy).\n\nFilter map features\n\nTo find map features using the filter, under **Map Features** , enter a\nterm in the **Filter** box.\n\nIf you can't find a map feature:\n\n- Don't use plurals. All of the categories are singular.\n\n- Try using a more generic term for the feature. For example, instead of\n \"pizza parlor\" or \"fast food,\" search for \"restaurant.\"\n\n- Try using a broader category, and then explore that category for the closest\n map feature. For example, instead of \"theater,\" search for \"entertainment.\"\n\nInspect map features\n\nTo find map features using the map inspector, perform the following steps:\n\n1. Left-click anywhere on the map to open the map inspector at your click point.\n\n2. Select a map feature in the map inspector to open it in the **Map Features** pane."]]