
このチュートリアルでは、Google マップを Android アプリに追加し、ポリラインとポリゴンを使って地図上にルートとエリアを描画する方法を紹介します。
Maps SDK for Android を使用して Android アプリを作成するには、このチュートリアルを参考にしてください。推奨される開発環境は Android Studio です。
コードを取得する
GitHub にて、Google Maps Android API v2 サンプル リポジトリをダウンロードするかクローンを作成します。
アクティビティの Java バージョンを表示する:
    // Copyright 2020 Google LLC
//
// Licensed under the Apache License, Version 2.0 (the "License");
// you may not use this file except in compliance with the License.
// You may obtain a copy of the License at
//
//      http://www.apache.org/licenses/LICENSE-2.0
//
// Unless required by applicable law or agreed to in writing, software
// distributed under the License is distributed on an "AS IS" BASIS,
// WITHOUT WARRANTIES OR CONDITIONS OF ANY KIND, either express or implied.
// See the License for the specific language governing permissions and
// limitations under the License.

package com.example.polygons;

import android.os.Bundle;
import android.widget.Toast;
import androidx.appcompat.app.AppCompatActivity;
import com.google.android.gms.maps.CameraUpdateFactory;
import com.google.android.gms.maps.GoogleMap;
import com.google.android.gms.maps.OnMapReadyCallback;
import com.google.android.gms.maps.SupportMapFragment;
import com.google.android.gms.maps.model.BitmapDescriptorFactory;
import com.google.android.gms.maps.model.CustomCap;
import com.google.android.gms.maps.model.Dash;
import com.google.android.gms.maps.model.Dot;
import com.google.android.gms.maps.model.Gap;
import com.google.android.gms.maps.model.JointType;
import com.google.android.gms.maps.model.LatLng;
import com.google.android.gms.maps.model.PatternItem;
import com.google.android.gms.maps.model.Polygon;
import com.google.android.gms.maps.model.PolygonOptions;
import com.google.android.gms.maps.model.Polyline;
import com.google.android.gms.maps.model.PolylineOptions;
import com.google.android.gms.maps.model.RoundCap;
import java.util.Arrays;
import java.util.List;


/**
 * An activity that displays a Google map with polylines to represent paths or routes,
 * and polygons to represent areas.
 */
public class PolyActivity extends AppCompatActivity
        implements
                OnMapReadyCallback,
                GoogleMap.OnPolylineClickListener,
                GoogleMap.OnPolygonClickListener {

    @Override
    protected void onCreate(Bundle savedInstanceState) {
        super.onCreate(savedInstanceState);

        // Retrieve the content view that renders the map.
        setContentView(R.layout.activity_maps);

        // Get the SupportMapFragment and request notification when the map is ready to be used.
        SupportMapFragment mapFragment = (SupportMapFragment) getSupportFragmentManager()
                .findFragmentById(R.id.map);
        mapFragment.getMapAsync(this);
    }

    /**
     * Manipulates the map when it's available.
     * The API invokes this callback when the map is ready to be used.
     * This is where we can add markers or lines, add listeners or move the camera.
     * In this tutorial, we add polylines and polygons to represent routes and areas on the map.
     */
    @Override
    public void onMapReady(GoogleMap googleMap) {

        // Add polylines to the map.
        // Polylines are useful to show a route or some other connection between points.
        Polyline polyline1 = googleMap.addPolyline(new PolylineOptions()
                .clickable(true)
                .add(
                        new LatLng(-35.016, 143.321),
                        new LatLng(-34.747, 145.592),
                        new LatLng(-34.364, 147.891),
                        new LatLng(-33.501, 150.217),
                        new LatLng(-32.306, 149.248),
                        new LatLng(-32.491, 147.309)));
        // Store a data object with the polyline, used here to indicate an arbitrary type.
        polyline1.setTag("A");
        // Style the polyline.
        stylePolyline(polyline1);

        Polyline polyline2 = googleMap.addPolyline(new PolylineOptions()
                .clickable(true)
                .add(
                        new LatLng(-29.501, 119.700),
                        new LatLng(-27.456, 119.672),
                        new LatLng(-25.971, 124.187),
                        new LatLng(-28.081, 126.555),
                        new LatLng(-28.848, 124.229),
                        new LatLng(-28.215, 123.938)));
        polyline2.setTag("B");
        stylePolyline(polyline2);

        // Add polygons to indicate areas on the map.
        Polygon polygon1 = googleMap.addPolygon(new PolygonOptions()
                .clickable(true)
                .add(
                        new LatLng(-27.457, 153.040),
                        new LatLng(-33.852, 151.211),
                        new LatLng(-37.813, 144.962),
                        new LatLng(-34.928, 138.599)));
        // Store a data object with the polygon, used here to indicate an arbitrary type.
        polygon1.setTag("alpha");
        // Style the polygon.
        stylePolygon(polygon1);

        Polygon polygon2 = googleMap.addPolygon(new PolygonOptions()
                .clickable(true)
                .add(
                        new LatLng(-31.673, 128.892),
                        new LatLng(-31.952, 115.857),
                        new LatLng(-17.785, 122.258),
                        new LatLng(-12.4258, 130.7932)));
        polygon2.setTag("beta");
        stylePolygon(polygon2);

        // Position the map's camera near Alice Springs in the center of Australia,
        // and set the zoom factor so most of Australia shows on the screen.
        googleMap.moveCamera(CameraUpdateFactory.newLatLngZoom(new LatLng(-23.684, 133.903), 4));

        // Set listeners for click events.
        googleMap.setOnPolylineClickListener(this);
        googleMap.setOnPolygonClickListener(this);
    }

    private static final int COLOR_BLACK_ARGB = 0xff000000;
    private static final int POLYLINE_STROKE_WIDTH_PX = 12;

    /**
     * Styles the polyline, based on type.
     * @param polyline The polyline object that needs styling.
     */
    private void stylePolyline(Polyline polyline) {
        String type = "";
        // Get the data object stored with the polyline.
        if (polyline.getTag() != null) {
            type = polyline.getTag().toString();
        }

        switch (type) {
            // If no type is given, allow the API to use the default.
            case "A":
                // Use a custom bitmap as the cap at the start of the line.
                polyline.setStartCap(
                        new CustomCap(
                                BitmapDescriptorFactory.fromResource(R.drawable.ic_arrow), 10));
                break;
            case "B":
                // Use a round cap at the start of the line.
                polyline.setStartCap(new RoundCap());
                break;
        }

        polyline.setEndCap(new RoundCap());
        polyline.setWidth(POLYLINE_STROKE_WIDTH_PX);
        polyline.setColor(COLOR_BLACK_ARGB);
        polyline.setJointType(JointType.ROUND);
    }

    private static final int PATTERN_GAP_LENGTH_PX = 20;
    private static final PatternItem DOT = new Dot();
    private static final PatternItem GAP = new Gap(PATTERN_GAP_LENGTH_PX);

    // Create a stroke pattern of a gap followed by a dot.
    private static final List<PatternItem> PATTERN_POLYLINE_DOTTED = Arrays.asList(GAP, DOT);

    /**
     * Listens for clicks on a polyline.
     * @param polyline The polyline object that the user has clicked.
     */
    @Override
    public void onPolylineClick(Polyline polyline) {
        // Flip from solid stroke to dotted stroke pattern.
        if ((polyline.getPattern() == null) || (!polyline.getPattern().contains(DOT))) {
            polyline.setPattern(PATTERN_POLYLINE_DOTTED);
        } else {
            // The default pattern is a solid stroke.
            polyline.setPattern(null);
        }

        Toast.makeText(this, "Route type " + polyline.getTag().toString(),
                Toast.LENGTH_SHORT).show();
    }

    /**
     * Listens for clicks on a polygon.
     * @param polygon The polygon object that the user has clicked.
     */
    @Override
    public void onPolygonClick(Polygon polygon) {
        // Flip the values of the red, green, and blue components of the polygon's color.
        int color = polygon.getStrokeColor() ^ 0x00ffffff;
        polygon.setStrokeColor(color);
        color = polygon.getFillColor() ^ 0x00ffffff;
        polygon.setFillColor(color);

        Toast.makeText(this, "Area type " + polygon.getTag().toString(), Toast.LENGTH_SHORT).show();
    }

    private static final int COLOR_WHITE_ARGB = 0xffffffff;
    private static final int COLOR_DARK_GREEN_ARGB = 0xff388E3C;
    private static final int COLOR_LIGHT_GREEN_ARGB = 0xff81C784;
    private static final int COLOR_DARK_ORANGE_ARGB = 0xffF57F17;
    private static final int COLOR_LIGHT_ORANGE_ARGB = 0xffF9A825;

    private static final int POLYGON_STROKE_WIDTH_PX = 8;
    private static final int PATTERN_DASH_LENGTH_PX = 20;
    private static final PatternItem DASH = new Dash(PATTERN_DASH_LENGTH_PX);

    // Create a stroke pattern of a gap followed by a dash.
    private static final List<PatternItem> PATTERN_POLYGON_ALPHA = Arrays.asList(GAP, DASH);

    // Create a stroke pattern of a dot followed by a gap, a dash, and another gap.
    private static final List<PatternItem> PATTERN_POLYGON_BETA =
        Arrays.asList(DOT, GAP, DASH, GAP);

    /**
     * Styles the polygon, based on type.
     * @param polygon The polygon object that needs styling.
     */
    private void stylePolygon(Polygon polygon) {
        String type = "";
        // Get the data object stored with the polygon.
        if (polygon.getTag() != null) {
            type = polygon.getTag().toString();
        }

        List<PatternItem> pattern = null;
        int strokeColor = COLOR_BLACK_ARGB;
        int fillColor = COLOR_WHITE_ARGB;

        switch (type) {
            // If no type is given, allow the API to use the default.
            case "alpha":
                // Apply a stroke pattern to render a dashed line, and define colors.
                pattern = PATTERN_POLYGON_ALPHA;
                strokeColor = COLOR_DARK_GREEN_ARGB;
                fillColor = COLOR_LIGHT_GREEN_ARGB;
                break;
            case "beta":
                // Apply a stroke pattern to render a line of dots and dashes, and define colors.
                pattern = PATTERN_POLYGON_BETA;
                strokeColor = COLOR_DARK_ORANGE_ARGB;
                fillColor = COLOR_LIGHT_ORANGE_ARGB;
                break;
        }

        polygon.setStrokePattern(pattern);
        polygon.setStrokeWidth(POLYGON_STROKE_WIDTH_PX);
        polygon.setStrokeColor(strokeColor);
        polygon.setFillColor(fillColor);
    }
}
アクティビティの Kotlin バージョンを表示する:
    // Copyright 2020 Google LLC
//
// Licensed under the Apache License, Version 2.0 (the "License");
// you may not use this file except in compliance with the License.
// You may obtain a copy of the License at
//
//      http://www.apache.org/licenses/LICENSE-2.0
//
// Unless required by applicable law or agreed to in writing, software
// distributed under the License is distributed on an "AS IS" BASIS,
// WITHOUT WARRANTIES OR CONDITIONS OF ANY KIND, either express or implied.
// See the License for the specific language governing permissions and
// limitations under the License.
package com.example.polygons

import android.os.Bundle
import android.widget.Toast
import androidx.appcompat.app.AppCompatActivity
import com.google.android.gms.maps.CameraUpdateFactory
import com.google.android.gms.maps.GoogleMap
import com.google.android.gms.maps.GoogleMap.OnPolygonClickListener
import com.google.android.gms.maps.GoogleMap.OnPolylineClickListener
import com.google.android.gms.maps.OnMapReadyCallback
import com.google.android.gms.maps.SupportMapFragment
import com.google.android.gms.maps.model.BitmapDescriptorFactory
import com.google.android.gms.maps.model.CustomCap
import com.google.android.gms.maps.model.Dash
import com.google.android.gms.maps.model.Dot
import com.google.android.gms.maps.model.Gap
import com.google.android.gms.maps.model.JointType
import com.google.android.gms.maps.model.LatLng
import com.google.android.gms.maps.model.PatternItem
import com.google.android.gms.maps.model.Polygon
import com.google.android.gms.maps.model.PolygonOptions
import com.google.android.gms.maps.model.Polyline
import com.google.android.gms.maps.model.PolylineOptions
import com.google.android.gms.maps.model.RoundCap

/**
 * An activity that displays a Google map with polylines to represent paths or routes,
 * and polygons to represent areas.
 */
class PolyActivity : AppCompatActivity(), OnMapReadyCallback, OnPolylineClickListener, OnPolygonClickListener {

    override fun onCreate(savedInstanceState: Bundle?) {
        super.onCreate(savedInstanceState)

        // Retrieve the content view that renders the map.
        setContentView(R.layout.activity_maps)

        // Get the SupportMapFragment and request notification when the map is ready to be used.
        val mapFragment = supportFragmentManager
            .findFragmentById(R.id.map) as SupportMapFragment?
        mapFragment?.getMapAsync(this)
    }

    /**
     * Manipulates the map when it's available.
     * The API invokes this callback when the map is ready to be used.
     * This is where we can add markers or lines, add listeners or move the camera.
     * In this tutorial, we add polylines and polygons to represent routes and areas on the map.
     */
    override fun onMapReady(googleMap: GoogleMap) {

        // Add polylines to the map.
        // Polylines are useful to show a route or some other connection between points.
        val polyline1 = googleMap.addPolyline(PolylineOptions()
            .clickable(true)
            .add(
                LatLng(-35.016, 143.321),
                LatLng(-34.747, 145.592),
                LatLng(-34.364, 147.891),
                LatLng(-33.501, 150.217),
                LatLng(-32.306, 149.248),
                LatLng(-32.491, 147.309)))
        // Store a data object with the polyline, used here to indicate an arbitrary type.
        polyline1.tag = "A"
        // Style the polyline.
        stylePolyline(polyline1)

        val polyline2 = googleMap.addPolyline(PolylineOptions()
            .clickable(true)
            .add(
                LatLng(-29.501, 119.700),
                LatLng(-27.456, 119.672),
                LatLng(-25.971, 124.187),
                LatLng(-28.081, 126.555),
                LatLng(-28.848, 124.229),
                LatLng(-28.215, 123.938)))
        polyline2.tag = "B"
        stylePolyline(polyline2)

        // Add polygons to indicate areas on the map.
        val polygon1 = googleMap.addPolygon(PolygonOptions()
            .clickable(true)
            .add(
                LatLng(-27.457, 153.040),
                LatLng(-33.852, 151.211),
                LatLng(-37.813, 144.962),
                LatLng(-34.928, 138.599)))
        // Store a data object with the polygon, used here to indicate an arbitrary type.
        polygon1.tag = "alpha"
        // Style the polygon.
        stylePolygon(polygon1)

        val polygon2 = googleMap.addPolygon(PolygonOptions()
            .clickable(true)
            .add(
                LatLng(-31.673, 128.892),
                LatLng(-31.952, 115.857),
                LatLng(-17.785, 122.258),
                LatLng(-12.4258, 130.7932)))
        polygon2.tag = "beta"
        stylePolygon(polygon2)

        // Position the map's camera near Alice Springs in the center of Australia,
        // and set the zoom factor so most of Australia shows on the screen.
        googleMap.moveCamera(CameraUpdateFactory.newLatLngZoom(LatLng(-23.684, 133.903), 4f))

        // Set listeners for click events.
        googleMap.setOnPolylineClickListener(this)
        googleMap.setOnPolygonClickListener(this)
    }

    private val COLOR_BLACK_ARGB = -0x1000000
    private val POLYLINE_STROKE_WIDTH_PX = 12

    /**
     * Styles the polyline, based on type.
     * @param polyline The polyline object that needs styling.
     */
    private fun stylePolyline(polyline: Polyline) {
        // Get the data object stored with the polyline.
        val type = polyline.tag?.toString() ?: ""
        when (type) {
            "A" -> {
                // Use a custom bitmap as the cap at the start of the line.
                polyline.startCap = CustomCap(
                    BitmapDescriptorFactory.fromResource(R.drawable.ic_arrow), 10f)
            }
            "B" -> {
               // Use a round cap at the start of the line.
                polyline.startCap = RoundCap()
            }
        }
        polyline.endCap = RoundCap()
        polyline.width = POLYLINE_STROKE_WIDTH_PX.toFloat()
        polyline.color = COLOR_BLACK_ARGB
        polyline.jointType = JointType.ROUND
    }

    private val PATTERN_GAP_LENGTH_PX = 20
    private val DOT: PatternItem = Dot()
    private val GAP: PatternItem = Gap(PATTERN_GAP_LENGTH_PX.toFloat())

    // Create a stroke pattern of a gap followed by a dot.
    private val PATTERN_POLYLINE_DOTTED = listOf(GAP, DOT)

    /**
     * Listens for clicks on a polyline.
     * @param polyline The polyline object that the user has clicked.
     */
    override fun onPolylineClick(polyline: Polyline) {
        // Flip from solid stroke to dotted stroke pattern.
        if (polyline.pattern == null || !polyline.pattern!!.contains(DOT)) {
            polyline.pattern = PATTERN_POLYLINE_DOTTED
        } else {
            // The default pattern is a solid stroke.
            polyline.pattern = null
        }
        Toast.makeText(this, "Route type " + polyline.tag.toString(),
            Toast.LENGTH_SHORT).show()
    }

    /**
     * Listens for clicks on a polygon.
     * @param polygon The polygon object that the user has clicked.
     */
    override fun onPolygonClick(polygon: Polygon) {
        // Flip the values of the red, green, and blue components of the polygon's color.
        var color = polygon.strokeColor xor 0x00ffffff
        polygon.strokeColor = color
        color = polygon.fillColor xor 0x00ffffff
        polygon.fillColor = color
        Toast.makeText(this, "Area type ${polygon.tag?.toString()}", Toast.LENGTH_SHORT).show()
    }

    private val COLOR_WHITE_ARGB = -0x1
    private val COLOR_DARK_GREEN_ARGB = -0xc771c4
    private val COLOR_LIGHT_GREEN_ARGB = -0x7e387c
    private val COLOR_DARK_ORANGE_ARGB = -0xa80e9
    private val COLOR_LIGHT_ORANGE_ARGB = -0x657db
    private val POLYGON_STROKE_WIDTH_PX = 8
    private val PATTERN_DASH_LENGTH_PX = 20

    private val DASH: PatternItem = Dash(PATTERN_DASH_LENGTH_PX.toFloat())

    // Create a stroke pattern of a gap followed by a dash.
    private val PATTERN_POLYGON_ALPHA = listOf(GAP, DASH)

    // Create a stroke pattern of a dot followed by a gap, a dash, and another gap.
    private val PATTERN_POLYGON_BETA = listOf(DOT, GAP, DASH, GAP)

    /**
     * Styles the polygon, based on type.
     * @param polygon The polygon object that needs styling.
     */
    private fun stylePolygon(polygon: Polygon) {
        // Get the data object stored with the polygon.
        val type = polygon.tag?.toString() ?: ""
        var pattern: List<PatternItem>? = null
        var strokeColor = COLOR_BLACK_ARGB
        var fillColor = COLOR_WHITE_ARGB
        when (type) {
            "alpha" -> {
                // Apply a stroke pattern to render a dashed line, and define colors.
                pattern = PATTERN_POLYGON_ALPHA
                strokeColor = COLOR_DARK_GREEN_ARGB
                fillColor = COLOR_LIGHT_GREEN_ARGB
            }
            "beta" -> {
                // Apply a stroke pattern to render a line of dots and dashes, and define colors.
                pattern = PATTERN_POLYGON_BETA
                strokeColor = COLOR_DARK_ORANGE_ARGB
                fillColor = COLOR_LIGHT_ORANGE_ARGB
            }
        }
        polygon.strokePattern = pattern
        polygon.strokeWidth = POLYGON_STROKE_WIDTH_PX.toFloat()
        polygon.strokeColor = strokeColor
        polygon.fillColor = fillColor
    }
}
開発プロジェクトを設定する
次のステップに沿って、Android Studio でチュートリアル プロジェクトを作成します。
- Android Studio をダウンロードしてインストールします。
- Android Studio に Google Play 開発者サービス パッケージを追加します。
- Google Maps Android API v2 のサンプル リポジトリをダウンロードするかクローンを作成します(このチュートリアルの閲覧を開始した時点で行っていない場合)。
次の手順でチュートリアル プロジェクトをインポートします。
- Android Studio で、[File] > [New] > [Import Project] を選択します。
- ダウンロードした Google Maps Android API v2 のサンプル リポジトリの保存先に移動します。
- 次の場所で Polygons プロジェクトを見つけます。
PATH-TO-SAVED-REPO/android-samples/tutorials/java/Polygons(Java)または
PATH-TO-SAVED-REPO/android-samples/tutorials/kotlin/Polygons(Kotlin) - プロジェクト ディレクトリを選択して、[Open] をクリックします。Android Studio が Gradle ビルドツールを使用してプロジェクトをビルドします。
必要な API を有効化して API キーを取得する
このチュートリアルを完了するには、必要な API が有効化された Google Cloud プロジェクトと、Maps SDK for Android の使用を許可されている API キーが必要です。詳しくは以下をご覧ください。
アプリに API キーを追加する
- プロジェクトの
local.propertiesファイルを開きます。 次の文字列を追加し、
YOUR_API_KEYを実際の API キーの値に置き換えます。MAPS_API_KEY=YOUR_API_KEYアプリを作成すると、Android 用 Secrets Gradle プラグイン によって API キーがコピーされ、Android マニフェストでビルド変数として使えるようになります(以下の説明をご覧ください)。
アプリをビルドして実行する
アプリをビルドして実行する手順:
Android デバイスをコンピュータに接続します。手順に沿って、Android デバイスでデベロッパー オプションを有効にし、デバイスを検出するようにシステムを設定します。
または、Android Virtual Device(AVD)Manager を使用して仮想デバイスを設定することもできます。エミュレータを指定する際は、Google API を含むイメージを選択する必要があります。詳しくは、Android Studio プロジェクトをセットアップするをご覧ください。
Android Studio で [Run] メニュー オプション(またはプレイボタン アイコン)をクリックします。表示される指示に沿ってデバイスを選択します。
Android Studio で Gradle が起動してアプリがビルドされ、デバイスまたはエミュレータ上で実行されます。
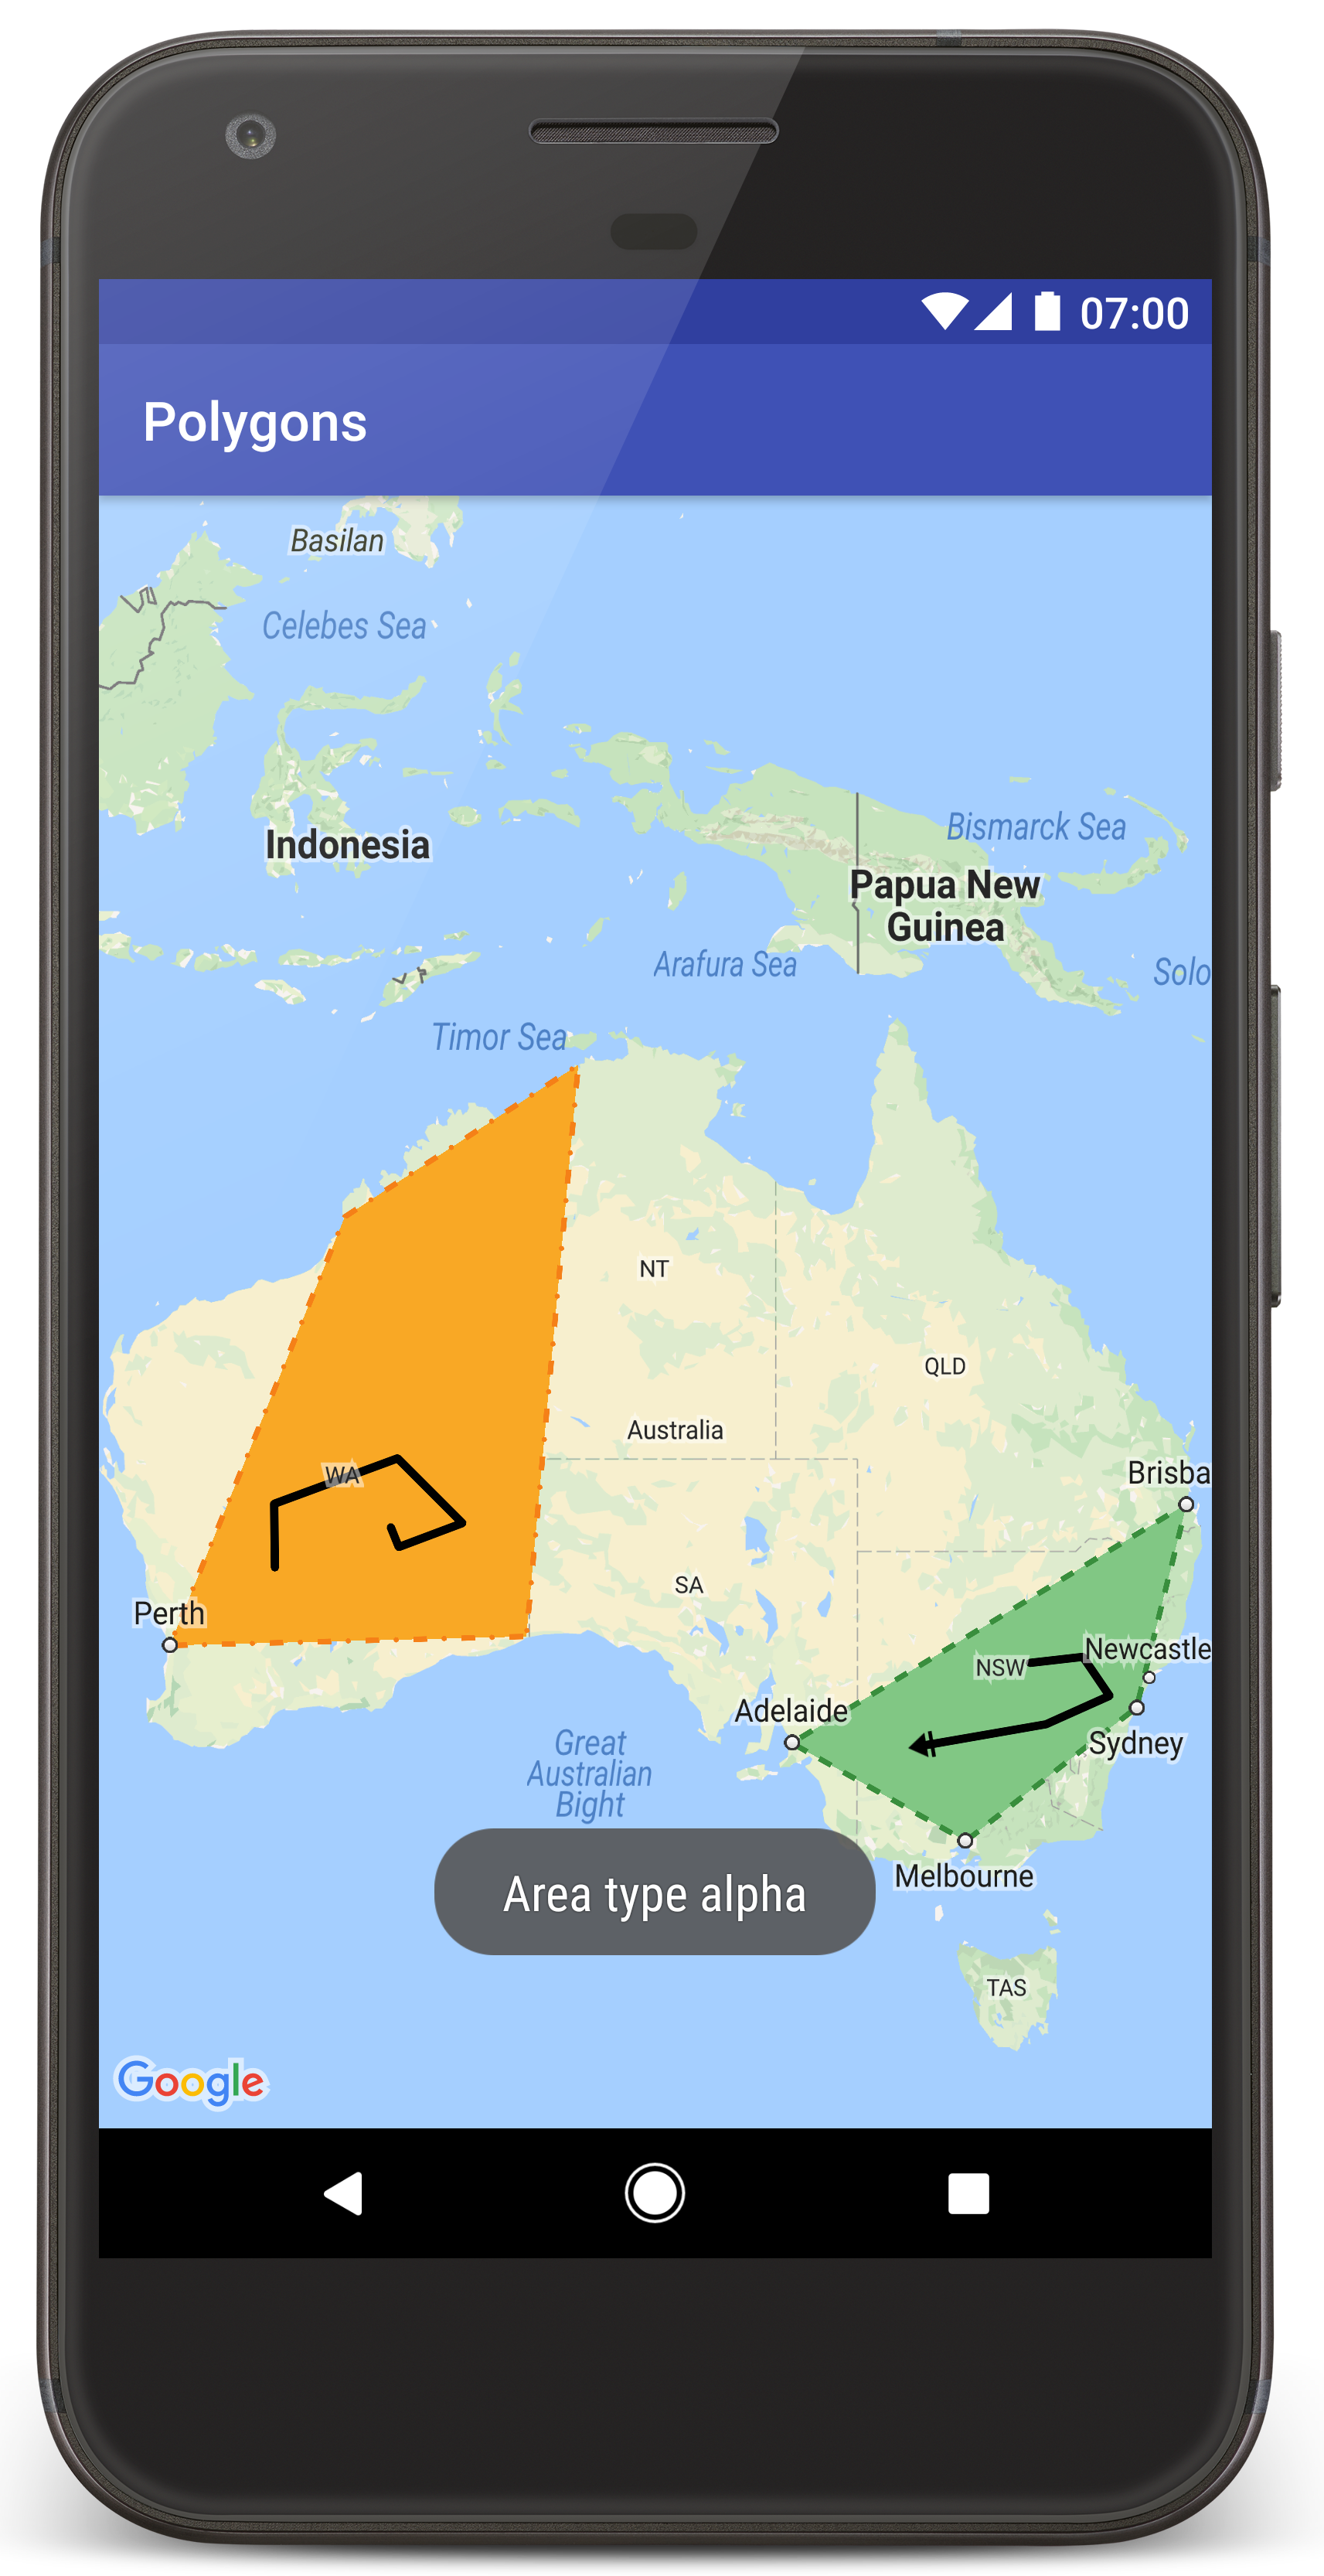
このページの画像のように、オーストラリアに 2 つのポリゴンがオーバーレイされた地図が表示されます。
トラブルシューティング:
- 地図が表示されない場合は、上記の手順どおりに API キーを取得してアプリに追加していることをご確認ください。Android Studio の Android Monitor のログでも、API キーに関するエラー メッセージを確認してください。
- ログを表示してアプリをデバッグするには、Android Studio デバッグツールを使用します。
コードを理解する
ここでは、Polygons アプリの最も重要な部分について説明します。これは、同様のアプリの作成方法を理解するうえで役に立ちます。
Android マニフェストを確認する
アプリの AndroidManifest.xml ファイルには次の要素が含まれています。
アプリのコンパイルに使用した Google Play 開発者サービスのバージョンを埋め込む
meta-data要素を追加します。<meta-data android:name="com.google.android.gms.version" android:value="@integer/google_play_services_version" />API キーを指定する
meta-data要素を追加します。このチュートリアルのサンプルでは、API キーの値がビルド変数(先ほど定義したキーの名前に一致する)MAPS_API_KEYにマッピングされています。 アプリをビルドすると、Android 用 Secrets Gradle プラグインにより、local.propertiesファイル内のキーがマニフェストのビルド変数として使えるようになります。<meta-data android:name="com.google.android.geo.API_KEY" android:value="${MAPS_API_KEY}" />build.gradleファイルで、次の行を使って API キーを Android マニフェストに渡します。id 'com.google.android.libraries.mapsplatform.secrets-gradle-plugin'
マニフェストの詳細な例を以下に示します。
  <?xml version="1.0" encoding="utf-8"?>
<!--
 Copyright 2020 Google LLC

 Licensed under the Apache License, Version 2.0 (the "License");
 you may not use this file except in compliance with the License.
 You may obtain a copy of the License at

      http://www.apache.org/licenses/LICENSE-2.0

 Unless required by applicable law or agreed to in writing, software
 distributed under the License is distributed on an "AS IS" BASIS,
 WITHOUT WARRANTIES OR CONDITIONS OF ANY KIND, either express or implied.
 See the License for the specific language governing permissions and
 limitations under the License.
-->

<manifest xmlns:android="http://schemas.android.com/apk/res/android">

    <application
        android:allowBackup="true"
        android:icon="@mipmap/ic_launcher"
        android:label="@string/app_name"
        android:supportsRtl="true"
        android:theme="@style/AppTheme">

        <meta-data
            android:name="com.google.android.gms.version"
            android:value="@integer/google_play_services_version" />

        <!--
             The API key for Google Maps-based APIs.
        -->
        <meta-data
            android:name="com.google.android.geo.API_KEY"
            android:value="${MAPS_API_KEY}" />

        <activity
            android:name="com.example.polygons.PolyActivity"
            android:exported="true"
            android:label="@string/title_activity_maps">
            <intent-filter>
                <action android:name="android.intent.action.MAIN" />
                <category android:name="android.intent.category.LAUNCHER" />
            </intent-filter>
        </activity>
    </application>
</manifest>
地図を追加する
Maps SDK for Android を使用して地図を表示します。
アクティビティのレイアウト ファイル(
activity_maps.xml)に<fragment>要素を追加します。この要素では、地図のコンテナとして機能し、GoogleMapオブジェクトへのアクセス権を付与するようSupportMapFragmentを定義します。このチュートリアルでは、Android フレームワークの以前のバージョンとの下位互換性を確保するため、地図フラグメントの Android サポート ライブラリ バージョンを使用します。<!-- Copyright 2020 Google LLC Licensed under the Apache License, Version 2.0 (the "License"); you may not use this file except in compliance with the License. You may obtain a copy of the License at http://www.apache.org/licenses/LICENSE-2.0 Unless required by applicable law or agreed to in writing, software distributed under the License is distributed on an "AS IS" BASIS, WITHOUT WARRANTIES OR CONDITIONS OF ANY KIND, either express or implied. See the License for the specific language governing permissions and limitations under the License. --> <fragment xmlns:android="http://schemas.android.com/apk/res/android" xmlns:tools="http://schemas.android.com/tools" android:id="@+id/map" android:name="com.google.android.gms.maps.SupportMapFragment" android:layout_width="match_parent" android:layout_height="match_parent" tools:context="com.example.polygons.PolyActivity" />
アクティビティの
onCreate()メソッドで、レイアウト ファイルをコンテンツ ビューとして設定します。FragmentManager.findFragmentById()を呼び出して、地図フラグメントに対するハンドルを取得します。次に、getMapAsync()を使用して、地図コールバックを登録します。Java
@Override protected void onCreate(Bundle savedInstanceState) { super.onCreate(savedInstanceState); // Retrieve the content view that renders the map. setContentView(R.layout.activity_maps); // Get the SupportMapFragment and request notification when the map is ready to be used. SupportMapFragment mapFragment = (SupportMapFragment) getSupportFragmentManager() .findFragmentById(R.id.map); mapFragment.getMapAsync(this); }
Kotlin
override fun onCreate(savedInstanceState: Bundle?) { super.onCreate(savedInstanceState) // Retrieve the content view that renders the map. setContentView(R.layout.activity_maps) // Get the SupportMapFragment and request notification when the map is ready to be used. val mapFragment = supportFragmentManager .findFragmentById(R.id.map) as SupportMapFragment? mapFragment?.getMapAsync(this) }
OnMapReadyCallbackインターフェースを実装し、onMapReady()メソッドをオーバーライドします。GoogleMapオブジェクトが利用可能な場合は、API でこのコールバックが呼び出されるため、地図にオブジェクトを追加して、アプリに合わせて詳細にカスタマイズできます。Java
public class PolyActivity extends AppCompatActivity implements OnMapReadyCallback, GoogleMap.OnPolylineClickListener, GoogleMap.OnPolygonClickListener { @Override protected void onCreate(Bundle savedInstanceState) { super.onCreate(savedInstanceState); // Retrieve the content view that renders the map. setContentView(R.layout.activity_maps); // Get the SupportMapFragment and request notification when the map is ready to be used. SupportMapFragment mapFragment = (SupportMapFragment) getSupportFragmentManager() .findFragmentById(R.id.map); mapFragment.getMapAsync(this); } /** * Manipulates the map when it's available. * The API invokes this callback when the map is ready to be used. * This is where we can add markers or lines, add listeners or move the camera. * In this tutorial, we add polylines and polygons to represent routes and areas on the map. */ @Override public void onMapReady(GoogleMap googleMap) { // Add polylines to the map. // Polylines are useful to show a route or some other connection between points. Polyline polyline1 = googleMap.addPolyline(new PolylineOptions() .clickable(true) .add( new LatLng(-35.016, 143.321), new LatLng(-34.747, 145.592), new LatLng(-34.364, 147.891), new LatLng(-33.501, 150.217), new LatLng(-32.306, 149.248), new LatLng(-32.491, 147.309))); // Position the map's camera near Alice Springs in the center of Australia, // and set the zoom factor so most of Australia shows on the screen. googleMap.moveCamera(CameraUpdateFactory.newLatLngZoom(new LatLng(-23.684, 133.903), 4)); // Set listeners for click events. googleMap.setOnPolylineClickListener(this); googleMap.setOnPolygonClickListener(this); }
Kotlin
class PolyActivity : AppCompatActivity(), OnMapReadyCallback, OnPolylineClickListener, OnPolygonClickListener { override fun onCreate(savedInstanceState: Bundle?) { super.onCreate(savedInstanceState) // Retrieve the content view that renders the map. setContentView(R.layout.activity_maps) // Get the SupportMapFragment and request notification when the map is ready to be used. val mapFragment = supportFragmentManager .findFragmentById(R.id.map) as SupportMapFragment? mapFragment?.getMapAsync(this) } /** * Manipulates the map when it's available. * The API invokes this callback when the map is ready to be used. * This is where we can add markers or lines, add listeners or move the camera. * In this tutorial, we add polylines and polygons to represent routes and areas on the map. */ override fun onMapReady(googleMap: GoogleMap) { // Add polylines to the map. // Polylines are useful to show a route or some other connection between points. val polyline1 = googleMap.addPolyline(PolylineOptions() .clickable(true) .add( LatLng(-35.016, 143.321), LatLng(-34.747, 145.592), LatLng(-34.364, 147.891), LatLng(-33.501, 150.217), LatLng(-32.306, 149.248), LatLng(-32.491, 147.309))) // Position the map's camera near Alice Springs in the center of Australia, // and set the zoom factor so most of Australia shows on the screen. googleMap.moveCamera(CameraUpdateFactory.newLatLngZoom(LatLng(-23.684, 133.903), 4f)) // Set listeners for click events. googleMap.setOnPolylineClickListener(this) googleMap.setOnPolygonClickListener(this) }
ポリラインを追加して地図にラインを引く
Polyline は、一連の線分のつながりです。ポリラインは、地図上の場所間のルートや経路などのつながりを表すのに役立ちます。
PolylineOptionsオブジェクトを作成して地点を追加します。 それぞれの地点は地図上の場所を表し、緯度と経度の値を含むLatLngオブジェクトで定義されます。以下のコードサンプルでは、6 つの地点をつなぐポリラインが作成されます。GoogleMap.addPolyline()を呼び出して、地図にポリラインを追加します。Java
Polyline polyline1 = googleMap.addPolyline(new PolylineOptions() .clickable(true) .add( new LatLng(-35.016, 143.321), new LatLng(-34.747, 145.592), new LatLng(-34.364, 147.891), new LatLng(-33.501, 150.217), new LatLng(-32.306, 149.248), new LatLng(-32.491, 147.309)));
Kotlin
val polyline1 = googleMap.addPolyline(PolylineOptions() .clickable(true) .add( LatLng(-35.016, 143.321), LatLng(-34.747, 145.592), LatLng(-34.364, 147.891), LatLng(-33.501, 150.217), LatLng(-32.306, 149.248), LatLng(-32.491, 147.309)))
ポリラインでクリック イベントを処理する場合は、ポリラインの clickable オプションを true に設定します。イベントの詳細については、このチュートリアルの後半で説明します。
ポリラインを含む任意のデータを保存する
ポリラインやその他のジオメトリ オブジェクトを含む任意のデータ オブジェクトを保存できます。
Polyline.setTag()を呼び出して、ポリラインを含むデータ オブジェクトを保存します。以下のコードでは、ポリラインのタイプを示す任意のタグ(A)を定義しています。Java
Polyline polyline1 = googleMap.addPolyline(new PolylineOptions()
    .clickable(true)
    .add(
            new LatLng(-35.016, 143.321),
            new LatLng(-34.747, 145.592),
            new LatLng(-34.364, 147.891),
            new LatLng(-33.501, 150.217),
            new LatLng(-32.306, 149.248),
            new LatLng(-32.491, 147.309)));
// Store a data object with the polyline, used here to indicate an arbitrary type.
polyline1.setTag("A");
Kotlin
val polyline1 = googleMap.addPolyline(PolylineOptions()
.clickable(true)
.add(
    LatLng(-35.016, 143.321),
    LatLng(-34.747, 145.592),
    LatLng(-34.364, 147.891),
    LatLng(-33.501, 150.217),
    LatLng(-32.306, 149.248),
    LatLng(-32.491, 147.309)))
// Store a data object with the polyline, used here to indicate an arbitrary type.
polyline1.tag = "A
次のセクションに示すように、
Polyline.getTag()を使用してデータを取得します。
ポリラインにカスタム スタイルを追加する
PolylineOptions オブジェクトで、さまざまなスタイルのプロパティを指定できます。スタイルのオプションには、ストロークの色と幅およびパターンのほか、ジョイントのタイプや、始点と終点のキャップなどがあります。特定のプロパティを指定しない場合は、API でそのプロパティのデフォルトの値が使用されます。
次のコードでは、ラインの終点にラウンド キャップ、始点にポリラインのタイプに応じて異なるキャップがそれぞれ適用されます。この場合、タイプはポリラインのデータ オブジェクトに保存されている任意のプロパティとなります。サンプルでは、ストロークの幅と色や、ジョイント タイプも指定されています。
Java
private static final int COLOR_BLACK_ARGB = 0xff000000; private static final int POLYLINE_STROKE_WIDTH_PX = 12; /** * Styles the polyline, based on type. * @param polyline The polyline object that needs styling. */ private void stylePolyline(Polyline polyline) { String type = ""; // Get the data object stored with the polyline. if (polyline.getTag() != null) { type = polyline.getTag().toString(); } switch (type) { // If no type is given, allow the API to use the default. case "A": // Use a custom bitmap as the cap at the start of the line. polyline.setStartCap( new CustomCap( BitmapDescriptorFactory.fromResource(R.drawable.ic_arrow), 10)); break; case "B": // Use a round cap at the start of the line. polyline.setStartCap(new RoundCap()); break; } polyline.setEndCap(new RoundCap()); polyline.setWidth(POLYLINE_STROKE_WIDTH_PX); polyline.setColor(COLOR_BLACK_ARGB); polyline.setJointType(JointType.ROUND); }
Kotlin
private val COLOR_BLACK_ARGB = -0x1000000 private val POLYLINE_STROKE_WIDTH_PX = 12 /** * Styles the polyline, based on type. * @param polyline The polyline object that needs styling. */ private fun stylePolyline(polyline: Polyline) { // Get the data object stored with the polyline. val type = polyline.tag?.toString() ?: "" when (type) { "A" -> { // Use a custom bitmap as the cap at the start of the line. polyline.startCap = CustomCap( BitmapDescriptorFactory.fromResource(R.drawable.ic_arrow), 10f) } "B" -> { // Use a round cap at the start of the line. polyline.startCap = RoundCap() } } polyline.endCap = RoundCap() polyline.width = POLYLINE_STROKE_WIDTH_PX.toFloat() polyline.color = COLOR_BLACK_ARGB polyline.jointType = JointType.ROUND }
上記のコードでは、タイプ A のポリラインの始点のキャップにカスタム ビットマップを指定しているほか、リファレンスのストロークの幅を 10 ピクセルに指定しています。API では、ビットマップがリファレンスのストロークの幅に基づいてスケーリングされます。リファレンスのストロークの幅を指定する際は、ビットマップ画像の作成時に使用した幅、つまり元の画像サイズでの幅を指定します。ヒント: 画像エディタで表示倍率を 100% に設定してビットマップ画像を開き、画像に適したライン ストロークの幅を検討します。
詳しくは、ラインキャップと、シェイプのカスタマイズに関するその他のオプションをご覧ください。
ポリラインでのクリック イベントを処理する
Polyline.setClickable()を呼び出して、ポリラインをクリック可能にします(デフォルトでは、ポリラインはクリックできないため、ユーザーがポリラインをタップしてもアプリには通知されません)。OnPolylineClickListenerインターフェースを実装し、GoogleMap.setOnPolylineClickListener()を呼び出して、地図にリスナーを設定します。Java
public class PolyActivity extends AppCompatActivity implements OnMapReadyCallback, GoogleMap.OnPolylineClickListener, GoogleMap.OnPolygonClickListener { @Override protected void onCreate(Bundle savedInstanceState) { super.onCreate(savedInstanceState); // Retrieve the content view that renders the map. setContentView(R.layout.activity_maps); // Get the SupportMapFragment and request notification when the map is ready to be used. SupportMapFragment mapFragment = (SupportMapFragment) getSupportFragmentManager() .findFragmentById(R.id.map); mapFragment.getMapAsync(this); } /** * Manipulates the map when it's available. * The API invokes this callback when the map is ready to be used. * This is where we can add markers or lines, add listeners or move the camera. * In this tutorial, we add polylines and polygons to represent routes and areas on the map. */ @Override public void onMapReady(GoogleMap googleMap) { // Add polylines to the map. // Polylines are useful to show a route or some other connection between points. Polyline polyline1 = googleMap.addPolyline(new PolylineOptions() .clickable(true) .add( new LatLng(-35.016, 143.321), new LatLng(-34.747, 145.592), new LatLng(-34.364, 147.891), new LatLng(-33.501, 150.217), new LatLng(-32.306, 149.248), new LatLng(-32.491, 147.309))); // Position the map's camera near Alice Springs in the center of Australia, // and set the zoom factor so most of Australia shows on the screen. googleMap.moveCamera(CameraUpdateFactory.newLatLngZoom(new LatLng(-23.684, 133.903), 4)); // Set listeners for click events. googleMap.setOnPolylineClickListener(this); googleMap.setOnPolygonClickListener(this); }
Kotlin
class PolyActivity : AppCompatActivity(), OnMapReadyCallback, OnPolylineClickListener, OnPolygonClickListener { override fun onCreate(savedInstanceState: Bundle?) { super.onCreate(savedInstanceState) // Retrieve the content view that renders the map. setContentView(R.layout.activity_maps) // Get the SupportMapFragment and request notification when the map is ready to be used. val mapFragment = supportFragmentManager .findFragmentById(R.id.map) as SupportMapFragment? mapFragment?.getMapAsync(this) } /** * Manipulates the map when it's available. * The API invokes this callback when the map is ready to be used. * This is where we can add markers or lines, add listeners or move the camera. * In this tutorial, we add polylines and polygons to represent routes and areas on the map. */ override fun onMapReady(googleMap: GoogleMap) { // Add polylines to the map. // Polylines are useful to show a route or some other connection between points. val polyline1 = googleMap.addPolyline(PolylineOptions() .clickable(true) .add( LatLng(-35.016, 143.321), LatLng(-34.747, 145.592), LatLng(-34.364, 147.891), LatLng(-33.501, 150.217), LatLng(-32.306, 149.248), LatLng(-32.491, 147.309))) // Position the map's camera near Alice Springs in the center of Australia, // and set the zoom factor so most of Australia shows on the screen. googleMap.moveCamera(CameraUpdateFactory.newLatLngZoom(LatLng(-23.684, 133.903), 4f)) // Set listeners for click events. googleMap.setOnPolylineClickListener(this) googleMap.setOnPolygonClickListener(this) }
onPolylineClick()コールバック メソッドをオーバーライドします。次の例では、ユーザーがポリラインをクリックするたびに、ラインのストローク パターンが実線または点線に切り替わります。Java
private static final int PATTERN_GAP_LENGTH_PX = 20; private static final PatternItem DOT = new Dot(); private static final PatternItem GAP = new Gap(PATTERN_GAP_LENGTH_PX); // Create a stroke pattern of a gap followed by a dot. private static final List<PatternItem> PATTERN_POLYLINE_DOTTED = Arrays.asList(GAP, DOT); /** * Listens for clicks on a polyline. * @param polyline The polyline object that the user has clicked. */ @Override public void onPolylineClick(Polyline polyline) { // Flip from solid stroke to dotted stroke pattern. if ((polyline.getPattern() == null) || (!polyline.getPattern().contains(DOT))) { polyline.setPattern(PATTERN_POLYLINE_DOTTED); } else { // The default pattern is a solid stroke. polyline.setPattern(null); } Toast.makeText(this, "Route type " + polyline.getTag().toString(), Toast.LENGTH_SHORT).show(); }
Kotlin
private val PATTERN_GAP_LENGTH_PX = 20 private val DOT: PatternItem = Dot() private val GAP: PatternItem = Gap(PATTERN_GAP_LENGTH_PX.toFloat()) // Create a stroke pattern of a gap followed by a dot. private val PATTERN_POLYLINE_DOTTED = listOf(GAP, DOT) /** * Listens for clicks on a polyline. * @param polyline The polyline object that the user has clicked. */ override fun onPolylineClick(polyline: Polyline) { // Flip from solid stroke to dotted stroke pattern. if (polyline.pattern == null || !polyline.pattern!!.contains(DOT)) { polyline.pattern = PATTERN_POLYLINE_DOTTED } else { // The default pattern is a solid stroke. polyline.pattern = null } Toast.makeText(this, "Route type " + polyline.tag.toString(), Toast.LENGTH_SHORT).show() }
エリアを表すポリゴンを地図に追加する
Polygon は、Polyline と同様に、指定されたシーケンスの一連の座標で構成されるシェイプです。違いは、ポリゴンが塗りつぶし可能な閉じたエリアを定義するのに対し、ポリラインは端が開いている点です。
PolygonOptionsオブジェクトを作成して地点を追加します。 それぞれの地点は地図上の場所を表し、緯度と経度の値を含むLatLngオブジェクトで定義されます。以下のコードサンプルでは、4 つの地点をつなぐポリゴンが作成されます。Polygon.setClickable()を呼び出して、ポリゴンをクリック可能にします(デフォルトでは、ポリゴンはクリックできず、ユーザーがポリゴンをタップしてもアプリには通知されません)。ポリゴンでのクリック イベントの処理は、このチュートリアルの前半で説明したポリラインでのイベントの処理と同様に行います。GoogleMap.addPolygon()を呼び出して、地図にポリゴンを追加します。Polygon.setTag()を呼び出して、ポリゴンを含むデータ オブジェクトを保存します。以下のコードでは、ポリゴンの任意のタイプ(alpha)を定義しています。Java
// Add polygons to indicate areas on the map. Polygon polygon1 = googleMap.addPolygon(new PolygonOptions() .clickable(true) .add( new LatLng(-27.457, 153.040), new LatLng(-33.852, 151.211), new LatLng(-37.813, 144.962), new LatLng(-34.928, 138.599))); // Store a data object with the polygon, used here to indicate an arbitrary type. polygon1.setTag("alpha");
Kotlin
// Add polygons to indicate areas on the map. val polygon1 = googleMap.addPolygon(PolygonOptions() .clickable(true) .add( LatLng(-27.457, 153.040), LatLng(-33.852, 151.211), LatLng(-37.813, 144.962), LatLng(-34.928, 138.599))) // Store a data object with the polygon, used here to indicate an arbitrary type. polygon1.tag = "alpha" // Style the polygon.
ポリゴンにカスタム スタイルを追加する
PolygonOptions オブジェクトではさまざまなスタイルのプロパティを指定できます。スタイルのオプションには、ストロークの色と幅およびパターンのほか、ストローク ジョイントのタイプや、塗りつぶしの色などがあります。特定のプロパティを指定しない場合は、API でそのプロパティのデフォルトの値が使用されます。
次のコードでは、ポリゴンのタイプに応じて特定の色とストローク パターンが適用されます。この場合、タイプはポリゴンのデータ オブジェクトに保存されている任意のプロパティとなります。
Java
private static final int COLOR_WHITE_ARGB = 0xffffffff; private static final int COLOR_DARK_GREEN_ARGB = 0xff388E3C; private static final int COLOR_LIGHT_GREEN_ARGB = 0xff81C784; private static final int COLOR_DARK_ORANGE_ARGB = 0xffF57F17; private static final int COLOR_LIGHT_ORANGE_ARGB = 0xffF9A825; private static final int POLYGON_STROKE_WIDTH_PX = 8; private static final int PATTERN_DASH_LENGTH_PX = 20; private static final PatternItem DASH = new Dash(PATTERN_DASH_LENGTH_PX); // Create a stroke pattern of a gap followed by a dash. private static final List<PatternItem> PATTERN_POLYGON_ALPHA = Arrays.asList(GAP, DASH); // Create a stroke pattern of a dot followed by a gap, a dash, and another gap. private static final List<PatternItem> PATTERN_POLYGON_BETA = Arrays.asList(DOT, GAP, DASH, GAP); /** * Styles the polygon, based on type. * @param polygon The polygon object that needs styling. */ private void stylePolygon(Polygon polygon) { String type = ""; // Get the data object stored with the polygon. if (polygon.getTag() != null) { type = polygon.getTag().toString(); } List<PatternItem> pattern = null; int strokeColor = COLOR_BLACK_ARGB; int fillColor = COLOR_WHITE_ARGB; switch (type) { // If no type is given, allow the API to use the default. case "alpha": // Apply a stroke pattern to render a dashed line, and define colors. pattern = PATTERN_POLYGON_ALPHA; strokeColor = COLOR_DARK_GREEN_ARGB; fillColor = COLOR_LIGHT_GREEN_ARGB; break; case "beta": // Apply a stroke pattern to render a line of dots and dashes, and define colors. pattern = PATTERN_POLYGON_BETA; strokeColor = COLOR_DARK_ORANGE_ARGB; fillColor = COLOR_LIGHT_ORANGE_ARGB; break; } polygon.setStrokePattern(pattern); polygon.setStrokeWidth(POLYGON_STROKE_WIDTH_PX); polygon.setStrokeColor(strokeColor); polygon.setFillColor(fillColor); }
Kotlin
private val COLOR_WHITE_ARGB = -0x1 private val COLOR_DARK_GREEN_ARGB = -0xc771c4 private val COLOR_LIGHT_GREEN_ARGB = -0x7e387c private val COLOR_DARK_ORANGE_ARGB = -0xa80e9 private val COLOR_LIGHT_ORANGE_ARGB = -0x657db private val POLYGON_STROKE_WIDTH_PX = 8 private val PATTERN_DASH_LENGTH_PX = 20 private val DASH: PatternItem = Dash(PATTERN_DASH_LENGTH_PX.toFloat()) // Create a stroke pattern of a gap followed by a dash. private val PATTERN_POLYGON_ALPHA = listOf(GAP, DASH) // Create a stroke pattern of a dot followed by a gap, a dash, and another gap. private val PATTERN_POLYGON_BETA = listOf(DOT, GAP, DASH, GAP) /** * Styles the polygon, based on type. * @param polygon The polygon object that needs styling. */ private fun stylePolygon(polygon: Polygon) { // Get the data object stored with the polygon. val type = polygon.tag?.toString() ?: "" var pattern: List<PatternItem>? = null var strokeColor = COLOR_BLACK_ARGB var fillColor = COLOR_WHITE_ARGB when (type) { "alpha" -> { // Apply a stroke pattern to render a dashed line, and define colors. pattern = PATTERN_POLYGON_ALPHA strokeColor = COLOR_DARK_GREEN_ARGB fillColor = COLOR_LIGHT_GREEN_ARGB } "beta" -> { // Apply a stroke pattern to render a line of dots and dashes, and define colors. pattern = PATTERN_POLYGON_BETA strokeColor = COLOR_DARK_ORANGE_ARGB fillColor = COLOR_LIGHT_ORANGE_ARGB } } polygon.strokePattern = pattern polygon.strokeWidth = POLYGON_STROKE_WIDTH_PX.toFloat() polygon.strokeColor = strokeColor polygon.fillColor = fillColor }
詳しくは、ストローク パターンと、シェイプのカスタマイズに関するその他のオプションをご覧ください。
次のステップ
円オブジェクトについて学びます。円はポリゴンに似ていますが、円の形状を定義するプロパティを持ちます。