Page Summary
-
To send information to your web app, you must send a
Canvasresponse from your conversational logic which can render or update the web app. -
Enabling Interactive Canvas requires specific configuration in the Actions console or modifications to your
settings.yamlfile for Actions SDK. -
Your Action should check for the
INTERACTIVE_CANVASdevice capability and provide alternative responses if it's not available. -
The first
Canvasresponse you send to a user must include the URL of your web app to render it on the user's device. -
Subsequent
Canvasresponses can pass data to the web app, either automatically with Actions Builder or manually through your webhook, to update its state.
To relay information to your web app, you must send a Canvas response
from your conversational logic. A Canvas response can do either of the following:
- Render the full-screen web app on the user's device
- Pass data to update the web app
The following sections describe how to return a Canvas response for each scenario.
Enable Interactive Canvas
You must configure your Action in a specific way to use Interactive Canvas.
Creating an Action that uses Interactive Canvas requires additional
configuration in the Actions console (and, for the Actions SDK, modifications to
your settings.yaml file). To see the full procedure for creating and
configuring an Interactive Canvas Action with the Actions SDK, see
Create a project.
When using Actions Builder, follow these additional steps to enable Interactive Canvas:
- If you did not select the Game card on the What type of Action do you want to build? screen, click Deploy in the top navigation. Under Additional Information, select the Games & fun category. Click Save.
- Click Develop in the top navigation of the Actions console.
- Click Interactive Canvas in the left navigation.
- Under Do you want your Action to use Interactive Canvas?, select one of
the following:
- Enable Interactive Canvas with server webhook fulfillment. This option
relies on the webhook to access certain features, and frequently uses
onUpdate()to pass data to the web app. When enabled, intent matches are handled in scenes, and you can choose to call the webhook before transitioning to another scene or ending the conversation. - Enable Interactive Canvas with client fulfillment. This option allows
you to move your webhook fulfillment logic to the web app, and limit
webhook calls to only the conversational features that require it,
such as account linking. When enabled, you can use
expect()to register intent handlers on the client-side.
- Enable Interactive Canvas with server webhook fulfillment. This option
relies on the webhook to access certain features, and frequently uses
- Optional: Enter your web app URL into the Set your default web app URL
field. This action adds a default
Canvasresponse with the URL field to your Main invocation. - Click Save.
When using the Actions SDK, follow these additional steps to enable Interactive Canvas:
- Set the
categoryfield in yoursettings.yamlfile toGAMES_AND_TRIVIAto best describe and help users discover your Action. - Set the
usesInteractiveCanvasfield in yoursettings.yamlfile totrue.
Check surface capability
The Interactive Canvas framework runs only on Assistant devices that provide
a visual interface, so your Action needs to check for the INTERACTIVE_CANVAS
capability on the user's device. When you define prompts in Actions Builder,
you can specify a list of device capabilities in the selector field of the
candidates object. The prompt selector selects the prompt candidate that is most
appropriate for the user's device capability.
To return a Canvas response, your Action's logic should do the following:
- Check that the user's device supports the
INTERACTIVE_CANVAScapability. If it does, send the user aCanvasresponse. - If the Interactive Canvas capability is unavailable, check if the user's
device supports the capability
RICH_RESPONSE. If it does, send the user a rich response instead. - If the rich response capability is unavailable, send the user a simple response.
The following snippets return the appropriate response based on the capabilities of the user's device:
YAML
candidates:
  - selector:
      surface_capabilities:
        capabilities:
          - INTERACTIVE_CANVAS
    canvas:
      url: 'https://example.web.app'
  - selector:
      surface_capabilities:
        capabilities:
          - RICH_RESPONSE
    content:
      card:
        title: Card title
        text: Card Content
        image:
          url: 'https://example.com/image.png'
          alt: Alt text
        button:
          name: Link name
          open:
            url: 'https://example.com/'
  - first_simple:
      variants:
        - speech: Example simple response.
JSON
{
  "candidates": [
    {
      "selector": {
        "surface_capabilities": {
          "capabilities": [
            "INTERACTIVE_CANVAS"
          ]
        }
      },
      "canvas": {
        "url": "https://example.web.app"
      }
    },
    {
      "selector": {
        "surface_capabilities": {
          "capabilities": [
            "RICH_RESPONSE"
          ]
        }
      },
      "content": {
        "card": {
          "title": "Card title",
          "text": "Card Content",
          "image": {
            "url": "https://example.com/image.png",
            "alt": "Alt text"
          },
          "button": {
            "name": "Link name",
            "open": {
              "url": "https://example.com/"
            }
          }
        }
      }
    },
    {
      "first_simple": {
        "variants": [
          {
            "speech": "Example simple response."
          }
        ]
      }
    }
  ]
}
Node.js
const supportsRichResponse = conv.device.capabilities.includes("RICH_RESPONSE");
const supportsInteractiveCanvas = conv.device.capabilities.includes("INTERACTIVE_CANVAS");
if (supportsInteractiveCanvas) {
  // Respond with a Canvas response
  conv.add(new Canvas({
    url: 'https://example.web.app',
  }));
} else if (supportsRichResponse) {
  // Respond with a rich response
  conv.add(new Card({
    title: 'Card title',
    image: new Image({
      url: 'https://example.com/image.png',
      alt: 'Alt text',
    }),
    button: new Link({
      name: 'Link name',
      open: {
        url: 'https://example.com/',
      },
    }),
  }));
} else {
  // Respond with a simple response
  conv.add('Example simple response.');
}
Render the web app
An Action that uses Interactive Canvas includes a web app with customized visuals that you send to users as a response. Once the web app renders, users continue to interact with it through voice, text, or touch until the conversation is over.
Your first Canvas response must contain the URL of the web app. This type of
Canvas response tells Google Assistant to render the web app at that address
on the user's device. Typically, you send the first Canvas response
immediately after the user invokes your Action. When the web app loads, the
Interactive Canvas library loads, and the web app registers a callback handler
with the Interactive Canvas API.
You can specify the URL of your web app in Actions Builder, as shown in the following screenshot:
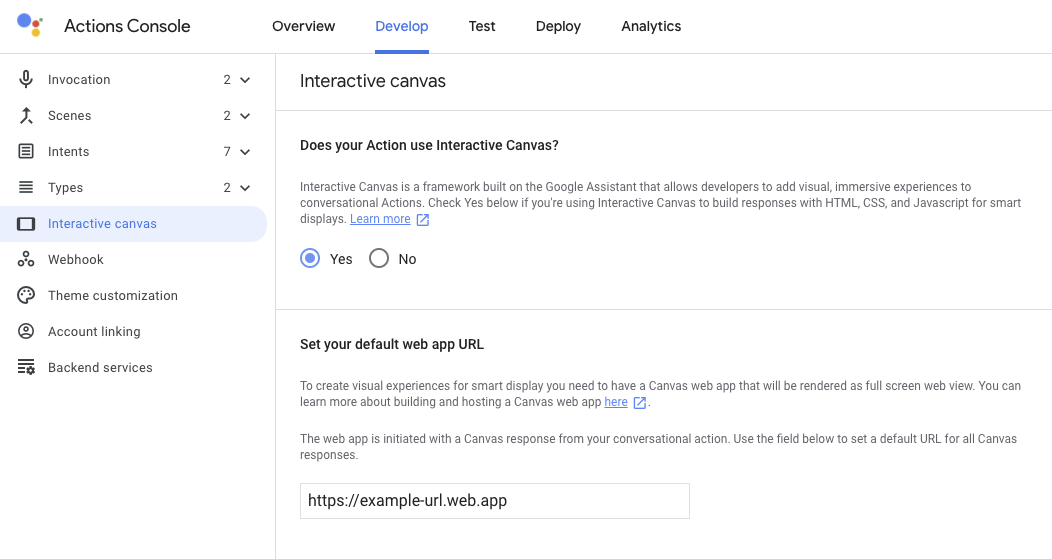
If you create a prompt that includes a Canvas response after specifying the
web app URL, Actions Builder auto-populates the URL field of the Canvas response. For more
information about setting the web app URL in the console, see the
Enable Interactive Canvas section.
The following snippets show how to construct Canvas responses that render
the web app in both Actions Builder and your webhook:
YAML
candidates:
  - first_simple:
       variants:
         - speech: >-
             Welcome! Do you want me to change color or pause spinning? You can
             also tell me to ask you later.
     canvas:
       url: 'https://your-web-app.com'
JSON
{
  "candidates": [
    {
      "first_simple": {
        "variants": [
          {
            "speech": "Welcome! Do you want me to change color or pause spinning? You can also tell me to ask you later."
          }
        ]
      },
      "canvas": {
        "url": "https://your-web-app.com"
      }
    }
  ]
}
Node.js
app.handle('welcome', (conv) => {
  conv.add('Welcome! Do you want me to change color or pause spinning? ' +
    'You can also tell me to ask you later.');
  conv.add(new Canvas({
    url: `https://your-web-app.com`,
  }));
});
JSON
{
  "session": {
    "id": "session_id",
    "params": {}
  },
  "prompt": {
    "override": false,
    "firstSimple": {
      "speech": "Welcome! Do you want me to change color or pause spinning? You can also tell me to ask you later.",
      "text": "Welcome! Do you want me to change color or pause spinning? You can also tell me to ask you later."
    },
    "canvas": {
      "data": [],
      "suppressMic": false,
      "url": "https://your-web-app.com"
    }
  }
}
Pass data to update the web app
After you send the initial Canvas response, you can use additional Canvas
responses to provide updates to data, which your web app's custom logic uses
to make changes to your web app. When you send a Canvas response that passes
data to the web app, the following steps occur:
- When the intent is matched within a scene, it triggers an event, and a
Canvasresponse containing adatafield with a JSON payload is then sent back as a response. - The
datafield is passed to anonUpdatecallback and used to update the web app. Your Conversational Action can send a new
Canvasresponse and provide information in thedatafield to send new updates or load new states.
You can pass data to your web app in two ways:
- With Actions Builder. Actions Builder auto-populates the
datafield in theCanvasresponse with the necessary metadata to update the web app. - With a webhook. If you have a webhook, you can configure a custom data
payload to update the web app in your
Canvasresponse.
The following sections describe how to pass data through Actions Builder and through a webhook.
Use Actions Builder to pass data
With Actions Builder, you don't need to define a webhook to manage the metadata
that is sent to your web app. Instead, when you configure your intent handler in
the Actions Builder UI, you can include a Canvas response. A
data field is automatically populated with the necessary metadata to update
your web app, like the intent name, any parameters captured from the user's input,
and the current scene.
For example, the following Guess intent handler indicates that you want to include a Canvas
response:
YAML
candidates:
  - canvas:
      send_state_data_to_canvas_app: true
JSON
{
  "candidates": [
    {
      "canvas": {
        "send_state_data_to_canvas_app": true
      }
    }
  ]
}
You can optionally append the following snippet to the intent handler to send a TTS message:
...
  - first_simple:
      variants:
        - speech: Optional message.
Actions Builder automatically extends the Canvas response with metadata to
update the web app, as shown in the following snippets. In this case, the user
guessed the letter "a" in a word-guessing game:
YAML
candidates:
  - canvas:
      data:
        - google:
            intent:
              params:
                letter:
                  resolved: a
                  original: a
              name: guess
            scene: Game
      sendStateDataToCanvasApp: true
JSON
{
  "candidates": [
    {
      "canvas": {
        "data": [
          {
            "google": {
              "intent": {
                "params": {
                  "letter": {
                    "resolved": "a",
                    "original": "a"
                  }
                },
                "name": "guess"
              },
              "scene": "Game"
            }
          }
        ],
        "sendStateDataToCanvasApp": true
      }
    }
  ]
}
This response updates your web app with the user's answer and transitions to the appropriate scene.
Use your webhook to pass data
You can manually configure the data field of Canvas responses in your webhook
with the necessary state information to update your web app. This approach is
recommended if you need to include a custom data payload in a Canvas response
instead of only passing along the typical metadata needed to update the web app.
The following snippets show how to pass data in a Canvas response in your
webhook:
Node.js
app.handle('start_spin', (conv) => {
  conv.add(`Ok, I'm spinning. What else?`);
  conv.add(new Canvas({
    data: {
      command: 'SPIN',
      spin: true,
    },
  }));
});
JSON
{
  "session": {
    "id": "session_id",
    "params": {}
  },
  "prompt": {
    "override": false,
    "firstSimple": {
      "speech": "Ok, I'm spinning. What else?",
      "text": "Ok, I'm spinning. What else?"
    },
    "canvas": {
      "data": {
        "command": "SPIN",
        "spin": true
      },
      "suppressMic": false,
      "url": ""
    }
  }
}
Guidelines and restrictions
Keep the following guidelines and restrictions for Canvas responses in mind
when building your Action:
- Each webhook handler in your fulfillment must include
Canvas. If the webhook response does not includeCanvas, your web app closes. - You only need to include your web app URL in the first
Canvasresponse you send to the user. - The
Canvasresponse URL should be valid and its protocol must be https. - The
Canvasresponse must be 50 KB or smaller in size.