
適用於 Google 助理的 Google 登入機制,提供最簡便的使用者體驗 讓使用者和開發人員進行帳戶連結和建立帳戶。您的動作 可以在對話期間要求存取使用者的 Google 個人資料, 包括使用者名稱、電子郵件地址和個人資料相片
可用於提供個人化使用者體驗 在你的動作中如果您在其他平台上有應用程式 且採用 Google 登入 也可以尋找並連結現有使用者的帳戶、建立新帳戶 與使用者建立直接的溝通管道
如要透過 Google 登入進行帳戶連結程序,您必須要求使用者提供同意聲明 存取自己的 Google 個人資料。這樣您就能使用對方個人資料中的資訊 來識別您系統中的使用者。
實作 Google 登入帳戶連結
按照下列章節中的步驟,新增連結至 開拍
設定專案
如要設定專案使用 Google 登入帳戶連結功能,請按照下列步驟操作:
- 開啟 Actions 主控台並選取專案。
- 按一下「開發」分頁標籤,然後選擇「帳戶連結」。
- 啟用「帳戶連結」旁的切換鈕。
- 在「建立帳戶」部分中選取「是」。
在「連結類型」中選取「Google 登入」。
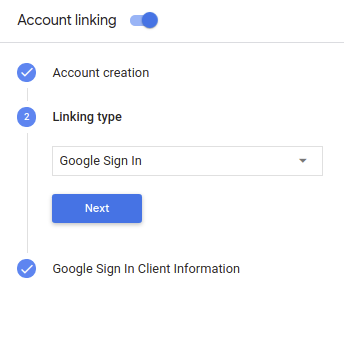
開啟「客戶資訊」,然後記下「Google 核發給動作的用戶端 ID」值。
按一下 [儲存]。
設計驗證流程的語音使用者介面
,瞭解如何調查及移除這項存取權。檢查使用者是否已通過驗證,並開始帳戶連結流程
- 在 Actions 主控台中開啟 Actions Builder 專案。
- 建立新場景,以便在動作中開始連結帳戶:
- 按一下「Scenes」。
- 按一下「新增」圖示 (+) 即可新增場景。
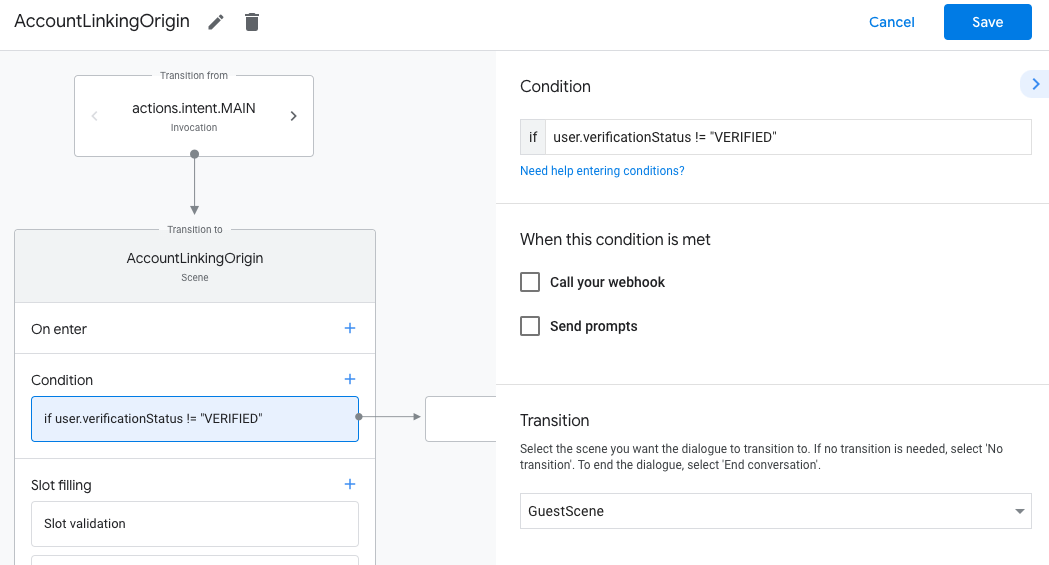
- 在新建立的場景中,按一下新增 add 「條件」圖示。
- 新增條件,檢查與對話相關聯的使用者是否處於
已驗證使用者如果檢查失敗,動作就無法連結帳戶
而應改回使用
不必連結帳戶的功能
- 在「條件」下方的
Enter new expression欄位中,輸入下列邏輯:user.verificationStatus != "VERIFIED" - 在「轉換」下方,選取不需要連結帳戶的場景,或是 做為僅供訪客使用功能的進入點。
- 在「條件」下方的
- 按一下「條件」的新增 add 圖示。
- 新增條件以觸發帳戶連結流程 (如果使用者沒有)
其他身分
- 在「條件」下方的
Enter new expression欄位中,輸入下列邏輯:user.verificationStatus == "VERIFIED" - 在「轉換」下方,選取「帳戶連結」系統場景。
- 按一下 [儲存]。
- 在「條件」下方的
![]()
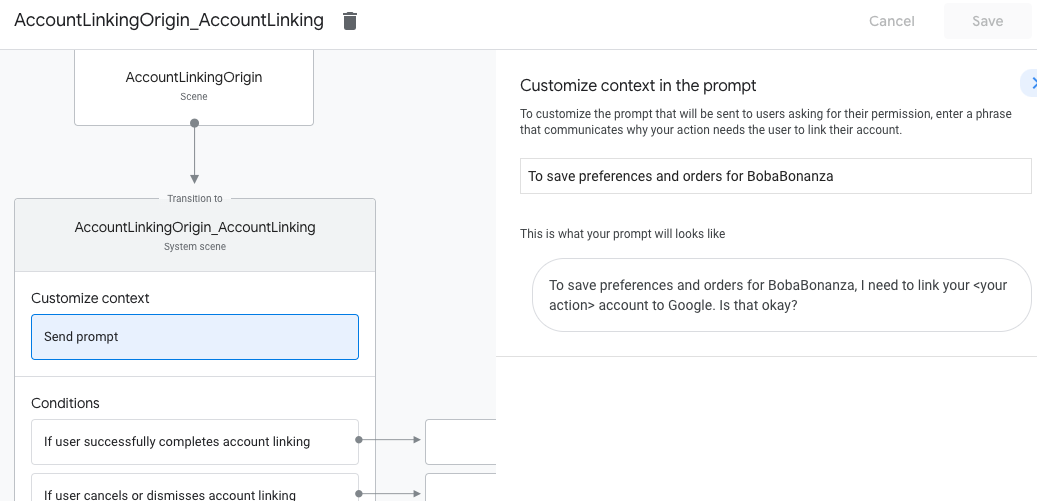
儲存後,名為 <SceneName>_AccountLinking 的新帳戶連結系統場景
就會加入您的專案
自訂帳戶連結情境
- 在「Scenes」下方,選取連結帳戶的系統場景。
- 按一下「傳送提示」,然後新增要向使用者說明的簡短句子 為何動作需要存取自己的身分 (例如「如要儲存你的偏好設定」)。
- 按一下 [儲存]。
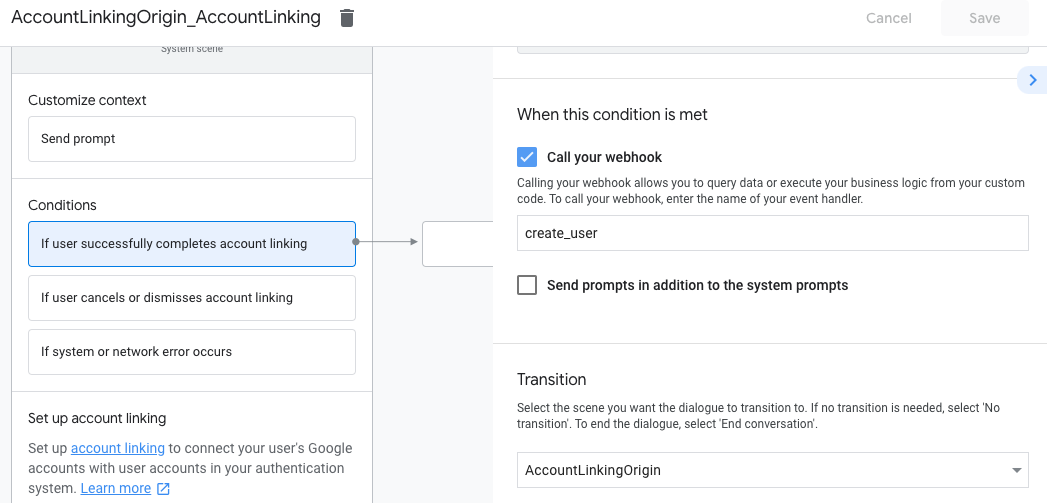
- 在「條件」下方,點選「如果使用者成功完成帳戶連結」。
- 設定當使用者同意連結自己的帳戶時,流程應如何進行。 舉例來說,您可以呼叫 Webhook 來處理任何必要的自訂商業邏輯 然後切回原始場景
- 按一下 [儲存]。
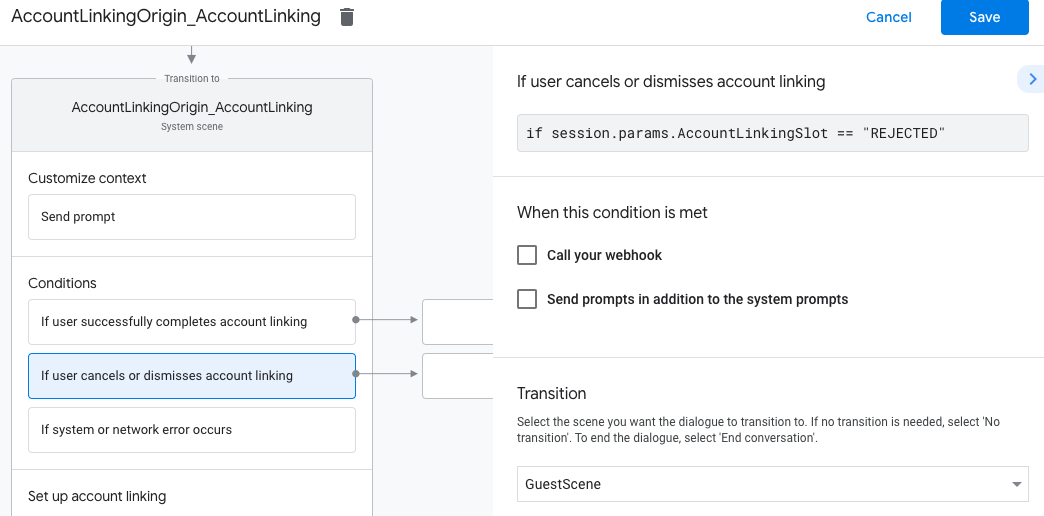
- 在「條件」下方,按一下「如果使用者取消或關閉帳戶連結」。
- 設定使用者不同意連結自身時,應如何繼續流程 讓他們使用服務帳戶例如傳送確認訊息並重新導向至場景 這類功能不需連結帳戶
- 按一下 [儲存]。
- 在「條件」下方,按一下「如果發生系統或網路錯誤」。
- 設定無法在帳戶連結流程的情況下處理流程 作業完成。 例如傳送確認訊息並重新導向至場景 這類功能不需連結帳戶
- 按一下 [儲存]。
在後端存取設定檔資訊
使用者授權你的 Google 個人資料存取後,你會收到 內含使用者的 Google 個人資料資訊的 Google ID 權杖 的操作提示
如要存取使用者的個人資料資訊,您必須先驗證權杖並解碼 方法如下:
- 針對您的語言使用 JWT 解碼程式庫, 憑證,以及使用 Google 的公開金鑰 (適用於 JWK 或 PEM 格式),藉此驗證權杖的簽章。
- 確認權杖的核發者 (已解碼權杖中的
iss欄位) 是否為https://accounts.google.com而且目標對象 (已解碼權杖中的aud欄位) 是 Google 為您的動作核發的用戶端 ID,這些用戶端會指派給專案 。
以下是已解碼的權杖範例:
{
  "sub": 1234567890,        // The unique ID of the user's Google Account
  "iss": "https://accounts.google.com",        // The token's issuer
  "aud": "123-abc.apps.googleusercontent.com", // Client ID assigned to your Actions project
  "iat": 233366400,         // Unix timestamp of the token's creation time
  "exp": 233370000,         // Unix timestamp of the token's expiration time
  "name": "Jan Jansen",
  "given_name": "Jan",
  "family_name": "Jansen",
  "email": "jan@gmail.com", // If present, the user's email address
  "locale": "en_US"
}
如果您使用 Actions on Google Fulfillment 程式庫適用於 Node.js, 可以為您驗證符記並加以解碼 設定檔內容,如以下程式碼片段所示。
...
const app = conversation({
  // REPLACE THE PLACEHOLDER WITH THE CLIENT_ID OF YOUR ACTIONS PROJECT
  clientId: CLIENT_ID,
});
...
// Invoked on successful completion of account linking flow, check if we need to
// create a Firebase user.
app.handle('linkAccount', async conv => {
  let payload = conv.headers.authorization;
  if (payload) {
  // Get UID for Firebase auth user using the email of the user
    const email = payload.email;
    if (!conv.user.params.uid && email) {
      try {
        conv.user.params.uid = (await auth.getUserByEmail(email)).uid;
      } catch (e) {
        if (e.code !== 'auth/user-not-found') {
          throw e;
        }
        // If the user is not found, create a new Firebase auth user
        // using the email obtained from Google Assistant
        conv.user.params.uid = (await auth.createUser({email})).uid;
      }
    }
  }
});
處理資料存取要求
如要處理資料存取要求,只要驗證使用者的 Google ID 已宣告即可 表示資料庫中已有的憑證下列程式碼片段顯示 以下範例說明如何檢查 Firestore 資料庫中是否已有使用者的訂單:
...
app.handle('Place_Order', async conv => {
  const order = conv.session.params.order;
  const userDoc = dbs.user.doc(conv.user.params.uid);
  const orderHistory = userDoc.collection("orderHistory");
  if (orderHistory) {
    // Order history exists, so the user already placed an order.
    // Update counter for order type.
    await orderHistory.doc(order).update({ count: admin.firestore.FieldValue.increment(1)});
  } else {
    // First order they place
    await orderHistory.doc(order).set({ option: order, count: 1});
    options.forEach(opt => {
      if (opt != order) {
        orderHistory.doc(opt).set({ option: opt, count: 0});
      }
    });
  }
  return conv.add(`Your ${order} has been placed. ` +
      'Thanks for using Boba Bonanza, see you soon!');
});