
Page Summary
-
Account Linking, specifically "Link from your Platform" on Android, allows users to connect their account on your service with their Google Account directly within your mobile app.
-
This method improves performance and user experience by keeping the account linking process within the familiar context of your app, leveraging existing user authentication.
-
Developers benefit from increased control over where and how to promote linking, higher conversion rates, reduced drop-off rates, and low implementation effort if an OAuth2.0 implementation exists.
-
The linking process involves user consent on both Google and your service's screens before the link is established, granting Google access to shared data.
-
Implementing "Link from your Platform" requires an Android app and an OAuth 2.0 server supporting the authorization code flow, and involves setting up the development environment and configuring your app with necessary dependencies.
Account Linking can be completed directly within your mobile app, allowing your users to link their account on your service with their Google Account. The established link grants Google access to the data the user consents to share.
This approach improves account linking performance by engaging users within the familiar context of your app instead of an Assistant conversation. It can be integrated into user onboarding, settings, and other app surfaces, creating opportunities for discovery and engagement of your Google Assistant Action. For example, after linking you could offer to take the user directly to your Action.
Benefits for users include:
- Users can start and complete the account linking process in your app, an environment they are already familiar with.
- Users do not require login credentials because they have already been authenticated on the device and in your mobile app.
Benefits for developers include:
- Control where to promote and initiate account linking in your mobile app, for example, in user settings, on interstitials or after a user signs in to your mobile app. Adding multiple entry points to initiate account linking helps make account linking more discoverable, resulting in increased engagement and number of linked accounts.
- Increase in the conversion rate as users are able to complete the linking process in fewer steps than the standard web-based OAuth flow.
- Low engineering effort required to implement Link from your Platform (Android) because this flow leverages your existing OAuth2.0 implementation, assuming you already have one implemented.
- Reduced drop-off rates because users do not need to re-enter their login credentials and are able to complete the process in fewer steps. Drop-off rates can be as high as 80% in flows where users are required to recall and enter their sign-in credentials.
How it works
Link from your Platform is completed in the following steps:
- User will click / toggle a linking trigger on your mobile app.
- The user selects the Google Account to link.
- The user selects an existing Google Account on the device to link, or signs in with a new account
- The user is shown a Google hosted consent screens and has to agree to continue or cancel to stop the linking process.
- The user is shown your consent screen and has to agree to continue or cancel to stop the linking process.
- The Link is established between the user’s account, on your service, and their Google Account.
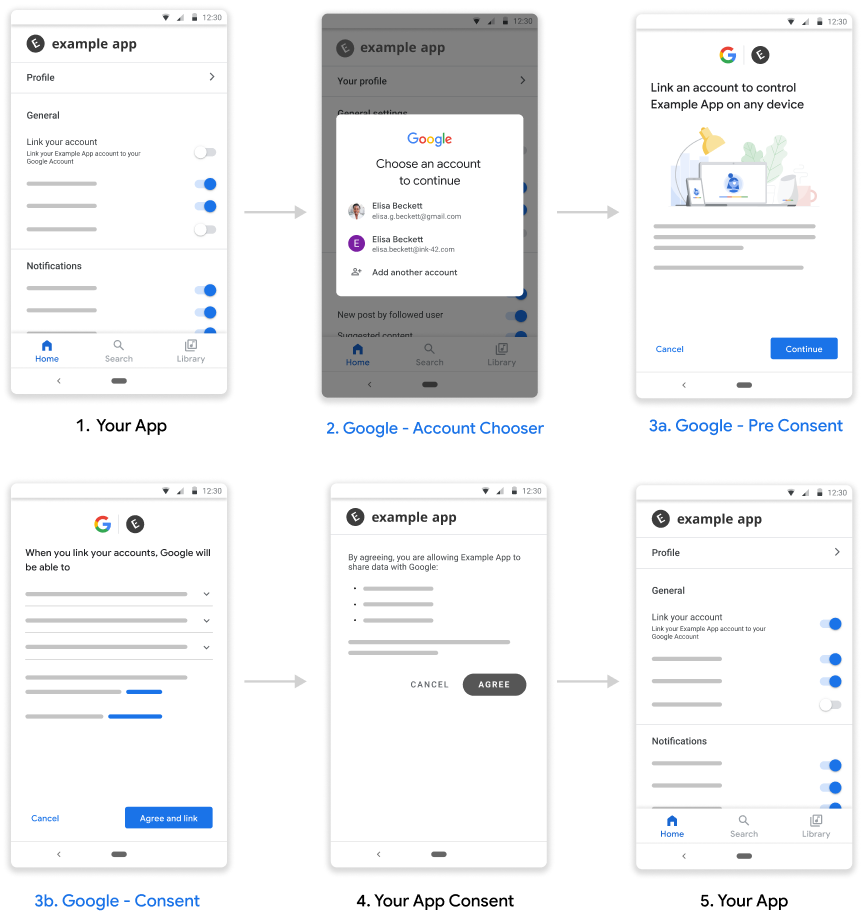
Figure 1. Link from your Platform Flow
Requirements
To implement Link from your platform, you need the following:
- An android app.
- Own, manage, and maintain an OAuth 2.0 server that supports the OAuth 2.0 authorization code flow.
Setup
Before proceeeding with the steps below, you must have completed the Account Linking registration process.
Setup your development environment
Get the latest Google Play services on your development host:
- Open the Android SDK Manager.
Under SDK Tools, find Google Play services.
If the status for these packages is not Installed, select them both and click Install Packages.
Configure your app
In your project-level
build.gradlefile, include Google's Maven repository in both yourbuildscriptandallprojectssections.buildscript { repositories { google() } } allprojects { repositories { google() } }Add the dependencies for the “Link with Google” API to your module's app-level gradle file, which is usually
app/build.gradle:dependencies { implementation 'com.google.android.gms:play-services-auth:21.6.0' }
Add support for Link from your Platform
The Link from your Platform flow will result in an access token, provided by your service, being saved by Google. Consent must be received before returning the token for the user.
Follow the steps below to get consent from the user and return an auth code token via the Google Play Services SDK.
Build a PendingIntent that can launch your consent activity - The consent is launched by the Play Services API. You will need to provide a
PendingIntent(which will be referred to as theconsentPendingIntentfor clarity) when the API is calledKotlin
// Build a PendingIntent that can launch the consent activity
val consentPendingIntent = buildConsentPendingIntent()
Java
// Build a PendingIntent that can launch your consent activity
PendingIntent consentPendingIntent =
          buildConsentPendingIntent();
Create corresponding Activity to handle the consent intent
Kotlin
  class ConsentActivity : AppCompatActivity

  private fun onConsentAccepted() {
      // Obtain a token (for simplicity, we’ll ignore the async nature
      // of the following call)
      val token = getToken()
      val intent = Intent()
                  .putExtra(SaveAccountLinkingTokenRequest.EXTRA_TOKEN,
                            token)
      setResult(Activity.RESULT_OK, intent)
      finish()
  }

  private fun onConsentRejectedOrCanceled() {
      setResult(Activity.RESULT_CANCELED)
      finish()
  }
Java
  public class ConsentActivity extends AppCompatActivity {
    ...
    private void onConsentAccepted() {
      // Obtain a token (for simplicity, we’ll ignore the async nature of
      // the following call
      String token = getToken();
      Intent intent = new Intent();
      intent.putExtra(SaveAccountLinkingTokenRequest.EXTRA_TOKEN, token);
      setResult(Activity.RESULT_OK, intent);
      finish();
    }

    private void onConsentRejectedOrCanceled() {
      setResult(Activity.RESULT_CANCELED, null);
      finish();
    }
 }
We assume that the methods
onConsentAccpeted()andonConsentRejectedOrCanceled()are called if user accepts or rejects/cancels your consent, respectively.Create a request for saving the token and, among other configuration parameters, pass the
PendingIntentcreated in step 1 above.Kotlin
  // Create an ActivityResultLauncher which registers a callback for the
  // Activity result contract
  val activityResultLauncher = registerForActivityResult(
    ActivityResultContracts.StartIntentSenderForResult())
    { result ->
      if (result.resultCode == RESULT_OK) {
        // Successfully finished the flow and saved the token
      } else {
        // Flow failed, for example the user may have canceled the flow
      }
    }

  // Build token save request
  val request = SaveAccountLinkingTokenRequest.builder()
    .setTokenType(SaveAccountLinkingTokenRequest.TOKEN_TYPE_AUTH_CODE)
    .setConsentPendingIntent(consentPendingIntent)
    .setServiceId("service-id-of-and-defined-by-developer")
    //Set the scopes that the token is valid for on your platform
    .setScopes(scopes)
    .build()

   // Launch consent activity and retrieve token
   Identity.getCredentialSavingClient(this)
     .saveAccountLinkingToken(request)
     .addOnSuccessListener( saveAccountLinkingTokenResult -> {
        if (saveAccountLinkingTokenResult.hasResolution()) {
          val pendingIntent = saveAccountLinkingTokenResult
                              .getPendingIntent()
          val intentSenderRequest = IntentSenderRequest
                                    .Builder(pendingIntent).build()
          activityResultLauncher.launch(intentSenderRequest)
        } else {
           // This should not happen, let’s log this
           Log.e(TAG, "Failed to save token");
        }
      })
      .addOnFailureListener(e -> Log.e(TAG, “Failed to save token”, e))
Java
  // Create an ActivityResultLauncher which registers a callback for the
  // Activity result contract
  ActivityResultLauncher<IntentSenderRequest>
      activityResultLauncher =
      registerForActivityResult(new ActivityResultContracts
                                    .StartIntentSenderForResult(),
                                result -> {
      if (result.getResultCode() == RESULT_OK) {
          // Successfully finished the flow and saved the token
      } else {
          // Flow failed, for example the user may have canceled the flow
      }
  });

 // Build token save request
 SaveAccountLinkingTokenRequest request =
    SaveAccountLinkingTokenRequest.builder()
        .setTokenType(
            SaveAccountLinkingTokenRequest.TOKEN_TYPE_AUTH_CODE)
        .setConsentPendingIntent(consentPendingIntent)
        .setServiceId("service-id-of-and-defined-by-developer")
        //Set the scopes that the token is valid for on your platform
        .setScopes(scopes)
        .build();

  // Launch consent activity and retrieve token
  Identity.getCredentialSavingClient(this)
      .saveAccountLinkingToken(request)
      .addOnSuccessListener(
          saveAccountLinkingTokenResult -> {
            if (saveAccountLinkingTokenResult.hasResolution()) {
              // Launch the resolution intent
              PendingIntent pendingIntent =
                  saveAccountLinkingTokenResult.getPendingIntent();
              IntentSenderRequest intentSenderRequest =
                  new IntentSenderRequest.Builder(pendingIntent).build();
              activityResultLauncher.launch(intentSenderRequest);
            } else {
              // This should not happen, let’s log this
              Log.e(TAG, "Failed to save token");
            }
          })
      .addOnFailureListener(e -> Log.e(TAG, "Failed to save token", e));
  ```
The above steps prompts a user for consent and returns an authorization code to Google.
Best Practices
Your app should indicate link status to the user through a button, toggle or a similar visual element.
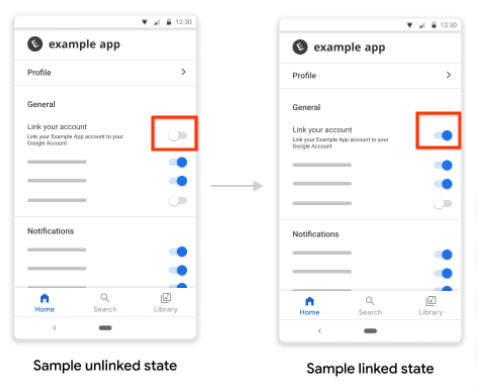
Figure 1. Sample link status image
You should notify the user after a successful link e.g. display a toast, trigger a toggle state change or redirect the user to a separate link success page.
You should consider prompting in-app users to link accounts, ideally based on strong signals that linking would benefit such users.
After successfully linking, you should give users an example of what to do with the linked account e.g. if you just linked a music streaming service, ask your Google Assistant to play music.
Enable users to manage their linked accounts, including the option to unlink them. Point them to their Google Linked Accounts management page, that is, https://myaccount.google.com/accountlinking.