
Webhook フルフィルメントを構築したら、それを本番環境にデプロイして接続します。 アクションに追加します。次の手順では、環境を設定する方法について説明します。 本番環境のホスティングのために Cloud Functions for Firebase にデプロイする必要があります。ただし、 HTTPS リクエストをサポートするウェブ ホスティング プラットフォームであれば、 フルフィルメントをホストします
Webhook をすでにウェブ ホスティング プラットフォームにデプロイしている場合は、 Webhook をアクションに接続するに進みます。なお、 以下のプロセスの手順は、Dialogflow と Actions SDK。
Cloud Functions for Firebase にデプロイする
- Node.js をダウンロードしてインストールします。
Firebase CLI を設定して初期化します。次のコマンドを実行すると、
EACCESエラーが発生した場合は、 npm の権限を変更します。npm install -g firebase-toolsGoogle アカウントを使用して Firebase ツールを認証します。
firebase loginActions プロジェクト ディレクトリに移動して、Firebase を初期化します。内容は次のとおりです。 セットアップする Firebase CLI 機能を選択するよう求めるメッセージが表示されます。 アクション プロジェクトです。使用する
Functionsとその他の機能を選択します。 Enter キーを押して確定し、続行します。cd <cloud_function_dir> firebase initFirebase ツールを Actions プロジェクトに関連付けるため、 矢印キーを使ってプロジェクト リスト内を移動します。
プロジェクトを選択すると、Firebase ツールによって Functions の設定が開始されます 使用する言語を尋ねられます矢印キーで選択し、 Enter キーを押して続行します。
=== Functions Setup

A functions directory will be created in your project with a Node.js
package pre-configured. Functions can be deployed with firebase deploy.

? What language would you like to use to write Cloud Functions? (Use arrow keys)
> JavaScript
TypeScript
ESLint を使用して潜在的なバグを捕捉し、スタイルを適用するかどうかを選択します
YまたはNを入力:? Do you want to use ESLint to catch probable bugs and enforce style? (Y/n)
プロンプトに対して「
Y」と入力して、プロジェクトの依存関係を取得します。? Do you want to install dependencies with npm now? (Y/n)
設定が完了すると、次のような出力が表示されます。
✔ Firebase initialization complete!
actions-on-google 依存関係をインストールします。
cd <cloud_function_dir>/functions
npm install actions-on-google
フルフィルメント依存関係を取得し、フルフィルメント関数をデプロイします。
npm install
firebase deploy --only functions
デプロイには数分かかります。完了すると、次のような出力が表示されます。Dialogflow にアクセスするには、Function URL が必要です。
✔  Deploy complete!

Project Console: https://console.firebase.google.com/project/exampleproject-123/overview
Function URL (cloudFunctionName): https://us-central1-exampleproject-123.cloudfunctions.net/cloudFunctionName
Webhook をアクションに接続する
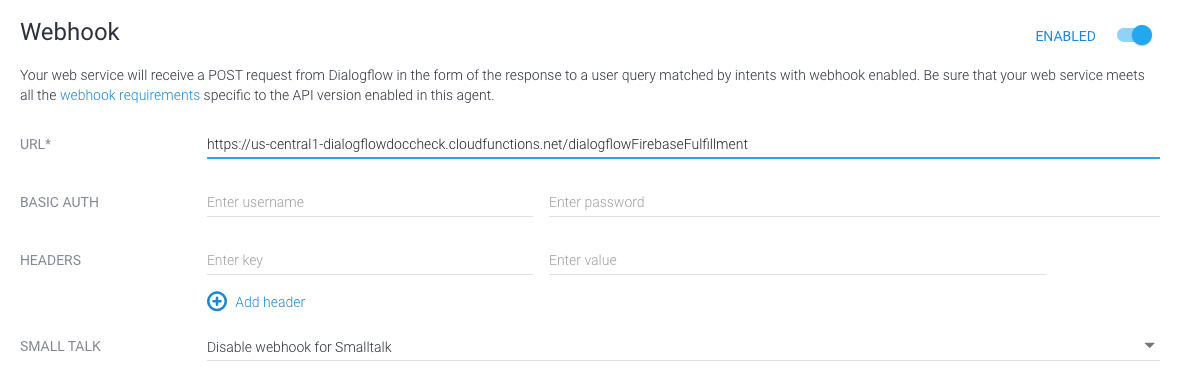
Dialogflow を使用している場合: Dialogflow コンソールの場合は、 [Fulfillment] で、[Webhook] ボタンを [ENABLED] に切り替えて、 URL フィールドの URL を Function URL に置き換えます。
Actions SDK を使用している場合: オブジェクトを作成します。
conversations オブジェクト内で使用して、アクションでフルフィルメントを宣言します。
パッケージ:
{
  "actions": [
    {
      "description": "Default Welcome Intent",
      "name": "MAIN",
      "fulfillment": {
        "conversationName": "myFulfillmentFunction"
      },
      "intent": {
        "name": "actions.intent.MAIN",
        "trigger": {
          "queryPatterns": [
            "talk to myFulfillmentFunction"
          ]
        }
      }
    }
  ],
  "conversations": {
    "myFulfillmentFunction": {
      "name": "myFulfillmentFunction",
      "url": "https://us-central1-myprojectname-ab123.cloudfunctions.net/cloudFunctionName"
    }
  },
  "locale": "en"
}