
多樣化的回覆會添加視覺元素,加深使用者與廣告的互動 開拍您可以在提示中使用下列複合式回應類型:
- 基本資訊卡
- 圖片資訊卡
- 資料表資訊卡
定義複合式回應時,請搭配 RICH_RESPONSE 使用「候選」
顯示功能,確保 Google 助理只會在
支援的裝置。在content
提示。
基本資訊卡
基本資訊卡的設計旨在簡潔扼要,以呈現重要 (或摘要) 資訊 以及允許使用者進一步瞭解 (使用網頁連結)。
基本資訊卡主要用於顯示,因為這個資訊卡沒有互動
功能。如要將按鈕連結至網路,桌面必須
同時具備 WEB_LINK 功能
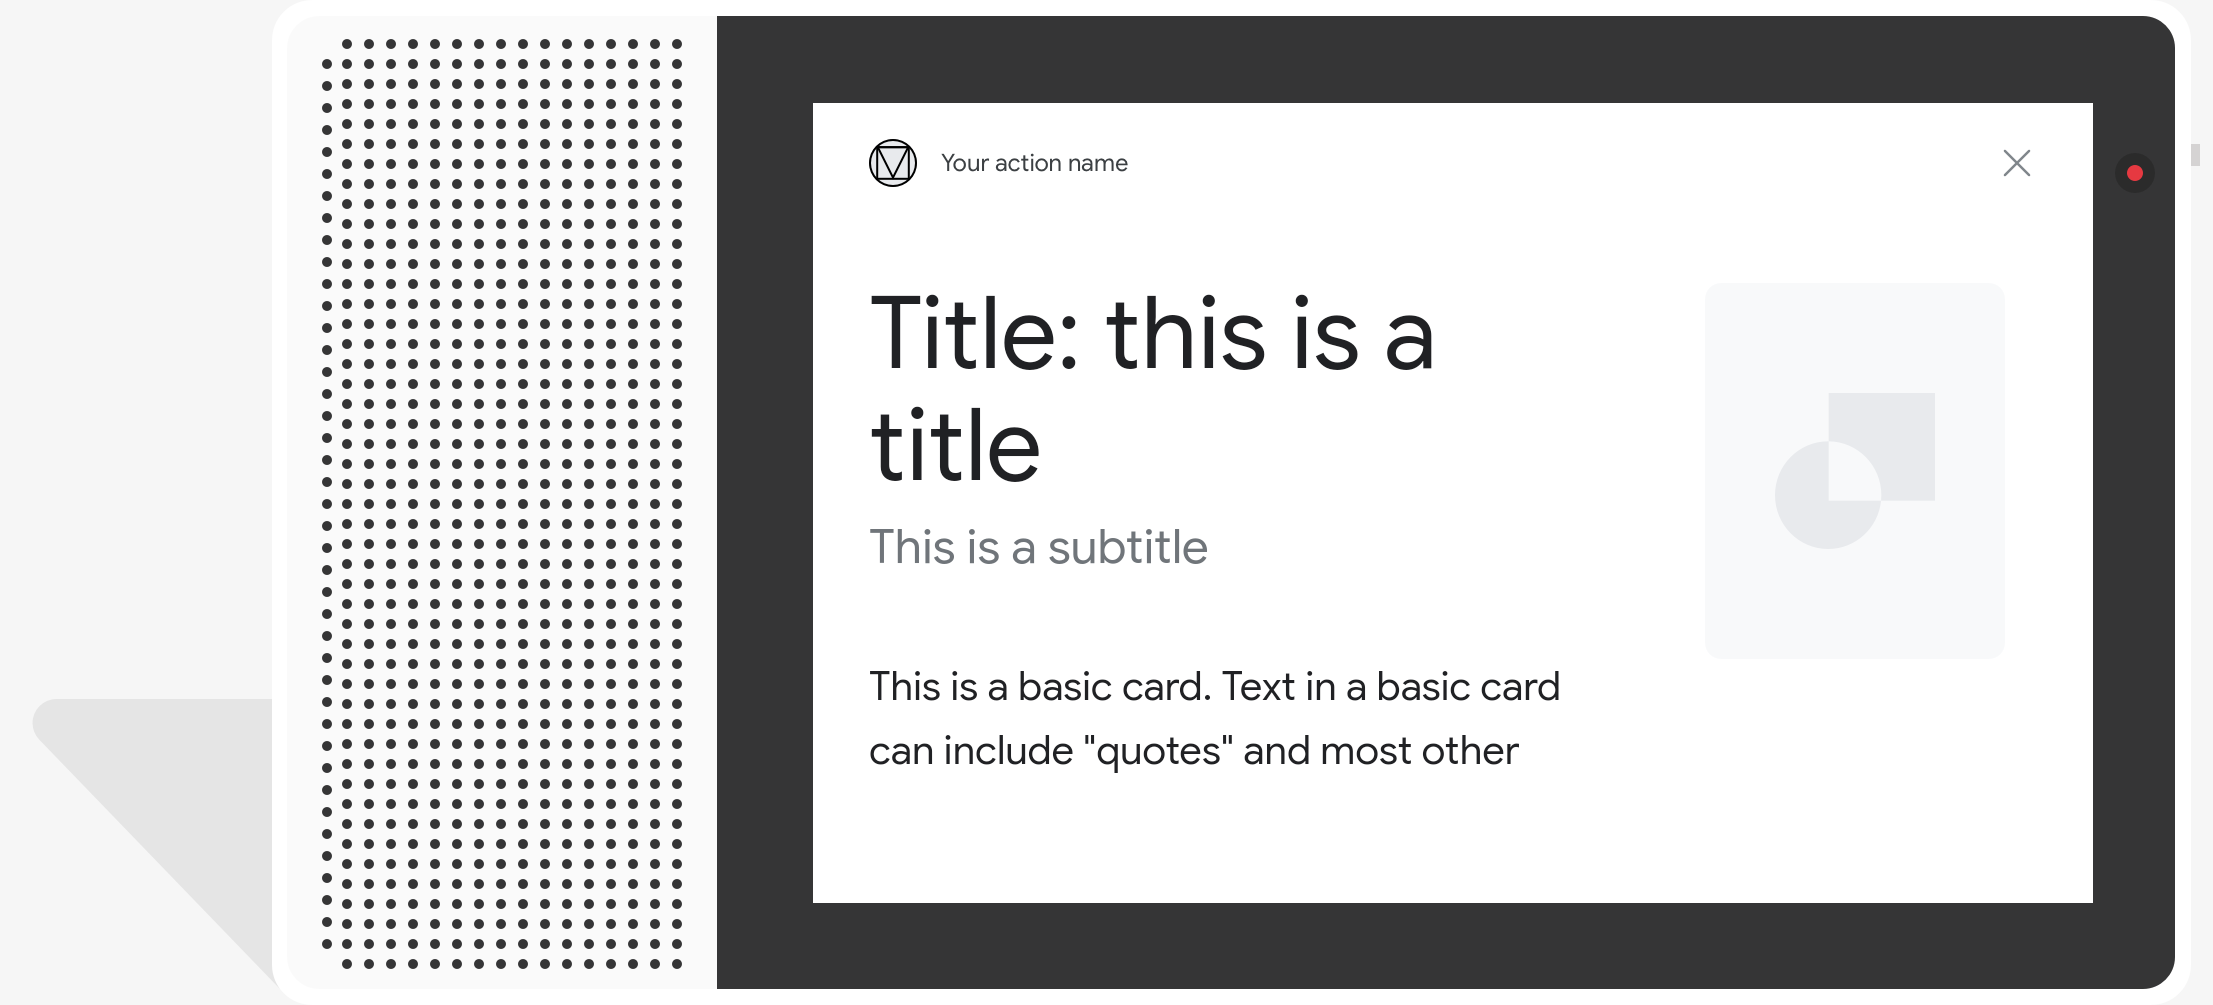
屬性
基本資訊卡回應類型具備以下屬性:
| 屬性 | 類型 | 需求 | 說明 |
|---|---|---|---|
title |
字串 | 選用 | 資訊卡的純文字標題。標題採用固定的字型與大小 第一行後方的字元會被截斷。如果沒有,資訊卡高度會收合 已指定標題。 |
subtitle |
字串 | 選用 | 資訊卡的純文字副標題。標題採用固定的字型與大小 且第一行後方的字元都會被截斷。如果發生以下情況,資訊卡高度會收合 未指定子標題。 |
text |
字串 | 條件式 |
資訊卡的純文字內容。過長的文字過長
最後一個字詞斷行這個屬性為必要項目,除非
這項資源的限制如下:
系統僅支援部分 Markdown:
|
image |
Image |
選用 | 資訊卡中顯示的圖片。圖片可以是 JPG、PNG 和 GIF (動畫) 和非動畫)。 |
image_fill |
ImageFill |
選用 | 資訊卡和映像檔容器之間的框線;當 圖片的長寬比與圖片容器的長寬比不符 比例。 |
button |
Link |
選用 | 使用者按下按鈕後,可將使用者連結至特定網址。按鈕必須包含
包含按鈕文字的 name 屬性,以及
含有連結網址的 url 屬性。按鈕文字可
不會誤導觀眾,而且會在審查程序進行檢查。 |
程式碼範例
YAML
candidates:
  - first_simple:
      variants:
        - speech: This is a card.
          text: This is a card.
    content:
      card:
        title: Card Title
        subtitle: Card Subtitle
        text: Card Content
        image:
          url: 'https://developers.google.com/assistant/assistant_96.png'
          alt: Google Assistant logo
JSON
{
  "candidates": [
    {
      "first_simple": {
        "variants": [
          {
            "speech": "This is a card.",
            "text": "This is a card."
          }
        ]
      },
      "content": {
        "card": {
          "title": "Card Title",
          "subtitle": "Card Subtitle",
          "text": "Card Content",
          "image": {
            "url": "https://developers.google.com/assistant/assistant_96.png",
            "alt": "Google Assistant logo"
          }
        }
      }
    }
  ]
}
Node.js
app.handle('Card', conv => {
  conv.add('This is a card.');
  conv.add(new Card({
    "title": "Card Title",
    "subtitle": "Card Subtitle",
    "text": "Card Content",
    "image": new Image({
      url: 'https://developers.google.com/assistant/assistant_96.png',
      alt: 'Google Assistant logo'
    })
  }));
});
JSON
{
  "responseJson": {
    "session": {
      "id": "session_id",
      "params": {}
    },
    "prompt": {
      "override": false,
      "content": {
        "card": {
          "title": "Card Title",
          "subtitle": "Card Subtitle",
          "text": "Card Content",
          "image": {
            "alt": "Google Assistant logo",
            "height": 0,
            "url": "https://developers.google.com/assistant/assistant_96.png",
            "width": 0
          }
        }
      },
      "firstSimple": {
        "speech": "This is a card.",
        "text": "This is a card."
      }
    }
  }
}
圖片資訊卡
圖片資訊卡旨在提供更簡單的替代選項 內含一張圖片。如要展示圖片,可以使用圖片資訊卡; 也不需要支援文字或互動元件
屬性
圖片資訊卡回應類型具備下列屬性:
| 屬性 | 類型 | 需求 | 說明 |
|---|---|---|---|
url |
字串 | 必填 | 圖片的來源網址。圖片可以是 JPG、PNG 或 GIF (動畫和 非動畫)。 |
alt |
字串 | 必填 | 用於無障礙功能的圖片文字說明。 |
height |
int32 | 選用 | 圖片的高度 (以像素為單位)。 |
width |
int32 | 選用 | 圖片寬度 (以像素為單位)。 |
程式碼範例
YAML
candidates:
  - first_simple:
      variants:
        - speech: This is an image prompt.
          text: This is an image prompt.
    content:
      image:
        alt: Google Assistant logo
        url: 'https://developers.google.com/assistant/assistant_96.png'
JSON
{
  "candidates": [
    {
      "first_simple": {
        "variants": [
          {
            "speech": "This is an image prompt.",
            "text": "This is an image prompt."
          }
        ]
      },
      "content": {
        "image": {
          "alt": "Google Assistant logo",
          "url": "https://developers.google.com/assistant/assistant_96.png"
        }
      }
    }
  ]
}
Node.js
app.handle('Image', conv => {
  conv.add("This is an image prompt!");
  conv.add(new Image({
      url: 'https://developers.google.com/assistant/assistant_96.png',
      alt: 'Google Assistant logo'
  }));
});
JSON
{
  "responseJson": {
    "session": {
      "id": "session_id",
      "params": {}
    },
    "prompt": {
      "override": false,
      "content": {
        "image": {
          "alt": "Google Assistant logo",
          "height": 0,
          "url": "https://developers.google.com/assistant/assistant_96.png",
          "width": 0
        }
      },
      "firstSimple": {
        "speech": "This is an image prompt.",
        "text": "This is an image prompt."
      }
    }
  }
}
表格資訊卡
表格資訊卡可讓您在回覆中顯示表格資料 (例如 體育賽事排名、選舉結果和航班)。您可以定義資料欄 Google 助理顯示在表格資訊卡中的列 (最多 3 列)。您也可以製定 資料欄和資料列,以及優先順序。
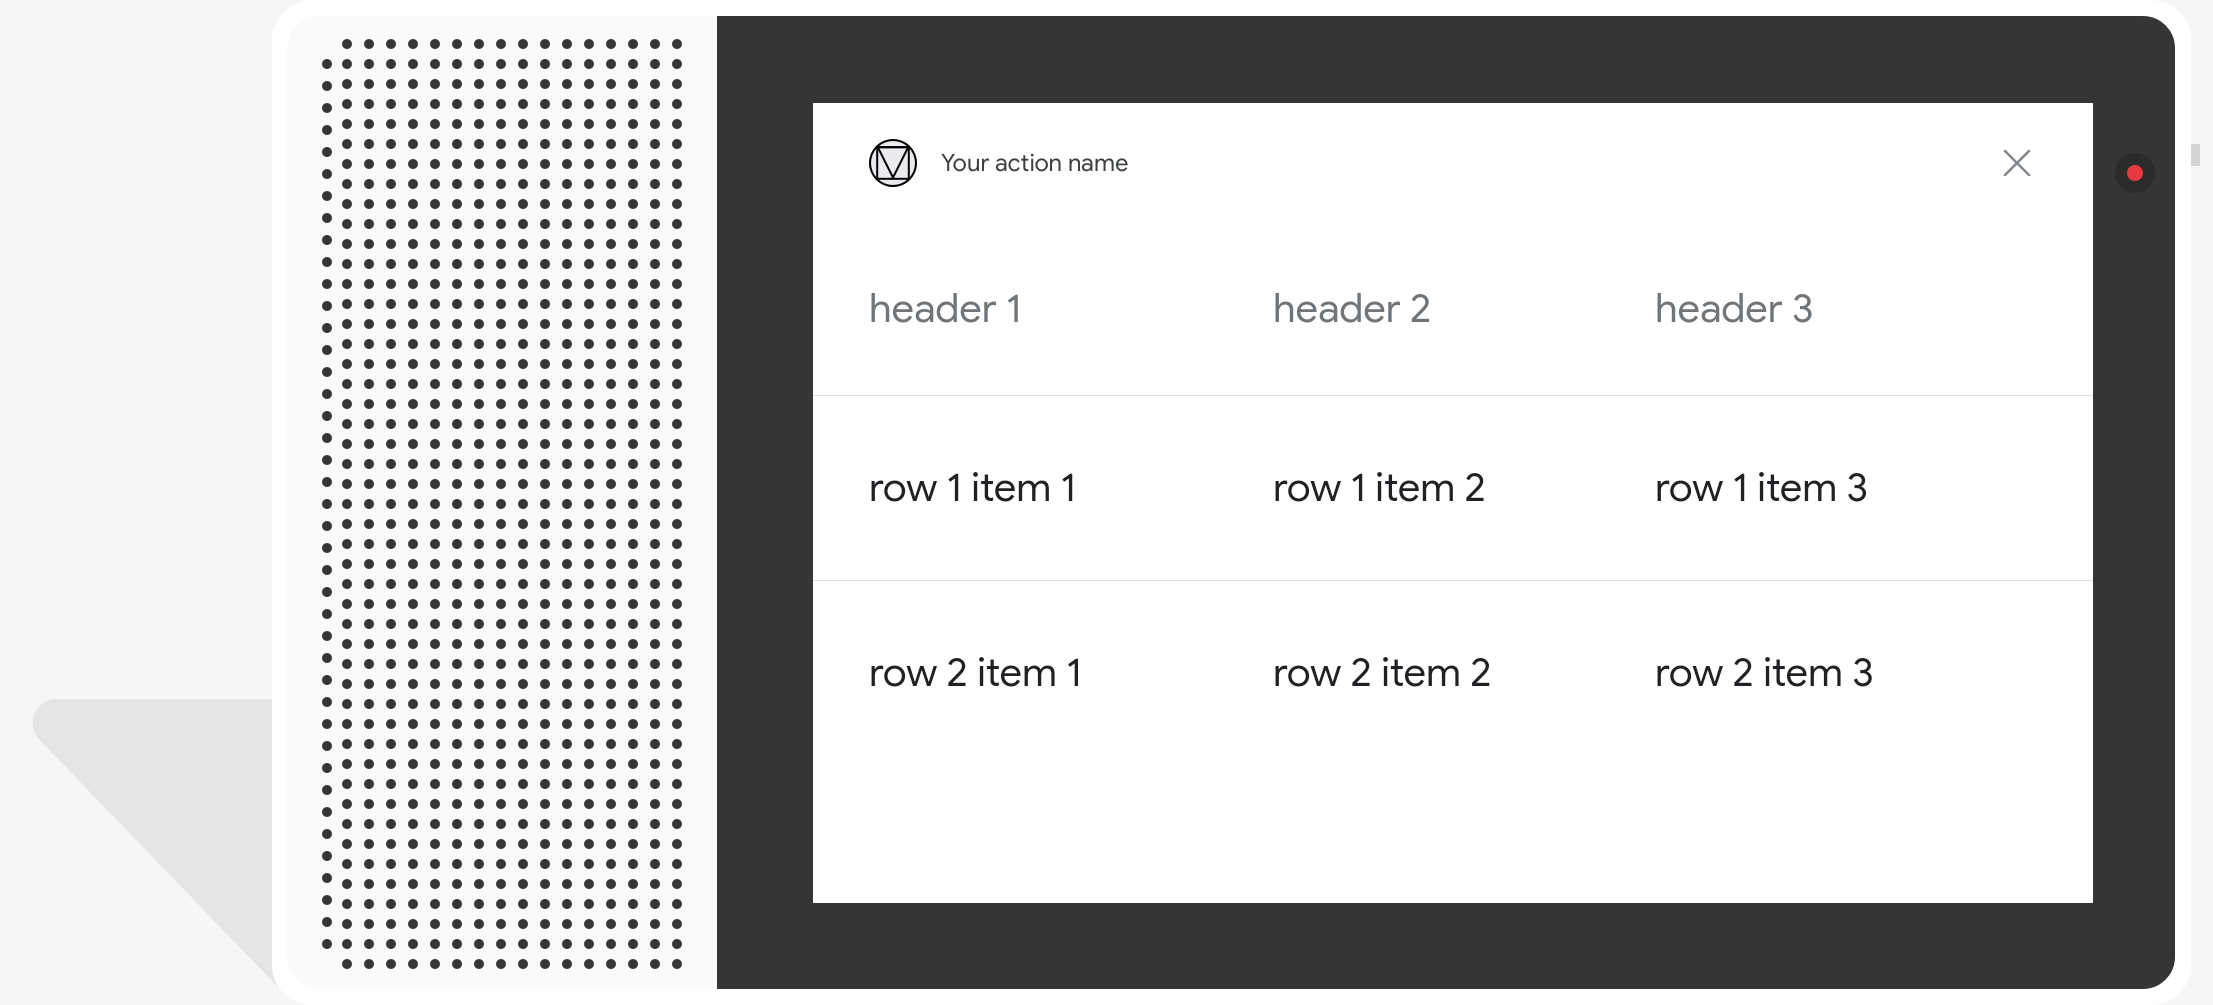
資料表會顯示靜態資料,且無法進行互動。互動式選項 則請改用圖像選取回應。
屬性
表格資訊卡回應類型具備下列屬性:
| 屬性 | 類型 | 需求 | 說明 |
|---|---|---|---|
title |
字串 | 條件式 | 表格的純文字標題。如果符合以下情況,就必須提供這個屬性:
已設定 subtitle。 |
subtitle |
字串 | 選用 | 資料表的純文字副標題。表格資訊卡不會顯示字幕 會受到主題自訂影響 |
columns |
TableColumn 陣列 |
必填 | 資料欄的標頭和對齊方式。每個 TableColumn 物件
描述同一欄中不同資料欄的標頭和對齊方式
表格。 |
rows |
TableRow 陣列 |
必填 |
表格的資料列資料。保證會顯示前 3 列,但 其他廣告就不會出現在某些介面上。您可以使用 模擬工具,瞭解特定表面會顯示哪些資料列。 每個 |
image |
Image |
選用 | 與資料表相關聯的圖片。 |
button |
Link |
選用 | 使用者按下按鈕後,可將使用者連結至特定網址。按鈕必須有
name 屬性,包含按鈕文字,以及
含有連結網址的 url 屬性。按鈕文字不得
誤導資訊,並且會在審查程序進行檢查。
|
程式碼範例
以下程式碼片段說明如何實作表格資訊卡:
YAML
candidates:
  - first_simple:
      variants:
        - speech: This is a table.
          text: This is a table.
    content:
      table:
        title: Table Title
        subtitle: Table Subtitle
        columns:
          - header: Column A
          - header: Column B
          - header: Column C
        rows:
          - cells:
              - text: A1
              - text: B1
              - text: C1
          - cells:
              - text: A2
              - text: B2
              - text: C2
          - cells:
              - text: A3
              - text: B3
              - text: C3
        image:
          alt: Google Assistant logo
          url: 'https://developers.google.com/assistant/assistant_96.png'
JSON
{
  "candidates": [
    {
      "first_simple": {
        "variants": [
          {
            "speech": "This is a table.",
            "text": "This is a table."
          }
        ]
      },
      "content": {
        "table": {
          "title": "Table Title",
          "subtitle": "Table Subtitle",
          "columns": [
            {
              "header": "Column A"
            },
            {
              "header": "Column B"
            },
            {
              "header": "Column C"
            }
          ],
          "rows": [
            {
              "cells": [
                {
                  "text": "A1"
                },
                {
                  "text": "B1"
                },
                {
                  "text": "C1"
                }
              ]
            },
            {
              "cells": [
                {
                  "text": "A2"
                },
                {
                  "text": "B2"
                },
                {
                  "text": "C2"
                }
              ]
            },
            {
              "cells": [
                {
                  "text": "A3"
                },
                {
                  "text": "B3"
                },
                {
                  "text": "C3"
                }
              ]
            }
          ],
          "image": {
            "alt": "Google Assistant logo",
            "url": "https://developers.google.com/assistant/assistant_96.png"
          }
        }
      }
    }
  ]
}
Node.js
app.handle('Table', conv => {
  conv.add('This is a table.');
  conv.add(new Table({
    "title": "Table Title",
    "subtitle": "Table Subtitle",
    "image": new Image({
      url: 'https://developers.google.com/assistant/assistant_96.png',
      alt: 'Google Assistant logo'
    }),
    "columns": [{
      "header": "Column A"
    }, {
      "header": "Column B"
    }, {
      "header": "Column C"
    }],
    "rows": [{
      "cells": [{
        "text": "A1"
      }, {
        "text": "B1"
      }, {
        "text": "C1"
      }]
    }, {
      "cells": [{
        "text": "A2"
      }, {
        "text": "B2"
      }, {
        "text": "C2"
      }]
    }, {
      "cells": [{
        "text": "A3"
      }, {
        "text": "B3"
      }, {
        "text": "C3"
      }]
    }]
  }));
});
JSON
{
  "responseJson": {
    "session": {
      "id": "session_id",
      "params": {}
    },
    "prompt": {
      "override": false,
      "content": {
        "table": {
          "button": {},
          "columns": [
            {
              "header": "Column A"
            },
            {
              "header": "Column B"
            },
            {
              "header": "Column C"
            }
          ],
          "image": {
            "alt": "Google Assistant logo",
            "height": 0,
            "url": "https://developers.google.com/assistant/assistant_96.png",
            "width": 0
          },
          "rows": [
            {
              "cells": [
                {
                  "text": "A1"
                },
                {
                  "text": "B1"
                },
                {
                  "text": "C1"
                }
              ]
            },
            {
              "cells": [
                {
                  "text": "A2"
                },
                {
                  "text": "B2"
                },
                {
                  "text": "C2"
                }
              ]
            },
            {
              "cells": [
                {
                  "text": "A3"
                },
                {
                  "text": "B3"
                },
                {
                  "text": "C3"
                }
              ]
            }
          ],
          "subtitle": "Table Subtitle",
          "title": "Table Title"
        }
      },
      "firstSimple": {
        "speech": "This is a table.",
        "text": "This is a table."
      }
    }
  }
}
自訂回應
可以建立自訂主題,藉此變更複合式回應的外觀 。這個自訂項目可用來定義 使用者在途徑上叫用動作時,能融入對話的外觀和風格 還有螢幕
如要設定自訂回應主題,請按照下列步驟操作:
- 在 Actions 主控台中,前往「開發」>「開發」>「開發自訂主題。
- 設定以下任一或所有資訊:
- 背景顏色:做為資訊卡的背景。一般來說 在背景使用淺色,讓資訊卡的內容更易於瀏覽 讀取。
- 主要顏色:資訊卡的主要顏色標題文字和介面 元素。一般而言,使用較深的原色可提高對比 輸入背景顏色
- 字型系列:說明標題和其他文字使用的字型類型 醒目的文字元素
- 圖片角落樣式:改變資訊卡的外觀也不必那麼單憑空像
- 背景圖片:要用於取代背景的自訂圖片 顏色。提供兩張不同的圖片,說明介面裝置是否正在運作 橫向或直向模式。如果使用背景圖片 顏色是否設為白色。
- 按一下 [儲存]。
