

Jika add-on Google Workspace Anda terhubung ke layanan atau API pihak ketiga yang memerlukan otorisasi, add-on dapat meminta pengguna untuk login dan mengotorisasi akses.
Halaman ini menjelaskan cara mengautentikasi pengguna menggunakan alur otorisasi (seperti OAuth), yang mencakup langkah-langkah berikut:
- Mendeteksi kapan otorisasi diperlukan.
- Menampilkan antarmuka kartu yang meminta pengguna untuk login ke layanan.
- Memuat ulang add-on sehingga pengguna dapat mengakses layanan atau resource yang dilindungi.
Jika add-on Anda hanya memerlukan identitas pengguna, Anda dapat langsung mengautentikasi pengguna menggunakan ID atau alamat email Google Workspace mereka. Untuk menggunakan alamat email untuk autentikasi, lihat memvalidasi permintaan JSON. Jika Anda membuat add-on menggunakan Google Apps Script, Anda dapat mempermudah proses ini menggunakan library OAuth2 untuk Google Apps Script (ada juga versi OAuth1).
Mendeteksi bahwa otorisasi diperlukan
Saat menggunakan add-on Anda, pengguna mungkin tidak diizinkan mengakses resource yang dilindungi karena berbagai alasan, seperti berikut:
- Token akses untuk terhubung ke layanan pihak ketiga belum dibuat atau sudah tidak berlaku.
- Token akses tidak mencakup resource yang diminta.
- Token akses tidak mencakup cakupan yang diperlukan permintaan.
Add-on Anda harus mendeteksi kasus ini agar pengguna dapat login dan mengakses layanan Anda.
Jika Anda membuat di Apps Script, fungsi hasAccess library OAuth dapat memberi tahu Anda apakah Anda memiliki akses ke layanan.
Atau, saat menggunakan
UrlFetchApp.fetch
permintaan, Anda dapat menetapkan parameter muteHttpExceptions ke true. Tindakan ini
mencegah permintaan menampilkan pengecualian saat permintaan gagal dan memungkinkan Anda
memeriksa kode respons permintaan dan konten dalam objek
HttpResponse yang ditampilkan.
Meminta pengguna untuk login ke layanan Anda
Saat add-on Anda mendeteksi bahwa otorisasi diperlukan, add-on harus menampilkan antarmuka kartu untuk meminta pengguna login ke layanan. Kartu login harus mengalihkan pengguna untuk menyelesaikan proses autentikasi dan otorisasi pihak ketiga di infrastruktur Anda.
Saat membuat add-on menggunakan endpoint HTTP, kami merekomendasikan agar Anda melindungi aplikasi tujuan dengan Login dengan Google, dan mendapatkan ID pengguna menggunakan token identitas yang dikeluarkan selama login. Sub-klaim berisi ID unik pengguna dan dapat dikorelasikan dengan ID dari add-on Anda.
Membuat dan menampilkan kartu login
Untuk kartu login layanan Anda, Anda dapat menggunakan kartu otorisasi dasar Google, atau Anda dapat menyesuaikan kartu untuk menampilkan informasi tambahan, seperti logo organisasi Anda. Jika Anda memublikasikan add-on secara publik, Anda harus menggunakan kartu kustom.
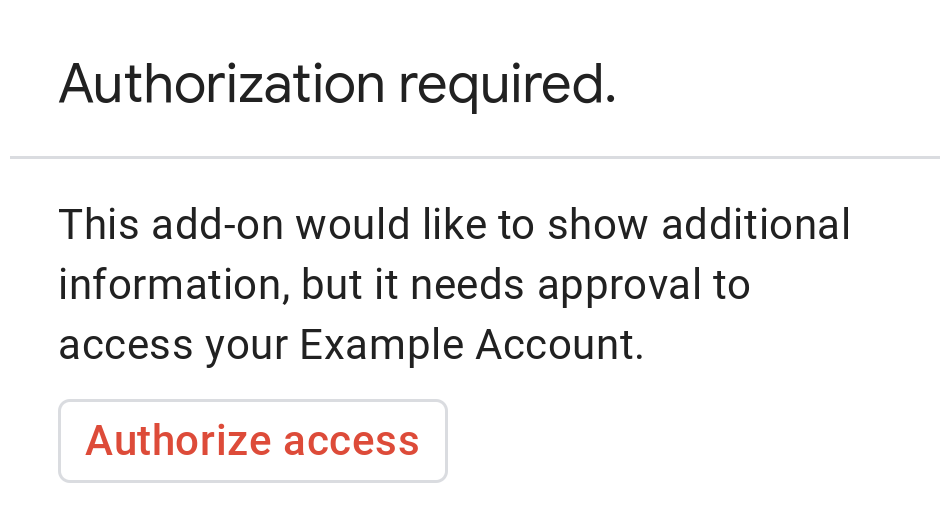
Kartu otorisasi dasar
Gambar berikut menunjukkan contoh kartu otorisasi dasar Google:
Untuk meminta pengguna dengan kartu otorisasi dasar, Anda harus menampilkan objek AuthorizationError. Kode berikut menunjukkan contoh objek AuthorizationError:
Apps Script
CardService.newAuthorizationException()
    .setAuthorizationUrl('AUTHORIZATION_URL')
    .setResourceDisplayName('RESOURCE_DISPLAY_NAME')
    .throwException();
JSON
Tampilkan respons JSON berikut:
{
  "basic_authorization_prompt": {
    "authorization_url": "AUTHORIZATION_URL",
    "resource": "RESOURCE_DISPLAY_NAME"
  }
}
Ganti kode berikut:
AUTHORIZATION_URL: URL untuk aplikasi web yang menangani otorisasi.RESOURCE_DISPLAY_NAME: Nama tampilan untuk resource atau layanan yang dilindungi. Nama ini ditampilkan kepada pengguna pada permintaan otorisasi. Misalnya, jikaRESOURCE_DISPLAY_NAMEAnda adalahExample Account, permintaan tersebut akan menampilkan "This add-on would like to show additional information, but it needs approval to access your Example Account."
Setelah menyelesaikan otorisasi, pengguna akan diminta untuk memuat ulang add-on untuk mengakses resource yang dilindungi.
Menampilkan kartu otorisasi di Google Chat
Jika add-on Anda memperluas Google Chat dan pengguna menjalankannya dalam Google Chat, pengguna dapat menyelesaikan proses otorisasi tanpa pemuatan ulang manual. Google Chat mendukung percobaan ulang otomatis eksekusi sebelumnya jika pemicunya adalah Message, Added to space, atau App command. Untuk pemicu ini, add-on Anda akan menerima completeRedirectUri dalam payload peristiwa.
Anda harus mengenkode completeRedirectUri di URL konfigurasi untuk memicu percobaan ulang otomatis. Mengalihkan ke URL ini memberi sinyal ke Google Chat bahwa permintaan konfigurasi telah dipenuhi, dan memungkinkan Google Chat mencoba kembali eksekusi sebelumnya.
Saat pengguna berhasil dialihkan ke configCompleteRedirectUrl yang diberikan dalam pesan asli, Google Chat akan melakukan langkah-langkah berikut:
- Menghapus permintaan yang ditampilkan kepada pengguna yang memulai.
- Mengirim objek peristiwa asli ke add-on yang sama untuk kedua kalinya.
Jika Anda tidak mengenkode completeRedirectUri di URL konfigurasi, pengguna tetap dapat menyelesaikan alur otorisasi. Namun, Google Chat tidak mencoba kembali eksekusi sebelumnya, dan pengguna harus memanggil add-on Anda lagi secara manual.
Contoh kode berikut menunjukkan cara aplikasi Chat dapat meminta kredensial OAuth2 offline, menyimpannya dalam database, dan menggunakannya untuk melakukan panggilan API dengan autentikasi pengguna.
Apps Script
Node.js
Python
Java
Kartu otorisasi kustom
Untuk mengubah permintaan otorisasi, Anda dapat membuat kartu kustom untuk pengalaman login layanan Anda.
Jika Anda memublikasikan add-on secara publik, Anda harus menggunakan kartu otorisasi kustom untuk semua aplikasi host Google Workspace, kecuali Chat. Untuk mempelajari lebih lanjut persyaratan publikasi untuk Google Workspace Marketplace, lihat Tentang peninjauan aplikasi.
Kartu yang ditampilkan harus melakukan hal berikut:
- Menjelaskan kepada pengguna bahwa add-on meminta izin untuk mengakses layanan non-Google atas nama mereka.
- Menjelaskan apa yang dapat dilakukan add-on jika diotorisasi.
- Berisi tombol atau widget serupa yang mengarahkan pengguna ke URL otorisasi layanan. Pastikan fungsi widget ini jelas bagi pengguna.
- Widget sebelumnya harus menggunakan setelan
OnClose.RELOADdalam objekOpenLinkuntuk memastikan add-on dimuat ulang setelah otorisasi diterima. - Semua link yang dibuka dari permintaan otorisasi harus menggunakan HTTPS.
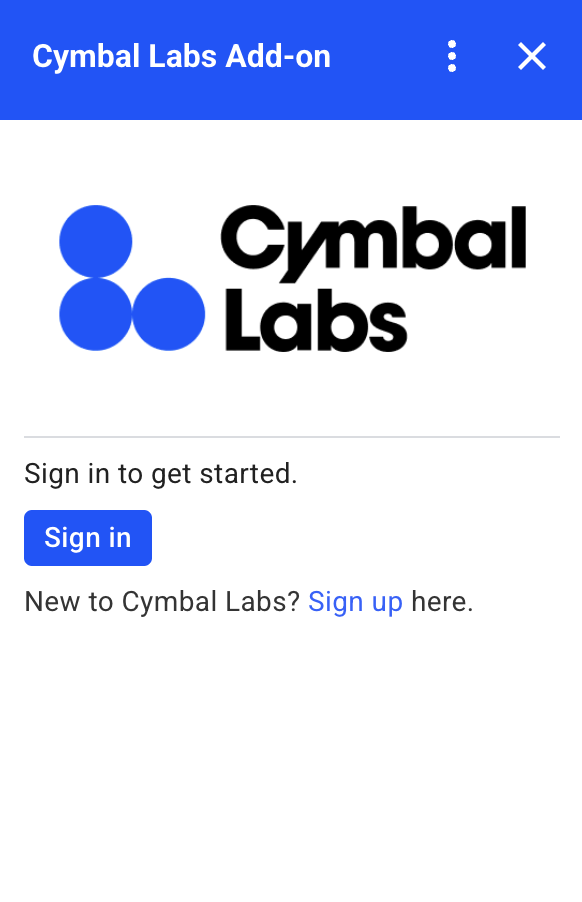
Gambar berikut menunjukkan contoh kartu otorisasi kustom untuk halaman beranda add-on. Kartu ini mencakup logo, deskripsi, dan tombol login:
Kode berikut menunjukkan cara menggunakan contoh kartu kustom ini:
Apps Script
function customAuthorizationCard() {
    let cardSection1Image1 = CardService.newImage()
        .setImageUrl('LOGO_URL')
        .setAltText('LOGO_ALT_TEXT');

    let cardSection1Divider1 = CardService.newDivider();

    let cardSection1TextParagraph1 = CardService.newTextParagraph()
        .setText('DESCRIPTION');

    let cardSection1ButtonList1Button1 = CardService.newTextButton()
        .setText('Sign in')
        .setBackgroundColor('#0055ff')
        .setTextButtonStyle(CardService.TextButtonStyle.FILLED)
        .setAuthorizationAction(CardService.newAuthorizationAction()
            .setAuthorizationUrl('AUTHORIZATION_URL'));

    let cardSection1ButtonList1 = CardService.newButtonSet()
        .addButton(cardSection1ButtonList1Button1);

    let cardSection1TextParagraph2 = CardService.newTextParagraph()
        .setText('TEXT_SIGN_UP');

    let cardSection1 = CardService.newCardSection()
        .addWidget(cardSection1Image1)
        .addWidget(cardSection1Divider1)
        .addWidget(cardSection1TextParagraph1)
        .addWidget(cardSection1ButtonList1)
        .addWidget(cardSection1TextParagraph2);

    let card = CardService.newCardBuilder()
        .addSection(cardSection1)
        .build();
    return [card];
}

function startNonGoogleAuth() {
    CardService.newAuthorizationException()
        .setAuthorizationUrl('AUTHORIZATION_URL')
        .setResourceDisplayName('RESOURCE_DISPLAY_NAME')
        .setCustomUiCallback('customAuthorizationCard')
        .throwException();
  }
JSON
Tampilkan respons JSON berikut:
{
  "custom_authorization_prompt": {
    "action": {
      "navigations": [
        {
          "pushCard": {
            "sections": [
              {
                "widgets": [
                  {
                    "image": {
                      "imageUrl": "LOGO_URL",
                      "altText": "LOGO_ALT_TEXT"
                    }
                  },
                  {
                    "divider": {}
                  },
                  {
                    "textParagraph": {
                      "text": "DESCRIPTION"
                    }
                  },
                  {
                    "buttonList": {
                      "buttons": [
                        {
                          "text": "Sign in",
                          "onClick": {
                            "openLink": {
                              "url": "AUTHORIZATION_URL",
                              "onClose": "RELOAD",
                              "openAs": "OVERLAY"
                            }
                          },
                          "color": {
                            "red": 0,
                            "green": 0,
                            "blue": 1,
                            "alpha": 1,
                          }
                        }
                      ]
                    }
                  },
                  {
                    "textParagraph": {
                      "text": "TEXT_SIGN_UP"
                    }
                  }
                ]
              }
            ]
          }
        }
      ]
    }
  }
}
Ganti kode berikut:
LOGO_URL: URL untuk logo atau gambar. Harus berupa URL publik.LOGO_ALT_TEXT: Teks alternatif untuk logo atau gambar, sepertiCymbal Labs Logo.DESCRIPTION: Ajakan (call to action) bagi pengguna untuk login, sepertiSign in to get started.- Untuk memperbarui tombol login:
AUTHORIZATION_URL: URL untuk aplikasi web yang menangani otorisasi.- Opsional: Untuk mengubah warna tombol, perbarui
colornilai float RGBA kolom. Untuk Apps Script, perbaruisetBackgroundColormetode menggunakan nilai heksadesimal.
TEXT_SIGN_UP: Teks yang meminta pengguna untuk membuat akun jika mereka belum memilikinya. Misalnya,New to Cymbal Labs? <a href=\"https://www.example.com/signup\">Sign up</a> here.
Mengelola login pihak ketiga di seluruh aplikasi Google Workspace
Salah satu aplikasi umum untuk add-on Google Workspace adalah menyediakan antarmuka untuk berinteraksi dengan sistem pihak ketiga dari dalam aplikasi host Google Workspace.
Sistem pihak ketiga sering kali mengharuskan pengguna login menggunakan ID pengguna, sandi, atau kredensial lainnya. Saat pengguna login ke layanan pihak ketiga Anda saat mereka menggunakan satu host Google Workspace, Anda harus memastikan mereka tidak perlu login lagi saat beralih ke host Google Workspace lain.
Jika Anda membuat di Apps Script, Anda dapat mencegah permintaan login berulang dengan properti pengguna atau token ID. Hal ini dijelaskan di bagian berikut.
Properti pengguna
Anda dapat menyimpan data login pengguna di properti pengguna Apps Script. Misalnya, Anda dapat membuat Token Web JSON (JWT) sendiri dari layanan login mereka dan mencatatnya di properti pengguna, atau mencatat nama pengguna dan sandi untuk layanan mereka.
Properti pengguna memiliki cakupan sehingga hanya dapat diakses oleh pengguna tersebut dalam skrip add-on Anda. Pengguna lain dan skrip lain tidak dapat mengakses properti ini. Lihat
PropertiesService
untuk mengetahui detail selengkapnya.
Token ID
Anda dapat menggunakan token ID Google sebagai kredensial login untuk layanan Anda. Ini adalah cara untuk mencapai single sign-on. Pengguna sudah login ke Google karena mereka berada di aplikasi host Google.
Contoh konfigurasi OAuth non-Google
Contoh kode Apps Script berikut menunjukkan cara mengonfigurasi add-on untuk menggunakan API non-Google yang memerlukan OAuth. Contoh ini menggunakan library OAuth2 untuk Apps Script untuk membuat layanan untuk mengakses API.
Apps Script
/**
* Attempts to access a non-Google API using a constructed service
* object.
*
* If your add-on needs access to non-Google APIs that require OAuth,
* you need to implement this method. You can use the OAuth1 and
* OAuth2 Apps Script libraries to help implement it.
*
* @param {String} url         The URL to access.
* @param {String} method_opt  The HTTP method. Defaults to GET.
* @param {Object} headers_opt The HTTP headers. Defaults to an empty
*                             object. The Authorization field is added
*                             to the headers in this method.
* @return {HttpResponse} the result from the UrlFetchApp.fetch() call.
*/
function accessProtectedResource(url, method_opt, headers_opt) {
  var service = getOAuthService();
  var maybeAuthorized = service.hasAccess();
  if (maybeAuthorized) {
    // A token is present, but it may be expired or invalid. Make a
    // request and check the response code to be sure.

    // Make the UrlFetch request and return the result.
    var accessToken = service.getAccessToken();
    var method = method_opt || 'get';
    var headers = headers_opt || {};
    headers['Authorization'] =
        Utilities.formatString('Bearer %s', accessToken);
    var resp = UrlFetchApp.fetch(url, {
      'headers': headers,
      'method' : method,
      'muteHttpExceptions': true, // Prevents thrown HTTP exceptions.
    });

    var code = resp.getResponseCode();
    if (code >= 200 && code < 300) {
      return resp.getContentText("utf-8"); // Success
    } else if (code == 401 || code == 403) {
      // Not fully authorized for this action.
      maybeAuthorized = false;
    } else {
      // Handle other response codes by logging them and throwing an
      // exception.
      console.error("Backend server error (%s): %s", code.toString(),
                    resp.getContentText("utf-8"));
      throw ("Backend server error: " + code);
    }
  }

  if (!maybeAuthorized) {
    // Invoke the authorization flow using the default authorization
    // prompt card.
    CardService.newAuthorizationException()
        .setAuthorizationUrl(service.getAuthorizationUrl())
        .setResourceDisplayName("Display name to show to the user")
        .throwException();
  }
}

/**
* Create a new OAuth service to facilitate accessing an API.
* This example assumes there is a single service that the add-on needs to
* access. Its name is used when persisting the authorized token, so ensure
* it is unique within the scope of the property store. You must set the
* client secret and client ID, which are obtained when registering your
* add-on with the API.
*
* See the Apps Script OAuth2 Library documentation for more
* information:
*   https://github.com/googlesamples/apps-script-oauth2#1-create-the-oauth2-service
*
*  @return A configured OAuth2 service object.
*/
function getOAuthService() {
  return OAuth2.createService('SERVICE_NAME')
      .setAuthorizationBaseUrl('SERVICE_AUTH_URL')
      .setTokenUrl('SERVICE_AUTH_TOKEN_URL')
      .setClientId('CLIENT_ID')
      .setClientSecret('CLIENT_SECRET')
      .setScope('SERVICE_SCOPE_REQUESTS')
      .setCallbackFunction('authCallback')
      .setCache(CacheService.getUserCache())
      .setPropertyStore(PropertiesService.getUserProperties());
}

/**
* Boilerplate code to determine if a request is authorized and returns
* a corresponding HTML message. When the user completes the OAuth2 flow
* on the service provider's website, this function is invoked from the
* service. In order for authorization to succeed you must make sure that
* the service knows how to call this function by setting the correct
* redirect URL.
*
* The redirect URL to enter is:
* https://script.google.com/macros/d/<Apps Script ID>/usercallback
*
* See the Apps Script OAuth2 Library documentation for more
* information:
*   https://github.com/googlesamples/apps-script-oauth2#1-create-the-oauth2-service
*
*  @param {Object} callbackRequest The request data received from the
*                  callback function. Pass it to the service's
*                  handleCallback() method to complete the
*                  authorization process.
*  @return {HtmlOutput} a success or denied HTML message to display to
*          the user.
*/
function authCallback(callbackRequest) {
  var authorized = getOAuthService().handleCallback(callbackRequest);
  if (authorized) {
    return HtmlService.createHtmlOutput(
      'Success!');
  } else {
    return HtmlService.createHtmlOutput('Denied');
  }
}

/**
* Unauthorizes the non-Google service. This is useful for OAuth
* development/testing.  Run this method (Run > resetOAuth in the script
* editor) to reset OAuth to re-prompt the user for OAuth.
*/
function resetOAuth() {
  getOAuthService().reset();
}