

Komponen Place Details
Komponen Place Details dari Places UI Kit memungkinkan Anda menambahkan komponen UI individual yang menampilkan detail tempat di aplikasi Anda. Komponen ini dapat disesuaikan.

Komponen Place Details dapat digunakan secara independen atau bersamaan dengan layanan dan Google Maps Platform API lainnya. Komponen ini menggunakan ID Tempat, nama resource, atau koordinat lintang/bujur dan menampilkan informasi Place Details yang dirender.
Komponen Place Details sepenuhnya dapat diubah temanya, sehingga Anda dapat menyesuaikan font, warna, dan radius sudut agar sesuai dengan kasus penggunaan dan panduan merek visual Anda. Anda dapat menyesuaikan tampilan detail tempat dengan membuat tema yang memperluas PlacesMaterialTheme dan memberikan penggantian untuk atribut tema. Anda juga dapat menyesuaikan kolom detail tempat yang disertakan dengan menentukan daftar entri Konten, yang masing-masing sesuai dengan informasi yang ditampilkan tentang tempat tersebut.
Varian tata letak
Komponen Place Details mendukung dua varian tata letak utama:
- Ringkas: Tata letak untuk melihat pratinjau informasi utama.
- Lengkap: Tata letak komprehensif yang menampilkan semua detail tempat yang tersedia.
Tata letak ringkas dapat ditampilkan dalam orientasi vertikal atau horizontal. Hal ini memungkinkan Anda mengintegrasikan komponen ke dalam berbagai tata letak desain dan ukuran layar. Tata letak lengkap hanya dapat ditampilkan secara vertikal.
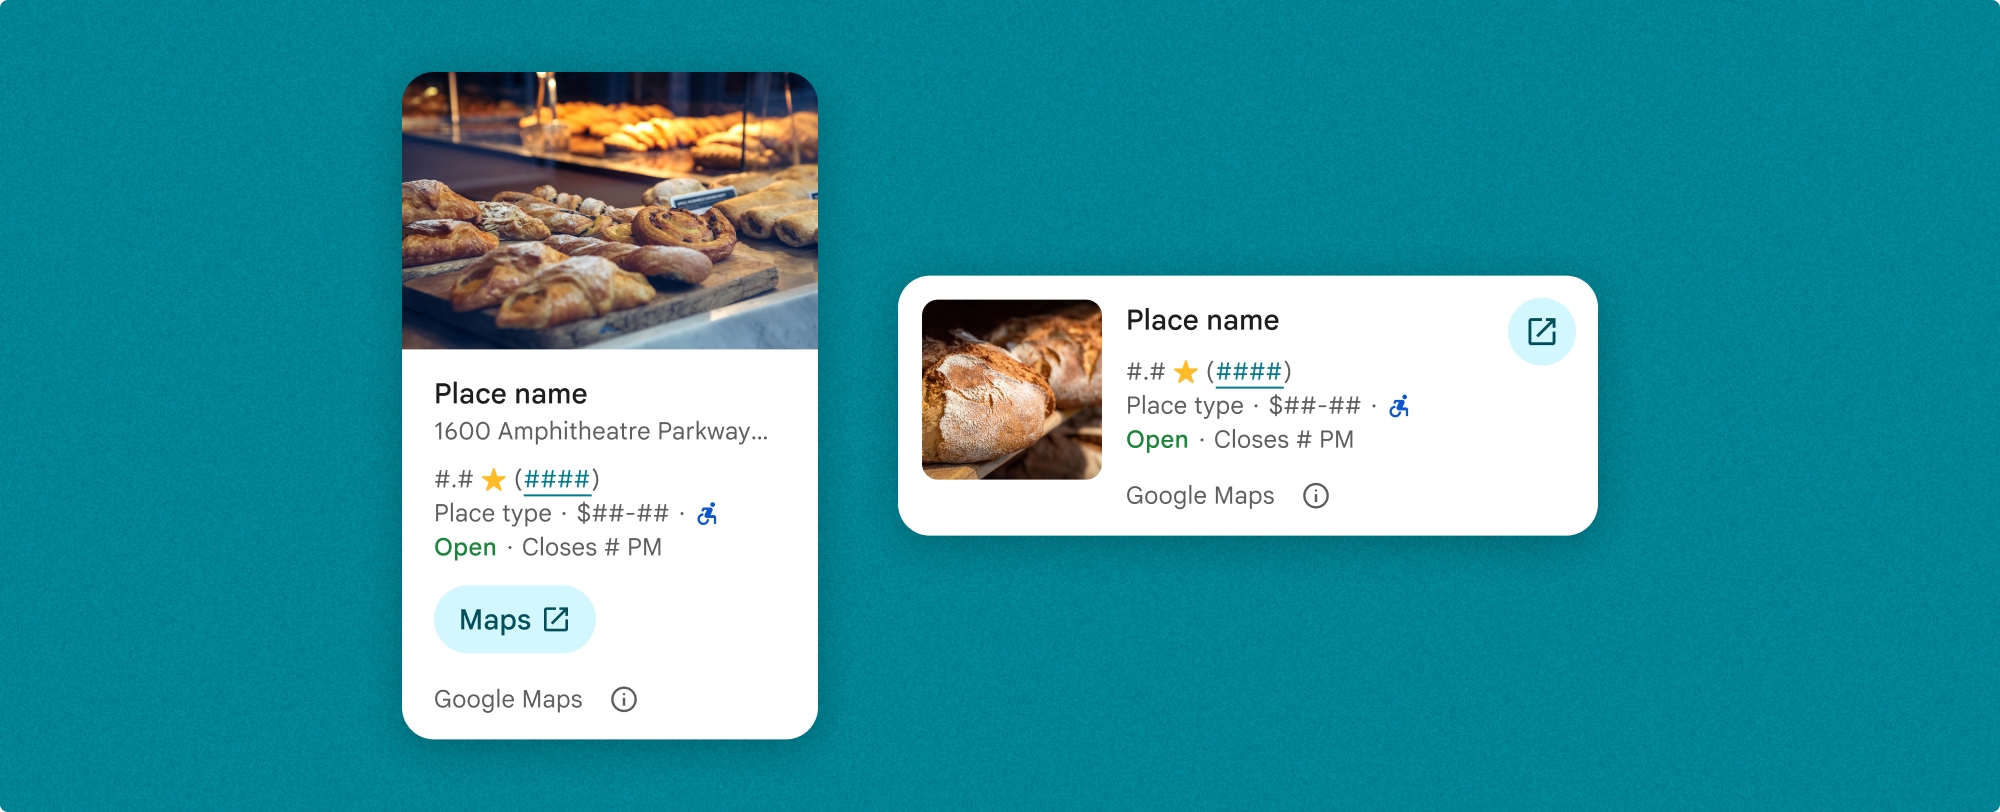
Komponen Place Details memberi Anda kontrol terperinci atas konten yang ditampilkan dalam komponen. Setiap elemen (seperti foto, ulasan, dan informasi kontak) dapat ditampilkan atau disembunyikan secara individual, sehingga memungkinkan penyesuaian yang akurat terhadap tampilan komponen dan kepadatan informasi.

Tampilan ringkas Place Details
Fragmen ringkas Place Details (PlaceDetailsCompactFragment) merender detail untuk tempat yang dipilih menggunakan ruang minimal. Hal ini dapat berguna di jendela info yang menyoroti tempat di peta, dalam pengalaman media sosial seperti berbagi lokasi dalam chat, sebagai saran untuk memilih lokasi Anda saat ini, atau dalam artikel media untuk mereferensikan tempat di Google Maps.
Tampilan lengkap Place Details
Tampilan lengkap Place Details (PlaceDetailsFragment) menawarkan area yang lebih besar untuk menampilkan informasi detail tempat, dan memungkinkan Anda menampilkan lebih banyak jenis informasi.
Opsi tampilan konten
Anda dapat menentukan konten yang akan ditampilkan menggunakan enum di PlaceDetailsCompactFragment.Content atau PlaceDetailsFragment.Content.
| Tampilan ringkas | Tampilan lengkap |
|---|---|
|
|
Penagihan
Saat menggunakan Place Details UI Kit, Anda akan ditagih setiap kali metode .loadWithPlaceId(), .loadWithResourceName(), atau loadWithCoordinates() dipanggil. Jika Anda memuat tempat yang sama beberapa kali, Anda akan ditagih untuk setiap permintaan.
Untuk menghindari penagihan beberapa kali, jangan langsung menambahkan .loadWithPlaceId() atau .loadWithResourceName() di metode siklus proses Android. Misalnya, jangan langsung memanggil .loadWithPlaceId() atau .loadWithResourceName() di metode onResume().
Menambahkan detail tempat ke aplikasi Anda
Anda dapat menambahkan detail tempat ke aplikasi dengan menambahkan fragmen ke tata letak. Saat membuat instance fragmen, Anda dapat menyesuaikan tampilan dan nuansa informasi Place Details agar sesuai dengan kebutuhan dan tampilan aplikasi Anda. Pelajari penyesuaian lebih lanjut.
Anda memiliki tiga metode yang tersedia di Kotlin dan Java: satu untuk memuat fragmen dengan ID Tempat (loadWithPlaceId()), satu untuk memuat fragmen dengan nama resource (loadWithResourceName()), dan satu untuk memuat fragmen dengan koordinat lintang/bujur (loadWithCoordinates()). Anda dapat memilih metode apa pun, atau beberapa metode.
Posisi default untuk tampilan ringkas adalah vertikal. Jika Anda menginginkan tata letak horizontal, tentukan Orientation.HORIZONTAL. Anda juga dapat menentukan Orientation.VERTICAL secara opsional untuk kejelasan. Tampilan lengkap hanya dapat ditampilkan secara vertikal.
Lihat contoh di bagian contoh komponen Place Details.
Menyesuaikan tampilan visual
Gaya kustom
Anda dapat menyesuaikan warna, tipografi, spasi, batas, dan sudut komponen Place Details.
Places UI Kit menawarkan pendekatan sistem desain untuk penyesuaian visual yang secara kasar didasarkan pada Desain Material (dengan beberapa modifikasi khusus Google Maps). Lihat referensi Desain Material untuk Warna dan Tipografi. Secara default, gaya ini mematuhi bahasa desain visual Google Maps.
Places UI Kit menyediakan tema gelap secara default, sehingga Anda mungkin perlu menyesuaikan tema gelap dan terang. Untuk menyesuaikan tema gelap, tambahkan entri untuk warna di values-night/colors.xml.
Lihat bagian Gaya kustom untuk mengetahui informasi selengkapnya tentang gaya.
Penyesuaian lebar dan tinggi
Tampilan ringkas
Lebar yang direkomendasikan:
- Orientasi vertikal: Antara 180dp dan 300dp.
- Orientasi horizontal: Antara 180dp dan 500dp.
Lebar yang lebih kecil dari 160dp mungkin tidak ditampilkan dengan benar.
Praktik terbaiknya adalah tidak menetapkan tinggi untuk tampilan ringkas. Hal ini akan memungkinkan konten di jendela menetapkan tinggi, sehingga semua informasi dapat ditampilkan.
Tampilan lengkap
Untuk tampilan lengkap, lebar yang direkomendasikan adalah antara 250dp dan 450dp. Lebar yang lebih kecil dari 250dp mungkin tidak ditampilkan dengan benar.
Anda dapat menetapkan tinggi komponen: tampilan Place Details vertikal akan men-scroll secara vertikal dalam ruang yang dialokasikan.
Praktik terbaiknya adalah menetapkan tinggi untuk tampilan lengkap. Hal ini akan memungkinkan konten di jendela men-scroll dengan benar.
Contoh komponen Place Details
Membuat tampilan ringkas atau lengkap
Kotlin
        // We create a new instance of the fragment using its factory method.
        // We can specify which content to show, the orientation, and a custom theme.
        val fragment = PlaceDetailsCompactFragment.newInstance(
            PlaceDetailsCompactFragment.ALL_CONTENT, // Show all available content.
            orientation,
            R.style.CustomizedPlaceDetailsTheme,
        ).apply {
            // The PlaceLoadListener provides callbacks for when the place data is successfully
            // loaded or when an error occurs. This is where we update our UI state.
            setPlaceLoadListener(object : PlaceLoadListener {
                override fun onSuccess(place: Place) {
                    Log.d(TAG, "Place loaded: ${place.id}")
                    // Once the data is loaded, we hide the loading indicator and show the fragment.
                    binding.loadingIndicatorMain.visibility = View.GONE
                    binding.placeDetailsContainer.visibility = View.VISIBLE
                    binding.dismissButton.visibility = View.VISIBLE
                }

                override fun onFailure(e: Exception) {
                    Log.e(TAG, "Place failed to load", e)
                    // On failure, we hide the UI and notify the user.
                    dismissPlaceDetails()
                    Toast.makeText(this@MainActivity, "Failed to load place details.", Toast.LENGTH_SHORT).show()
                }
            })
        }

        // We add the fragment to our layout's container view.
        // `commitNow()` is used to ensure the fragment is immediately added and available,
        // which is important because we need to call a method on it right after.
        supportFragmentManager
            .beginTransaction()
            .replace(binding.placeDetailsContainer.id, fragment)
            .commitNow()

        // **This is the key step**: After adding the fragment, we call `loadWithPlaceId`
        // to trigger the data loading process for the selected place.
        // We use `post` to ensure this runs after the layout has been measured,
        // which can prevent potential timing issues.
        binding.root.post {
            fragment.loadWithPlaceId(placeId)
        }
    }
Java
PlaceDetailsCompactFragment fragment =
  PlaceDetailsCompactFragment.newInstance(
        Orientation.HORIZONTAL,
        Arrays.asList(Content.ADDRESS, Content.TYPE, Content.RATING, Content.ACCESSIBLE_ENTRANCE_ICON),
        R.style.CustomizedPlaceDetailsTheme);

fragment.setPlaceLoadListener(
  new PlaceLoadListener() {
        @Override public void onSuccess(Place place) { ... }

        @Override public void onFailure(Exception e) { ... }
});

getSupportFragmentManager()
      .beginTransaction()
      .add(R.id.fragment_container, fragment)
      .commitNow();

// Load the fragment with a Place ID.
fragment.loadWithPlaceId(placeId);

// Load the fragment with a resource name.
fragment.loadWithResourceName(resourceName);
Contoh kode lengkap ini menentukan orientasi tampilan ringkas secara terprogram berdasarkan konfigurasi perangkat pengguna.
Kotlin
package com.example.placedetailsuikit

import android.Manifest
import android.annotation.SuppressLint
import android.content.pm.PackageManager
import android.content.res.Configuration
import android.location.Location
import android.os.Bundle
import android.util.Log
import android.view.View
import android.widget.Toast
import androidx.activity.enableEdgeToEdge
import androidx.activity.result.ActivityResultLauncher
import androidx.activity.result.contract.ActivityResultContracts
import androidx.activity.viewModels
import androidx.appcompat.app.AppCompatActivity
import androidx.core.app.ActivityCompat
import androidx.lifecycle.ViewModel
import com.example.placedetailsuikit.databinding.ActivityMainBinding
import com.google.android.gms.location.FusedLocationProviderClient
import com.google.android.gms.location.LocationServices
import com.google.android.gms.maps.CameraUpdateFactory
import com.google.android.gms.maps.GoogleMap
import com.google.android.gms.maps.OnMapReadyCallback
import com.google.android.gms.maps.SupportMapFragment
import com.google.android.gms.maps.model.LatLng
import com.google.android.gms.maps.model.PointOfInterest
import com.google.android.libraries.places.api.Places
import com.google.android.libraries.places.api.model.Place
import com.google.android.libraries.places.widget.PlaceDetailsCompactFragment
import com.google.android.libraries.places.widget.PlaceLoadListener
import com.google.android.libraries.places.widget.model.Orientation

private const val TAG = "PlacesUiKit"

/**
 * A simple ViewModel to store UI state that needs to survive configuration changes.
 * In this case, it holds the ID of the selected place. Using a ViewModel is good practice
 * as it prevents data loss during events like screen rotation, ensuring a
 * seamless user experience.
 */
class MainViewModel : ViewModel() {
    var selectedPlaceId: String? = null
}

/**
 * This activity serves as a basic example of integrating the Place Details UI Kit.
 * It demonstrates the fundamental steps required:
 * 1. Setting up a Google Map.
 * 2. Requesting location permissions to center the map.
 * 3. Handling clicks on Points of Interest (POIs) to get a Place ID.
 * 4. Using the Place ID to load and display place details in a [PlaceDetailsCompactFragment].
 */
class MainActivity : AppCompatActivity(), OnMapReadyCallback, GoogleMap.OnPoiClickListener {
    // ViewBinding provides type-safe access to views defined in the XML layout,
    // eliminating the need for `findViewById` and preventing null pointer exceptions.
    private lateinit var binding: ActivityMainBinding
    private var googleMap: GoogleMap? = null

    // The FusedLocationProviderClient is the main entry point for interacting with the
    // fused location provider, which intelligently manages the underlying location technologies.
    private lateinit var fusedLocationClient: FusedLocationProviderClient

    // Using registerForActivityResult is the modern, recommended approach for handling
    // permission requests. It decouples the request from the handling logic, making the
    // code cleaner and easier to manage compared to the older `onRequestPermissionsResult` callback.
    private lateinit var requestPermissionLauncher: ActivityResultLauncher<Array<String>>

    // The `by viewModels()` delegate provides a lazy-initialized ViewModel scoped to this Activity.
    // This ensures that we get the same ViewModel instance across configuration changes.
    private val viewModel: MainViewModel by viewModels()

    override fun onCreate(savedInstanceState: Bundle?) {
        super.onCreate(savedInstanceState)

        // The ActivityResultLauncher is initialized here. The lambda defines the callback
        // that will be executed once the user responds to the permission dialog.
        requestPermissionLauncher =
            registerForActivityResult(ActivityResultContracts.RequestMultiplePermissions()) { permissions ->
                // We check if either fine or coarse location permission was granted.
                if (permissions[Manifest.permission.ACCESS_FINE_LOCATION] == true || permissions[Manifest.permission.ACCESS_COARSE_LOCATION] == true) {
                    Log.d(TAG, "Location permission granted by user.")
                    fetchLastLocation()
                } else {
                    // If permission is denied, we inform the user and default to a known location.
                    // This ensures the app remains functional even without location access.
                    Log.d(TAG, "Location permission denied by user.")
                    Toast.makeText(
                        this,
                        "Location permission denied. Showing default location.",
                        Toast.LENGTH_LONG
                    ).show()
                    moveToSydney()
                }
            }

        // enableEdgeToEdge() allows the app to draw behind the system bars for a more immersive experience.
        enableEdgeToEdge()
        binding = ActivityMainBinding.inflate(layoutInflater)
        setContentView(binding.root)

        binding.dismissButton.setOnClickListener {
            dismissPlaceDetails()
        }

        // --- Crucial: Initialize Places SDK ---
        // It's essential to initialize the Places SDK before making any other Places API calls.
        // This should ideally be done once, for example, in the Application's `onCreate`.
        val apiKey = BuildConfig.PLACES_API_KEY
        if (apiKey.isEmpty() || apiKey == "YOUR_API_KEY") {
            // A valid API key is required for the Places SDK to function.
            Log.e(TAG, "No api key")
            Toast.makeText(
                this,
                "Add your own API_KEY in local.properties",
                Toast.LENGTH_LONG
            ).show()
            finish()
            return
        }

        // `initializeWithNewPlacesApiEnabled` is used to opt-in to the new SDK version.
        Places.initializeWithNewPlacesApiEnabled(applicationContext, apiKey)

        fusedLocationClient = LocationServices.getFusedLocationProviderClient(this)
        // ------------------------------------

        // The SupportMapFragment is the container for the map. `getMapAsync` allows us to
        // work with the GoogleMap object via a callback once it's fully initialized.
        val mapFragment =
            supportFragmentManager.findFragmentById(R.id.map_fragment) as SupportMapFragment?
        mapFragment?.getMapAsync(this)

        // This block handles restoration after a configuration change (e.g., screen rotation).
        // If a place was selected before the rotation, its ID is stored in the ViewModel.
        // We use this ID to immediately show the details fragment again.
        if (viewModel.selectedPlaceId != null) {
            viewModel.selectedPlaceId?.let { placeId ->
                Log.d(TAG, "Restoring PlaceDetailsFragment for place ID: $placeId")
                showPlaceDetailsFragment(placeId)
            }
        }
    }

    /**
     * This callback is triggered when the GoogleMap object is ready to be used.
     * All map setup logic should be placed here.
     */
    override fun onMapReady(map: GoogleMap) {
        Log.d(TAG, "Map is ready")
        googleMap = map
        // Setting the OnPoiClickListener allows us to capture user taps on points of interest.
        googleMap?.setOnPoiClickListener(this)

        // After the map is ready, we determine the initial camera position based on location permissions.
        if (isLocationPermissionGranted()) {
            fetchLastLocation()
        } else {
            requestLocationPermissions()
        }
    }

    /**
     * A helper function to centralize the check for location permissions.
     */
    private fun isLocationPermissionGranted(): Boolean {
        return ActivityCompat.checkSelfPermission(
            this,
            Manifest.permission.ACCESS_FINE_LOCATION
        ) == PackageManager.PERMISSION_GRANTED ||
                ActivityCompat.checkSelfPermission(
                    this,
                    Manifest.permission.ACCESS_COARSE_LOCATION
                ) == PackageManager.PERMISSION_GRANTED
    }

    /**
     * This function triggers the permission request flow. The result is handled by the
     * ActivityResultLauncher defined in `onCreate`.
     */
    private fun requestLocationPermissions() {
        Log.d(TAG, "Requesting location permissions.")
        requestPermissionLauncher.launch(
            arrayOf(
                Manifest.permission.ACCESS_FINE_LOCATION,
                Manifest.permission.ACCESS_COARSE_LOCATION
            )
        )
    }

    /**
     * Fetches the device's last known location. This is a fast and battery-efficient way
     * to get a location fix. It should only be called after verifying permissions.
     */
    @SuppressLint("MissingPermission")
    private fun fetchLastLocation() {
        // Double-checking permissions here is a good practice, although the call sites are already guarded.
        if (isLocationPermissionGranted()) {
            fusedLocationClient.lastLocation
                .addOnSuccessListener { location: Location? ->
                    if (location != null) {
                        val userLocation = LatLng(location.latitude, location.longitude)
                        googleMap?.moveCamera(CameraUpdateFactory.newLatLngZoom(userLocation, 13f))
                        Log.d(TAG, "Moved to user's last known location.")
                    } else {
                        // `lastLocation` can be null if the location has never been recorded.
                        // In this case, we fall back to a default location.
                        Log.d(TAG, "Last known location is null. Falling back to Sydney.")
                        moveToSydney()
                    }
                }
                .addOnFailureListener {
                    // This listener handles errors in the location fetching process.
                    Log.e(TAG, "Failed to get location.", it)
                    moveToSydney()
                }
        }
    }

    /**
     * Moves the map camera to a default, hardcoded location (Sydney).
     * This serves as a reliable fallback.
     */
    private fun moveToSydney() {
        val sydney = LatLng(-33.8688, 151.2093)
        googleMap?.moveCamera(CameraUpdateFactory.newLatLngZoom(sydney, 13f))
        Log.d(TAG, "Moved to Sydney")
    }

    /**
     * This is the callback for the `OnPoiClickListener`. It's triggered when a user
     * taps a POI on the map.
     */
    override fun onPoiClick(poi: PointOfInterest) {
        val placeId = poi.placeId
        Log.d(TAG, "Place ID: $placeId")

        // We save the selected place ID to the ViewModel. This is critical for surviving
        // configuration changes. If the user rotates the screen now, the `onCreate`
        // method will be able to restore the place details view.
        viewModel.selectedPlaceId = placeId
        showPlaceDetailsFragment(placeId)
    }

    /**
     * This function is the core of the integration. It creates, configures, and displays
     * the [PlaceDetailsCompactFragment].
     * @param placeId The unique identifier for the place to be displayed.
     */
    private fun showPlaceDetailsFragment(placeId: String) {
        Log.d(TAG, "Showing PlaceDetailsFragment for place ID: $placeId")

        // We manage the visibility of UI elements to provide feedback to the user.
        // The wrapper is shown, and a loading indicator is displayed while the data is fetched.
        binding.placeDetailsWrapper.visibility = View.VISIBLE
        binding.dismissButton.visibility = View.GONE
        binding.placeDetailsContainer.visibility = View.GONE
        binding.loadingIndicatorMain.visibility = View.VISIBLE

        // The Place Details widget can be displayed vertically or horizontally.
        // We dynamically choose the orientation based on the device's current configuration.
        val orientation =
            if (resources.configuration.orientation == Configuration.ORIENTATION_LANDSCAPE) {
                Orientation.HORIZONTAL
            } else {
                Orientation.VERTICAL
            }


        // We create a new instance of the fragment using its factory method.
        // We can specify which content to show, the orientation, and a custom theme.
        val fragment = PlaceDetailsCompactFragment.newInstance(
            PlaceDetailsCompactFragment.ALL_CONTENT, // Show all available content.
            orientation,
            R.style.CustomizedPlaceDetailsTheme,
        ).apply {
            // The PlaceLoadListener provides callbacks for when the place data is successfully
            // loaded or when an error occurs. This is where we update our UI state.
            setPlaceLoadListener(object : PlaceLoadListener {
                override fun onSuccess(place: Place) {
                    Log.d(TAG, "Place loaded: ${place.id}")
                    // Once the data is loaded, we hide the loading indicator and show the fragment.
                    binding.loadingIndicatorMain.visibility = View.GONE
                    binding.placeDetailsContainer.visibility = View.VISIBLE
                    binding.dismissButton.visibility = View.VISIBLE
                }

                override fun onFailure(e: Exception) {
                    Log.e(TAG, "Place failed to load", e)
                    // On failure, we hide the UI and notify the user.
                    dismissPlaceDetails()
                    Toast.makeText(this@MainActivity, "Failed to load place details.", Toast.LENGTH_SHORT).show()
                }
            })
        }

        // We add the fragment to our layout's container view.
        // `commitNow()` is used to ensure the fragment is immediately added and available,
        // which is important because we need to call a method on it right after.
        supportFragmentManager
            .beginTransaction()
            .replace(binding.placeDetailsContainer.id, fragment)
            .commitNow()

        // **This is the key step**: After adding the fragment, we call `loadWithPlaceId`
        // to trigger the data loading process for the selected place.
        // We use `post` to ensure this runs after the layout has been measured,
        // which can prevent potential timing issues.
        binding.root.post {
            fragment.loadWithPlaceId(placeId)
        }
    }


    /**
     * Hides the place details view and clears the selected place ID from the ViewModel.
     */
    private fun dismissPlaceDetails() {
        binding.placeDetailsWrapper.visibility = View.GONE
        // Clearing the ID in the ViewModel is important so that if the user rotates the
        // screen after dismissing, the details view doesn't reappear.
        viewModel.selectedPlaceId = null
    }

    override fun onDestroy() {
        super.onDestroy()
        // It's a good practice to nullify references to objects that have a lifecycle
        // tied to the activity, like the GoogleMap object, to prevent potential memory leaks.
        googleMap = null
    }
}
Membuat tema
Saat membuat instance fragmen, Anda dapat menentukan tema yang mengganti salah satu atribut gaya default. Atribut tema yang tidak diganti akan menggunakan gaya default. Jika ingin mendukung tema gelap, Anda dapat menambahkan entri untuk warna di values-night/colors.xml.
Places UI Kit menyediakan tema gelap secara default, sehingga Anda mungkin perlu menyesuaikan tema gelap dan terang. Untuk menyesuaikan tema gelap, tambahkan entri untuk warna di values-night/colors.xml.
  <style name="CustomizedPlaceDetailsTheme" parent="PlacesMaterialTheme">
    <item name="placesColorPrimary">@color/app_primary_color</item>
    <item name="placesColorOnSurface">@color/app_color_on_surface</item>
    <item name="placesColorOnSurfaceVariant">@color/app_color_on_surface</item>

    <item name="placesTextAppearanceBodySmall">@style/app_text_appearence_small</item>

    <item name="placesCornerRadius">20dp</item>
  </style>
Menggunakan konten standar
Contoh ini menggunakan konten standar.
  val fragmentStandardContent = PlaceDetailsCompactFragment.newInstance(
    PlaceDetailsCompactFragment.STANDARD_CONTENT,
    orientation,
    R.style.CustomizedPlaceDetailsTheme
  )
Menyesuaikan konten tertentu
Contoh ini hanya memilih opsi Content alamat, pintu masuk khusus difabel, dan media untuk tampilan ringkas, lalu merendernya dengan CustomizedPlaceDetailsTheme.
  val placeDetailsFragment = PlaceDetailsCompactFragment.newInstance(
    orientation,
    listOf(
        Content.ADDRESS,
        Content.ACCESSIBLE_ENTRANCE,
        Content.MEDIA
    ),
    R.style.CustomizedPlaceDetailsTheme
)
Menggunakan semua konten
Contoh ini menggunakan semua Content opsi tampilan ringkas.
  val fragmentAllContent = PlaceDetailsCompactFragment.newInstance(
    orientation,
    PlaceDetailsCompactFragment.ALL_CONTENT,
    R.style.CustomizedPlaceDetailsTheme
  )