
Componente Place Details
Il componente Place Details di Places UI Kit ti consente di aggiungere un singolo componente UI che mostra i dettagli del luogo nella tua app. Questo componente è personalizzabile.
Il componente Place Details può essere utilizzato in modo indipendente o in combinazione con altre API e servizi di Google Maps Platform. Il componente accetta un ID luogo, un nome risorsa o coordinate di latitudine/longitudine e restituisce le informazioni di Place Details sottoposte a rendering.
Il componente Place Details è completamente personalizzabile, il che ti consente di modificare i caratteri, i colori e i raggi degli angoli in base al tuo caso d'uso e alle linee guida del brand visivo. Puoi personalizzare l'aspetto dei dettagli del luogo creando un tema che estende PlacesMaterialTheme e fornisce override per gli attributi del tema. Puoi anche personalizzare i campi dei dettagli del luogo inclusi specificando un elenco di voci di contenuti, ognuna delle quali corrisponde a un'informazione mostrata sul luogo.
Varianti di layout
Il componente Place Details supporta due varianti di layout principali:
- Compatto: un layout per visualizzare in anteprima le informazioni chiave.
- Completo: un layout completo che mostra tutti i dettagli del luogo disponibili.
Il layout compatto può essere visualizzato in orientamento verticale o orizzontale. In questo modo, puoi integrare il componente in vari layout di progettazione e dimensioni dello schermo. Il layout completo può essere visualizzato solo in verticale.
Il componente Place Details ti offre un controllo granulare sui contenuti visualizzati nel componente. Ogni elemento (ad esempio foto, recensioni e informazioni di contatto) può essere mostrato o nascosto singolarmente, consentendo una personalizzazione precisa dell'aspetto e della densità di informazioni dei componenti.
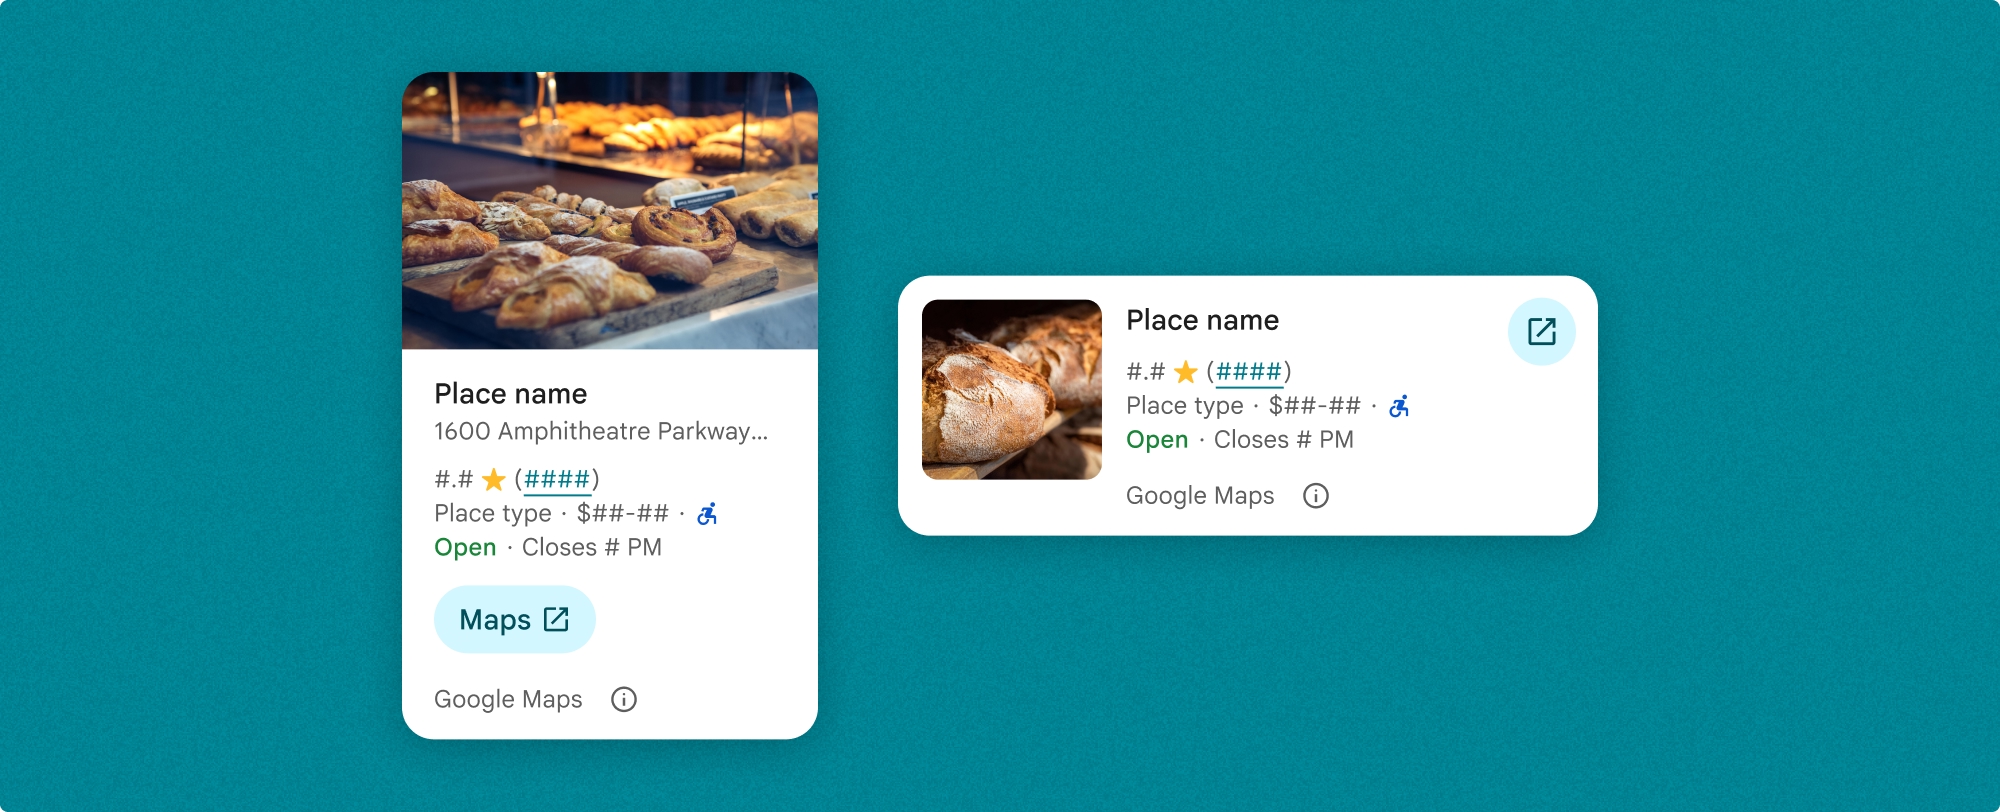
Visualizzazione compatta di Place Details
Il frammento compatto di Place Details (PlaceDetailsCompactFragment) esegue il rendering dei dettagli di un luogo selezionato utilizzando uno spazio minimo. Questa opzione può essere utile in una finestra informativa che mette in evidenza un luogo su una mappa, in un'esperienza di social media come la condivisione di una posizione in una chat, come suggerimento per la selezione della tua posizione attuale o all'interno di un articolo di notizie per fare riferimento al luogo su Google Maps.
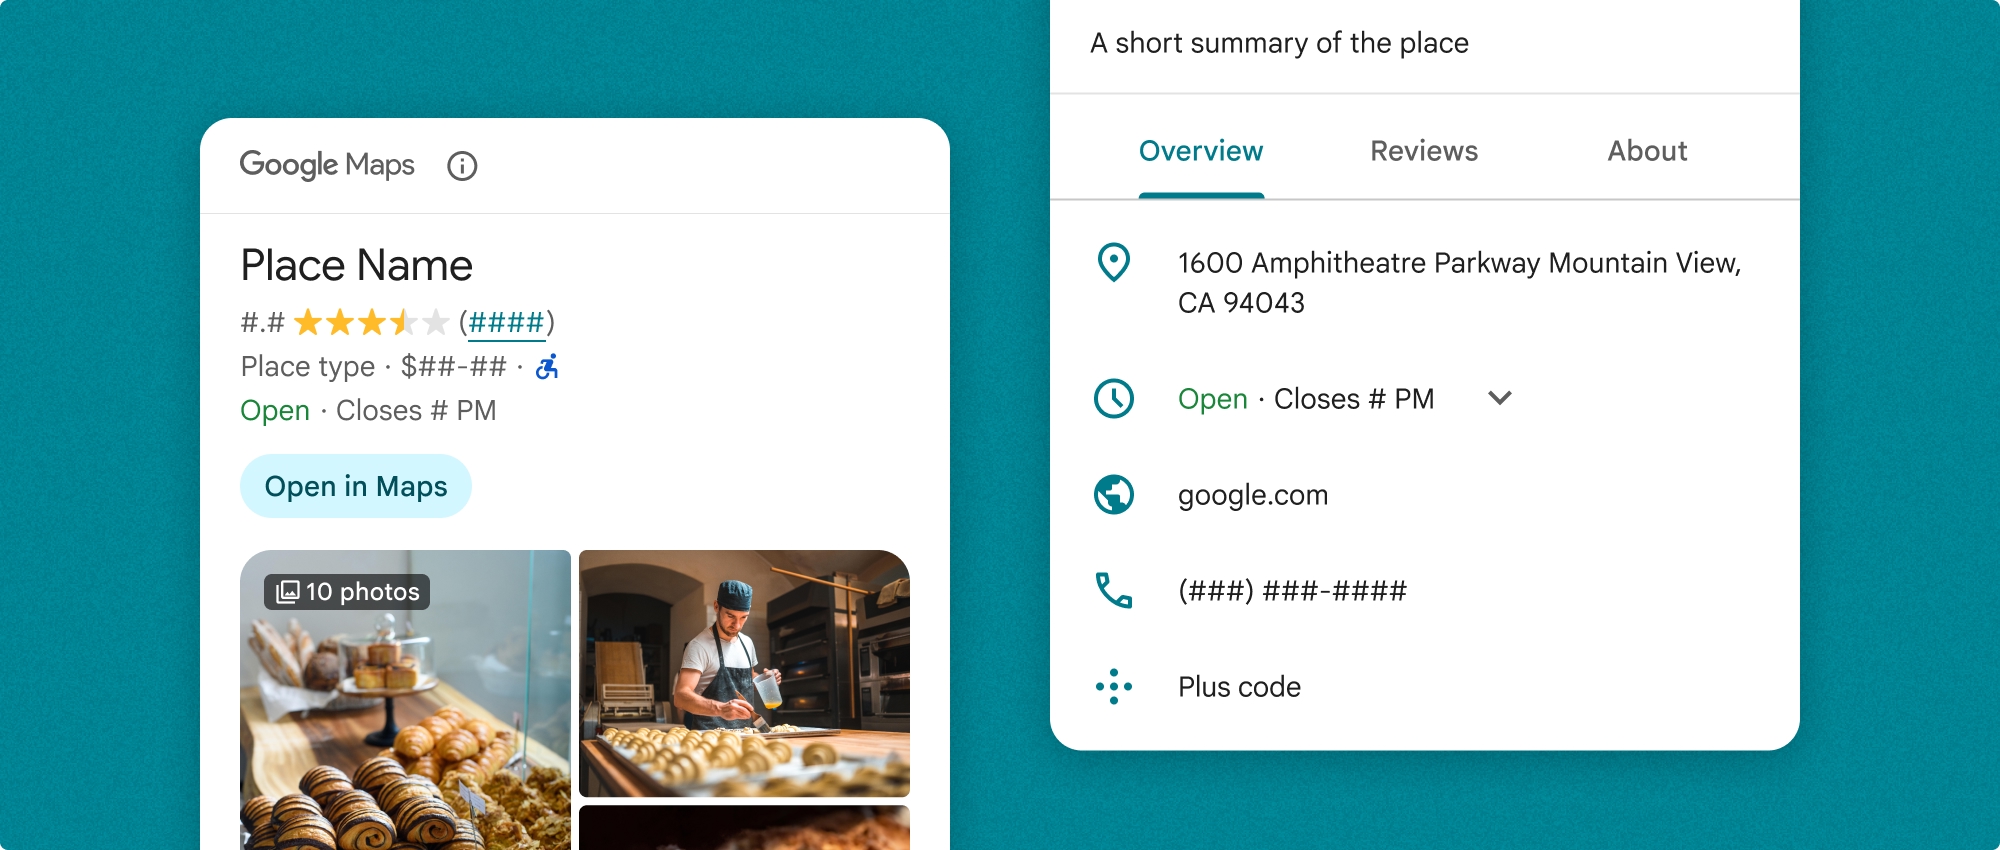
Visualizzazione completa di Place Details
La visualizzazione completa di Place Details (PlaceDetailsFragment) offre una superficie più ampia per mostrare le informazioni sui dettagli del luogo e ti consente di visualizzare più tipi di informazioni.
Opzioni di visualizzazione dei contenuti
Puoi specificare i contenuti da visualizzare utilizzando gli enum in PlaceDetailsCompactFragment.Content o PlaceDetailsFragment.Content.
| Visualizzazione compatta | Visualizzazione completa |
|---|---|
|
|
Fatturazione
Quando utilizzi Place Details UI Kit, ti viene addebitato un importo ogni volta che viene chiamato il metodo .loadWithPlaceId(), .loadWithResourceName() o loadWithCoordinates(). Se carichi lo stesso luogo più volte, ti viene addebitato un importo per ogni richiesta.
Per evitare addebiti multipli, non aggiungere direttamente .loadWithPlaceId() o .loadWithResourceName() nei metodi del ciclo di vita di Android. Ad esempio, non chiamare direttamente .loadWithPlaceId() o .loadWithResourceName() nel metodo onResume().
Aggiungere i dettagli del luogo all'app
Puoi aggiungere i dettagli del luogo alla tua app aggiungendo un frammento a un layout. Quando crei un'istanza del frammento, puoi personalizzare l'aspetto delle informazioni sui dettagli del luogo in base alle tue esigenze e all'aspetto della tua app. Scopri di più sulla personalizzazione.
Sono disponibili tre metodi in Kotlin e Java: uno per caricare il frammento con un ID luogo (loadWithPlaceId()), uno per caricare il frammento con un nome risorsa (loadWithResourceName()) e uno per caricare il frammento con coordinate di latitudine/longitudine (loadWithCoordinates()). Puoi scegliere uno o più metodi.
La posizione predefinita per la visualizzazione compatta è verticale. Se vuoi un layout orizzontale, specifica Orientation.HORIZONTAL. Puoi anche specificare facoltativamente Orientation.VERTICAL per maggiore chiarezza. La visualizzazione completa può essere visualizzata solo in verticale.
Consulta gli esempi nella sezione Esempi di componenti Place Details.
Personalizzare l'aspetto visivo
Stile personalizzato
Puoi personalizzare i colori, la tipografia, la spaziatura, i bordi e gli angoli del componente Place Details.
Places UI Kit offre un approccio di sistema di progettazione alla personalizzazione visiva basato approssimativamente su Material Design (con alcune modifiche specifiche di Google Maps). Consulta il riferimento di Material Design per Colore e Tipografia. Per impostazione predefinita, lo stile è conforme al linguaggio di progettazione visiva di Google Maps.
Places UI Kit fornisce un tema scuro per impostazione predefinita, quindi potrebbe essere necessario personalizzare sia il tema scuro sia quello chiaro. Per personalizzare il tema scuro, aggiungi una voce per il colore in values-night/colors.xml.
Per ulteriori informazioni sullo stile, consulta la sezione Stile personalizzato.
Personalizzazione di larghezza e altezza
Visualizzazioni compatte
Larghezze consigliate:
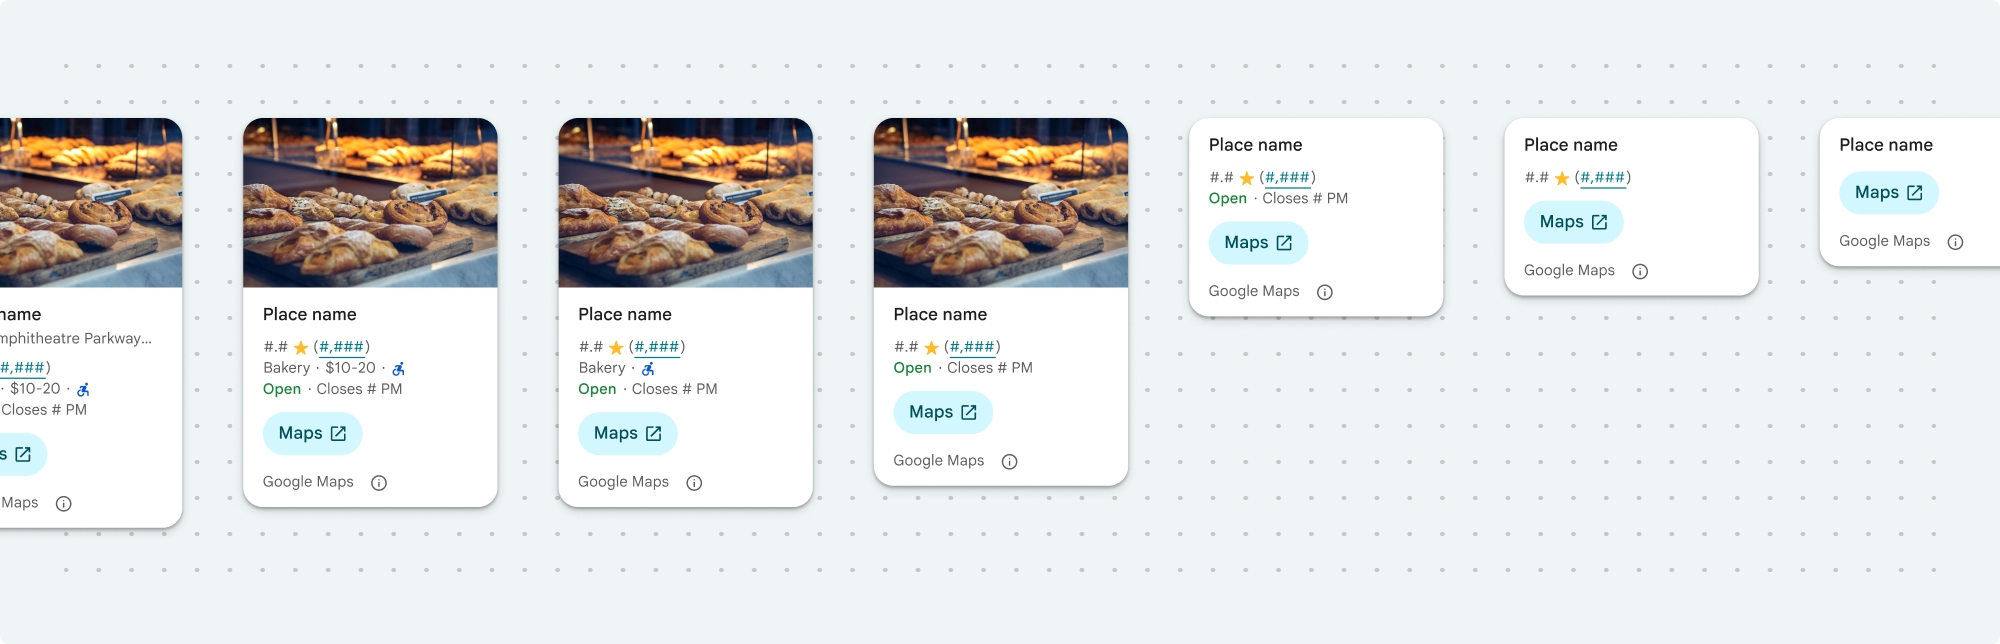
- Orientamento verticale: tra 180 dp e 300 dp.
- Orientamento orizzontale: tra 180 dp e 500 dp.
Le larghezze inferiori a 160 dp potrebbero non essere visualizzate correttamente.
La best practice consiste nel non impostare un'altezza per le visualizzazioni compatte. In questo modo, i contenuti della finestra possono impostare l'altezza, consentendo la visualizzazione di tutte le informazioni.
Visualizzazioni complete
Per le visualizzazioni complete, la larghezza consigliata è compresa tra 250 dp e 450 dp. Una larghezza inferiore a 250 dp potrebbe non essere visualizzata correttamente.
Puoi impostare l'altezza del componente: la visualizzazione verticale di Place Details scorrerà verticalmente nello spazio assegnato.
La best practice consiste nell'impostare un'altezza per le visualizzazioni complete. In questo modo, i contenuti della finestra possono scorrere correttamente.
Esempi di componenti Place Details
Creare una visualizzazione compatta o completa
Kotlin
        // We create a new instance of the fragment using its factory method.
        // We can specify which content to show, the orientation, and a custom theme.
        val fragment = PlaceDetailsCompactFragment.newInstance(
            PlaceDetailsCompactFragment.ALL_CONTENT, // Show all available content.
            orientation,
            R.style.CustomizedPlaceDetailsTheme,
        ).apply {
            // The PlaceLoadListener provides callbacks for when the place data is successfully
            // loaded or when an error occurs. This is where we update our UI state.
            setPlaceLoadListener(object : PlaceLoadListener {
                override fun onSuccess(place: Place) {
                    Log.d(TAG, "Place loaded: ${place.id}")
                    // Once the data is loaded, we hide the loading indicator and show the fragment.
                    binding.loadingIndicatorMain.visibility = View.GONE
                    binding.placeDetailsContainer.visibility = View.VISIBLE
                    binding.dismissButton.visibility = View.VISIBLE
                }

                override fun onFailure(e: Exception) {
                    Log.e(TAG, "Place failed to load", e)
                    // On failure, we hide the UI and notify the user.
                    dismissPlaceDetails()
                    Toast.makeText(this@MainActivity, "Failed to load place details.", Toast.LENGTH_SHORT).show()
                }
            })
        }

        // We add the fragment to our layout's container view.
        // `commitNow()` is used to ensure the fragment is immediately added and available,
        // which is important because we need to call a method on it right after.
        supportFragmentManager
            .beginTransaction()
            .replace(binding.placeDetailsContainer.id, fragment)
            .commitNow()

        // **This is the key step**: After adding the fragment, we call `loadWithPlaceId`
        // to trigger the data loading process for the selected place.
        // We use `post` to ensure this runs after the layout has been measured,
        // which can prevent potential timing issues.
        binding.root.post {
            fragment.loadWithPlaceId(placeId)
        }
    }
Java
PlaceDetailsCompactFragment fragment =
  PlaceDetailsCompactFragment.newInstance(
        Orientation.HORIZONTAL,
        Arrays.asList(Content.ADDRESS, Content.TYPE, Content.RATING, Content.ACCESSIBLE_ENTRANCE_ICON),
        R.style.CustomizedPlaceDetailsTheme);

fragment.setPlaceLoadListener(
  new PlaceLoadListener() {
        @Override public void onSuccess(Place place) { ... }

        @Override public void onFailure(Exception e) { ... }
});

getSupportFragmentManager()
      .beginTransaction()
      .add(R.id.fragment_container, fragment)
      .commitNow();

// Load the fragment with a Place ID.
fragment.loadWithPlaceId(placeId);

// Load the fragment with a resource name.
fragment.loadWithResourceName(resourceName);
Questo esempio di codice completo determina l'orientamento della visualizzazione compatta a livello di programmazione in base alla configurazione del dispositivo dell'utente.
Kotlin
package com.example.placedetailsuikit

import android.Manifest
import android.annotation.SuppressLint
import android.content.pm.PackageManager
import android.content.res.Configuration
import android.location.Location
import android.os.Bundle
import android.util.Log
import android.view.View
import android.widget.Toast
import androidx.activity.enableEdgeToEdge
import androidx.activity.result.ActivityResultLauncher
import androidx.activity.result.contract.ActivityResultContracts
import androidx.activity.viewModels
import androidx.appcompat.app.AppCompatActivity
import androidx.core.app.ActivityCompat
import androidx.lifecycle.ViewModel
import com.example.placedetailsuikit.databinding.ActivityMainBinding
import com.google.android.gms.location.FusedLocationProviderClient
import com.google.android.gms.location.LocationServices
import com.google.android.gms.maps.CameraUpdateFactory
import com.google.android.gms.maps.GoogleMap
import com.google.android.gms.maps.OnMapReadyCallback
import com.google.android.gms.maps.SupportMapFragment
import com.google.android.gms.maps.model.LatLng
import com.google.android.gms.maps.model.PointOfInterest
import com.google.android.libraries.places.api.Places
import com.google.android.libraries.places.api.model.Place
import com.google.android.libraries.places.widget.PlaceDetailsCompactFragment
import com.google.android.libraries.places.widget.PlaceLoadListener
import com.google.android.libraries.places.widget.model.Orientation

private const val TAG = "PlacesUiKit"

/**
 * A simple ViewModel to store UI state that needs to survive configuration changes.
 * In this case, it holds the ID of the selected place. Using a ViewModel is good practice
 * as it prevents data loss during events like screen rotation, ensuring a
 * seamless user experience.
 */
class MainViewModel : ViewModel() {
    var selectedPlaceId: String? = null
}

/**
 * This activity serves as a basic example of integrating the Place Details UI Kit.
 * It demonstrates the fundamental steps required:
 * 1. Setting up a Google Map.
 * 2. Requesting location permissions to center the map.
 * 3. Handling clicks on Points of Interest (POIs) to get a Place ID.
 * 4. Using the Place ID to load and display place details in a [PlaceDetailsCompactFragment].
 */
class MainActivity : AppCompatActivity(), OnMapReadyCallback, GoogleMap.OnPoiClickListener {
    // ViewBinding provides type-safe access to views defined in the XML layout,
    // eliminating the need for `findViewById` and preventing null pointer exceptions.
    private lateinit var binding: ActivityMainBinding
    private var googleMap: GoogleMap? = null

    // The FusedLocationProviderClient is the main entry point for interacting with the
    // fused location provider, which intelligently manages the underlying location technologies.
    private lateinit var fusedLocationClient: FusedLocationProviderClient

    // Using registerForActivityResult is the modern, recommended approach for handling
    // permission requests. It decouples the request from the handling logic, making the
    // code cleaner and easier to manage compared to the older `onRequestPermissionsResult` callback.
    private lateinit var requestPermissionLauncher: ActivityResultLauncher<Array<String>>

    // The `by viewModels()` delegate provides a lazy-initialized ViewModel scoped to this Activity.
    // This ensures that we get the same ViewModel instance across configuration changes.
    private val viewModel: MainViewModel by viewModels()

    override fun onCreate(savedInstanceState: Bundle?) {
        super.onCreate(savedInstanceState)

        // The ActivityResultLauncher is initialized here. The lambda defines the callback
        // that will be executed once the user responds to the permission dialog.
        requestPermissionLauncher =
            registerForActivityResult(ActivityResultContracts.RequestMultiplePermissions()) { permissions ->
                // We check if either fine or coarse location permission was granted.
                if (permissions[Manifest.permission.ACCESS_FINE_LOCATION] == true || permissions[Manifest.permission.ACCESS_COARSE_LOCATION] == true) {
                    Log.d(TAG, "Location permission granted by user.")
                    fetchLastLocation()
                } else {
                    // If permission is denied, we inform the user and default to a known location.
                    // This ensures the app remains functional even without location access.
                    Log.d(TAG, "Location permission denied by user.")
                    Toast.makeText(
                        this,
                        "Location permission denied. Showing default location.",
                        Toast.LENGTH_LONG
                    ).show()
                    moveToSydney()
                }
            }

        // enableEdgeToEdge() allows the app to draw behind the system bars for a more immersive experience.
        enableEdgeToEdge()
        binding = ActivityMainBinding.inflate(layoutInflater)
        setContentView(binding.root)

        binding.dismissButton.setOnClickListener {
            dismissPlaceDetails()
        }

        // --- Crucial: Initialize Places SDK ---
        // It's essential to initialize the Places SDK before making any other Places API calls.
        // This should ideally be done once, for example, in the Application's `onCreate`.
        val apiKey = BuildConfig.PLACES_API_KEY
        if (apiKey.isEmpty() || apiKey == "YOUR_API_KEY") {
            // A valid API key is required for the Places SDK to function.
            Log.e(TAG, "No api key")
            Toast.makeText(
                this,
                "Add your own API_KEY in local.properties",
                Toast.LENGTH_LONG
            ).show()
            finish()
            return
        }

        // `initializeWithNewPlacesApiEnabled` is used to opt-in to the new SDK version.
        Places.initializeWithNewPlacesApiEnabled(applicationContext, apiKey)

        fusedLocationClient = LocationServices.getFusedLocationProviderClient(this)
        // ------------------------------------

        // The SupportMapFragment is the container for the map. `getMapAsync` allows us to
        // work with the GoogleMap object via a callback once it's fully initialized.
        val mapFragment =
            supportFragmentManager.findFragmentById(R.id.map_fragment) as SupportMapFragment?
        mapFragment?.getMapAsync(this)

        // This block handles restoration after a configuration change (e.g., screen rotation).
        // If a place was selected before the rotation, its ID is stored in the ViewModel.
        // We use this ID to immediately show the details fragment again.
        if (viewModel.selectedPlaceId != null) {
            viewModel.selectedPlaceId?.let { placeId ->
                Log.d(TAG, "Restoring PlaceDetailsFragment for place ID: $placeId")
                showPlaceDetailsFragment(placeId)
            }
        }
    }

    /**
     * This callback is triggered when the GoogleMap object is ready to be used.
     * All map setup logic should be placed here.
     */
    override fun onMapReady(map: GoogleMap) {
        Log.d(TAG, "Map is ready")
        googleMap = map
        // Setting the OnPoiClickListener allows us to capture user taps on points of interest.
        googleMap?.setOnPoiClickListener(this)

        // After the map is ready, we determine the initial camera position based on location permissions.
        if (isLocationPermissionGranted()) {
            fetchLastLocation()
        } else {
            requestLocationPermissions()
        }
    }

    /**
     * A helper function to centralize the check for location permissions.
     */
    private fun isLocationPermissionGranted(): Boolean {
        return ActivityCompat.checkSelfPermission(
            this,
            Manifest.permission.ACCESS_FINE_LOCATION
        ) == PackageManager.PERMISSION_GRANTED ||
                ActivityCompat.checkSelfPermission(
                    this,
                    Manifest.permission.ACCESS_COARSE_LOCATION
                ) == PackageManager.PERMISSION_GRANTED
    }

    /**
     * This function triggers the permission request flow. The result is handled by the
     * ActivityResultLauncher defined in `onCreate`.
     */
    private fun requestLocationPermissions() {
        Log.d(TAG, "Requesting location permissions.")
        requestPermissionLauncher.launch(
            arrayOf(
                Manifest.permission.ACCESS_FINE_LOCATION,
                Manifest.permission.ACCESS_COARSE_LOCATION
            )
        )
    }

    /**
     * Fetches the device's last known location. This is a fast and battery-efficient way
     * to get a location fix. It should only be called after verifying permissions.
     */
    @SuppressLint("MissingPermission")
    private fun fetchLastLocation() {
        // Double-checking permissions here is a good practice, although the call sites are already guarded.
        if (isLocationPermissionGranted()) {
            fusedLocationClient.lastLocation
                .addOnSuccessListener { location: Location? ->
                    if (location != null) {
                        val userLocation = LatLng(location.latitude, location.longitude)
                        googleMap?.moveCamera(CameraUpdateFactory.newLatLngZoom(userLocation, 13f))
                        Log.d(TAG, "Moved to user's last known location.")
                    } else {
                        // `lastLocation` can be null if the location has never been recorded.
                        // In this case, we fall back to a default location.
                        Log.d(TAG, "Last known location is null. Falling back to Sydney.")
                        moveToSydney()
                    }
                }
                .addOnFailureListener {
                    // This listener handles errors in the location fetching process.
                    Log.e(TAG, "Failed to get location.", it)
                    moveToSydney()
                }
        }
    }

    /**
     * Moves the map camera to a default, hardcoded location (Sydney).
     * This serves as a reliable fallback.
     */
    private fun moveToSydney() {
        val sydney = LatLng(-33.8688, 151.2093)
        googleMap?.moveCamera(CameraUpdateFactory.newLatLngZoom(sydney, 13f))
        Log.d(TAG, "Moved to Sydney")
    }

    /**
     * This is the callback for the `OnPoiClickListener`. It's triggered when a user
     * taps a POI on the map.
     */
    override fun onPoiClick(poi: PointOfInterest) {
        val placeId = poi.placeId
        Log.d(TAG, "Place ID: $placeId")

        // We save the selected place ID to the ViewModel. This is critical for surviving
        // configuration changes. If the user rotates the screen now, the `onCreate`
        // method will be able to restore the place details view.
        viewModel.selectedPlaceId = placeId
        showPlaceDetailsFragment(placeId)
    }

    /**
     * This function is the core of the integration. It creates, configures, and displays
     * the [PlaceDetailsCompactFragment].
     * @param placeId The unique identifier for the place to be displayed.
     */
    private fun showPlaceDetailsFragment(placeId: String) {
        Log.d(TAG, "Showing PlaceDetailsFragment for place ID: $placeId")

        // We manage the visibility of UI elements to provide feedback to the user.
        // The wrapper is shown, and a loading indicator is displayed while the data is fetched.
        binding.placeDetailsWrapper.visibility = View.VISIBLE
        binding.dismissButton.visibility = View.GONE
        binding.placeDetailsContainer.visibility = View.GONE
        binding.loadingIndicatorMain.visibility = View.VISIBLE

        // The Place Details widget can be displayed vertically or horizontally.
        // We dynamically choose the orientation based on the device's current configuration.
        val orientation =
            if (resources.configuration.orientation == Configuration.ORIENTATION_LANDSCAPE) {
                Orientation.HORIZONTAL
            } else {
                Orientation.VERTICAL
            }


        // We create a new instance of the fragment using its factory method.
        // We can specify which content to show, the orientation, and a custom theme.
        val fragment = PlaceDetailsCompactFragment.newInstance(
            PlaceDetailsCompactFragment.ALL_CONTENT, // Show all available content.
            orientation,
            R.style.CustomizedPlaceDetailsTheme,
        ).apply {
            // The PlaceLoadListener provides callbacks for when the place data is successfully
            // loaded or when an error occurs. This is where we update our UI state.
            setPlaceLoadListener(object : PlaceLoadListener {
                override fun onSuccess(place: Place) {
                    Log.d(TAG, "Place loaded: ${place.id}")
                    // Once the data is loaded, we hide the loading indicator and show the fragment.
                    binding.loadingIndicatorMain.visibility = View.GONE
                    binding.placeDetailsContainer.visibility = View.VISIBLE
                    binding.dismissButton.visibility = View.VISIBLE
                }

                override fun onFailure(e: Exception) {
                    Log.e(TAG, "Place failed to load", e)
                    // On failure, we hide the UI and notify the user.
                    dismissPlaceDetails()
                    Toast.makeText(this@MainActivity, "Failed to load place details.", Toast.LENGTH_SHORT).show()
                }
            })
        }

        // We add the fragment to our layout's container view.
        // `commitNow()` is used to ensure the fragment is immediately added and available,
        // which is important because we need to call a method on it right after.
        supportFragmentManager
            .beginTransaction()
            .replace(binding.placeDetailsContainer.id, fragment)
            .commitNow()

        // **This is the key step**: After adding the fragment, we call `loadWithPlaceId`
        // to trigger the data loading process for the selected place.
        // We use `post` to ensure this runs after the layout has been measured,
        // which can prevent potential timing issues.
        binding.root.post {
            fragment.loadWithPlaceId(placeId)
        }
    }


    /**
     * Hides the place details view and clears the selected place ID from the ViewModel.
     */
    private fun dismissPlaceDetails() {
        binding.placeDetailsWrapper.visibility = View.GONE
        // Clearing the ID in the ViewModel is important so that if the user rotates the
        // screen after dismissing, the details view doesn't reappear.
        viewModel.selectedPlaceId = null
    }

    override fun onDestroy() {
        super.onDestroy()
        // It's a good practice to nullify references to objects that have a lifecycle
        // tied to the activity, like the GoogleMap object, to prevent potential memory leaks.
        googleMap = null
    }
}
Creare un tema
Quando crei un'istanza di un frammento, puoi specificare un tema che esegue l'override di uno qualsiasi degli attributi di stile predefiniti. Gli attributi del tema di cui non viene eseguito l'override utilizzano gli stili predefiniti. Se vuoi supportare un tema scuro, puoi aggiungere una voce per il colore in values-night/colors.xml.
Places UI Kit fornisce un tema scuro per impostazione predefinita, quindi potrebbe essere necessario personalizzare sia il tema scuro sia quello chiaro. Per personalizzare il tema scuro, aggiungi una voce per il colore in values-night/colors.xml.
  <style name="CustomizedPlaceDetailsTheme" parent="PlacesMaterialTheme">
    <item name="placesColorPrimary">@color/app_primary_color</item>
    <item name="placesColorOnSurface">@color/app_color_on_surface</item>
    <item name="placesColorOnSurfaceVariant">@color/app_color_on_surface</item>

    <item name="placesTextAppearanceBodySmall">@style/app_text_appearence_small</item>

    <item name="placesCornerRadius">20dp</item>
  </style>
Utilizzare contenuti standard
Questo esempio utilizza i contenuti standard.
  val fragmentStandardContent = PlaceDetailsCompactFragment.newInstance(
    PlaceDetailsCompactFragment.STANDARD_CONTENT,
    orientation,
    R.style.CustomizedPlaceDetailsTheme
  )
Personalizzare contenuti specifici
Questo esempio seleziona solo le opzioni Content di indirizzo, ingresso per ospiti con mobilità ridotta e contenuti multimediali per una visualizzazione compatta ed esegue il rendering con CustomizedPlaceDetailsTheme.
  val placeDetailsFragment = PlaceDetailsCompactFragment.newInstance(
    orientation,
    listOf(
        Content.ADDRESS,
        Content.ACCESSIBLE_ENTRANCE,
        Content.MEDIA
    ),
    R.style.CustomizedPlaceDetailsTheme
)
Utilizzare tutti i contenuti
Questo esempio utilizza tutte le Content opzioni di una visualizzazione compatta.
  val fragmentAllContent = PlaceDetailsCompactFragment.newInstance(
    orientation,
    PlaceDetailsCompactFragment.ALL_CONTENT,
    R.style.CustomizedPlaceDetailsTheme
  )