
Page Summary
-
Developers can customize the appearance and visibility of UI elements like compass, location button, and recenter button within the Google Maps SDK for iOS.
-
Navigation UI elements such as the header, footer, directions list, and trip progress bar can be customized or replaced with custom views for a tailored navigation experience.
-
Speedometer visibility and alerts are controllable, while destination markers can be hidden or customized, but currently lack text label support.
-
Default map gestures like scrolling, zooming, tilting, and rotating can be individually disabled while retaining programmatic camera control.
-
UI elements can be positioned relative to the navigation header and footer using layout guides, and alternate route display can be controlled to manage UI clutter.
Using the Navigation SDK for iOS, you can modify the user experience with your map by determining which of the built-in UI controls and elements appear on the map, and which gestures you allow. You can also modify the visual appearance of the Navigation UI. Refer to the Policies page for guidelines on acceptable modifications to the Navigation UI.
Map UI controls
The Navigation SDK provides some built-in UI controls
similar to those found in the Google Maps for iOS application. You can
toggle the visibility of these controls using the GMSUISettings
class. Changes you make on this class reflect immediately on the map.
Compass
The Navigation SDK provides a compass graphic which appears in the top right corner of the map under certain circumstances and only when enabled. When the user clicks on the compass, the camera animates back to a position with a bearing of zero (the default orientation) and the compass fades away shortly after.
If navigation is enabled and the camera mode is set to "following," the compass remains visible and tapping the compass toggles between tilted and overview camera perspectives.
To avoid driver distraction, the compass remains in the same position if the header (in portrait mode) expands and conflicts with the default position of the compass. If you add a secondary header custom control or header accessory view, the compass is hidden to avoid UI conflicts.
The compass supports day and night modes, as well as dark mode.
The compass is disabled by default. You can enable the compass by setting the
compassButton
property of GMSUISettings to true. However, you cannot force the compass to
always be shown.
Swift
mapView.settings.compassButton = true
Objective-C
mapView.settings.compassButton = YES;
My Location button
The My Location button appears in the bottom right corner of the screen only
when the My Location button is enabled. When a user clicks the button, the
camera animates to focus on the user's current location if the user's location
is known. You can enable the button by setting the
myLocationButton
property of GMSUISettings to true.
Swift
mapView.settings.myLocationButton = true
Objective-C
mapView.settings.myLocationButton = YES;
Recenter button
When navigation is enabled, the recenter button appears when the user scrolls
the map view, and disappears when the user taps to re-center the map. To allow
the recenter button to appear, set the recenterButtonEnabled
property of GMSUISettings to true. To prevent the recenter button from
appearing, set recenterButtonEnabled to false.
Swift
mapView.settings.isRecenterButtonEnabled = true
Objective-C
mapView.settings.recenterButtonEnabled = YES;
Map UI accessories
The Navigation SDK provides UI accessories that appear during navigation similar to those found in the Google Maps for iOS application. You can adjust the visibility or visual appearance of these controls as described in this section. Changes you make here reflect during the user's next trip.
Navigation header and footer
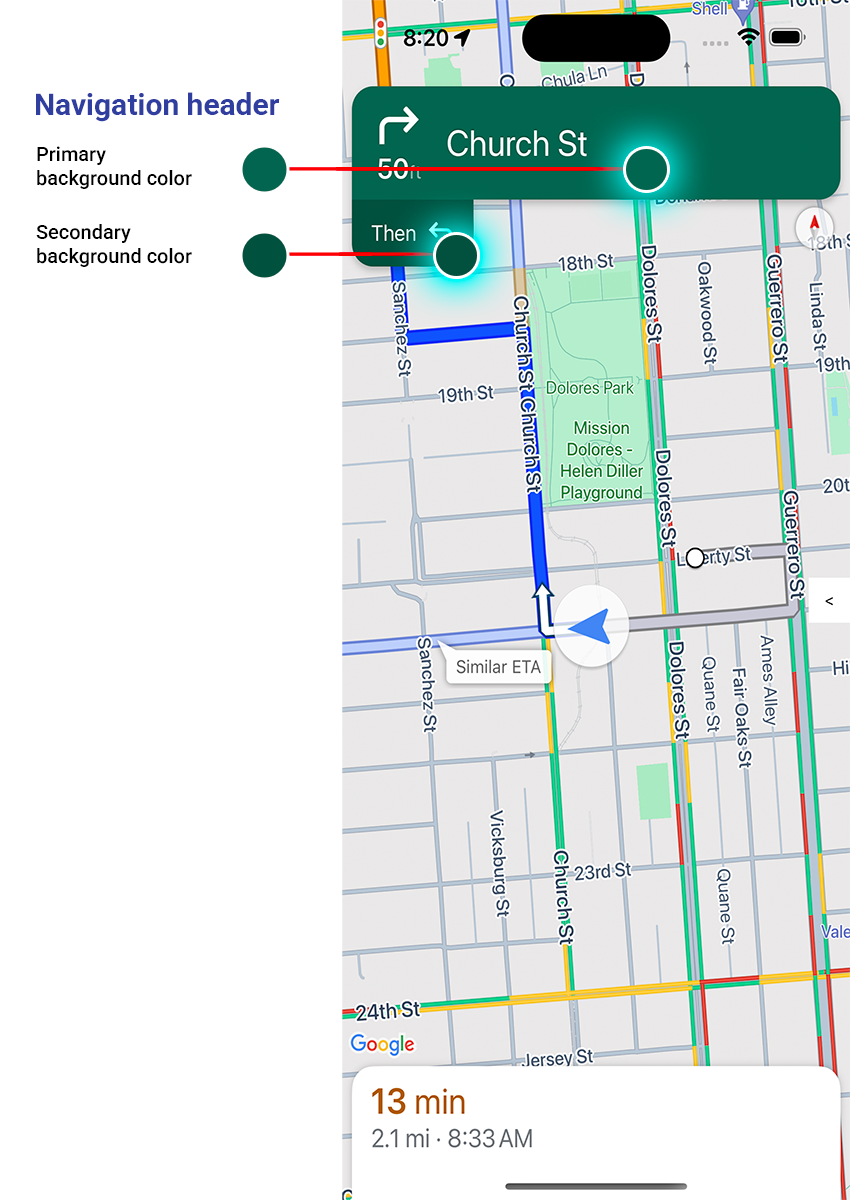
During navigation, the navigation header appears at the top of the screen and the navigation footer appears at the bottom. The navigation header shows the street name and direction for the next turn on the route, as well as the direction of the following turn. The navigation footer shows the estimated time and distance to the destination, as well as the estimated time of arrival.
You can toggle the visibility of the navigation header and footer and set its colors programmatically using the following properties:
navigationHeaderEnabled— controls whether the navigation header is visible (default istrue).navigationFooterEnabled— controls whether the navigation footer is visible (default istrue).navigationHeaderPrimaryBackgroundColor— sets the primary background color for the navigation header.navigationHeaderSecondaryBackgroundColor— sets the secondary background color for the navigation header.
The following code example shows turning on visibility for the header and
footer, then setting navigationHeaderPrimaryBackgroundColor to blue, and
navigationHeaderSecondaryBackgroundColor to red.
Swift
mapView.settings.isNavigationHeaderEnabled = true
mapView.settings.isNavigationFooterEnabled = true
mapView.settings.navigationHeaderPrimaryBackgroundColor = .blue
mapView.settings.navigationHeaderSecondaryBackgroundColor = .red
Objective-C
mapView.settings.navigationHeaderEnabled = YES;
mapView.settings.navigationFooterEnabled = YES;
mapView.settings.navigationHeaderPrimaryBackgroundColor = [UIColor blueColor];
mapView.settings.navigationHeaderSecondaryBackgroundColor = [UIColor redColor];
Navigation accessory header view
You can customize your app by replacing the secondary navigation header view
with your own customized accessory view. You do it by creating a view that
implements the GMSNavigationAccessoryView protocol. This protocol has one
required method: -heightForAccessoryViewConstrainedToSize:onMapView:. You are
given the maximum available size for your view on the given mapView, and you
must provide the height that your view requires.
You can then pass this view to the mapView by calling setHeaderAccessoryView:
The mapView animates-out any current views, and then animates-in your custom
view. The navigation header must be visible so that your custom view can
display.
To remove the custom header accessory view, pass nil to
setHeaderAccessoryView:.
If your view must change size at any time, then you can call
invalidateLayoutForAccessoryView:, passing in the view that needs to change
size.
Example
The following code example demonstrates a custom view that implements the
GMSNavigationAccessoryView protocol. This custom view is then used to set a
custom navigation header accessory view.
Swift
class MyCustomView: UIView, GMSNavigationAccessoryView {
…
  func heightForAccessoryViewConstrained(to size: CGSize, on mapView: GMSMapView) -> CGFloat {
    // viewHeight gets calculated as the height your view needs.
    return viewHeight
  }
…
}

let customView = MyCustomView(...)
mapView.setHeaderAccessory(customView)

// At some later point customView changes size.
mapView.invalidateLayout(forAccessoryView: customView)

// Remove the custom header accessory view.
mapView.setHeaderAccessory(nil)
Objective-C
@interface MyCustomView : UIView <GMSNavigationAccessoryView>
…
@end

@implementation MyCustomView
…
- (CGFloat)heightForAccessoryViewConstrainedToSize:(CGSize)size onMapView:(GMSMapView *)mapView {
  // viewHeight gets calculated as the height your view needs.
  return viewHeight;
}
…
@end

MyCustomView *customView = [[MyCustomView alloc] init…];
[_mapView setHeaderAccessoryView:customView];

// At some later point customView changes size.
[_mapView invalidateLayoutForAccessoryView:customView];

// Remove the custom header accessory view.
[_mapView setHeaderAccessoryView:nil];
Normal and low-light modes
The
GMSNavigatorListener.didChangeSuggestedLightingMode
listener method is triggered when estimated lighting conditions are updated. For
example, when night falls at the device's current location. You can
programmatically modify low-light mode behavior in the following ways:
- Choose when normal and low-light modes are used by using the
GMSNavigationLightingModeenum. - Select primary and secondary background colors of low-light mode by setting
values for the
navigationHeaderPrimaryBackgroundColorNightModeand thenavigationHeaderSecondaryBackgroundColorNightModeproperties.
Directions List
You can provide step-by-step directions in your app. The following example shows one possible way to do this. These steps may vary depending on your own implementation.
- Enable an entry point button after
setDestinationson theGMSNavigator(navigator) has completed successfully andguidanceActiveon the navigator has been enabled. - Upon a user tapping on the entry point button, create a
GMSNavigationDirectionsListController(controller) with the navigator associated with theGMSMapView(mapView). - Add the controller to an instance of
UIViewController(view controller), and add thedirectionsListViewas a subview of the view controller. ThereloadDataandinvalidateLayoutmethods on the controller should be called as one would with aUICollectionView. - Push the view controller onto the app's view controller hierarchy.
The following code example shows adding a DirectionsListViewController.
Swift
override func viewDidLoad() {
  super.viewDidLoad()
  // Add the directionsListView to the host view controller's view.
  let directionsListView = directionsListController.directionsListView
  directionsListView.frame = self.view.frame
  self.view.addSubview(directionsListView)
  directionsListView.translatesAutoresizingMaskIntoConstraints = false
  directionsListView.topAnchor.constraint(equalTo: self.view.topAnchor).isActive = true
  directionsListView.leadingAnchor.constraint(equalTo: self.view.leadingAnchor).isActive = true
  directionsListView.trailingAnchor.constraint(equalTo: self.view.trailingAnchor).isActive = true
  directionsListView.bottomAnchor.constraint(equalTo: self.view.bottomAnchor).isActive = true
  ...
}

override func viewWillAppear(_ animated: Bool) {
  super.viewWillAppear(animated)
  // Make sure data is fresh when the view appears.
  directionsListController.reloadData()
  ...
}

override func willTransition(to newCollection: UITraitCollection, with coordinator: UIViewControllerTransitionCoordinator) {
  super.willTransition(to: newCollection, with: coordinator)
  // Invalidate the layout during rotation.
  coordinator.animate(alongsideTransition: {_ in
    self.directionsListController.invalidateLayout()
  })
  ...
}
Objective-C
- (void)viewDidLoad {
  [super viewDidLoad];
  // Add the directionsListView to the host view controller's view.
  UIView *directionsListView = _directionsListController.directionsListView;
  directionsListView.frame = self.view.bounds;
  [self.view addSubview:directionsListView];
  directionsListView.translatesAutoresizingMaskIntoConstraints = NO;
  [directionsListView.topAnchor constraintEqualToAnchor:self.view.topAnchor].active = YES;
  [directionsListView.leadingAnchor constraintEqualToAnchor:self.view.leadingAnchor].active = YES;
  [directionsListView.trailingAnchor constraintEqualToAnchor:self.view.trailingAnchor].active = YES;
  [directionsListView.bottomAnchor constraintEqualToAnchor:self.view.bottomAnchor].active = YES;
  ...
}

- (void)viewWillAppear:(BOOL)animated {
  [super viewWillAppear:animated];
  // Make sure data is fresh when the view appears.
  [_directionsListController reloadData];
  ...
}

- (void)willTransitionToTraitCollection:(UITraitCollection *)newCollection
              withTransitionCoordinator:(id<UIViewControllerTransitionCoordinator>)coordinator {
  [super willTransitionToTraitCollection:newCollection withTransitionCoordinator:coordinator];
  void(^animationBlock)(id <UIViewControllerTransitionCoordinatorContext>context) =
      ^void(id <UIViewControllerTransitionCoordinatorContext>context) {
    [_directionsListController invalidateLayout];
  };
  // Invalidate the layout during rotation.
  [coordinator animateAlongsideTransition:animationBlock
                               completion:nil];
  ...
}

...
Trip progress bar
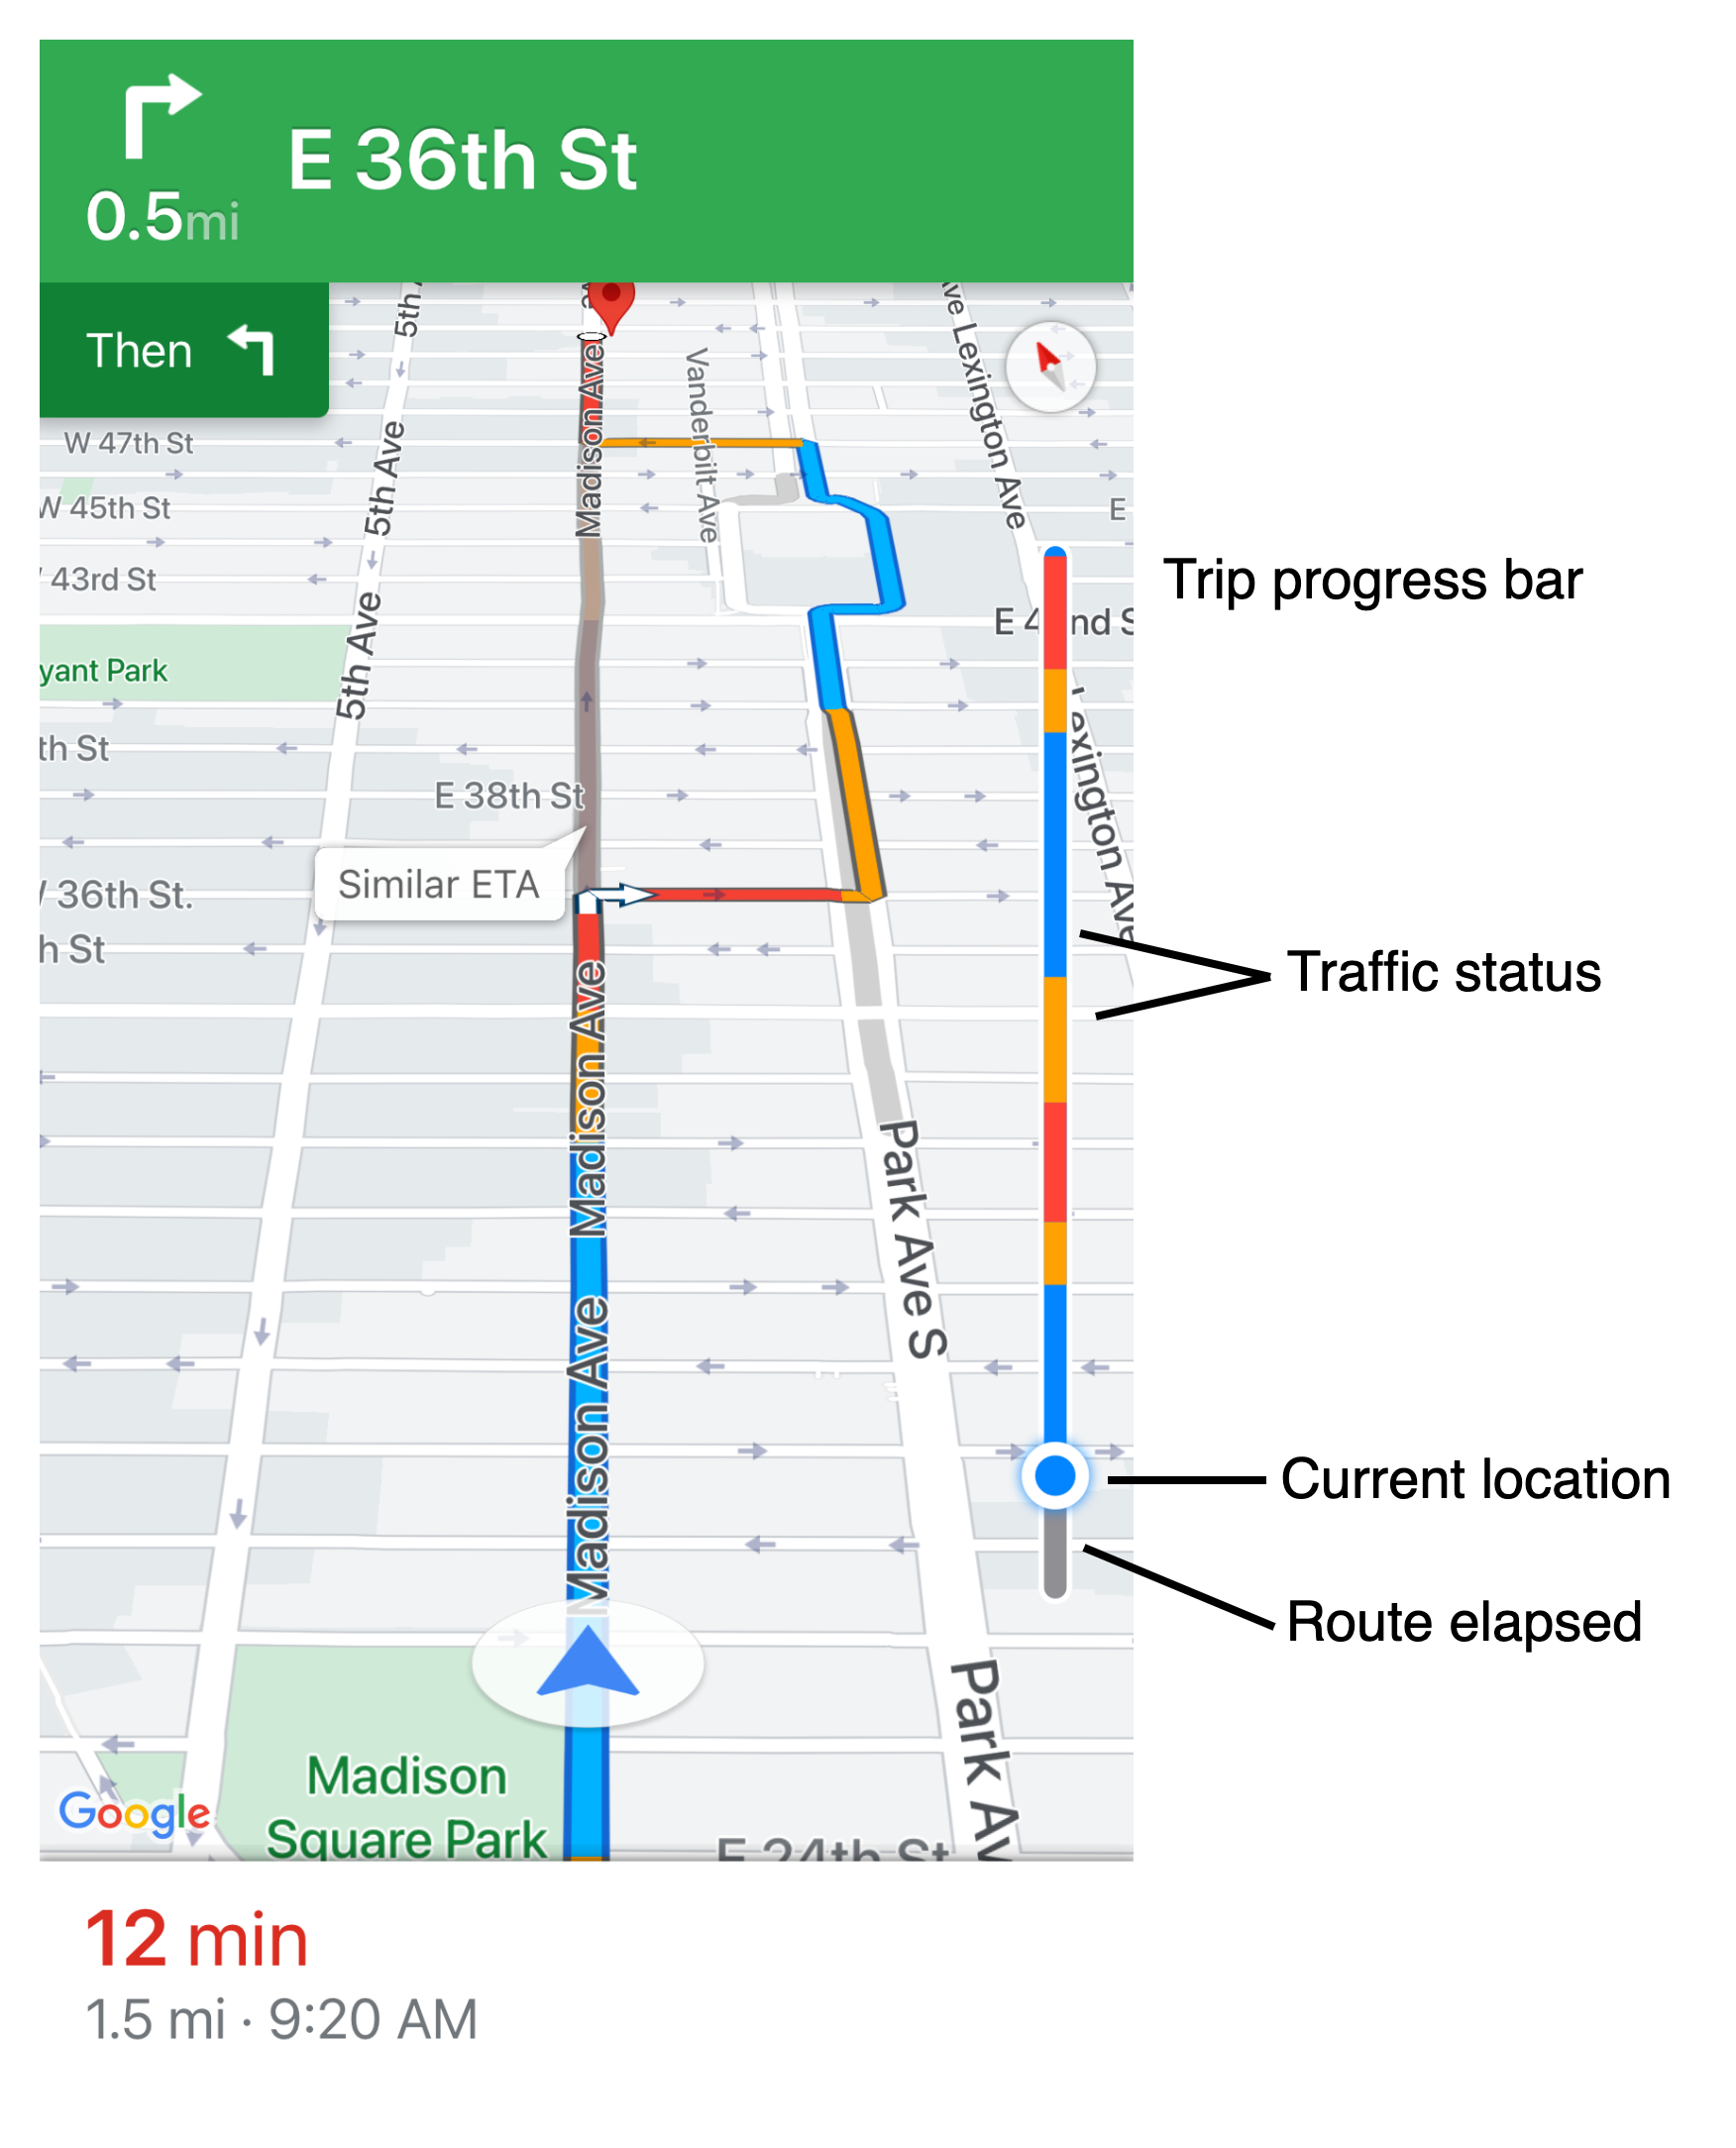
The trip progress bar is a vertical bar that appears on the start/leading side of the map when navigation starts. When enabled, it displays an overview for an entire trip, along with the user's destination and current position.
The provides users the ability to quickly anticipate any upcoming issues, such as traffic, without needing to zoom in. They can then reroute the trip if necessary. If the user reroutes the trip, the progress bar resets as if a new trip has started from that point.
The trip progress bar displays the following status indicators:
Traffic status—the status of upcoming traffic.
Current location—the driver's current location in the trip.
Route elapsed—the elapsed portion of the trip.
Enable the trip progress bar by setting the navigationTripProgressBarEnabled
property in GMSUISettings.
Swift
mapView.settings.isNavigationTripProgressBarEnabled = true
Objective-C
mapView.settings.navigationTripProgressBarEnabled = YES;
Trip progress bar positioning
- The left side of the bar roughly aligns with the left of the speedometer, Google logo, and Re-center button (when visible). The width is 12 pt.
- The trip progress bar responds dynamically to the vertical space on the screen. The bottom of the bar is positioned 210 pt from the bottom of the screen. The top of the trip progress bar remains at least 170 pt from the top of the screen, with a maximum height of the bar is 400 pt.
- If the trip progress bar overlaps with the navigation header or other Navigation UI elements, it appears under those other elements.
Prompt Visibility API (Experimental)
The Prompt Visibility API lets you avoid conflicts between UI elements generated by the Navigation SDK and your own custom UI elements by adding a listener to receive a callback before a Navigation SDK UI element is about to appear and as soon as the element is removed. For more information, including code samples, see the Prompt Visibility API section of the Configure real-time-disruptions page.
Traffic lights and stop signs
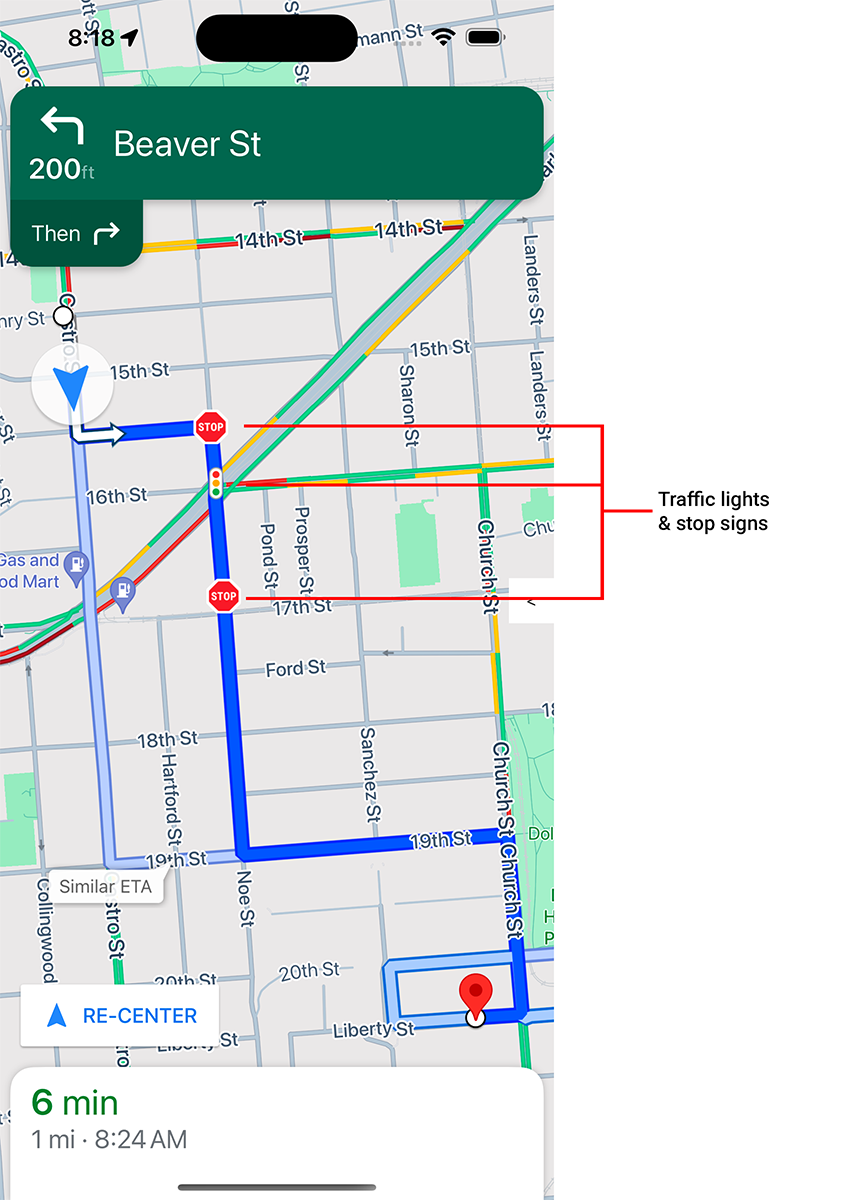
You can enable the display of traffic lights and stop signs during
active navigation in the mapView, which provides additional context for routes
and trip maneuvers.
By default, traffic lights and stop signs are disabled in the Navigation SDK for iOS. To enable
this feature, call the GMSMapView settings for each option independently:
showsTrafficLights and showsStopSigns.
Swift
mapView.settings.showsTrafficLights = true
mapView.settings.showsStopSigns = true
Objective-C
mapView.settings.showsTrafficLights = YES;
mapView.settings.showsStopSigns = YES;
Speedometer control
When navigation is enabled and the travel mode is set to driving, the Navigation SDK for iOS displays a speed limit control in the lower corner of the map that shows the current speed limit. When the driver exceeds the speed limit, the control expands to display a second speedometer with the driver's current speed.
You can set alert levels to change the formatting of the speedometer display when the driver exceeds the speed limit by a specified amount. For example, you can specify that the current speed displays with a red text color when the driver exceeds the speed limit by 5 mph, and with a red background color when the driver exceeds the speed limit by 10 mph.
To display the speed limit control, set the shouldDisplaySpeedometer
property of GMSUISettings to true. To disable the display of the speed limit
control, set shouldDisplaySpeedometer to false.
Swift
mapView.settings.shouldDisplaySpeedometer = true
Objective-C
mapView.settings.shouldDisplaySpeedometer = YES;
For more information on setting alerts for the speedometer, see Configure speedometer alerts.
Destination markers
You can show or hide the destination markers for a given route by setting the
showsDestinationMarkers
property of GMSUISettings. The following example shows turning off the
destination markers.
Swift
mapView.settings.showsDestinationMarkers = false
Objective-C
mapView.settings.showsDestinationMarkers = NO;
Map experience features
The Navigation SDK provides you the ability to make further customizations to the navigation experience for your users. Changes you make to your instance reflect during the user's next update of your app.
Destination highlighting and entrances

When a destination is created with a placeID, the destination building will be highlighted and an entrance icon will be shown whenever possible. These visual cues aid users in distinguishing and navigating to their intended destination.
To create a destination with a placeID, use one of the GMSNavigationWaypoint initializers that accepts a placeID. For example, the destinations created in the Navigate a route tutorial include destination highlighting and entrance labels when available.
3D building display during navigation

3D buildings are displayed during navigation by default. To disable this feature, set buildingsEnabled to false (Swift) or NO (Objective-C).
Disable default map gestures
You can disable the default gestures on the map by setting properties of the
GMSUISettings class, which is available as a property of the GMSMapView.
The following gestures can be enabled and disabled programmatically. Note that
disabling the gesture won't limit programmatic access to the camera
settings.
scrollGestures— controls whether scroll gestures are enabled or disabled. If enabled, users may swipe to pan the camera.zoomGestures— controls whether zoom gestures are enabled or disabled. If enabled, users may double tap, two-finger tap, or pinch to zoom the camera. Note that double tapping or pinching whenscrollGesturesare enabled may pan the camera to the specified point.tiltGestures— controls whether tilt gestures are enabled or disabled. If enabled, users may use a two-finger vertical down or up swipe to tilt the camera.rotateGestures— controls whether rotate gestures are enabled or disabled. If enabled, users may use a two-finger rotate gesture to rotate the camera.
In this example, both pan and zoom gestures have been disabled.
Swift
mapView.settings.scrollGestures = false
mapView.settings.zoomGestures = false
Objective-C
mapView.settings.scrollGestures = NO;
mapView.settings.zoomGestures = NO;
Position controls and UI elements
You can position controls and other UI elements relative to the position of the navigation header and footer, by using the following properties:
navigationHeaderLayoutGuidenavigationFooterLayoutGuidebottomTrailingButtonsLayoutGuide
The following code example shows using the layout guides to position a pair of labels in the map view:
Swift
/* Add a label to the top left, positioned below the header. */
let topLabel = UILabel()
topLabel.text = "Top Left"
mapView.addSubview(topLabel)
topLabel.translatesAutoresizingMaskIntoConstraints = false
topLabel.topAnchor.constraint(equalTo: mapView.navigationHeaderLayoutGuide.bottomAnchor).isActive = true
topLabel.leadingAnchor.constraint(equalTo: mapView.leadingAnchor).isActive = true

/* Add a label to the bottom right, positioned above the footer. */
let bottomLabel = UILabel()
bottomLabel.text = "Bottom Right"
mapView.addSubview(bottomLabel)
bottomLabel.translatesAutoresizingMaskIntoConstraints = false
bottomLabel.bottomAnchor.constraint(equalTo: mapView.navigationFooterLayoutGuide.topAnchor).isActive = true
bottomLabel.trailingAnchor.constraint(equalTo: mapView.trailingAnchor).isActive = true
Objective-C
/* Add a label to the top left, positioned below the header. */
UILabel *topLabel = [[UILabel alloc] init];
topLabel.text = @"Top Left";
[view addSubview:topLabel];
topLabel.translatesAutoresizingMaskIntoConstraints = NO;
[topLabel.topAnchor
    constraintEqualToAnchor:mapView.navigationHeaderLayoutGuide.bottomAnchor].active = YES;
[topLabel.leadingAnchor constraintEqualToAnchor:mapView.leadingAnchor].active = YES;

/* Add a label to the bottom right, positioned above the footer. */
UILabel *bottomLabel = [[UILabel alloc] init];
bottomLabel.text = @"Bottom Right";
[view addSubview:bottomLabel];
bottomLabel.translatesAutoresizingMaskIntoConstraints = NO;
[bottomLabel.bottomAnchor
    constraintEqualToAnchor:mapView.navigationFooterLayoutGuide.topAnchor].active = YES;
[bottomLabel.trailingAnchor constraintEqualToAnchor:mapView.trailingAnchor].active = YES;
For an example of how to use a bottomTrailingButtonsLayoutGuide, to position the
real-time disruptions reporting button, see Configure real-time disruptions.
Hide alternate routes
When the user interface becomes cluttered with too much information, you can
reduce clutter by displaying fewer alternate routes than the default (two), or
by displaying no alternate routes at all. You can configure this option before
you fetch the routes by configuring GMSNavigationRoutingOptions, and setting
the alternateRoutesStrategy with one of the following enumeration values:
| Enumeration Value | Description |
|---|---|
| GMSNavigationAlternateRoutesStrategyAll | Default. Displays up to two alternate routes. |
| GMSNavigationAlternateRoutesStrategyOne | Displays one alternate route (if one is available). |
| GMSNavigationAlternateRoutesStrategyNone | Hides alternate routes. |
Example
The following code example demonstrates how to hide alternate routes altogether.
Swift
let routingOptions = GMSNavigationRoutingOptions(alternateRoutesStrategy: .none)
navigator?.setDestinations(destinations,
                           routingOptions: routingOptions) { routeStatus in
  ...
}
Objective-C
GMSNavigationRoutingOptions *routingOptions = [[GMSNavigationRoutingOptions alloc] initWithAlternateRoutesStrategy:GMSNavigationAlternateRoutesStrategyNone];
[navigator setDestinations:destinations
            routingOptions:routingOptions
                  callback:^(GMSRouteStatus routeStatus){...}];