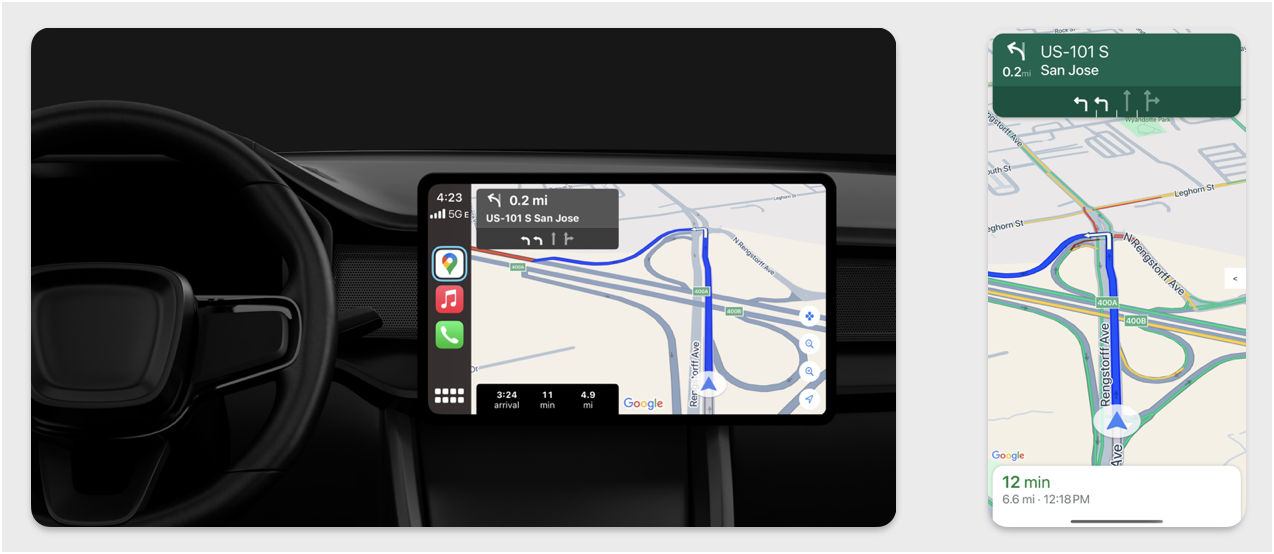
В этом разделе описывается, как использовать Navigation SDK с библиотекой Apple CarPlay для отображения навигации вашего приложения на встроенных головных устройствах . Если встроенная система автомобиля поддерживает CarPlay, водитель может использовать ваше приложение непосредственно на дисплее своего автомобиля, подключив телефон к устройству. Голосовые подсказки также воспроизводятся через динамики автомобиля.
Приложение CarPlay создается на основе набора шаблонов пользовательского интерфейса, предоставленных Apple. Ваше приложение отвечает за выбор шаблона для отображения и за предоставление данных в нем.
Система на приборной панели отображает интерактивные элементы, сертифицированные с точки зрения безопасности , чтобы водитель мог безопасно добраться до места назначения, не отвлекаясь. Вы также можете запрограммировать приложение так, чтобы водитель мог взаимодействовать со специальными функциями приложения, такими как принятие или отклонение заказов или просмотр местоположения клиента на карте. Также можно запрограммировать отображение обновлений статуса заказа на приборной панели.

Настраивать
Начните с CarPlay
Для начала ознакомьтесь с документацией Apple:
Настройте Navigation SDK
- После ознакомления с документацией Apple вы готовы к работе с Navigation SDK.
- Настройте свой проект, если вы еще не интегрировали Navigation SDK в свое приложение.
- Включите ленту инструкций TurnByTurn для вашего приложения.
- Необязательно. Используйте значки, созданные из Navigation SDK.
- Нарисуйте карту, используя класс
GMSMapView, предоставленный в классе UIView. Подробнее см. в разделе «Навигация по маршруту» . ЗаполнитеCPNavigationSessionданными из библиотеки TurnByTurn.
Нарисуйте карту и навигационный интерфейс
Класс GMSMapView отображает карту, а CPMapTemplate — пользовательский интерфейс на экранах CarPlay. Он предоставляет практически ту же функциональность, что и GMSMapView для телефонов, но с ограниченной интерактивностью.
Быстрый
init(window: CPWindow) {
    super.init(nibName: nil, bundle: nil)
    self.window = window

    // More CPMapTemplate initialization

}

override func viewDidLoad() {
    super.viewDidLoad()

    let mapViewOptions = GMSMapViewOptions()
    mapViewOptions.screen = window.screen
    mapViewOptions.frame = self.view.bounds

    mapView = GMSMapView(options: mapViewOptions)
    mapView.autoresizingMask = [.flexibleHeight, .flexibleWidth]
    mapView.settings.isNavigationHeaderEnabled = false
    mapView.settings.isNavigationFooterEnabled = false

    // Disable buttons: in CarPlay, no part of the map is clickable.
    // The app should instead place these buttons in the appropriate slots of the CarPlay template.
    mapView.settings.compassButton = false
    mapView.settings.isRecenterButtonEnabled = false
    mapView.shouldDisplaySpeedometer = false
    mapView.isMyLocationEnabled = true

    self.view.addSubview(mapView)
}
Objective-C
- (instancetype)initWithWindow:(CPWindow *)window {
  self = [super initWithNibName:nil bundle:nil];
  if (self) {
    _window = window;

  // More CPMapTemplate initialization
  }
}

- (void)viewDidLoad {
  [super viewDidLoad];
  GMSMapViewOptions *options = [[GMSMapViewOptions alloc] init];
  options.screen = _window.screen;
  options.frame = self.view.bounds;
  _mapView = [[GMSMapView alloc] initWithOptions:options];
  _mapView.autoresizingMask = UIViewAutoresizingFlexibleHeight | UIViewAutoresizingFlexibleWidth;
  _mapView.settings.navigationHeaderEnabled = NO;
  _mapView.settings.navigationFooterEnabled = NO;

  // Disable buttons: in CarPlay, no part of the map is clickable.
  // The app should instead place these buttons in the appropriate slots of the CarPlay template.
  _mapView.settings.compassButton = NO;
  _mapView.settings.recenterButtonEnabled = NO;

  _mapView.shouldDisplaySpeedometer = NO;
  _mapView.myLocationEnabled = YES;

  [self.view addSubview:_mapView];
}
Включить взаимодействие с картой
Для обеспечения безопасности водителя CarPlay ограничивает взаимодействие с поверхностью экрана серией методов CPMapTemplateDelegate . Используйте эти обратные вызовы для поддержки ограниченного взаимодействия водителя с картой на экране приборной панели.
Для поддержки дополнительных действий пользователя создайте массив CPMapButton и назначьте его CPMapTemplate.mapButtons .
Следующий код создает интерактивные элементы и кнопки для панорамирования, увеличения и уменьшения масштаба, а также для указания местоположения пользователя.
Панорамирование взаимодействий
Быстрый
// MARK: CPMapTemplateDelegate
func mapTemplate(_ mapTemplate: CPMapTemplate, panBeganWith direction: CPMapTemplate.PanDirection) {

}

func mapTemplate(_ mapTemplate: CPMapTemplate, panWith direction: CPMapTemplate.PanDirection) {
    let scrollAmount = scrollAmount(for: direction)
    let scroll = GMSCameraUpdate.scrollBy(x: scrollAmount.x, y: scrollAmount.y)
    mapView.animate(with: scroll)
}

func mapTemplate(_ mapTemplate: CPMapTemplate, panEndedWith direction: CPMapTemplate.PanDirection) {
}

func scrollAmount(for panDirection: CPMapTemplate.PanDirection) -> CGPoint {
    let scrollDistance = 80.0
    var scrollAmount = CGPoint(x: 0, y: 0)
    switch panDirection {
        case .left:
            scrollAmount.x -= scrollDistance
            break;
        case .right:
            scrollAmount.x += scrollDistance
            break;
        case .up:
            scrollAmount.y += scrollDistance
            break;
        case .down:
            scrollAmount.y -= scrollDistance
            break;
        default:
            break;
    }
    if scrollAmount.x != 0 && scrollAmount.y != 0 {
        // Adjust length if scrolling diagonally.
        scrollAmount = CGPointMake(scrollAmount.x * sqrt(1.0/2.0), scrollAmount.y * sqrt(1.0/2.0))
    }
    return scrollAmount
}
Objective-C
#pragma mark - CPMapTemplateDelegate

- (void)mapTemplate:(CPMapTemplate *)mapTemplate panBeganWithDirection:(CPPanDirection)direction {
}

- (void)mapTemplate:(CPMapTemplate *)mapTemplate panWithDirection:(CPPanDirection)direction {
CGPoint scrollAmount = [self scrollAmountForPanDirection:direction];
GMSCameraUpdate *scroll = [GMSCameraUpdate scrollByX:scrollAmount.x Y:scrollAmount.y];
[_mapView animateWithCameraUpdate:scroll];
}

- (void)mapTemplate:(CPMapTemplate *)mapTemplate panEndedWithDirection:(CPPanDirection)direction {
}
- (CGPoint)scrollAmountForPanDirection:(CPPanDirection)direction {
  static const CGFloat scrollDistance = 80.;
  CGPoint scrollAmount = {0., 0.};
  if (direction & CPPanDirectionLeft) {
    scrollAmount.x = -scrollDistance;
  }
  if (direction & CPPanDirectionRight) {
    scrollAmount.x = scrollDistance;
  }
  if (direction & CPPanDirectionUp) {
    scrollAmount.y = -scrollDistance;
  }
  if (direction & CPPanDirectionDown) {
    scrollAmount.y = scrollDistance;
  }
  if (scrollAmount.x != 0 && scrollAmount.y != 0) {
  // Adjust length if scrolling diagonally.
  scrollAmount =
    CGPointMake(scrollAmount.x * (CGFloat)M_SQRT1_2, scrollAmount.y * (CGFloat)M_SQRT1_2);
  }
  return scrollAmount;
}
Распространенные варианты использования кнопок
Быстрый
// MARK: Create Buttons

func createMapButtons() -> [CPMapButton] {
    let panButton = mapButton(systemImageName: "dpad.fill") { [weak self] in
        self?.didTapPanButton()
    }

    let zoomOutButton = mapButton(systemImageName: "minus.magnifyingglass") { [weak self] in
        self?.didTapZoomOutButton()
    }

    let zoomInButton = mapButton(systemImageName: "plus.magnifyingglass") { [weak self] in
        self?.didTapZoomInButton()
    }

    let myLocationButton = mapButton(systemImageName: "location") { [weak self] in
        self?.didTapMyLocationButton()
    }

    let mapButtons = [panButton, zoomOutButton, zoomInButton, myLocationButton]
    return mapButtons
}

func mapButton(systemImageName: String, handler: @escaping () -> Void) -> CPMapButton {

}


// MARK: Button callbacks

@objc func didTapPanButton() {
    mapTemplate?.showPanningInterface(animated: true)
}

@objc func didTapZoomOutButton() {
    mapView.animate(with: GMSCameraUpdate.zoomOut())
}

@objc func didTapZoomInButton() {
    mapView.animate(with: GMSCameraUpdate.zoomIn())
}

@objc func didTapMyLocationButton() {
    if let lastLocation = lastLocation {
        let cameraPosition = GMSCameraPosition(target: lastLocation.coordinate, zoom: 15)
        mapView.animate(to: cameraPosition)
    }
}
Objective-C
#pragma mark - Create Buttons

- (NSArray<CPMapButton *>*)createMapButtons {
    NSMutableArray<CPMapButton *> *mapButtons = [NSMutableArray<CPMapButton *> array];

    __weak __typeof__(self) weakSelf = self;
    CPMapButton *panButton = [self mapButtonWithSystemImageNamed:@"dpad.fill"
                                                        handler:^(CPMapButton *_) {
                                                        [weakSelf didTapPanButton];
                                                        }];
    [mapButtons addObject:panButton];

    CPMapButton *zoomOutButton =
        [self mapButtonWithSystemImageNamed:@"minus.magnifyingglass"
                                    handler:^(CPMapButton *_Nonnull mapButon) {
                                    [weakSelf didTapZoomOutButton];
                                    }];
    [mapButtons addObject:zoomOutButton];

    CPMapButton *zoomInButton =
        [self mapButtonWithSystemImageNamed:@"plus.magnifyingglass"
                                    handler:^(CPMapButton *_Nonnull mapButon) {
                                    [weakSelf didTapZoomInButton];
                                    }];
    [mapButtons addObject:zoomInButton];

    CPMapButton *myLocationButton =
        [self mapButtonWithSystemImageNamed:@"location"
                                    handler:^(CPMapButton *_Nonnull mapButton) {
                                    [weakSelf didTapMyLocationButton];
                                    }];
    [mapButtons addObject:myLocationButton];
    return mapButtons;
}

#pragma mark - Button Callbacks

- (void)didTapZoomOutButton {
[_mapView animateWithCameraUpdate:[GMSCameraUpdate zoomOut]];
}

- (void)didTapZoomInButton {
[_mapView animateWithCameraUpdate:[GMSCameraUpdate zoomIn]];
}

- (void)didTapMyLocationButton {
CLLocation *location = self.lastLocation;
if (location) {
    GMSCameraPosition *position =
        [[GMSCameraPosition alloc] initWithTarget:self.lastLocation.coordinate zoom:15.];
    [_mapView animateToCameraPosition:position];
}
}

- (void)didTapPanButton {
[_mapTemplate showPanningInterfaceAnimated:YES];
_isPanningInterfaceEnabled = YES;
}

- (void)didTapStopPanningButton {
[_mapTemplate dismissPanningInterfaceAnimated:YES];
_isPanningInterfaceEnabled = NO;
}
Примечание: Альтернативные маршруты нельзя выбрать на экране CarPlay. Их необходимо выбрать на телефоне до запуска CarPlay.
Отображение навигационных указаний
В этом разделе рассказывается, как настроить прослушиватель потока данных и как заполнить навигационные указания на панелях навигации и расчета маршрута. Подробнее см. в разделе «Создание навигационного приложения CarPlay» Руководства по программированию приложений CarPlay .

Панели навигации и оценки маршрута содержат навигационную карту, на которой отображается навигационная информация, относящаяся к текущему маршруту. Библиотека TurnByTurn в составе Navigation SDK может предоставить часть этой информации, например, символы, текст и оставшееся время.
Настроить прослушиватель
Следуйте инструкциям по настройке прослушивателя событий, приведенным в разделе Подробная информация о пошаговом потоке данных .
Заполнить навигационную информацию
Первая часть следующего примера кода показывает, как создать оценку времени поездки CarPlay, преобразуя GMSNavigationNavInfo.timeToCurrentStepSeconds в CPTravelEstimate . Подробнее об этих и других элементах отображения см. в разделе «Подробности о потоке данных с пошаговой индикацией» .
Во второй части примера показано, как создать объект и сохранить его в поле userInfo объекта CPManuevers . Это определяет стиль CPManeuverDisplayStyle , который также используется для информации о выборе полосы движения. Подробнее см. в руководстве по программированию приложения CarPlay от Apple.
Быстрый
// Get a CPTravelEstimate from GMSNavigationNavInfo
func getTravelEstimates(from navInfo:GMSNavigationNavInfo) -> CPTravelEstimates {
    let distanceRemaining = navInfo.roundedDistance(navInfo.distanceToCurrentStepMeters)
    let timeRemaining = navInfo.roundedTime(navInfo.timeToCurrentStepSeconds)
    let travelEstimates = CPTravelEstimates(distanceRemaining: distanceRemaining, timeRemaining: timeRemaining)
    return travelEstimates
}

//  Create an object to be stored in the userInfo field of CPManeuver to determine the CPManeuverDisplayStyle.

/** An object to be stored in the userInfo field of a CPManeuver. */

struct ManeuverUserInfo {
    var stepInfo: GMSNavigationStepInfo
    var isLaneGuidance: Bool
}

func mapTemplate(_ mapTemplate: CPMapTemplate, displayStyleFor maneuver: CPManeuver) -> CPManeuverDisplayStyle {
    let userInfo = maneuver.userInfo
    if let maneuverUserInfo = userInfo as? ManeuverUserInfo {
        return maneuverUserInfo.isLaneGuidance ? .symbolOnly : .leadingSymbol
    }
    return .leadingSymbol
}

// Get a CPManeuver with instructionVariants and symbolImage from GMSNavigationStepInfo
func getManeuver(for stepInfo: GMSNavigationStepInfo) -> CPManeuver {
    let maneuver = CPManeuver()
    maneuver.userInfo = ManeuverUserInfo(stepInfo: stepInfo, isLaneGuidance: false)
    switch stepInfo.maneuver {
        case .destination:
            maneuver.instructionVariants = ["Your destination is ahead."]
            break
        case .destinationLeft:
            maneuver.instructionVariants = ["Your destination is ahead on your left."]
            break
        case .destinationRight:
            maneuver.instructionVariants = ["Your destination is ahead on your right."]
            break
        default:
            maneuver.attributedInstructionVariants = currentNavInfo?.instructions(forStep: stepInfo, options: instructionOptions)
            break
    }
    maneuver.symbolImage = stepInfo.maneuverImage(with: instructionOptions.imageOptions)
    return maneuver
}

// Get the lane image for a CPManeuver from GMSNavigationStepInfo
func laneGuidanceManeuver(for stepInfo: GMSNavigationStepInfo) -> CPManeuver? {
    let maneuver = CPManeuver()
    maneuver.userInfo = ManeuverUserInfo(stepInfo: stepInfo, isLaneGuidance: true)
    let lanesImage = stepInfo.lanesImage(with: imageOptions)
    guard let lanesImage = lanesImage else { return nil }
    maneuver.symbolImage = lanesImage
    return maneuver
}
Objective-C
// Get a CPTravelEstimate from GMSNavigationNavInfo
- (nonull CPTravelEstimates *)travelEstimates:(GMSNavigationNavInfo *_Nonnull navInfo) {
NSMeasurement<NSUnitLength *> *distanceRemaining = [navInfo roundedDistance:navInfo.distanceToCurrentStepMeters];
NSTimeInterval timeRemaining = [navInfo roundedTime:navInfo.timeToCurrentStepSeconds];
CPTravelEstimate* travelEstimate = [[CPTravelEstimates alloc] initWithDistanceRemaining:distanceRemaining
                                                timeRemaining:timeRemaining];
}
//  Create an object to be stored in the userInfo field of CPManeuver to determine the CPManeuverDisplayStyle.

/** An object to be stored in the userInfo field of a CPManeuver. */
@interface ManeuverUserInfo : NSObject

@property(nonatomic, readonly, nonnull) GMSNavigationStepInfo *stepInfo;
@property(nonatomic, readonly, getter=isLaneGuidance) BOOL laneGuidance;

- (nonnull instancetype)initWithStepInfo:(GMSNavigationStepInfo *)stepInfo
                        isLaneGuidance:(BOOL)isLaneGuidance NS_DESIGNATED_INITIALIZER;

- (instancetype)init NS_UNAVAILABLE;

@end

- (CPManeuverDisplayStyle)mapTemplate:(CPMapTemplate *)mapTemplate
            displayStyleForManeuver:(nonnull CPManeuver *)maneuver {
ManeuverUserInfo *userInfo = maneuver.userInfo;
return userInfo.laneGuidance ? CPManeuverDisplayStyleSymbolOnly : CPManeuverDisplayStyleDefault;
}
// Get a CPManeuver with instructionVariants and symbolImage from GMSNavigationStepInfo
- (nonnull CPManeuver *)maneuverForStep:(nonnull GMSNavigationStepInfo *)stepInfo {
CPManeuver *maneuver = [[CPManeuver alloc] init];
maneuver.userInfo = [[ManeuverUserInfo alloc] initWithStepInfo:stepInfo isLaneGuidance:NO];
switch (stepInfo.maneuver) {
    case GMSNavigationManeuverDestination:
    maneuver.instructionVariants = @[ @"Your destination is ahead." ];
    break;
    case GMSNavigationManeuverDestinationLeft:
    maneuver.instructionVariants = @[ @"Your destination is ahead on your left." ];
    break;
    case GMSNavigationManeuverDestinationRight:
    maneuver.instructionVariants = @[ @"Your destination is ahead on your right." ];
    break;
    default: {
    maneuver.attributedInstructionVariants =
        [_currentNavInfo instructionsForStep:stepInfo options:_instructionOptions];
    break;
    }
}
maneuver.symbolImage = [stepInfo maneuverImageWithOptions:_instructionOptions.imageOptions];
return maneuver;
}
// Get the lane image for a CPManeuver from GMSNavigationStepInfo
- (nullable CPManeuver *)laneGuidanceManeuverForStep:(nonnull GMSNavigationStepInfo *)stepInfo {
CPManeuver *maneuver = [[CPManeuver alloc] init];
maneuver.userInfo = [[ManeuverUserInfo alloc] initWithStepInfo:stepInfo isLaneGuidance:YES];
UIImage *lanesImage = [stepInfo lanesImageWithOptions:_imageOptions];
if (!lanesImage) {
    return nil;
}
maneuver.symbolImage = lanesImage;
return maneuver;
}
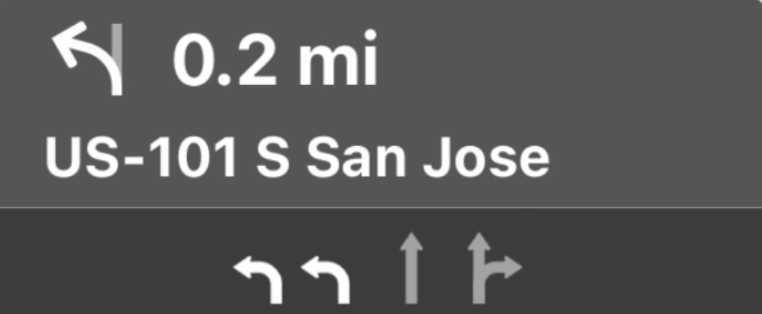
Маневры
CarPlay использует класс CPManeuver для пошагового управления. Подробнее о манёврах и подсказках для движения по полосам см. в разделе «Подробности о пошаговом потоке данных» .
Сопутствующая документация
- https://developer.apple.com/carplay/
- https://developer.apple.com/carplay/documentation/CarPlay-App-Programming-Guide.pdf
- https://developer.apple.com/design/human-interface-guidelines/carplay
- Подробная информация о пошаговой передаче данных
- Проложить маршрут

