

Place Markers 元件
Place Markers 元件可讓您建立自訂地圖註解,直接在地圖上顯示重要地點資訊。您可以顯示地點的評分、地點類型、營業中/已關閉狀態、價格範圍或自訂文字 (例如 AI 生成的標籤或行程編號)。這樣一來,使用者就能在不需輕觸詳細地點資訊卡的情況下,獲得資訊更豐富的地圖探索體驗。
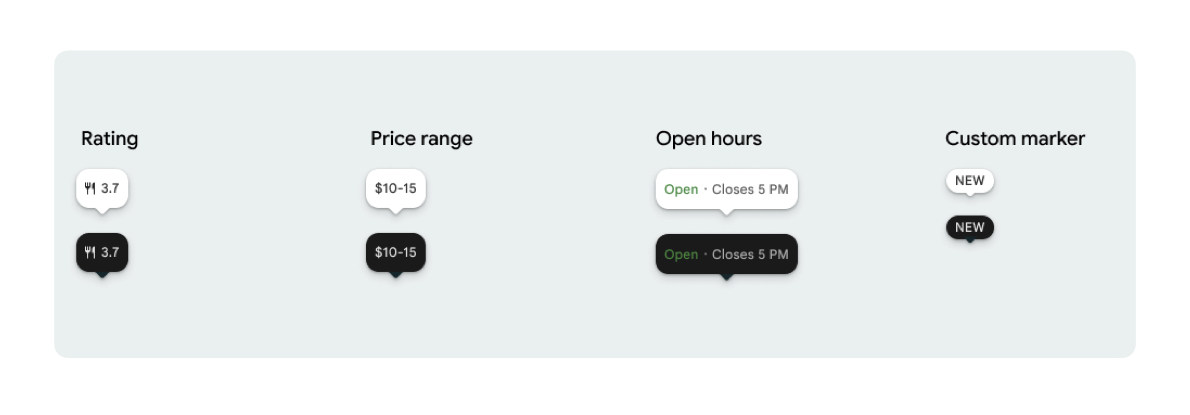
每個 PlaceMarker 最多可顯示一個標記圖示和選用的標記文字。
可用的圖示如下:
type:地點類型。none:沒有圖示。
rating:評分。priceRange:價格範圍 (例如 $10-20)。openStatus:商家是否營業中。custom:自訂文字 (例如「熱門」)。
使用地點 ID (.placeID)、資源名稱 (.resourceName) 或地理座標 (.coordinate) 參照地點。
顯示和出處註明規定
顯示 Places UI Kit 地圖標記時,標記不得單獨顯示。點按或輕觸時,必須開啟相關聯的「地點詳細資料」元件或輕量型方塊,提供必要的 Google 品牌宣傳、貢獻者出處資訊和「回報問題」流程。
如遇空間有限的情況,請參閱相片和評論的出處資訊規定。
地點標記範例
基本標記自訂
以下程式碼範例說明如何自訂基本地點標記。
Swift
import GooglePlacesSwift
import SwiftUI

@MainActor
struct DefaultMarker: View {
  var body: some View {
    PlaceMarker(
      identifier: PlaceIdentifier.placeID("PLACE_ID"),
      markerIcon: .none
    )
  }
}

@MainActor
struct RatingMarker: View {
  var body: some View {
    PlaceMarker(
      identifier: PlaceIdentifier.placeID("PLACE_ID"),
      markerIcon: .none,
      markerText: .rating
    )
  }
}

@MainActor
struct TypeAndRatingMarker: View {
  var body: some View {
    PlaceMarker(
      identifier: PlaceIdentifier.placeID("PLACE_ID"),
      markerIcon: .type,
      markerText: .rating
    )
  }
}


@MainActor
struct PriceRangeMarker: View {
  var body: some View {
    PlaceMarker(
      identifier: PlaceIdentifier.resourceName("places/PLACE_RESOURCE_NAME"),
      markerIcon: .none,
      markerType: .priceRange
    )
  }
}


@MainActor
struct OpenStatusMarker: View {
  var body: some View {
    PlaceMarker(
      identifier: PlaceIdentifier.coordinate(CLLocationCoordinate2D(latitude: 37.7749, longitude: -122.4194)),
      markerIcon: .icon,
      markerText: .openStatus
    )
  }
}
@MainActor
struct PhotoMarker: View {
    PlaceMarker(
        identifier: PlaceIdentifier.resourceName("places/PLACE_RESOURCE_NAME")
        markerIcon =.Photo
    )
}


@MainActor
struct CustomMarker: View {
  var body: some View {
    PlaceMarker(
      identifier: PlaceIdentifier.placeID("PLACE_ID"),
      markerIcon: .none,
      markerType: .custom(label: "3")
    )
  }
}
自訂標記外觀
以下程式碼範例說明如何使用宣告式 SwiftUI 檢視區塊修飾符,隱藏三角形的對話泡泡尖端,藉此自訂標記外觀,並提供輕觸回呼,在使用者輕觸標記時觸發自訂應用程式動作。
Swift
@MainActor
struct ModifierStyleMarker: View {
  var body: some View {
    PlaceMarker(
      identifier: .placeID("PLACE_ID"),
      markerIcon: .none,
      markerText: .openStatus,
      configuration: PlaceMarkerConfiguration(beakPresence: false)
    )
    .onTap { placeID in
      print("Marker tapped for place: \(placeID)")
    }
  }
}
處理回呼
下列程式碼範例說明如何使用回呼處理成功算繪或資料遺失錯誤。
Swift
import GooglePlacesSwift
import SwiftUI


@MainActor
struct StatusHandlingMarker: View {
  var body: some View {
    PlaceMarker(
      identifier: PlaceIdentifier.placeID("PLACE_ID"),
      markerIcon: .none
      markerText: .priceRange,
    )
    /// Triggered when place data is successfully fetched or when data fetching fails or
    /// required data is missing for the place..
    .onLoad { result in
        if let place = result.place {
          print("Marker successfully loaded for place ID: \(place.placeID)")
        } else if let error = result.error {
          print("Failed to load marker: \(error)")
      }
    }
  }
}
與 Maps SDK 整合
下列程式碼範例說明如何使用 PlaceMarkerHostingView 輔助類別,將 PlaceMarker 包裝 PlaceMarker 在 Google Maps SDK for iOS GMSMarker 中。
Swift
import GoogleMaps
import GooglePlacesSwift
import SwiftUI
import UIKit


func addPlaceMarker(to mapView: GMSMapView, placeID: String) {
  let marker = GMSMarker()
  let markerView = PlaceMarker(
    identifier: .placeID(placeID),
    markerType: .rating(showIcon: true),
  ).onLoad { result in
    switch Result
    case .success(let place)
      marker.position = place.coordinate
    case .error(let error) {
      print("Failed to load marker: \(error)")
    }
  }

  marker.iconView = PlaceMakerHostingView(markerView)
  marker.map = mapView
}