

利用 Navigation SDK for iOS,您可以确定将哪些内置界面控件和元素显示在地图上以及允许哪些手势,从而修改地图的用户体验。您还可以修改导航界面的视觉外观。如需了解有关对导航界面进行可接受修改的指南,请参阅“政策”页面。
地图界面控件
Navigation SDK 提供了一些内置界面控件,这些控件与 iOS 版 Google 地图应用中的控件类似。您可以使用 GMSUISettings 类切换这些控件的显示状态。您对此类所做的更改会立即体现在地图上。
罗盘
Navigation SDK 提供的罗盘图形会在特定情况下显示在地图右上角,并且仅在启用时显示。当用户点击罗盘时,相机会以动画呈现方式恢复到方位为零(默认朝向)的位置,并且罗盘会在之后不久逐渐消失。
如果导航已启用且摄像头模式设置为“跟随”,则指南针会保持可见状态,点按指南针可在倾斜和概览摄像头视角之间切换。
为避免驾驶员分心,如果标题(在纵向模式下)展开并与指南针的默认位置冲突,指南针将保持在同一位置。如果您添加了辅助标题自定义控件或标题辅助视图,指南针会隐藏起来,以避免界面冲突。
指南针支持日间模式、夜间模式和深色模式。
在 11.0.0 及更高版本中,指南针默认处于启用状态。您可以通过将 GMSUISettings 的 compassButton 属性设置为 false 来停用指南针。
Swift
mapView.settings.compassButton = false
Objective-C
mapView.settings.compassButton = NO;
“我的位置”按钮
仅当启用了“我的位置”按钮时,“我的位置”按钮才会显示在屏幕右下角。当用户点击该按钮时,如果系统知道用户的位置,相机将通过动画效果聚焦于用户的当前位置。您可以通过将 GMSUISettings 的 myLocationButton 属性设为 true 来启用该按钮。
Swift
mapView.settings.myLocationButton = true
Objective-C
mapView.settings.myLocationButton = YES;
“重新居中”按钮
启用导航功能后,当用户滚动地图视图时,系统会显示重新居中按钮;当用户点按该按钮以重新居中地图时,系统会隐藏该按钮。如需允许显示“重新居中”按钮,请将 GMSUISettings 的 recenterButtonEnabled 属性设置为 true。如需防止重新居中按钮显示,请将 recenterButtonEnabled 设置为 false。
Swift
mapView.settings.isRecenterButtonEnabled = true
Objective-C
mapView.settings.recenterButtonEnabled = YES;
地图界面配件
Navigation SDK 提供在导航期间显示的界面配件,类似于 iOS 版 Google 地图应用中的配件。您可以按照本部分中的说明调整这些控件的可见性或外观。您在此处所做的更改会在用户的下一次行程中生效。
导航页眉和页脚

在导航期间,导航标题会显示在屏幕顶部,导航页脚会显示在底部。导航标题会显示路线中下一个转弯处的街道名称和方向,以及后续转弯的方向。导航页脚会显示到达目的地的预计时间和距离,以及预计到达时间。
您可以使用以下属性以编程方式切换导航标题和页脚的可见性并设置其颜色:
navigationHeaderEnabled- 控制导航标题是否可见(默认值为true)。navigationFooterEnabled- 控制导航页脚是否可见(默认值为true)。navigationHeaderPrimaryBackgroundColor- 设置导航标题的主要背景颜色。navigationHeaderSecondaryBackgroundColor- 设置导航标题的辅助背景颜色。
以下代码示例展示了如何开启标题和页脚的可见性,然后将 navigationHeaderPrimaryBackgroundColor 设置为蓝色,并将 navigationHeaderSecondaryBackgroundColor 设置为红色。
Swift
mapView.settings.isNavigationHeaderEnabled = true
mapView.settings.isNavigationFooterEnabled = true
mapView.settings.navigationHeaderPrimaryBackgroundColor = .blue
mapView.settings.navigationHeaderSecondaryBackgroundColor = .red
Objective-C
mapView.settings.navigationHeaderEnabled = YES;
mapView.settings.navigationFooterEnabled = YES;
mapView.settings.navigationHeaderPrimaryBackgroundColor = [UIColor blueColor];
mapView.settings.navigationHeaderSecondaryBackgroundColor = [UIColor redColor];
导航配件标题视图
您可以通过将辅助导航标题视图替换为您自己的自定义辅助视图来自定义应用。为此,您可以创建一个实现 GMSNavigationAccessoryView 协议的视图。此协议有一个必需的方法:-heightForAccessoryViewConstrainedToSize:onMapView:。系统会为给定 mapView 上的视图提供最大可用尺寸,您必须提供视图所需的高度。
然后,您可以通过调用 setHeaderAccessoryView: 将此视图传递给 mapView。mapView 会淡出所有当前视图,然后淡入您的自定义视图。导航标题必须可见,以便显示自定义视图。
如需移除自定义标头辅助视图,请将 nil 传递给 setHeaderAccessoryView:。
如果您的视图必须随时更改大小,您可以调用 invalidateLayoutForAccessoryView:,并传入需要更改大小的视图。
示例
以下代码示例展示了实现 GMSNavigationAccessoryView 协议的自定义视图。然后,使用此自定义视图设置自定义导航标头辅助视图。
Swift
class MyCustomView: UIView, GMSNavigationAccessoryView {
…
  func heightForAccessoryViewConstrained(to size: CGSize, on mapView: GMSMapView) -> CGFloat {
    // viewHeight gets calculated as the height your view needs.
    return viewHeight
  }
…
}

let customView = MyCustomView(...)
mapView.setHeaderAccessory(customView)

// At some later point customView changes size.
mapView.invalidateLayout(forAccessoryView: customView)

// Remove the custom header accessory view.
mapView.setHeaderAccessory(nil)
Objective-C
@interface MyCustomView : UIView <GMSNavigationAccessoryView>
…
@end

@implementation MyCustomView
…
- (CGFloat)heightForAccessoryViewConstrainedToSize:(CGSize)size onMapView:(GMSMapView *)mapView {
  // viewHeight gets calculated as the height your view needs.
  return viewHeight;
}
…
@end

MyCustomView *customView = [[MyCustomView alloc] init…];
[_mapView setHeaderAccessoryView:customView];

// At some later point customView changes size.
[_mapView invalidateLayoutForAccessoryView:customView];

// Remove the custom header accessory view.
[_mapView setHeaderAccessoryView:nil];
正常模式和弱光模式
当估计的光照条件更新时,系统会触发 GMSNavigatorListener.didChangeSuggestedLightingMode 监听器方法。例如,当设备当前位置天黑时。您可以通过以下方式以编程方式修改低光模式行为:
- 使用
GMSNavigationLightingMode枚举选择何时使用正常模式和弱光模式。 - 通过为
navigationHeaderPrimaryBackgroundColorNightMode和navigationHeaderSecondaryBackgroundColorNightMode属性设置值,选择低光模式的主背景色和次背景色。
路线列表
您可以在应用中提供分步路线。以下示例展示了一种可能的实现方式。这些步骤可能会因您自己的实现而异。
- 在
GMSNavigator(导航器)上的setDestinations成功完成且导航器上的guidanceActive已启用后,启用入口点按钮。 - 当用户点按入口点按钮时,创建一个与
GMSMapView(mapView) 关联的导航器GMSNavigationDirectionsListController(控制器)。 - 将控制器添加到
UIViewController(视图控制器)的实例,并将directionsListView添加为视图控制器的子视图。应像使用UICollectionView一样调用控制器上的reloadData和invalidateLayout方法。 - 将视图控制器推送到应用的视图控制器层次结构中。
以下代码示例展示了如何添加 DirectionsListViewController。
Swift
override func viewDidLoad() {
  super.viewDidLoad()
  // Add the directionsListView to the host view controller's view.
  let directionsListView = directionsListController.directionsListView
  directionsListView.frame = self.view.frame
  self.view.addSubview(directionsListView)
  directionsListView.translatesAutoresizingMaskIntoConstraints = false
  directionsListView.topAnchor.constraint(equalTo: self.view.topAnchor).isActive = true
  directionsListView.leadingAnchor.constraint(equalTo: self.view.leadingAnchor).isActive = true
  directionsListView.trailingAnchor.constraint(equalTo: self.view.trailingAnchor).isActive = true
  directionsListView.bottomAnchor.constraint(equalTo: self.view.bottomAnchor).isActive = true
  ...
}

override func viewWillAppear(_ animated: Bool) {
  super.viewWillAppear(animated)
  // Make sure data is fresh when the view appears.
  directionsListController.reloadData()
  ...
}

override func willTransition(to newCollection: UITraitCollection, with coordinator: UIViewControllerTransitionCoordinator) {
  super.willTransition(to: newCollection, with: coordinator)
  // Invalidate the layout during rotation.
  coordinator.animate(alongsideTransition: {_ in
    self.directionsListController.invalidateLayout()
  })
  ...
}
Objective-C
- (void)viewDidLoad {
  [super viewDidLoad];
  // Add the directionsListView to the host view controller's view.
  UIView *directionsListView = _directionsListController.directionsListView;
  directionsListView.frame = self.view.bounds;
  [self.view addSubview:directionsListView];
  directionsListView.translatesAutoresizingMaskIntoConstraints = NO;
  [directionsListView.topAnchor constraintEqualToAnchor:self.view.topAnchor].active = YES;
  [directionsListView.leadingAnchor constraintEqualToAnchor:self.view.leadingAnchor].active = YES;
  [directionsListView.trailingAnchor constraintEqualToAnchor:self.view.trailingAnchor].active = YES;
  [directionsListView.bottomAnchor constraintEqualToAnchor:self.view.bottomAnchor].active = YES;
  ...
}

- (void)viewWillAppear:(BOOL)animated {
  [super viewWillAppear:animated];
  // Make sure data is fresh when the view appears.
  [_directionsListController reloadData];
  ...
}

- (void)willTransitionToTraitCollection:(UITraitCollection *)newCollection
              withTransitionCoordinator:(id<UIViewControllerTransitionCoordinator>)coordinator {
  [super willTransitionToTraitCollection:newCollection withTransitionCoordinator:coordinator];
  void(^animationBlock)(id <UIViewControllerTransitionCoordinatorContext>context) =
      ^void(id <UIViewControllerTransitionCoordinatorContext>context) {
    [_directionsListController invalidateLayout];
  };
  // Invalidate the layout during rotation.
  [coordinator animateAlongsideTransition:animationBlock
                               completion:nil];
  ...
}

...
行程进度条
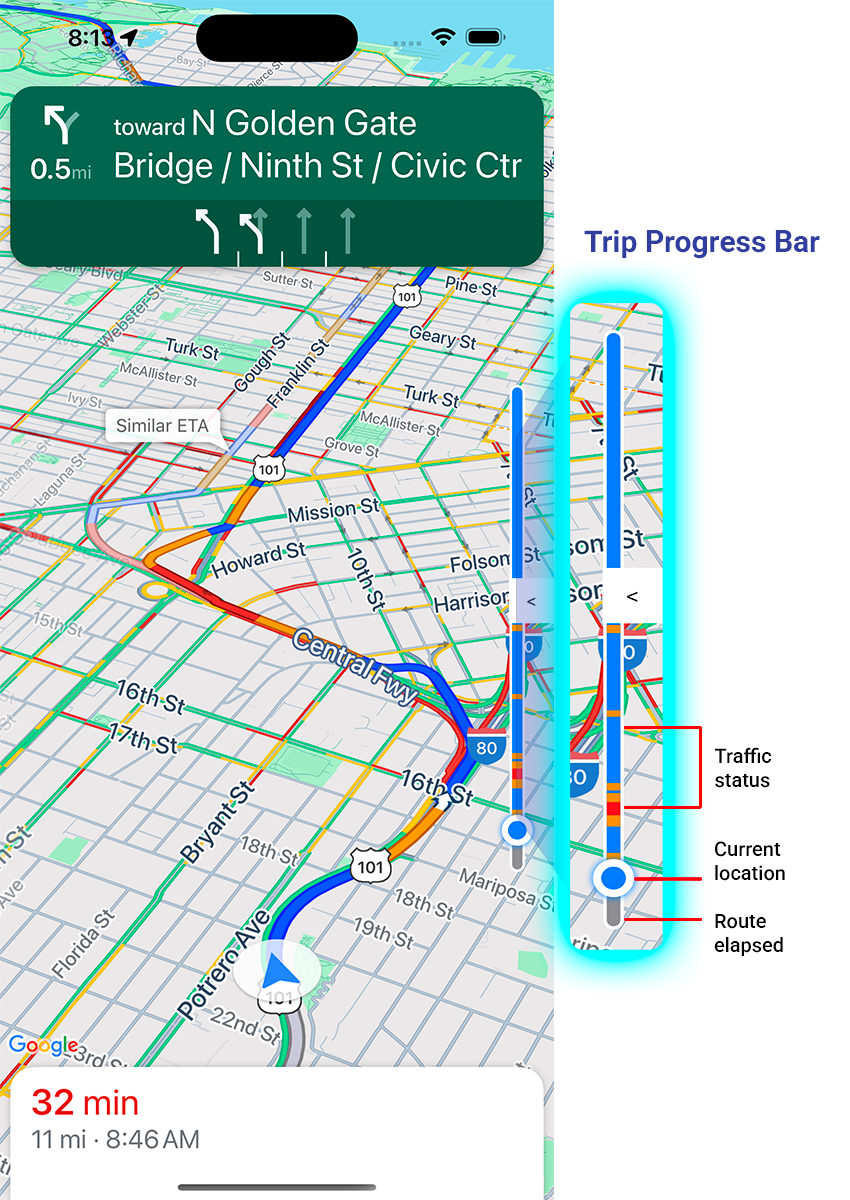
行程进度条是一条竖线,在导航开始时显示在地图的起始侧/前导侧。启用后,系统会显示整个行程的概览,以及用户的目的地和当前位置。
这样一来,用户无需放大,即可快速预测任何即将出现的问题,例如交通状况。然后,他们可以根据需要重新规划行程。如果用户重新规划行程,进度条会重置,就像从该点开始了一段新行程一样。
行程进度条会显示以下状态指示器:
路况信息 - 即将到来的路况。
当前位置 - 行程中司机的当前位置。
路线已过 - 行程中已过的时间。
通过在 GMSUISettings 中设置 navigationTripProgressBarEnabled 属性来启用行程进度条。
Swift
mapView.settings.isNavigationTripProgressBarEnabled = true
Objective-C
mapView.settings.navigationTripProgressBarEnabled = YES;
行程进度条位置
- 该栏的左侧大致与车速表、Google 徽标和“重新居中”按钮(显示时)的左侧对齐。宽度为 12 点。
- 行程进度条会根据屏幕上的垂直空间动态调整。该栏的底部距离屏幕底部 210 pt。行程进度条的顶部与屏幕顶部的距离至少为 170 点,进度条的最大高度为 400 点。
- 如果行程进度条与导航标题或其他导航界面元素重叠,则会显示在这些其他元素下方。
Prompt Visibility API(实验性)
借助提示可见性 API,您可以通过添加监听器来接收回调,从而避免导航 SDK 生成的界面元素与您自己的自定义界面元素发生冲突。该回调会在导航 SDK 界面元素即将显示之前以及该元素被移除后立即触发。如需了解详情(包括代码示例),请参阅配置实时中断页面中的提示可见性 API 部分。
速度计控制
启用导航功能并将出行方式设置为驾车后,Navigation SDK for iOS 会在地图的下角显示一个限速控件,其中显示当前限速。当驾驶员超速时,该控件会展开即可显示第二个速度计,其中显示驾驶员的当前速度。
您可以设置提醒级别,以便在驾驶员超速达到指定程度时更改车速表显示的格式。例如,您可以指定当驾驶员超速 5 英里/小时时,当前速度以红色文本颜色显示;当驾驶员超速 10 英里/小时时,当前速度以红色背景颜色显示。
如需显示限速控件,请将 GMSUISettings 的 shouldDisplaySpeedometer 属性设置为 true。如需停用限速控件的显示,请将 shouldDisplaySpeedometer 设置为 false。
Swift
mapView.settings.shouldDisplaySpeedometer = true
Objective-C
mapView.settings.shouldDisplaySpeedometer = YES;
如需详细了解如何为速度计设置提醒,请参阅配置速度计提醒。
目的地标记
您可以通过设置 GMSUISettings 的 showsDestinationMarkers 属性来显示或隐藏指定路线的目的地标记。以下示例展示了如何关闭目的地标记。
Swift
mapView.settings.showsDestinationMarkers = false
Objective-C
mapView.settings.showsDestinationMarkers = NO;
地图体验功能
借助 Navigation SDK,您可以进一步自定义用户的导航体验。您对实例所做的更改会在用户下次更新应用时反映出来。
目的地突出显示和入口
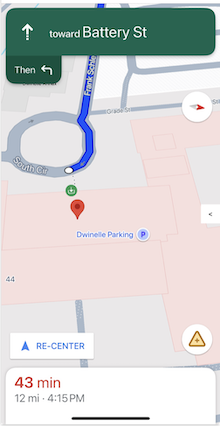
如果创建的目的地包含 placeID,系统会突出显示目的地建筑物,并尽可能显示入口图标。这些视觉提示有助于用户区分并前往其预期目的地。
如需创建包含 placeID 的目的地,请使用接受 placeID 的 GMSNavigationWaypoint 初始化程序之一。例如,在导航路线教程中创建的目的地包含目的地突出显示和入口标签(如有)。
导航期间的 3D 建筑显示
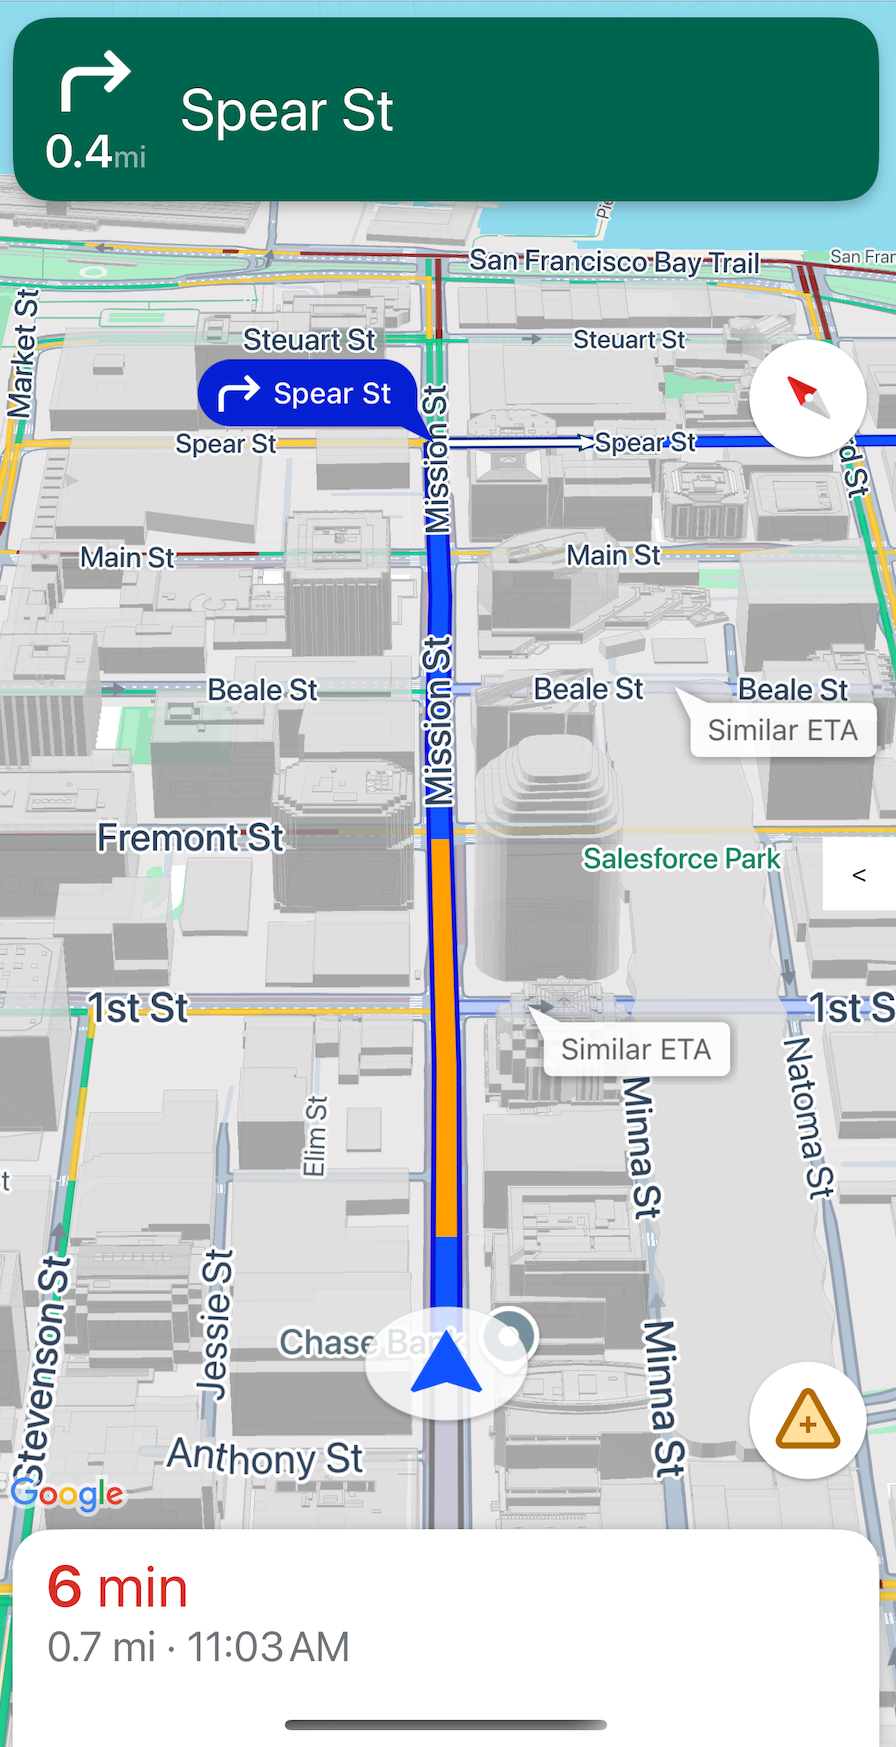
默认情况下,系统会在导航期间显示 3D 建筑。如需停用此功能,请将 buildingsEnabled 设置为 false (Swift) 或 NO (Objective-C)。
停用默认地图手势
您可以通过设置 GMSMapView 的属性 GMSUISettings 类的属性,停用地图上的默认手势。您可以编程方式启用或停用以下手势。请注意,停用手势不会限制对相机设置的程序化访问。
scrollGestures- 控制是否启用或停用滚动手势。如果启用,用户可以通过滑动来平移相机。zoomGestures- 控制是否启用或停用缩放手势。如果启用,用户可以双点按、双指点按或张合双指来缩放相机。请注意,启用scrollGestures后,双击或双指张合可能会使相机平移到指定点。tiltGestures- 控制是否启用倾斜手势。如果启用,用户可以使用双指垂直向下滑动或向上滑动来倾斜摄像头。rotateGestures- 控制旋转手势是启用还是停用。启用后,用户可以使用双指旋转手势来旋转相机。
在此示例中,平移和缩放手势均已停用。
Swift
mapView.settings.scrollGestures = false
mapView.settings.zoomGestures = false
Objective-C
mapView.settings.scrollGestures = NO;
mapView.settings.zoomGestures = NO;
位置控件和界面元素
您可以使用以下属性,根据导航标题和页脚的位置来定位控件和其他界面元素:
navigationHeaderLayoutGuidenavigationFooterLayoutGuidebottomTrailingButtonsLayoutGuide
以下代码示例展示了如何使用布局参考线在地图视图中放置一对标签:
Swift
/* Add a label to the top left, positioned below the header. */
let topLabel = UILabel()
topLabel.text = "Top Left"
mapView.addSubview(topLabel)
topLabel.translatesAutoresizingMaskIntoConstraints = false
topLabel.topAnchor.constraint(equalTo: mapView.navigationHeaderLayoutGuide.bottomAnchor).isActive = true
topLabel.leadingAnchor.constraint(equalTo: mapView.leadingAnchor).isActive = true

/* Add a label to the bottom right, positioned above the footer. */
let bottomLabel = UILabel()
bottomLabel.text = "Bottom Right"
mapView.addSubview(bottomLabel)
bottomLabel.translatesAutoresizingMaskIntoConstraints = false
bottomLabel.bottomAnchor.constraint(equalTo: mapView.navigationFooterLayoutGuide.topAnchor).isActive = true
bottomLabel.trailingAnchor.constraint(equalTo: mapView.trailingAnchor).isActive = true
Objective-C
/* Add a label to the top left, positioned below the header. */
UILabel *topLabel = [[UILabel alloc] init];
topLabel.text = @"Top Left";
[view addSubview:topLabel];
topLabel.translatesAutoresizingMaskIntoConstraints = NO;
[topLabel.topAnchor
    constraintEqualToAnchor:mapView.navigationHeaderLayoutGuide.bottomAnchor].active = YES;
[topLabel.leadingAnchor constraintEqualToAnchor:mapView.leadingAnchor].active = YES;

/* Add a label to the bottom right, positioned above the footer. */
UILabel *bottomLabel = [[UILabel alloc] init];
bottomLabel.text = @"Bottom Right";
[view addSubview:bottomLabel];
bottomLabel.translatesAutoresizingMaskIntoConstraints = NO;
[bottomLabel.bottomAnchor
    constraintEqualToAnchor:mapView.navigationFooterLayoutGuide.topAnchor].active = YES;
[bottomLabel.trailingAnchor constraintEqualToAnchor:mapView.trailingAnchor].active = YES;
如需查看如何使用 bottomTrailingButtonsLayoutGuide 定位实时中断报告按钮的示例,请参阅配置实时中断。
隐藏备选路线
如果界面上显示的信息过多,导致界面杂乱无章,您可以减少显示的备选路线(少于默认的两条),或者完全不显示备选路线,从而减少杂乱程度。您可以在提取路线之前配置此选项,方法是配置 GMSNavigationRoutingOptions 并将 alternateRoutesStrategy 设置为以下枚举值之一:
| 枚举值 | 说明 |
|---|---|
| GMSNavigationAlternateRoutesStrategyAll | 默认值。显示最多两条备选路线。 |
| GMSNavigationAlternateRoutesStrategyOne | 显示一条备选路线(如果有)。 |
| GMSNavigationAlternateRoutesStrategyNone | 隐藏备选路线。 |
示例
以下代码示例演示了如何完全隐藏替代路线。
Swift
let routingOptions = GMSNavigationRoutingOptions(alternateRoutesStrategy: .none)
navigator?.setDestinations(destinations,
                           routingOptions: routingOptions) { routeStatus in
  ...
}
Objective-C
GMSNavigationRoutingOptions *routingOptions = [[GMSNavigationRoutingOptions alloc] initWithAlternateRoutesStrategy:GMSNavigationAlternateRoutesStrategyNone];
[navigator setDestinations:destinations
            routingOptions:routingOptions
                  callback:^(GMSRouteStatus routeStatus){...}];