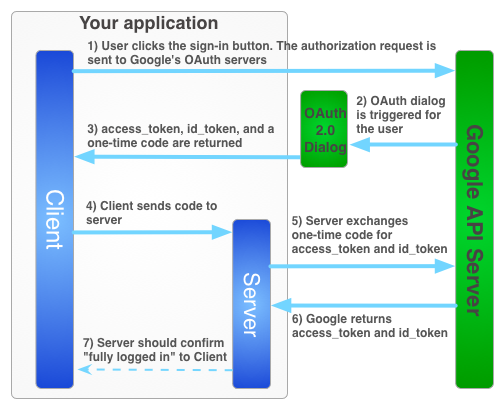
如要在使用者離線時代表使用者使用 Google 服務,您必須使用混合型伺服器端流程,讓使用者在用戶端使用 JavaScript API 用戶端授權您的應用程式,然後您將特殊的一次性授權碼傳送至伺服器。您的伺服器會交換這組一次性程式碼,從 Google 取得自己的存取權和更新權杖,以便伺服器能夠自行發出 API 呼叫,這項作業可在使用者離線時執行。與純伺服器端流程和傳送存取權杖至伺服器相比,這項一次性代碼流程具有安全性優勢。
如下圖所示,取得伺服器端應用程式的存取權杖登入流程。
一次性驗證碼有幾項安全優點,透過代碼,Google 可直接將權杖提供給您的伺服器,不必經過任何中介。雖然我們不建議洩漏程式碼,但如果沒有用戶端密鑰,這些程式碼就很難使用。請妥善保管用戶端密鑰!
實作一次性驗證碼流程
Google 登入按鈕會提供存取權杖和授權碼。此代碼為一次性代碼,可讓您的伺服器與 Google 伺服器交換存取權杖。
下列程式碼範例示範如何執行一次性程式碼流程。
如要使用一次性驗證碼流程驗證 Google 登入功能,您必須:
步驟 1:建立用戶端 ID 和用戶端密碼
如要建立用戶端 ID 和用戶端密鑰,請建立 Google API 控制台專案、設定 OAuth 用戶端 ID,並註冊 JavaScript 來源:
前往 Google API 控制台。
從專案下拉式選單中選取現有專案,或選取「Create a new project」建立新專案。
在側欄的「API 和服務」下方,選取「憑證」,然後按一下「設定同意畫面」。
選擇電子郵件地址、指定產品名稱,然後按下「儲存」。
在「Credentials」分頁中,選取「Create credentials」下拉式清單,然後選擇「OAuth client ID」。
在「Application type」(應用程式類型) 下方,選取 [Web application] (網頁應用程式)。
註冊應用程式可存取 Google API 的來源,如下所示。來源是指通訊協定、主機名稱和通訊埠的獨特組合。
在「Authorized JavaScript origins」(已授權的 JavaScript 來源) 欄位中輸入應用程式的來源。您可以輸入多個來源,讓應用程式在不同的通訊協定、網域或子網域上執行。請勿使用萬用字元。在下方範例中,第二個網址可能是正式版網址。
http://localhost:8080
https://myproductionurl.example.com
「已授權的重新導向 URI」欄位不需要值。Redirect URI 不適用於 JavaScript API。
按下「Create」(建立) 按鈕,
在隨即顯示的「OAuth 用戶端」對話方塊中,複製用戶端 ID。用戶端 ID 可讓應用程式存取已啟用的 Google API。
步驟 2:在頁面中加入 Google 平台程式庫
加入下列指令碼,說明匿名函式會將指令碼插入這個 index.html 網頁的 DOM。
<!-- The top of file index.html -->
<html itemscope itemtype="http://schema.org/Article">
<head>
  <!-- BEGIN Pre-requisites -->
  <script src="//ajax.googleapis.com/ajax/libs/jquery/1.8.2/jquery.min.js">
  </script>
  <script src="https://apis.google.com/js/client:platform.js?onload=start" async defer>
  </script>
  <!-- END Pre-requisites -->
步驟 3:初始化 GoogleAuth 物件
載入 auth2 程式庫並呼叫 gapi.auth2.init(),以初始化 GoogleAuth 物件。請在呼叫 init() 時,指定您的用戶端 ID 和要要求的範圍。
<!-- Continuing the <head> section -->
  <script>
    function start() {
      gapi.load('auth2', function() {
        auth2 = gapi.auth2.init({
          client_id: 'YOUR_CLIENT_ID.apps.googleusercontent.com',
          // Scopes to request in addition to 'profile' and 'email'
          //scope: 'additional_scope'
        });
      });
    }
  </script>
</head>
<body>
  <!-- ... -->
</body>
</html>
步驟 4:在頁面中新增登入按鈕
在網頁中加入登入按鈕,然後附加點擊處理常式來呼叫 grantOfflineAccess(),來啟動一次性程式碼流程。
<!-- Add where you want your sign-in button to render -->
<!-- Use an image that follows the branding guidelines in a real app -->
<button id="signinButton">Sign in with Google</button>
<script>
  $('#signinButton').click(function() {
    // signInCallback defined in step 6.
    auth2.grantOfflineAccess().then(signInCallback);
  });
</script>
步驟 5:讓使用者登入
使用者按一下登入按鈕,並授予應用程式您要求的權限。接著,您在 grantOfflineAccess().then() 方法中指定的回呼函式會傳遞 JSON 物件,其中包含授權碼。例如:
{"code":"4/yU4cQZTMnnMtetyFcIWNItG32eKxxxgXXX-Z4yyJJJo.4qHskT-UtugceFc0ZRONyF4z7U4UmAI"}
步驟 6:將授權碼傳送至伺服器
code 是一次性程式碼,可讓伺服器交換自己的存取權杖和更新權杖。您必須先向使用者顯示要求離線存取權的授權對話方塊,才能取得重新整理權杖。如果您在步驟 4 的 OfflineAccessOptions 中指定了 select-account prompt,則必須儲存擷取的更新憑證,以便日後使用,因為後續的交換作業會針對更新憑證傳回 null。此流程可比標準 OAuth 2.0 流程更安全。
存取權杖一律會在交換有效的授權碼時傳回。
以下指令碼會定義登入按鈕的回呼函式。登入成功後,函式會儲存用於用戶端的存取權權杖,並將一次性代碼傳送至位於相同網域的伺服器。
<!-- Last part of BODY element in file index.html -->
<script>
function signInCallback(authResult) {
  if (authResult['code']) {

    // Hide the sign-in button now that the user is authorized, for example:
    $('#signinButton').attr('style', 'display: none');

    // Send the code to the server
    $.ajax({
      type: 'POST',
      url: 'http://example.com/storeauthcode',
      // Always include an `X-Requested-With` header in every AJAX request,
      // to protect against CSRF attacks.
      headers: {
        'X-Requested-With': 'XMLHttpRequest'
      },
      contentType: 'application/octet-stream; charset=utf-8',
      success: function(result) {
        // Handle or verify the server response.
      },
      processData: false,
      data: authResult['code']
    });
  } else {
    // There was an error.
  }
}
</script>
步驟 7:使用授權碼交換存取權杖
在伺服器上,將驗證碼換成存取和更新權杖。請使用存取權杖代表使用者呼叫 Google API,然後可選擇是否儲存更新權杖,方便在存取權杖過期時取得新的存取權杖。
如果您要求個人資料存取權,也會取得 ID 權杖,其中包含使用者的個人資料基本資訊。
例如:
Java
// (Receive authCode via HTTPS POST)


if (request.getHeader("X-Requested-With") == null) {
  // Without the `X-Requested-With` header, this request could be forged. Aborts.
}

// Set path to the Web application client_secret_*.json file you downloaded from the
// Google API Console: https://console.cloud.google.com/apis/credentials
// You can also find your Web application client ID and client secret from the
// console and specify them directly when you create the GoogleAuthorizationCodeTokenRequest
// object.
String CLIENT_SECRET_FILE = "/path/to/client_secret.json";

// Exchange auth code for access token
GoogleClientSecrets clientSecrets =
    GoogleClientSecrets.load(
        JacksonFactory.getDefaultInstance(), new FileReader(CLIENT_SECRET_FILE));
GoogleTokenResponse tokenResponse =
          new GoogleAuthorizationCodeTokenRequest(
              new NetHttpTransport(),
              JacksonFactory.getDefaultInstance(),
              "https://oauth2.googleapis.com/token",
              clientSecrets.getDetails().getClientId(),
              clientSecrets.getDetails().getClientSecret(),
              authCode,
              REDIRECT_URI)  // Specify the same redirect URI that you use with your web
                             // app. If you don't have a web version of your app, you can
                             // specify an empty string.
              .execute();

String accessToken = tokenResponse.getAccessToken();

// Use access token to call API
GoogleCredential credential = new GoogleCredential().setAccessToken(accessToken);
Drive drive =
    new Drive.Builder(new NetHttpTransport(), JacksonFactory.getDefaultInstance(), credential)
        .setApplicationName("Auth Code Exchange Demo")
        .build();
File file = drive.files().get("appfolder").execute();

// Get profile info from ID token
GoogleIdToken idToken = tokenResponse.parseIdToken();
GoogleIdToken.Payload payload = idToken.getPayload();
String userId = payload.getSubject();  // Use this value as a key to identify a user.
String email = payload.getEmail();
boolean emailVerified = Boolean.valueOf(payload.getEmailVerified());
String name = (String) payload.get("name");
String pictureUrl = (String) payload.get("picture");
String locale = (String) payload.get("locale");
String familyName = (String) payload.get("family_name");
String givenName = (String) payload.get("given_name");
Python
from apiclient import discovery
import httplib2
from oauth2client import client

# (Receive auth_code by HTTPS POST)


# If this request does not have `X-Requested-With` header, this could be a CSRF
if not request.headers.get('X-Requested-With'):
    abort(403)

# Set path to the Web application client_secret_*.json file you downloaded from the
# Google API Console: https://console.cloud.google.com/apis/credentials
CLIENT_SECRET_FILE = '/path/to/client_secret.json'

# Exchange auth code for access token, refresh token, and ID token
credentials = client.credentials_from_clientsecrets_and_code(
    CLIENT_SECRET_FILE,
    ['https://www.googleapis.com/auth/drive.appdata', 'profile', 'email'],
    auth_code)

# Call Google API
http_auth = credentials.authorize(httplib2.Http())
drive_service = discovery.build('drive', 'v3', http=http_auth)
appfolder = drive_service.files().get(fileId='appfolder').execute()

# Get profile info from ID token
userid = credentials.id_token['sub']
email = credentials.id_token['email']
