
This is the sixth walkthrough in the Classroom add-ons walkthrough series.
In this walkthrough, you modify the example from the previous walkthrough step to produce a graded activity-type attachment. You also pass a grade back to Google Classroom programmatically, which appears in the teacher's grade book as a draft grade.
This walkthrough differs slightly from others in the series in that there are present two possible approaches to passing grades back to Classroom. Both have distinct impacts on the developer and user experiences; consider both as you design your Classroom add-on. Read our Interacting with attachments guide page for additional discussion of the implementation options.
Note that the grading features in the API are optional. They can be used with any activity-type attachment.
In the course of this walkthrough, you complete the following:
- Modify the previous attachment creation requests to the Classroom API to also set the attachment's grade denominator.
- Programmatically score the student's submission and set the attachment's grade numerator.
- Implement two approaches to pass the submission's grade to Classroom using signed-in or offline teacher credentials.
Once finished, grades appear in the Classroom gradebook after the passback behavior is triggered. The exact moment when this happens depends on the implementation approach.
For the purposes of this example, reuse the activity from the previous walkthrough, in which a student is shown an image of a famous landmark and is prompted to enter its name. Assign full marks for the attachment if the student enters the correct name, zero otherwise.
Understand the Classroom add-ons API grading feature
Your add-on can set both the grade numerator and grade denominator for an
attachment. These are respectively set using the pointsEarned and maxPoints
values in the API. An attachment card in the Classroom UI shows
the maxPoints value when it has been set.
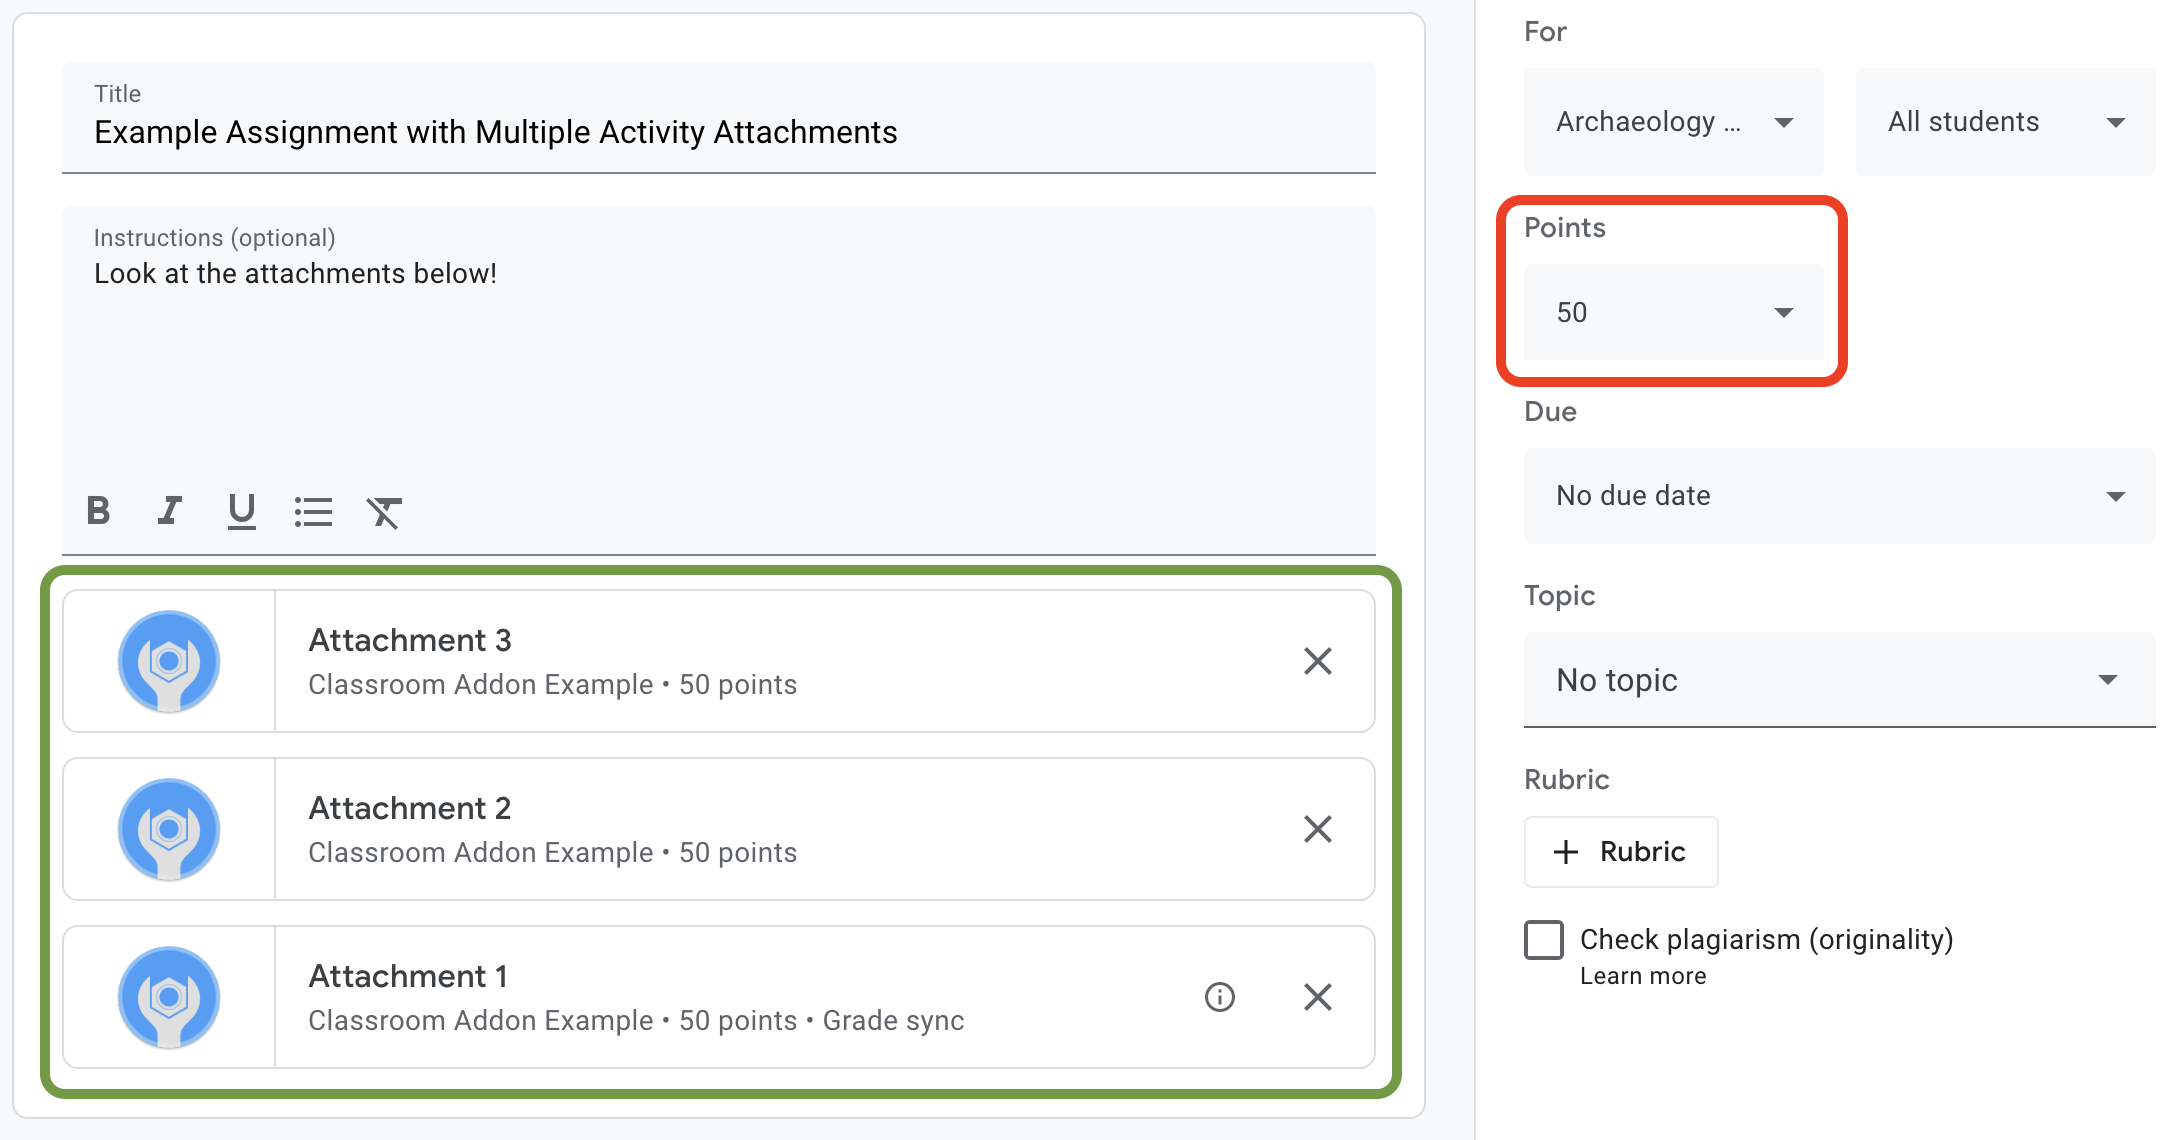
Figure 1. The assignment creation UI with three add-on attachment cards that
have maxPoints set.
The Classroom add-ons API lets you configure the settings for and set
the score earned for attachment grades. These are not the same as the
assignment grades. However, the assignment grade settings follows the
attachment grade settings of the attachment that has the Grade sync label on
its attachment card. When the "Grade sync" attachment sets pointsEarned for a
student submission, it also sets the student's draft grade for the assignment.
Usually, the first attachment that was added to the assignment that sets
maxPoints receives the "Grade sync" label. See the assignment creation UI
example shown in Figure 1 for an example of the "Grade sync" label. Note that
the "Attachment 1" card has the "Grade sync" label and that the assignment grade
in the red box has been updated to 50 points. Note also that although Figure 1
shows three attachment cards, only one card has the "Grade sync" label. This is
a key limitation of the current implementation: only one attachment can have
the "Grade sync" label.
If there are multiple attachments that have set maxPoints, removing the
attachment with "Grade sync" doesn't enable "Grade sync" on any of the
remaining attachments. Adding another attachment that sets maxPoints enables
Grade Sync on the new attachment, and the maximum assignment grade adjusts to
match. There's no mechanism to programmatically see which attachment has the
"Grade sync" label nor to see how many attachments a particular assignment has.
Set an attachment's maximum grade
This section describes setting the denominator for an attachment grade; that
is, the maximum possible score that all students can achieve for their
submissions. To do so, set the attachment's maxPoints value.
Only a minor modification to our existing implementation is necessary to enable
the grading features. When creating an attachment, add the maxPoints value in
the same AddOnAttachment object that contains the studentWorkReviewUri,
teacherViewUri, and other attachment fields.
Note that the default maximum score for a new assignment is 100. We suggest
setting maxPoints to a value other than 100 so that you can verify that the
grades are being set correctly. Set maxPoints to 50 as a demonstration:
Python
Add the maxPoints field when constructing the attachment object, just
prior to issuing a CREATE request to the
courses.courseWork.addOnAttachments endpoint. You can find this in the
webapp/attachment_routes.py file if following our provided example.
attachment = {
    # Specifies the route for a teacher user.
    "teacherViewUri": {
        "uri":
            flask.url_for(
                "load_activity_attachment",
                _scheme='https',
                _external=True),
    },
    # Specifies the route for a student user.
    "studentViewUri": {
        "uri":
            flask.url_for(
                "load_activity_attachment",
                _scheme='https',
                _external=True)
    },
    # Specifies the route for a teacher user when the attachment is
    # loaded in the Classroom grading view.
    "studentWorkReviewUri": {
        "uri":
            flask.url_for(
                "view_submission", _scheme='https', _external=True)
    },
    # Sets the maximum points that a student can earn for this activity.
    # This is the denominator in a fractional representation of a grade.
    "maxPoints": 50,
    # The title of the attachment.
    "title": f"Attachment {attachment_count}",
}
For the purposes of this demonstration, you also store the maxPoints value in
your local Attachment database; this saves having to make an additional API call
later when grading student submissions. Note, however, that it's possible that
teachers alter the assignment grade settings independently of your add-on. Send
a GET request to the courses.courseWork endpoint to see the
assignment-level maxPoints value. When doing so, pass the itemId in the
CourseWork.id field.
Now update your database model to also hold the attachment's maxPoints value.
We recommend using the maxPoints value from the CREATE response:
Python
First, add a max_points field to the Attachment table. You can find this
in the webapp/models.py file if following our provided example.
# Database model to represent an attachment.
class Attachment(db.Model):
    # The attachmentId is the unique identifier for the attachment.
    attachment_id = db.Column(db.String(120), primary_key=True)

    # The image filename to store.
    image_filename = db.Column(db.String(120))

    # The image caption to store.
    image_caption = db.Column(db.String(120))

    # The maximum number of points for this activity.
    max_points = db.Column(db.Integer)
Return to the courses.courseWork.addOnAttachments CREATE request. Store
the maxPoints value returned in the response.
new_attachment = Attachment(
    # The new attachment's unique ID, returned in the CREATE response.
    attachment_id=resp.get("id"),
    image_filename=key,
    image_caption=value,
    # Store the maxPoints value returned in the response.
    max_points=int(resp.get("maxPoints")))
db.session.add(new_attachment)
db.session.commit()
The attachment now has a maximum grade. You should be able to test this behavior now; add an attachment to a new assignment, and observe that the attachment card shows the "Grade sync" label and the assignment's "Points" value changes.
Set a student submission grade in Classroom
This section describes setting the numerator for an attachment grade; that's,
an individual student's score for the attachment. To do so, set a student
attachment submission's pointsEarned value.
You now have an important decision to make: how should your add-on issue a
request to set pointsEarned?
The issue is that setting pointsEarned requires the teacher OAuth scope.
You shouldn't grant teacher scope to student users; this could result in
unexpected behavior when students interact with your add-on such as loading the
Teacher View iframe instead of the Student View iframe. You therefore have two
choices for how to set pointsEarned:
- Using the logged-in teacher's credentials.
- Using stored (offline) teacher credentials.
The following sections discuss the tradeoffs of each approach before demonstrating each implementation. Note that our provided examples demonstrate both approaches to passing a grade to Classroom; see the language-specific instructions below to see how to select an approach when running the provided examples:
Python
Find the SET_GRADE_WITH_LOGGED_IN_USER_CREDENTIALS declaration at the top
of webapp/attachment_routes.py file. Set this value to True to pass back
grades using the signed-in teacher's credentials. Set this value to False
to pass back grades using stored credentials when the student submits the
activity.
Set grades using the signed-in teacher's credentials
Use the signed-in user's credentials to issue the request to set pointsEarned.
This should seem quite intuitive as it mirrors the rest of the implementation
thus far, and requires little effort to realize.
However, consider that the teacher only interacts with the student's submission in the Student Work Review iframe. This has some important implications:
- No grades populate in Classroom until the teacher takes action in the Classroom UI.
- A teacher may have to open every student submission in order to populate all student grades.
- There is a brief delay between Classroom receiving the grade and its appearance in the Classroom UI. The delay is typically five to ten seconds, but can be as long as 30 seconds.
The combination of these factors means that teachers may have to do considerable, time-consuming manual work to fully populate a class's grades.
To implement this approach, add one additional API call to your existing Student Work Review route.
After fetching the student submission and attachment records, evaluate the
student's submission and store the resulting grade. Set the grade in the
pointsEarned field of an AddOnAttachmentStudentSubmission object. Finally,
issue a PATCH request to the
courses.courseWork.addOnAttachments.studentSubmissions endpoint with the
AddOnAttachmentStudentSubmission instance in the request body. Note that we
also need to specify pointsEarned in the updateMask in our PATCH request:
Python
# Look up the student's submission in our database.
student_submission = Submission.query.get(flask.session["submissionId"])

# Look up the attachment in the database.
attachment = Attachment.query.get(student_submission.attachment_id)

grade = 0

# See if the student response matches the stored name.
if student_submission.student_response.lower(
) == attachment.image_caption.lower():
    grade = attachment.max_points

# Create an instance of the Classroom service.
classroom_service = ch._credential_handler.get_classroom_service()

# Build an AddOnAttachmentStudentSubmission instance.
add_on_attachment_student_submission = {
    # Specifies the student's score for this attachment.
    "pointsEarned": grade,
}

# Issue a PATCH request to set the grade numerator for this attachment.
patch_grade_response = classroom_service.courses().courseWork(
).addOnAttachments().studentSubmissions().patch(
    courseId=flask.session["courseId"],
    itemId=flask.session["itemId"],
    attachmentId=flask.session["attachmentId"],
    submissionId=flask.session["submissionId"],
    # updateMask is a list of fields being modified.
    updateMask="pointsEarned",
    body=add_on_attachment_student_submission).execute()
Set grades using offline teacher credentials
The second approach to setting grades requires the use of stored credentials
for the teacher that created the attachment. This implementation requires that
you construct credentials using a previously-authorized teacher's refresh and
access tokens, and then use these credentials to set pointsEarned.
A critical advantage to this approach is that grades populate without requiring teacher action in the Classroom UI, avoiding the issues mentioned above. The result is that end users perceive the grading experience as seamless and efficient. Additionally, this approach lets you to choose the moment in which you pass back grades, such as when students complete the activity or asynchronously.
Complete the following tasks to implement this approach:
- Modify User database records to store an access token.
- Modify Attachment database records to store a teacher ID.
- Retrieve the teacher's credentials and (optionally) construct a new Classroom service instance.
- Set a submission's grade.
For the purposes of this demonstration, set the grade when the student completes the activity; that's, when the student submits the form in the Student View route.
Modify User database records to store access token
Two unique tokens are required to make API calls, the refresh token and the
access token. If you've been following the walkthrough series thus far, your
User table schema should already store a refresh token. Storing the refresh
token is sufficient when you only making API calls with the signed-in user, as
you receive an access token as part of the authentication flow.
However, you now need to make calls as someone other than the signed-in user,
meaning the authentication flow is not available. Thus, you need to store the
access token alongside the refresh token. Update your User table schema to
include an access token:
Python
In our provided example, this is in the webapp/models.py file.
# Database model to represent a user.
class User(db.Model):
    # The user's identifying information:
    id = db.Column(db.String(120), primary_key=True)
    display_name = db.Column(db.String(80))
    email = db.Column(db.String(120), unique=True)
    portrait_url = db.Column(db.Text())

    # The user's refresh token, which will be used to obtain an access token.
    # Note that refresh tokens will become invalid if:
    # - The refresh token has not been used for six months.
    # - The user revokes your app's access permissions.
    # - The user changes passwords.
    # - The user belongs to a Google Cloud organization
    #   that has session control policies in effect.
    refresh_token = db.Column(db.Text())

    # An access token for this user.
    access_token = db.Column(db.Text())
Then, update any code that creates or updates a User record to also store the
access token:
Python
In our provided example, this is in the webapp/credential_handler.py file.
def save_credentials_to_storage(self, credentials):
    # Issue a request for the user's profile details.
    user_info_service = googleapiclient.discovery.build(
        serviceName="oauth2", version="v2", credentials=credentials)
    user_info = user_info_service.userinfo().get().execute()
    flask.session["username"] = user_info.get("name")
    flask.session["login_hint"] = user_info.get("id")

    # See if we have any stored credentials for this user. If they have used
    # the add-on before, we should have received login_hint in the query
    # parameters.
    existing_user = self.get_credentials_from_storage(user_info.get("id"))

    # If we do have stored credentials, update the database.
    if existing_user:
        if user_info:
            existing_user.id = user_info.get("id")
            existing_user.display_name = user_info.get("name")
            existing_user.email = user_info.get("email")
            existing_user.portrait_url = user_info.get("picture")

        if credentials and credentials.refresh_token is not None:
            existing_user.refresh_token = credentials.refresh_token
            # Update the access token.
            existing_user.access_token = credentials.token

    # If not, this must be a new user, so add a new entry to the database.
    else:
        new_user = User(
            id=user_info.get("id"),
            display_name=user_info.get("name"),
            email=user_info.get("email"),
            portrait_url=user_info.get("picture"),
            refresh_token=credentials.refresh_token,
            # Store the access token as well.
            access_token=credentials.token)

        db.session.add(new_user)

    db.session.commit()
Modify Attachment database records to store a teacher ID
In order to set a grade for an activity, make a call to set pointsEarned as a
teacher in the course. There are a several ways to accomplish this:
- Store a local mapping of teacher credentials to course IDs. Note, however, the same teacher may not always be associated with a particular course.
- Issue
GETrequests to the Classroom APIcoursesendpoint to get the current teacher(s). Then, query local user records to locate matching teacher credentials. - When creating an add-on attachment, store a teacher ID in the local
attachments database. Then, retrieve the teacher credentials from the
attachmentIdpassed to the Student View iframe.
This example demonstrates the last option since you're setting grades when the student completes an activity attachment.
Add a teacher ID field to your database's Attachment table:
Python
In our provided example, this is in the webapp/models.py file.
# Database model to represent an attachment.
class Attachment(db.Model):
    # The attachmentId is the unique identifier for the attachment.
    attachment_id = db.Column(db.String(120), primary_key=True)

    # The image filename to store.
    image_filename = db.Column(db.String(120))

    # The image caption to store.
    image_caption = db.Column(db.String(120))

    # The maximum number of points for this activity.
    max_points = db.Column(db.Integer)

    # The ID of the teacher that created the attachment.
    teacher_id = db.Column(db.String(120))
Then, update any code that creates or updates an Attachment record to also
store the creator's ID:
Python
In our provided example, this is in the create_attachments method in the
webapp/attachment_routes.py file.
# Store the attachment by id.
new_attachment = Attachment(
    # The new attachment's unique ID, returned in the CREATE response.
    attachment_id=resp.get("id"),
    image_filename=key,
    image_caption=value,
    max_points=int(resp.get("maxPoints")),
    teacher_id=flask.session["login_hint"])
db.session.add(new_attachment)
db.session.commit()
Retrieve the teacher's credentials
Find the route that serves the Student View iframe. Immediately after storing the student's response in your local database, retrieve the teacher's credentials from your local storage. This should be straightforward given the preparation in the previous two steps. You can also use these to construct a new instance of the Classroom service for the teacher user:
Python
In our provided example, this is in the load_activity_attachment method in
the webapp/attachment_routes.py file.
# Create an instance of the Classroom service using the tokens for the
# teacher that created the attachment.

# We're assuming that there are already credentials in the session, which
# should be true given that we are adding this within the Student View
# route; we must have had valid credentials for the student to reach this
# point. The student credentials will be valid to construct a Classroom
# service for another user except for the tokens.
if not flask.session.get("credentials"):
    raise ValueError(
        "No credentials found in session for the requested user.")

# Make a copy of the student credentials so we don't modify the original.
teacher_credentials_dict = deepcopy(flask.session.get("credentials"))

# Retrieve the requested user's stored record.
teacher_record = User.query.get(attachment.teacher_id)

# Apply the user's tokens to the copied credentials.
teacher_credentials_dict["refresh_token"] = teacher_record.refresh_token
teacher_credentials_dict["token"] = teacher_record.access_token

# Construct a temporary credentials object.
teacher_credentials = google.oauth2.credentials.Credentials(
    **teacher_credentials_dict)

# Refresh the credentials if necessary; we don't know when this teacher last
# made a call.
if teacher_credentials.expired:
    teacher_credentials.refresh(Request())

# Request the Classroom service for the specified user.
teacher_classroom_service = googleapiclient.discovery.build(
    serviceName=CLASSROOM_API_SERVICE_NAME,
    version=CLASSROOM_API_VERSION,
    credentials=teacher_credentials)
Set a submission's grade
The procedure from here is identical to that of using the signed-in teacher's credentials. However, note that you should make the call with the teacher credentials retrieved in the previous step:
Python
# Issue a PATCH request as the teacher to set the grade numerator for this
# attachment.
patch_grade_response = teacher_classroom_service.courses().courseWork(
).addOnAttachments().studentSubmissions().patch(
    courseId=flask.session["courseId"],
    itemId=flask.session["itemId"],
    attachmentId=flask.session["attachmentId"],
    submissionId=flask.session["submissionId"],
    # updateMask is a list of fields being modified.
    updateMask="pointsEarned",
    body=add_on_attachment_student_submission).execute()
Test the add-on
Similar to the previous walkthrough, create an assignment with an activity-type attachment as a teacher, submit a response as a student, then open their submission in the Student Work Review iframe. You should be able to see the grade appear at different times depending on your implementation approach:
- If you chose to pass back a grade when the student completed the activity, you should already see their draft grade in the UI before opening the Student Work Review iframe. You can also see it in the student list when opening the assignment, and in the "Grade" box next to the Student Work Review iframe.
- If you chose to pass back a grade when the teacher opens the Student Work Review iframe, the grade should appear in the "Grade" box soon after the iframe loads. As mentioned above, this can take up to 30 seconds. Thereafter, the grade for the specific student should also appear in the other Classroom gradebook views.
Confirm that the correct score appears for the student.
Congratulations! You're ready to proceed to the next step: creating attachments outside of Google Classroom.