Zadbaj o dobrą organizację dzięki kolekcji
Zapisuj i kategoryzuj treści zgodnie ze swoimi preferencjami.
Projekt Actions umieszcza wszystkie akcje w jednym kontenerze. Ty
opublikować ten projekt w Actions on Google, żeby Asystent Google wiedział,
i wywoływać tryby konwersacyjne.
Rysunek 1. Struktura projektu w Actions.
Do tworzenia projektu w Actions używasz tych komponentów niskiego poziomu:
Ustawienia i zasoby definiują metadane projektu
i zasobów takich jak ikony projektów. Google wykorzystuje te informacje do publikowania
akcje do katalogu Asystenta, aby użytkownicy mogli je wykrywać i wywoływać
.
Intencje reprezentują zadanie do wykonania, na przykład określone
dane wejściowe użytkownika lub zdarzenie systemowe, które wymaga przetworzenia. Najczęstszy typ
to intencje użytkownika. Te intencje umożliwiają zadeklarowanie trenowania
wyrażenia, które są naturalnie rozszerzane przez NLU (rozumienie języka naturalnego).
o wiele więcej podobnych wyrażeń. NLU wykorzystuje agregację
te wyrażenia do wytrenowania modelu językowego, którego Asystent używa do dopasowywania użytkowników
dane wejściowe. jeśli w trakcie rozmowy niektóre dane wejściowe użytkownika są zgodne z językiem intencji.
model, środowisko wykonawcze Asystenta wysyła intencję do akcji, dzięki czemu może ona
przetwarza je i odpowiada użytkownikowi.
Typy umożliwiają wyodrębnianie uporządkowanych danych z danych wejściowych użytkownika. Według
oznaczanie wyrażeń na potrzeby trenowania typami, NLU może wyodrębnić odpowiednie, uporządkowane
więc nie musisz analizować tych danych.
Sceny przetwarzają intencje i są głównymi elementami logicznymi tych procesów
swoje akcje. Mogą wypełniać przedziały, oceniać logikę warunkową, zwracać
użytkownikowi, a nawet wywoływać zewnętrzne usługi internetowe w celu
to logika biznesowa. Sceny w połączeniu z intencjami to skuteczny sposób:
wykrywać określone dane wejściowe użytkownika lub zdarzenia systemowe i przeprowadzać odpowiednie
logikę logiczną.
Prompty definiują odpowiedzi statyczne lub dynamiczne, których używasz do
odpowiadać użytkownikom.
Webhooki umożliwiają przekazywanie dodatkowej pracy usługom internetowym.
(realizację), takich jak weryfikacja danych lub generowanie promptów. Twoje akcje
komunikować się z realizacją za pomocą protokołu webhooka opartego na formacie JSON.
Interaktywny obszar roboczy umożliwia tworzenie bogatych treści
i wciągające doświadczenia dzięki aplikacjom internetowym, które korzystają z języków HTML, CSS i JavaScript.
Utwórz projekt
Zanim zaczniesz programować – musisz utworzyć projekt w Konsoli Actions
Asystenta Google. Aby utworzyć projekt:
Wpisz nazwę projektu i kliknij Create Project (Utwórz projekt).
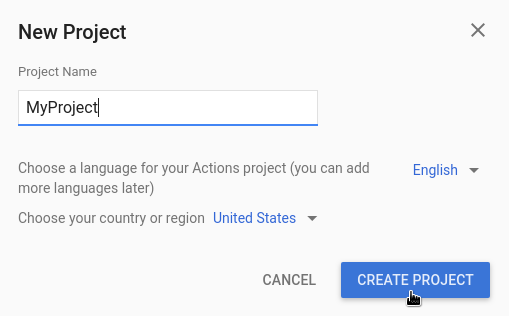
Na ekranie Jakie działanie chcesz utworzyć? wybierz
wybierz kategorię, która najlepiej odpowiada Twojemu projektowi, i kliknij Dalej.
Na ekranie Jak chcesz utworzyć wybierz sposób
i kliknij Rozpocznij tworzenie. Możesz np. zacząć od pustego
lub przykład.
.
Zdefiniuj informacje o projekcie
Ustawienia i zasoby projektu definiują informacje o nim, takie jak
obsługa cech i powierzchni, obsługiwane języki, wyświetlana nazwa, opis
logo i inne elementy. W poniższej tabeli opisano główne ustawienia i zasoby
podane przez Ciebie. Działanie Actions on Google
informacje potrzebne do wdrożenia i opublikowania projektu w Asystencie
Katalog.
Nazwa
Opis
Informacje o katalogu
Udostępnia informacje, dzięki którym Actions on Google może opublikować Twoje
projekt w katalogu Asystenta. Obejmuje metadane i prześladowania
o projekcie oraz zasobach graficznych
do logo i obrazów banerów.
Kierowanie na lokalizację
Konfiguruje języki, w których dostępne są akcje.
Funkcje interfejsu
Konfiguruje platformy, na których akcje są dostępne.
Informacje o firmie
Określa dane kontaktowe firmy.
Weryfikowanie marki
Połącz swoją witrynę lub aplikację na Androida, aby uzyskać dodatkowe korzyści
np. zarezerwowane nazwy wywołań i linki do witryn w Akcjach.
Wersja
Konfiguruje różne wersje testowe i produkcyjne akcji
do testowania i produkcji.
Linki Asystenta
Zezwalaj użytkownikom na wywoływanie akcji z usług internetowych.
Aby zdefiniować informacje o projekcie:
Testowanie projektów w symulatorze
W Konsoli Actions znajdziesz symulator do podglądu działań.
pozwala wyświetlać dane debugowania, ustawiać możliwości urządzenia, symulować
język itp.
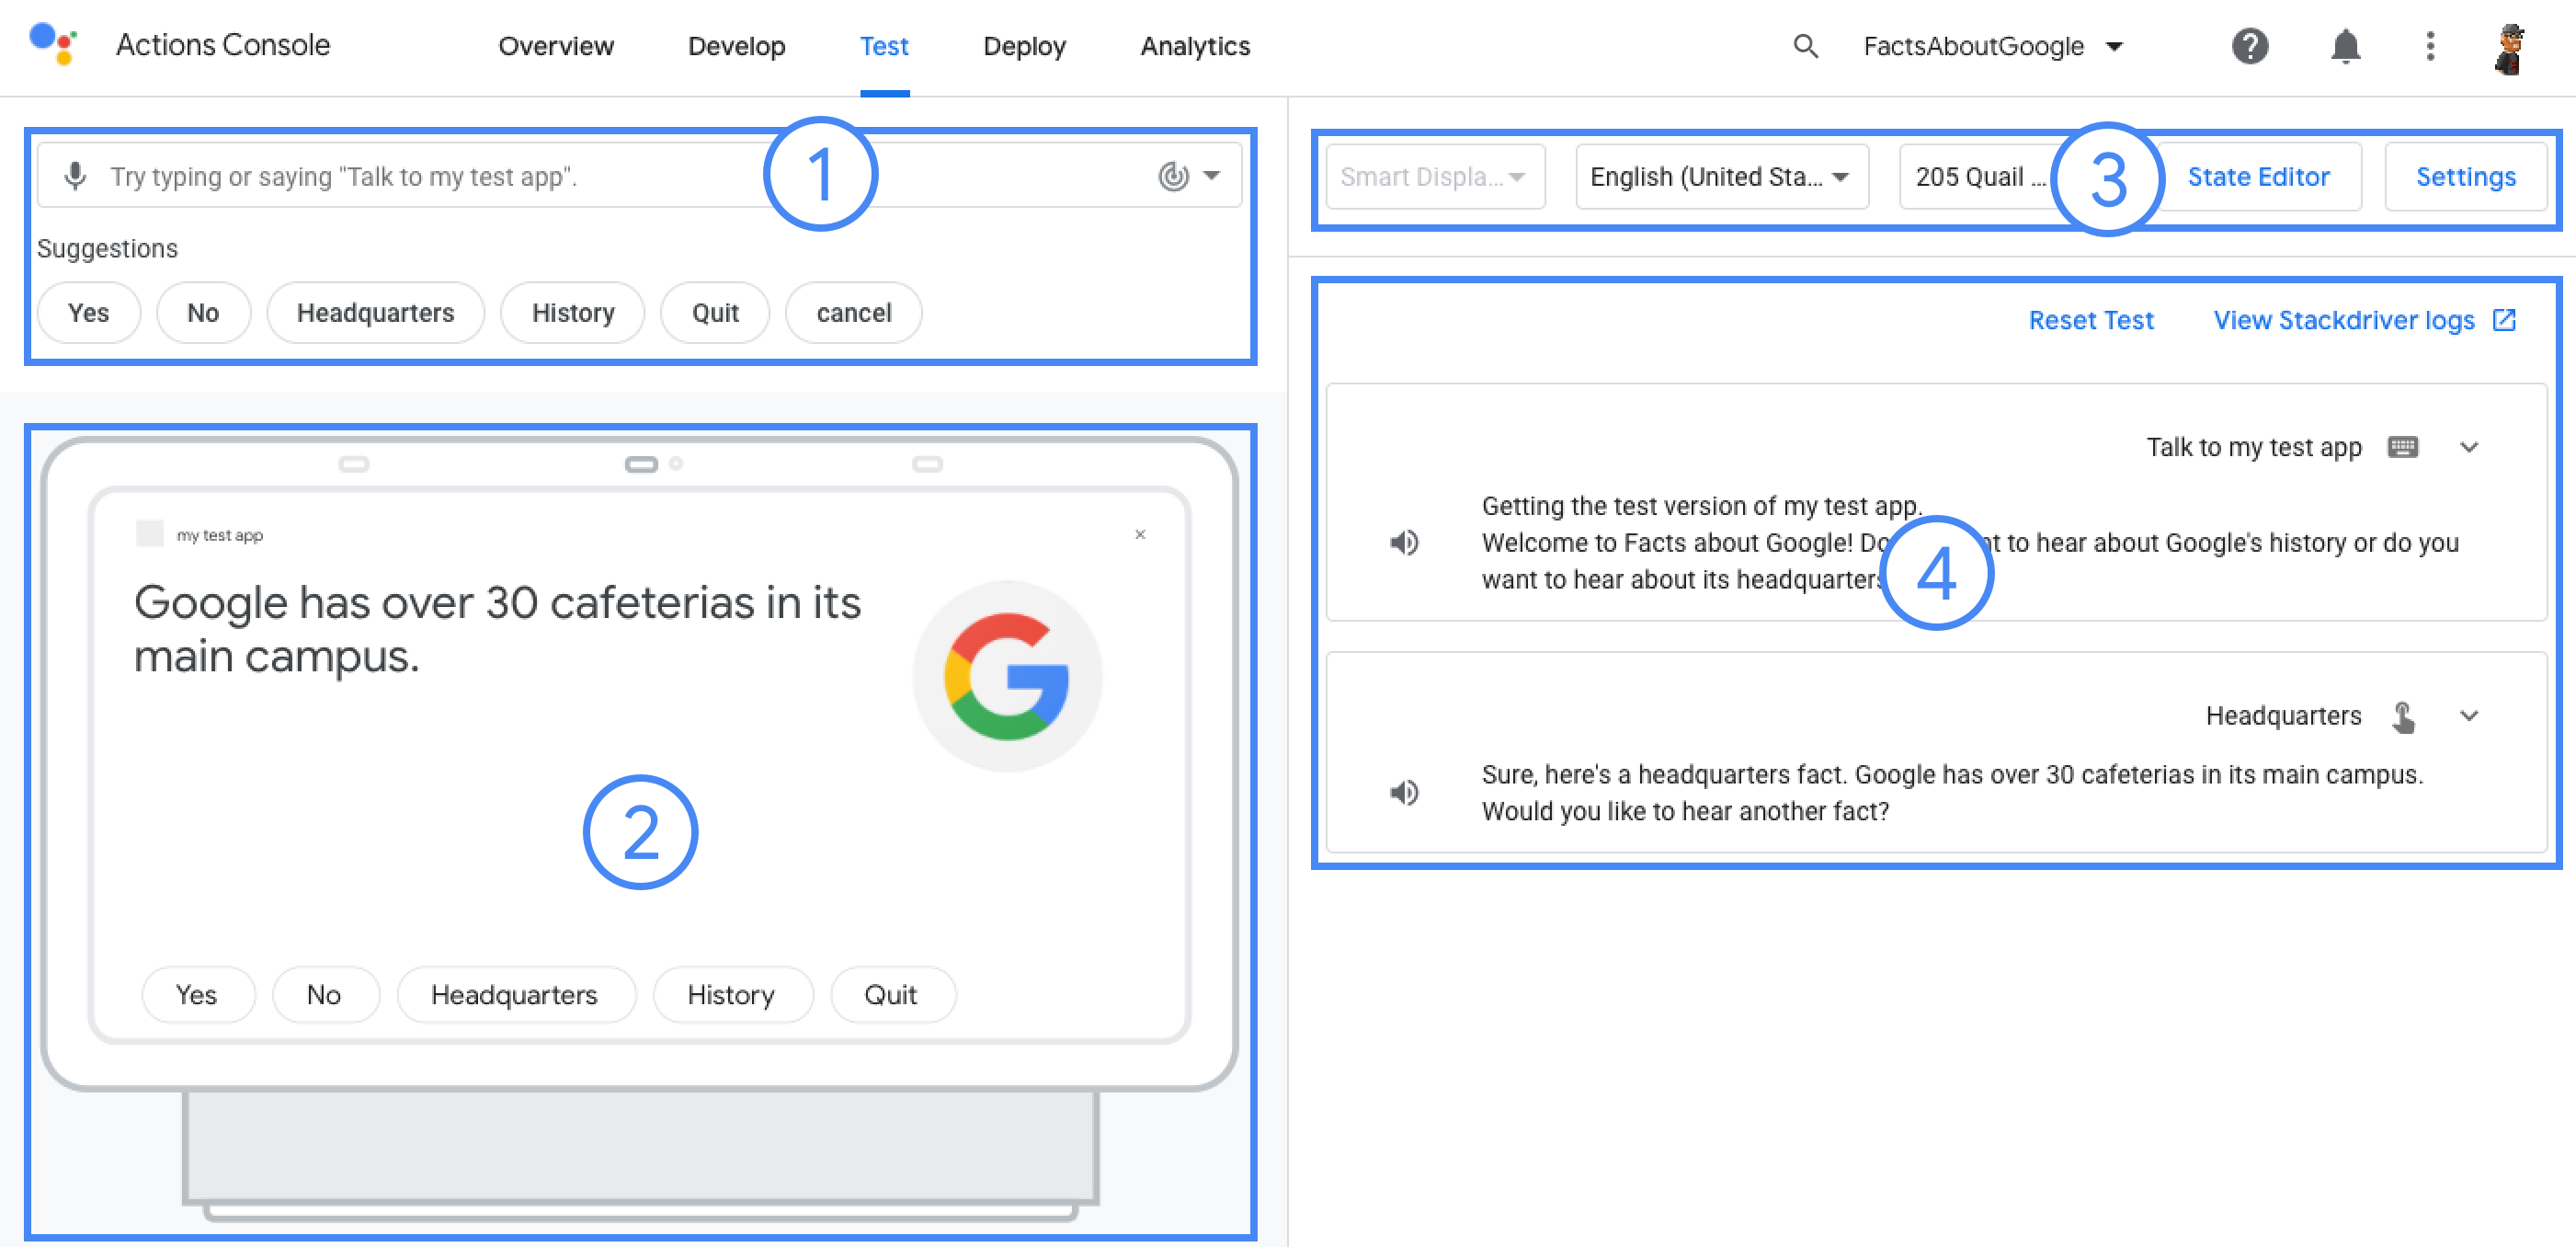
Rysunek 3. Główne obszary symulatora: (1) dane wejściowe użytkownika,
(2) widok urządzenia, (3) opcje i ustawienia oraz (4) dziennik rozmowy.
[[["Łatwo zrozumieć","easyToUnderstand","thumb-up"],["Rozwiązało to mój problem","solvedMyProblem","thumb-up"],["Inne","otherUp","thumb-up"]],[["Brak potrzebnych mi informacji","missingTheInformationINeed","thumb-down"],["Zbyt skomplikowane / zbyt wiele czynności do wykonania","tooComplicatedTooManySteps","thumb-down"],["Nieaktualne treści","outOfDate","thumb-down"],["Problem z tłumaczeniem","translationIssue","thumb-down"],["Problem z przykładami/kodem","samplesCodeIssue","thumb-down"],["Inne","otherDown","thumb-down"]],["Ostatnia aktualizacja: 2025-07-26 UTC."],[[["\u003cp\u003eAn Actions project enables the creation of conversational experiences for Google Assistant by packaging all actions into a single container for publishing.\u003c/p\u003e\n"],["\u003cp\u003eBuilding an Actions project involves utilizing components such as intents, types, scenes, prompts, webhooks and more for defining user interactions and logic.\u003c/p\u003e\n"],["\u003cp\u003eDefining project information in the Actions console, including directory information, locales and surfaces, is crucial for publishing and deploying to the Assistant directory.\u003c/p\u003e\n"],["\u003cp\u003eThe Actions console simulator provides a comprehensive environment for testing projects with features such as debugging, device settings, and locale simulation.\u003c/p\u003e\n"]]],[],null,["# Build projects\n\nActions Builder Actions SDK \n\nAn Actions project packages all of your Actions into a single container. You\npublish this project to Actions on Google so Google Assistant knows how to discover\nand invoke your conversational experiences.\n**Figure 1**. Actions project structure\n\nYou use the following low-level components to build your Actions project:\n\n- [**Settings and resources**](#define_project_information) define project metadata\n and resources like project icons. Google uses this information to publish\n your Actions to the Assistant directory, so that users can discover and invoke\n them.\n\n- [**Intents**](../intents) represent a task to be carried out, such as some\n user input or a system event that needs processing. The most common type of\n intent you'll use are user intents. These intents let you declare training\n phrases that are naturally expanded by the NLU (natural language understanding)\n engine to include many more, similar phrases. The NLU uses the aggregation of\n these phrases to train a language model that the Assistant uses to match user\n input. During a conversation, if some user input matches the intent's language\n model, the Assistant runtime sends the intent to your Action, so that it can\n process it and respond to the user.\n\n- [**Types**](../types) let you extract structured data from user input. By\n annotating training phrases with types, the NLU can extract relevant, structured\n data for you, so you don't have to parse open-ended input.\n\n- [**Scenes**](../scenes) process intents and are the main logic executors for\n your Actions. They can do slot-filling, evaluate conditional logic, return\n prompts to the user, and even call on external web services to carry out\n business logic. In combination with intents, scenes give you a powerful way to\n detect specific user input or system events and to carry out corresponding\n logic.\n\n- [**Prompts**](../prompts) define static or dynamic responses that you use to\n respond back to users.\n\n- [**Webhooks**](../webhooks) let you delegate extra work to web services\n (fulfillment), such as validating data or generating prompts. Your Actions\n communicate with your fulfillment through a JSON-based, webhook protocol.\n\n- [**Interactive Canvas**](/assistant/interactivecanvas) lets you create rich\n and immersive experiences with web apps that utilize HTML, CSS, and JavaScript.\n\nCreate a project\n----------------\n\nYou must create a project in the Actions console before you can develop for\nGoogle Assistant. To create a project:\n\n1. Go to the [Actions console](//console.actions.google.com/).\n2. Click **New project**.\n3. Enter a name for your project and click **Create Project** .\n4. In the **What kind of Action do you want to build?** screen, select a category that best represents your project and click **Next**.\n5. In the **How do you want to build it** screen, select a way to build and click **Start building**. For example, you can start with an empty project or with a sample.\n\n| **Key Point:** If you are building for Interactive Canvas, follow these additional steps:\n|\n| 1. If you did not select the **Game** card on the **What type of Action\n| do you want to build?** screen, click **Deploy** in the top navigation. Under **Additional Information** , select the **Games \\& fun** category. Click **Save**.\n| 2. Click **Develop** in the top navigation of the Actions console.\n| 3. Click **Interactive Canvas** in the left navigation.\n| 4. Under **Does your Action use Interactive Canvas?** , select **Yes**.\n| 5. **Optional** : Enter your web app URL into the **Set your default web app URL** field. This action adds a default `Canvas` response with the URL field to your Main invocation.\n| 6. Click **Save**.\n\n\u003cbr /\u003e\n\nDefine project information\n--------------------------\n\n| **Note:** See the [Directory information](/assistant/console/directory-information) documentation for more details on how to manage project information.\n\nYour project's settings and resources define information about your project like\nfeature and surface support, supported locales, display name, description,\nlogos, and more. The following table describes the main settings and resources\nyou provide. Actions on Google uses this\ninformation to deploy and publish your project to the [Assistant\ndirectory](//assistant.google.com/explore).\n\n| Name | Description |\n|-----------------------|-------------------------------------------------------------------------------------------------------------------------------------------------------------------------------------------------------------|\n| Directory information | Provides information so that Actions on Google can publish your project to the Assistant directory. Includes metadata and desecriptions about your project and image resources for logos and banner images. |\n| Location targeting | Configures the locales that your Actions are available in. |\n| Surface capabilities | Configures the surfaces that your Actions are available on. |\n| Company details | Specifies contact information for your company. |\n| Brand verification | Connect a website or Android app that you own to gain extra benefits such as reserved invocation names and website linking within your Actions. |\n| Release | Configures different testing and production releases for your Action for testing and production. |\n| Assistant links | Let users invoke your Actions from your web properties. |\n\nTo define project information:\n\nTest projects in the simulator\n------------------------------\n\n| **Note:** See the [Actions simulator](/assistant/console/simulator) documentation for complete information about testing your projects.\n\nThe Actions console provides a simulator to preview your Actions in. The\nsimulator lets you see debug information, set device capabilities, simulate\nlocale, and more.\n**Figure 3.** The main areas of the simulator: (1) user input, (2) device view, (3) options and settings, and (4) conversation log.\n\nTo test a project:"]]