
इस गाइड में बताया गया है कि Google Mobile Ads Unity Plugin का इस्तेमाल करके, मीडिएशन की मदद से DT Exchange से विज्ञापन लोड करने और दिखाने का तरीका क्या है. इसमें वॉटरफ़ॉल इंटिग्रेशन शामिल हैं. इसमें विज्ञापन यूनिट के मीडिएशन कॉन्फ़िगरेशन में DT Exchange जोड़ने और Unity ऐप्लिकेशन में DT SDK और अडैप्टर को इंटिग्रेट करने का तरीका बताया गया है.
इस्तेमाल किए जा सकने वाले इंटिग्रेशन और विज्ञापन फ़ॉर्मैट
DT Exchange के लिए Unity मीडिएशन अडैप्टर में ये सुविधाएं उपलब्ध हैं:
| इंटिग्रेशन | |
|---|---|
| बिडिंग | |
| वॉटरफ़ॉल | |
| फ़ॉर्मैट | |
| बैनर वाले विज्ञापन | |
| इंटरस्टीशियल विज्ञापन | |
| इनाम वाले विज्ञापन | |
| नेटिव विज्ञापन | |
ज़रूरी शर्तें
- Google Mobile Ads Unity Plugin पर अपलोड हुआ नया वीडियो
- Unity 4 या इसके बाद वाला वर्शन
- [बिडिंग के लिए]: बिडिंग में सभी काम करने वाले विज्ञापन फ़ॉर्मैट को इंटिग्रेट करने के लिए, DT Exchange 3.3.12 या इसके बाद के वर्शन के लिए Google Mobile Ads मीडिएशन प्लगिन का इस्तेमाल करें (नए वर्शन का इस्तेमाल करने का सुझाव दिया जाता है)
- Android पर डिप्लॉय करने के लिए
- Android का एपीआई लेवल 23 या इसके बाद का वर्शन
- iOS पर डिप्लॉय करने के लिए
- iOS डिप्लॉयमेंट का टारगेट 13.3 या इसके बाद का वर्शन होना चाहिए
- Google Mobile Ads Unity Plugin के साथ कॉन्फ़िगर किया गया ऐसा Unity प्रोजेक्ट जिस पर काम किया जा सकता हो. ज़्यादा जानकारी के लिए, Google Mobile Ads Unity Plugin सेट अप करना लेख पढ़ें.
- AdMob मीडिएशन सेट अप करें.
पहला चरण: DT Exchange के यूआई में कॉन्फ़िगरेशन सेट अप करना
नया ऐप्लिकेशन और विज्ञापन प्लेसमेंट जोड़ना
DT Exchange Console में साइन अप करें या लॉग इन करें.
ऐप्लिकेशन जोड़ें पर क्लिक करें.
अपना प्लैटफ़ॉर्म और प्लेसमेंट चुनें. इसके बाद, फ़ॉर्म में बाकी जानकारी भरें. इसके बाद, ऐप्लिकेशन बनाएं पर क्लिक करें.
Android
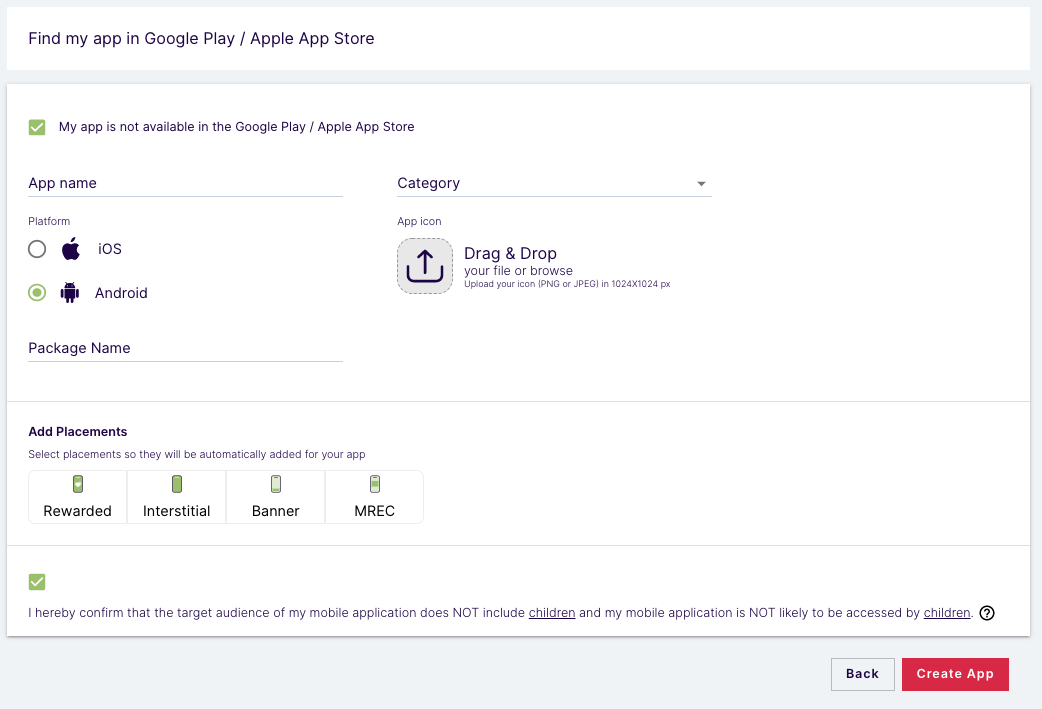
iOS
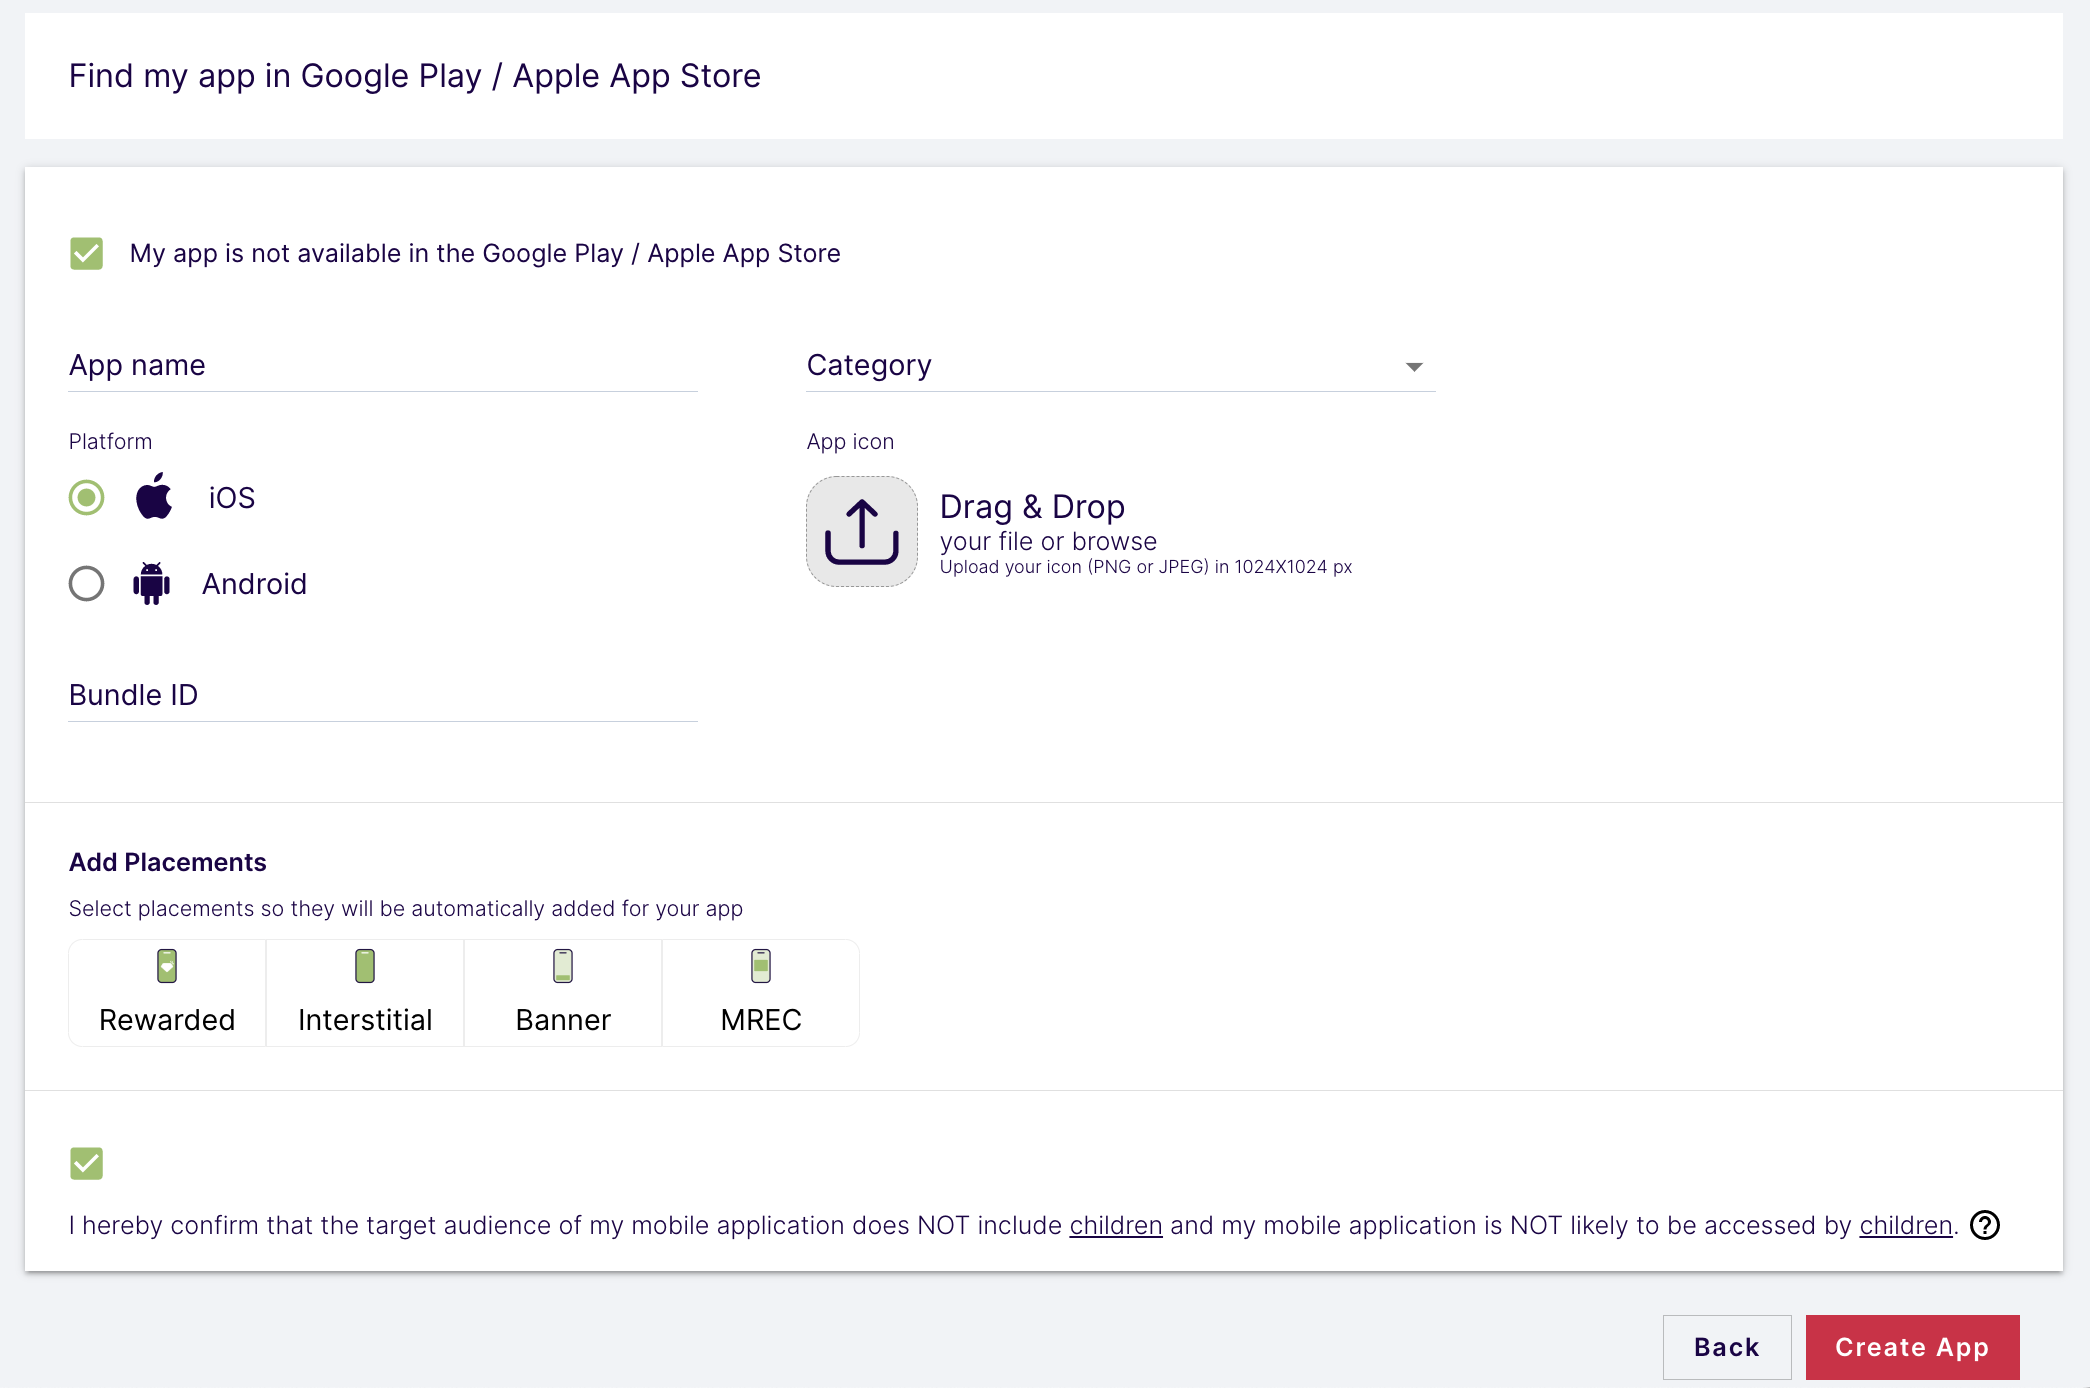
अपने प्लेसमेंट के नाम डालें और उनके टाइप चुनें. इसके बाद, प्लेसमेंट सेव करें पर क्लिक करें.
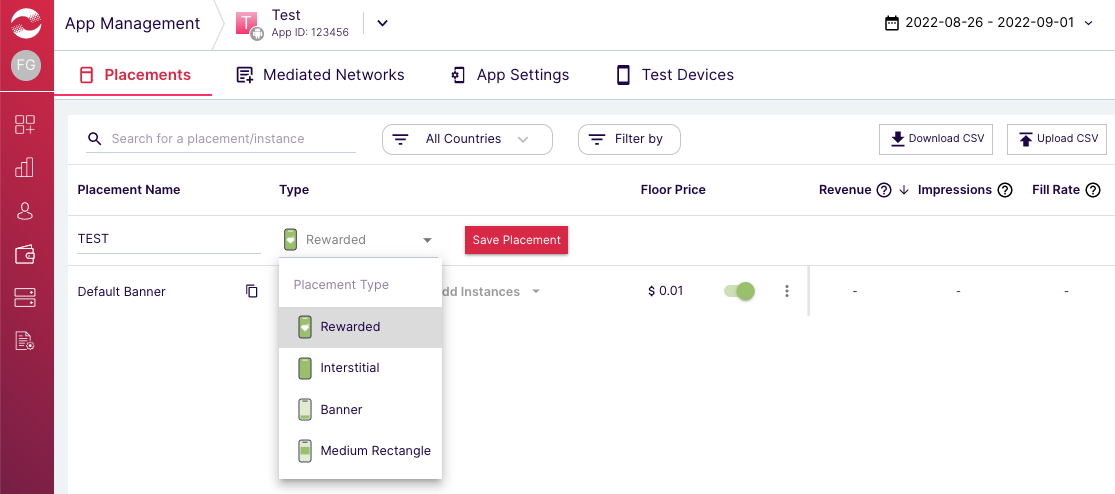
ऐप्लिकेशन आईडी और प्लेसमेंट आईडी
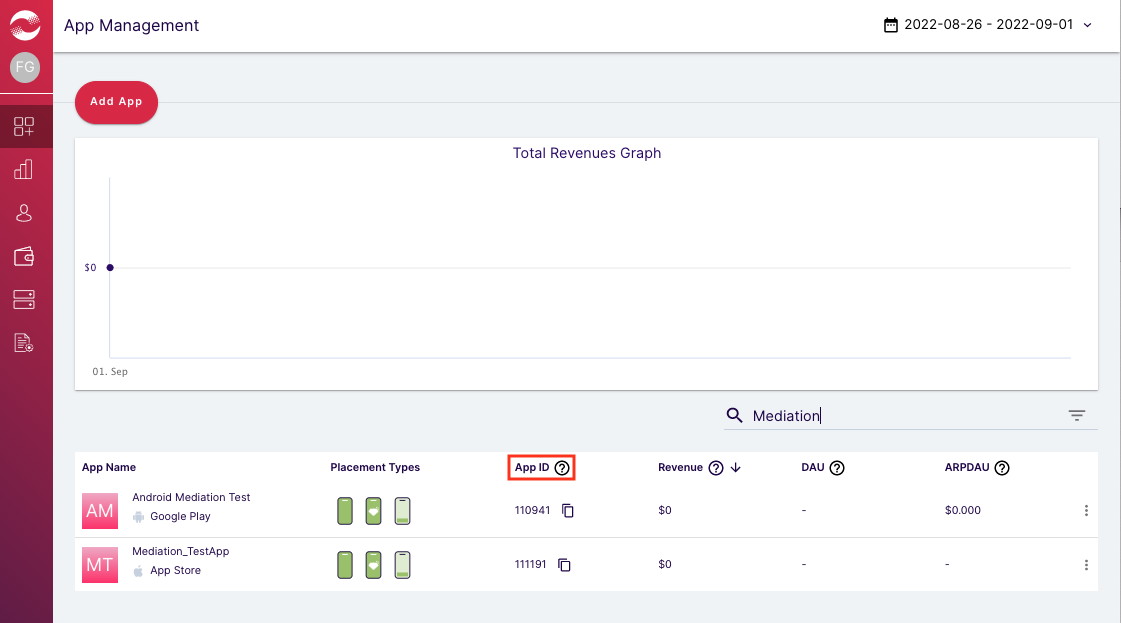
बाईं ओर मौजूद नेविगेशन बार पर कर्सर घुमाकर उसे खोलें. इसके बाद, ऐप्लिकेशन मैनेजमेंट पर क्लिक करें.
ऐप्लिकेशन मैनेजमेंट पेज पर, अपने ऐप्लिकेशन के बगल में मौजूद ऐप्लिकेशन आईडी को नोट करें.
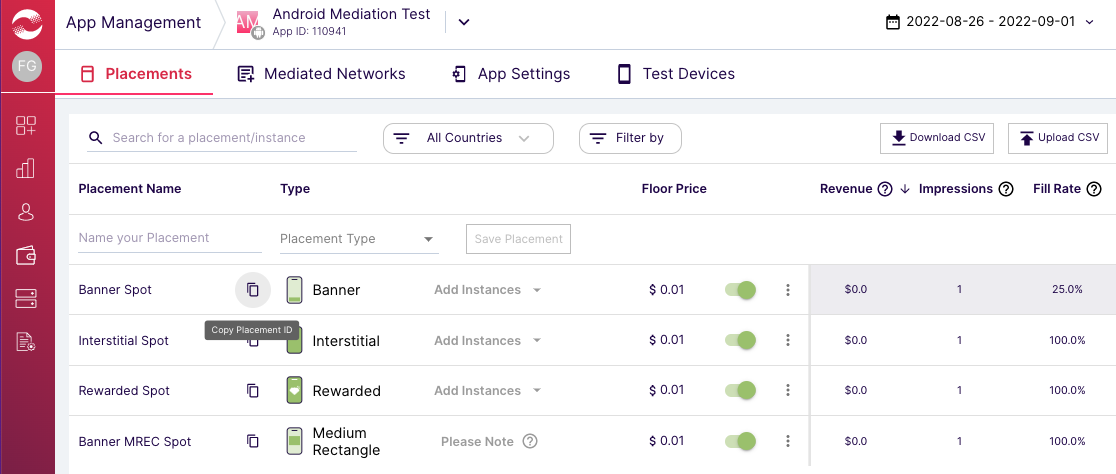
अपना ऐप्लिकेशन चुनें और प्लेसमेंट टैब पर जाएं. प्लेसमेंट आईडी को नोट करें..
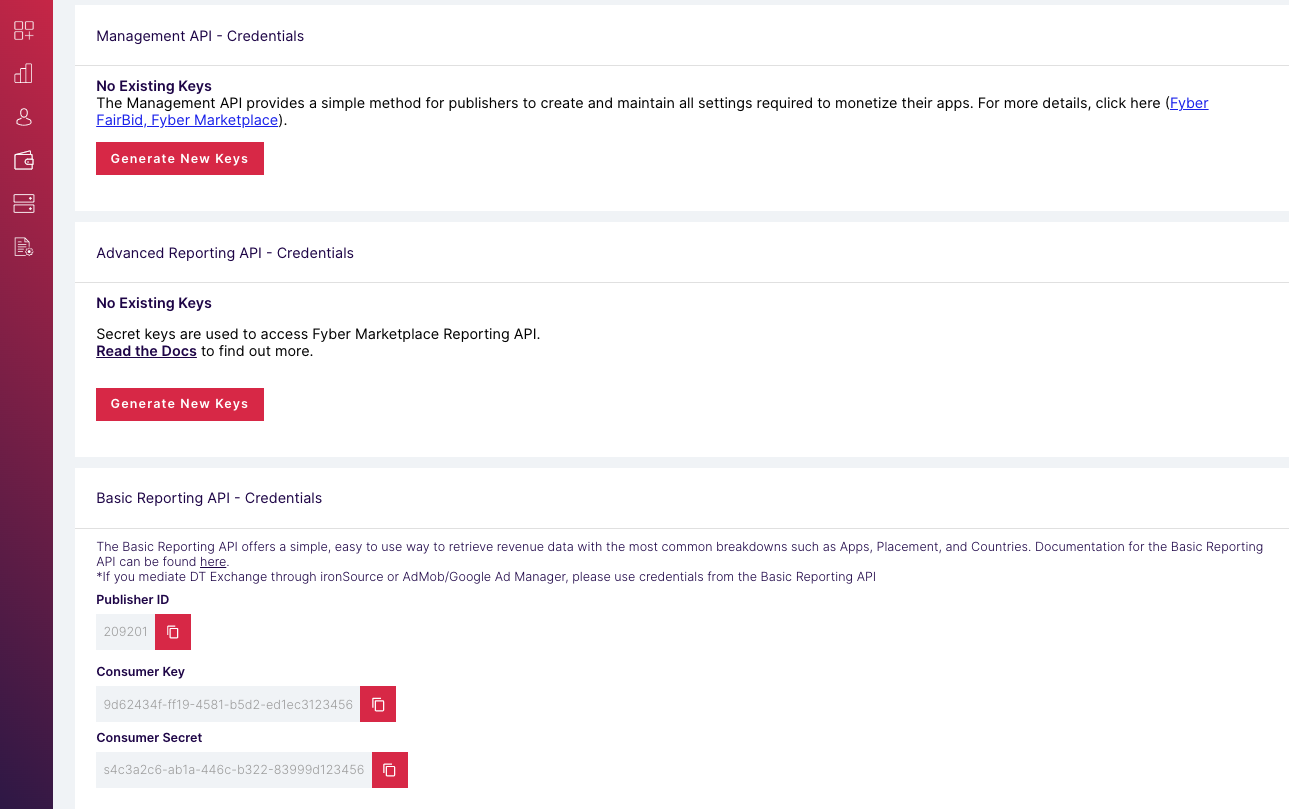
पब्लिशर आईडी, उपभोक्ता कुंजी, और उपभोक्ता सीक्रेट
बाईं ओर मौजूद मेन्यू में जाकर, अपने उपयोगकर्ता नाम पर क्लिक करें. इसके बाद, उपयोगकर्ता प्रोफ़ाइल को चुनें.
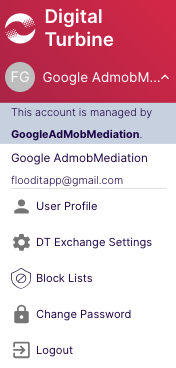
पब्लिशर आईडी, उपयोगकर्ता कुंजी, और उपयोगकर्ता सीक्रेट नोट करें, क्योंकि अगले चरण में इनकी ज़रूरत पड़ेगी.
app-ads.txt फ़ाइल अपडेट करना
ऐप्लिकेशन के लिए, अनुमति वाले सेलर (app-ads.txt), IAB Tech Lab की एक पहल है. इसकी मदद से यह पक्का किया जा सकता है कि आपके ऐप्लिकेशन की विज्ञापन इन्वेंट्री सिर्फ़ वे चैनल बेचें जिन्हें आपने अनुमति दी है. विज्ञापन से मिलने वाले रेवेन्यू में ज़्यादा नुकसान न हो, इसके लिए आपको app-ads.txt फ़ाइल लागू करनी होगी.
अगर आपने अब तक ऐसा नहीं किया है, तो
अपने ऐप्लिकेशन के लिए app-ads.txt फ़ाइल सेट अप करें.
DT Exchange के लिए app-ads.txt लागू करने के लिए, DT को अपनी app-ads.txt फ़ाइल में जोड़ें.
दूसरा चरण: AdMob के यूआई में DT Exchange की डिमांड सेट अप करना
अपनी विज्ञापन यूनिट के लिए मीडिएशन की सेटिंग कॉन्फ़िगर करना
Android
निर्देशों के लिए, Android के लिए गाइड में दिया गया दूसरा चरण देखें.
iOS
निर्देशों के लिए, iOS के लिए गाइड में दिया गया दूसरा चरण देखें.
DT Exchange को जीडीपीआर और अमेरिका के राज्यों में लागू कानूनों के तहत विज्ञापन पार्टनर की सूची में जोड़ना
AdMob के यूज़र इंटरफ़ेस (यूआई) में, यूरोप और अमेरिका के राज्यों के कानूनों के तहत विज्ञापन पार्टनर की सूची में DT Exchange (Fyber Monetization) को जोड़ने के लिए, यहां दिया गया तरीका अपनाएं: यूरोपीय कानूनों की सेटिंग और अमेरिका के राज्यों के कानूनों की सेटिंग
तीसरा चरण: DT SDK और अडैप्टर को इंपोर्ट करना
OpenUPM-CLI
अगर आपने OpenUPM-CLI इंस्टॉल किया है, तो Google Mobile Ads DT Exchange Mediation Plugin for Unity को अपने प्रोजेक्ट में इंस्टॉल किया जा सकता है. इसके लिए, अपने प्रोजेक्ट की रूट डायरेक्ट्री में जाकर यह कमांड चलाएं:
openupm add com.google.ads.mobile.mediation.dtexchangeOpenUPM
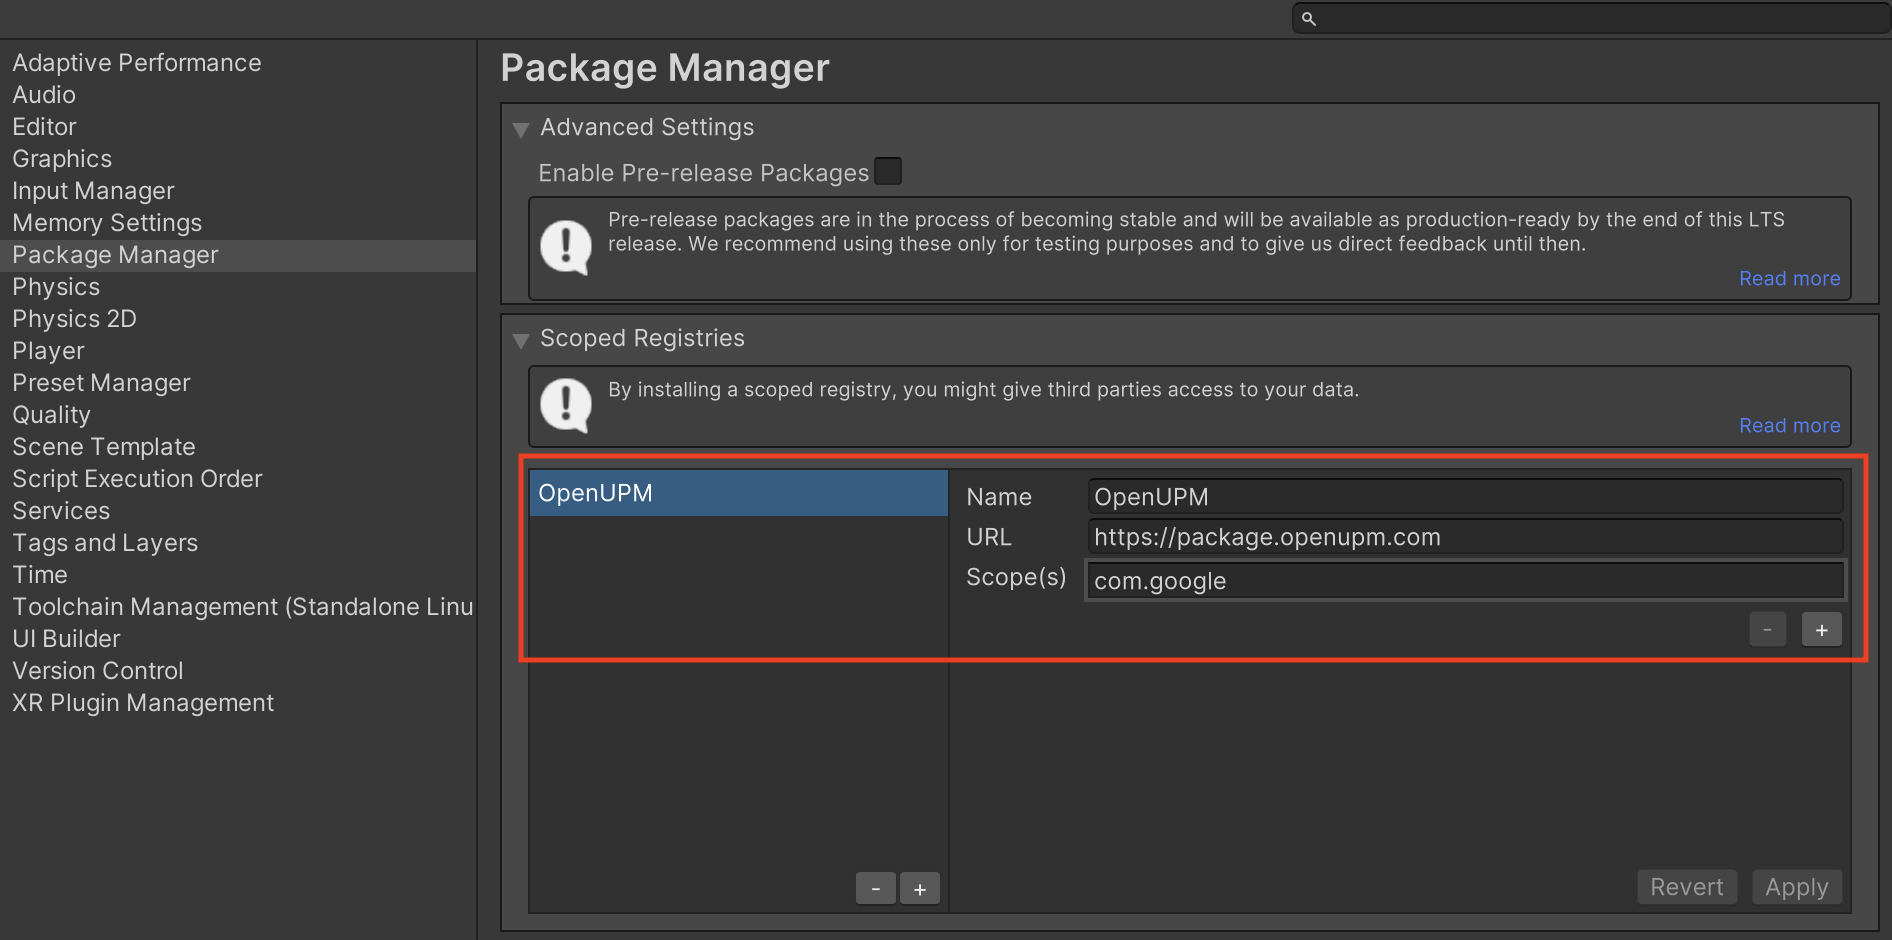
Unity Package Manager Settings खोलने के लिए, Unity प्रोजेक्ट एडिटर में बदलाव करें > प्रोजेक्ट सेटिंग > Package Manager चुनें.
स्कोप की गई रजिस्ट्री टैब में, OpenUPM को स्कोप की गई रजिस्ट्री के तौर पर जोड़ें. इसके लिए, यह जानकारी दें:
- नाम:
OpenUPM - URL:
https://package.openupm.com - स्कोप:
com.google
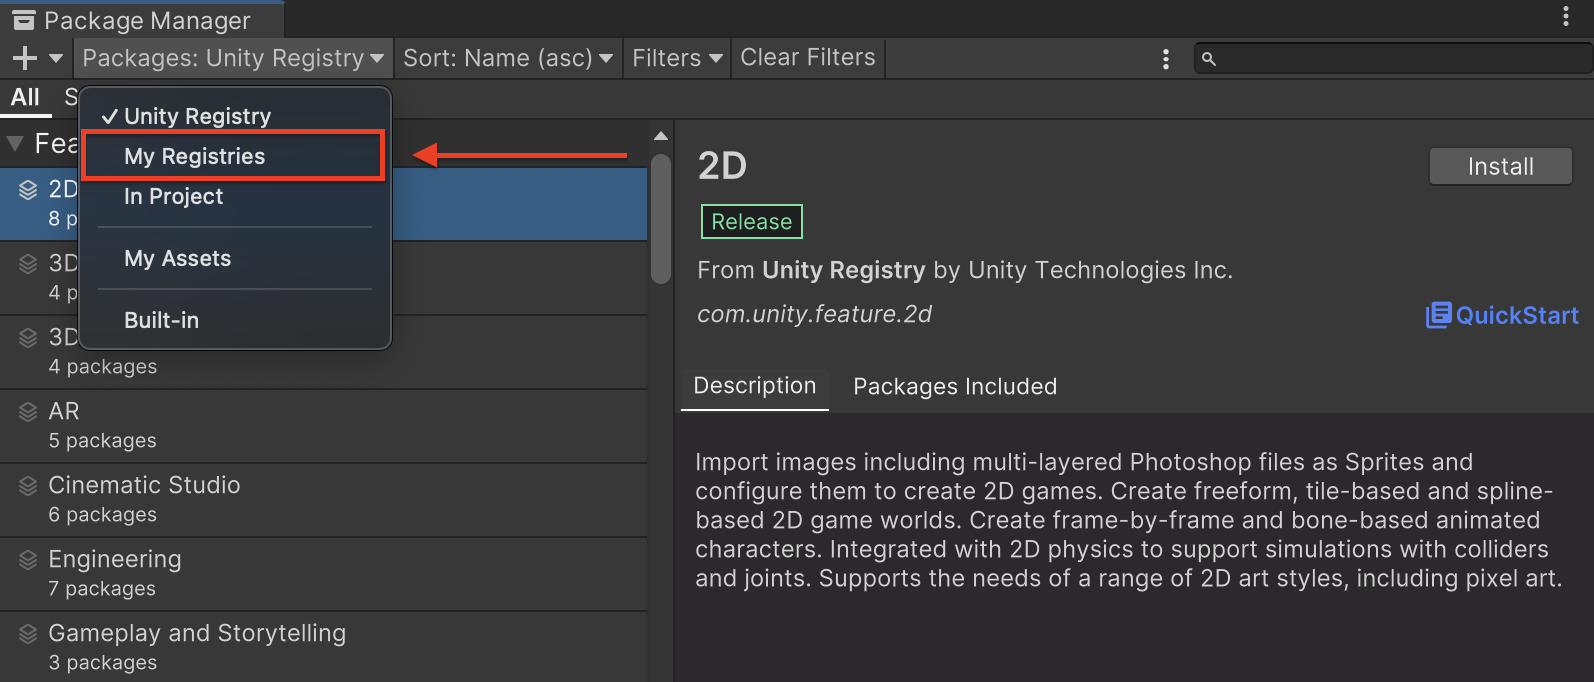
इसके बाद, विंडो > पैकेज मैनेजर पर जाकर Unity Package Manager खोलें. इसके बाद, ड्रॉप-डाउन मेन्यू से मेरी रजिस्ट्री चुनें.
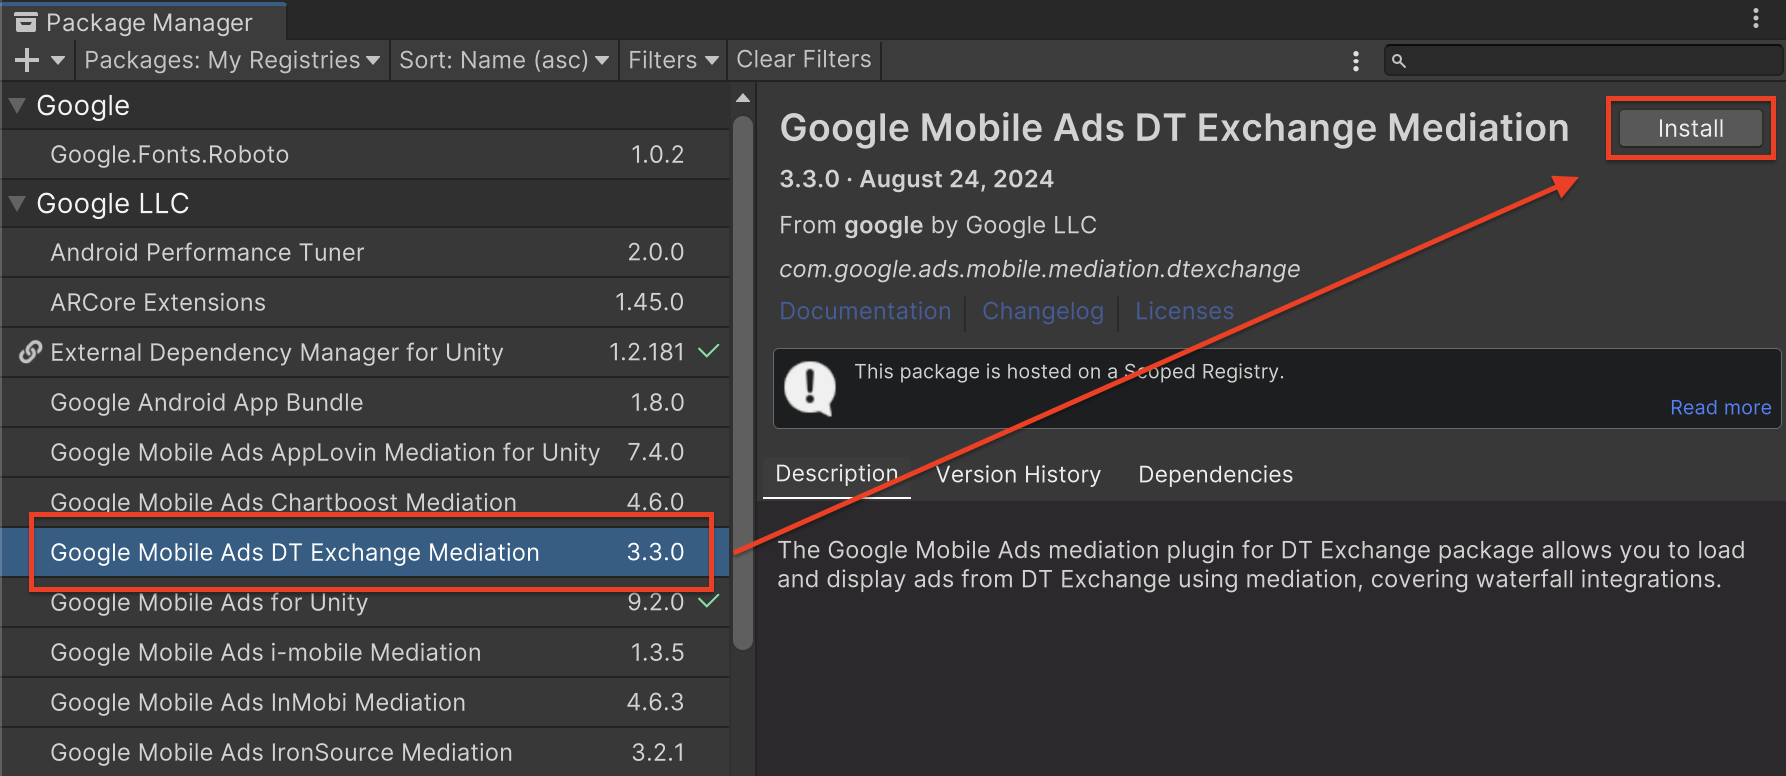
Google Mobile Ads DTExchange Mediation पैकेज चुनें और Install पर क्लिक करें.
Unity पैकेज
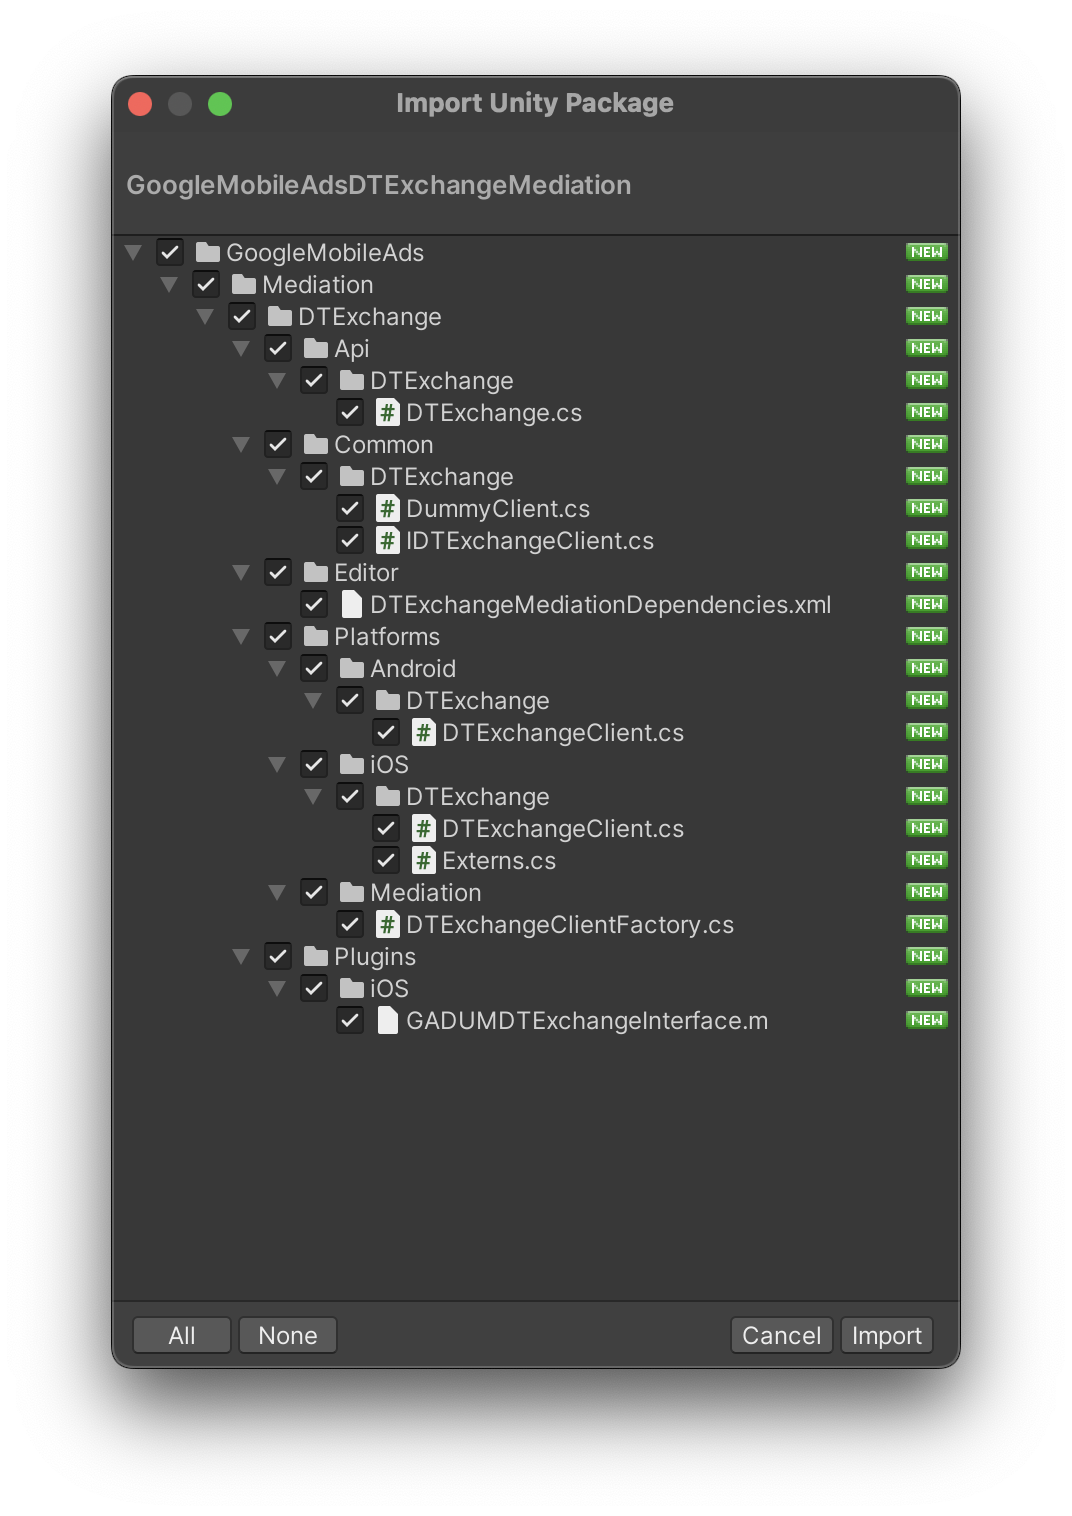
बदलाव की जानकारी में दिए गए डाउनलोड लिंक से, DT Exchange के लिए Google Mobile Ads mediation प्लगिन का नया वर्शन डाउनलोड करें. इसके बाद, ज़िप फ़ाइल से GoogleMobileAdsDTExchangeMediation.unitypackage को एक्सट्रैक्ट करें.
अपने यूनिटी प्रोजेक्ट एडिटर में, ऐसेट > पैकेज इंपोर्ट करें >
कस्टम पैकेज चुनें. इसके बाद, डाउनलोड की गई
GoogleMobileAdsDTExchangeMediation.unitypackage
फ़ाइल ढूंढें. पक्का करें कि सभी फ़ाइलें चुनी गई हों. इसके बाद, इंपोर्ट करें पर क्लिक करें.
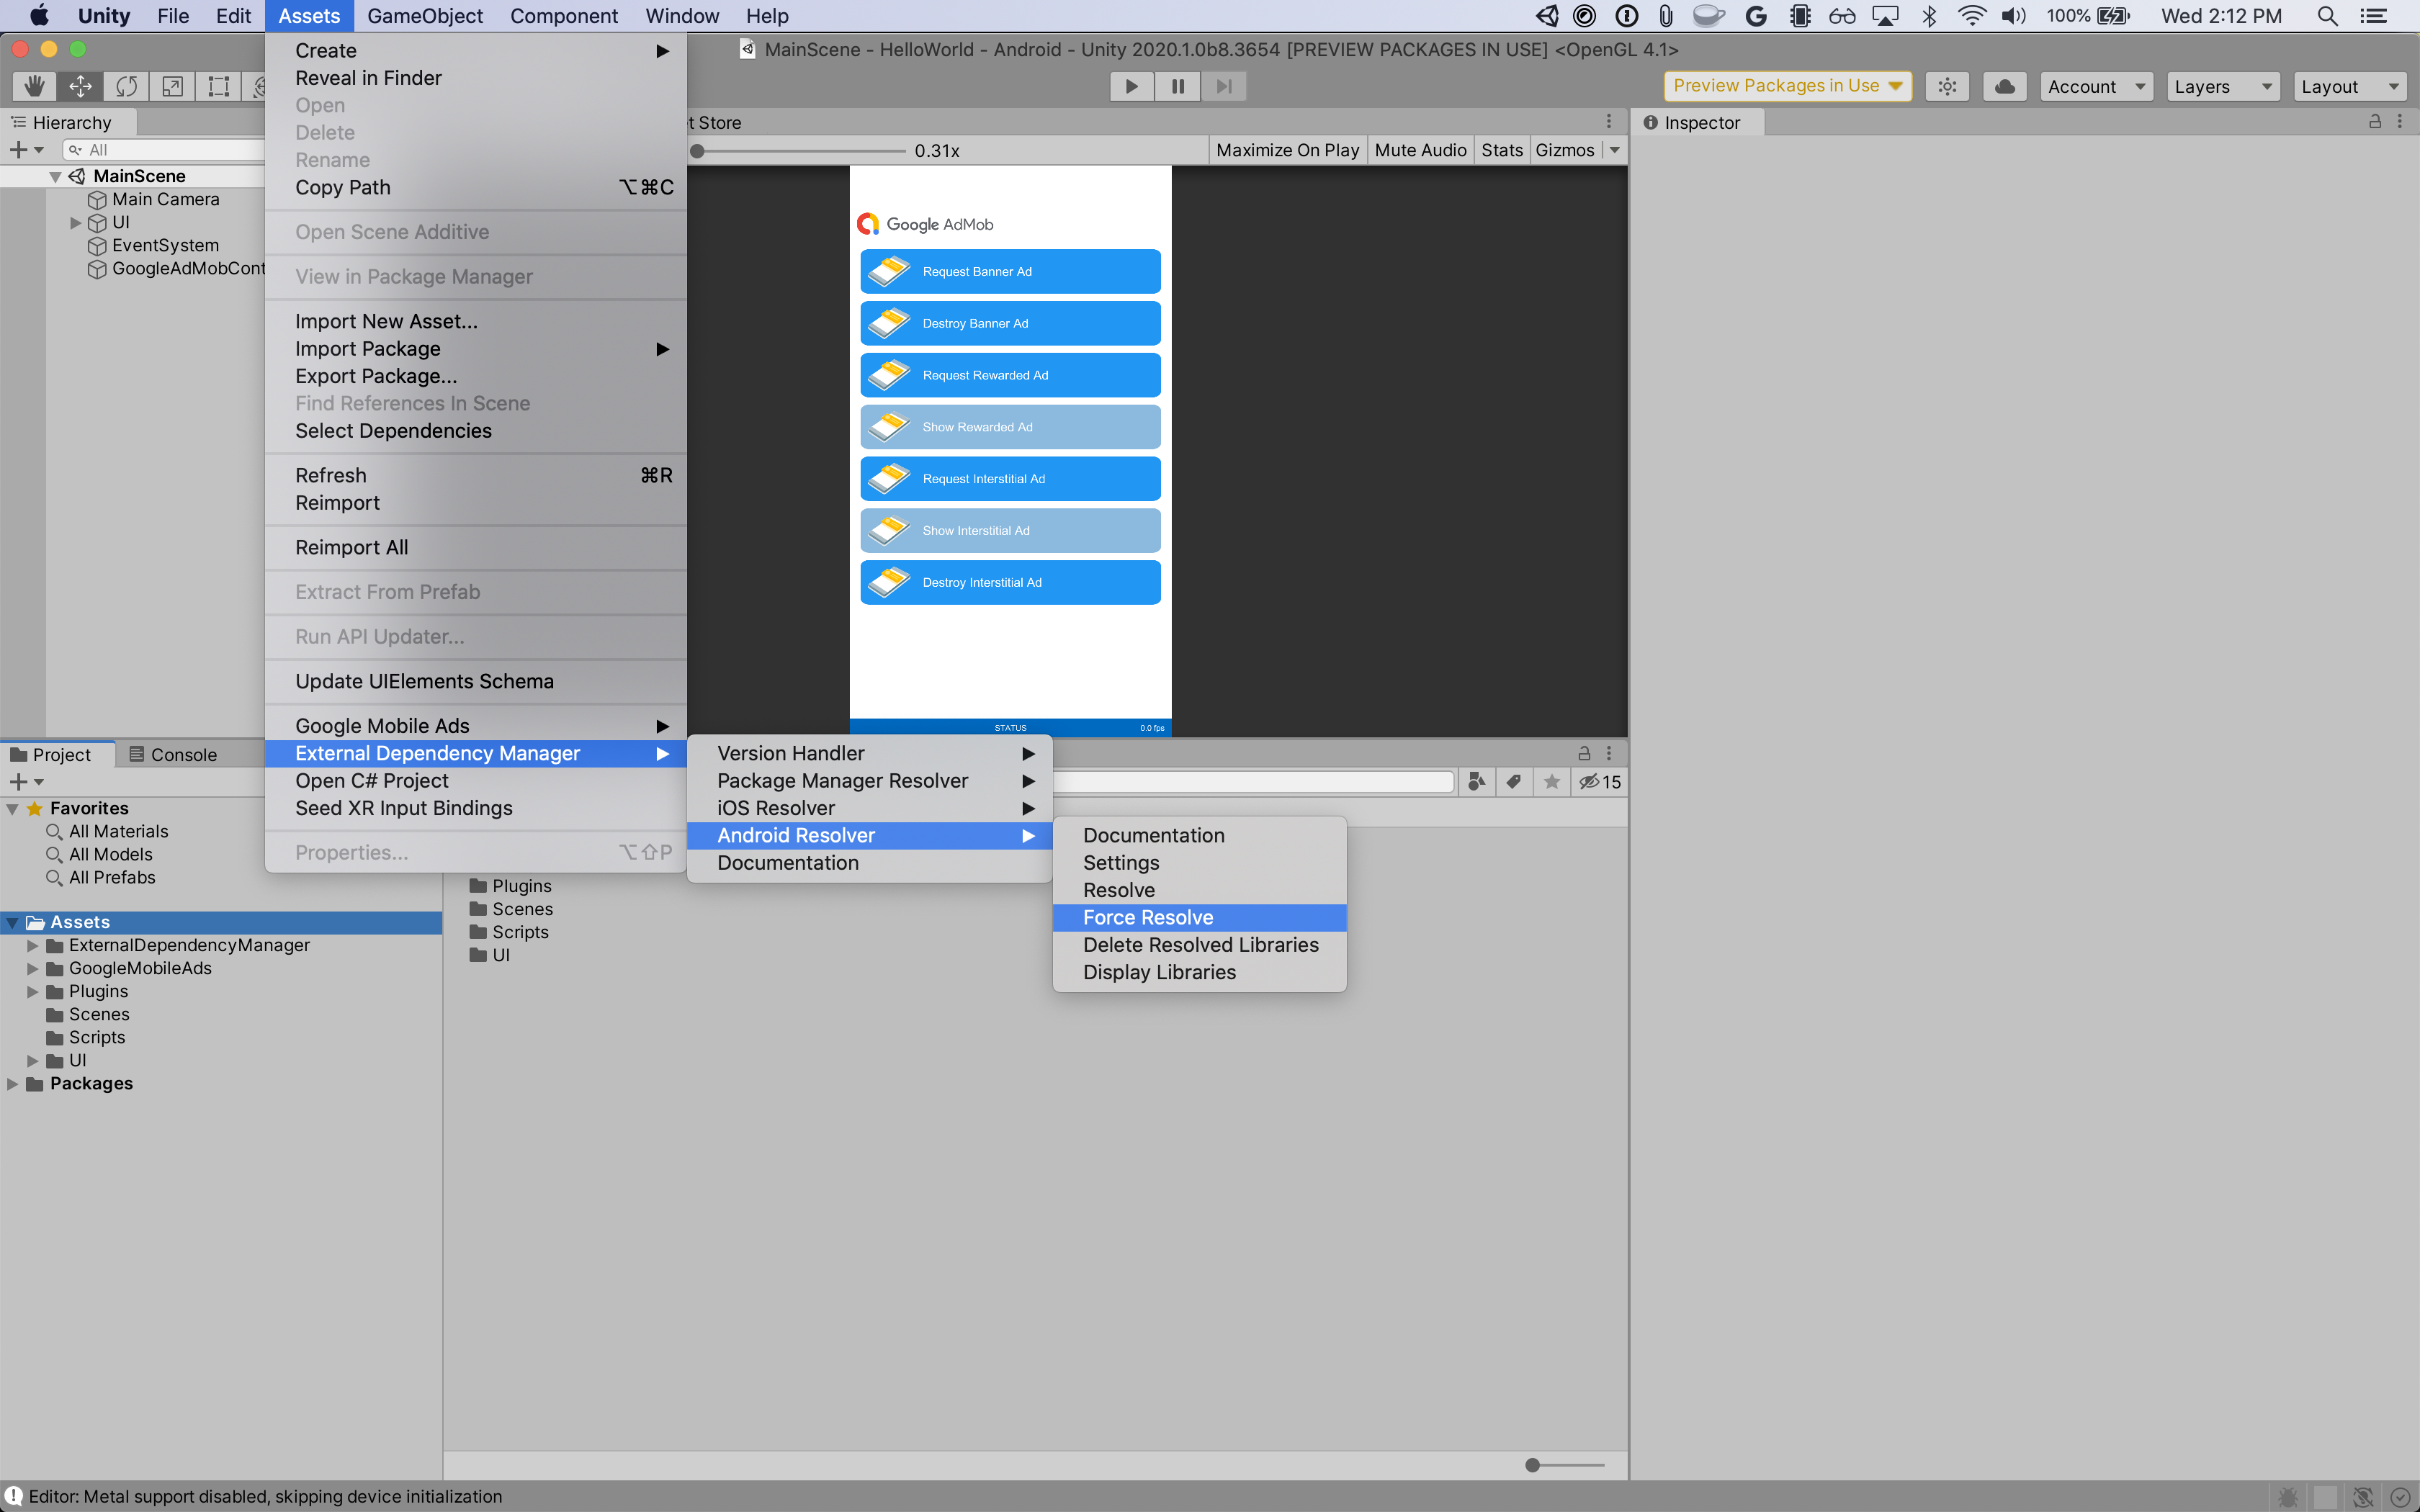
इसके बाद, ऐसेट > External Dependency Manager >
Android Resolver > Force Resolve को चुनें. External Dependency Manager लाइब्रेरी, डिपेंडेंसी को शुरू से हल करेगी. साथ ही, एलान की गई डिपेंडेंसी को आपके Unity ऐप्लिकेशन की Assets/Plugins/Android डायरेक्ट्री में कॉपी करेगी.
चौथा चरण: DT SDK पर निजता सेटिंग लागू करना
ईयू उपयोगकर्ता की सहमति से जुड़ी नीति और जीडीपीआर
Google की ईयू उपयोगकर्ता की सहमति से जुड़ी नीति का पालन करने के लिए, आपको यूरोपियन इकनॉमिक एरिया (ईईए), यूके, और स्विट्ज़रलैंड में मौजूद उपयोगकर्ताओं को कुछ जानकारी देनी होगी. साथ ही, आपको कानूनी तौर पर ज़रूरी होने पर, कुकी या अन्य लोकल स्टोरेज का इस्तेमाल करने के लिए उनकी सहमति लेनी होगी. इसके अलावा, आपको विज्ञापन को ज़्यादा काम का बनाने के लिए, निजी डेटा को इकट्ठा करने, शेयर करने, और इस्तेमाल करने के लिए भी उनकी सहमति लेनी होगी. इस नीति में, ईयू के ई-निजता निर्देश और जनरल डेटा प्रोटेक्शन रेगुलेशन (जीडीपीआर) की ज़रूरी शर्तों के बारे में बताया गया है. यह आपकी ज़िम्मेदारी है कि सहमति की जानकारी, आपकी मीडिएशन चेन में मौजूद हर विज्ञापन सोर्स को भेजी जाए. Google, उपयोगकर्ता की सहमति के विकल्प को ऐसे नेटवर्क पर अपने-आप नहीं भेज सकता.
इस सेक्शन में, DT Exchange के लिए दिलचस्पी के मुताबिक दिखाए जाने वाले विज्ञापन की सुविधा को चालू या बंद करने का तरीका बताया गया है.
DT Exchange के 1.1.0 वर्शन के लिए Google Mobile Ads mediation प्लगिन में, SetGDPRRequired() और SetGDPRConsentString() तरीकों के साथ Fyber क्लास जोड़ी गई है. इससे, DT Exchange को सहमति की जानकारी मैन्युअल तरीके से भेजी जा सकती है. यहां दिए गए सैंपल कोड में, इन पैरामीटर को DT Exchange अडैप्टर को पास करने का तरीका बताया गया है:
using GoogleMobileAds.Api.Mediation.Fyber;
// ...

Fyber.SetGDPRConsent(true);
Fyber.SetGDPRConsentString("myGDPRConsentString");
ज़्यादा जानकारी के लिए, DT Exchange का GDPR लेख पढ़ें. साथ ही, यह भी जानें कि इस तरीके में कौनसी वैल्यू दी जा सकती हैं.
अमेरिका के राज्यों के निजता कानून
अमेरिका के राज्यों के निजता कानूनों के मुताबिक, उपयोगकर्ताओं को अपनी "निजी जानकारी" (जैसा कि कानून में परिभाषित है) की "बिक्री" से ऑप्ट आउट करने का अधिकार मिलना चाहिए. ऑप्ट आउट का विकल्प देने के लिए, "बिक्री करने वाले" पक्ष को अपने होम पेज पर "मेरी निजी जानकारी न बेचें" का लिंक प्रमुखता से दिखाना होगा. अमेरिका के राज्यों के निजता कानूनों का पालन करने से जुड़ी गाइड में, Google के विज्ञापन दिखाने के लिए सीमित डेटा प्रोसेसिंग मोड को चालू करने की सुविधा मिलती है. हालांकि, Google आपकी मीडिएशन चेन में मौजूद हर विज्ञापन नेटवर्क पर इस सेटिंग को लागू नहीं कर सकता. इसलिए, आपको मीडिएशन चेन में मौजूद हर उस विज्ञापन नेटवर्क कंपनी की पहचान करनी होगी जो निजी जानकारी की बिक्री में हिस्सा ले सकती है. साथ ही, आपको यह पक्का करने के लिए कि निजता कानून का पालन किया जा रहा है, उन सभी नेटवर्क से मिले दिशा-निर्देशों का पालन करना होगा.
DT Exchange 3.1.1 वर्शन के लिए Google Mobile Ads मीडिएशन प्लगिन में, SetCCPAString() क्लास को SetCCPAString() तरीके के साथ जोड़ा गया है. इससे, DT Exchange को सहमति की जानकारी मैन्युअल तरीके से भेजी जा सकती है.Fyber नीचे दिए गए सैंपल कोड में बताया गया है कि इन पैरामीटर को DT Exchange अडैप्टर को कैसे पास किया जाता है:
using GoogleMobileAds.Api.Mediation.Fyber;
// ...

Fyber.SetCCPAString("myCCPAConsentString");

// You can also clear CCPA consent information using the following method:
Fyber.ClearCCPAString();
ज़्यादा जानकारी के लिए, DT Exchange का CCPA Open Source लेख पढ़ें. साथ ही, यह भी जानें कि इस तरीके में कौनसी वैल्यू दी जा सकती हैं.
पांचवां चरण: ज़रूरी कोड जोड़ना
Android
DT Exchange इंटिग्रेशन के लिए, किसी और कोड की ज़रूरत नहीं होती.
iOS
SKAdNetwork इंटिग्रेशन
अपने प्रोजेक्ट की Info.plist फ़ाइल में SKAdNetwork आइडेंटिफ़ायर जोड़ने के लिए, DT Exchange के दस्तावेज़ पढ़ें.
छठा चरण: लागू किए गए बदलावों की जांच करना
टेस्ट विज्ञापनों को चालू करना
पक्का करें कि आपने AdMob के लिए, अपने टेस्ट डिवाइस को रजिस्टर किया हो.
टेस्ट विज्ञापनों की पुष्टि करना
यह पुष्टि करने के लिए कि आपको DT Exchange से टेस्ट विज्ञापन मिल रहे हैं, विज्ञापन जांचने वाले टूल में DT Exchange (बिडिंग) और DT Exchange (वॉटरफ़ॉल) विज्ञापन सोर्स का इस्तेमाल करके, विज्ञापन के किसी एक सोर्स को टेस्ट करना चालू करें.
गड़बड़ी के कोड
अगर अडैप्टर को DT Exchange से विज्ञापन नहीं मिलता है, तो पब्लिशर, विज्ञापन रिस्पॉन्स में हुई गड़बड़ी की जानकारी देखने के लिए, इनमें से किसी क्लास के हिसाब से ResponseInfo का इस्तेमाल कर सकते हैं:
Android
com.google.ads.mediation.fyber.FyberMediationAdapter
iOS
GADMediationAdapterFyber
विज्ञापन लोड न होने पर, DT Exchange अडैप्टर से मिलने वाले कोड और उनसे जुड़े मैसेज यहां दिए गए हैं:
Android
| गड़बड़ी का कोड | वजह |
|---|---|
| 101 | AdMob के यूज़र इंटरफ़ेस में कॉन्फ़िगर किए गए DT Exchange सर्वर पैरामीटर मौजूद नहीं हैं या मान्य नहीं हैं. |
| 103 | विज्ञापन का अनुरोध किया गया साइज़, DT Exchange के साथ काम करने वाले बैनर के साइज़ से मेल नहीं खाता. |
| 105 | DT SDK ने विज्ञापन लोड किया, लेकिन अनचाहा कंट्रोलर दिखाया. |
| 106 | विज्ञापन दिखाने के लिए तैयार नहीं है. |
| 107 | कॉन्टेक्स्ट, गतिविधि का इंस्टेंस नहीं है. |
| 108 | विज्ञापन नहीं दिखाया जा सका. |
| 200-399 | DT SDK टूल से गड़बड़ी का मैसेज मिला. ज़्यादा जानकारी के लिए, कोड देखें. |
iOS
| गड़बड़ी का कोड | कारण |
|---|---|
| 0-10 | DT SDK टूल से गड़बड़ी का मैसेज मिला. ज़्यादा जानकारी के लिए, दस्तावेज़ देखें. |
| 101 | AdMob के यूज़र इंटरफ़ेस में कॉन्फ़िगर किए गए DT Exchange सर्वर पैरामीटर मौजूद नहीं हैं या मान्य नहीं हैं. |
| 102 | विज्ञापन का अनुरोध किया गया साइज़, DT Exchange के साथ काम करने वाले बैनर के साइज़ से मेल नहीं खाता. |
| 103 | विज्ञापन नहीं दिखाया जा सका, क्योंकि विज्ञापन ऑब्जेक्ट का इस्तेमाल पहले ही किया जा चुका है. |
| 104 | विज्ञापन तैयार न होने की वजह से, DT Exchange के विज्ञापन नहीं दिखाए जा सके. |
| 105 | DT SDK टूल से, शुरू करने के दौरान गड़बड़ी का मैसेज मिला. |
DT Exchange Unity Mediation Plugin के बदलावों का लॉग
वर्शन 3.5.9
- DT Exchange Android अडैप्टर के वर्शन 8.4.5.0 के साथ काम करता है.
- DT Exchange iOS अडैप्टर के 8.4.7.1 वर्शन के साथ काम करता है.
- इसे Google Mobile Ads Unity Plugin के 11.1.0 वर्शन के साथ बनाया और टेस्ट किया गया है.
वर्शन 3.5.8
- DT Exchange Android अडैप्टर के वर्शन 8.4.5.0 के साथ काम करता है.
- DT Exchange iOS adapter के 8.4.7.0 वर्शन के साथ काम करता है.
- इसे Google Mobile Ads Unity प्लगिन के 11.0.0 वर्शन के साथ बनाया और टेस्ट किया गया है.
वर्शन 3.5.7
- DT Exchange Android अडैप्टर के वर्शन 8.4.4.0 के साथ काम करता है.
- DT Exchange iOS अडैप्टर के 8.4.6.0 वर्शन के साथ काम करता है.
- इसे Google Mobile Ads Unity प्लगिन के 11.0.0 वर्शन के साथ बनाया और टेस्ट किया गया है.
वर्शन 3.5.6
- DT Exchange Android अडैप्टर के वर्शन 8.4.3.0 के साथ काम करता है.
- DT Exchange iOS अडैप्टर के 8.4.5.0 वर्शन के साथ काम करता है.
- इसे Google Mobile Ads Unity प्लगिन के 11.0.0 वर्शन के साथ बनाया और टेस्ट किया गया है.
वर्शन 3.5.5
- DT Exchange Android adapter के वर्शन 8.4.2.2 के साथ काम करता है.
- DT Exchange iOS अडैप्टर के वर्शन 8.4.4.1 के साथ काम करता है.
- इसे Google Mobile Ads Unity प्लगिन के 11.0.0 वर्शन के साथ बनाया और टेस्ट किया गया है.
वर्शन 3.5.4
- DT Exchange Android अडैप्टर के वर्शन 8.4.2.1 के साथ काम करता है.
- DT Exchange iOS अडैप्टर के 8.4.4.0 वर्शन के साथ काम करता है.
- इसे Google Mobile Ads Unity प्लगिन के 10.7.0 वर्शन के साथ बनाया और टेस्ट किया गया है.
वर्शन 3.5.3
- DT Exchange Android adapter version 8.4.2.0 के साथ काम करता है.
- DT Exchange iOS अडैप्टर के 8.4.3.0 वर्शन के साथ काम करता है.
- इसे Google Mobile Ads Unity Plugin के 10.6.0 वर्शन के साथ बनाया और टेस्ट किया गया है.
वर्शन 3.5.2
- DT Exchange Android अडैप्टर के वर्शन 8.4.1.0 के साथ काम करता है.
- DT Exchange iOS adapter version 8.4.2.1 के साथ काम करता है.
- इसे Google Mobile Ads Unity Plugin के 10.6.0 वर्शन के साथ बनाया और टेस्ट किया गया है.
वर्शन 3.5.1
- DT Exchange Android adapter के वर्शन 8.4.0.1 के साथ काम करता है.
- DT Exchange iOS अडैप्टर के 8.4.2.0 वर्शन के साथ काम करता है.
- इसे Google Mobile Ads Unity Plugin के 10.6.0 वर्शन के साथ बनाया और टेस्ट किया गया है.
वर्शन 3.5.0
- DT Exchange Android अडैप्टर के वर्शन 8.4.0.0 के साथ काम करता है.
- DT Exchange iOS अडैप्टर के 8.4.1.0 वर्शन के साथ काम करता है.
- इसे Google Mobile Ads Unity Plugin के 10.6.0 वर्शन के साथ बनाया और टेस्ट किया गया है.
वर्शन 3.4.0
- DT Exchange Android अडैप्टर के वर्शन 8.4.0.0 के साथ काम करता है.
- DT Exchange iOS अडैप्टर के 8.3.8.0 वर्शन के साथ काम करता है.
- इसे Google Mobile Ads Unity Plugin के 10.5.0 वर्शन के साथ बनाया और टेस्ट किया गया है.
वर्शन 3.3.12
- DT Exchange Android adapter के वर्शन 8.3.8.0 के साथ काम करता है.
- DT Exchange iOS अडैप्टर के 8.3.8.0 वर्शन के साथ काम करता है.
- इसे Google Mobile Ads Unity प्लगिन के 10.3.0 वर्शन के साथ बनाया और टेस्ट किया गया है.
वर्शन 3.3.11
- DT Exchange Android अडैप्टर के वर्शन 8.3.7.0 के साथ काम करता है.
- DT Exchange iOS अडैप्टर के 8.3.7.0 वर्शन के साथ काम करता है.
- इसे Google Mobile Ads Unity प्लगिन के 10.2.0 वर्शन के साथ बनाया और टेस्ट किया गया है.
वर्शन 3.3.10
- DT Exchange Android अडैप्टर के वर्शन 8.3.7.0 के साथ काम करता है.
- DT Exchange iOS अडैप्टर के 8.3.6.0 वर्शन के साथ काम करता है.
- इसे Google Mobile Ads Unity प्लगिन के 10.0.0 वर्शन के साथ बनाया और टेस्ट किया गया है.
वर्शन 3.3.9
- DT Exchange Android adapter के 8.3.6.1 वर्शन के साथ काम करता है.
- DT Exchange iOS अडैप्टर के 8.3.6.0 वर्शन के साथ काम करता है.
- इसे Google Mobile Ads Unity प्लगिन के 10.0.0 वर्शन के साथ बनाया और टेस्ट किया गया है.
वर्शन 3.3.8
- DT Exchange Android अडैप्टर के वर्शन 8.3.5.0 के साथ काम करता है.
- DT Exchange iOS अडैप्टर के 8.3.4.0 वर्शन के साथ काम करता है.
- इसे Google Mobile Ads Unity Plugin के 9.5.0 वर्शन के साथ बनाया और टेस्ट किया गया है.
वर्शन 3.3.7
- DT Exchange Android adapter के वर्शन 8.3.4.0 के साथ काम करता है.
- DT Exchange iOS अडैप्टर के 8.3.4.0 वर्शन के साथ काम करता है.
- इसे Google Mobile Ads Unity Plugin के 9.5.0 वर्शन के साथ बनाया और टेस्ट किया गया है.
वर्शन 3.3.6
- DT Exchange Android adapter version 8.3.3.0 के साथ काम करता है.
- DT Exchange iOS अडैप्टर के 8.3.4.0 वर्शन के साथ काम करता है.
- इसे Google Mobile Ads Unity Plugin के 9.5.0 वर्शन के साथ बनाया और टेस्ट किया गया है.
वर्शन 3.3.5
- DT Exchange Android adapter version 8.3.3.0 के साथ काम करता है.
- DT Exchange iOS अडैप्टर के 8.3.3.0 वर्शन के साथ काम करता है.
- इसे Google Mobile Ads Unity प्लगिन के 9.4.0 वर्शन के साथ बनाया और टेस्ट किया गया है.
वर्शन 3.3.4
- DT Exchange Android adapter version 8.3.3.0 के साथ काम करता है.
- DT Exchange iOS अडैप्टर के वर्शन 8.3.2.1 के साथ काम करता है.
- इसे Google Mobile Ads Unity प्लगिन के 9.4.0 वर्शन के साथ बनाया और टेस्ट किया गया है.
वर्शन 3.3.3
- DT Exchange Android अडैप्टर के वर्शन 8.3.2.0 के साथ काम करता है.
- DT Exchange iOS अडैप्टर के वर्शन 8.3.2.1 के साथ काम करता है.
- इसे Google Mobile Ads Unity प्लगिन के 9.3.0 वर्शन के साथ बनाया और टेस्ट किया गया है.
वर्शन 3.3.2
- DT Exchange Android adapter version 8.3.1.0 के साथ काम करता है.
- DT Exchange iOS अडैप्टर के वर्शन 8.3.2.1 के साथ काम करता है.
- इसे Google Mobile Ads Unity प्लगिन के 9.3.0 वर्शन के साथ बनाया और टेस्ट किया गया है.
वर्शन 3.3.1
- DT Exchange Android adapter version 8.3.1.0 के साथ काम करता है.
- DT Exchange iOS अडैप्टर के 8.3.2.0 वर्शन के साथ काम करता है.
- इसे Google Mobile Ads Unity प्लगिन के 9.2.0 वर्शन के साथ बनाया और टेस्ट किया गया है.
वर्शन 3.3.0
DummyClientका नाम बदलकरPlaceholderClientकर दिया गया.- DT Exchange Android अडैप्टर के वर्शन 8.3.0.0 के साथ काम करता है.
- DT Exchange iOS अडैप्टर के 8.3.1.0 वर्शन के साथ काम करता है.
- इसे Google Mobile Ads Unity प्लगिन के 9.2.0 वर्शन के साथ बनाया और टेस्ट किया गया है.
वर्शन 3.2.1
- DT Exchange Android adapter version 8.2.7.0 के साथ काम करता है.
- DT Exchange iOS अडैप्टर के 8.3.1.0 वर्शन के साथ काम करता है.
- इसे Google Mobile Ads Unity Plugin के 9.1.1 वर्शन के साथ बनाया और टेस्ट किया गया है.
वर्शन 3.2.0
- DT Exchange Android adapter version 8.2.7.0 के साथ काम करता है.
- DT Exchange iOS अडैप्टर के 8.3.0.0 वर्शन के साथ काम करता है.
- इसे Google Mobile Ads Unity Plugin के 9.1.0 वर्शन के साथ बनाया और टेस्ट किया गया है.
वर्शन 3.1.12
- DT Exchange Android adapter version 8.2.7.0 के साथ काम करता है.
- DT Exchange iOS अडैप्टर के 8.2.8.0 वर्शन के साथ काम करता है.
- इसे Google Mobile Ads Unity Plugin के 9.1.0 वर्शन के साथ बनाया और टेस्ट किया गया है.
वर्शन 3.1.11
- DT Exchange Android adapter version 8.2.7.0 के साथ काम करता है.
- DT Exchange iOS अडैप्टर के 8.2.7.0 वर्शन के साथ काम करता है.
- इसे Google Mobile Ads Unity Plugin के 9.1.0 वर्शन के साथ बनाया और टेस्ट किया गया है.
वर्शन 3.1.10
- DT Exchange Android adapter 8.2.6.1 के साथ काम करता है.
- DT Exchange iOS अडैप्टर के 8.2.7.0 वर्शन के साथ काम करता है.
- इसे Google Mobile Ads Unity Plugin के 9.0.0 वर्शन के साथ बनाया और टेस्ट किया गया है.
वर्शन 3.1.8
- DT Exchange Android adapter version 8.2.5.0 के साथ काम करता है.
- DT Exchange iOS अडैप्टर के 8.2.6.0 वर्शन के साथ काम करता है.
- इसे Google Mobile Ads Unity Plugin के 8.6.0 वर्शन के साथ बनाया और टेस्ट किया गया है.
वर्शन 3.1.7
- DT Exchange Android अडैप्टर के वर्शन 8.2.4.0 के साथ काम करता है.
- DT Exchange iOS अडैप्टर के 8.2.4.0 वर्शन के साथ काम करता है.
- इसे Google Mobile Ads Unity Plugin के 8.5.2 वर्शन के साथ बनाया और टेस्ट किया गया है.
वर्शन 3.1.6
- DT Exchange Android अडैप्टर के वर्शन 8.2.3.0 के साथ काम करता है.
- DT Exchange iOS अडैप्टर के 8.2.3.0 वर्शन के साथ काम करता है.
- इसे Google Mobile Ads Unity प्लगिन के 8.4.1 वर्शन के साथ बनाया और टेस्ट किया गया है.
वर्शन 3.1.5
- अडैप्टर के कॉन्टेंट को
GoogleMobileAds/Mediation/DTExchange/में ले जाया गया. GoogleMobileAds.Mediation.DTExchangeका इस्तेमाल करने के लिए, अडैप्टर नेमस्पेस को फिर से फ़ैक्टर किया गया.- DT Exchange Android अडैप्टर के वर्शन 8.2.3.0 के साथ काम करता है.
- DT Exchange iOS अडैप्टर के 8.2.1.0 वर्शन के साथ काम करता है.
- इसे Google Mobile Ads Unity प्लगिन के 8.1.0 वर्शन के साथ बनाया और टेस्ट किया गया है.
वर्शन 3.1.4
- DT Exchange Android adapter version 8.2.2.0 के साथ काम करता है.
- DT Exchange iOS अडैप्टर के 8.1.9.1 वर्शन के साथ काम करता है.
- इसे Google Mobile Ads Unity Plugin के 7.4.1 वर्शन के साथ बनाया और टेस्ट किया गया है.
वर्शन 3.1.3
- DT Exchange Android adapter के वर्शन 8.2.1.0 के साथ काम करता है.
- DT Exchange iOS अडैप्टर के 8.1.9.0 वर्शन के साथ काम करता है.
- इसे Google Mobile Ads Unity Plugin के 7.4.0 वर्शन के साथ बनाया और टेस्ट किया गया है.
वर्शन 3.1.2
- Unity mediation प्लगिन का नाम बदलकर "DT Exchange" कर दिया गया है.
GoogleMobileAds.Api.Mediation.Fyber.Fyberक्लास का नाम बदलकरGoogleMobileAds.Api.Mediation.DTExchange.DTExchangeकर दिया गया है.- DT Exchange Android adapter के वर्शन 8.2.1.0 के साथ काम करता है.
- DT Exchange iOS अडैप्टर के 8.1.7.0 वर्शन के साथ काम करता है.
- इसे Google Mobile Ads Unity प्लगिन के 7.3.1 वर्शन के साथ बनाया और टेस्ट किया गया है.
वर्शन 3.1.1
Fyberक्लास में ये तरीके जोड़े गए हैं:SetCCPAString(string)ClearCCPAString()
- Fyber Android adapter version 8.2.0.0 के साथ काम करता है.
- Fyber iOS अडैप्टर के 8.1.6.0 वर्शन के साथ काम करता है.
- इसे Google Mobile Ads Unity Plugin के 7.3.0 वर्शन के साथ बनाया और टेस्ट किया गया है.
वर्शन 3.1.0
- Fyber Android adapter version 8.2.0.0 के साथ काम करता है.
- Fyber iOS अडैप्टर के 8.1.5.0 वर्शन के साथ काम करता है.
- इसे Google Mobile Ads Unity Plugin के 7.2.0 वर्शन के साथ बनाया और टेस्ट किया गया है.
वर्शन 3.0.2
- Fyber Android adapter version 8.1.3.1 के साथ काम करता है.
- Fyber iOS अडैप्टर के 8.1.5.0 वर्शन के साथ काम करता है.
- इसे Google Mobile Ads Unity Plugin के 7.0.2 वर्शन के साथ बनाया और टेस्ट किया गया है.
वर्शन 3.0.1
- Fyber Android अडैप्टर के वर्शन 8.1.3.0 के साथ काम करता है.
- Fyber iOS अडैप्टर के 8.1.4.0 वर्शन के साथ काम करता है.
- इसे Google Mobile Ads Unity प्लगिन के 7.0.0 वर्शन के साथ बनाया और टेस्ट किया गया है.
वर्शन 3.0.0
- Fyber Android adapter version 8.1.2.0 के साथ काम करता है.
- Fyber iOS अडैप्टर के 8.1.2.0 वर्शन के साथ काम करता है.
वर्शन 2.0.0
- Fyber Android adapter version 7.8.4.1 के साथ काम करता है.
- Fyber iOS adapter version 8.0.0.0 के साथ काम करता है.
वर्शन 1.6.1
- Fyber Android adapter version 7.8.3.0 के साथ काम करता है.
- Fyber iOS adapter version 7.8.6.0 के साथ काम करता है.
वर्शन 1.6.0
- Fyber Android adapter version 7.8.2.0 के साथ काम करता है.
- Fyber iOS अडैप्टर के 7.8.5.0 वर्शन के साथ काम करता है.
वर्शन 1.5.2
- Fyber Android adapter version 7.7.4.0 के साथ काम करता है.
- Fyber iOS adapter version 7.7.3.0 के साथ काम करता है.
वर्शन 1.5.1
- Fyber Android अडैप्टर के वर्शन 7.7.2.0 के साथ काम करता है.
- Fyber iOS adapter version 7.7.2.0 के साथ काम करता है.
वर्शन 1.5.0
- Fyber Android अडैप्टर के वर्शन 7.7.1.0 के साथ काम करता है.
- Fyber iOS अडैप्टर के 7.7.1.0 वर्शन के साथ काम करता है.
वर्शन 1.4.0
- Fyber Android adapter version 7.7.0.0 के साथ काम करता है.
- Fyber iOS adapter version 7.6.4.0 के साथ काम करता है.
वर्शन 1.3.0
- Fyber Android adapter version 7.6.0.0 के साथ काम करता है.
- Fyber iOS adapter के 7.6.0.0 वर्शन के साथ काम करता है.
वर्शन 1.2.3
- Fyber Android adapter version 7.5.4.0 के साथ काम करता है.
- Fyber iOS अडैप्टर के 7.5.6.0 वर्शन के साथ काम करता है.
वर्शन 1.2.2
- Fyber Android adapter version 7.5.3.0 के साथ काम करता है.
- Fyber iOS adapter version 7.5.4.0 के साथ काम करता है.
वर्शन 1.2.1
- Fyber Android adapter version 7.5.2.0 के साथ काम करता है.
- Fyber iOS adapter version 7.5.3.0 के साथ काम करता है.
वर्शन 1.2.0
- Fyber Android adapter version 7.5.0.0 के साथ काम करता है.
- Fyber iOS अडैप्टर के 7.5.1.0 वर्शन के साथ काम करता है.
वर्शन 1.1.0
- जीडीपीआर की ज़रूरी शर्तों को पूरा करने के लिए,
Fyberक्लास में ये तरीके जोड़े गए हैं:SetGDPRConsent()SetGDPRConsentString()ClearGDPRConsentData()
- Fyber Android adapter version 7.3.4.0 के साथ काम करता है.
- Fyber iOS adapter version 7.5.0.0 के साथ काम करता है.
वर्शन 1.0.0
- पहली रिलीज़!
- Fyber Android adapter version 7.3.4.0 के साथ काम करता है.
- Fyber iOS adapter version 7.4.0.0 के साथ काम करता है.