 導入原生廣告,您將可自訂廣告,打造更優質的使用者體驗,進而提高參與度和整體收益。
如要充分發揮原生廣告的效益,請務必設計廣告版面配置,確保廣告自然融入應用程式。為協助您快速上手,我們製作了原生範本。
原生範本附上原生廣告檢視區塊的完整程式碼,有助您快速導入及輕鬆修改。有了原生範本,只要幾分鐘就能導入第一則原生廣告,還能迅速自訂外觀和風格,不必撰寫大量程式碼。這些範本可安插於任何地方,包括新聞動態消息中使用的 RecyclerView、對話方塊或應用程式內的任意位置。
原生範本是以 Android Studio 模組的形式提供,方便加到專案並自由運用。
範本大小
範本分為小型和中型兩種,都採 TemplateView 類別,且顯示比例固定。範本可調整至填滿上層檢視區塊的寬度。
小型範本
@layout/gnt_small_template_view
小型範本非常適合用於 RecyclerView,或任何需要長方形廣告檢視區塊的時候,比如說可以用在動態內廣告。

中型範本
@layout/gnt_medium_template_view
中型範本會占據一半到四分之三的頁面區塊,也可用於動態內廣告,適合到達網頁或啟動畫面。
您可以自由調整刊登位置,並根據需求修改原始碼和 XML 檔案。

安裝原生廣告範本
原生範本的安插方式很簡單,使用 GitHub 上的「Clone or download」選項下載 ZIP 檔案,再將模組匯入現有的 Android Studio 專案即可。
選擇「檔案」>「新增」>「匯入模組」。
選取
nativetemplates資料夾。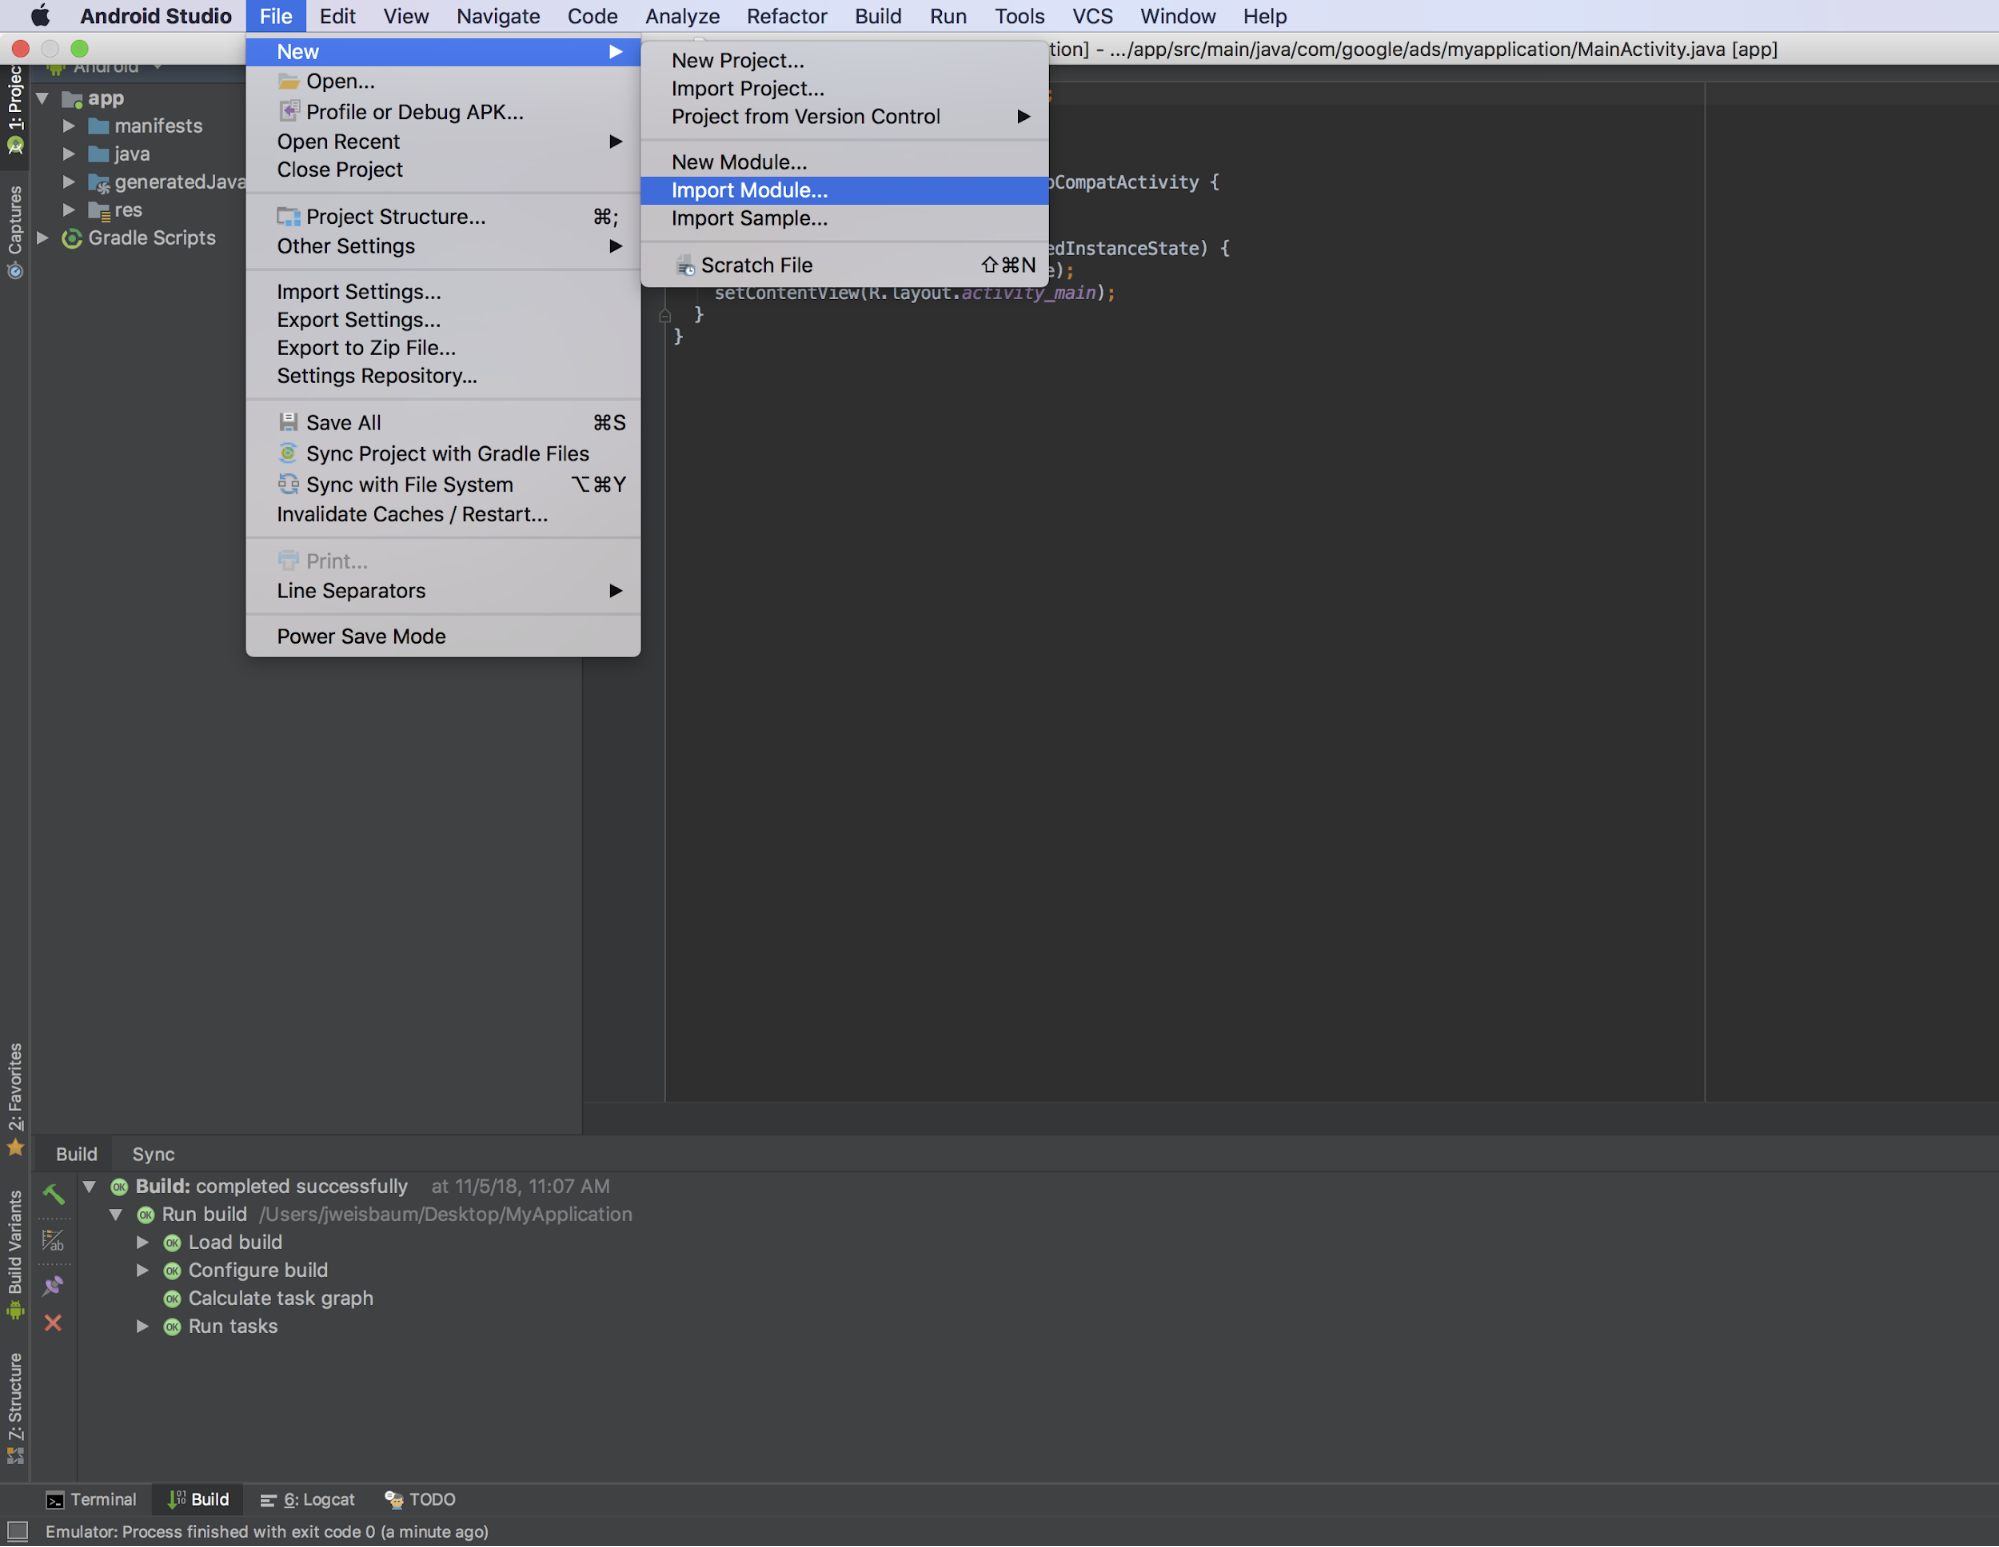
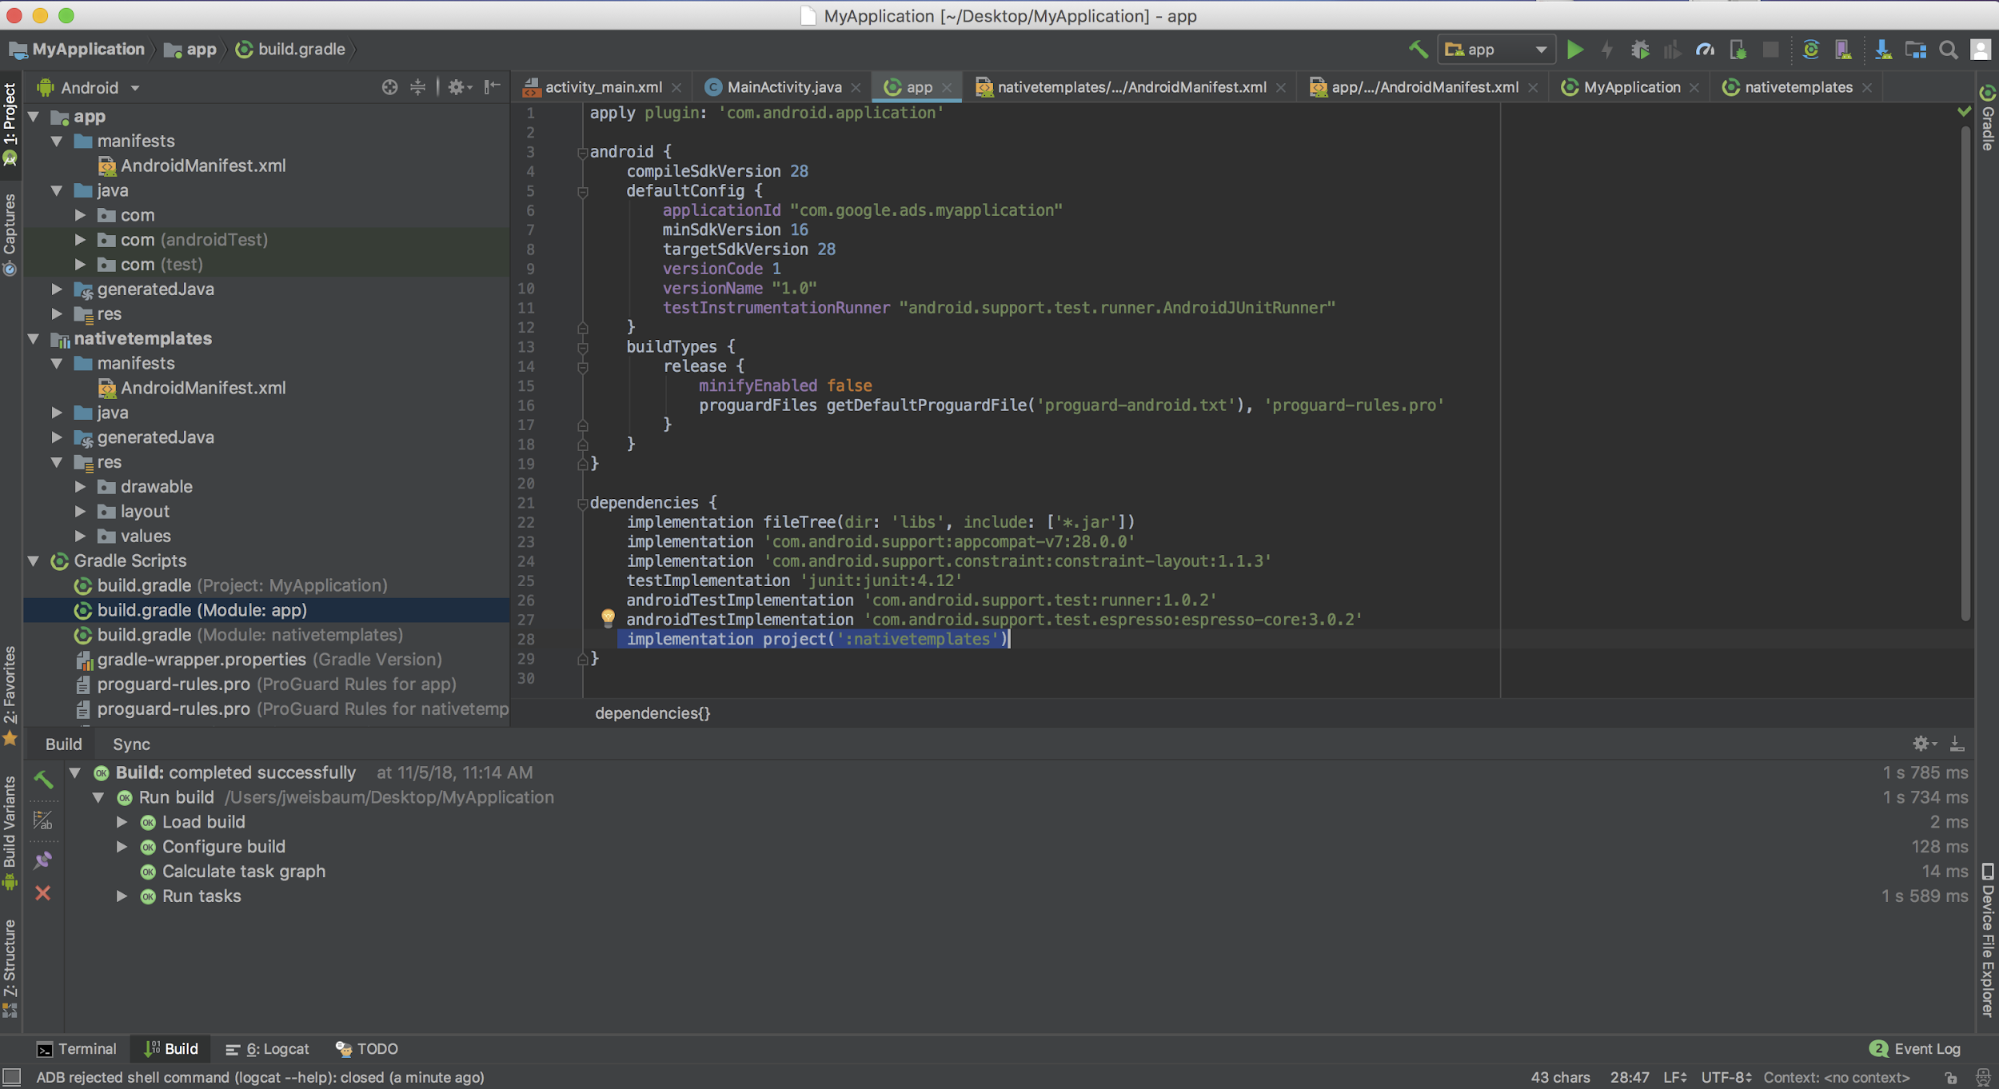
在應用程式層級的
build.gradle檔案中,新增以下程式碼:dependencies { ... implementation project(':nativetemplates') ... }
使用原生廣告範本
如同其他檢視區塊群組,範本也可用於任何版面配置 XML 檔案。
使用範本時須完成兩個步驟:
首先,您需要在版面配置中加入範本。
<LinearLayout
   xmlns:android="http://schemas.android.com/apk/res/android"
   xmlns:app="http://schemas.android.com/apk/res-auto"
   xmlns:tools="http://schemas.android.com/tools"
   android:layout_width="match_parent"
   android:layout_height="match_parent"
   tools:context=".MainActivity"
   tools:showIn="@layout/activity_main" >

<!--  This is your template view -->
<com.google.android.ads.nativetemplates.TemplateView
   android:id="@+id/my_template"
   <!-- this attribute determines which template is used. The other option is
    @layout/gnt_medium_template_view -->
   app:gnt_template_type="@layout/gnt_small_template_view"
   android:layout_width="match_parent"
   android:layout_height="match_parent" />

...
</LinearLayout>
接著在範本載入時供應原生廣告:
MobileAds.initialize(this);
AdLoader adLoader = new AdLoader.Builder(this, "ca-app-pub-3940256099942544/2247696110")
    .forNativeAd(new NativeAd.OnNativeAdLoadedListener() {
        @Override
        public void onNativeAdLoaded(NativeAd nativeAd) {
            NativeTemplateStyle styles = new
              NativeTemplateStyle.Builder().withMainBackgroundColor(background).build();
            TemplateView template = findViewById(R.id.my_template);
            template.setStyles(styles);
            template.setNativeAd(nativeAd);
        }
     })
     .build();

adLoader.loadAd(new AdRequest.Builder().build());
設定字典鍵樣式
設定範本樣式的方法有兩種:使用傳統版面配置 XML 或 NativeTemplateStyle.Builder 物件。上方程式碼範例說明如何用 NativeTemplateStyle.Builder 物件設定主要背景顏色,但還有很多其他做法。以下列出所有可用的建構工具方法。建構工具會傳回 NativeTemplateStyle 物件,覆寫所有 XML 版面配置樣式。XML 版面配置 gnt_small_template.xml 和 gnt_medium_template.xml 採用您熟悉的 Android 樣式設定參數。
| 原生範本樣式的建構工具方法 | |
|---|---|
withCallToActionTextTypeface
|
Typeface callToActionTextTypeface
行動號召的字體。 |
withCallToActionTextSize
|
float callToActionTextSize
行動號召文字的大小。 |
withCallToActionTypefaceColor
|
int callToActionTypefaceColor
行動號召文字的顏色。 |
withCallToActionBackgroundColor
|
ColorDrawable callToActionBackgroundColor
行動號召的背景顏色。 |
withPrimaryTextTypeface
|
Typeface primaryTextTypeface
第一列文字的字體。 |
withPrimaryTextSize
|
float primaryTextSize
第一列文字的大小。 |
withPrimaryTextTypefaceColor
|
int primaryTextTypefaceColor
第一列文字的顏色。 |
withPrimaryTextBackgroundColor
|
ColorDrawable primaryTextBackgroundColor
第一列文字的背景顏色。 |
withSecondaryTextTypeface
|
Typeface secondaryTextTypeface
第二列文字的字體。 |
withSecondaryTextSize
|
float secondaryTextSize
第二列文字的大小。 |
withSecondaryTextTypefaceColor
|
int secondaryTextTypefaceColor
第二列文字的文字顏色。 |
withSecondaryTextBackgroundColor
|
ColorDrawable secondaryTextBackgroundColor
第二列文字的背景顏色。 |
withTertiaryTextTypeface
|
Typeface tertiaryTextTypeface
第三列文字的字體。 |
withTertiaryTextSize
|
float tertiaryTextSize
第三列文字的大小。 |
withTertiaryTextTypefaceColor
|
int tertiaryTextTypefaceColor
第三列文字的文字顏色。 |
withTertiaryTextBackgroundColor
|
ColorDrawable tertiaryTextBackgroundColor
第三列文字的背景顏色。 |
withMainBackgroundColor
|
ColorDrawable mainBackgroundColor
主要背景顏色。 |
提供內容
為協助速開發原生廣告,我們準備了許多現成的原生範本,也歡迎您前往 GitHub 存放區,貢獻您製作的範本或新功能。如有需要請傳送提取要求,我們就會著手處理。