Page Summary
-
The Unity Editor is version locked to a specific version of Gradle, and earlier versions are incompatible with the latest Google Mobile Ads.
-
For Unity Editor 2021.3.41f1 or higher, enabling the Gradle build pre-processor automatically applies necessary settings.
-
For Unity Editor versions below 2021.3.41f1, manual configuration of Android and Gradle settings is required, including enabling Custom Gradle Templates and setting the Target API Level to 34 or higher.
-
For Unity Editor versions 2019.4 - 2021.3.37f1, you need to export the project to Android Studio and update Gradle, JDK, and various build and project files.
The Unity Editor is version locked to a specific version of Gradle. Earlier versions of the Unity Editor use earlier versions of Gradle which are incompatible with the latest version of Google Mobile Ads.
To build Android, select your preferred Unity Editor version:
2023.1 or higher
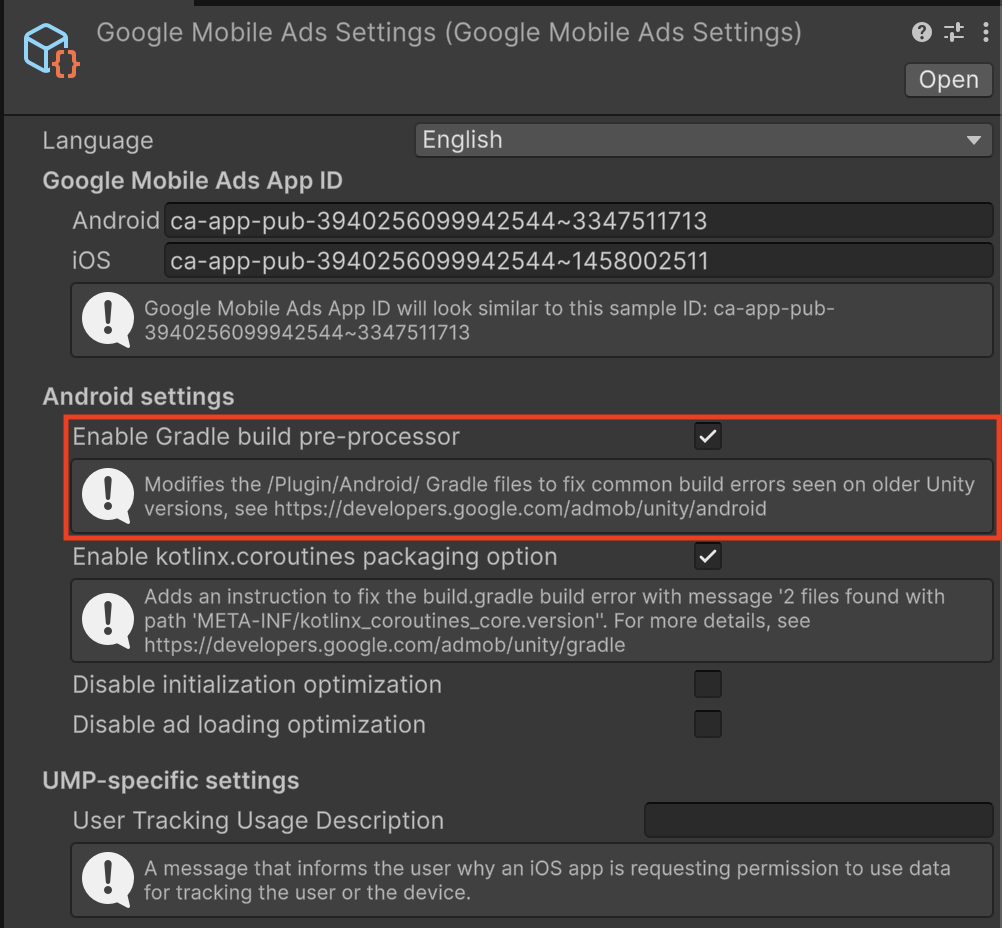
Enable Gradle build pre-processor
The Gradle build preprocessor is enabled by default in Unity Editor 2021.3.41f1 and later. The processor automatically applies all necessary Gradle and player settings to support the latest Google Mobile Ads Unity Plugin on earlier versions of the Unity Editor.

Manually configure Android and Gradle settings
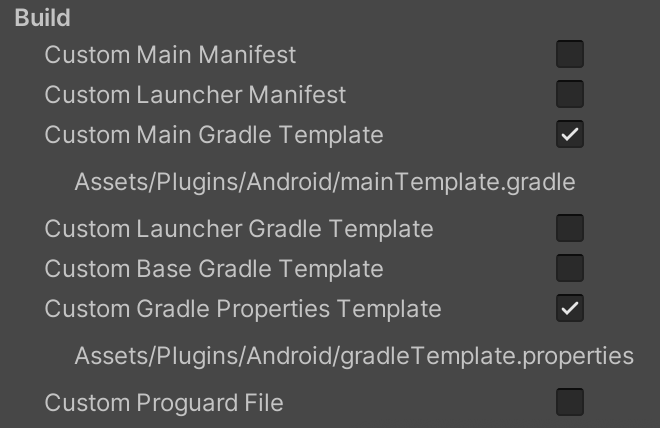
Enable Custom Gradle Templates
Go to Project Settings > Player > Android > Publishing Settings > Build
and enable Custom Main Gradle Template and Custom Gradle Properties Template.

Set Target API Level
From the main menu open Edit > Project Settings > Player > Android > Other Settings and set the Target API Level to API Level 23 or higher.
2021.3.41f1 - 2022.3
Enable Gradle build pre-processor
The Gradle build preprocessor is enabled by default in Unity Editor 2021.3.41f1 and later. The processor automatically applies all necessary Gradle and player settings to support the latest Google Mobile Ads Unity Plugin on earlier versions of the Unity Editor.

Manually configure Android and Gradle settings
Enable Custom Gradle Templates
Go to Project Settings > Player > Android > Publishing Settings > Build
and enable Custom Main Gradle Template and Custom Gradle Properties Template.

Set Target API Level
From the main menu open Edit > Project Settings > Player > Android > Other Settings and set the Target API Level to API Level 23 or higher.
Add jetifier ignore list to `gradleTemplate.properties`
Edit Assets/Plugins/Android/gradleTemplate.properties
and add the following line:
android.jetifier.ignorelist=annotation-experimental-1.4.0.aar
Remove `minSDKVersion` from `AndroidManifest.xml`
Edit Assets/Plugins/Android/GoogleMobileAdsPlugin.androidlib/AndroidManifest.xml
and remove android:minSdkVersion="21" from the uses-sdk node.
Your AndroidManifest.xml should look like the following:
<?xml version="1.0" encoding="utf-8"?>
<manifest xmlns:android="http://schemas.android.com/apk/res/android"
    package="com.google.unity.ads"
    android:versionName="1.0"
    android:versionCode="1">
  <uses-sdk />
  <application>
    <uses-library android:required="false" android:name="org.apache.http.legacy"/>
  </application>
</manifest>
2019.4 - 2021.3.37f1
Prerequisites
Before continuing, ensure you have the following:
- Download and install the latest stable version of Android Studio.
- Optional: For details on building for Android, see Java versions in Android builds
Enable Custom Gradle Templates
Go to Project Settings > Player > Android > Publishing Settings > Build
and enable Custom Main Gradle Template and Custom Gradle Properties Template.

Set Target API Level
From the main menu open Edit > Project Settings > Player > Android > Other Settings and set the Target API Level to API Level 35 or higher.
Export to Android Studio
Modify the Android build settings by selecting File (or Unity Editor on MacOS) > Build Settings and check Export Project:

If you receive a warning that Android SDK platform API level 35 is missing, select the 'Update Android SDK' option.
Open Android Studio
This section contains steps performed within Android Studio.
Update Gradle JDK configuration
Open the Gradle settings from File (or Android Studio on MacOS) > Settings > Build > Execution > Deployment > Build Tools > Gradle. Locate the Gradle JDK drop-down and set the Gradle JDK to use JDK 17 or later.

If you don't have JDK 17 installed, select the Download JDK options from the Gradle JDK menu bar and download a compatible version. We recommend the JetBrains runtime vendor with aarch64 support, to match what Android Studio distributes.
Update the project-level build.gradle
Set Gradle tools version to 8.1.1 or newer.
plugins {
    id 'com.android.application' version '8.1.1' apply false
    id 'com.android.library' version '8.1.1' apply false
}

task clean(type: Delete) {
    delete rootProject.buildDir
}
Update /gradle/gradle-wrapper.properties
Set distributionUrl to use Gradle 8.1.1 or newer.
distributionUrl=https\://services.gradle.org/distributions/gradle-8.1.1-bin.zip
Update launcher/build.gradle
- Set the
namespaceattribute using the value of thepackageattribute fromlauncher/AndroidManifest.xml - Set
sourceCompatibilityandtargetCompatibilityto Java 17
apply plugin: 'com.android.application'

dependencies {
    implementation project(':unityLibrary')
}

android {
    namespace "com.google.android.gms.example"
    compileSdkVersion 35
    buildToolsVersion '35.0.0'

    compileOptions {
        sourceCompatibility JavaVersion.VERSION_17
        targetCompatibility JavaVersion.VERSION_17
    }

    defaultConfig {
        minSdkVersion 28
        targetSdkVersion 35
        applicationId 'com.google.android.gms.example'
        ndk {
            abiFilters 'armeabi-v7a', 'arm64-v8a', 'x86', 'x86_64'
        }
        versionCode 1
        versionName '1.0'
    }

    aaptOptions {
        noCompress = ['.unity3d', '.ress', '.resource', '.obb', '.bundle', '.unityexp']
        ignoreAssetsPattern = "!.svn:!.git:!.ds_store:!*.scc:.*:!CVS:!thumbs.db:!picasa.ini:!*~"
    }

    lintOptions {
        abortOnError false
    }

    buildTypes {
        debug {
            minifyEnabled false
            proguardFiles getDefaultProguardFile('proguard-android.txt')
            signingConfig signingConfigs.debug
            jniDebuggable true
        }
        release {
            minifyEnabled false
            proguardFiles getDefaultProguardFile('proguard-android.txt')
            signingConfig signingConfigs.debug
        }
    }

    packagingOptions {
        doNotStrip '*/armeabi-v7a/*.so'
        doNotStrip '*/arm64-v8a/*.so'
        doNotStrip '*/x86/*.so'
        doNotStrip '*/x86_64/*.so'
        jniLibs {
            useLegacyPackaging true
        }
    }

    bundle {
        language {
            enableSplit = false
        }
        density {
            enableSplit = false
        }
        abi {
            enableSplit = true
        }
    }
}

apply from: '../unityLibrary/GoogleMobileAdsPlugin.androidlib/packaging_options.gradle'
Update project-level settings.gradle
Set pluginManagement and dependencyResolutionManagement sections.
pluginManagement {
    repositories {
        gradlePluginPortal()
        google()
        mavenCentral()
    }
}

include ':launcher', ':unityLibrary'
include 'unityLibrary:GoogleMobileAdsPlugin.androidlib'

dependencyResolutionManagement {
    repositoriesMode.set(RepositoriesMode.PREFER_SETTINGS)
    repositories {

        google()
        mavenCentral()
        flatDir {
            dirs "${project(':unityLibrary').projectDir}/libs"
        }
    }
}
Update unityLibrary/build.gradle
- Set
namespacewith the value"com.unity3d.player" - Set
sourceCompatibilityandtargetCompatibilitytoJavaVersion.VERSION_17
    apply plugin: 'com.android.library'

    dependencies {
        implementation fileTree(dir: 'libs', include: ['*.jar'])
        // Android Resolver Dependencies Start
        implementation 'androidx.constraintlayout:constraintlayout:2.1.4'
        implementation 'com.google.android.gms:play-services-ads:23.6.0'
        implementation 'com.google.android.ump:user-messaging-platform:3.1.0'
        // Android Resolver Dependencies End
        implementation(name: 'googlemobileads-unity', ext:'aar')
        implementation project('GoogleMobileAdsPlugin.androidlib')
    }

    // Android Resolver Exclusions Start
    android {
      packagingOptions {
          exclude ('/lib/armeabi/*' + '*')
          exclude ('/lib/mips/*' + '*')
          exclude ('/lib/mips64/*' + '*')
          exclude ('/lib/x86/*' + '*')
      }
    }
    // Android Resolver Exclusions End

    android {
        namespace "com.unity3d.player"
        compileSdkVersion 35
        buildToolsVersion '30.0.2'

        compileOptions {
            sourceCompatibility JavaVersion.VERSION_17
            targetCompatibility JavaVersion.VERSION_17
        }

        defaultConfig {
            minSdkVersion 28
            targetSdkVersion 34
            ndk {
                abiFilters 'armeabi-v7a', 'arm64-v8a', 'x86_64'
            }
            versionCode 1
            versionName '1.0'
            consumerProguardFiles 'proguard-unity.txt'
        }

        lintOptions {
            abortOnError false
        }

        aaptOptions {
            ignoreAssetsPattern = "!.svn:!.git:!.ds_store:!*.scc:.*:!CVS:!thumbs.db:!picasa.ini:!*~"
        }

        packagingOptions {
            doNotStrip '*/armeabi-v7a/*.so'
            doNotStrip '*/arm64-v8a/*.so'
            doNotStrip '*/x86_64/*.so'
        }
    }


    apply from: 'GoogleMobileAdsPlugin.androidlib/packaging_options.gradle'
    gradle.projectsEvaluated { apply from: 'GoogleMobileAdsPlugin.androidlib/validate_dependencies.gradle' }
Update unity/Library/GoogleMobileAdsPlugin.androidlib/build.gradle
Set the namespace attribute with the value "com.google.unity.ads".
apply plugin: 'android-library'

dependencies {
    implementation fileTree(dir: 'bin', include: ['<em>.jar'])
    implementation fileTree(dir: 'libs', include: ['</em>.jar'])
}

android {
    namespace "com.google.unity.ads"
    sourceSets {
        main {
            manifest.srcFile 'AndroidManifest.xml'
            //java.srcDirs = ['src']
            res.srcDirs = ['res']
            assets.srcDirs = ['assets']
            jniLibs.srcDirs = ['libs']
        }
    }

    compileSdkVersion 34
    buildToolsVersion '30.0.2'
    defaultConfig {
        targetSdkVersion 31
    }

    lintOptions {
        abortOnError false
    }
}
Run the Android Project
From Android Studio, run gradle sync, and run the project.
