數位身分證件可透過應用程式內和網站流程接受。 如要接受 Google 錢包中的憑證,請完成下列步驟:
- 按照提供的指示,透過應用程式或網站整合。
- 使用測試 ID,透過 Google 錢包沙箱測試流程。
- 如要啟用這項功能,請填寫這份表單申請存取權,並接受 Google 錢包憑證服務條款。您必須為每個商家實體填寫這份表單。填寫表單後,我們的團隊會與你聯絡。
- 如有任何疑問,請洽詢
wallet-identity-rp-support@google.com。
支援的憑證格式
目前有幾項提議的標準定義了數位身分證件的資料格式,其中兩項已在業界獲得廣泛採用:
Android Credential Manager 支援這兩種格式,但 Google 錢包目前僅支援以 mdoc 為基礎的數位身分證件。
支援的憑證
Google 錢包支援 2 種憑證類型:
- 行動駕照 (mDL)
- 身分證件票證
您可以在流程中透過單一參數變更要求任一憑證。
使用者體驗
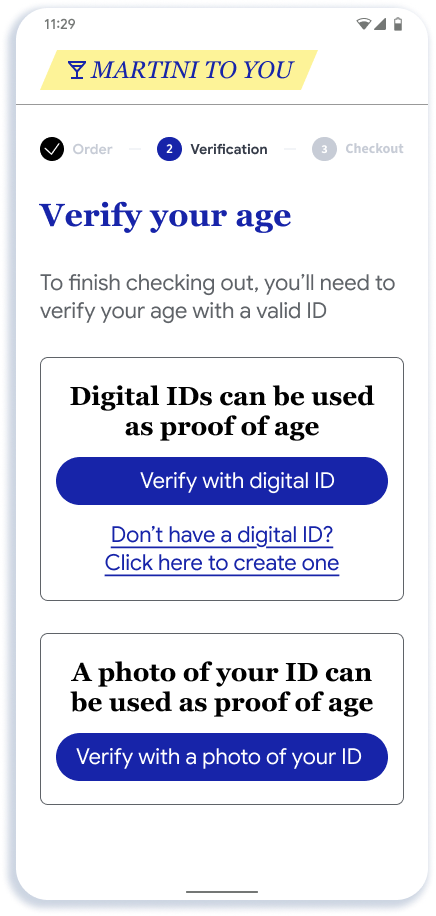
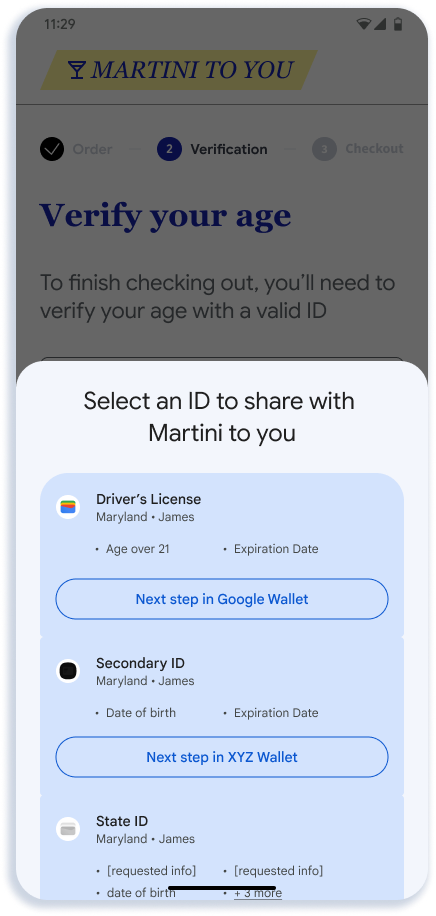
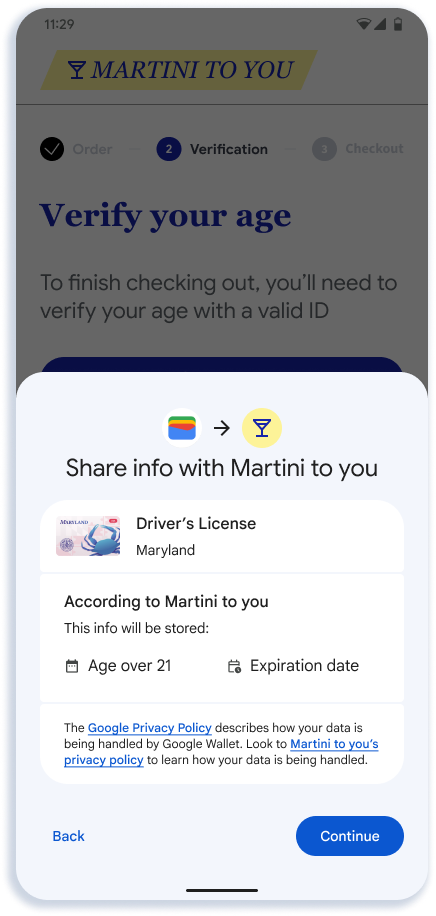
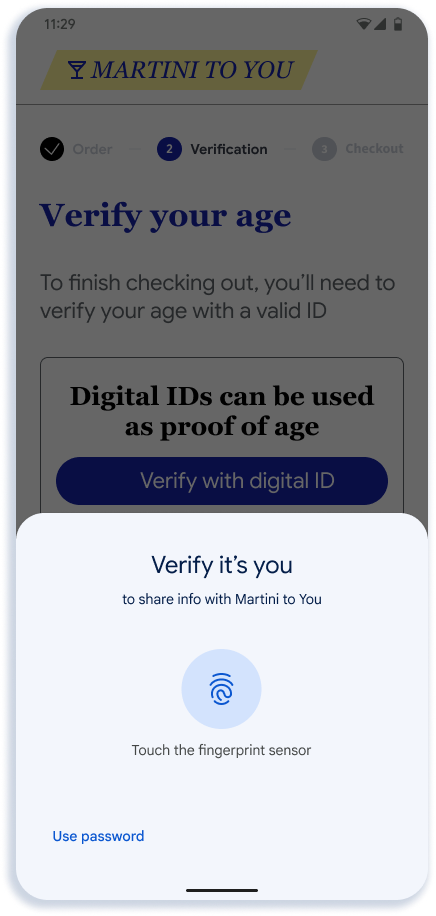
本節說明建議的線上簡報流程。流程會顯示向應用程式呈現年齡的畫面,但網頁和其他類型的呈現方式類似。
 |
 |
 |
 |
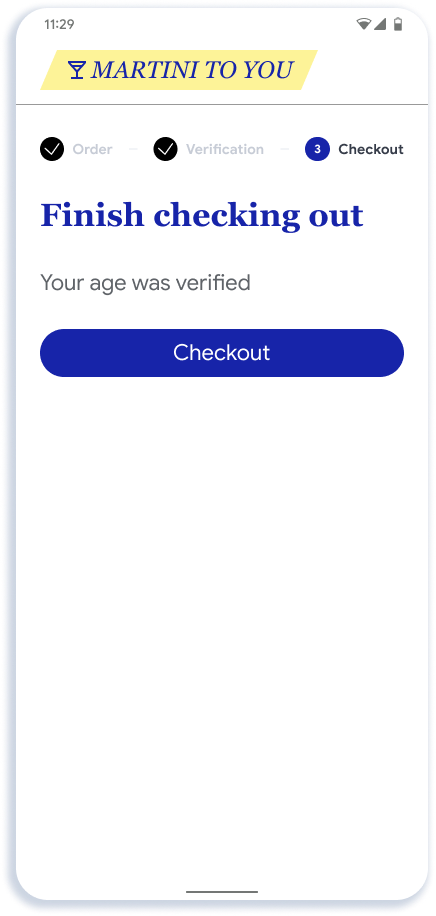 |
| 系統提示使用者在應用程式或網站中驗證年齡 | 使用者會看到可用的合格憑證 | 使用者在 Google 錢包中看到確認頁面 | 使用者驗證身分,確認要共用 | 傳送至應用程式或網站的資料 |
重要附註
- 應用程式或網站可彈性建立 API 的進入點。如步驟 1 所示,我們建議顯示「使用數位身分證件驗證」等一般按鈕,因為我們預期日後會有更多選項透過 API 提供,不限於 Google 錢包。
- 步驟 2 中的選取器畫面是由 Android 算繪。系統會根據各錢包提供的註冊邏輯,以及憑證管理服務傳送的要求,判斷是否符合資格。
- 步驟 3 由 Google 錢包提供。Google 錢包會在這個畫面顯示開發人員提供的名稱、標誌和隱私權政策。
新增數位身分證件流程
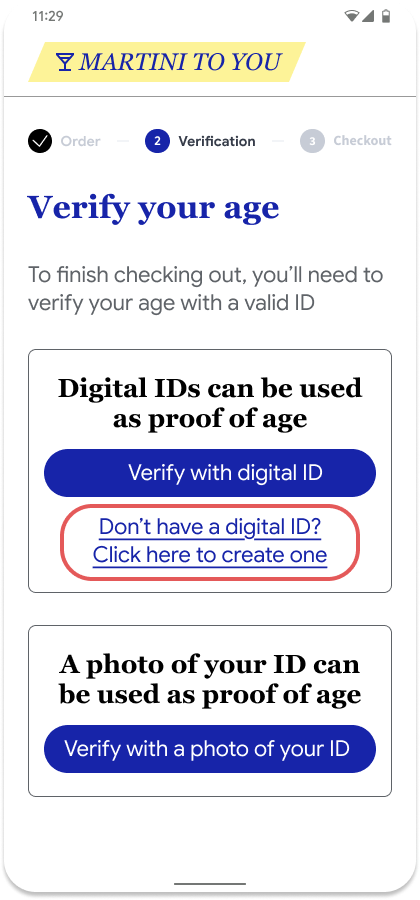
如果使用者沒有憑證,建議在「使用數位身分證件驗證」按鈕旁提供連結,以便深層連結至 Google 錢包,讓使用者新增數位身分證件。
 |
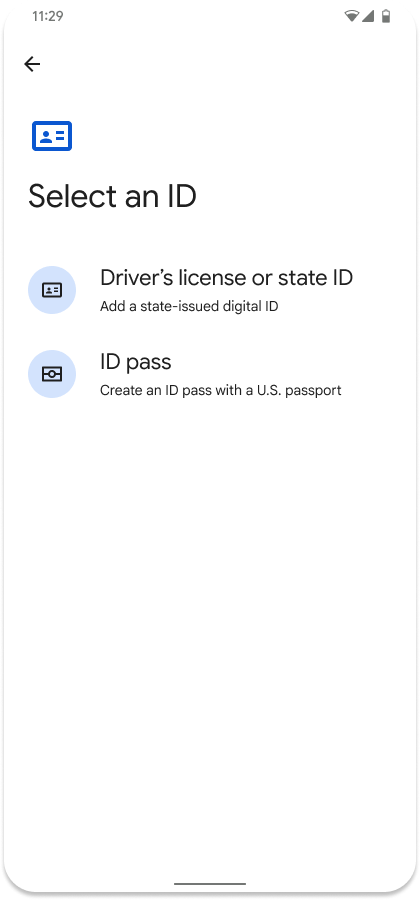 |
| 系統提示使用者在應用程式或網站中驗證年齡 | 使用者前往 Google 錢包取得數位身分證件 |
沒有可用的數位身分證件
如果使用者選取「使用數位身分證驗證」選項,但沒有數位身分證,系統會顯示這則錯誤訊息。
 |
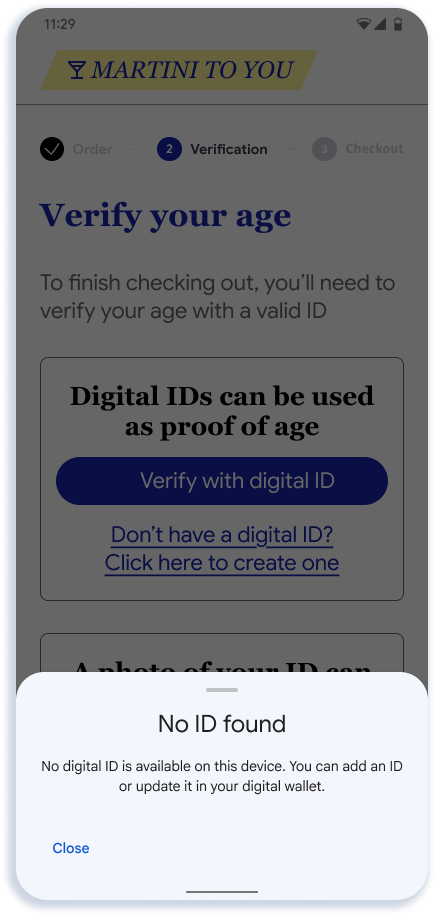 |
| 系統提示使用者在應用程式或網站中驗證年齡 | 如果使用者沒有數位身分證件,系統會顯示錯誤訊息 |
為保護使用者隱私,API 不支援靜默瞭解使用者是否有任何可用數位 ID 的功能。因此建議您加入如圖所示的加入連結選項。
從錢包要求身分證件的請求格式
以下是 mdoc requestJson 要求範例,可從 Android 裝置或網頁上的任何錢包取得身分憑證。
{
      "requests" : [
        {
          "protocol": "openid4vp-v1-unsigned",
          "data": {<credential_request>} // This is an object, shouldn't be a string.
        }
      ]
}
要求加密
client_metadata 包含每個要求的加密公開金鑰。
您需要儲存每個要求的私密金鑰,並使用這些金鑰驗證及授權從錢包應用程式收到的權杖。
requestJson 中的 credential_request 參數包含下列欄位。
特定憑證
{
  "response_type": "vp_token",
  "response_mode": "dc_api.jwt", // change this to dc_api if you want to demo with a non encrypted response.
  "nonce": "1234",
  "dcql_query": {
    "credentials": [
      {
        "id": "cred1",
        "format": "mso_mdoc",
        "meta": {
          "doctype_value": "org.iso.18013.5.1.mDL"  // this is for mDL. Use com.google.wallet.idcard.1 for ID pass
        },
        "claims": [
          {
            "path": [
              "org.iso.18013.5.1",
              "family_name"
            ],
            "intent_to_retain": false // set this to true if you are saving the value of the field
          },
          {
            "path": [
              "org.iso.18013.5.1",
              "given_name"
            ],
            "intent_to_retain": false
          },
          {
            "path": [
              "org.iso.18013.5.1",
              "age_over_18"
            ],
            "intent_to_retain": false
          }
        ]
      }
    ]
  },
  "client_metadata": {
    "jwks": {
      "keys": [ // sample request encryption key
        {
          "kty": "EC",
          "crv": "P-256",
          "x": "pDe667JupOe9pXc8xQyf_H03jsQu24r5qXI25x_n1Zs",
          "y": "w-g0OrRBN7WFLX3zsngfCWD3zfor5-NLHxJPmzsSvqQ",
          "use": "enc",
          "kid" : "1",  // This is required
          "alg" : "ECDH-ES",  // This is required
        }
      ]
    },
    "vp_formats_supported": {
      "mso_mdoc": {
        "deviceauth_alg_values": [
          -7
        ],
        "isserauth_alg_values": [
          -7
        ]
      }
    }
  }
}
任何符合資格的憑證
以下是 mDL 和身分證件的範例要求。使用者可以選擇其中一種方式繼續操作。
{
  "response_type": "vp_token",
  "response_mode": "dc_api.jwt", // change this to dc_api if you want to demo with a non encrypted response.
  "nonce": "1234",
  "dcql_query": {
    "credentials": [
      {
        "id": "mdl-request",
        "format": "mso_mdoc",
        "meta": {
          "doctype_value": "org.iso.18013.5.1.mDL"
        },
        "claims": [
          {
            "path": [
              "org.iso.18013.5.1",
              "family_name"
            ],
            "intent_to_retain": false // set this to true if you are saving the value of the field
          },
          {
            "path": [
              "org.iso.18013.5.1",
              "given_name"
            ],
            "intent_to_retain": false
          },
          {
            "path": [
              "org.iso.18013.5.1",
              "age_over_18"
            ],
            "intent_to_retain": false
          }
        ]
      },
      {  // Credential type 2
        "id": "id_pass-request",
        "format": "mso_mdoc",
        "meta": {
          "doctype_value": "com.google.wallet.idcard.1"
        },
        "claims": [
          {
            "path": [
              "org.iso.18013.5.1",
              "family_name"
            ],
            "intent_to_retain": false // set this to true if you are saving the value of the field
          },
          {
            "path": [
              "org.iso.18013.5.1",
              "given_name"
            ],
            "intent_to_retain": false
          },
          {
            "path": [
              "org.iso.18013.5.1",
              "age_over_18"
            ],
            "intent_to_retain": false
          }
        ]
      }
    ]
    credential_sets : [
      {
        "options": [
          [ "mdl-request" ],
          [ "id_pass-request" ]
        ]
      }
    ]
  },
  "client_metadata": {
    "jwks": {
      "keys": [ // sample request encryption key
        {
          "kty": "EC",
          "crv": "P-256",
          "x": "pDe667JupOe9pXc8xQyf_H03jsQu24r5qXI25x_n1Zs",
          "y": "w-g0OrRBN7WFLX3zsngfCWD3zfor5-NLHxJPmzsSvqQ",
          "use": "enc",
          "kid" : "1",  // This is required
          "alg" : "ECDH-ES",  // This is required
        }
      ]
    },
    "vp_formats_supported": {
      "mso_mdoc": {
        "deviceauth_alg_values": [
          -7
        ],
        "isserauth_alg_values": [
          -7
        ]
      }
    }
  }
}
您可以從儲存在 Google 錢包中的任何身分證件,要求任意數量的支援屬性。
應用程式內
如要從 Android 應用程式要求身分憑證,請按照下列步驟操作:
更新依附元件
在專案的 build.gradle 檔案中更新依附元件,以便使用 Credential Manager (Beta 版):
dependencies {
    implementation("androidx.credentials:credentials:1.5.0-beta01")
    implementation("androidx.credentials:credentials-play-services-auth:1.5.0-beta01")
}
設定 Credential Manager
如要設定及初始化 CredentialManager 物件,請新增類似以下的邏輯:
// Use your app or activity context to instantiate a client instance of CredentialManager.
val credentialManager = CredentialManager.create(context)
要求身分屬性
應用程式不會為身分要求指定個別參數,而是將所有參數一併提供為 CredentialOption 中的 JSON 字串。憑證管理工具會將這個 JSON 字串傳遞給可用的數位錢包,但不會檢查內容。每個錢包隨後會負責: - 剖析 JSON 字串,瞭解身分識別要求。 - 判斷儲存的憑證 (如有) 是否符合要求。
即使是 Android 應用程式整合,我們也建議合作夥伴在伺服器上建立請求。
您會在 GetDigitalCredentialOption() 函式呼叫中,使用「要求格式」的 requestJson 做為 request。
// The request in the JSON format to conform with
// the JSON-ified Digital Credentials API request definition.
val requestJson = generateRequestFromServer()
val digitalCredentialOption =
    GetDigitalCredentialOption(requestJson = requestJson)

// Use the option from the previous step to build the `GetCredentialRequest`.
val getCredRequest = GetCredentialRequest(
    listOf(digitalCredentialOption)
)

coroutineScope.launch {
    try {
        val result = credentialManager.getCredential(
            context = activityContext,
            request = getCredRequest
        )
        verifyResult(result)
    } catch (e : GetCredentialException) {
        handleFailure(e)
    }
}
驗證回應
收到錢包的回應後,請確認回應是否成功,且包含 credentialJson 回應。
// Handle the successfully returned credential.
fun verifyResult(result: GetCredentialResponse) {
    val credential = result.credential
    when (credential) {
        is DigitalCredential -> {
            val responseJson = credential.credentialJson
            validateResponseOnServer(responseJson) // make a server call to validate the response
        }
        else -> {
            // Catch any unrecognized credential type here.
            Log.e(TAG, "Unexpected type of credential ${credential.type}")
        }
    }
}

// Handle failure.
fun handleFailure(e: GetCredentialException) {
  when (e) {
        is GetCredentialCancellationException -> {
            // The user intentionally canceled the operation and chose not
            // to share the credential.
        }
        is GetCredentialInterruptedException -> {
            // Retry-able error. Consider retrying the call.
        }
        is NoCredentialException -> {
            // No credential was available.
        }
        else -> Log.w(TAG, "Unexpected exception type ${e::class.java}")
    }
}
credentialJson 回應包含 W3C 定義的加密 identityToken (JWT)。這項回覆是由 Google 錢包應用程式製作。
範例:
{
  "protocol" : "openid4vp-v1-unsigned",
  "data" : {
    <encrpted_response>
  }
}
您會將這項回應傳回伺服器,驗證其真實性。您可以參閱驗證憑證回應的步驟。
網頁
如要在 Chrome 或其他支援的瀏覽器上,使用 Digital Credentials API 要求身分憑證,請發出下列要求。
const credentialResponse = await navigator.credentials.get({
          digital : {
          requests : [
            {
              protocol: "openid4vp-v1-unsigned",
              data: {<credential_request>} // This is an object, shouldn't be a string.
            }
          ]
        }
      })
將此 API 的回應傳回伺服器,驗證憑證回應
驗證憑證回應的步驟
從應用程式或網站收到加密的 identityToken 後,您需要執行多項驗證,才能信任回應。
使用私密金鑰解密回應
第一步是使用儲存的私密金鑰解密權杖,並取得回應 JSON。
Python 範例:
from jwcrypto import jwe, jwk # Retrieve the Private Key from Datastore reader_private_jwk = jwk.JWK.from_json(jwe_private_key_json_str) # Save public key thumbprint for session transcript encryption_public_jwk_thumbprint = reader_private_jwk.thumbprint() # Decrypt the JWE encrypted response from Google Wallet jwe_object = jwe.JWE() jwe_object.deserialize(encrypted_jwe_response_from_wallet) jwe_object.decrypt(reader_private_jwk) decrypted_payload_bytes = jwe_object.payload decrypted_data = json.loads(decrypted_payload_bytes)decrypted_data會產生包含憑證的vp_tokenJSON{ "vp_token": { "cred1": ["<base64UrlNoPadding_encoded_credential>"] // This applies to OpenID4VP 1.0 spec. } }建立工作階段轉錄稿
下一個步驟是從 ISO/IEC 18013-5:2021 建立 SessionTranscript,並使用 Android 或網頁專屬的交接結構:
SessionTranscript = [
  null,                // DeviceEngagementBytes not available
  null,                // EReaderKeyBytes not available
  [
    "OpenID4VPDCAPIHandover",
    AndroidHandoverDataBytes   // BrowserHandoverDataBytes for Web
  ]
]
無論是 Android 或網頁移交,您都必須使用產生
credential_request時使用的相同隨機值。Android Handover
    AndroidHandoverData = [
      origin,             // "android:apk-key-hash:<base64SHA256_ofAppSigningCert>",
      nonce,           // nonce that was used to generate credential request,
      encryption_public_jwk_thumbprint,  // Encryption public key (JWK) Thumbprint
    ]

    AndroidHandoverDataBytes = hashlib.sha256(cbor2.dumps(AndroidHandoverData)).digest()
瀏覽器交接
    BrowserHandoverData =[
      origin,               // Origin URL
      nonce,               //  nonce that was used to generate credential request
      encryption_public_jwk_thumbprint,  // Encryption public key (JWK) Thumbprint
    ]

    BrowserHandoverDataBytes = hashlib.sha256(cbor2.dumps(BrowserHandoverData)).digest()
使用
SessionTranscript時,必須根據 ISO/IEC 18013-5:2021 第 9 條驗證 DeviceResponse。這包括幾個步驟,例如:檢查州政府發行機構憑證。請參閱支援的發卡機構 IACA 憑證。
驗證 MSO 簽章 (18013-5 第 9.1.2 節)
計算及檢查資料元素的 ValueDigest (18013-5 第 9.1.2 節)
驗證
deviceSignature簽章 (18013-5 第 9.1.3 節)
{
  "version": "1.0",
  "documents": [
    {
      "docType": "org.iso.18013.5.1.mDL",
      "issuerSigned": {
        "nameSpaces": {...}, // contains data elements
        "issuerAuth": [...]  // COSE_Sign1 w/ issuer PK, mso + sig
      },
      "deviceSigned": {
        "nameSpaces": 24(<< {} >>), // empty
        "deviceAuth": {
          "deviceSignature": [...] // COSE_Sign1 w/ device signature
        }
      }
    }
  ],
  "status": 0
}
建構解決方案
如要建構解決方案,請參閱 GitHub 上的身分驗證器參考實作
以零知識證明 (ZKP) 為基礎的驗證
零知識證明 (ZKP) 是一種密碼編譯方法,可讓個人 (證明者) 向驗證者證明自己擁有特定身分資訊或符合特定條件 (例如年滿 18 歲、持有有效憑證),但不會揭露實際的基礎資料。基本上,這是一種確認身分聲明真實性的方式,同時可保護私密詳細資料。
如果數位身分識別系統直接分享身分識別資料,通常會要求使用者提供過多的個人資訊,增加資料外洩和身分竊盜的風險。零知識證明可帶來典範轉移,以最少的揭露資訊進行驗證。
數位身分識別中的 ZKP 重要概念:
- 驗證者:嘗試證明自己身分某個面向的個人。
- 驗證者:要求身分屬性證明文件的實體。
- 證明:一種加密通訊協定,可讓證明者向驗證者證明其聲明屬實,但不會揭露私密資訊。
零知識證明的核心屬性:
- 完備性:如果陳述內容屬實,且驗證者和證明者都誠實,驗證者就會相信。
- 健全性:如果陳述內容為假,不誠實的證明者無法 (以極高機率) 說服誠實的驗證者相信陳述內容為真。
- 零知識:驗證者除了知道陳述內容為真以外,不會獲得任何資訊。不會洩漏驗證者身分中的任何實際資料。
如要從 Google 錢包取得零知識證明,請將要求格式變更為 mso_mdoc_zk,並將 zk_system_type 新增至 Request
  ...
  "dcql_query": {
    "credentials": [{
      "id": "cred1",
      "format": "mso_mdoc_zk",
      "meta": {
        "doctype_value": "org.iso.18013.5.1.mDL"
        "zk_system_type": [
        {
          "system": "longfellow-libzk-v1",
          "circuit_hash": "f88a39e561ec0be02bb3dfe38fb609ad154e98decbbe632887d850fc612fea6f", // This will differ if you need more than 1 attribute.
          "num_attributes": 1, // number of attributes (in claims) this has can support
          "version": 5,
          "block_enc_hash": 4096,
          "block_enc_sig": 2945,
        }
        {
          "system": "longfellow-libzk-v1",
          "circuit_hash": "137e5a75ce72735a37c8a72da1a8a0a5df8d13365c2ae3d2c2bd6a0e7197c7c6", // This will differ if you need more than 1 attribute.
          "num_attributes": 1, // number of attributes (in claims) this has can support
          "version": 6,
          "block_enc_hash": 4096,
          "block_enc_sig": 2945,
        }
       ],
       "verifier_message": "challenge"
      },
     "claims": [{
         ...
      "client_metadata": {
        "jwks": {
          "keys": [ // sample request encryption key
            {
              ...
錢包會回傳加密的零知識證明。您可以使用 Google 的 longfellow-zk 程式庫,根據簽發者 IACA 憑證驗證這項證明。
驗證服務包含可供部署的 Docker 型伺服器,可讓您根據特定簽發者 IACA 憑證驗證回應。
您可以修改 certs.pem,管理要信任的 IACA 簽發者憑證。
如需更多詳細資料,請傳送電子郵件至支援信箱:
wallet-identity-rp-support@google.com
