Page Summary
-
This tutorial provides a step-by-step guide for creating custom tags in Google Tag Manager's server-side container, using a hypothetical "Baz Analytics" service as an example.
-
The custom tag leverages user-defined and automatically collected data to send an HTTP GET request to the specified analytics service.
-
Developers can utilize JavaScript within the tag template to manage data, cookies, and the HTTP request process.
-
Thorough testing is recommended before deploying the custom tag and, if beneficial to others, consider sharing it via the Community Template Gallery.
-
The example demonstrates key concepts of server-side tagging, such as tag responsibilities, data handling, and necessary permissions for cookie and event data access.
In An introduction to server-side tagging, you got an overview of server-side tagging in Tag Manager. You learned what clients are and what they do: Clients receive event data from your users' devices and adapt it for use by the rest of the container. This article describes how to process that data in server-side tags.
In a server container, tags receive incoming event data from your clients, transform it, and send it back out for collection and analysis. Tags can send the data wherever you want. As long as the destination accepts HTTP requests, it can also accept data from a server container.
Server containers have three built-in tags which are ready for use with no custom configuration:
- Google Analytics 4
- HTTP Request
If you want to send data somewhere other than Google Analytics, or you need more features than the HTTP Request tag provides, you'll need to use a different tag. You can find additional tags in the Community Template Gallery or you can write your own. This tutorial will teach you the basics of writing your own tags for a server container.
Objectives
- Learn which APIs to use to read event data, send HTTP requests, and set cookies in the browser.
- Learn best practices for designing your tag's configuration options.
- Learn the difference between user-specified data and automatically collected data and why that distinction is important.
- Learn the role of a tag in a server container. Understand what a tag should and should not do.
- Learn when to consider submitting a tag template to the Community Template Gallery.
Prerequisites
- A deployed server container
- Familiarity with Tag Manager, server containers, and their basic concepts like clients, tags, triggers, and variables
- Familiarity with the basics of writing templates for tags and variables
The Baz Analytics tag
In this tutorial you'll create a tag that sends measurement data to a service called Baz Analytics.
Baz Analytics is a simple, hypothetical analytics service that ingests data via
HTTP GET requests to https://example.com/baz_analytics. It has the following
parameters:
| Parameter | Example | Description |
|---|---|---|
| id | BA-1234 | The ID of your Baz Analytics account. |
| en | click | Event name. |
| l | https://www.google.com/search?q=sgtm
|
URL of the page where the event occurred. |
| u | 2384294892 | The ID of the user performing the action. Used to tie multiple actions back to a single user. |
Tag configuration
The first thing to do is create the tag template. Go to the Templates section of your container and click New in the Tag Templates section. Add a name and description to your tag.
Next, go to the Fields section of the template editor to add the different configuration options for your tag. The obvious next question is: what options do you need? There are three ways you could choose to build the tag:
- Total Configuration: Add a configuration field for every parameter. Require the user to set everything explicitly.
- No Configuration: Don't have any options for configuring the tag. All data is taken directly from the event.
- Some Configuration: Have fields for some parameters and not others.
Having fields for every parameter is very flexible and gives the user total
control over their tag configuration. In practice however, this usually results
in a lot of duplicated work. In particular, things like the Baz Analytics l
parameter, which contains the URL of the page, are unambiguous and universal.
Entering the same, unchanging piece of data every time the tag is configured is
something best left to the computer.
Maybe the answer is to have a tag that only takes data from an event. This is
the simplest possible tag for a user to configure, since there's nothing for
them to actually do. On the other hand, it's also the most restrictive and
fragile option. Users can't change the behavior of the tag even if they need to.
For example, maybe they call an event purchase on their website and in Google
Analytics, but Baz Analytics calls it buy. Or, maybe the assumptions the tag
makes about the structure of the incoming event data don't actually match
reality. In either case, the user is stuck.
As with many things, the answer lies somewhere between the two extremes. Some data makes sense to always take from the event. Other data should be configured by the user. How do you decide which is which? To answer that question, we'll need to take a closer look at the data coming into the container.
Where does data come from?
The data coming into a server container from the Google Analytics 4 tag can be roughly divided into two categories: User-specified data and automatically collected data.
User-specified data is everything that a user puts into a gtag.js event
command. For example, a command like this:
gtag('event', 'search', {
  search_term: 'beets',
});
Will result in the following parameters in the server container:
{
  event_name: 'search',
  search_term: 'beets',
}
That's simple enough, but from the perspective of the tag it's very difficult to
work with. Because this data is entered by the user, it can be anything.
Perhaps, as above, the user only sends in
recommended events and parameters, but there's
no requirement that they do so. With the important exception of the location
(but not the value!) of the event_name parameter, there are no guarantees
about the form or structure of the user's data.
Fortunately, user-entered data is not the only thing that the container will receive. It will also get a bunch of data that is automatically collected by the Google Analytics 4 tag in the browser. That includes:
ip_overridelanguagepage_locationpage_referrerpage_titlescreen_resolutionuser_agent
Additionally, if the server request comes from a web browser, there may also be
browser cookie data available via the getCookieValue API.
Together, these make up the automatically collected data that we mentioned above. In general, it consists of data that is universal and semantically unambiguous. When a request comes in from a GA4 tag in the browser, this data will always be available and it will always have the same format. For more details on these parameters, take a look at the event reference.
This classification gives us a useful tool to use when deciding which data should be configured by the user and which data should be specified in the tag. Automatically collected data is safe to read directly from the event. Everything else should be configured by the user.
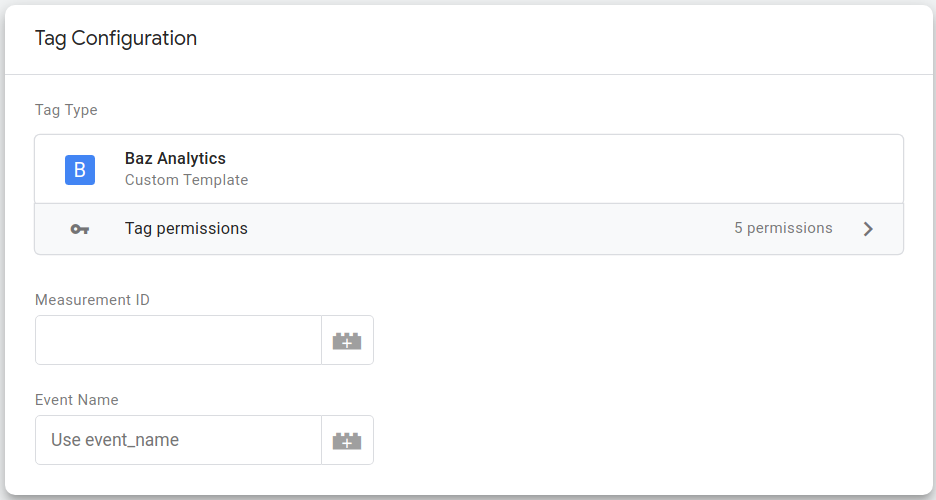
With that in mind, take another look at the parameters for the Baz Analytics tag.
- Measurement ID,
id: Because it is not automatically collected, it is a clear example of a value that should be entered by the user when configuring the tag. - Event name,
en: As mentioned above, the event name can always be taken directly from theevent_nameparameter. However, because its value is user-defined, it's a good idea to offer the ability to override the name if needed. - Page URL,
l: This value can be taken from thepage_locationparameter, which is automatically collected by the Google Analytics GA4 browser tag on every event. Therefore, you should not require the user to enter a value manually. - User ID,
u: In the Baz Analytics server tag, theuparameter is neither user-specified nor automatically collected by the tag on the page. Instead, it is stored in a browser cookie so that users can be identified across multiple visits to the website. As you'll see in the implementation below, it is the Baz Analytics server tag that uses thesetCookieAPI to set the cookie. This means that the Baz Analytics tag is the only thing that knows where and how the cookie is stored. Likel, theuparameter should be automatically collected.
Once you're done setting up the tag configuration, it should look something like this:
Tag implementation
Now that the tag's configuration is squared away, you're ready to move on to implementing its behavior in sandboxed JavaScript.
The tag needs to do four things:
- Get the event name from the tag's configuration.
- Get the page URL from the event's
page_locationproperty. - Calculate a user ID. The tag will look for the user ID in a cookie called
_bauid. If that cookie is not present, the tag will calculate a new value and store it for later requests. - Construct a URL and make a request to the Baz Analytics collection server.
It's also worth taking a moment to think about how the tag fits into the container as a whole. Different container components play different roles, so there are also things that the tag does not or should not do. Your tag:
- Shouldn't examine the event to figure out whether it should run. That's what a trigger is for.
- Shouldn't run the container with the
runContainerAPI. That's the client's job. - With the important exception of cookies, it shouldn't try to interact directly with the request or response. That's also the client's job.
Writing a tag template that does any of these things would result in confusing behavior for users of your tag. For example, a tag that sends a response to the incoming request would prevent the client from doing the same. That would break users' expectations about how the container is supposed to behave.
With all of that in mind, below is an annotated implementation of the tag in sandboxed JS.
const encodeUriComponent = require('encodeUriComponent');
const generateRandom = require('generateRandom');
const getCookieValues = require('getCookieValues');
const getEventData = require('getEventData');
const logToConsole = require('logToConsole');
const makeString = require('makeString');
const sendHttpGet = require('sendHttpGet');
const setCookie = require('setCookie');

const USER_ID_COOKIE = '_bauid';
const MAX_USER_ID = 1000000000;

// The event name is taken from either the tag's configuration or from the
// event. Configuration data comes into the sandboxed code as a predefined
// variable called 'data'.
const eventName = data.eventName || getEventData('event_name');

// page_location is automatically collected by the Google Analytics 4 tag.
// Therefore, it's safe to take it directly from event data rather than require
// the user to specify it. Use the getEventData API to retrieve a single data
// point from the event. There's also a getAllEventData API that returns the
// entire event.
const pageLocation = getEventData('page_location');
const userId = getUserId();

const url = 'https://www.example.com/baz_analytics?' +
    'id=' + encodeUriComponent(data.measurementId) +
    'en=' + encodeUriComponent(eventName) +
    (pageLocation ? 'l=' + encodeUriComponent(pageLocation) : '') +
    'u=' + userId;

// The sendHttpGet API takes a URL and returns a promise that resolves with the
// result once the request completes. You must call data.gtmOnSuccess() or
// data.gtmOnFailure() so that the container knows when the tag has finished
// executing.
sendHttpGet(url).then((result) => {
  if (result.statusCode >= 200 && result.statusCode < 300) {
    data.gtmOnSuccess();
  } else {
    data.gtmOnFailure();
  }
});

// The user ID is taken from a cookie, if present. If it's not present, a new ID
// is randomly generated and stored for later use.
//
// Generally speaking, tags should not interact directly with the request or
// response. This prevents different tags from conflicting with each other.
// Cookies, however, are an exception. Tags are the only container entities that
// know which cookies they need to read or write. Therefore, it's okay for tags
// to interact with them directly.
function getUserId() {
  const userId = getCookieValues(USER_ID_COOKIE)[0] || generateRandom(0, MAX_USER_ID);
  // The setCookie API adds a value to the 'cookie' header on the response.
  setCookie(USER_ID_COOKIE, makeString(userId), {
    'max-age': 3600 * 24 * 365 * 2,
    domain: 'auto',
    path: '/',
    httpOnly: true,
    secure: true,
  });

  return userId;
}
With that, the tag is implemented. Before you can use the tag, you'll need to set its API permissions properly. Go to the Permissions tab of the Template Editor and specify the following permissions:
- Reads Cookie Values:
_bauid - Reads Event Data:
event_nameandpage_location - Sends HTTP Requests:
https://www.example.com/* - Sets a Cookie:
_bauid
You should also write tests for your tag. To read more about template testing, read the tests section of the template developer guide.
Finally, don't forget to try running your tag with the Run Code button at least once. That will prevent many simple mistakes from making it onto your server.
Submit your tag to the Community Template Gallery
Since you've gone through all of the work create, test, and deploy a new tag, there's no reason to keep it to yourself. If you think that the your new tag would be useful to other people, consider submitting it to the Community Template Gallery.
Conclusion
In this tutorial, you learned the basics of writing a tag for a server container. You learned:
- Which APIs to use to read event data, send HTTP requests, and set cookies on the browser.
- Best practices for designing the configuration options for a tag.
- The difference between user-specified data and automatically collected data and why that distinction is important.
- The role of a tag in the container; what it should and should not do.
- When and how to submit tag templates to the Community Template Gallery.