This guide explains how to:
- Provision a preview server to enable the preview feature for the container.
- Provision a tagging server to handle live traffic.
- Increase or decrease the number of servers that are running your Google Tag Manager container.
- Keep your tagging server version updated after provisioning the server.
Prerequisites
- You need a GCP account. If you don't have one, create a new GCP account.
- You need a GCP billing account. If you don't have one, create a GCP billing account (requires the Billing Account Creator role).
- You need the Project Creator and the Billing Account User role. Learn more about adding roles.
Provision a preview and tagging server
You can provision a Cloud Run service either automatically in Google Tag Manager or manually in Google Cloud.
Edit the service configuration
To change your service configuration:
- Open Cloud Run.
- Select the service you need to adjust.
- Click Edit & Deploy New Revision.
- Make changes and click Deploy.
Cloud Run cost
In this Cloud Run configuration, each server costs approximately $45 /month (USD). Each server is a Cloud Run instance with 1 vCPU and 0.5GB memory using the CPU always allocated pricing model.
We recommend running a minimum of 2 instances to reduce the risk of data loss in case of a server outage. However, you may choose to run fewer (or more) servers. We expect that autoscaling 2-10 servers will handle 35-350 requests per second, though the performance will vary with the number of tags, and what those tags do.
Cloud Run will dynamically scale with load. The max-instances setting is the
worst case scenario for how much you will need to pay for resources. Cloud Run
won't provision that many instances unless necessary.
Cloud Run cost estimation
To estimate the monthly cost of running your tagging servers, use the Google Cloud Pricing Calculator. The calculator opens with a pre-configured estimate for a default server-side tagging deployment. You can adjust the settings to get a more accurate estimate based on your expected traffic.
Optional: Migrating from App Engine
If you previously created an App Engine deployment and have verified that it is no longer receiving any traffic, disable the App Engine application to prevent unexpected billing charges.
Optional: Multi-region deployment
If your website has a global presence or you would like to build redundancy into the service, deploy the tagging servers to multiple regions.
Before you start:
- Create a load balancer
- Note your chosen BACKEND_NAME.
To add more regions to your deployment:
- Replace REGION with the region where the preview server is deployed. This may already be filled out if you followed the command line options to provision the preview and tagging server.
- Replace CONTAINER_CONFIG with container config string from Tag Manager. This may already be filled out if you followed the command line options to provision the preview and tagging server.
- Replace NEW_REGION with the new region where you would like the tagging server to be deployed.
- Replace BACKEND_NAME with the name you chose while provisioning the load balancer.
- Optional: To add another region, substitute NEW_REGION variable and the re-run the code snippet.
    gcloud run deploy "server-side-tagging" \
    --region NEW_REGION \
    --image gcr.io/cloud-tagging-10302018/gtm-cloud-image:stable \
    --platform managed \
    --ingress all \
    --min-instances 2 \
    --max-instances 10 \
    --timeout 60 \
    --allow-unauthenticated \
    --no-cpu-throttling \
    --update-env-vars PREVIEW_SERVER_URL="$(
      gcloud run services describe server-side-tagging-preview \--region "REGION" \
      --format="value(status.url)")",CONTAINER_CONFIG="CONTAINER_CONFIG" && \

    gcloud compute network-endpoint-groups create server-side-tagging-neg \
    --region=NEW_REGION \
    --network-endpoint-type=SERVERLESS \
    --cloud-run-service="server-side-tagging" && \

    gcloud compute backend-services add-backend --global "BACKEND_NAME" \
    --network-endpoint-group-region=NEW_REGION \
    --network-endpoint-group=server-side-tagging-neg
Optional: Disable logging
Request logging
By default, information about every single request (e.g. request path, query parameters, etc) is logged. If your tagging server handles a lot of requests per month (e.g. greater than 1 million), those log messages may incur significant logging charges. To reduce or eliminate the logging charges, we recommend disabling the request logging.
To disable request logging:
- In Google Cloud platform, open the
Logs Router. Make sure
you're in the project that matches your container ID:

- For the Type: Cloud Logging bucket, Name: _Default line, select the overflow menu, then click Edit Sink.
- Under Sink destination, select logs bucket _Default.
Under Choose logs to include in sink, add a new line. Enter the following rule to the existing inclusion filter:
NOT LOG_ID("run.googleapis.com/requests")To also disable logging from the load balancer, add a new line and enter the following rule to the existing inclusion filter:
NOT LOG_ID("requests")Update Sink to apply the changes. Now the requests will be excluded from logging.
Verify that no new requests are appearing in the Logs Explorer logs.
Console logging
The tagging server, clients, or tags in a container can log messages to console that may incur logging charges. To reduce or eliminate the logging charges, you can disable unwanted console log messages.
Identify unwanted console logs:
- In GCP, open the Logs Explorer.
Look for any unwanted log messages that originate from your tags. For example:
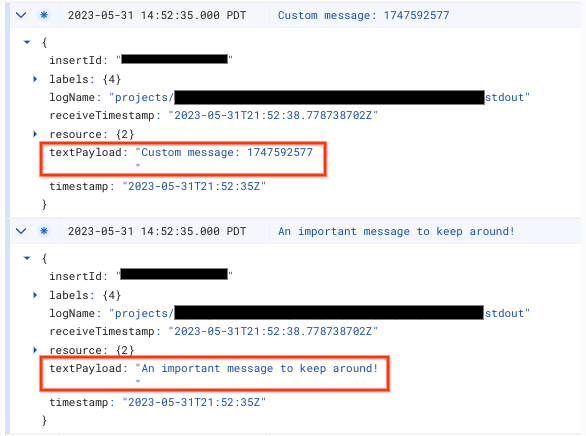
A tag might send the following logs:
const logToConsole = require('logToConsole');

logToConsole('Custom message: ' + data.param1);
logToConsole('An important message to keep around!');
data.gtmOnSuccess()
Look for the corresponding log messages in the
textPayloadfield:
To disable console log message:
- In Google Cloud platform, open the
Logs Router. Make sure
you're in the project that matches your container ID:
- For the Type: Cloud Logging bucket, Name: _Default line, select the overflow menu, then click Edit Sink.
- Under Sink destination, select logs bucket _Default.
Under Choose logs to include in sink, add a new line. Enter the following rule to the existing inclusion filter:
NOT textPayload:"Custom message:"For your console logs, replace the Custom message: text with a substring from console log you wish to disable. For more elaborate filters, utilize the logging query language.
Update Sink to apply the changes. The matching
logToConsolemessage should be excluded from logging.Verify that no new console log messages are appearing in the Logs Explorer.
2. Map the deployment to your custom domain
Set up a custom domain to use a domain other than the default address that Cloud Run provides.
3. Add the server URL to Google Tag Manager
Now that you have a server, you need to make sure that Google Tag Manager knows it should use your server.
Open Google Tag Manager.
Click on the server container you want to point to your tagging server.
Open your server container settings in the Admin tab > Container Settings.
Click Add URL and paste your server URL.
Save and go back to your workspace.
4. Validation
Now that you've set up your tagging server, make sure that it works as intended.
UI verification
In your Tag Manager workspace, click the Preview button. If the preview page loads, then everything is set up correctly.
API verification
You can also verify that the server is responding to health checks using its API:
- Copy your Server container URL from Admin > Container Settings.
- Open a new browser tab.
- Paste the URL and append
/healthyto the path. For example:https://www.example.com/metrics/healthy - If your service works, you should see the text
okon the page.
If requests for a specific product are missing, verify that an event is being
triggered. The config command initializes the product, but data is usually
only transmitted when an event is called.
For more information on best practices for server side tagging verification, see Custom domain configuration.
Preview multiple URLs
If you have mapped multiple domains to a single tagging server, make sure each URL is added to the container settings.
If you provided multiple URLs, all paths (the string after the domain name) must match.
| Works | Does not work |
|---|---|
URL 1: example.com/abcURL 2: example2.com/abc |
URL 1: example.com/abcURL 2: example2.com/def |
If multiple URLs are added, you will see an icon next to the Preview button that lets you select the URL to preview.
Update the tagging server version
New tagging server updates contain security vulnerability fixes and new features. We recommend at least updating your tagging server for each major version release (e.g. upgrading from version 1.x.x to 2.x.x) when Tag Manager notifies you to update.
To update your tagging server, deploy a new revision using the same settings you used previously.
- Open Cloud Run.
- Select the service you want to update.
- Click Edit & Deploy New Revision.
- Make sure the Container image URL is set to
gcr.io/cloud-tagging-10302018/gtm-cloud-image:stableand click Deploy.
To verify that the update was successful:
- In your server container, click the Preview button to start a new debug session and send a request on a separate tab.
- In the Summary, select the Console tab and make sure there are no messages asking you to update the tagging server.
Tag Manager may show messages asking you to update your tagging server for up to a day after the server has been updated successfully. However, the preview page will show an up to date message about the tagging server version.