

Регистрация в качестве разработчика – это обязательный однократный процесс, в ходе которого ваш проект Google Cloud связывается с аккаунтом Merchant Center, а контактная информация разработчика регистрируется в Google. Это позволяет Google отправлять важные служебные уведомления и обязательные обновления указанным вами техническим контактным лицам.
Эта статья – часть серии материалов о том, как начать работу с Merchant API. Если вы уже зарегистрированы в Merchant API, перейдите к следующему разделу: Добавьте первый товар
Требования
Прежде чем регистрироваться для использования Merchant API, убедитесь, что выполняются следующие требования:
- Аккаунт Merchant Center. У вас должен быть аккаунт Merchant Center. Регистрация поддерживается только для рабочих аккаунтов. Тестовые аккаунты не подходят для регистрации в качестве разработчика.
- Подтвержденная главная страница. В вашем аккаунте Merchant Center должен быть подтвержденный сайт. Это подтвердит право собственности на домен, связанный с вашей компанией.
- Доступ с правами администратора к аккаунту Merchant Center. У адреса электронной почты или сервисного аккаунта, который вы используете для авторизации вызова регистрации, должен быть тип доступа
ADMINв аккаунте Merchant Center, который вы регистрируете. Подробнее о том, как авторизовать запросы к Merchant API… - Идентификатор проекта Google Cloud. Ваше приложение должно быть связано с отдельным проектом Google Cloud, чтобы предоставлять учетные данные для аутентификации. Подробнее о том, как найти название, номер и идентификатор проекта…
- Действительный адрес электронной почты, связанный с аккаунтом Google, который вы указали в качестве контактного адреса разработчика для получения новостей от Google. Нельзя использовать адрес электронной почты сервисного аккаунта. Вы можете использовать адрес электронной почты, который уже связан с аккаунтом Merchant Center, или указать новый.
Как зарегистрироваться в качестве разработчика в Merchant API
Чтобы использовать Merchant API, вы должны зарегистрировать контактную информацию разработчика и облачный проект Google Cloud в аккаунте Merchant Center с помощью метода registerGcp.
Независимо от того, работаете вы с несколькими аккаунтами продавца или нет, выполните операцию регистрации один раз для каждого облачного проекта Google Cloud, который вы планируете использовать. Если вы работаете с несколькими проектами Google Cloud, вы можете зарегистрировать любой или все из них в одном аккаунте Merchant Center.
Преимущества регистрации
Регистрация дает следующие преимущества:
- Создание технического контактного лица. Создает техническое контактное лицо в Merchant Center. Google отправляет техническому контактному лицу важные уведомления, связанные с API, например объявления о сервисах и информацию о новых функциях.
- Управление несколькими аккаунтами продавца. Вы можете указать контактное лицо разработчика для всех аккаунтов продавца, которыми управляете.
Все вызовы Merchant API из незарегистрированного облачного проекта Google Cloud, кроме регистрации, блокируются. При этом возвращается код ошибки 401 со статусом UNAUTHENTICATED и следующее сообщение об ошибке:
GCP project with id {GCP_ID} and number {GCP_NUMBER} is not registered with the merchant account.
Follow these steps https://developers.google.com/merchant/api/guides/quickstart#register_as_a_developer
to register the GCP project with the merchant account then try calling the API again in 5 minutes.
Важные примечания
- Однократная настройка для каждого облачного проекта Google Cloud. Регистрация выполняется один раз для каждого облачного проекта Google Cloud и применяется ко всем пользователям и сервисным аккаунтам в этом облачном проекте. Убедитесь, что Merchant API включен в вашем проекте Google Cloud.
- Каждый облачный проект Google Cloud можно зарегистрировать только в одном аккаунте Merchant Center. Если вы попытаетесь зарегистрировать один облачный проект Google Cloud в нескольких аккаунтах Merchant Center одновременно, появится ошибка
ALREADY_REGISTERED. Укажите тот же адрес электронной почты разработчика, что и при регистрации. Обратите внимание, что с одним аккаунтом Merchant Center можно связать несколько проектов Google Cloud. Укажите правильный аккаунт для сторонних организаций, управляющих несколькими продавцами. Чтобы обеспечить стабильность и избежать перебоев в работе, сторонние организации, представляющие или управляющие несколькими продавцами, должны использовать подходящую структуру аккаунтов в экосистеме Google. Мы рекомендуем зарегистрировать аккаунт, который представляет вашу компанию, в зависимости от ее типа:
- Торговые площадки с расширенным аккаунтом. Если ваша компания работает как торговая площадка и у вас уже есть расширенный аккаунт, представляющий всю платформу, используйте его идентификатор.
- Сервисы сравнения цен (ССЦ). Если вы представляете ССЦ, используйте уникальный идентификатор аккаунта ССЦ или группы ССЦ.
- Агентства, разработчики и другие сторонние организации. Если вы представляете стороннюю организацию, например агентство или стороннего разработчика, управляете несколькими аккаунтами продавцов и у вас нет единого идентификатора Merchant Center, представляющего вашу компанию, создайте новый основной аккаунт Merchant Center и запросите его преобразование в расширенный аккаунт. Расширенные аккаунты позволяют управлять дочерними аккаунтами и создавать необходимую структуру для операций с третьими сторонами.
В таблице ниже приведены рекомендации для разных типов партнеров.
Тип партнера Рекомендуемый аккаунт для регистрации Торговые площадки Основной (самый крупный) расширенный аккаунт. Рекламные агентства Отдельный аккаунт или расширенный аккаунт, представляющий вашу компанию. Если вы только начинаете работать с Merchant API, рекомендуем создать отдельный аккаунт. Сервисы сравнения цен (ССЦ) Идентификатор аккаунта группы ССЦ или отдельного ССЦ в группе. Не используйте расширенный аккаунт ССЦ. Продавцы или бренды Основной аккаунт, представляющий ваш бренд. Может быть отдельным или расширенным аккаунтом. Поставщики данных о точках продаж и ассортименте Основной (самый крупный) расширенный аккаунт. Другие сторонние поставщики Если у вас есть аккаунт Merchant Center, вы можете использовать его для регистрации. В противном случае создайте отдельный аккаунт компании. Затем подтвердите свой сайт. Зарегистрируйтесь только в основном аккаунте Merchant Center. Выполните регистрацию разработчика, используя только основной аккаунт Merchant Center, и станете контактным лицом разработчика для всех связанных дочерних аккаунтов Merchant Center. Не регистрируйте каждый дочерний аккаунт Merchant Center.
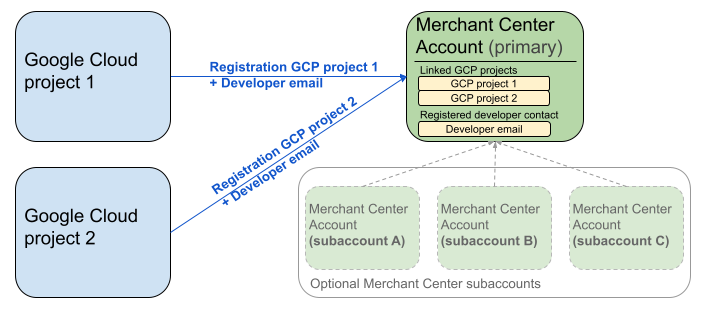
На приведенной выше схеме показана настройка регистрации при использовании нескольких проектов Google Cloud и одного основного аккаунта Merchant Center с несколькими дочерними аккаунтами Merchant Center (необязательно).
Требование аутентификации. При регистрации аутентифицированный аккаунт Merchant Center (в котором хранятся ваши учетные данные) должен совпадать с аккаунтом Merchant Center, который вы регистрируете. Вы не сможете зарегистрировать дочерний аккаунт, если выполнили аутентификацию с помощью отдельного родительского или управляющего аккаунта.
Только для аккаунтов с подтвержденным сайтом. Зарегистрироваться могут только аккаунты Merchant Center с подтвержденным сайтом.
Нельзя зарегистрировать тестовые аккаунты.
После того как вы зарегистрируете адрес электронной почты разработчика:
- Вы можете выполнять вызовы Merchant API в течение пяти минут после регистрации.
- Если адрес электронной почты принадлежит существующему пользователю Merchant Center, ему будет назначена роль
API developer. В противном случае в Merchant Center будет создан новый пользователь, который должен принять приглашение в течение 14 дней, чтобы срок его действия не истек и не пришлось начинать процесс регистрации заново. Вы завершаете процесс регистрации только после того, как пользователь нажмет на ссылку в приглашении.
Как позвонить для регистрации
Для регистрации вызовите метод registerGcp. Вы можете позвонить для регистрации двумя способами:
- Вариант 1. Прямые вызовы API. Вы отправляете необработанные запросы к конечным точкам API напрямую, как правило, по протоколу HTTP(S). Вам нужно вручную создавать тело запроса, устанавливать заголовки (в том числе для аутентификации) и анализировать ответ.
- Вариант 2. Клиентские библиотеки. Вы используете готовые библиотеки, которые позволяют взаимодействовать с Merchant API более удобным способом на нужном языке. Они выполняют аутентификацию и авторизацию и позволяют абстрагироваться от базовой HTTP-коммуникации. Чтобы вы могли быстро приступить к работе, мы подготовили официальные примеры кода.
Авторизация для звонка при регистрации
Как описано в разделе Авторизация запросов к Merchant API, существует два сценария аутентификации:
- OAuth 2.0 – для сторонних поставщиков или агентств, управляющих несколькими аккаунтами продавцов.
- Сервисные аккаунты – для доступа к вашему аккаунту Merchant Center.
Подробнее об авторизации вызова регистрации рассказывается в статье Как выполнить аутентификацию и авторизацию для вызова регистрации?
Звонок для регистрации
В приведенных ниже примерах вы выполняете вызов регистрации с помощью прямых вызовов API или клиентских библиотек.
Выполните вызов регистрации с помощью метода registerGcp.
POST https://merchantapi.googleapis.com/accounts/v1/accounts/{ACCOUNT_ID}/developerRegistration:registerGcp
Content-Type: application/json
Authorization: Bearer {ACCESS_TOKEN}"

{
  "developerEmail": "{DEVELOPER_EMAIL}"
}
Замените следующее:
ACCOUNT_ID– идентификатор Merchant Center.ACCESS_TOKEN– токен авторизации для выполнения вызова API.DEVELOPER_EMAIL– адрес электронной почты основного контактного лица по техническим вопросам.
При успешном вызове возвращается ресурс DeveloperRegistration, подтверждающий успешное установление связи:
  "name": "accounts/{ACCOUNT_ID}/developerRegistration",
  "gcpIds": ["{GOOGLE_CLOUD_PROJECT_ID}"]
Python
Скачайте образцы и следуйте инструкциям из образцов кода на Python для Google Merchant API, чтобы настроить клиентские библиотеки Python.
from examples.authentication import configuration
from examples.authentication import generate_user_credentials
from google.shopping.merchant_accounts_v1 import DeveloperRegistrationServiceClient
from google.shopping.merchant_accounts_v1 import RegisterGcpRequest
def register_gcp(account_id: str, developer_email: str) -> None:
"""Registers the GCP project used to call the Merchant API with a developer email.
Args:
account_id: The ID of your Merchant Center account.
developer_email: The email address of the developer to register.
"""
# Get OAuth credentials.
credentials = generate_user_credentials.main()
# Create a client to the Developer Registration Service.
client = DeveloperRegistrationServiceClient(credentials=credentials)
# The name has the format: accounts/{account}/developerRegistration
name = f"accounts/{account_id}/developerRegistration"
# Create the request to register the GCP project.
request = RegisterGcpRequest(
name=name,
developer_email=developer_email,
)
# Make the API call and handle potential errors.
try:
print("Sending RegisterGcp request:")
response = client.register_gcp(request=request)
print("Registered GCP project successfully:")
print(response)
except RuntimeError as e:
print(f"An error occurred: {e}")
if __name__ == "__main__":
# Your Merchant Center account ID.
# This can be found in the Merchant Center UI.
_account_id = configuration.Configuration().read_merchant_info()
# The developer email to associate with the GCP project.
_developer_email = "YOUR_EMAIL_HERE"
register_gcp(_account_id, _developer_email)
Java
Скачайте образцы и следуйте инструкциям из образцов Java для Google Merchant API, чтобы настроить клиентские библиотеки Java.
import com.google.api.gax.core.FixedCredentialsProvider;
import com.google.auth.oauth2.GoogleCredentials;
import com.google.shopping.merchant.accounts.v1.DeveloperRegistration;
import com.google.shopping.merchant.accounts.v1.DeveloperRegistrationName;
import com.google.shopping.merchant.accounts.v1.DeveloperRegistrationServiceClient;
import com.google.shopping.merchant.accounts.v1.DeveloperRegistrationServiceSettings;
import com.google.shopping.merchant.accounts.v1.RegisterGcpRequest;
import shopping.merchant.samples.utils.Authenticator;
import shopping.merchant.samples.utils.Config;
/**
* This class demonstrates how to register the GCP project used to call the Merchant API with a
* developer email.
*/
public class RegisterGcpSample {
public static DeveloperRegistration registerGcp(Config config, String developerEmail) throws Exception {
// Obtains OAuth token based on the user's configuration.
GoogleCredentials credential = new Authenticator().authenticate();
// Creates service settings using the credentials retrieved above.
DeveloperRegistrationServiceSettings developerRegistrationServiceSettings =
DeveloperRegistrationServiceSettings.newBuilder()
.setCredentialsProvider(FixedCredentialsProvider.create(credential))
.build();
// Creates DeveloperRegistration name to identify the DeveloperRegistration.
// The name has the format: accounts/{account}/developerRegistration
String name =
DeveloperRegistrationName.newBuilder()
.setAccount(config.getAccountId().toString())
.build()
.toString();
// Calls the API and propagates any network failures/errors.
try (DeveloperRegistrationServiceClient developerRegistrationServiceClient =
DeveloperRegistrationServiceClient.create(developerRegistrationServiceSettings)) {
// Creates a request to register the GCP project with the developer email.
RegisterGcpRequest request =
RegisterGcpRequest.newBuilder().setName(name).setDeveloperEmail(developerEmail).build();
System.out.println("Sending RegisterGcp request:");
DeveloperRegistration response = developerRegistrationServiceClient.registerGcp(request);
System.out.println(response);
return response;
}
}
public static void main(String[] args) throws Exception {
Config config = Config.load();
String developerEmail = "YOUR_EMAIL_HERE"; // Replace with your email
registerGcp(config, developerEmail);
}
}
PHP
Скачайте образцы и следуйте инструкциям из образцов PHP для Google Merchant API, чтобы настроить клиентские библиотеки PHP.
require_once __DIR__ . '/../../../../vendor/autoload.php';
require_once __DIR__ . '/../../../Authentication/Authentication.php';
require_once __DIR__ . '/../../../Authentication/Config.php';
use Google\ApiCore\ApiException;
use Google\Shopping\Merchant\Accounts\V1\Client\DeveloperRegistrationServiceClient;
use Google\Shopping\Merchant\Accounts\V1\RegisterGcpRequest;
/**
* This class demonstrates how to register the GCP project used to call the
* Merchant API with a developer email.
*/
class RegisterGcpSample
{
/**
* A helper function to create the name string for the
* DeveloperRegistration.
*
* @param string $accountId The merchant account ID.
* @return string The name, which has the format:
* `accounts/{account}/developerRegistration`
*/
private static function getName(string $accountId): string
{
return sprintf("accounts/%s/developerRegistration", $accountId);
}
/**
* Registers the GCP project with a developer email.
*
* @param array $config The configuration data for authentication and account ID.
* @param string $developerEmail The email of the developer to register.
*/
public static function registerGcpSample(array $config, string $developerEmail): void
{
// Obtains OAuth credentials from the configuration file.
$credentials = Authentication::useServiceAccountOrTokenFile();
// Creates a configuration object for the client.
$options = ['credentials' => $credentials];
// Creates the DeveloperRegistrationServiceClient.
$developerRegistrationServiceClient = new DeveloperRegistrationServiceClient($options);
// Creates the name of the developer registration to identify it.
$name = self::getName($config['accountId']);
// Calls the API and handles any network failures.
try {
// Creates a request to register the GCP project with the developer email.
$request = new RegisterGcpRequest([
'name' => $name,
'developer_email' => $developerEmail
]);
printf("Sending RegisterGcp request:%s", PHP_EOL);
// The `registerGcp` method returns a `DeveloperRegistration` object
// upon success.
$response = $developerRegistrationServiceClient->registerGcp($request);
print "Successfully registered developer email '$developerEmail' for account {$config['accountId']}.\n";
print_r($response);
} catch (ApiException $e) {
printf("An error occurred: %s%s", $e->getMessage(), PHP_EOL);
}
}
/**
* Helper to execute the sample.
*/
public function callSample(): void
{
$config = Config::generateConfig();
// An email address for a developer to register for the API.
$developerEmail = 'YOUR_EMAIL_HERE'; // Replace with your email
self::registerGcpSample($config, $developerEmail);
}
}
// Executes the sample.
$sample = new RegisterGcpSample();
$sample->callSample();
cURL
curl -X POST "https://merchantapi.googleapis.com/accounts/v1/accounts/{ACCOUNT_ID}/developerRegistration:registerGcp" \
-H "Content-Type: application/json" \
-H "Authorization: Bearer {ACCESS_TOKEN}" \
-d '{
  "developerEmail": "{DEVELOPER_EMAIL}"
}'
Чтобы завершить регистрацию, убедитесь, что хотя бы у одного пользователя в Merchant Center есть роль API developer. Чтобы это сделать, выполните одно из следующих действий:
- Укажите
developerEmailв методеregisterGcp. - Добавьте нового пользователя с ролью
API developerв интерфейсе Merchant Center. - Назначьте роль
API developerсуществующему пользователю в интерфейсе Merchant Center. - Вызовите метод
accounts.users.create, чтобы создать нового пользователя и назначить ему рольAPI developer. - Назначьте роль
API developerсуществующему пользователю, используя методaccounts.users.patch.
Рекомендации после регистрации
Чтобы обеспечить надежное управление доступом и предотвратить сбои в работе сервисов, после завершения регистрации рекомендуем выполнить следующие действия:
Предоставьте дополнительные разрешения для приложения "API developer"
При регистрации контактному лицу разработчика автоматически назначается роль
API developer. Эта роль не включает другие разрешения, необходимые для управления аккаунтом Merchant Center или выполнения всех вызовов API. Мы рекомендуем назначить разработчикам роли ADMIN или STANDARD, чтобы предоставить им полный доступ.
Чтобы изменить права доступа пользователя, используйте метод accounts.users.patch. Чтобы добавить или удалить роли, укажите права доступа в поле updateMask тела запроса:
PATCH https://merchantapi.googleapis.com/accounts/v1/{ACCOUNT_ID}/users/{DEVELOPER_EMAIL}?update_mask=access_rights
Content-Type: application/json
Authorization: Bearer {ACCESS_TOKEN}"

{
  "name": "accounts/{ACCOUNT_ID}/users/{DEVELOPER_EMAIL}",
  "access_rights": [ "ADMIN", "API_DEVELOPER" ]
}
Python
from examples.authentication import configuration
from examples.authentication import generate_user_credentials
from google.protobuf import field_mask_pb2
from google.shopping.merchant_accounts_v1 import AccessRight
from google.shopping.merchant_accounts_v1 import UpdateUserRequest
from google.shopping.merchant_accounts_v1 import User
from google.shopping.merchant_accounts_v1 import UserServiceClient
FieldMask = field_mask_pb2.FieldMask
_ACCOUNT = configuration.Configuration().read_merchant_info()
def update_user(user_email, user_access_right):
"""Updates a user to make it an admin of the MC account."""
credentials = generate_user_credentials.main()
client = UserServiceClient(credentials=credentials)
# Create user name string
name = "accounts/" + _ACCOUNT + "/users/" + user_email
user = User(name=name, access_rights=[user_access_right])
field_mask = FieldMask(paths=["access_rights"])
try:
request = UpdateUserRequest(user=user, update_mask=field_mask)
print("Sending Update User request")
response = client.update_user(request=request)
print("Updated User Name below")
print(response.name)
except RuntimeError as e:
print(e)
if __name__ == "__main__":
# Modify this email to update the right user
email = "USER_MAIL_ACCOUNT"
access_right = AccessRight.ADMIN
update_user(email, access_right)
Java
import com.google.api.gax.core.FixedCredentialsProvider;
import com.google.auth.oauth2.GoogleCredentials;
import com.google.protobuf.FieldMask;
import com.google.shopping.merchant.accounts.v1.AccessRight;
import com.google.shopping.merchant.accounts.v1.UpdateUserRequest;
import com.google.shopping.merchant.accounts.v1.User;
import com.google.shopping.merchant.accounts.v1.UserName;
import com.google.shopping.merchant.accounts.v1.UserServiceClient;
import com.google.shopping.merchant.accounts.v1.UserServiceSettings;
import shopping.merchant.samples.utils.Authenticator;
import shopping.merchant.samples.utils.Config;
/** This class demonstrates how to update a user to make it an admin of the MC account. */
public class UpdateUserSample {
public static void updateUser(Config config, String email, AccessRight accessRight)
throws Exception {
GoogleCredentials credential = new Authenticator().authenticate();
UserServiceSettings userServiceSettings =
UserServiceSettings.newBuilder()
.setCredentialsProvider(FixedCredentialsProvider.create(credential))
.build();
// Creates user name to identify user.
String name =
UserName.newBuilder()
.setAccount(config.getAccountId().toString())
.setEmail(email)
.build()
.toString();
// Create a user with the updated fields.
User user = User.newBuilder().setName(name).addAccessRights(accessRight).build();
FieldMask fieldMask = FieldMask.newBuilder().addPaths("access_rights").build();
try (UserServiceClient userServiceClient = UserServiceClient.create(userServiceSettings)) {
UpdateUserRequest request =
UpdateUserRequest.newBuilder().setUser(user).setUpdateMask(fieldMask).build();
System.out.println("Sending Update User request");
User response = userServiceClient.updateUser(request);
System.out.println("Updated User Name below");
System.out.println(response.getName());
} catch (Exception e) {
System.out.println(e);
}
}
public static void main(String[] args) throws Exception {
Config config = Config.load();
String email = "testUser@gmail.com";
// Give the user admin rights. Note that all other rights, like
// PERFORMANCE_REPORTING, would be overwritten in this example
// if the user had those access rights before the update.
AccessRight accessRight = AccessRight.ADMIN;
updateUser(config, email, accessRight);
}
}
PHP
use Google\ApiCore\ApiException;
use Google\Protobuf\FieldMask;
use Google\Shopping\Merchant\Accounts\V1\AccessRight;
use Google\Shopping\Merchant\Accounts\V1\UpdateUserRequest;
use Google\Shopping\Merchant\Accounts\V1\User;
use Google\Shopping\Merchant\Accounts\V1\Client\UserServiceClient;
/**
* Updates a user.
*
* @param array $config The configuration data.
* @param string $email The email address of the user.
* @param int $accessRight The access right to grant the user.
* @return void
*/
function updateUser($config, $email, $accessRights): void
{
// Gets the OAuth credentials to make the request.
$credentials = Authentication::useServiceAccountOrTokenFile();
// Creates options config containing credentials for the client to use.
$options = ['credentials' => $credentials];
// Creates a client.
$userServiceClient = new UserServiceClient($options);
// Creates user name to identify user.
$name = 'accounts/' . $config['accountId'] . "/users/" . $email;
$user = (new User())
->setName($name)
->setAccessRights($accessRights);
$fieldMask = (new FieldMask())->setPaths(['access_rights']);
// Calls the API and catches and prints any network failures/errors.
try {
$request = new UpdateUserRequest([
'user' => $user,
'update_mask' => $fieldMask,
]);
print "Sending Update User request\n";
$response = $userServiceClient->updateUser($request);
print "Updated User Name below\n";
print $response->getName() . "\n";
} catch (ApiException $e) {
print $e->getMessage();
}
}
$config = Config::generateConfig();
$email = "testUser@gmail.com";
$accessRights = [AccessRight::ADMIN];
updateUser($config, $email, $accessRights);
cURL
curl -X PATCH \
"https://merchantapi.googleapis.com/accounts/v1/{ACCOUNT_ID}/users/{USER_EMAIL}?update_mask=access_rights" \
-H "Content-Type: application/json" \
-H "Authorization: Bearer {ACCESS_TOKEN}" \
-d '{
  "access_rights": [
    "ADMIN",
    "API_DEVELOPER"
  ]
}'
Как добавить контактную информацию разработчика
Чтобы избежать проблем, если основной контакт разработчика покинет компанию или потеряет доступ, необходимо добавить резервные контакты. Мы рекомендуем добавить в Merchant Center хотя бы одного пользователя с ролью API developer, чтобы у вас был запасной вариант.
Добавить пользователя или изменить существующего можно с помощью сервиса accounts.users в Merchant API или на странице Доступ и сервисы в интерфейсе Merchant Center. Добавив резервных разработчиков, вы сделаете интеграцию более надежной и независимой от одного человека.
PATCH https://merchantapi.googleapis.com/products/v1/accounts/{ACCOUNT_ID}/users
Content-Type: application/json
Authorization: Bearer {ACCESS_TOKEN}"
{
  "user_id": {USER_EMAIL},
  "user": { "access_rights": [ "API_DEVELOPER", "ADMIN" ] }
}
Python
from examples.authentication import configuration
from examples.authentication import generate_user_credentials
from google.shopping.merchant_accounts_v1 import AccessRight
from google.shopping.merchant_accounts_v1 import CreateUserRequest
from google.shopping.merchant_accounts_v1 import User
from google.shopping.merchant_accounts_v1 import UserServiceClient
_ACCOUNT = configuration.Configuration().read_merchant_info()
def get_parent(account_id):
return f"accounts/{account_id}"
def create_user(user_email):
"""Creates a user for a Merchant Center account."""
# Get OAuth credentials
credentials = generate_user_credentials.main()
# Create a UserServiceClient
client = UserServiceClient(credentials=credentials)
# Create parent string
parent = get_parent(_ACCOUNT)
# Create the request
request = CreateUserRequest(
parent=parent,
user_id=user_email,
user=User(
access_rights=[AccessRight.ADMIN, AccessRight.PERFORMANCE_REPORTING]
),
)
try:
print("Sending Create User request")
response = client.create_user(request=request)
print("Inserted User Name below")
print(response.name)
except RuntimeError as e:
print(e)
if __name__ == "__main__":
# Modify this email to create a new user
email = "USER_MAIL_ACCOUNT"
create_user(email)
Java
import com.google.api.gax.core.FixedCredentialsProvider;
import com.google.auth.oauth2.GoogleCredentials;
import com.google.shopping.merchant.accounts.v1.AccessRight;
import com.google.shopping.merchant.accounts.v1.CreateUserRequest;
import com.google.shopping.merchant.accounts.v1.User;
import com.google.shopping.merchant.accounts.v1.UserServiceClient;
import com.google.shopping.merchant.accounts.v1.UserServiceSettings;
import shopping.merchant.samples.utils.Authenticator;
import shopping.merchant.samples.utils.Config;
/** This class demonstrates how to create a user for a Merchant Center account. */
public class CreateUserSample {
private static String getParent(String accountId) {
return String.format("accounts/%s", accountId);
}
public static void createUser(Config config, String email) throws Exception {
// Obtains OAuth token based on the user's configuration.
GoogleCredentials credential = new Authenticator().authenticate();
// Creates service settings using the credentials retrieved above.
UserServiceSettings userServiceSettings =
UserServiceSettings.newBuilder()
.setCredentialsProvider(FixedCredentialsProvider.create(credential))
.build();
// Creates parent to identify where to insert the user.
String parent = getParent(config.getAccountId().toString());
// Calls the API and catches and prints any network failures/errors.
try (UserServiceClient userServiceClient = UserServiceClient.create(userServiceSettings)) {
CreateUserRequest request =
CreateUserRequest.newBuilder()
.setParent(parent)
// This field is the email address of the user.
.setUserId(email)
.setUser(
User.newBuilder()
.addAccessRights(AccessRight.ADMIN)
.addAccessRights(AccessRight.PERFORMANCE_REPORTING)
.build())
.build();
System.out.println("Sending Create User request");
User response = userServiceClient.createUser(request);
System.out.println("Inserted User Name below");
// The last part of the user name will be the email address of the user.
// Format: `accounts/{account}/user/{user}`
System.out.println(response.getName());
} catch (Exception e) {
System.out.println(e);
}
}
public static void main(String[] args) throws Exception {
Config config = Config.load();
// The email address of this user.
String email = "testUser@gmail.com";
createUser(config, email);
}
}
PHP
use Google\ApiCore\ApiException;
use Google\Shopping\Merchant\Accounts\V1\AccessRight;
use Google\Shopping\Merchant\Accounts\V1\CreateUserRequest;
use Google\Shopping\Merchant\Accounts\V1\User;
use Google\Shopping\Merchant\Accounts\V1\Client\UserServiceClient;
/**
* Creates a user.
*
* @param array $config The configuration data.
* @param string $email The email address of the user.
* @return void
*/
function createUser($config, $email): void
{
// Gets the OAuth credentials to make the request.
$credentials = Authentication::useServiceAccountOrTokenFile();
// Creates options config containing credentials for the client to use.
$options = ['credentials' => $credentials];
// Creates a client.
$userServiceClient = new UserServiceClient($options);
// Creates parent to identify where to insert the user.
$parent = sprintf("accounts/%s", $config['accountId']);
// Calls the API and catches and prints any network failures/errors.
try {
$request = new CreateUserRequest([
'parent' => $parent,
'user_id' => $email,
'user' => (new User())
->setAccessRights([AccessRight::ADMIN,AccessRight::PERFORMANCE_REPORTING])
]);
print "Sending Create User request\n";
$response = $userServiceClient->createUser($request);
print "Inserted User Name below\n";
print $response->getName() . "\n";
} catch (ApiException $e) {
print $e->getMessage();
}
}
$config = Config::generateConfig();
$email = "testUser@gmail.com";
createUser($config, $email);
cURL
curl -X PATCH \
"https://merchantapi.googleapis.com/products/v1/accounts/{ACCOUNT_ID}/users/{USER_EMAIL}?update_mask=access_rights" \
-H "Content-Type: application/json" \
-H "Authorization: Bearer {ACCESS_TOKEN}" \
-d '{
  "access_rights": [
    "ADMIN",
    "API_DEVELOPER"
  ]
}'