
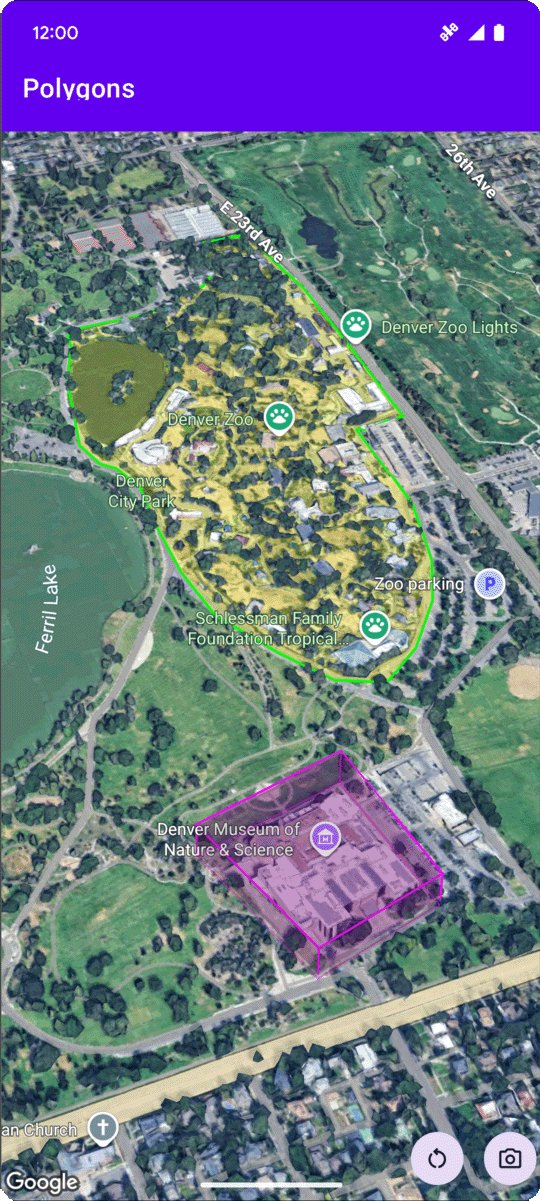
Aşağıdaki kod örneğinde, addPolygon yöntemini çağırarak 3D poligon ekleme ve 3D uzayda konumlandırma işlemi gösterilmektedir. Bu kod örneğini kullanmak için Kurulum ve Uygulamanıza 3D harita ekleme bölümündeki talimatları uygulayarak Android Studio projenizi temel bir 3D harita ile ayarlayın. Ardından, aşağıdaki kodu
MainActivity.kt dosyasına ekleyin:
// Add imports and define variables
import com.google.android.gms.maps3d.model.LatLngAltitude
import com.google.android.gms.maps3d.model.polygonOptions

val zooOutline = """
    39.7508987, -104.9565381
    39.7502883, -104.9565489
    39.7501976, -104.9563557
    39.7501481, -104.955594
    39.7499171, -104.9553043
    39.7495872, -104.9551648
    39.7492407, -104.954961
    39.7489685, -104.9548859
    39.7484488, -104.9548966
    39.7481189, -104.9548859
    39.7479539, -104.9547679
    39.7479209, -104.9544567
    39.7476487, -104.9535341
    39.7475085, -104.9525792
    39.7474095, -104.9519247
    39.747525, -104.9513776
    39.7476734, -104.9511844
    39.7478137, -104.9506265
    39.7477559, -104.9496395
    39.7477477, -104.9486203
    39.7478467, -104.9475796
    39.7482344, -104.9465818
    39.7486138, -104.9457878
    39.7491005, -104.9454874
    39.7495789, -104.945938
    39.7500491, -104.9466998
    39.7503213, -104.9474615
    39.7505358, -104.9486954
    39.7505111, -104.950648
    39.7511215, -104.9506587
    39.7511173, -104.9527187
    39.7511091, -104.9546445
    39.7508987, -104.9565381""".trimIndent()
        .split("\n")
        .map { line -> line.split(",").map { it.trim().toDouble() } }
        .map { coords ->
            latLngAltitude {
                latitude = coords[0]
                longitude = coords[1]
                altitude = 0.0
            }
        }

val zooPolygonOptions = polygonOptions {
    outerCoordinates = zooOutline
    fillColor = Color.argb(70, 255, 255, 0)
    strokeColor = Color.GREEN
    strokeWidth = 3.0
    altitudeMode = AltitudeMode.CLAMP_TO_GROUND
}

val zooPolygon = googleMap3D.addPolygon(zooPolygonOptions)

...

// Add to the onMap3DViewReady method, after the googleMap3D object has been initialized
googleMap3D.setCamera(
    camera {
        center = latLngAltitude {
            latitude = 39.748477
            longitude = -104.947575
            altitude = 1610.0
        }
        heading = 290.0
        tilt = 47.0
        range = 2251.0
    }
)
Poligon tıklama etkinliklerini dinleme
Bir poligonda tıklama etkinliklerini dinlemek için poligon nesnesinde setClickListener işlevini çağırın. Aşağıdaki örnekte, bir çokgene tıklama işleyicisinin nasıl ayarlanacağı gösterilmektedir:
polygon.setClickListener {
    lifecycleScope.launch(Dispatchers.Main) {
        Toast.makeText(this@PolygonsActivity, "Check out the Museum!", Toast.LENGTH_SHORT).show()
    }
}
Tıklama işleyicinin ana (veya kullanıcı arayüzü) iş parçacığında çalışmadığını unutmayın. Kullanıcı arayüzünde değişiklik yapmak (ör. Toast mesajı göstermek) istiyorsanız ana iş parçacığına geçmeniz gerekir. Kotlin için bu işlemi lifecycleScope.launch(Dispatchers.Main) kullanarak yapabilirsiniz.