
rubric एक टेंप्लेट है. इसका इस्तेमाल करके, शिक्षक छात्र-छात्राओं के सबमिट किए गए कामों को ग्रेड दे सकते हैं. Classroom API की मदद से, इन रूब्रिक को मैनेज करने के लिए, शिक्षक की ओर से कार्रवाई की जा सकती है.
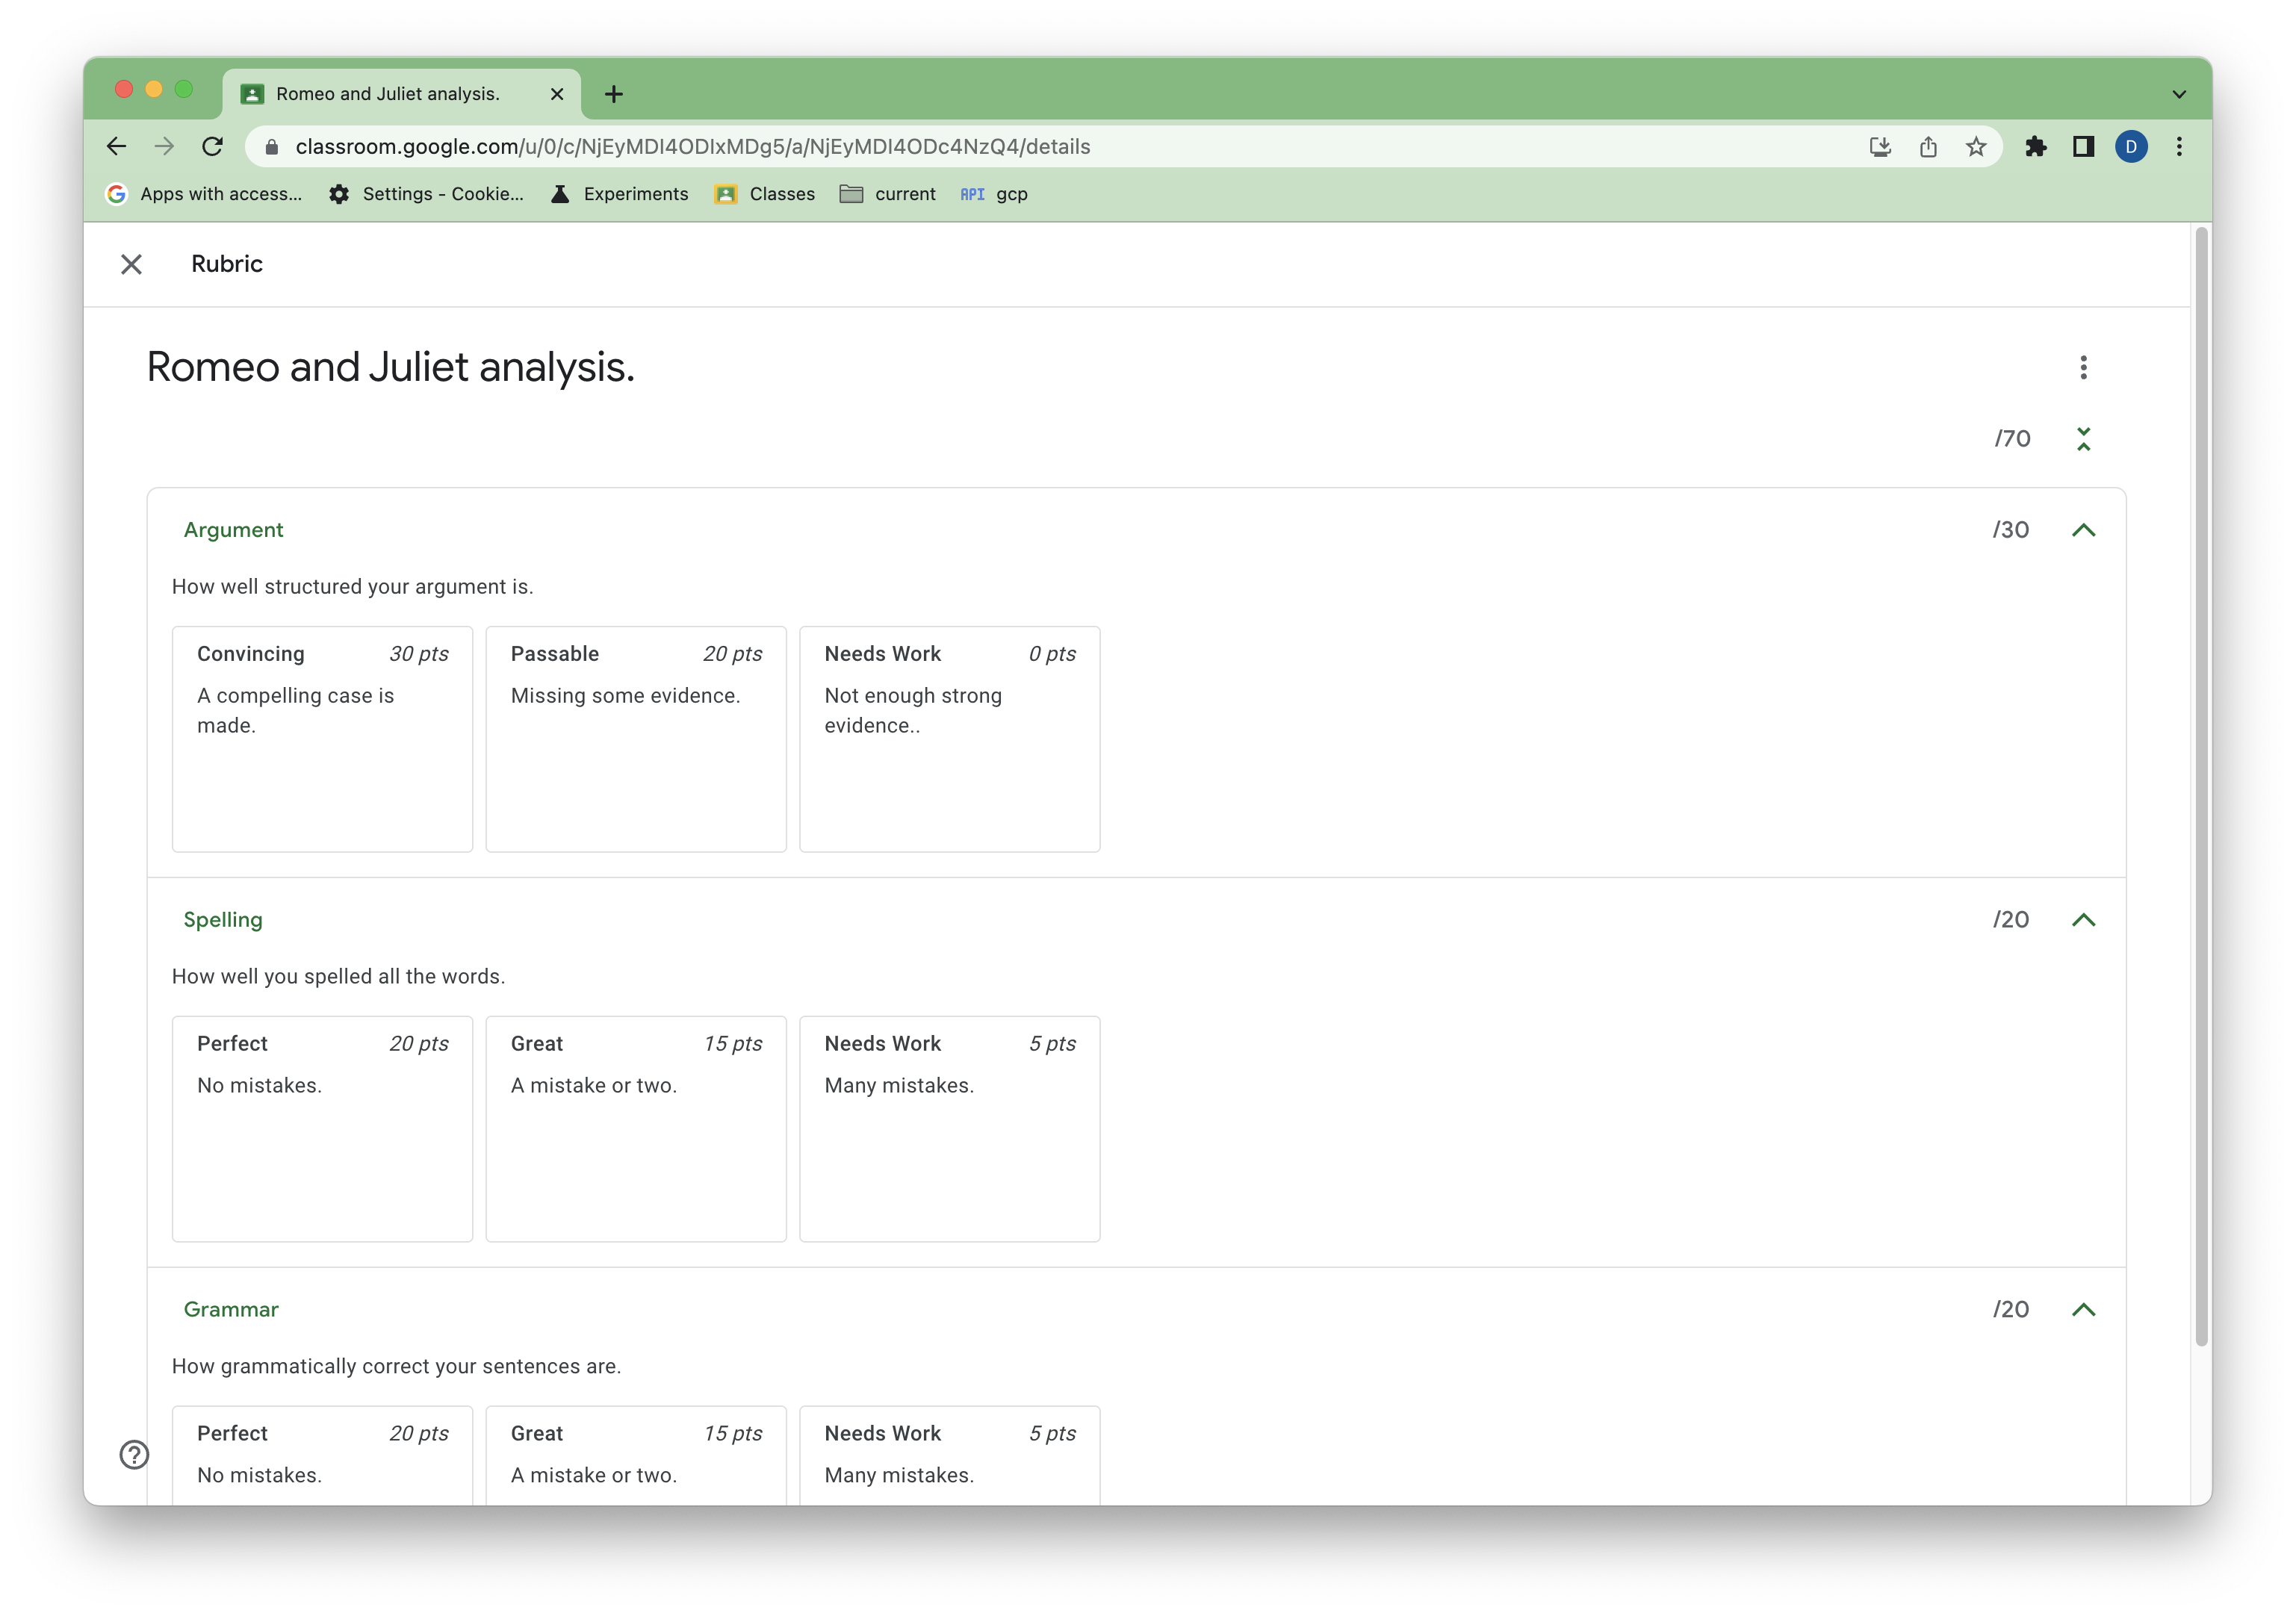 पहली इमेज. Classroom में असाइनमेंट के लिए, सैंपल रूब्रिक का व्यू.
इस गाइड में, Rubrics API के बुनियादी कॉन्सेप्ट और काम करने के तरीके के बारे में बताया गया है. रूब्रिक के सामान्य स्ट्रक्चर और Classroom के यूज़र इंटरफ़ेस (यूआई) में रूब्रिक से ग्रेड देने के तरीके के बारे में जानने के लिए, सहायता केंद्र के ये लेख पढ़ें.
ज़रूरी शर्तें
इस गाइड में यह माना गया है कि आपके पास ये चीज़ें हैं:
- Python 3.8.6 या इसके बाद का वर्शन
- pip पैकेज मैनेजमेंट टूल
- Google Cloud प्रोजेक्ट.
- Google Workspace for Education खाता, जिसमें Google Classroom चालू हो.
- कम से कम एक टेस्ट स्टूडेंट खाते वाली टेस्ट क्लास. अगर आपके पास ऐसी Classroom क्लास नहीं है जिसका इस्तेमाल टेस्टिंग के लिए किया जा सकता है, तो यूज़र इंटरफ़ेस (यूआई) में एक क्लास बनाएं और टेस्ट के लिए एक छात्र या छात्रा जोड़ें.
किसी डेस्कटॉप ऐप्लिकेशन के लिए क्रेडेंशियल को अनुमति देना
असली उपयोगकर्ता के तौर पर पुष्टि करने और अपने ऐप्लिकेशन में उपयोगकर्ता का डेटा ऐक्सेस करने के लिए, आपको एक या उससे ज़्यादा OAuth 2.0 क्लाइंट आईडी बनाने होंगे. क्लाइंट आईडी का इस्तेमाल, Google के OAuth सर्वर पर किसी एक ऐप्लिकेशन की पहचान करने के लिए किया जाता है. अगर आपका ऐप्लिकेशन कई प्लैटफ़ॉर्म पर काम करता है, तो आपको हर प्लैटफ़ॉर्म के लिए अलग-अलग क्लाइंट आईडी बनाना होगा.
- Google Cloud Console में, Google Cloud के क्रेडेंशियल पेज पर जाएं.
- क्रेडेंशियल बनाएं > OAuth क्लाइंट आईडी पर क्लिक करें.
- ऐप्लिकेशन का टाइप > डेस्कटॉप ऐप्लिकेशन पर क्लिक करें.
- नाम फ़ील्ड में, क्रेडेंशियल के लिए कोई नाम टाइप करें. यह नाम सिर्फ़ Google Cloud Console में दिखता है. उदाहरण के लिए, "Rubrics Preview client".
- बनाएं पर क्लिक करें. OAuth क्लाइंट बनने के बाद, आपको एक स्क्रीन दिखेगी. इसमें आपका नया क्लाइंट आईडी और क्लाइंट पासवर्ड दिखेगा.
- JSON डाउनलोड करें पर क्लिक करें. इसके बाद, ठीक है पर क्लिक करें. नया क्रेडेंशियल, OAuth 2.0 क्लाइंट आईडी में दिखता है.
- डाउनलोड की गई JSON फ़ाइल को
credentials.jsonके तौर पर सेव करें और फ़ाइल को अपनी वर्किंग डायरेक्ट्री में ले जाएं. - क्रेडेंशियल बनाएं > एपीआई पासकोड पर क्लिक करें और एपीआई पासकोड नोट करें.
ज़्यादा जानने के लिए, ऐक्सेस क्रेडेंशियल बनाना लेख पढ़ें.
OAuth के दायरे कॉन्फ़िगर करना
आपके प्रोजेक्ट के मौजूदा OAuth स्कोप के हिसाब से, आपको अतिरिक्त स्कोप कॉन्फ़िगर करने पड़ सकते हैं.
- OAuth सहमति स्क्रीन पर जाएं.
- दायरे की जानकारी वाली स्क्रीन पर जाने के लिए, ऐप्लिकेशन में बदलाव करें > सेव करें और जारी रखें पर क्लिक करें.
- दायरा जोड़ें या हटाएं पर क्लिक करें.
- अगर आपके पास ये स्कोप पहले से नहीं हैं, तो उन्हें जोड़ें:
https://www.googleapis.com/auth/classroom.coursework.studentshttps://www.googleapis.com/auth/classroom.courses
- इसके बाद, अपडेट करें > सेव करें और जारी रखें > सेव करें और जारी रखें > डैशबोर्ड पर वापस जाएं पर क्लिक करें.
ज़्यादा जानने के लिए, OAuth की सहमति वाली स्क्रीन को कॉन्फ़िगर करना लेख पढ़ें.
classroom.coursework.students स्कोप की मदद से, CourseWork के साथ-साथ, रूब्रिक को पढ़ने और लिखने का ऐक्सेस मिलता है. वहीं, classroom.courses स्कोप की मदद से, कोर्स को पढ़ने और लिखने का ऐक्सेस मिलता है.
किसी दिए गए तरीके के लिए ज़रूरी स्कोप, उस तरीके के रेफ़रंस दस्तावेज़ में दिए गए होते हैं. उदाहरण के तौर पर, courses.courseWork.rubrics.create अनुमति के दायरे देखें. Google API के लिए OAuth 2.0 के दायरे में, Classroom के सभी दायरे देखे जा सकते हैं. यहां रूब्रिक के बारे में नहीं बताया गया है, क्योंकि एपीआई अब भी झलक के तौर पर उपलब्ध है.
सैंपल कॉन्फ़िगर करना
अपनी वर्किंग डायरेक्ट्री में, Python के लिए Google क्लाइंट लाइब्रेरी इंस्टॉल करें:
pip install --upgrade google-api-python-client google-auth-httplib2 google-auth-oauthlib
main.py नाम की एक फ़ाइल बनाएं. यह फ़ाइल, क्लाइंट लाइब्रेरी बनाती है और YOUR_API_KEY की जगह आपकी एपीआई पासकोड का इस्तेमाल करके, उपयोगकर्ता को अनुमति देती है:
import json
import os.path

from google.auth.transport.requests import Request
from google.oauth2.credentials import Credentials
from google_auth_oauthlib.flow import InstalledAppFlow
from googleapiclient.discovery import build
from googleapiclient.errors import HttpError

# If modifying these scopes, delete the file token.json.
SCOPES = ['https://www.googleapis.com/auth/classroom.courses',
          'https://www.googleapis.com/auth/classroom.coursework.students']

def build_authenticated_service(api_key):
    """Builds the Classroom service."""
    creds = None
    # The file token.json stores the user's access and refresh tokens, and is
    # created automatically when the authorization flow completes for the first
    # time.
    if os.path.exists('token.json'):
        creds = Credentials.from_authorized_user_file('token.json', SCOPES)
    # If there are no (valid) credentials available, let the user log in.
    if not creds or not creds.valid:
        if creds and creds.expired and creds.refresh_token:
            creds.refresh(Request())
        else:
            flow = InstalledAppFlow.from_client_secrets_file(
                'credentials.json', SCOPES)
            creds = flow.run_local_server(port=0)
        # Save the credentials for the next run.
        with open('token.json', 'w') as token:
            token.write(creds.to_json())

    try:
        # Build the Classroom service.
        service = build(
            serviceName="classroom",
            version="v1",
            credentials=creds,
            discoveryServiceUrl=f"https://classroom.googleapis.com/$discovery/rest?labels=DEVELOPER_PREVIEW&key={api_key}")

        return service

    except HttpError as error:
        print('An error occurred: %s' % error)

if __name__ == '__main__':
    service = build_authenticated_service(YOUR_API_KEY)
python main.py का इस्तेमाल करके स्क्रिप्ट चलाएं. आपको साइन इन करने और OAuth स्कोप के लिए सहमति देने के लिए कहा जाएगा.
एक असाइनमेंट बनाएं
कोई रूब्रिक, किसी असाइनमेंट या CourseWork से जुड़ा होता है. साथ ही, वह सिर्फ़ उस CourseWork के संदर्भ में ही काम का होता है. रूब्रिक सिर्फ़ उस Google Cloud प्रोजेक्ट से बनाई जा सकती है जिसने पेरंट CourseWork आइटम बनाया है. इस गाइड के मकसद के लिए, स्क्रिप्ट के साथ नया CourseWork असाइनमेंट बनाएं.
main.py में यह जोड़ें:
def get_latest_course(service):
    """Retrieves the last created course."""
    try:
        response = service.courses().list(pageSize=1).execute()
        courses = response.get("courses", [])
        if not courses:
            print("No courses found. Did you remember to create one in the UI?")
            return
        course = courses[0]
        return course

    except HttpError as error:
        print(f"An error occurred: {error}")
        return error

def create_coursework(service, course_id):
    """Creates and returns a sample coursework."""
    try:
        coursework = {
            "title": "Romeo and Juliet analysis.",
            "description": """Write a paper arguing that Romeo and Juliet were
                                time travelers from the future.""",
            "workType": "ASSIGNMENT",
            "state": "PUBLISHED",
        }
        coursework = service.courses().courseWork().create(
            courseId=course_id, body=coursework).execute()
        return coursework

    except HttpError as error:
        print(f"An error occurred: {error}")
        return error
अब main.py को अपडेट करें, ताकि आपने अभी जो टेस्ट क्लास बनाई है उसका course_id वापस पा सकें. साथ ही, नया सैंपल असाइनमेंट बनाएं और असाइनमेंट का coursework_id वापस पाएं:
if __name__ == '__main__':
    service = build_authenticated_service(YOUR_API_KEY)

    course = get_latest_course(service)
    course_id = course.get("id")
    course_name = course.get("name")
    print(f"'{course_name}' course ID: {course_id}")

    coursework = create_coursework(service, course_id)
    coursework_id = coursework.get("id")
    print(f"Assignment created with ID {coursework_id}")

    #TODO(developer): Save the printed course and coursework IDs.
course_id और coursework_id सेव करें. ये सभी रूब्रिक के सीआरयूडी ऑपरेशन के लिए ज़रूरी हैं.
अब आपके पास Classroom में सैंपल CourseWork होना चाहिए.
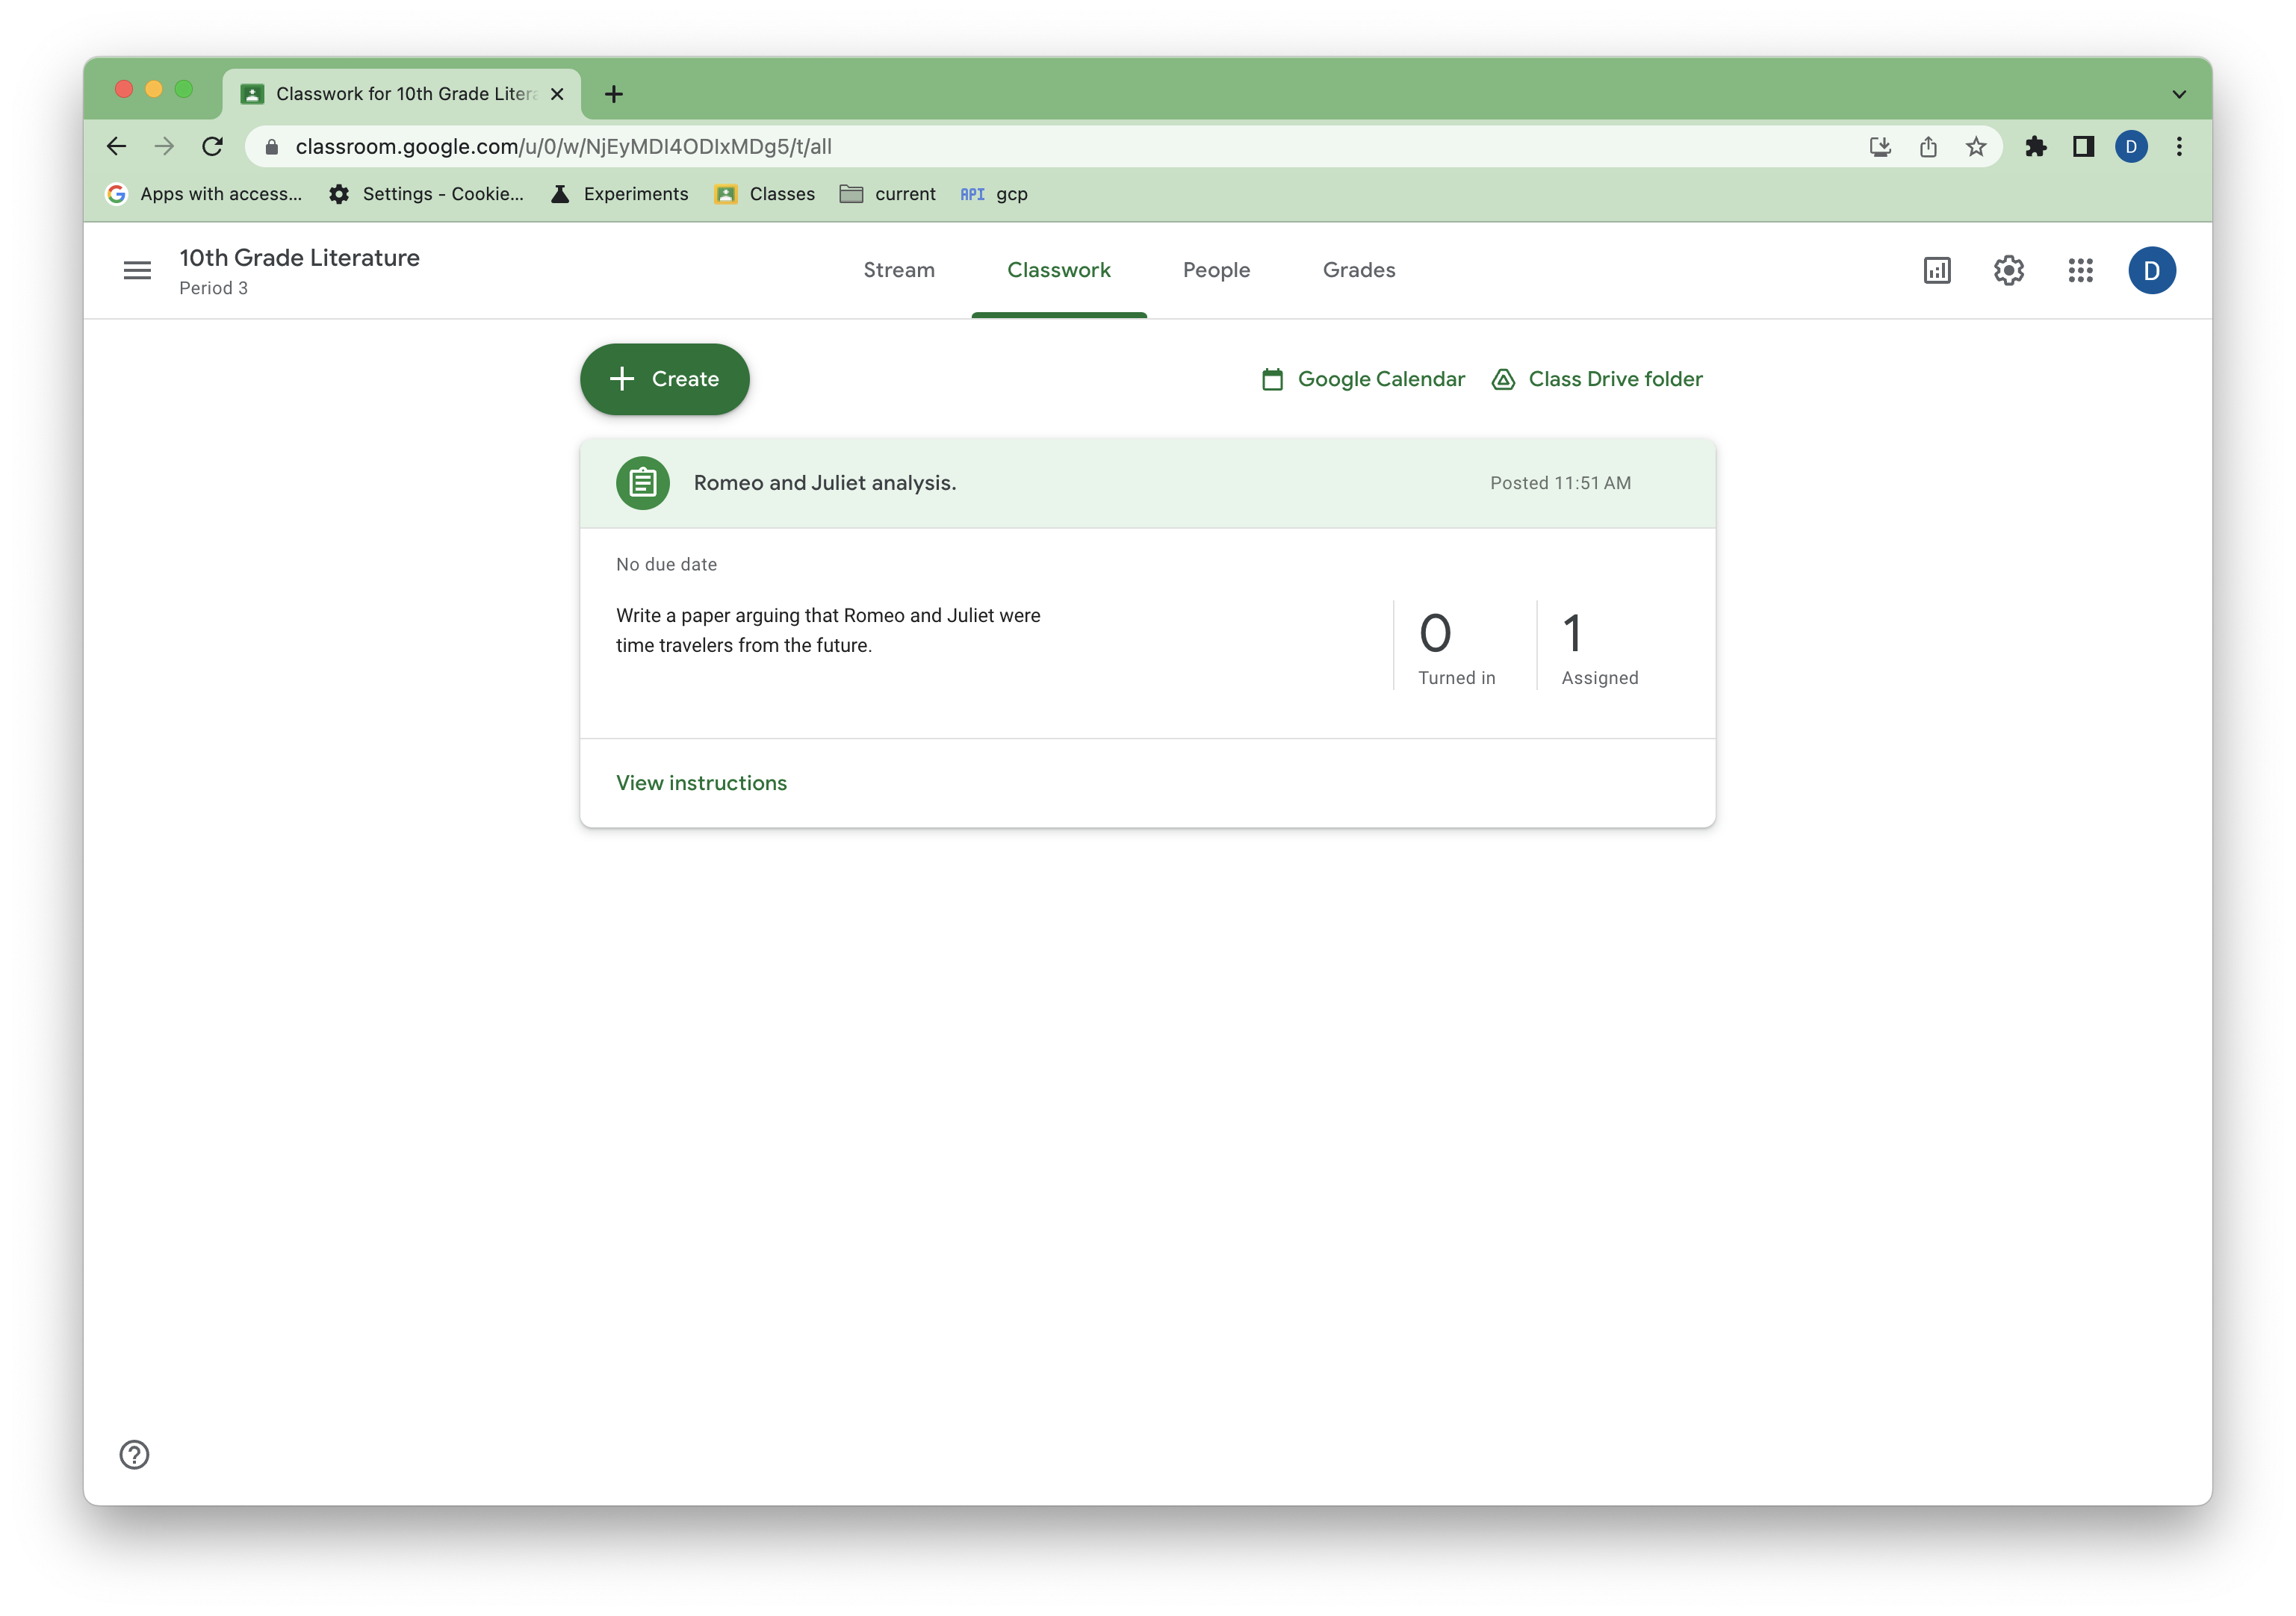 दूसरी इमेज. Classroom में सैंपल के तौर पर दिए गए असाइनमेंट की इमेज.
रूब्रिक बनाना
अब आप रूब्रिक मैनेज करने के लिए तैयार हैं.
CourseWork पर, Create कॉल की मदद से पूरा रूब्रिक ऑब्जेक्ट बनाकर रूब्रिक बनाई जा सकती है. इसमें शर्तों और लेवल के लिए आईडी प्रॉपर्टी शामिल नहीं की जाती हैं. ये प्रॉपर्टी बनाने के दौरान जनरेट होती हैं.
main.py में यह फ़ंक्शन जोड़ें:
def create_rubric(service, course_id, coursework_id):
    """Creates an example rubric on a coursework."""
    try:
        body = {
            "criteria": [
                {
                    "title": "Argument",
                    "description": "How well structured your argument is.",
                    "levels": [
                        {"title": "Convincing",
                         "description": "A compelling case is made.", "points": 30},
                        {"title": "Passable",
                         "description": "Missing some evidence.", "points": 20},
                        {"title": "Needs Work",
                         "description": "Not enough strong evidence..", "points": 0},
                    ]
                },
                {
                    "title": "Spelling",
                    "description": "How well you spelled all the words.",
                    "levels": [
                        {"title": "Perfect",
                         "description": "No mistakes.", "points": 20},
                        {"title": "Great",
                         "description": "A mistake or two.", "points": 15},
                        {"title": "Needs Work",
                         "description": "Many mistakes.", "points": 5},
                    ]
                },
                {
                    "title": "Grammar",
                    "description": "How grammatically correct your sentences are.",
                    "levels": [
                        {"title": "Perfect",
                         "description": "No mistakes.", "points": 20},
                        {"title": "Great",
                         "description": "A mistake or two.", "points": 15},
                        {"title": "Needs Work",
                         "description": "Many mistakes.", "points": 5},
                    ]
                },
            ]
        }

        rubric = service.courses().courseWork().rubrics().create(
            courseId=course_id, courseWorkId=coursework_id, body=body,
            # Specify the preview version. Rubrics CRUD capabilities are
            # supported in V1_20231110_PREVIEW and later.
            previewVersion="V1_20231110_PREVIEW"
            ).execute()
        print(f"Rubric created with ID {rubric.get('id')}")
        return rubric

    except HttpError as error:
        print(f"An error occurred: {error}")
        return error
इसके बाद, उदाहरण के तौर पर दिए गए रूब्रिक को बनाने के लिए, main.py को अपडेट करें और चलाएं. इसके लिए, पहले से मौजूद अपने Course और CourseWork आईडी का इस्तेमाल करें:
if __name__ == '__main__':
    service = build_authenticated_service(YOUR_API_KEY)

    rubric = create_rubric(service, YOUR_COURSE_ID, YOUR_COURSEWORK_ID)
    print(json.dumps(rubric, indent=4))
रूब्रिक के बारे में कुछ बातें:
- शर्त और लेवल का क्रम, Classroom के यूज़र इंटरफ़ेस (यूआई) में दिखता है.
- स्कोर वाले लेवल (
pointsप्रॉपर्टी वाले), पॉइंट के हिसाब से बढ़ते या घटते क्रम में क्रम में लगाए जाने चाहिए. इन्हें रैंडम क्रम में नहीं लगाया जा सकता. - टीचर, यूज़र इंटरफ़ेस (यूआई) में जाकर, शर्तों और स्कोर वाले लेवल (बिना स्कोर वाले लेवल नहीं) को फिर से क्रम से लगा सकते हैं. इससे डेटा में उनका क्रम बदल जाता है.
रूब्रिक के स्ट्रक्चर के बारे में ज़्यादा जानकारी के लिए, सीमाएं देखें.
यूज़र इंटरफ़ेस (यूआई) पर वापस जाकर, आपको असाइनमेंट पर रूब्रिक दिखेगा.
तीसरी इमेज. Classroom में असाइनमेंट के लिए, सैंपल रूब्रिक का व्यू.
रूब्रिक पढ़ना
रूब्रिक को स्टैंडर्ड List और Get तरीकों से पढ़ा जा सकता है.
किसी असाइनमेंट में ज़्यादा से ज़्यादा एक रूब्रिक हो सकता है. इसलिए, List का इस्तेमाल करना मुश्किल लग सकता है. हालांकि, अगर आपके पास पहले से रूब्रिक आईडी नहीं है, तो यह आपके लिए मददगार हो सकता है. अगर किसी CourseWork से कोई रूब्रिक नहीं जुड़ा है, तो List का जवाब खाली होता है.
main.py में यह फ़ंक्शन जोड़ें:
def get_rubric(service, course_id, coursework_id):
    """
    Get the rubric on a coursework. There can only be at most one.
    Returns null if there is no rubric.
    """
    try:
        response = service.courses().courseWork().rubrics().list(
            courseId=course_id, courseWorkId=coursework_id,
            # Specify the preview version. Rubrics CRUD capabilities are
            # supported in V1_20231110_PREVIEW and later.
            previewVersion="V1_20231110_PREVIEW"
            ).execute()

        rubrics = response.get("rubrics", [])
        if not rubrics:
            print("No rubric found for this assignment.")
            return
        rubric = rubrics[0]
        return rubric

    except HttpError as error:
        print(f"An error occurred: {error}")
        return error
जोड़ा गया रूब्रिक फ़ेच करने के लिए, main.py को अपडेट करें और चलाएं:
if __name__ == '__main__':
    service = build_authenticated_service(YOUR_API_KEY)

    rubric = get_rubric(service, YOUR_COURSE_ID, YOUR_COURSEWORK_ID)
    print(json.dumps(rubric, indent=4))

    #TODO(developer): Save the printed rubric ID.
आगे के चरणों के लिए, रूब्रिक में id प्रॉपर्टी को नोट करें.
Get तब अच्छा काम करता है, जब आपके पास रूब्रिक आईडी हो. इसके बजाय, फ़ंक्शन में Get का इस्तेमाल करने पर, ऐसा दिख सकता है:
def get_rubric(service, course_id, coursework_id, rubric_id):
    """
    Get the rubric on a coursework. There can only be at most one.
    Returns a 404 if there is no rubric.
    """
    try:
        rubric = service.courses().courseWork().rubrics().get(
            courseId=course_id,
            courseWorkId=coursework_id,
            id=rubric_id,
            # Specify the preview version. Rubrics CRUD capabilities are
            # supported in V1_20231110_PREVIEW and later.
            previewVersion="V1_20231110_PREVIEW"
        ).execute()

        return rubric

    except HttpError as error:
        print(f"An error occurred: {error}")
        return error
अगर कोई रूब्रिक नहीं है, तो यह लागू करने पर 404 कोड वाली गड़बड़ी दिखती है.
रूब्रिक अपडेट करना
किसी रूब्रिक में बदलाव करने के लिए, Patch कॉल का इस्तेमाल किया जाता है. किसी रूब्रिक के जटिल स्ट्रक्चर की वजह से, अपडेट को रीड-बदलाव करें-लिखें पैटर्न के साथ किया जाना चाहिए. इसमें पूरी criteria प्रॉपर्टी बदल दी जाती है.
अपडेट के नियम यहां दिए गए हैं:
- आईडी के बिना जोड़ी गई शर्तों या लेवल को जोड़ें माना जाता है.
- पहले से मौजूद शर्तों या लेवल को मिटाया गया माना जाता है.
- मौजूदा आईडी वाले, लेकिन बदले गए डेटा वाली शर्तों या लेवल को बदलाव माना जाता है. जिन प्रॉपर्टी में बदलाव नहीं किया गया है उन्हें वैसे ही छोड़ दिया जाता है.
- नए या अज्ञात आईडी के साथ दी गई शर्तों या लेवल को गड़बड़ियां माना जाता है.
- नई शर्तों और लेवल के क्रम को यूज़र इंटरफ़ेस (यूआई) का नया क्रम माना जाता है. हालांकि, इसमें ऊपर बताई गई सीमाएं लागू होती हैं.
रूब्रिक अपडेट करने के लिए फ़ंक्शन जोड़ें:
def update_rubric(service, course_id, coursework_id, rubric_id, body):
    """
    Updates the rubric on a coursework.
    """
    try:
        rubric = service.courses().courseWork().rubrics().patch(
            courseId=course_id,
            courseWorkId=coursework_id,
            id=rubric_id,
            body=body,
            updateMask='criteria',
            # Specify the preview version. Rubrics CRUD capabilities are
            # supported in V1_20231110_PREVIEW and later.
            previewVersion="V1_20231110_PREVIEW"
        ).execute()

        return rubric

    except HttpError as error:
        print(f"An error occurred: {error}")
        return error
इस उदाहरण में, criteria फ़ील्ड में बदलाव करने के लिए, updateMask का इस्तेमाल किया गया है.
इसके बाद, ऊपर बताए गए अपडेट के हर नियम में बदलाव करने के लिए, main.py में बदलाव करें:
if __name__ == '__main__':
    service = build_authenticated_service(YOUR_API_KEY)

    # Get the latest rubric.
    rubric = get_rubric(service, YOUR_COURSE_ID, YOUR_COURSEWORK_ID)
    criteria = rubric.get("criteria")
    """
    The "criteria" property should look like this:
    [
        {
            "id": "NkEyMdMyMzM2Nxkw",
            "title": "Argument",
            "description": "How well structured your argument is.",
            "levels": [
                {
                    "id": "NkEyMdMyMzM2Nxkx",
                    "title": "Convincing",
                    "description": "A compelling case is made.",
                    "points": 30
                },
                {
                    "id": "NkEyMdMyMzM2Nxky",
                    "title": "Passable",
                    "description": "Missing some evidence.",
                    "points": 20
                },
                {
                    "id": "NkEyMdMyMzM2Nxkz",
                    "title": "Needs Work",
                    "description": "Not enough strong evidence..",
                    "points": 0
                }
            ]
        },
        {
            "id": "NkEyMdMyMzM2Nxk0",
            "title": "Spelling",
            "description": "How well you spelled all the words.",
            "levels": [...]
        },
        {
            "id": "NkEyMdMyMzM2Nxk4",
            "title": "Grammar",
            "description": "How grammatically correct your sentences are.",
            "levels": [...]
        }
    ]
    """

    # Make edits. This example will make one of each type of change.

    # Add a new level to the first criteria. Levels must remain sorted by
    # points.
    new_level = {
        "title": "Profound",
        "description": "Truly unique insight.",
        "points": 50
    }
    criteria[0]["levels"].insert(0, new_level)

    # Remove the last criteria.
    del criteria[-1]

    # Update the criteria titles with numeric prefixes.
    for index, criterion in enumerate(criteria):
        criterion["title"] = f"{index}: {criterion['title']}"

    # Resort the levels from descending to ascending points.
    for criterion in criteria:
        criterion["levels"].sort(key=lambda level: level["points"])

    # Update the rubric with a patch call.
    new_rubric = update_rubric(
        service, YOUR_COURSE_ID, YOUR_COURSEWORK_ID, YOUR_RUBRIC_ID, rubric)

    print(json.dumps(new_rubric, indent=4))
अब ये बदलाव, शिक्षक को Classroom में दिखने चाहिए.
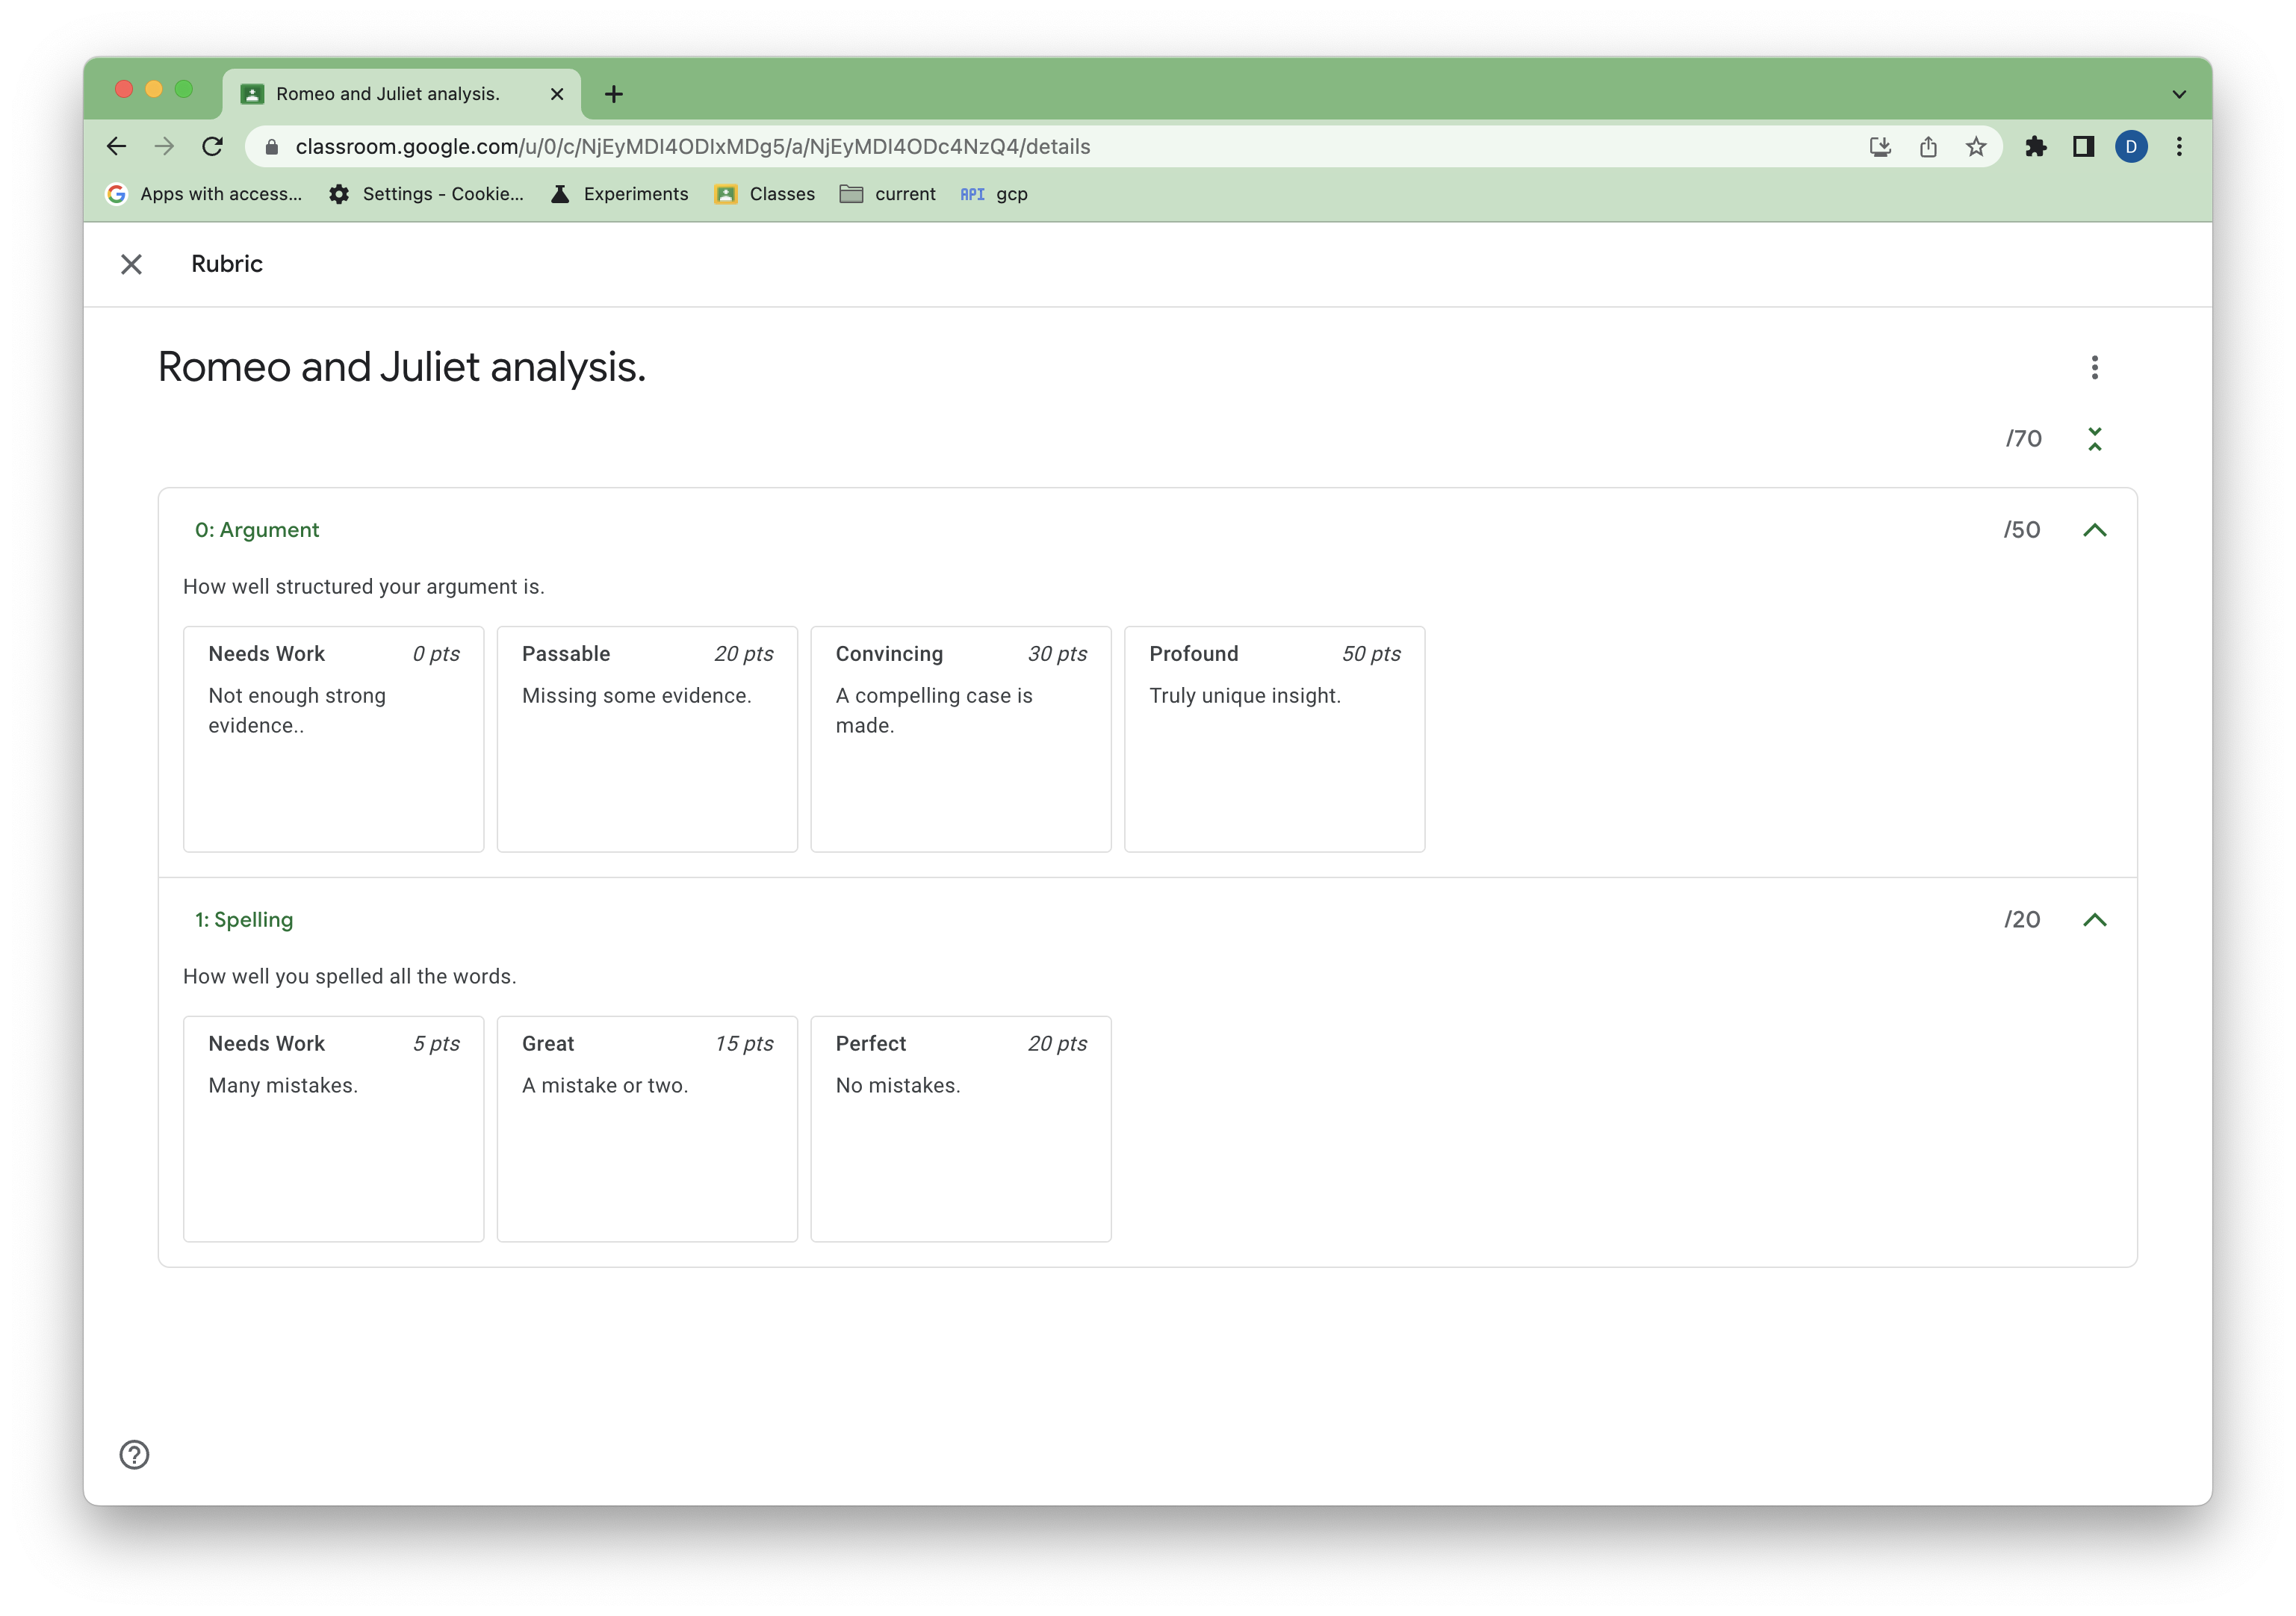 चौथी इमेज. अपडेट किए गए रूब्रिक का व्यू.
रूब्रिक की मदद से ग्रेड किए गए सबमिशन देखना
फ़िलहाल, एपीआई की मदद से छात्र-छात्राओं के सबमिशन को रूब्रिक की मदद से ग्रेड नहीं दिया जा सकता. हालांकि, Classroom के यूज़र इंटरफ़ेस (यूआई) में, रूब्रिक की मदद से ग्रेड किए गए सबमिशन के लिए, रूब्रिक के ग्रेड देखे जा सकते हैं.
छात्र/छात्रा के तौर पर, Classroom के यूज़र इंटरफ़ेस (यूआई) में जाकर, सैंपल असाइनमेंट पूरा करें और सबमिट करें. इसके बाद, शिक्षक के तौर पर, रूब्रिक का इस्तेमाल करके असाइनमेंट को मैन्युअल तरीके से ग्रेड दें.
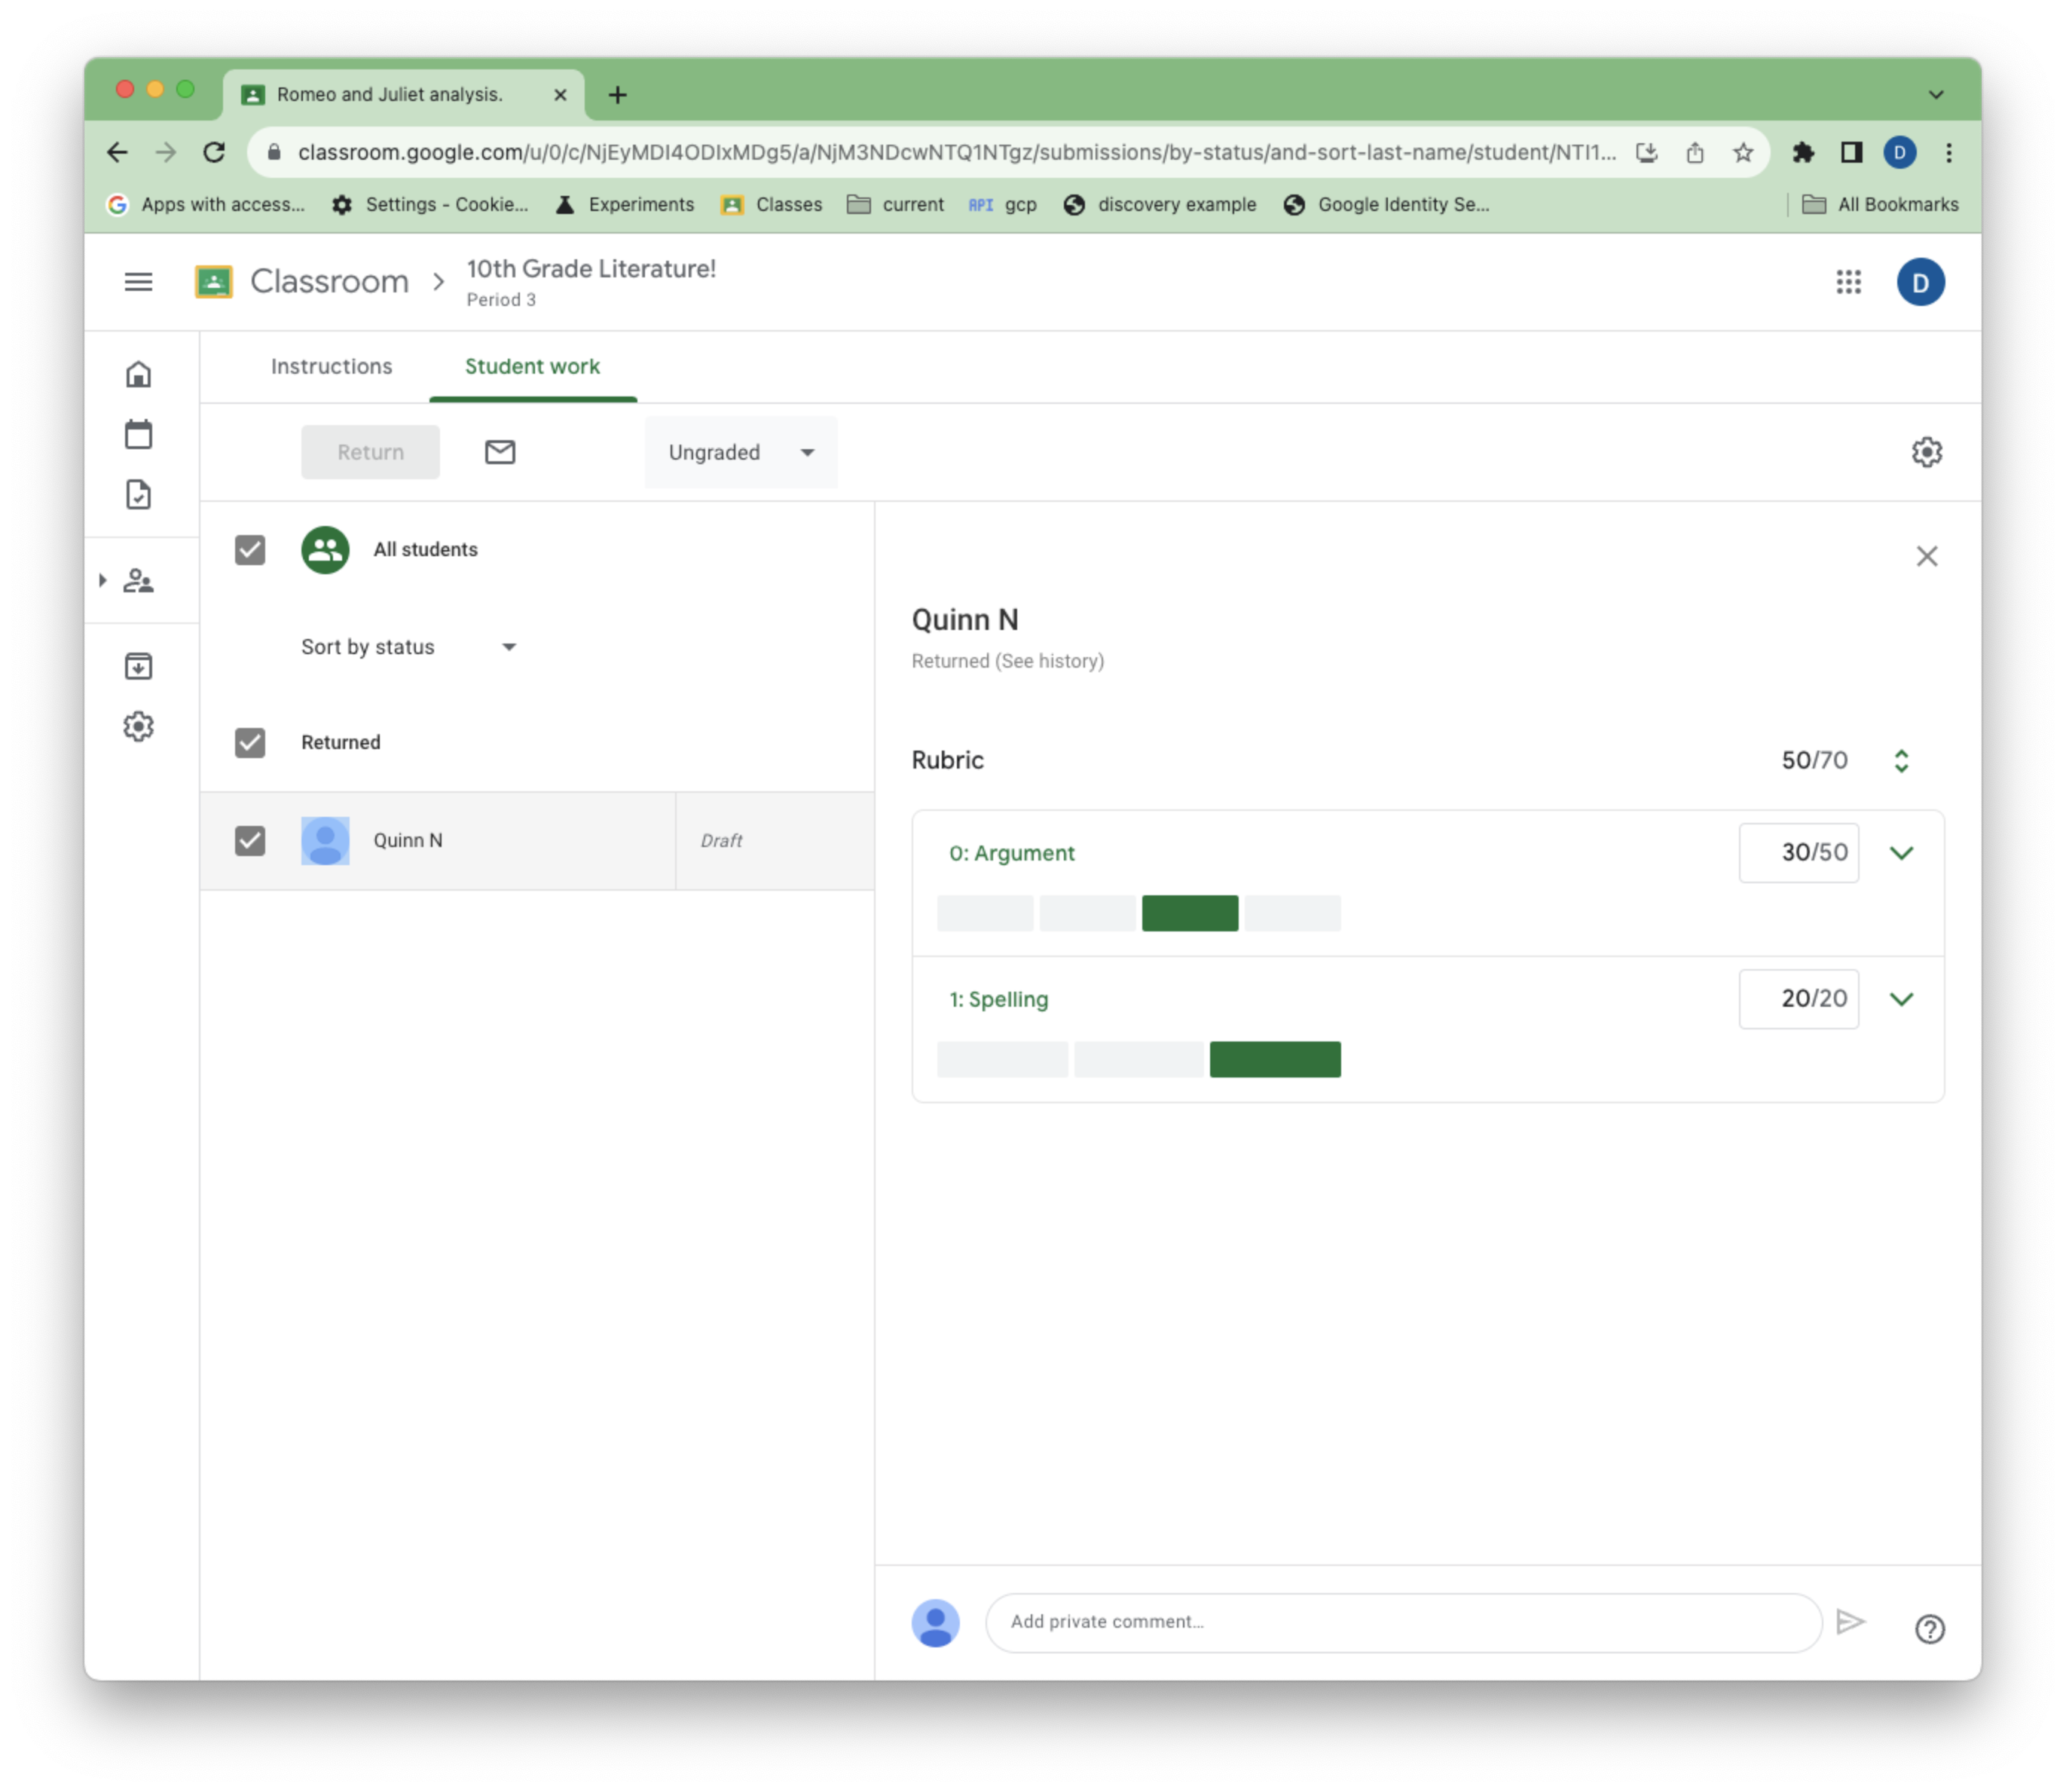 पांचवीं इमेज. ग्रेड देते समय, शिक्षक को दिखने वाला रूब्रिक.
रूब्रिक की मदद से ग्रेड किए गए छात्र-छात्राओं के सबमिट किए गए काम में दो नई प्रॉपर्टी होती हैं: draftRubricGrades और assignedRubricGrades. ये प्रॉपर्टी, ड्राफ़्ट के दौरान शिक्षक के चुने गए पॉइंट और लेवल के साथ-साथ, असाइन किए गए ग्रेड की स्थितियों को दिखाती हैं.
इसके अलावा, किसी रूब्रिक से जुड़े छात्र-छात्राओं के सबमिशन में, ग्रेड देने से पहले भी rubricId
फ़ील्ड होता है. यह CourseWork से जुड़ा नया रूब्रिक दिखाता है. अगर शिक्षक किसी रूब्रिक को मिटाकर नया बनाते हैं, तो यह वैल्यू बदल सकती है.
ग्रेड वाले सबमिशन देखने के लिए, मौजूदा studentSubmissions.Get और
studentSubmissions.List तरीकों का इस्तेमाल किया जा सकता है.
छात्र-छात्राओं के सबमिशन की सूची देखने के लिए, main.py में यह फ़ंक्शन जोड़ें:
def get_latest_submission(service, course_id, coursework_id):
    """Retrieves the last submission for an assignment."""
    try:
        response = service.courses().courseWork().studentSubmissions().list(
            courseId = course_id,
            courseWorkId = coursework_id,
            pageSize=1,
            # Specify the preview version. Rubrics CRUD capabilities are
            # supported in V1_20231110_PREVIEW and later.
            previewVersion="V1_20231110_PREVIEW"
        ).execute()
        submissions = response.get("studentSubmissions", [])
        if not submissions:
            print(
                """No submissions found. Did you remember to turn in and grade
                   the assignment in the UI?""")
            return
        submission = submissions[0]
        return submission

    except HttpError as error:
        print(f"An error occurred: {error}")
        return error
इसके बाद, सबमिशन ग्रेड देखने के लिए, main.py को अपडेट करें और चलाएं.
if __name__ == '__main__':
    service = build_authenticated_service(YOUR_API_KEY)

    submission = get_latest_submission(
        service, YOUR_COURSE_ID, YOUR_COURSEWORK_ID)
    print(json.dumps(submission, indent=4))
draftRubricGrades और assignedRubricGrades में ये शामिल हैं:
- उस रूब्रिक की शर्तों का
criterionId. - हर शर्त के लिए शिक्षक ने जो
pointsअसाइन किया है. यह चुने गए लेवल से हो सकता है, लेकिन शिक्षक ने इसे बदला भी हो सकता है. - हर शर्त के लिए चुने गए लेवल का
levelId. अगर टीचर ने कोई लेवल नहीं चुना है, लेकिन फिर भी शर्त के लिए पॉइंट असाइन किए हैं, तो यह फ़ील्ड मौजूद नहीं होता.
इन सूचियों में सिर्फ़ उन शर्तों के लिए एंट्री होती हैं जिनमें शिक्षक ने कोई लेवल चुना हो या पॉइंट सेट किए हों. उदाहरण के लिए, अगर कोई शिक्षक ग्रेड देते समय सिर्फ़ एक शर्त के साथ इंटरैक्ट करना चाहता है, तो draftRubricGrades और assignedRubricGrades में सिर्फ़ एक आइटम होगा. भले ही, रूब्रिक में कई शर्तें हों.
रूब्रिक मिटाना
किसी रूब्रिक को मिटाने के लिए, स्टैंडर्ड Delete अनुरोध किया जा सकता है. यहां दिया गया कोड, उदाहरण के तौर पर दिया गया फ़ंक्शन दिखाता है. हालांकि, ग्रेडिंग की प्रोसेस शुरू हो चुकी है, इसलिए मौजूदा रूब्रिक को नहीं मिटाया जा सकता:
def delete_rubric(service, course_id, coursework_id, rubric_id):
    """Deletes the rubric on a coursework."""
    try:
        service.courses().courseWork().rubrics().delete(
            courseId=course_id,
            courseWorkId=coursework_id,
            id=rubric_id,
            # Specify the preview version. Rubrics CRUD capabilities are
            # supported in V1_20231110_PREVIEW and later.
            previewVersion="V1_20231110_PREVIEW"
        ).execute()

    except HttpError as error:
        print(f"An error occurred: {error}")
        return error
रूब्रिक एक्सपोर्ट और इंपोर्ट करना
शिक्षक, रूब्रिक को फिर से इस्तेमाल करने के लिए, इन्हें मैन्युअल तरीके से Google Sheets में एक्सपोर्ट कर सकते हैं.
कोड में रूब्रिक की शर्तों के बारे में बताने के अलावा, इन एक्सपोर्ट की गई शीट से रूब्रिक बनाई और अपडेट की जा सकती हैं. इसके लिए, रूब्रिक के मुख्य हिस्से में criteria के बजाय sourceSpreadsheetId डालें:
def create_rubric_from_sheet(service, course_id, coursework_id, sheet_id):
    """Creates an example rubric on a coursework."""
    try:
        body = {
            "sourceSpreadsheetId": sheet_id
        }

        rubric = service.courses().courseWork().rubrics().create(
            courseId=course_id, courseWorkId=coursework_id, body=body,
            # Specify the preview version. Rubrics CRUD capabilities are
            # supported in V1_20231110_PREVIEW and later.
            previewVersion="V1_20231110_PREVIEW"
            ).execute()

        print(f"Rubric created with ID {rubric.get('id')}")
        return rubric

    except HttpError as error:
        print(f"An error occurred: {error}")
        return error
सुझाव/राय दें या शिकायत करें
अगर आपको कोई समस्या मिलती है या आपको कोई सुझाव देना है, तो अपना सुझाव, शिकायत या राय शेयर करें.