Android N 以降で Google Mobile Ads SDK 用に Charles プロキシを設定する
コレクションでコンテンツを整理
必要に応じて、コンテンツの保存と分類を行います。
Android N 以降では、Charles プロキシで広告の呼び出しを確認するために、次の手順が必要です。
- モバイル デバイスで Google Play 開発者サービスを更新します。
- モバイル デバイスでネットワーク トレースを有効にします。
- デバイスに Charles SSL 証明書をインストールし、プロキシを設定します。
- モバイルアプリの SSL プロキシを有効にします。
モバイル デバイスで Google Play 開発者サービスを更新する
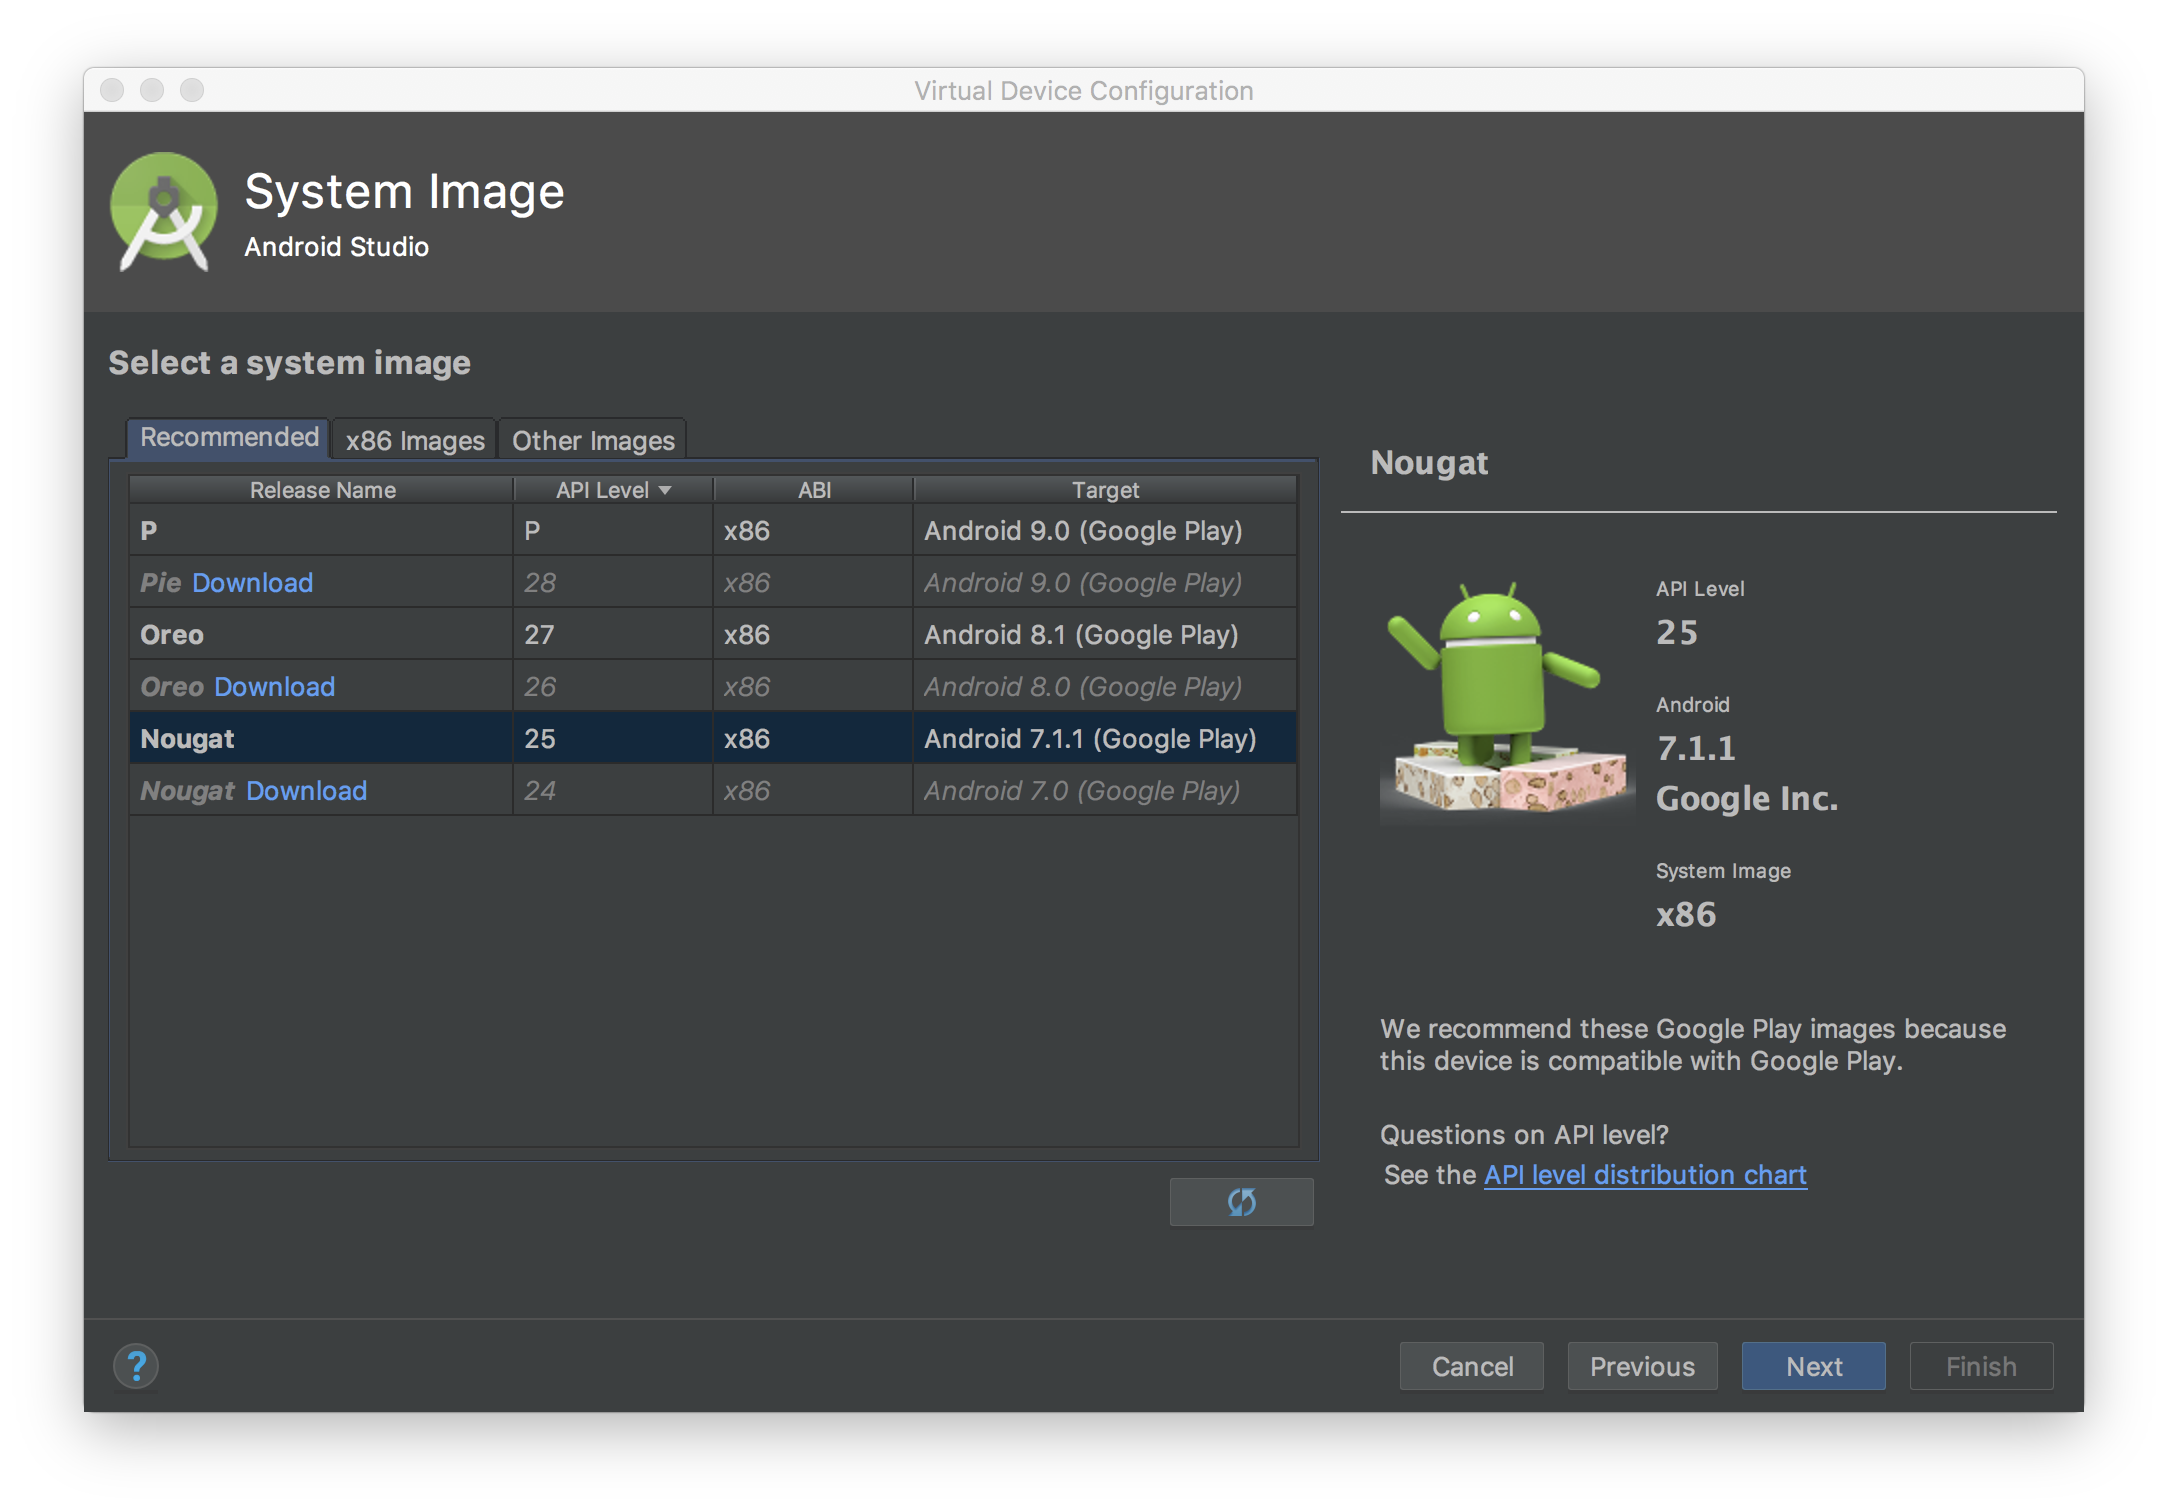
エミュレータを使用する場合、サイドメニューに Google Play のセクションが表示されないときは、Android Studio を更新して、[Virtual Device Configuration] にある最新のシステム イメージをダウンロードしてください。システム イメージを選択する際には、必ずターゲットに Google Play が含まれていることを確認してください。

サイドメニューで Google Play 開発者サービスのバージョンを確認し、最新バージョンに更新します。Google Play 開発者サービスの最低動作バージョンは 14.5.74
です。

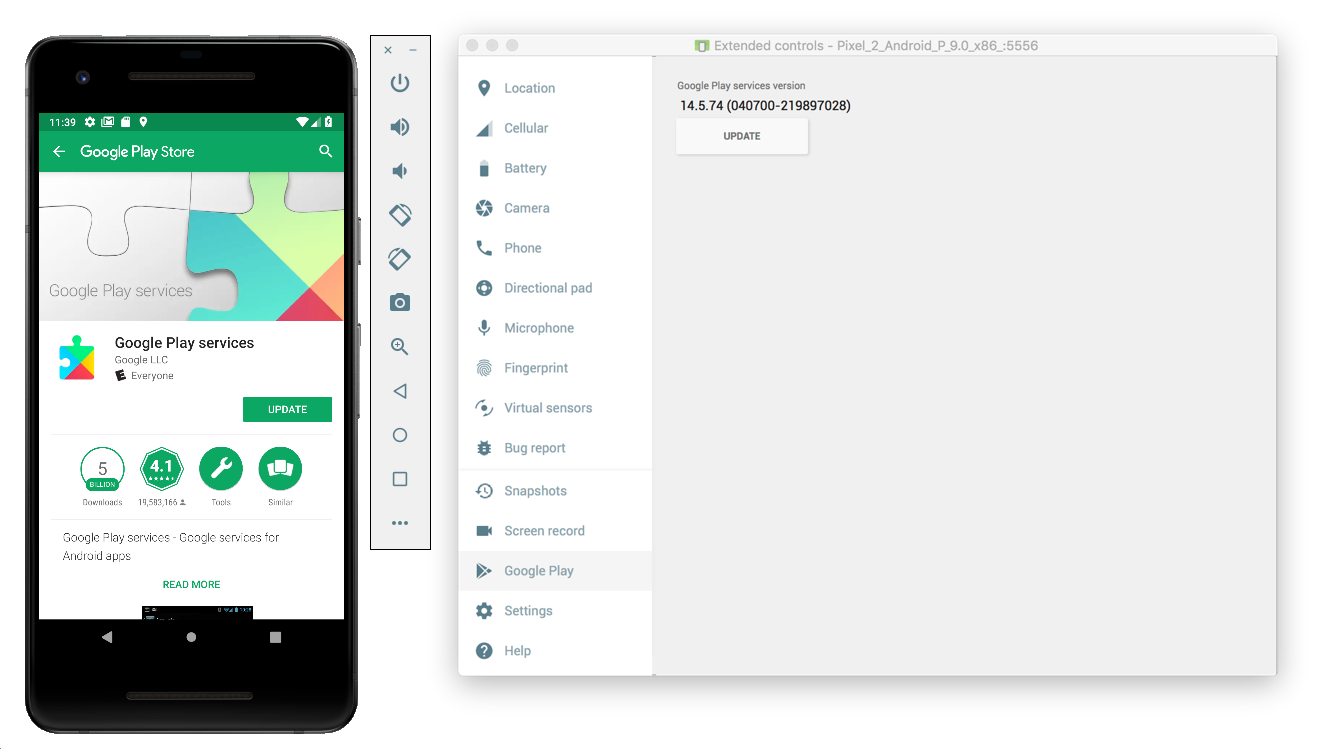
モバイル デバイス本体(スマートフォンまたはタブレット)でこの手順を行う場合は、Google Play を検索するか、こちらのリンクから直接 Google Play を開くことができます。
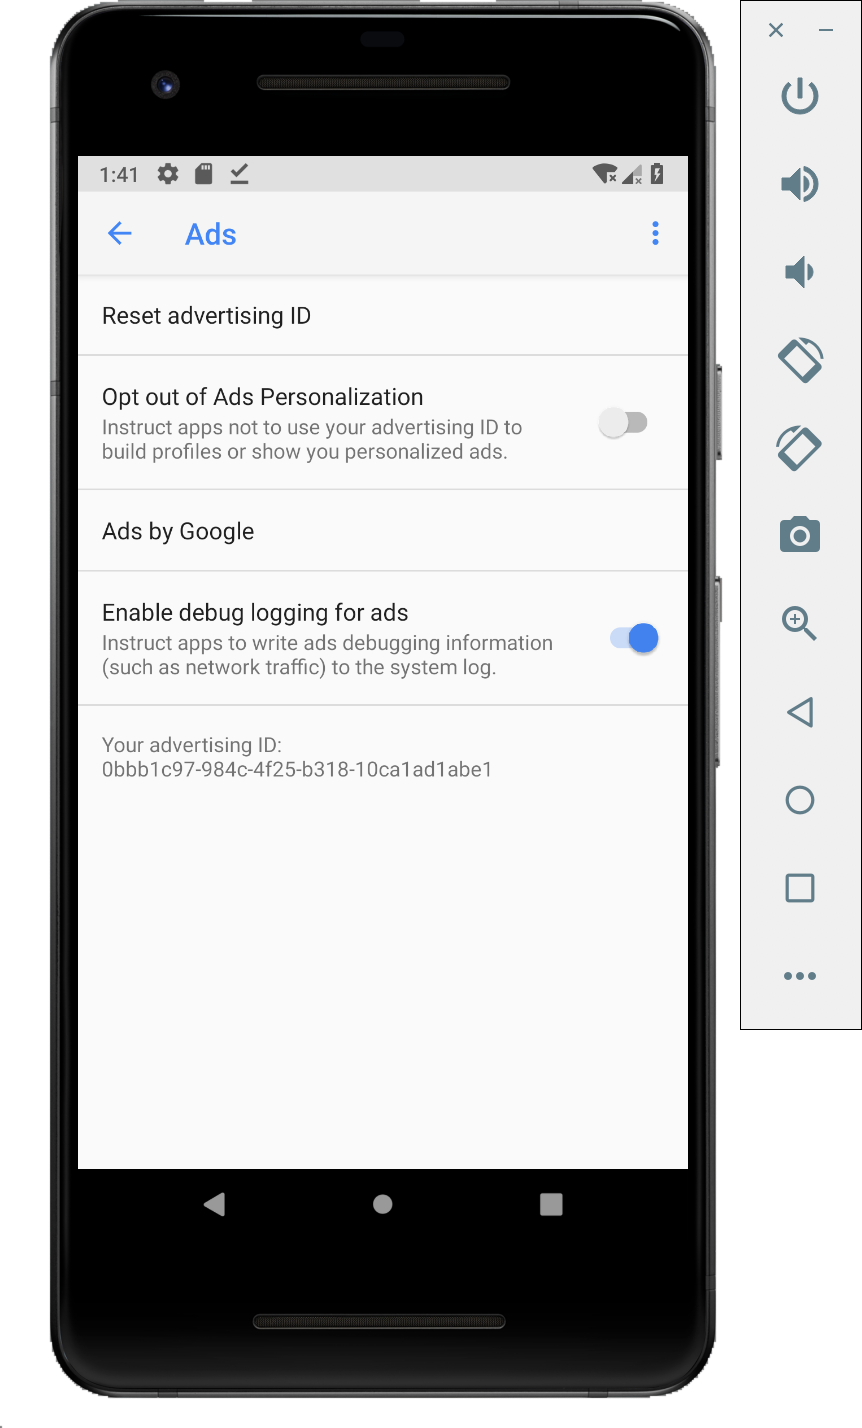
モバイル デバイスでネットワーク トレースを有効にする
ネットワーク トレースを有効にするには、デバイスの開発者向けオプションを有効にする必要があります。Google 設定アプリを起動し、[Google] > [広告] > [広告のデバッグログを有効にする]を選択します。AdMob および Google アド マネージャーのパブリッシャー様は、詳しいガイドをご利用いただけます。

デバイスに Charles SSL 証明書をインストールし、プロキシを設定する
Charles をモバイルアプリのプロキシとして使用するには、Charles をダウンロードし、パソコンにインストールします。表示される手順に沿って、Android エミュレータまたはモバイル デバイスに SSL 証明書をインストールします。

エミュレータは Charles を実行しているパソコンと同じ Wi-Fi ネットワークにすでに接続されているため、エミュレータをプロキシと併用する方が手順はシンプルになります。エミュレータをプロキシと併用する場合は、プロキシを localhost(http://127.0.0.1
)に設定し、Charles プロキシが実行されているポート(Charles メニュー オプションの [Proxy] > [Proxy Settings] で確認できる)を設定します。
モバイル デバイス本体(スマートフォンまたはタブレット)を使用する場合は、Charles を実行しているパソコンと同じ Wi-Fi ネットワークに、高度なネットワーク設定を使用してモバイル デバイスを接続する必要があります。デバイス本体でプロキシを設定する際には、Charles のメニュー オプション [Help] > [Local IP address] を選択して、パソコンの IP アドレスを取得し、デバイスのプロキシ アドレスに入力します(この方法を使用するには、同じ Wi-Fi ネットワークに接続している必要があります)。ポートは、Charles プロキシが実行されているポートを使用してください。
モバイルアプリの SSL プロキシを有効にする
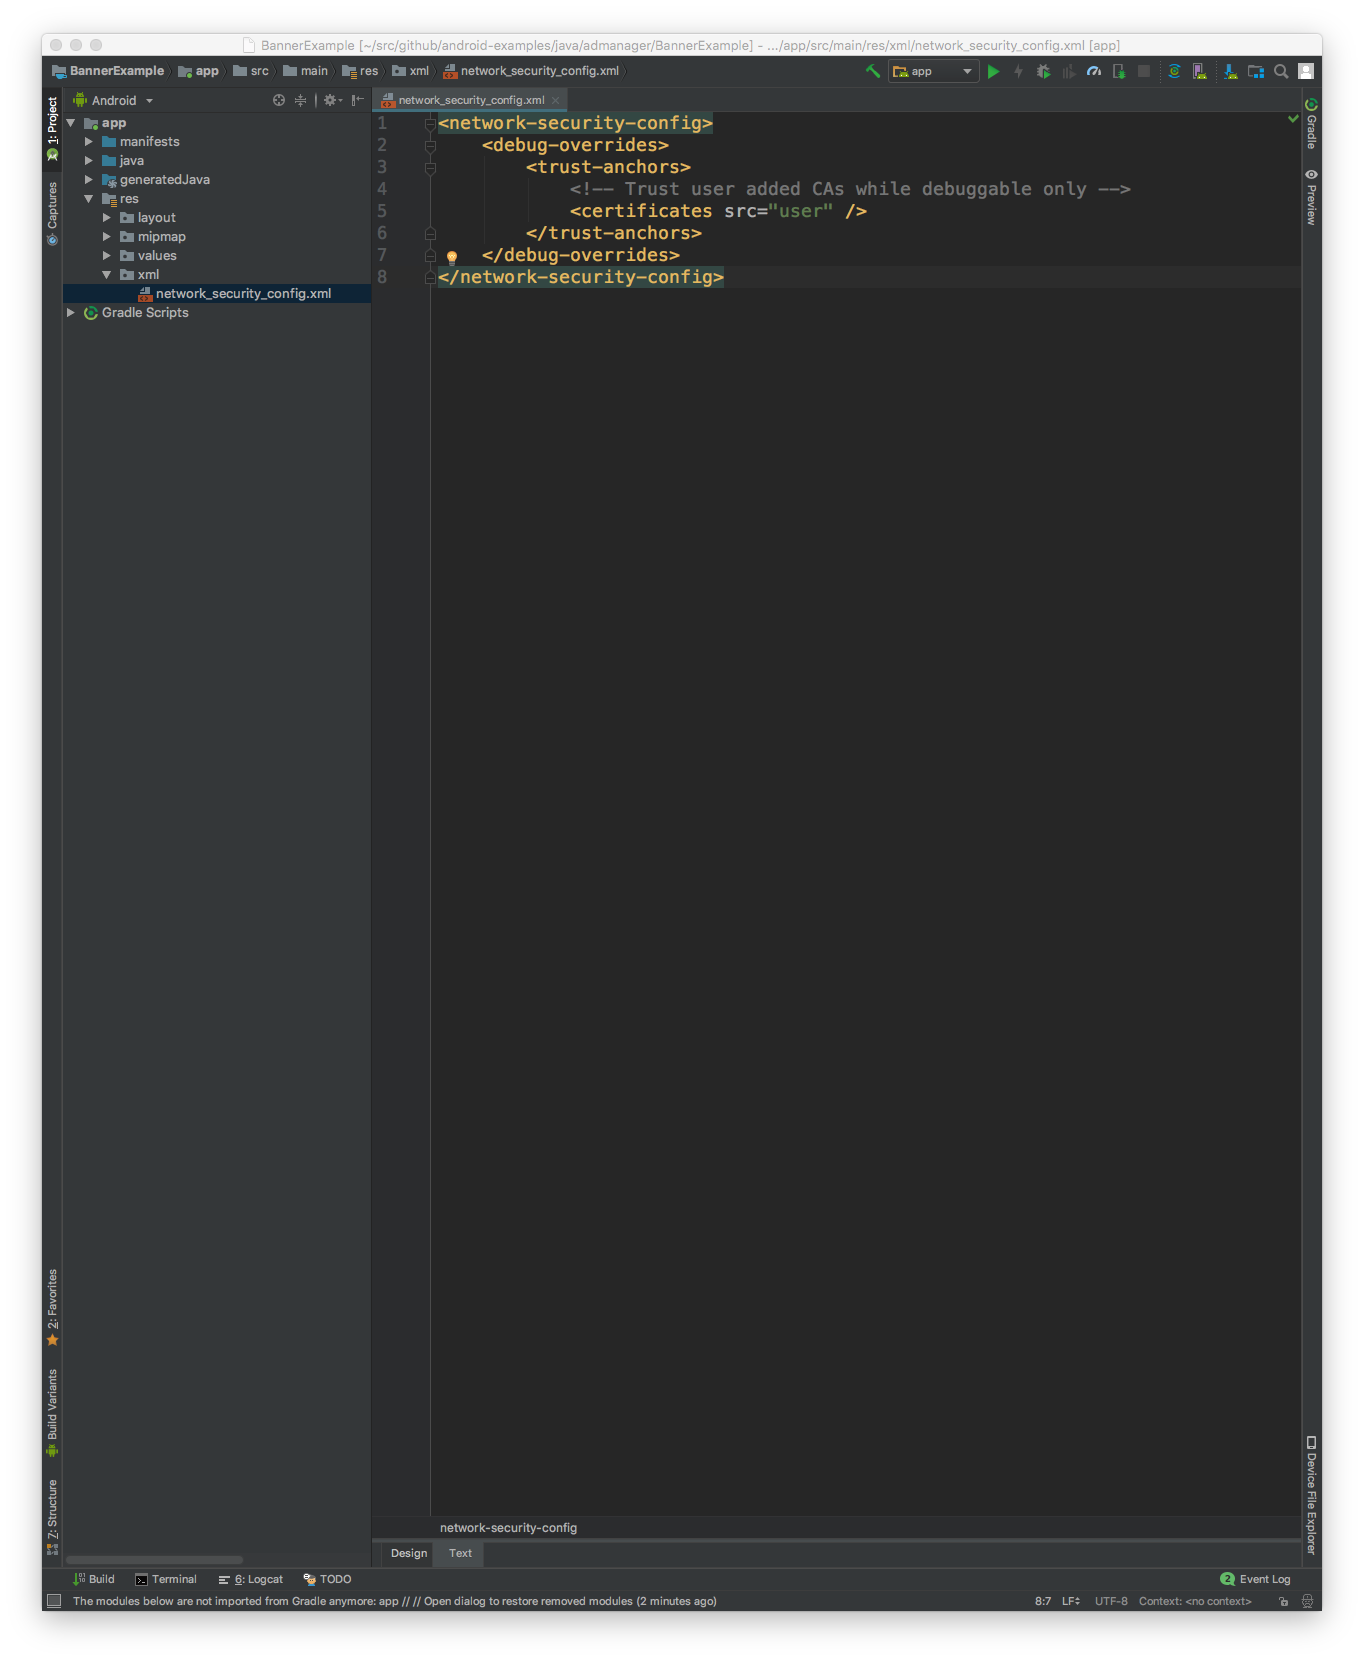
Charles がモバイルアプリの SSL トラフィックをキャプチャするには、ユーザー提供の SSL 証明書が信頼できるものであることを宣言する必要があります。
まずは、ネットワーク セキュリティ構成の新しい XML リソース ファイルを
<network-security-config>
<debug-overrides>
<trust-anchors>
<!-- Trust user added CAs while debuggable only -->
<certificates src="user" />
</trust-anchors>
</debug-overrides>
</network-security-config>

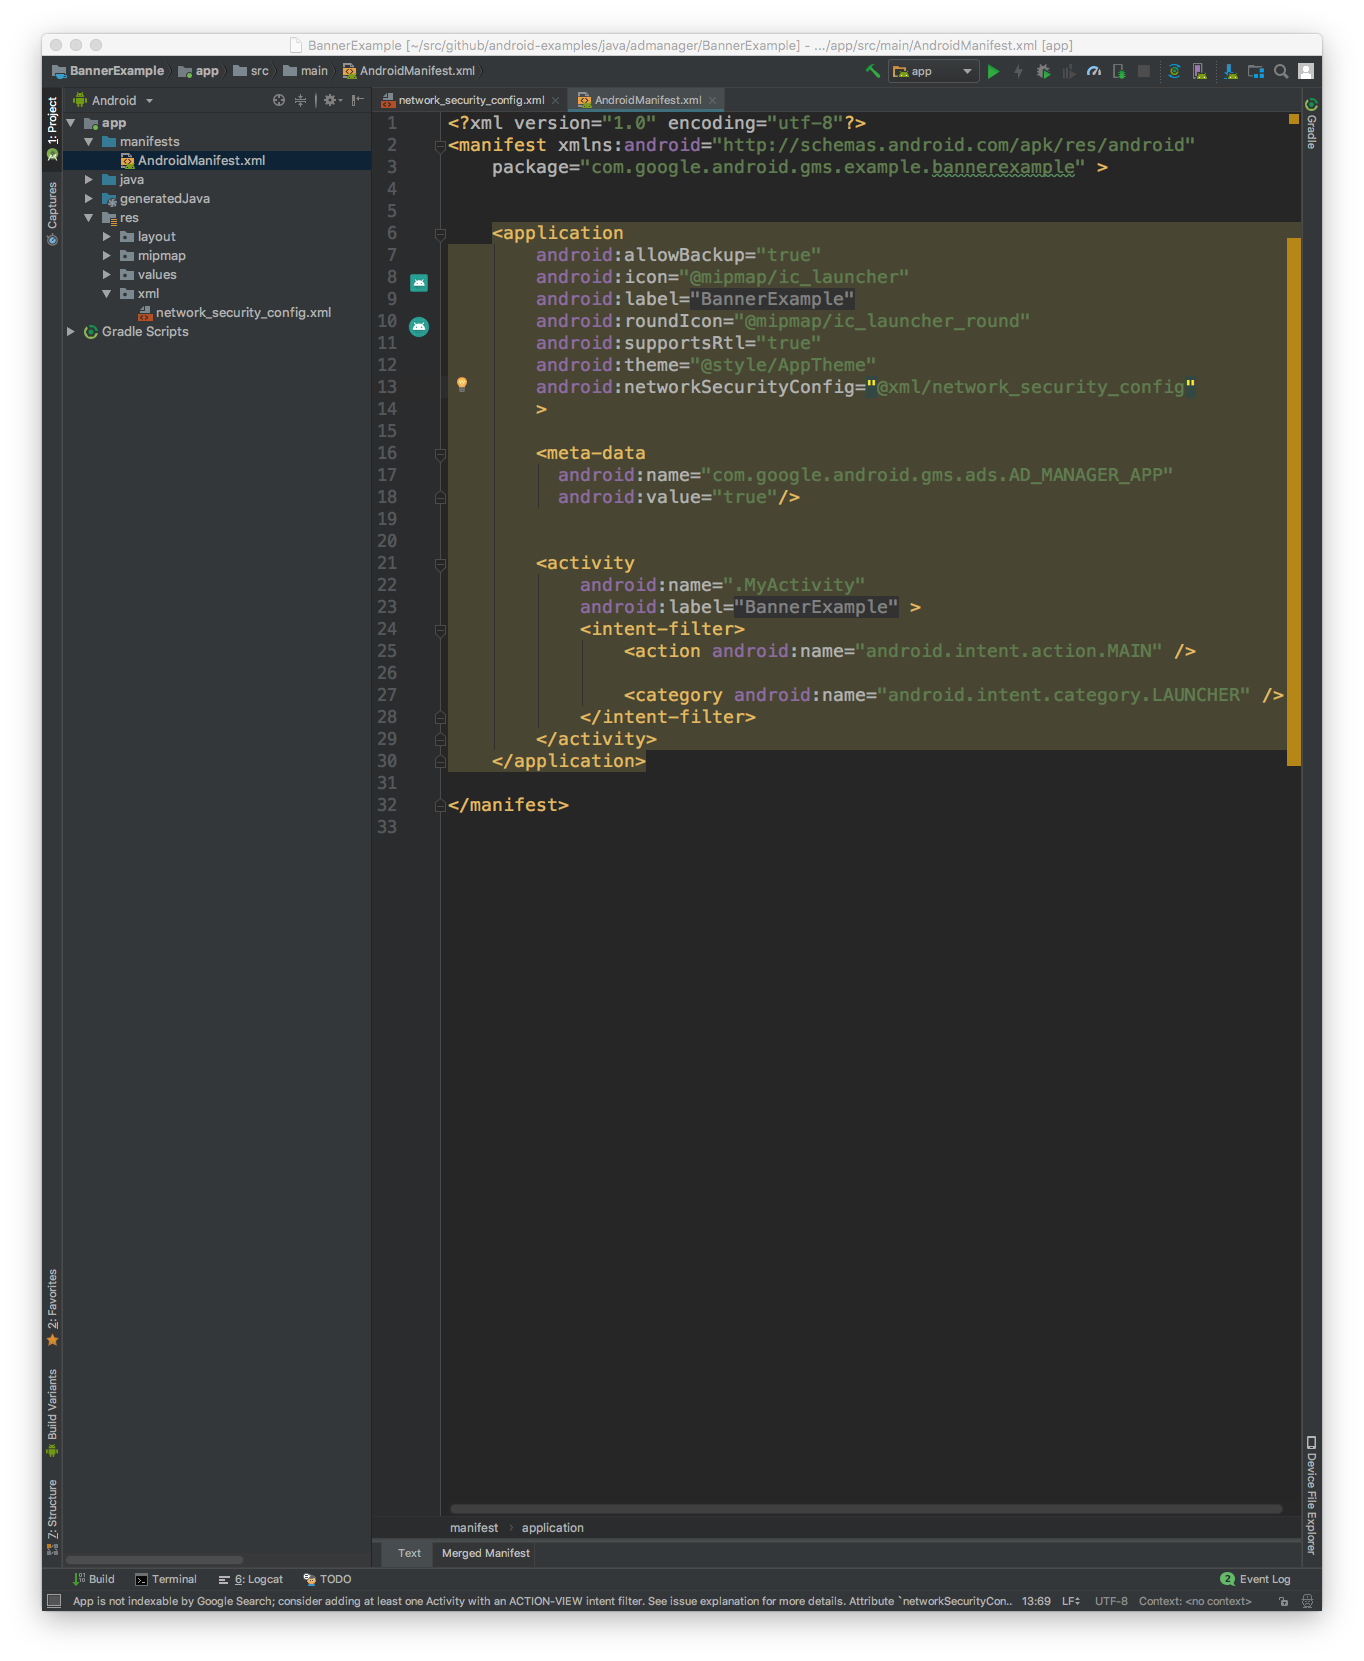
次に、このネットワーク セキュリティ構成を使用するように AndroidManifest.xml
ファイルを更新します。
<?xml version="1.0" encoding="utf-8"?>
<manifest ... >
<application ...
android:networkSecurityConfig="@xml/network_security_config"
... >
...
</application>
</manifest>

これで、モバイルアプリを起動すると、Charles のログで広告リクエストを確認できるようになります。
特に記載のない限り、このページのコンテンツはクリエイティブ・コモンズの表示 4.0 ライセンスにより使用許諾されます。コードサンプルは Apache 2.0 ライセンスにより使用許諾されます。詳しくは、Google Developers サイトのポリシーをご覧ください。Java は Oracle および関連会社の登録商標です。
最終更新日 2025-09-05 UTC。
[[["わかりやすい","easyToUnderstand","thumb-up"],["問題の解決に役立った","solvedMyProblem","thumb-up"],["その他","otherUp","thumb-up"]],[["必要な情報がない","missingTheInformationINeed","thumb-down"],["複雑すぎる / 手順が多すぎる","tooComplicatedTooManySteps","thumb-down"],["最新ではない","outOfDate","thumb-down"],["翻訳に関する問題","translationIssue","thumb-down"],["サンプル / コードに問題がある","samplesCodeIssue","thumb-down"],["その他","otherDown","thumb-down"]],["最終更新日 2025-09-05 UTC。"],[[["\u003cp\u003eOn Android N or higher, specific steps are required to view ad calls in Charles proxy, including updating Google Play services, enabling network tracing, installing the Charles SSL certificate, and configuring SSL proxy settings for your app.\u003c/p\u003e\n"],["\u003cp\u003eFor successful network tracing, ensure your Google Play services version is at least 14.5.74 and enable debug logging for ads within the Google Settings app.\u003c/p\u003e\n"],["\u003cp\u003eInstalling the Charles SSL certificate requires downloading Charles on your computer and following the instructions provided to install the certificate on your emulator or mobile device.\u003c/p\u003e\n"],["\u003cp\u003eWhen using Charles proxy, ensure your mobile device and computer are on the same Wi-Fi network and correctly configure proxy settings using either localhost for emulators or your computer's local IP address for physical devices.\u003c/p\u003e\n"],["\u003cp\u003eTo enable Charles to intercept SSL traffic from your mobile app, you need to declare trust for user-provided SSL certificates by adding a network security configuration XML file and updating your app's AndroidManifest.xml file.\u003c/p\u003e\n"]]],[],null,["On Android N or higher, ad calls are visible in Charles proxy only when the\nfollowing steps are performed:\n\n1. Update the Google Play services on the mobile device.\n2. Enable Network Tracing on the mobile device.\n3. Install Charles SSL certificate on your device, and set up proxy.\n4. Enable SSL Proxy for your mobile app.\n\nUpdate the Google Play services on the mobile device\n\nFor an emulator, if you don't see the Google Play section in the side menu,\nyou may need to update the Android Studio and download the latest system\nimages in the **Virtual Device Configuration**. Make sure to use a system\nimage with Google Play in its target.\n\nUse the side menu to check and update Google Play services to the latest\nversion. The minimum working version of the Google Play services is\n`14.5.74`.\n\nFor a physical mobile device (phone or tablet), you can search for Google\nPlay or follow this\n[link](//play.google.com/store/apps/details?id=com.google.android.gms)\nto open Google Play directly.\n\nEnable Network Tracing on the mobile device\n\nTo enable network tracing, you will need to [enable developer\noptions](//developer.android.com/studio/debug/dev-options) for your\ndevice. Launch the Google Settings app and select **Google \\\u003e Ads \\\u003e Enable\ndebug logging for ads** . A more detailed\n[guide](/admob/android/network-tracing) is\navailable for both AdMob and Google Ad Manager publishers.\n\nInstall Charles SSL certificate on your device, and set up proxy\n\nTo use Charles as a proxy for your mobile app, you will need to download and\n[install](//www.charlesproxy.com/documentation/installation/) Charles\non a computer. Follow Charles' instructions to install an SSL certificate on\nthe Android emulator or mobile device.\n\nIt is simpler to [use the emulator with a\nproxy](//developer.android.com/studio/run/emulator-networking#proxy) because the\nemulator is already connected to the same Wi-Fi network with the computer\nrunning Charles. When using the emulator with a proxy, set the proxy to\nlocalhost (`http://127.0.0.1`) and the port that Charles proxy is running on\n(found in Charles menu option **Proxy \\\u003e Proxy Settings**).\n\nIf you're using a physical mobile device (phone or tablet), you'll need to\nconnect the mobile device to the same Wi-Fi network with your computer\nrunning Charles using the [advanced network\nsettings](//support.google.com/pixelphone/answer/2819519). When setting up the\nproxy settings for your physical device, use the Charles menu option **Help \\\u003e\nLocal IP address** to get the IP address of your computer, to enter for the proxy\naddress on your device (you must be on the same Wi-Fi network for this to work).\nUse the port that Charles proxy is running on.\n\nEnable SSL Proxy for your mobile app\n\nFor Charles to intercept your mobile app's SSL traffic, you will need to declare\nthat your app can trust a user-provided SSL certificate.\n\nFirst, you will need to add a new XML resource file for [Network Security\nConfiguration](//developer.android.com/training/articles/security-config) under \n\n \u003cnetwork-security-config\u003e\n \u003cdebug-overrides\u003e\n \u003ctrust-anchors\u003e\n \u003c!-- Trust user added CAs while debuggable only --\u003e\n \u003ccertificates src=\"user\" /\u003e\n \u003c/trust-anchors\u003e\n \u003c/debug-overrides\u003e\n \u003c/network-security-config\u003e\n\nNext, update the `AndroidManifest.xml` file to use the network security\nconfiguration. \n\n \u003c?xml version=\"1.0\" encoding=\"utf-8\"?\u003e\n \u003cmanifest ... \u003e\n \u003capplication ...\n android:networkSecurityConfig=\"@xml/network_security_config\"\n ... \u003e\n ...\n \u003c/application\u003e\n \u003c/manifest\u003e\n\nAfter that, you can launch the mobile app and look for ad requests in the\nCharles log."]]