إعداد خادم وكيل Charles لحزمة "SDK لإعلانات Google على الأجهزة الجوّالة" على نظام التشغيل Android N أو الإصدارات الأحدث
تنظيم صفحاتك في مجموعات
يمكنك حفظ المحتوى وتصنيفه حسب إعداداتك المفضّلة.
في نظام التشغيل Android N أو الإصدارات الأحدث، لا تظهر طلبات الإعلانات في Charles proxy إلا عند اتّباع الخطوات التالية:
- تحديث "خدمات Google Play" على الجهاز الجوّال
- فعِّل ميزة "تتبُّع الشبكة" على الجهاز الجوّال.
- ثبِّت شهادة طبقة المقابس الآمنة (SSL) في Charles على جهازك، وأعِدّ الخادم الوكيل.
- فعِّل خادم وكيل طبقة المقابس الآمنة لتطبيقك على الأجهزة الجوّالة.
تحديث "خدمات Google Play" على الجهاز الجوّال
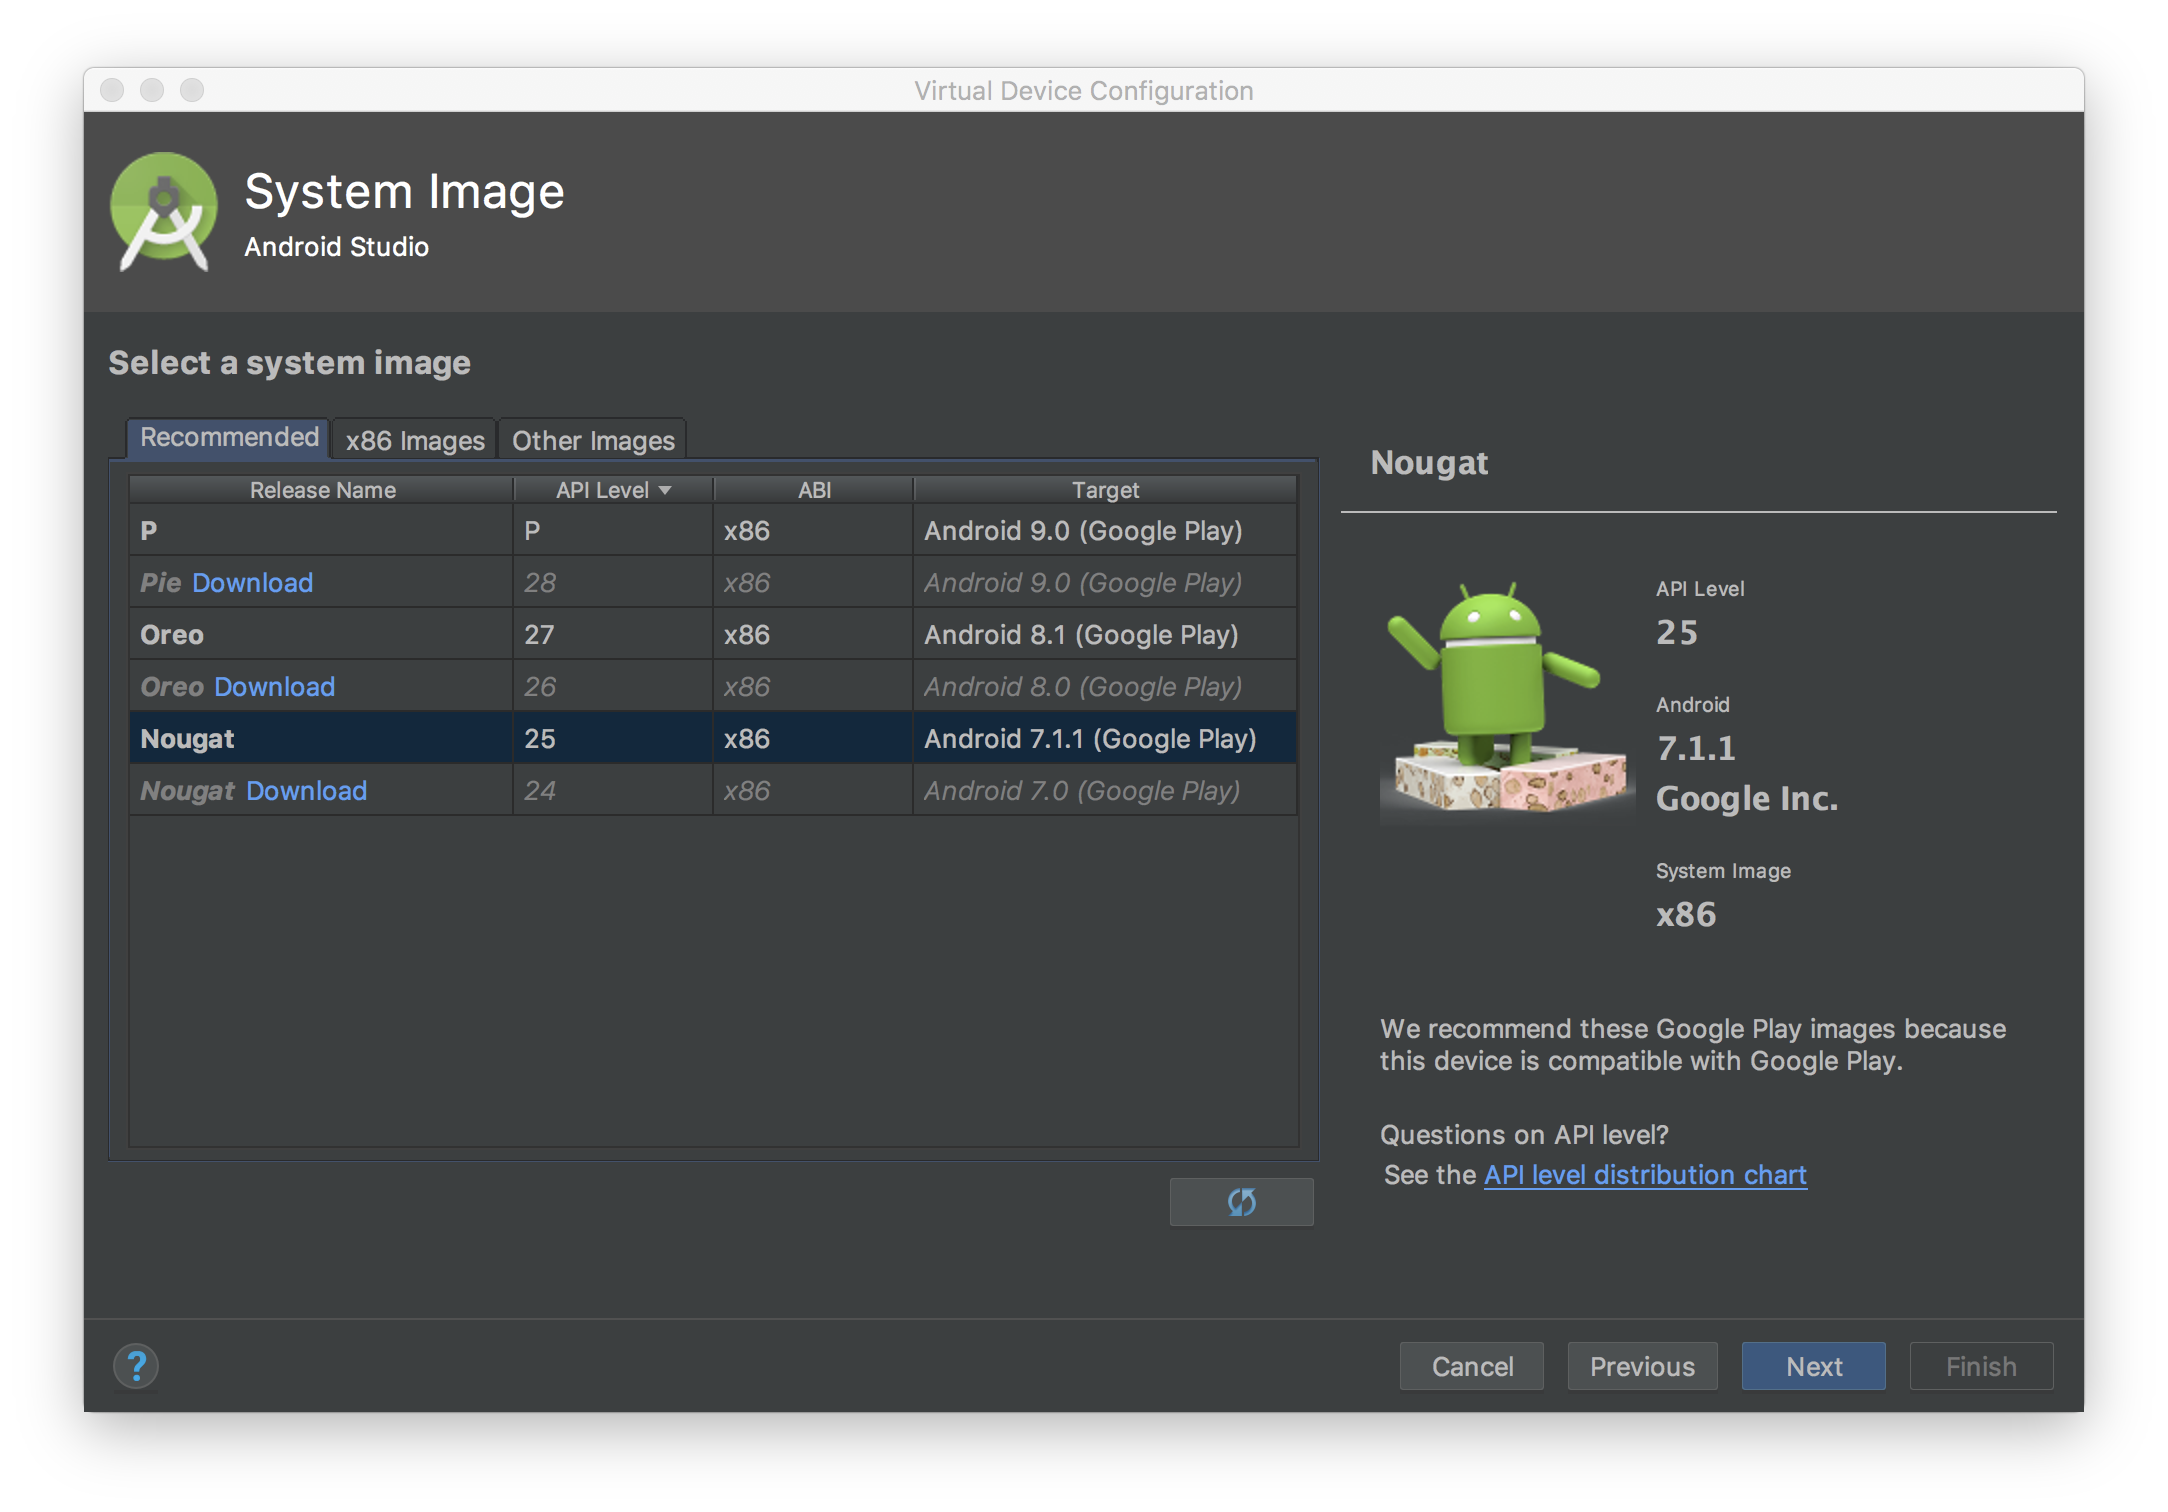
في المحاكي، إذا لم يظهر قسم Google Play في القائمة الجانبية، قد تحتاج إلى تحديث Android Studio وتنزيل أحدث صور النظام في إعداد الجهاز الافتراضي. احرص على استخدام صورة نظام تتضمّن Google Play في هدفها.
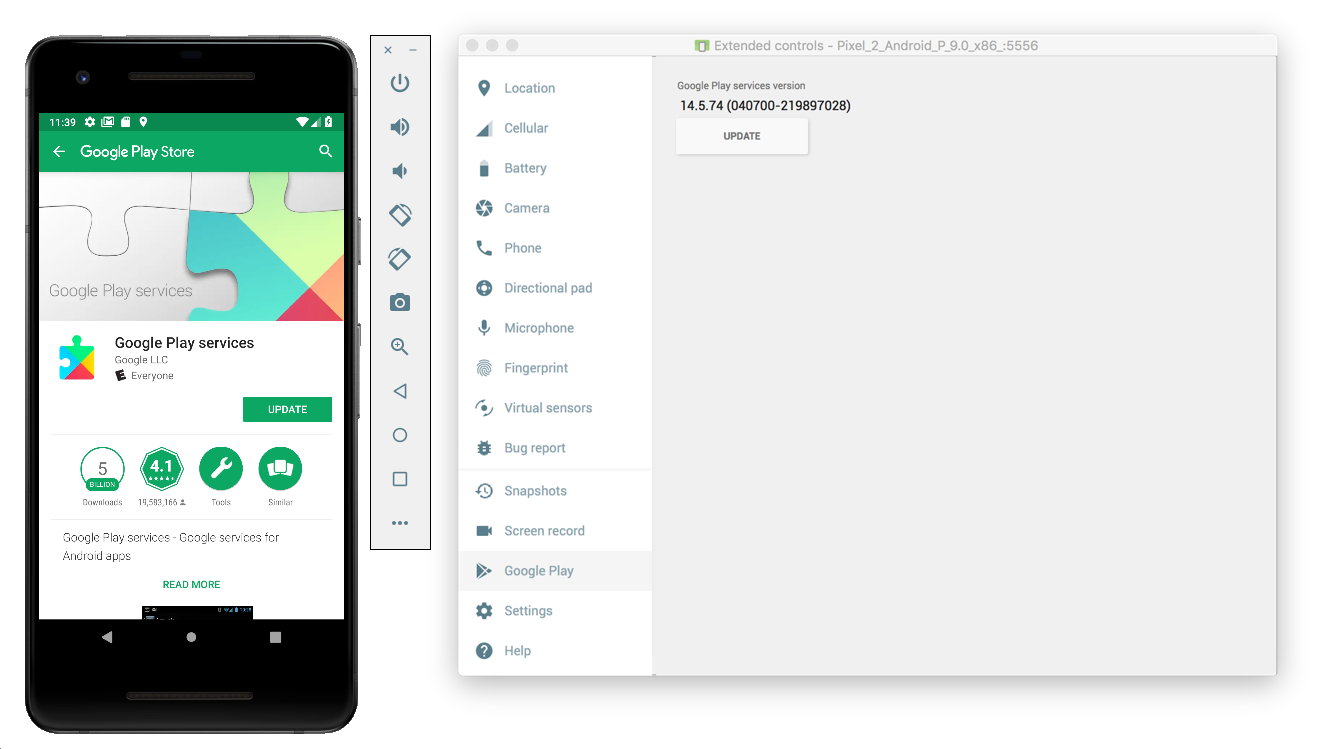
استخدِم القائمة الجانبية للتحقّق من إصدار "خدمات Google Play" وتحديثه إلى أحدث إصدار. الحدّ الأدنى للإصدار الذي يمكن استخدامه من "خدمات Google Play" هو 14.5.74
.

بالنسبة إلى جهاز جوّال فعلي (هاتف أو جهاز لوحي)، يمكنك البحث عن Google Play أو اتّباع هذا الرابط لفتح Google Play مباشرةً.
تفعيل ميزة "تتبُّع الشبكة" على الجهاز الجوّال
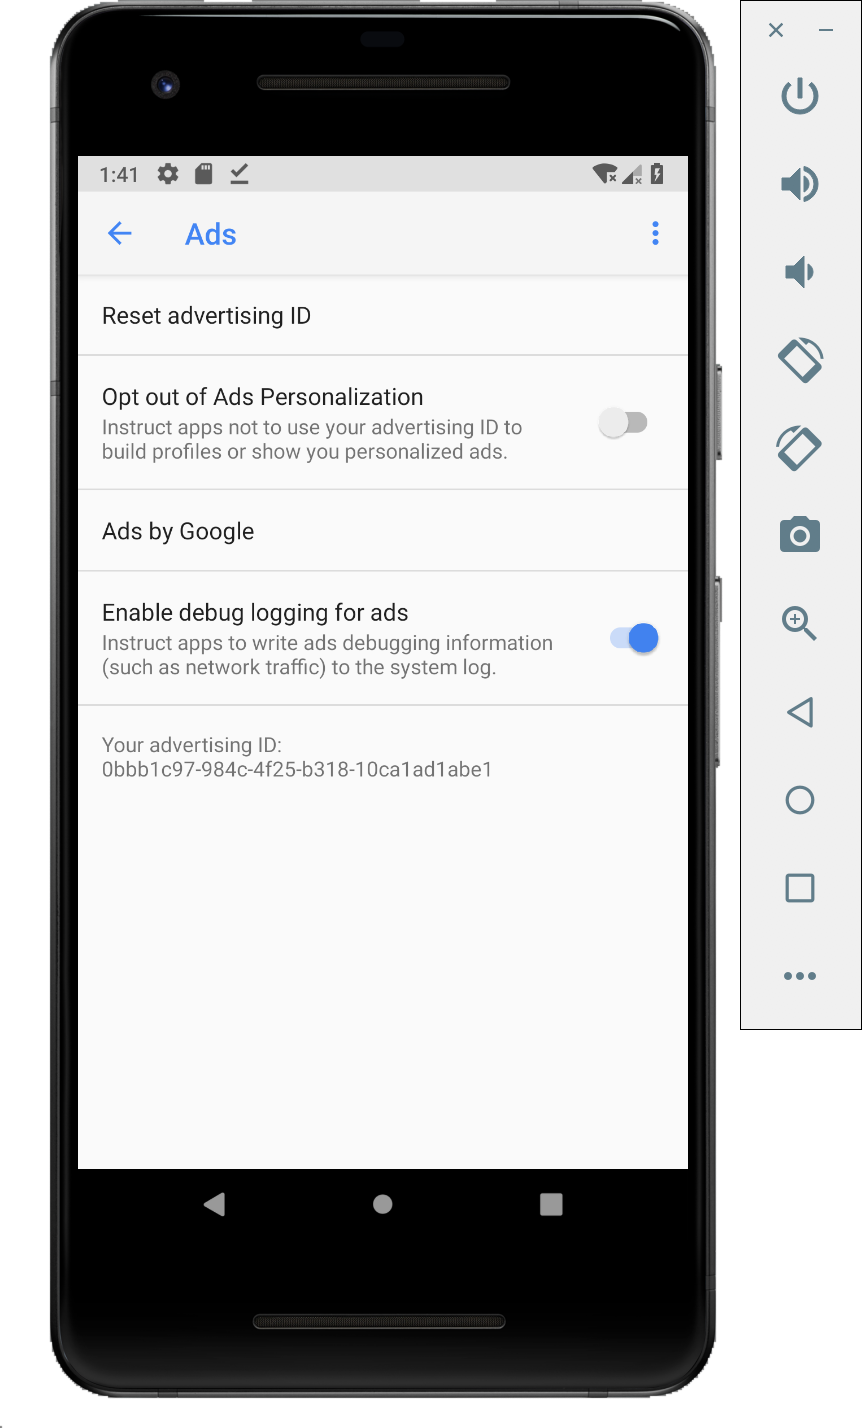
لتفعيل تتبُّع الشبكة، عليك تفعيل خيارات المطوّرين على جهازك. افتح تطبيق "إعدادات Google" واختَر Google > الإعلانات > تفعيل
تسجيل بيانات تصحيح الأخطاء للإعلانات. يتوفّر دليل أكثر تفصيلاً لكل من ناشري AdMob و"مدير إعلانات Google".

تثبيت شهادة طبقة المقابس الآمنة (SSL) في Charles على جهازك وإعداد الخادم الوكيل
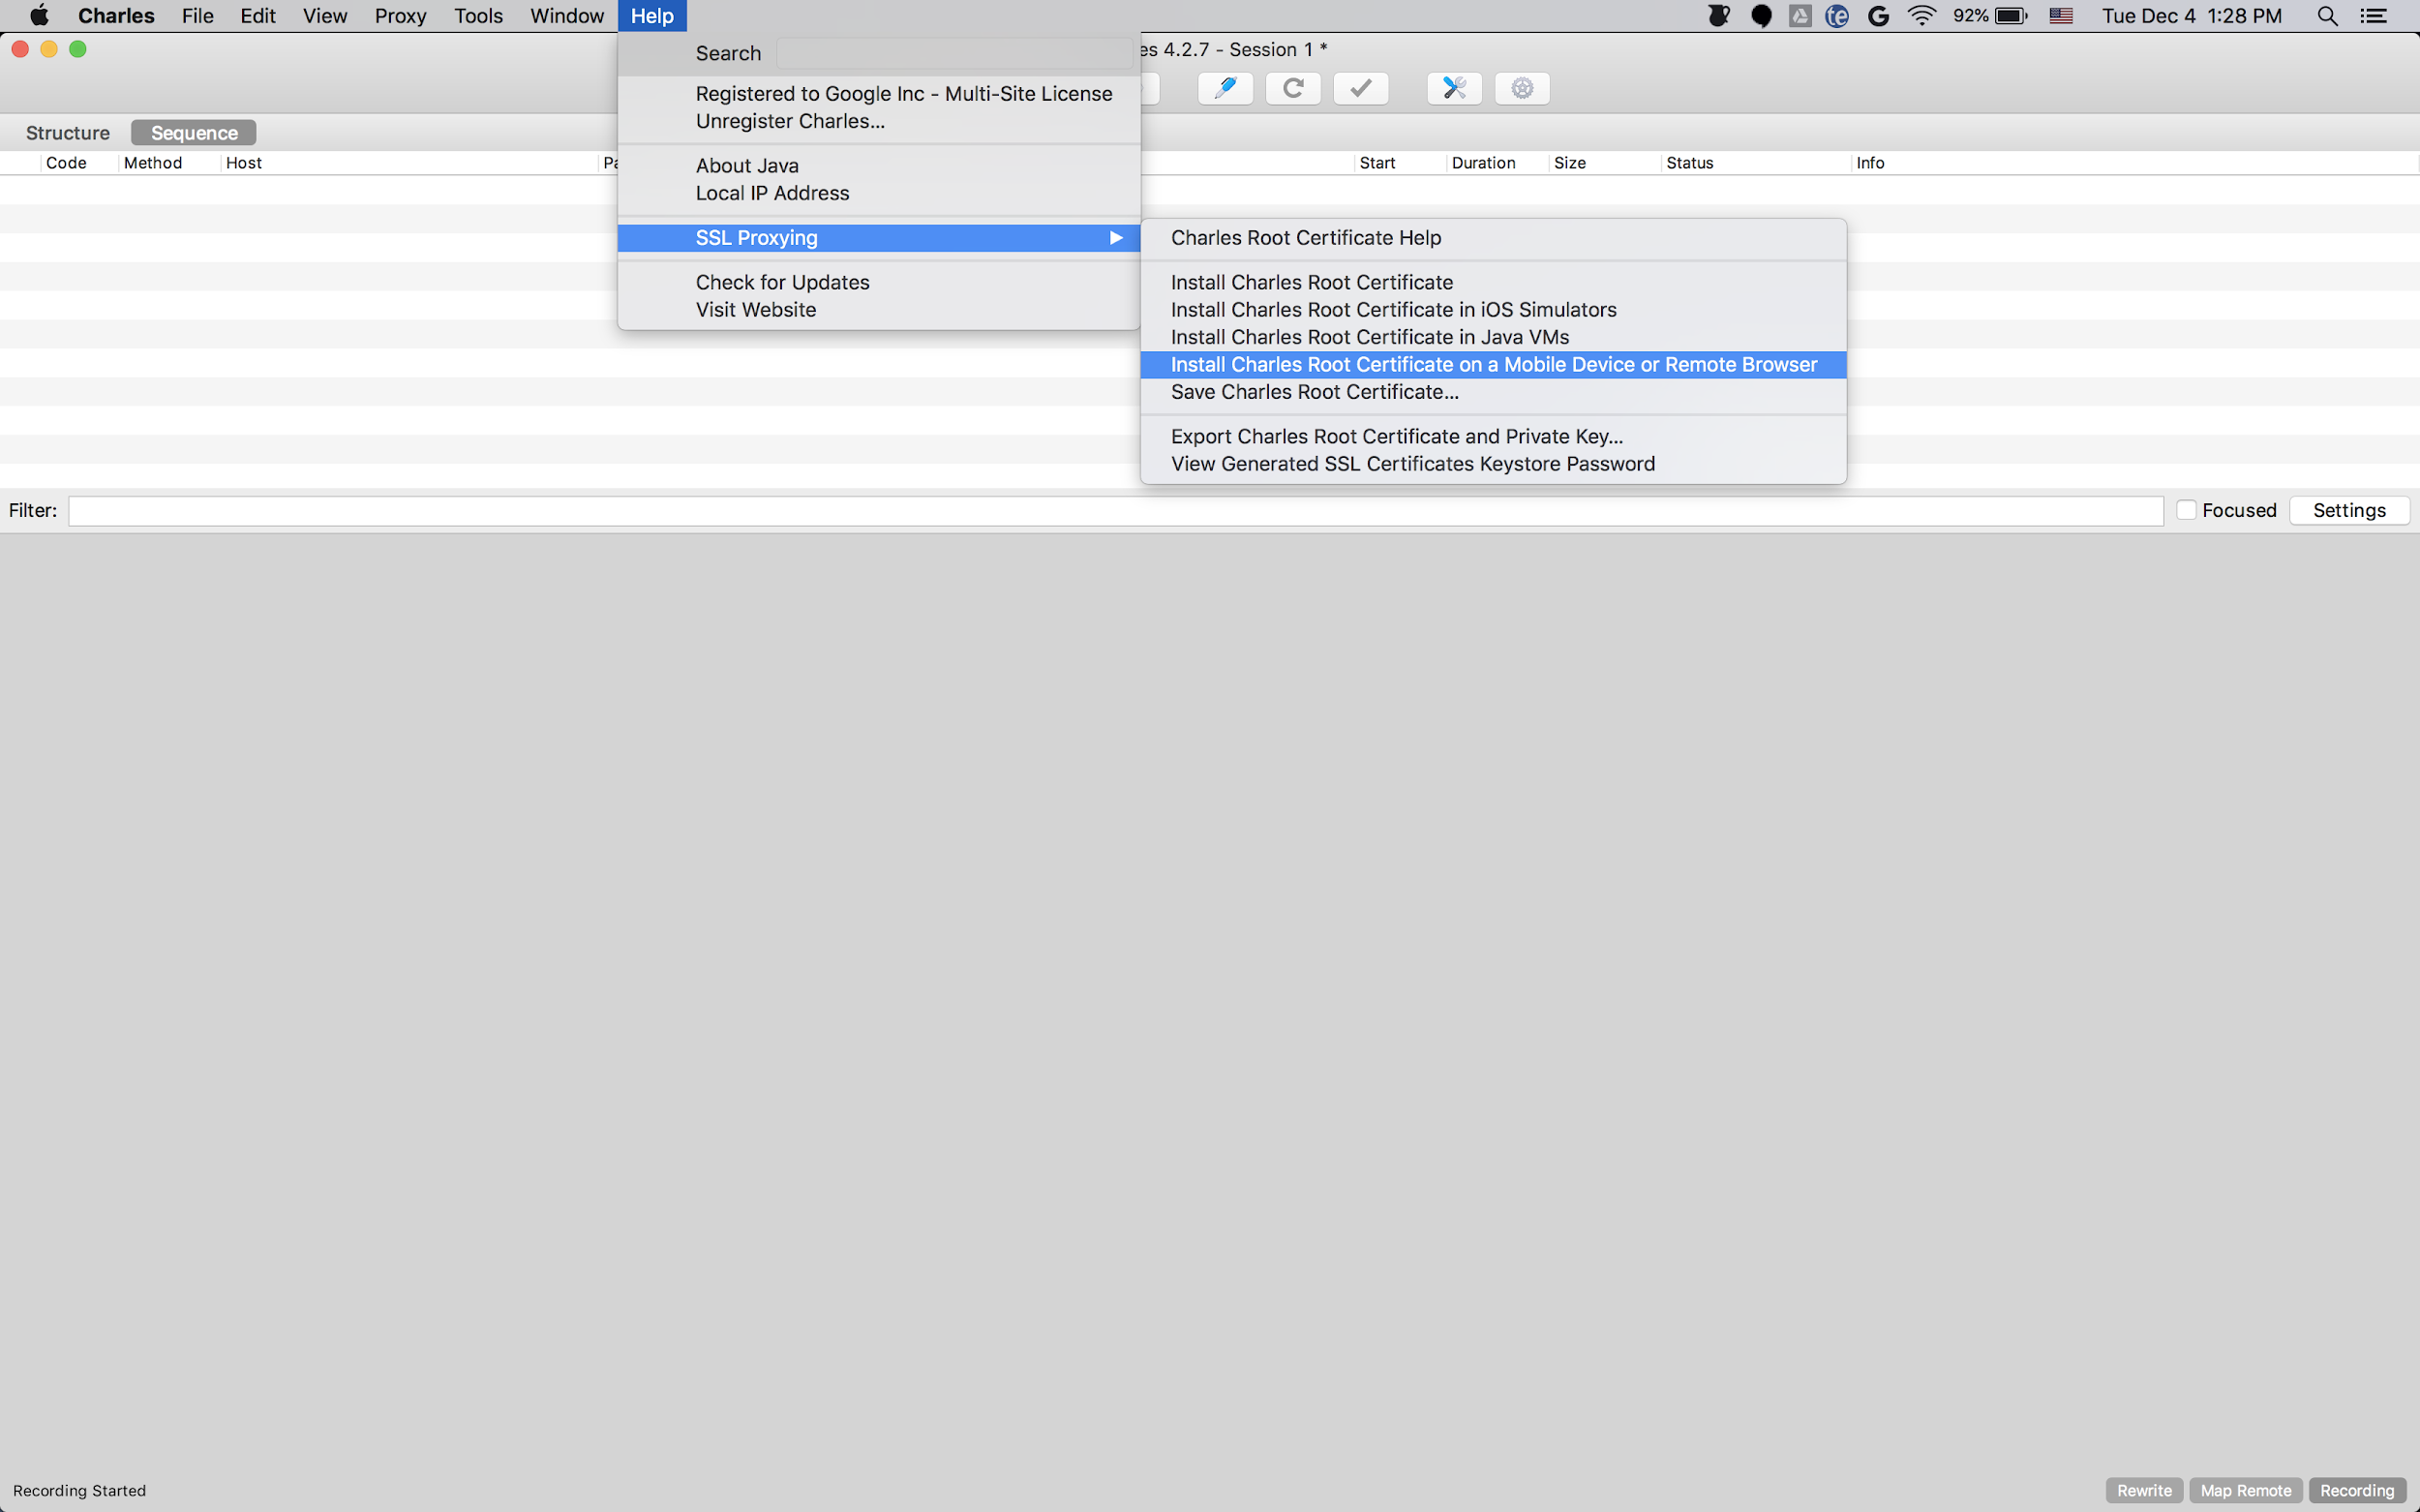
لاستخدام Charles كخادم وكيل لتطبيقك على الأجهزة الجوّالة، عليك تنزيل برنامج Charles وتثبيته على جهاز كمبيوتر. اتّبِع تعليمات Charles لتثبيت شهادة SSL على محاكي Android أو الجهاز الجوّال.

من الأسهل استخدام المحاكي مع
خادم وكيل لأنّ
المحاكي يكون متصلاً بشبكة Wi-Fi نفسها التي يتصل بها الكمبيوتر
الذي يتم تشغيل Charles عليه. عند استخدام المحاكي مع خادم وكيل، اضبط الخادم الوكيل على المضيف المحلي (http://127.0.0.1
) والمنفذ الذي يعمل عليه خادم Charles الوكيل (يمكنك العثور عليه في خيار قائمة Charles الخادم الوكيل > إعدادات الخادم الوكيل).
إذا كنت تستخدم جهازًا جوّالاً فعليًا (هاتفًا أو جهازًا لوحيًا)، عليك ربط الجهاز الجوّال بشبكة Wi-Fi نفسها التي يتصل بها الكمبيوتر الذي يشغّل Charles، وذلك باستخدام إعدادات الشبكة المتقدّمة. عند إعداد إعدادات الخادم الوكيل لجهازك الفعلي، استخدِم خيار القائمة Help > Local IP address (مساعدة > عنوان IP المحلي) في Charles للحصول على عنوان IP لجهاز الكمبيوتر، ثم أدخِله كعنوان الخادم الوكيل على جهازك (يجب أن تكون متصلاً بشبكة Wi-Fi نفسها لكي ينجح ذلك).
استخدِم المنفذ الذي يتم تشغيل خادم Charles الوكيل عليه.
تفعيل خادم وكيل طبقة المقابس الآمنة لتطبيقك على الأجهزة الجوّالة
لكي يتمكّن Charles من اعتراض زيارات طبقة المقابس الآمنة (SSL) لتطبيقك على الأجهزة الجوّالة، عليك الإفصاح عن أنّ تطبيقك يمكنه الوثوق بشهادة طبقة المقابس الآمنة (SSL) التي يقدّمها المستخدم.
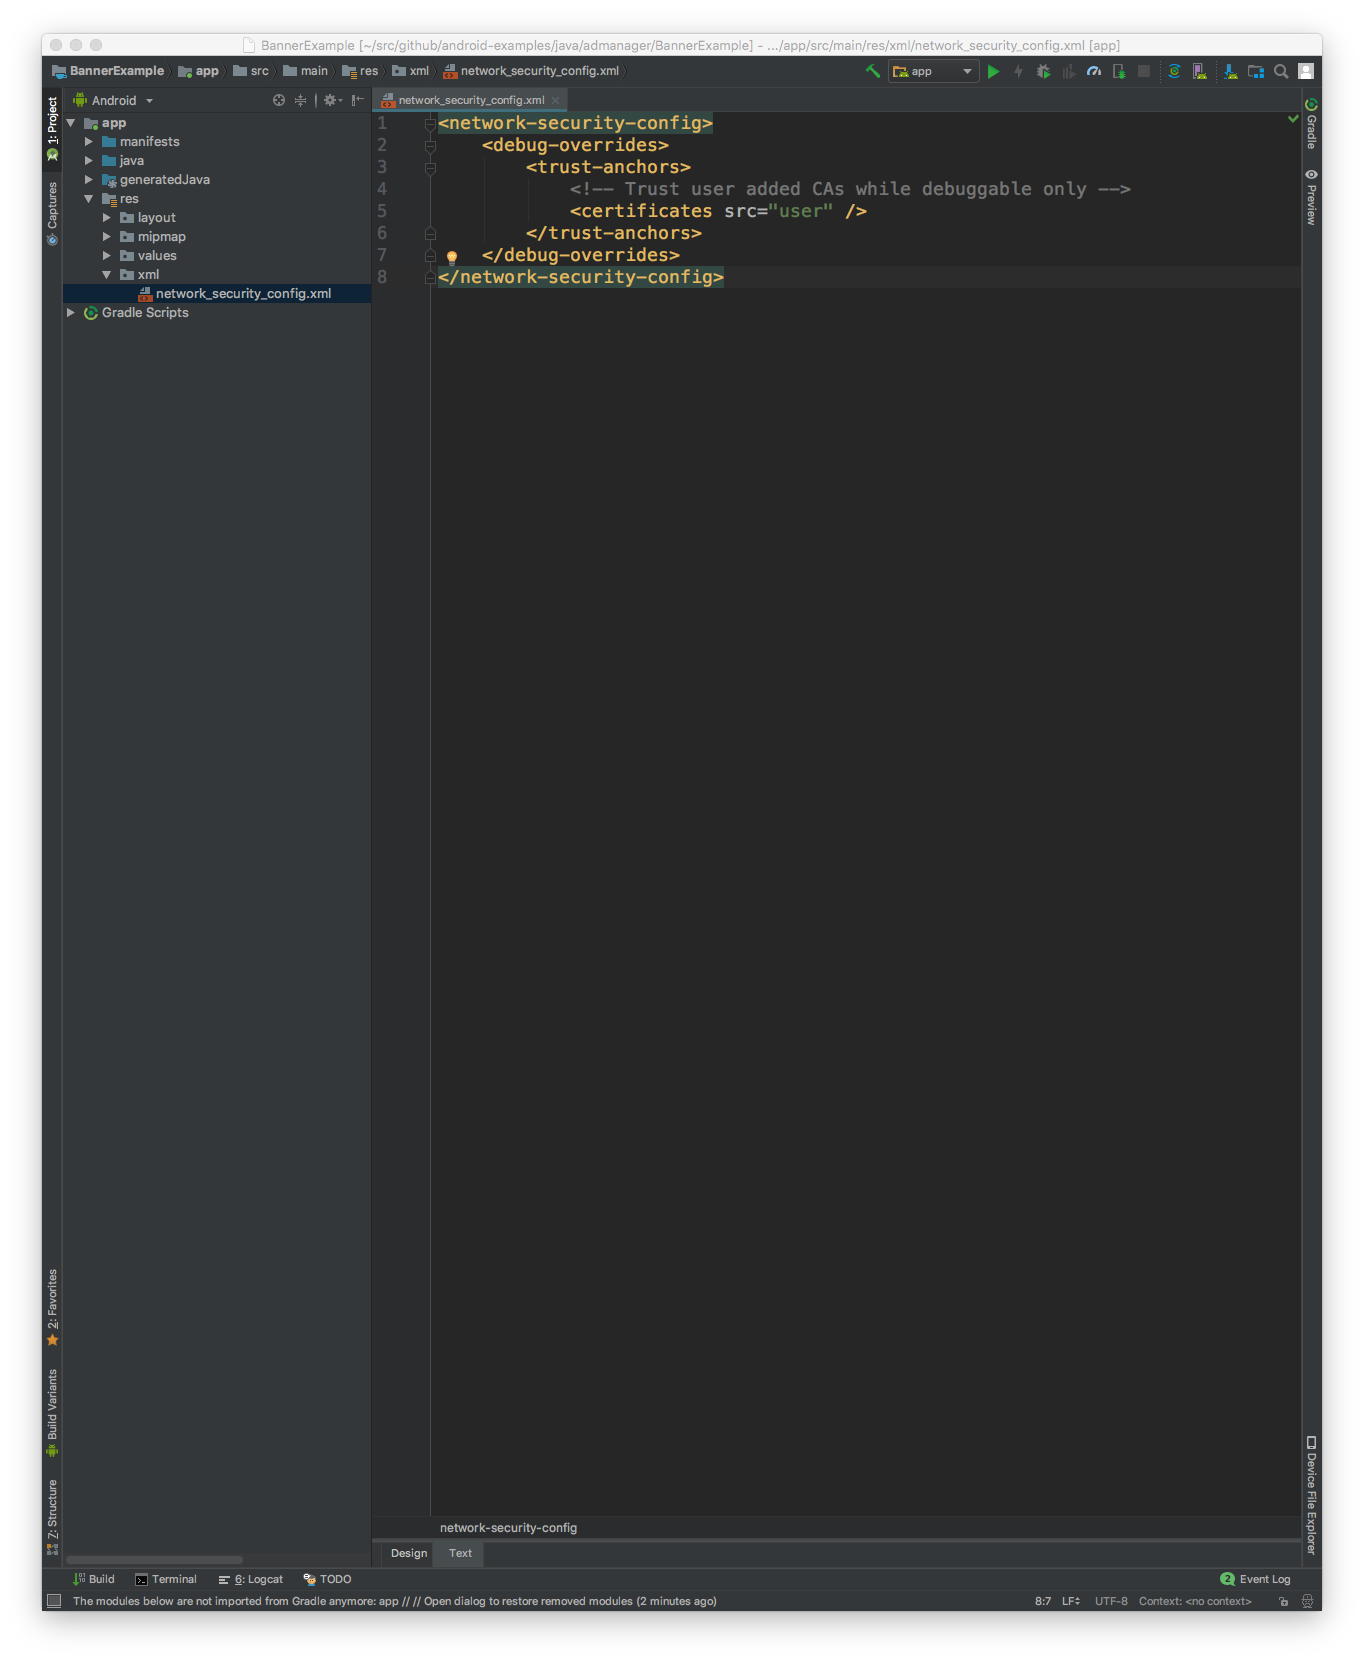
عليك أولاً إضافة ملف موارد XML جديد لإعدادات أمان الشبكة ضمن
<network-security-config>
<debug-overrides>
<trust-anchors>
<!-- Trust user added CAs while debuggable only -->
<certificates src="user" />
</trust-anchors>
</debug-overrides>
</network-security-config>

بعد ذلك، عدِّل ملف AndroidManifest.xml
لاستخدام إعدادات أمان الشبكة.
<?xml version="1.0" encoding="utf-8"?>
<manifest ... >
<application ...
android:networkSecurityConfig="@xml/network_security_config"
... >
...
</application>
</manifest>

بعد ذلك، يمكنك تشغيل تطبيق الأجهزة الجوّالة والبحث عن طلبات الإعلانات في سجلّ Charles.
إنّ محتوى هذه الصفحة مرخّص بموجب ترخيص Creative Commons Attribution 4.0 ما لم يُنصّ على خلاف ذلك، ونماذج الرموز مرخّصة بموجب ترخيص Apache 2.0. للاطّلاع على التفاصيل، يُرجى مراجعة سياسات موقع Google Developers. إنّ Java هي علامة تجارية مسجَّلة لشركة Oracle و/أو شركائها التابعين.
تاريخ التعديل الأخير: 2025-09-05 (حسب التوقيت العالمي المتفَّق عليه)
[[["يسهُل فهم المحتوى.","easyToUnderstand","thumb-up"],["ساعَدني المحتوى في حلّ مشكلتي.","solvedMyProblem","thumb-up"],["غير ذلك","otherUp","thumb-up"]],[["لا يحتوي على المعلومات التي أحتاج إليها.","missingTheInformationINeed","thumb-down"],["الخطوات معقدة للغاية / كثيرة جدًا.","tooComplicatedTooManySteps","thumb-down"],["المحتوى قديم.","outOfDate","thumb-down"],["ثمة مشكلة في الترجمة.","translationIssue","thumb-down"],["مشكلة في العيّنات / التعليمات البرمجية","samplesCodeIssue","thumb-down"],["غير ذلك","otherDown","thumb-down"]],["تاريخ التعديل الأخير: 2025-09-05 (حسب التوقيت العالمي المتفَّق عليه)"],[[["\u003cp\u003eOn Android N or higher, specific steps are required to view ad calls in Charles proxy, including updating Google Play services, enabling network tracing, installing the Charles SSL certificate, and configuring SSL proxy settings for your app.\u003c/p\u003e\n"],["\u003cp\u003eFor successful network tracing, ensure your Google Play services version is at least 14.5.74 and enable debug logging for ads within the Google Settings app.\u003c/p\u003e\n"],["\u003cp\u003eInstalling the Charles SSL certificate requires downloading Charles on your computer and following the instructions provided to install the certificate on your emulator or mobile device.\u003c/p\u003e\n"],["\u003cp\u003eWhen using Charles proxy, ensure your mobile device and computer are on the same Wi-Fi network and correctly configure proxy settings using either localhost for emulators or your computer's local IP address for physical devices.\u003c/p\u003e\n"],["\u003cp\u003eTo enable Charles to intercept SSL traffic from your mobile app, you need to declare trust for user-provided SSL certificates by adding a network security configuration XML file and updating your app's AndroidManifest.xml file.\u003c/p\u003e\n"]]],[],null,["On Android N or higher, ad calls are visible in Charles proxy only when the\nfollowing steps are performed:\n\n1. Update the Google Play services on the mobile device.\n2. Enable Network Tracing on the mobile device.\n3. Install Charles SSL certificate on your device, and set up proxy.\n4. Enable SSL Proxy for your mobile app.\n\nUpdate the Google Play services on the mobile device\n\nFor an emulator, if you don't see the Google Play section in the side menu,\nyou may need to update the Android Studio and download the latest system\nimages in the **Virtual Device Configuration**. Make sure to use a system\nimage with Google Play in its target.\n\nUse the side menu to check and update Google Play services to the latest\nversion. The minimum working version of the Google Play services is\n`14.5.74`.\n\nFor a physical mobile device (phone or tablet), you can search for Google\nPlay or follow this\n[link](//play.google.com/store/apps/details?id=com.google.android.gms)\nto open Google Play directly.\n\nEnable Network Tracing on the mobile device\n\nTo enable network tracing, you will need to [enable developer\noptions](//developer.android.com/studio/debug/dev-options) for your\ndevice. Launch the Google Settings app and select **Google \\\u003e Ads \\\u003e Enable\ndebug logging for ads** . A more detailed\n[guide](/admob/android/network-tracing) is\navailable for both AdMob and Google Ad Manager publishers.\n\nInstall Charles SSL certificate on your device, and set up proxy\n\nTo use Charles as a proxy for your mobile app, you will need to download and\n[install](//www.charlesproxy.com/documentation/installation/) Charles\non a computer. Follow Charles' instructions to install an SSL certificate on\nthe Android emulator or mobile device.\n\nIt is simpler to [use the emulator with a\nproxy](//developer.android.com/studio/run/emulator-networking#proxy) because the\nemulator is already connected to the same Wi-Fi network with the computer\nrunning Charles. When using the emulator with a proxy, set the proxy to\nlocalhost (`http://127.0.0.1`) and the port that Charles proxy is running on\n(found in Charles menu option **Proxy \\\u003e Proxy Settings**).\n\nIf you're using a physical mobile device (phone or tablet), you'll need to\nconnect the mobile device to the same Wi-Fi network with your computer\nrunning Charles using the [advanced network\nsettings](//support.google.com/pixelphone/answer/2819519). When setting up the\nproxy settings for your physical device, use the Charles menu option **Help \\\u003e\nLocal IP address** to get the IP address of your computer, to enter for the proxy\naddress on your device (you must be on the same Wi-Fi network for this to work).\nUse the port that Charles proxy is running on.\n\nEnable SSL Proxy for your mobile app\n\nFor Charles to intercept your mobile app's SSL traffic, you will need to declare\nthat your app can trust a user-provided SSL certificate.\n\nFirst, you will need to add a new XML resource file for [Network Security\nConfiguration](//developer.android.com/training/articles/security-config) under \n\n \u003cnetwork-security-config\u003e\n \u003cdebug-overrides\u003e\n \u003ctrust-anchors\u003e\n \u003c!-- Trust user added CAs while debuggable only --\u003e\n \u003ccertificates src=\"user\" /\u003e\n \u003c/trust-anchors\u003e\n \u003c/debug-overrides\u003e\n \u003c/network-security-config\u003e\n\nNext, update the `AndroidManifest.xml` file to use the network security\nconfiguration. \n\n \u003c?xml version=\"1.0\" encoding=\"utf-8\"?\u003e\n \u003cmanifest ... \u003e\n \u003capplication ...\n android:networkSecurityConfig=\"@xml/network_security_config\"\n ... \u003e\n ...\n \u003c/application\u003e\n \u003c/manifest\u003e\n\nAfter that, you can launch the mobile app and look for ad requests in the\nCharles log."]]