
This document guides you through the process of configuring your experiment design using the Meridian GeoX library. Learn how to prepare your data, set key experiment parameters, utilize advanced configurations, evaluate design viability, and how to visualize and export your chosen design.
Recap and data preparation
Start by importing the Meridian GeoX library, and preparing the pre-test dataset. As described in Collect and prepare your data, this dataset is the prerequisite of designing your GeoX study.
Your dataset must be a Pandas DataFrame, and the required columns are:
- date: For example, daily
- location: For example, different market areas
- conversions: Response data is usually raw conversion counts or revenue data, typically from an advertiser CRM
- spend: Spend data for campaigns included in the study. This is an
optional column. For multi-cell experiment configurations, use distinct
columns labels such as
spend_cell_1, orspend_cell_2.
1. Experiment design
This is the core interaction where you define the parameters of the upcoming experiment. To illustrate this step-by-step, an example of a 28-day heavy-up experiment design using time-based regression (TBR) & stratified sampling can be used.
DesignConfig: Used to set the foundations of experiments:experiment_duration: The length of the experiment, excluding any cooldowns. The duration typically covers at least one purchase cycle for the product.cell_count: The number of treatment cells in the experiment. The default is 1, meaning that one treatment group pairs with one control group in the experiment. If the value is greater than 1, design a multi-cell study that contains multiple treatment cells.experiment_types: Defines the nature of the test, such as holdback, go-dark, heavy-up. See Types of experiments for more details. In multi-cell experiments, you may set different experiment types for different cells. For example, {'cell_1': ExperimentType.GO_DARK, 'cell_2': ExperimentType.HEAVY_UP} indicates running go-dark in one treatment cell and heavy-up in another treatment cell, which is a very common setup in budget-neutral multi-cell experiments.methodology: The analysis method chosen for design selection, such as time-based regression, synthetic control, synthetic difference-in-differences.geo_assignment_rule: Both random or stratified sampling are supported.design_output_count: The total number of ranked recommended designs to include in the output.
More details of the methodology and assignment rules options can be viewed in Compare methodologies.
import datetime
import meridian_geox as geox

# Example: Specify a 28-day 'heavy-up' (increased spend) experiment using TBR
# and stratified sampling.
design_config = geox.DesignConfig(
    experiment_duration=datetime.timedelta(days=28),
    experiment_types=geox.ExperimentType.HEAVY_UP,
    methodology=geox.Methodology.TBR,
    geo_assignment_rule=geox.GeoAssignmentRule.STRATIFIED_SAMPLING,
    design_output_count=5
)
constraints: Lets you specify maximum budgets and other design related constraints. More advanced use cases, such as including or excluding specific geos or setting conversion thresholds. A basic constraints setup that only includes maximum budgets is as follows. The more advanced constraints are covered in the next section.
# Limit the max experiment budget to be 100000.
constraints = geox.Constraints(
    budget_constraint=geox.Budget(budget=100000)
)
geox.run_design(): The core function that takes the pretest dataset, configurations, and constraints to generate a set of potential experiment designs, ranked by MDE.
# Generate Design
# 'design_data' should be your pre-test pandas dataframe.
design_set = geox.run_design(
    design_data,
    design_config,
    constraints
)

# Select the top-ranked design
selected_id = next(iter(design_set.designs))
selected_design = design_set.designs[selected_id]
The DesignConfig also includes parameters that you may fine-tune for the
design, but leaving them blank is fine since there are default values for them:
alpha(Optional): The significance level for the test. The default value is 0.10 or 10%. It also means that the expected coverage probability of the confidence interval is 1 - alpha = 90%.power(Optional): The probability of detecting a true effect. The default value equals 80%.cost_per_incremental_conversion(CpIC, Optional): Used only in holdback experiments. In holdback experiments, CpIC is used to estimate the minimum budget—how much to spend on the newly activated campaigns. The default value is 1, though it's more practical to estimate your CpIC as 1/iCPD (or 1/iROAS), where the iCPD (or iROAS) estimate comes from an existing Meridian MMM model or past incrementality study, such as GeoX or Google's conversion lift. Because it's only useful in holdback experiments, CpIC is ignored in go-dark and heavy-up experiments (or cells), which measure existing live campaigns and experiment budget is projected using historical spend data.min_r2(Optional): The minimum out-of-sample R-squared (goodness-of-fit) score threshold required for candidate designs during the design phase. The default value is set to 0.8 (80%), filtering out candidate designs where pre-test model fit is less than this threshold.
2. Additional design configurations through constraints
In this section, you'll learn how to flexibly configure the design through passing more design constraints in addition to specifying a maximum budget alone that as shown in the earlier section. All these constraints are optional. Here's an example of adding a few constraints into design.
excluded_geos: The geos to be excluded from the experiment design. Usually these geos are large metros that you don't want to include in a Meridian GeoX study, which may cause significant media disruption.excluded_dates: Dates to exclude from the experiment design.budget_percent: The maximum budget percentage change for the experiment design. This can only be used if the spend data is provided per cell.budget_constraint: The budget constraint for the experiment design (per cell). This could be a total budget amount or a budget percentage change.max_conversions_percent: The maximum conversions volume for the treatment group. The default value is set as 30%, as an ordinary GeoX shouldn't affect more than 30% of your media.
# 1. Define specific dates to exclude
dates_to_exclude = {
    pd.to_datetime('2024-12-31'),
    pd.to_datetime('2025-01-01'),
}

# 2. Add them to your Constraints object which specifies
# excluded geos, excluded dates, maximum conversion percentages
custom_constraints = geox.Constraints(
    excluded_geos={'loc1', 'loc2', 'loc3'},
    excluded_dates=dates_to_exclude,
    max_conversions_percent=0.2,
    budget_constraint=geox.Budget(budget=150000)
)

# 3. Use these constraints in a new design
custom_design_set = geox.run_design(
    design_data,
    design_config,
    custom_constraints
)

print("Design generated with date exclusions.")
3. Evaluation, visualization and export
After running geox.run_design(), the output contains a list of candidate
designs. You can evaluate these designs by inspecting key metrics in the summary
table, such as R-squared (\( R^2 \)), MDE, and the A/A test p-value. All
design candidates in the summary table are ranked by MDE ascendingly.
| design_id | cell | design_methodology | r2 | mde | mde_abs | p_value (AA) | budget | design_implied_cpic | treatment_conversions_pct | treatment_geo_count |
|---|---|---|---|---|---|---|---|---|---|---|
| 52456ea8 | cell_1 | STRATIFIED_SAMPLING-TBR | 0.913 | 0.013 | 7085.925 | 0.394 | 7085.925 | 1 | 30.073 | 27 |
| d42f5f69 | cell_1 | STRATIFIED_SAMPLING-TBR | 0.917 | 0.014 | 7610.810 | 0.920 | 7610.810 | 1 | 29.820 | 29 |
| 6f8dc0bc | cell_1 | STRATIFIED_SAMPLING-TBR | 0.897 | 0.014 | 7610.809 | 0.371 | 7610.809 | 1 | 29.325 | 29 |
| 06c83b68 | cell_1 | STRATIFIED_SAMPLING-TBR | 0.945 | 0.015 | 7873.250 | 0.497 | 7873.250 | 1 | 30.064 | 30 |
| cb3f10cd | cell_1 | STRATIFIED_SAMPLING-TBR | 0.915 | 0.015 | 7873.249 | 0.169 | 7873.249 | 1 | 30.039 | 30 |
Evaluating design viability
To select an appropriate design to proceed in your Meridian GeoX journey, evaluate the candidates against these criteria:
R-squared (\( R^2 \)) threshold: Selecting a design with \( R^2 \ge 0.8 \) is recommended. An \( R^2 < 0.5 \) indicates that the control geos are poor predictors of the treatment geos, which under certain scenarios can make the post-test analysis unreliable.
A/A test validation: Ensure the selected design passes the A/A test. Your A/A test p-value should be greater than your chosen significance level (\( \alpha \)) to ensure no significant pre-existing bias exists. Additionally, if a high percentage of candidate designs fail the A/A test, it usually points to poor pre-test data quality—such as extreme outliers, sudden geo shifts, or high volatility—or a poor model fit. Running an experiment with such data makes the post-test analysis unreliable due to a high risk of false discoveries (detecting non-existent lift).
R-squared adjustment
The minimum required \( R^2 \) is controlled by the min_r2 parameter in
geox.DesignConfig. By default, the minimum required \( R^2 \) value is 0.8.
If the design search returns no viable candidates at 0.8, you have the
flexibility to relax the threshold, such as adjusting it to 0.75 or 0.70:
design_config = geox.DesignConfig(
    experiment_duration=datetime.timedelta(days=28),
    experiment_types=geox.ExperimentType.HEAVY_UP,
    methodology=geox.Methodology.TBR,
    min_r2=0.7,  # Adjust threshold if 0.8 yields no candidate designs
)
Troubleshoot A/A testing
Check for data anomalies: Inspect your pre-test data for data entry errors, missing days, or extreme one-off spikes in specific geos. Exclude these anomalous dates and geos using
Constraints(excluded_dates=...excluded_geos=...).Increase pre-test history: Provide a longer pre-test history (for example, moving from \( 3N \) to \( 6N \) or more) to give the model more data to learn stable relationships.
Feasibility of MDE: Compare the design's MDE against your business expectations. The MDE is the minimum lift the test can detect. If you expect your campaign to generate only a 5% lift, but your chosen design has an MDE of 12%, the study is underpowered and you shouldn't proceed without increasing the size of the treatment group or duration.
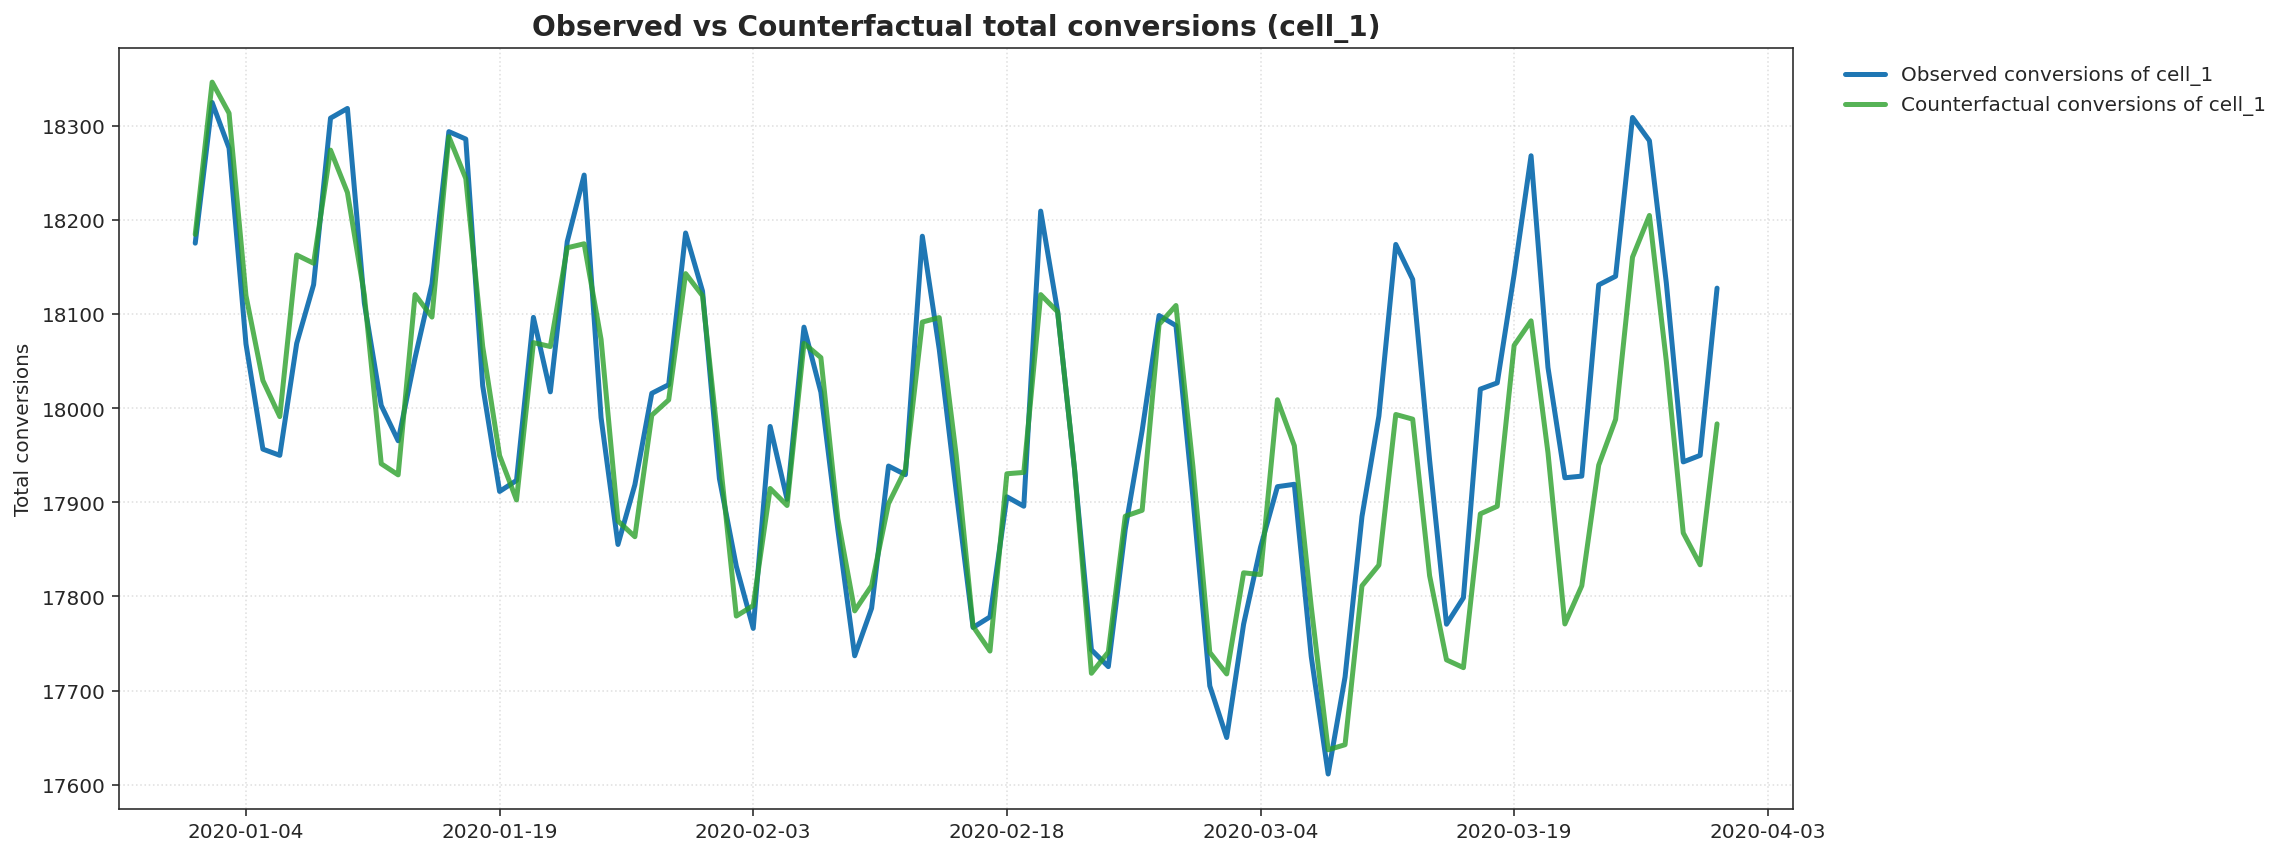
Visualize the design
Use geox.plot_design() to generate visual representations of the
treatment and counterfactual.
Export the design
In the end, your chosen design can be exported to JSON using
.export_to_json() and reloaded later with .load_from_json() in the future
to ensure consistency between the design and analysis phases.
4. Multi-cell design
Note that Meridian GeoX natively supports a variety of multi-cell experiments.
For example, a popular option, called budget neutral test, lets you test
go-dark (reducing budget) and heavy-up (increasing budget) effects in the same
market at the same time while the total budget across all geos still remains
neutral. To design a budget neutral test, you can set cell_count to be 2, and
then select experiment types of the two treatment cells to be
GO_DARK and HEAVY_UP.
import datetime
import meridian_geox as geox

# Example design configuration for multi-cell budget neutral test.
multi_cell_design_config = geox.DesignConfig(
    cell_count=2,
    experiment_duration=datetime.timedelta(days=28),
    experiment_types={
        'cell_1': ExperimentType.GO_DARK,
        'cell_2': ExperimentType.HEAVY_UP,
    },
    methodology=geox.Methodology.TBR,
    geo_assignment_rule=geox.GeoAssignmentRule.STRATIFIED_SAMPLING,
    design_output_count=5,
)
After setting up the constraints for the multi-cell test, the
geox.run_design() function should return the requested multi-cell designs.
Similar to the single cell scenario, the candidate designs can be retrieved
accordingly.
# Constraints for multi-cell test.
multi_cell_constraints = geox.Constraints(
      budget_constraint={
        'cell_1': geox.Budget(budget_pct=-1.0),
        'cell_2': geox.Budget(budget_pct=1.0),
    },
)
multi_cell_design_set = geox.run_design(
    design_data,
    multi_cell_design_config,
    multi_cell_constraints,
)

# Generates the candidate multi-cell designs.
print(f'Experiment design generated:')
multi_cell_selected_design_id = next(iter(multi_cell_design_set.designs))
pprint(multi_cell_design_set.designs[multi_cell_selected_design_id])