
Places SDK for iOS 中的自動完成服務會根據使用者的搜尋查詢,傳回地點預測結果。使用者輸入內容時,自動完成服務會傳回地點建議,例如商家、地址、加號地址和搜尋點。
您可以透過下列方式在應用程式中加入自動完成功能:
- 新增自動完成功能的 UI 控制項,藉此節省開發時間並確保使用者享有一致的體驗。
- 以程式輔助方式取得地點預測結果,打造個人化使用者體驗。
新增自動完成 UI 控制項
自動完成 UI 控制項是內建自動完成功能的搜尋對話方塊。使用者輸入搜尋字詞時,控制項會顯示預測地點清單,供使用者選擇。使用者選取地點後,系統會傳回 GMSPlace 執行個體,應用程式可使用該執行個體取得所選地點的詳細資料。
您可以透過下列方式,將自動完成 UI 控制項新增至應用程式:
新增全螢幕控制項
如要使用強制回應內容,請使用全螢幕控制項。在使用者完成選取前,自動完成 UI 會暫時取代應用程式的 UI。這項功能是由 GMSAutocompleteViewController 類別提供。使用者選取地點時,應用程式會收到回呼。
如要在應用程式中新增全螢幕控制項,請按照下列步驟操作:
- 在主要應用程式中建立 UI 元素,啟動自動完成 UI 控制項,例如
UIButton上的觸控事件處理常式。 - 在父項檢視控制器中實作
GMSAutocompleteViewControllerDelegate通訊協定。 - 建立
GMSAutocompleteViewController的執行個體,並將父項檢視區塊控制器指派為委派屬性。 - 建立
GMSPlaceField,定義要傳回的地點資料類型。 - 新增
GMSAutocompleteFilter,將查詢限制為特定類型的地點。 - 使用
[self presentViewController...]呈現GMSAutocompleteViewController。 - 在
didAutocompleteWithPlace委派方法中處理使用者的選取項目。 - 在
didAutocompleteWithPlace、didFailAutocompleteWithError和wasCancelled委派方法中,關閉控制器。
要讓使用者輕觸按鈕啟動 GMSAutocompleteViewController,以下展示的程式碼是一種可能方式。
Swift
import UIKit
import GooglePlaces

class ViewController: UIViewController {

  override func viewDidLoad() {
    makeButton()
  }

  // Present the Autocomplete view controller when the button is pressed.
  @objc func autocompleteClicked(_ sender: UIButton) {
    let autocompleteController = GMSAutocompleteViewController()
    autocompleteController.delegate = self

    // Specify the place data types to return.
    let fields: GMSPlaceField = GMSPlaceField(rawValue: UInt(GMSPlaceField.name.rawValue) |
      UInt(GMSPlaceField.placeID.rawValue))!
    autocompleteController.placeFields = fields

    // Specify a filter.
    let filter = GMSAutocompleteFilter()
    filter.types = [kGMSPlaceTypeCollectionAddress]
    autocompleteController.autocompleteFilter = filter

    // Display the autocomplete view controller.
    present(autocompleteController, animated: true, completion: nil)
  }

  // Add a button to the view.
  func makeButton() {
    let btnLaunchAc = UIButton(frame: CGRect(x: 5, y: 150, width: 300, height: 35))
    btnLaunchAc.backgroundColor = .blue
    btnLaunchAc.setTitle("Launch autocomplete", for: .normal)
    btnLaunchAc.addTarget(self, action: #selector(autocompleteClicked), for: .touchUpInside)
    self.view.addSubview(btnLaunchAc)
  }

}

extension ViewController: GMSAutocompleteViewControllerDelegate {

  // Handle the user's selection.
  func viewController(_ viewController: GMSAutocompleteViewController, didAutocompleteWith place: GMSPlace) {
    print("Place name: \(place.name)")
    print("Place ID: \(place.placeID)")
    print("Place attributions: \(place.attributions)")
    dismiss(animated: true, completion: nil)
  }

  func viewController(_ viewController: GMSAutocompleteViewController, didFailAutocompleteWithError error: Error) {
    // TODO: handle the error.
    print("Error: ", error.localizedDescription)
  }

  // User canceled the operation.
  func wasCancelled(_ viewController: GMSAutocompleteViewController) {
    dismiss(animated: true, completion: nil)
  }

  // Turn the network activity indicator on and off again.
  func didRequestAutocompletePredictions(_ viewController: GMSAutocompleteViewController) {
    UIApplication.shared.isNetworkActivityIndicatorVisible = true
  }

  func didUpdateAutocompletePredictions(_ viewController: GMSAutocompleteViewController) {
    UIApplication.shared.isNetworkActivityIndicatorVisible = false
  }

}
Objective-C
#import "ViewController.h"
@import GooglePlaces;

@interface ViewController () <GMSAutocompleteViewControllerDelegate>

@end

@implementation ViewController {
  GMSAutocompleteFilter *_filter;
}

-   (void)viewDidLoad {
  [super viewDidLoad];
  [self makeButton];
}

  // Present the autocomplete view controller when the button is pressed.
-   (void)autocompleteClicked {
  GMSAutocompleteViewController *acController = [[GMSAutocompleteViewController alloc] init];
  acController.delegate = self;

  // Specify the place data types to return.
  GMSPlaceField fields = (GMSPlaceFieldName | GMSPlaceFieldPlaceID);
  acController.placeFields = fields;

  // Specify a filter.
  _filter = [[GMSAutocompleteFilter alloc] init];
  _filter.types = @[ kGMSPlaceTypeBank ];
  acController.autocompleteFilter = _filter;

  // Display the autocomplete view controller.
  [self presentViewController:acController animated:YES completion:nil];
}

  // Add a button to the view.
-   (void)makeButton{
  UIButton *btnLaunchAc = [UIButton buttonWithType:UIButtonTypeCustom];
  [btnLaunchAc addTarget:self
             action:@selector(autocompleteClicked) forControlEvents:UIControlEventTouchUpInside];
  [btnLaunchAc setTitle:@"Launch autocomplete" forState:UIControlStateNormal];
  btnLaunchAc.frame = CGRectMake(5.0, 150.0, 300.0, 35.0);
  btnLaunchAc.backgroundColor = [UIColor blueColor];
  [self.view addSubview:btnLaunchAc];
}

  // Handle the user's selection.
-   (void)viewController:(GMSAutocompleteViewController *)viewController
didAutocompleteWithPlace:(GMSPlace *)place {
  [self dismissViewControllerAnimated:YES completion:nil];
  // Do something with the selected place.
  NSLog(@"Place name %@", place.name);
  NSLog(@"Place ID %@", place.placeID);
  NSLog(@"Place attributions %@", place.attributions.string);
}

-   (void)viewController:(GMSAutocompleteViewController *)viewController
didFailAutocompleteWithError:(NSError *)error {
  [self dismissViewControllerAnimated:YES completion:nil];
  // TODO: handle the error.
  NSLog(@"Error: %@", [error description]);
}

  // User canceled the operation.
-   (void)wasCancelled:(GMSAutocompleteViewController *)viewController {
  [self dismissViewControllerAnimated:YES completion:nil];
}

  // Turn the network activity indicator on and off again.
-   (void)didRequestAutocompletePredictions:(GMSAutocompleteViewController *)viewController {
  [UIApplication sharedApplication].networkActivityIndicatorVisible = YES;
}

-   (void)didUpdateAutocompletePredictions:(GMSAutocompleteViewController *)viewController {
  [UIApplication sharedApplication].networkActivityIndicatorVisible = NO;
}

@end
新增結果控制器
如要進一步控管文字輸入 UI,請使用結果控制器。結果控制器會根據輸入 UI 焦點,動態切換結果清單的顯示設定。
如要將結果控制器新增至應用程式,請按照下列步驟操作:
- 建立
GMSAutocompleteResultsViewController。- 在父項檢視控制器中導入
GMSAutocompleteResultsViewControllerDelegate通訊協定,並將父項檢視控制器指派為委派屬性。
- 在父項檢視控制器中導入
- 建立
UISearchController物件,並傳入GMSAutocompleteResultsViewController做為結果控制器引數。 - 將
GMSAutocompleteResultsViewController設為UISearchController的searchResultsUpdater屬性。 - 在應用程式的 UI 中新增
UISearchController的searchBar。 - 在
didAutocompleteWithPlace委派方法中處理使用者的選取項目。
將 UISearchController 的搜尋列放入應用程式 UI 的方式有幾種:
在導覽列中新增搜尋列
下列程式碼範例示範如何新增結果控制器、在導覽列加入 searchBar,以及處理使用者做出的選擇:
Swift
class ViewController: UIViewController {

  var resultsViewController: GMSAutocompleteResultsViewController?
  var searchController: UISearchController?
  var resultView: UITextView?

  override func viewDidLoad() {
    super.viewDidLoad()

    resultsViewController = GMSAutocompleteResultsViewController()
    resultsViewController?.delegate = self

    searchController = UISearchController(searchResultsController: resultsViewController)
    searchController?.searchResultsUpdater = resultsViewController

    // Put the search bar in the navigation bar.
    searchController?.searchBar.sizeToFit()
    navigationItem.titleView = searchController?.searchBar

    // When UISearchController presents the results view, present it in
    // this view controller, not one further up the chain.
    definesPresentationContext = true

    // Prevent the navigation bar from being hidden when searching.
    searchController?.hidesNavigationBarDuringPresentation = false
  }
}

// Handle the user's selection.
extension ViewController: GMSAutocompleteResultsViewControllerDelegate {
  func resultsController(_ resultsController: GMSAutocompleteResultsViewController,
                         didAutocompleteWith place: GMSPlace) {
    searchController?.isActive = false
    // Do something with the selected place.
    print("Place name: \(place.name)")
    print("Place address: \(place.formattedAddress)")
    print("Place attributions: \(place.attributions)")
  }

  func resultsController(_ resultsController: GMSAutocompleteResultsViewController,
                         didFailAutocompleteWithError error: Error){
    // TODO: handle the error.
    print("Error: ", error.localizedDescription)
  }

  // Turn the network activity indicator on and off again.
  func didRequestAutocompletePredictions(_ viewController: GMSAutocompleteViewController) {
    UIApplication.shared.isNetworkActivityIndicatorVisible = true
  }

  func didUpdateAutocompletePredictions(_ viewController: GMSAutocompleteViewController) {
    UIApplication.shared.isNetworkActivityIndicatorVisible = false
  }
}
Objective-C
-   (void)viewDidLoad {
  _resultsViewController = [[GMSAutocompleteResultsViewController alloc] init];
  _resultsViewController.delegate = self;

  _searchController = [[UISearchController alloc]
                       initWithSearchResultsController:_resultsViewController];
  _searchController.searchResultsUpdater = _resultsViewController;

  // Put the search bar in the navigation bar.
  [_searchController.searchBar sizeToFit];
  self.navigationItem.titleView = _searchController.searchBar;

  // When UISearchController presents the results view, present it in
  // this view controller, not one further up the chain.
  self.definesPresentationContext = YES;

  // Prevent the navigation bar from being hidden when searching.
  _searchController.hidesNavigationBarDuringPresentation = NO;
}

// Handle the user's selection.
-   (void)resultsController:(GMSAutocompleteResultsViewController *)resultsController
  didAutocompleteWithPlace:(GMSPlace *)place {
    _searchController.active = NO;
    // Do something with the selected place.
    NSLog(@"Place name %@", place.name);
    NSLog(@"Place address %@", place.formattedAddress);
    NSLog(@"Place attributions %@", place.attributions.string);
}

-   (void)resultsController:(GMSAutocompleteResultsViewController *)resultsController
didFailAutocompleteWithError:(NSError *)error {
  [self dismissViewControllerAnimated:YES completion:nil];
  // TODO: handle the error.
  NSLog(@"Error: %@", [error description]);
}

// Turn the network activity indicator on and off again.
-   (void)didRequestAutocompletePredictionsForResultsController:
    (GMSAutocompleteResultsViewController *)resultsController {
  [UIApplication sharedApplication].networkActivityIndicatorVisible = YES;
}

-   (void)didUpdateAutocompletePredictionsForResultsController:
    (GMSAutocompleteResultsViewController *)resultsController {
  [UIApplication sharedApplication].networkActivityIndicatorVisible = NO;
}
在檢視畫面頂端加上搜尋列
以下程式碼範例說明如何在檢視區塊頂端新增 searchBar。
Swift
import UIKit
import GooglePlaces

class ViewController: UIViewController {

  var resultsViewController: GMSAutocompleteResultsViewController?
  var searchController: UISearchController?
  var resultView: UITextView?

  override func viewDidLoad() {
    super.viewDidLoad()

    resultsViewController = GMSAutocompleteResultsViewController()
    resultsViewController?.delegate = self

    searchController = UISearchController(searchResultsController: resultsViewController)
    searchController?.searchResultsUpdater = resultsViewController

    let subView = UIView(frame: CGRect(x: 0, y: 65.0, width: 350.0, height: 45.0))

    subView.addSubview((searchController?.searchBar)!)
    view.addSubview(subView)
    searchController?.searchBar.sizeToFit()
    searchController?.hidesNavigationBarDuringPresentation = false

    // When UISearchController presents the results view, present it in
    // this view controller, not one further up the chain.
    definesPresentationContext = true
  }
}

// Handle the user's selection.
extension ViewController: GMSAutocompleteResultsViewControllerDelegate {
  func resultsController(_ resultsController: GMSAutocompleteResultsViewController,
                         didAutocompleteWith place: GMSPlace) {
    searchController?.isActive = false
    // Do something with the selected place.
    print("Place name: \(place.name)")
    print("Place address: \(place.formattedAddress)")
    print("Place attributions: \(place.attributions)")
  }

  func resultsController(_ resultsController: GMSAutocompleteResultsViewController,
                         didFailAutocompleteWithError error: Error){
    // TODO: handle the error.
    print("Error: ", error.localizedDescription)
  }

  // Turn the network activity indicator on and off again.
  func didRequestAutocompletePredictions(forResultsController resultsController: GMSAutocompleteResultsViewController) {
    UIApplication.shared.isNetworkActivityIndicatorVisible = true
  }

  func didUpdateAutocompletePredictions(forResultsController resultsController: GMSAutocompleteResultsViewController) {
    UIApplication.shared.isNetworkActivityIndicatorVisible = false
  }
}
Objective-C
-   (void)viewDidLoad {
    [super viewDidLoad];

    _resultsViewController = [[GMSAutocompleteResultsViewController alloc] init];
    _resultsViewController.delegate = self;

    _searchController = [[UISearchController alloc]
                             initWithSearchResultsController:_resultsViewController];
    _searchController.searchResultsUpdater = _resultsViewController;

    UIView *subView = [[UIView alloc] initWithFrame:CGRectMake(0, 65.0, 250, 50)];

    [subView addSubview:_searchController.searchBar];
    [_searchController.searchBar sizeToFit];
    [self.view addSubview:subView];

    // When UISearchController presents the results view, present it in
    // this view controller, not one further up the chain.
    self.definesPresentationContext = YES;
}

// Handle the user's selection.
-   (void)resultsController:(GMSAutocompleteResultsViewController *)resultsController
didAutocompleteWithPlace:(GMSPlace *)place {
  [self dismissViewControllerAnimated:YES completion:nil];
  // Do something with the selected place.
  NSLog(@"Place name %@", place.name);
  NSLog(@"Place address %@", place.formattedAddress);
  NSLog(@"Place attributions %@", place.attributions.string);
}

-   (void)resultsController:(GMSAutocompleteResultsViewController *)resultsController
didFailAutocompleteWithError:(NSError *)error {
  [self dismissViewControllerAnimated:YES completion:nil];
  // TODO: handle the error.
  NSLog(@"Error: %@", [error description]);
}

// Turn the network activity indicator on and off again.
-   (void)didRequestAutocompletePredictionsForResultsController:
    (GMSAutocompleteResultsViewController *)resultsController {
  [UIApplication sharedApplication].networkActivityIndicatorVisible = YES;
}

-   (void)didUpdateAutocompletePredictionsForResultsController:
    (GMSAutocompleteResultsViewController *)resultsController {
  [UIApplication sharedApplication].networkActivityIndicatorVisible = NO;
}
根據預設,
UISearchController
會在簡報時隱藏導覽列 (這項設定可以停用)。如果導覽列顯示為不透明,UISearchController 就無法正確設定放置位置。
請使用下列程式碼做為解決方法:
Swift
navigationController?.navigationBar.translucent = false
searchController?.hidesNavigationBarDuringPresentation = false

// This makes the view area include the nav bar even though it is opaque.
// Adjust the view placement down.
self.extendedLayoutIncludesOpaqueBars = true
self.edgesForExtendedLayout = .top
Objective-C
self.navigationController.navigationBar.translucent = NO;
_searchController.hidesNavigationBarDuringPresentation = NO;

// This makes the view area include the nav bar even though it is opaque.
// Adjust the view placement down.
self.extendedLayoutIncludesOpaqueBars = YES;
self.edgesForExtendedLayout = UIRectEdgeTop;
使用快顯視窗結果新增搜尋列
下列程式碼範例顯示如何在導覽列右側放置搜尋列,並在彈出式視窗中顯示結果。
Swift
import UIKit
import GooglePlaces

class ViewController: UIViewController {

  var resultsViewController: GMSAutocompleteResultsViewController?
  var searchController: UISearchController?
  var resultView: UITextView?

  override func viewDidLoad() {
    super.viewDidLoad()

    resultsViewController = GMSAutocompleteResultsViewController()
    resultsViewController?.delegate = self

    searchController = UISearchController(searchResultsController: resultsViewController)
    searchController?.searchResultsUpdater = resultsViewController

    // Add the search bar to the right of the nav bar,
    // use a popover to display the results.
    // Set an explicit size as we don't want to use the entire nav bar.
    searchController?.searchBar.frame = (CGRect(x: 0, y: 0, width: 250.0, height: 44.0))
    navigationItem.rightBarButtonItem = UIBarButtonItem(customView: (searchController?.searchBar)!)

    // When UISearchController presents the results view, present it in
    // this view controller, not one further up the chain.
    definesPresentationContext = true

    // Keep the navigation bar visible.
    searchController?.hidesNavigationBarDuringPresentation = false
    searchController?.modalPresentationStyle = .popover
  }
}
// Handle the user's selection.
extension ViewController: GMSAutocompleteResultsViewControllerDelegate {
  func resultsController(_ resultsController: GMSAutocompleteResultsViewController,
                         didAutocompleteWith place: GMSPlace) {
    searchController?.isActive = false
    // Do something with the selected place.
    print("Place name: \(place.name)")
    print("Place address: \(place.formattedAddress)")
    print("Place attributions: \(place.attributions)")
  }

  func resultsController(_ resultsController: GMSAutocompleteResultsViewController,
                         didFailAutocompleteWithError error: Error){
    // TODO: handle the error.
    print("Error: ", error.localizedDescription)
  }

  // Turn the network activity indicator on and off again.
  func didRequestAutocompletePredictions(forResultsController resultsController: GMSAutocompleteResultsViewController) {
    UIApplication.shared.isNetworkActivityIndicatorVisible = true
  }

  func didUpdateAutocompletePredictions(forResultsController resultsController: GMSAutocompleteResultsViewController) {
    UIApplication.shared.isNetworkActivityIndicatorVisible = false
  }
}
Objective-C
-   (void)viewDidLoad {
  [super viewDidLoad];

  _resultsViewController = [[GMSAutocompleteResultsViewController alloc] init];
  _resultsViewController.delegate = self;

  _searchController = [[UISearchController alloc]
                           initWithSearchResultsController:_resultsViewController];
  _searchController.searchResultsUpdater = _resultsViewController;

  // Add the search bar to the right of the nav bar,
  // use a popover to display the results.
  // Set an explicit size as we don't want to use the entire nav bar.
  _searchController.searchBar.frame = CGRectMake(0, 0, 250.0f, 44.0f);
  self.navigationItem.rightBarButtonItem =
  [[UIBarButtonItem alloc] initWithCustomView:_searchController.searchBar];

  // When UISearchController presents the results view, present it in
  // this view controller, not one further up the chain.
  self.definesPresentationContext = YES;

  // Keep the navigation bar visible.
  _searchController.hidesNavigationBarDuringPresentation = NO;

  _searchController.modalPresentationStyle = UIModalPresentationPopover;
}

// Handle the user's selection.
-   (void)resultsController:(GMSAutocompleteResultsViewController *)resultsController
didAutocompleteWithPlace:(GMSPlace *)place {
  [self dismissViewControllerAnimated:YES completion:nil];
  NSLog(@"Place name %@", place.name);
  NSLog(@"Place address %@", place.formattedAddress);
  NSLog(@"Place attributions %@", place.attributions.string);
}

-   (void)resultsController:(GMSAutocompleteResultsViewController *)resultsController
didFailAutocompleteWithError:(NSError *)error {
  [self dismissViewControllerAnimated:YES completion:nil];
  // TODO: handle the error.
  NSLog(@"Error: %@", [error description]);
}

// Turn the network activity indicator on and off again.
-   (void)didRequestAutocompletePredictionsForResultsController:
    (GMSAutocompleteResultsViewController *)resultsController {
  [UIApplication sharedApplication].networkActivityIndicatorVisible = YES;
}

-   (void)didUpdateAutocompletePredictionsForResultsController:
    (GMSAutocompleteResultsViewController *)resultsController {
  [UIApplication sharedApplication].networkActivityIndicatorVisible = NO;
}
使用資料表內容來源
如果應用程式有自訂搜尋文字 UI,您可以使用 GMSAutocompleteTableDataSource 類別,在檢視畫面控制器上顯示結果的表格檢視畫面。
如要使用 GMSAutocompleteTableDataSource 做為資料來源和檢視控制器中的 UITableView 委派項目:
- 在檢視控制器中實作
GMSAutocompleteTableDataSourceDelegate和UISearchBarDelegate通訊協定。 - 建立
GMSAutocompleteTableDataSource例項,並將檢視畫面控制器指派為委派屬性。 - 將
GMSAutocompleteTableDataSource設為檢視畫面控制器的資料來源和委派屬性。UITableView - 在搜尋文字輸入的處理常式中,呼叫
GMSAutocompleteTableDataSource上的sourceTextHasChanged。- 在
didAutocompleteWithPlace委派方法中處理使用者的選取項目。
- 在
- 在
didAutocompleteWithPlace、didFailAutocompleteWithError、wasCancelled委派方法中關閉控制器。
下列程式碼範例示範如何使用 GMSAutocompleteTableDataSource 類別,在另外加入 UISearchBar 時,驅動 UIViewController 的表格檢視畫面。
Swift
// Copyright 2020 Google LLC
//
// Licensed under the Apache License, Version 2.0 (the "License");
// you may not use this file except in compliance with the License.
// You may obtain a copy of the License at
//
//      http://www.apache.org/licenses/LICENSE-2.0
//
// Unless required by applicable law or agreed to in writing, software
// distributed under the License is distributed on an "AS IS" BASIS,
// WITHOUT WARRANTIES OR CONDITIONS OF ANY KIND, either express or implied.
// See the License for the specific language governing permissions and
// limitations under the License.

import GooglePlaces
import UIKit

class PlaceAutocompleteViewController: UIViewController {

  private var tableView: UITableView!
  private var tableDataSource: GMSAutocompleteTableDataSource!

  override func viewDidLoad() {
    super.viewDidLoad()

    let searchBar = UISearchBar(frame: CGRect(x: 0, y: 20, width: self.view.frame.size.width, height: 44.0))
    searchBar.delegate = self
    view.addSubview(searchBar)

    tableDataSource = GMSAutocompleteTableDataSource()
    tableDataSource.delegate = self

    tableView = UITableView(frame: CGRect(x: 0, y: 64, width: self.view.frame.size.width, height: self.view.frame.size.height - 44))
    tableView.delegate = tableDataSource
    tableView.dataSource = tableDataSource

    view.addSubview(tableView)
  }
}

extension PlaceAutocompleteViewController: UISearchBarDelegate {
  func searchBar(_ searchBar: UISearchBar, textDidChange searchText: String) {
    // Update the GMSAutocompleteTableDataSource with the search text.
    tableDataSource.sourceTextHasChanged(searchText)
  }
}

extension PlaceAutocompleteViewController: GMSAutocompleteTableDataSourceDelegate {
  func didUpdateAutocompletePredictions(for tableDataSource: GMSAutocompleteTableDataSource) {
    // Turn the network activity indicator off.
    UIApplication.shared.isNetworkActivityIndicatorVisible = false
    // Reload table data.
    tableView.reloadData()
  }

  func didRequestAutocompletePredictions(for tableDataSource: GMSAutocompleteTableDataSource) {
    // Turn the network activity indicator on.
    UIApplication.shared.isNetworkActivityIndicatorVisible = true
    // Reload table data.
    tableView.reloadData()
  }

  func tableDataSource(_ tableDataSource: GMSAutocompleteTableDataSource, didAutocompleteWith place: GMSPlace) {
    // Do something with the selected place.
    print("Place name: \(place.name)")
    print("Place address: \(place.formattedAddress)")
    print("Place attributions: \(place.attributions)")
  }

  func tableDataSource(_ tableDataSource: GMSAutocompleteTableDataSource, didFailAutocompleteWithError error: Error) {
    // Handle the error.
    print("Error: \(error.localizedDescription)")
  }

  func tableDataSource(_ tableDataSource: GMSAutocompleteTableDataSource, didSelect prediction: GMSAutocompletePrediction) -> Bool {
    return true
  }
}
Objective-C
// Copyright 2020 Google LLC
//
// Licensed under the Apache License, Version 2.0 (the "License");
// you may not use this file except in compliance with the License.
// You may obtain a copy of the License at
//
//      http://www.apache.org/licenses/LICENSE-2.0
//
// Unless required by applicable law or agreed to in writing, software
// distributed under the License is distributed on an "AS IS" BASIS,
// WITHOUT WARRANTIES OR CONDITIONS OF ANY KIND, either express or implied.
// See the License for the specific language governing permissions and
// limitations under the License.

#import "PlaceAutocompleteViewController.h"
@import GooglePlaces;
@import UIKit;

@interface PlaceAutocompleteViewController () <GMSAutocompleteTableDataSourceDelegate, UISearchBarDelegate>

@end

@implementation PlaceAutocompleteViewController {
  UITableView *tableView;
  GMSAutocompleteTableDataSource *tableDataSource;
}

- (void)viewDidLoad {
  [super viewDidLoad];

  UISearchBar *searchBar = [[UISearchBar alloc] initWithFrame:CGRectMake(0, 20, self.view.frame.size.width, 44)];
  searchBar.delegate = self;

  [self.view addSubview:searchBar];

  tableDataSource = [[GMSAutocompleteTableDataSource alloc] init];
  tableDataSource.delegate = self;

  tableView = [[UITableView alloc] initWithFrame:CGRectMake(0, 64, self.view.frame.size.width, self.view.frame.size.height - 44)];
  tableView.delegate = tableDataSource;
  tableView.dataSource = tableDataSource;

  [self.view addSubview:tableView];
}

#pragma mark - GMSAutocompleteTableDataSourceDelegate

- (void)didUpdateAutocompletePredictionsForTableDataSource:(GMSAutocompleteTableDataSource *)tableDataSource {
  // Turn the network activity indicator off.
  UIApplication.sharedApplication.networkActivityIndicatorVisible = NO;

  // Reload table data.
  [tableView reloadData];
}

- (void)didRequestAutocompletePredictionsForTableDataSource:(GMSAutocompleteTableDataSource *)tableDataSource {
  // Turn the network activity indicator on.
  UIApplication.sharedApplication.networkActivityIndicatorVisible = YES;

  // Reload table data.
  [tableView reloadData];
}

- (void)tableDataSource:(GMSAutocompleteTableDataSource *)tableDataSource didAutocompleteWithPlace:(GMSPlace *)place {
  // Do something with the selected place.
  NSLog(@"Place name: %@", place.name);
  NSLog(@"Place address: %@", place.formattedAddress);
  NSLog(@"Place attributions: %@", place.attributions);
}

- (void)tableDataSource:(GMSAutocompleteTableDataSource *)tableDataSource didFailAutocompleteWithError:(NSError *)error {
  // Handle the error
  NSLog(@"Error %@", error.description);
}

- (BOOL)tableDataSource:(GMSAutocompleteTableDataSource *)tableDataSource didSelectPrediction:(GMSAutocompletePrediction *)prediction {
  return YES;
}

#pragma mark - UISearchBarDelegate

- (void)searchBar:(UISearchBar *)searchBar textDidChange:(NSString *)searchText {
  // Update the GMSAutocompleteTableDataSource with the search text.
  [tableDataSource sourceTextHasChanged:searchText];
}

@end
自訂文字和背景顏色
您可以設定自動完成 UI 控制項中所有文字和背景的顏色,讓小工具更貼近應用程式的外觀。設定 UI 控制項顏色的方式有兩種:
- 盡可能使用內建的 iOS UIAppearance 通訊協定,為 UI 控制項設定全域樣式。這些設定適用於許多 UI 控制項,但並非全部。
- 使用小工具類別的 SDK 方法設定UIAppearance 通訊協定不支援的屬性。
一般來說,應用程式會同時使用 UIAppearance 通訊協定和 SDK 方法。下圖顯示可設定樣式的元素:
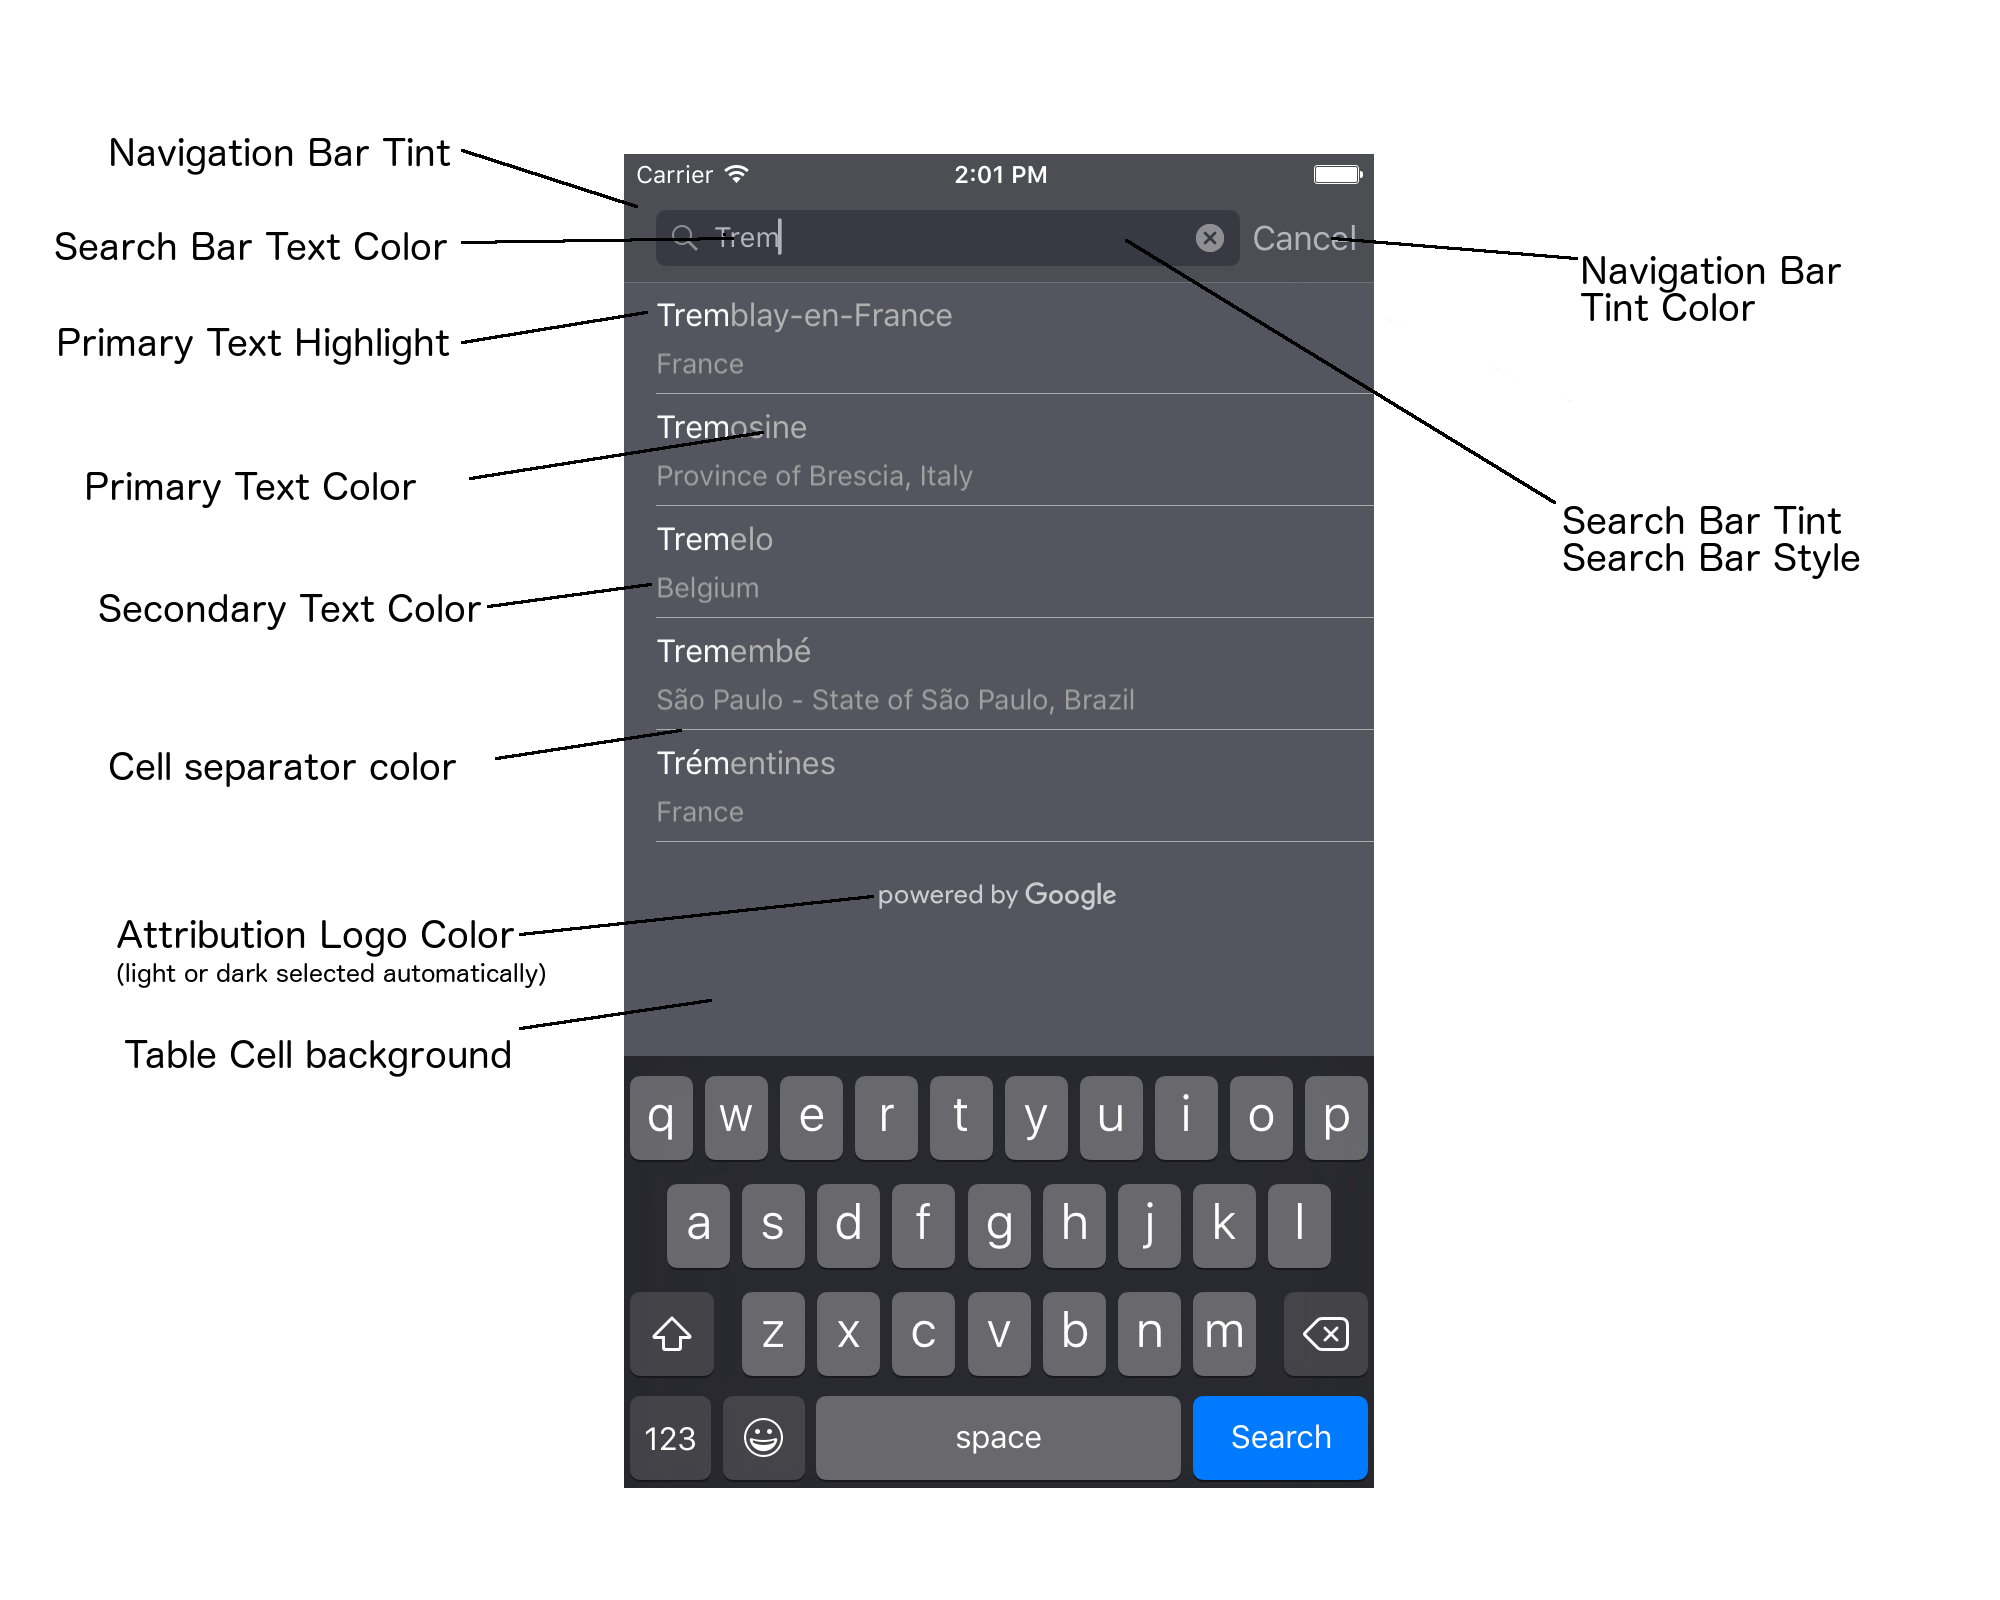
下表列出所有 UI 元素,並指出每個元素應如何設定樣式 (UIAppearance 協定或 SDK 方法)。
| UI 元素 | 方法 | 造型教學 |
|---|---|---|
| 導覽列色調 (背景) | UIAppearance 通訊協定 | 在 UINavigationBar 代理伺服器上呼叫 setBarTintColor。 |
| 導覽列的色調顏色 (搜尋列文字插入號和「取消」按鈕) | UIAppearance 通訊協定 | 在 UINavigationBar 代理伺服器上呼叫 setTintColor。 |
| 搜尋列文字顏色 | UIAppearance 通訊協定 | 在 searchBarTextAttributes 中設定 NSForegroundColorAttributeName。 |
| 搜尋列色調 | 不適用 | 搜尋列會呈現半透明狀態,並以導覽列的陰影版本顯示。 |
| 搜尋列預留位置文字顏色 (預設搜尋文字) | UIAppearance 通訊協定 | 在 placeholderAttributes 中設定 NSForegroundColorAttributeName。 |
| 主要文字 (也適用於錯誤和訊息文字) | SDK 方法 | 歡迎致電primaryTextColor。 |
| 醒目顯示主要文字 | SDK 方法 | 歡迎致電primaryTextHighlightColor。 |
| 次要文字 | SDK 方法 | 歡迎致電secondaryTextColor。 |
| 錯誤和訊息文字 | SDK 方法 | 歡迎致電primaryTextColor。 |
| 表格儲存格背景 | SDK 方法 | 歡迎致電tableCellBackgroundColor。 |
| 表格儲存格分隔線顏色 | SDK 方法 | 歡迎致電tableCellSeparatorColor。 |
| 「再試一次」按鈕 | SDK 方法 | 歡迎致電tintColor。 |
| 活動指標 (進度微調器) | UIAppearance 通訊協定 | 在 UIActivityIndicatorView 代理伺服器上呼叫 setColor。 |
| 「Powered by Google」標誌、悲傷的雲朵圖片 | 不適用 | 系統會根據背景對比度自動選取白色或灰色版本。 |
| 搜尋列文字欄位中的放大鏡和清除文字圖示 | 不適用 | 如要設定樣式,請將預設圖片換成所需顏色的圖片。 |
使用 UIAppearance 通訊協定
您可以透過 UIAppearance 通訊協定取得特定 UI 元素的顯示外觀 Proxy,然後設定該 UI 元素的顏色。進行修改時,特定 UI 元素的所有例項都會受到影響。舉例來說,下列範例會全域變更 UITextField 類別的文字顏色,使其在 UISearchBar 中時顯示為綠色:
[[UITextField appearanceWhenContainedIn:[UISearchBar class], nil]
    setDefaultTextAttributes:@{NSForegroundColorAttributeName:[UIColor greenColor]}];
如要進一步瞭解如何定義顏色值,請參閱「UIColor 類別參考資料」。
下列程式碼片段顯示您需要使用的所有 Proxy 指令,可為全螢幕自動完成 UI 控制項中的所有項目設定樣式。在 Appdelegate.m 的 didFinishLaunchingWithOptions 方法中新增下列程式碼:
// Define some colors.
UIColor *darkGray = [UIColor darkGrayColor];
UIColor *lightGray = [UIColor lightGrayColor];

// Navigation bar background.
[[UINavigationBar appearance] setBarTintColor:darkGray];
[[UINavigationBar appearance] setTintColor:lightGray];

// Color of typed text in the search bar.
NSDictionary *searchBarTextAttributes = @{
                                          NSForegroundColorAttributeName: lightGray,
                                          NSFontAttributeName : [UIFont systemFontOfSize:[UIFont systemFontSize]]
                                          };
[UITextField appearanceWhenContainedInInstancesOfClasses:@[[UISearchBar class]]]
    .defaultTextAttributes = searchBarTextAttributes;

// Color of the placeholder text in the search bar prior to text entry.
NSDictionary *placeholderAttributes = @{
                                        NSForegroundColorAttributeName: lightGray,
                                        NSFontAttributeName : [UIFont systemFontOfSize:[UIFont systemFontSize]]
                                        };

// Color of the default search text.
// NOTE: In a production scenario, "Search" would be a localized string.
NSAttributedString *attributedPlaceholder =
[[NSAttributedString alloc] initWithString:@"Search"
                                attributes:placeholderAttributes];
[UITextField appearanceWhenContainedInInstancesOfClasses:@[[UISearchBar class]]]
    .attributedPlaceholder = attributedPlaceholder;

// Color of the in-progress spinner.
[[UIActivityIndicatorView appearance] setColor:lightGray];

// To style the two image icons in the search bar (the magnifying glass
// icon and the 'clear text' icon), replace them with different images.
[[UISearchBar appearance] setImage:[UIImage imageNamed:@"custom_clear_x_high"]
                  forSearchBarIcon:UISearchBarIconClear
                            state:UIControlStateHighlighted];
[[UISearchBar appearance] setImage:[UIImage imageNamed:@"custom_clear_x"]
                  forSearchBarIcon:UISearchBarIconClear
                            state:UIControlStateNormal];
[[UISearchBar appearance] setImage:[UIImage imageNamed:@"custom_search"]
                    forSearchBarIcon:UISearchBarIconSearch
                            state:UIControlStateNormal];

// Color of selected table cells.
UIView *selectedBackgroundView = [[UIView alloc] init];
selectedBackgroundView.backgroundColor = [UIColor lightGrayColor];
[UITableViewCell appearanceWhenContainedIn:[GMSAutocompleteViewController class], nil]
    .selectedBackgroundView = selectedBackgroundView;
設定 UI 控制項樣式屬性
部分 UI 控制項元素具有不受 UIAppearance 協定影響的屬性,因此必須直接設定。下列程式碼範例顯示如何定義前景和背景顏色,並將這些顏色套用至名為 acController 的 UI 控制項執行個體。將這段程式碼新增至 ViewController.m 中的 onLaunchClicked 方法:
UIColor *darkGray = [UIColor darkGrayColor];
UIColor *lightGray = [UIColor lightGrayColor];

acController.secondaryTextColor = [UIColor colorWithWhite:1.0f alpha:0.5f];
acController.primaryTextColor = lightGray;
acController.primaryTextHighlightColor = [UIColor grayColor];
acController.tableCellBackgroundColor = darkGray;
acController.tableCellSeparatorColor = lightGray;
acController.tintColor = lightGray;
以程式輔助方式取得地點預測結果
您可以建立自訂搜尋使用者介面,做為自動完成小工具提供的使用者介面替代方案。如要這麼做,應用程式必須以程式輔助方式取得地點預測結果。應用程式可透過下列其中一種方式取得預測地點名稱和/或地址清單:
正在打給GMSPlacesClient findAutocompletePredictionsFromQuery:
如要取得預測地點名稱和/或地址的清單,請先例項化 GMSPlacesClient,然後使用下列參數呼叫 GMSPlacesClient
findAutocompletePredictionsFromQuery: 方法:
autocompleteQuery字串,內含使用者輸入的文字。GMSAutocompleteSessionToken,用於識別各個工作階段。您的應用程式應為每個自動完成要求呼叫傳遞相同權杖,然後在後續呼叫fetchPlacefromPlaceID:時,傳遞該權杖和地點 ID,以擷取使用者選取地點的 Place Details。- A
GMSAutocompleteFilterto:- 針對特定區域調整或限制結果。
- 將結果限制為特定類型的地點。
GMSPlaceLocationBias/Restriction 物件,可根據經緯度範圍,將結果調整至特定區域。
- 用來處理傳回預測結果的回呼方法。
下列程式碼範例顯示對 findAutocompletePredictionsFromQuery: 的呼叫。
Swift
/**
 *   Create a new session token. Be sure to use the same token for calling
 *   findAutocompletePredictions, as well as the subsequent place details request.
 *   This ensures that the user's query and selection are billed as a single session.
 */
let token = GMSAutocompleteSessionToken.init()

// Create a type filter.
let filter = GMSAutocompleteFilter()
filter.types = [kGMSPlaceTypeBank]
filter.locationBias = GMSPlaceRectangularLocationOption( northEastBounds,
                                   southWestBounds);

placesClient?.findAutocompletePredictions(fromQuery: "cheesebu",

                                          filter: filter,
                                          sessionToken: token,
                                          callback: { (results, error) in
    if let error = error {
      print("Autocomplete error: \(error)")
      return
    }
    if let results = results {
      for result in results {
        print("Result \(result.attributedFullText) with placeID \(result.placeID)")
      }
    }
})
Objective-C
/**
 *   Create a new session token. Be sure to use the same token for calling
 *   findAutocompletePredictionsFromQuery:, as well as the subsequent place details request.
 *   This ensures that the user's query and selection are billed as a single session.
 */
GMSAutocompleteSessionToken *token = [[GMSAutocompleteSessionToken alloc] init];

// Create a type filter.
GMSAutocompleteFilter *_filter = [[GMSAutocompleteFilter alloc] init];
_filter.types = @[ kGMSPlaceTypeBank ];

[_placesClient findAutocompletePredictionsFromQuery:@"cheesebu"
filter:_filter sessionToken:token callback:^(NSArray<GMSAutocompletePrediction *> * _Nullable results, NSError * _Nullable error) {
  if (error != nil) {
    NSLog(@"An error occurred %@", [error localizedDescription]);
    return;
  }
  if (results != nil) {
    for (GMSAutocompletePrediction *result in results) {
      NSLog(@"Result %@ with PlaceID %@", result.attributedFullText, result.placeID);
    }
  }
}];
API 會叫用指定的回呼方法,並傳入 GMSAutocompletePrediction 物件陣列。
每個 GMSAutocompletePrediction 物件都包含下列資訊:
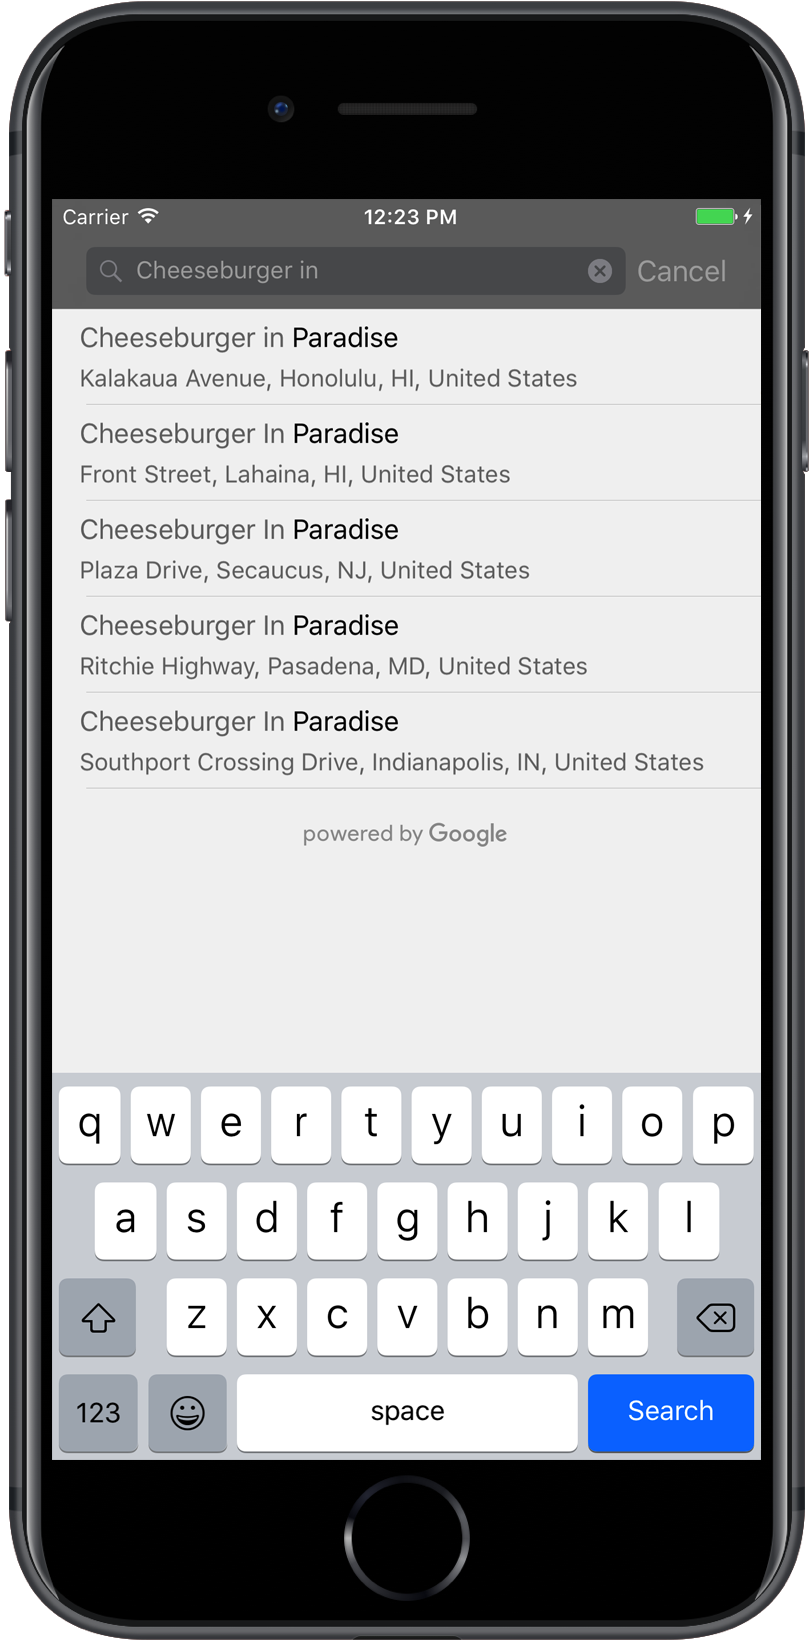
attributedFullText- 預測結果全文,以NSAttributedString形式呈現。例如「雪梨歌劇院,澳洲新南威爾斯州雪梨」。每個符合使用者輸入內容的文字範圍都有一個屬性kGMSAutocompleteMatchAttribute。您可以使用這項屬性,醒目顯示使用者查詢中相符的文字,例如下圖所示。placeID:預測地點的地點 ID。地點 ID 是用來識別特定地點的文字 ID,如要進一步瞭解地點 ID,請參閱地點 ID 總覽。distanceMeters:從指定origin到目的地的直線距離。如未設定origin屬性,系統不會傳回任何距離值。
以下程式碼範例說明如何使用 enumerateAttribute,以粗體文字醒目顯示結果中與使用者查詢文字相符的部分:
Swift
let regularFont = UIFont.systemFont(ofSize: UIFont.labelFontSize)
let boldFont = UIFont.boldSystemFont(ofSize: UIFont.labelFontSize)

let bolded = prediction.attributedFullText.mutableCopy() as! NSMutableAttributedString
bolded.enumerateAttribute(kGMSAutocompleteMatchAttribute, in: NSMakeRange(0, bolded.length), options: []) {
  (value, range: NSRange, stop: UnsafeMutablePointer<ObjCBool>) -> Void in
    let font = (value == nil) ? regularFont : boldFont
    bolded.addAttribute(NSFontAttributeName, value: font, range: range)
}

label.attributedText = bolded
Objective-C
UIFont *regularFont = [UIFont systemFontOfSize:[UIFont labelFontSize]];
UIFont *boldFont = [UIFont boldSystemFontOfSize:[UIFont labelFontSize]];

NSMutableAttributedString *bolded = [prediction.attributedFullText mutableCopy];
[bolded enumerateAttribute:kGMSAutocompleteMatchAttribute
                   inRange:NSMakeRange(0, bolded.length)
                   options:0
                usingBlock:^(id value, NSRange range, BOOL *stop) {
                  UIFont *font = (value == nil) ? regularFont : boldFont;
                  [bolded addAttribute:NSFontAttributeName value:font range:range];
                }];

label.attributedText = bolded;
使用擷取程式
如要從頭開始建構自己的自動完成控制項,可以使用 GMSAutocompleteFetcher,這個方法會包裝 GMSPlacesClient 上的 autocompleteQuery 方法。擷取器會節流處理要求,只傳回最近輸入的搜尋文字結果。不會提供任何 UI 元素。
如要導入
GMSAutocompleteFetcher,請按照下列步驟操作:
- 實作
GMSAutocompleteFetcherDelegate協定。 - 建立
GMSAutocompleteFetcher物件。 - 在使用者輸入內容時,對擷取器呼叫
sourceTextHasChanged。 - 使用
didAutcompleteWithPredictions和didFailAutocompleteWithError通訊協定方法處理預測和錯誤。
下列程式碼範例示範如何使用擷取器接收使用者輸入內容,並在文字檢視畫面中顯示相符地點。已省略選取地點的功能。FetcherSampleViewController 衍生自 FetcherSampleViewController.h 中的 UIViewController。
Swift
import UIKit
import GooglePlaces

class ViewController: UIViewController {

  var textField: UITextField?
  var resultText: UITextView?
  var fetcher: GMSAutocompleteFetcher?

  override func viewDidLoad() {
    super.viewDidLoad()

    view.backgroundColor = .white
    edgesForExtendedLayout = []

    // Set bounds to inner-west Sydney Australia.
    let neBoundsCorner = CLLocationCoordinate2D(latitude: -33.843366,
                                                longitude: 151.134002)
    let swBoundsCorner = CLLocationCoordinate2D(latitude: -33.875725,
                                                longitude: 151.200349)

    // Set up the autocomplete filter.
    let filter = GMSAutocompleteFilter()
    filter.locationRestriction = GMSPlaceRectangularLocationOption(neBoundsCorner, swBoundsCorner)

    // Create a new session token.
    let token: GMSAutocompleteSessionToken = GMSAutocompleteSessionToken.init()

    // Create the fetcher.
    fetcher = GMSAutocompleteFetcher(bounds: nil, filter: filter)
    fetcher?.delegate = self
    fetcher?.provide(token)

    textField = UITextField(frame: CGRect(x: 5.0, y: 10.0,
                                          width: view.bounds.size.width - 5.0,
                                          height: 64.0))
    textField?.autoresizingMask = .flexibleWidth
    textField?.addTarget(self, action: #selector(textFieldDidChange(textField:)),
                         for: .editingChanged)
    let placeholder = NSAttributedString(string: "Type a query...")

    textField?.attributedPlaceholder = placeholder

    resultText = UITextView(frame: CGRect(x: 0, y: 65.0,
                                          width: view.bounds.size.width,
                                          height: view.bounds.size.height - 65.0))
    resultText?.backgroundColor = UIColor(white: 0.95, alpha: 1.0)
    resultText?.text = "No Results"
    resultText?.isEditable = false

    self.view.addSubview(textField!)
    self.view.addSubview(resultText!)
  }

  @objc func textFieldDidChange(textField: UITextField) {
    fetcher?.sourceTextHasChanged(textField.text!)
  }

}

extension ViewController: GMSAutocompleteFetcherDelegate {
  func didAutocomplete(with predictions: [GMSAutocompletePrediction]) {
    let resultsStr = NSMutableString()
    for prediction in predictions {
      resultsStr.appendFormat("\n Primary text: %@\n", prediction.attributedPrimaryText)
      resultsStr.appendFormat("Place ID: %@\n", prediction.placeID)
    }

    resultText?.text = resultsStr as String
  }

  func didFailAutocompleteWithError(_ error: Error) {
    resultText?.text = error.localizedDescription
  }
}
Objective-C
#import "FetcherSampleViewController.h"
#import <GooglePlaces/GooglePlaces.h>

@interface FetcherSampleViewController () <GMSAutocompleteFetcherDelegate>

@end

@implementation FetcherSampleViewController {
  UITextField *_textField;
  UITextView *_resultText;
  GMSAutocompleteFetcher* _fetcher;
}

-   (void)viewDidLoad {
  [super viewDidLoad];

  self.view.backgroundColor = [UIColor whiteColor];
  self.edgesForExtendedLayout = UIRectEdgeNone;

  // Set bounds to inner-west Sydney Australia.
  CLLocationCoordinate2D neBoundsCorner = CLLocationCoordinate2DMake(-33.843366, 151.134002);
  CLLocationCoordinate2D swBoundsCorner = CLLocationCoordinate2DMake(-33.875725, 151.200349);

  GMSAutocompleteFilter *autocompleteFilter = [[GMSAutocompleteFilter alloc] init];
  autocompleteFilter.locationRestriction =
        GMSPlaceRectangularLocationOption(neBoundsCorner, swBoundsCorner);

  // Create the fetcher.
  _fetcher = [[GMSAutocompleteFetcher alloc] initWithBounds:nil
                                                     filter:filter];
  _fetcher.delegate = self;

  // Set up the UITextField and UITextView.
  _textField = [[UITextField alloc] initWithFrame:CGRectMake(5.0f,
                                                             0,
                                                             self.view.bounds.size.width - 5.0f,
                                                             44.0f)];
  _textField.autoresizingMask = UIViewAutoresizingFlexibleWidth;
  [_textField addTarget:self
                 action:@selector(textFieldDidChange:)
       forControlEvents:UIControlEventEditingChanged];
  _resultText =[[UITextView alloc] initWithFrame:CGRectMake(0,
                                                            45.0f,
                                                            self.view.bounds.size.width,
                                                            self.view.bounds.size.height - 45.0f)];
  _resultText.backgroundColor = [UIColor colorWithWhite:0.95f alpha:1.0f];
  _resultText.text = @"No Results";
  _resultText.editable = NO;
  [self.view addSubview:_textField];
  [self.view addSubview:_resultText];
}

-   (void)textFieldDidChange:(UITextField *)textField {
  NSLog(@"%@", textField.text);
  [_fetcher sourceTextHasChanged:textField.text];
}

#pragma mark - GMSAutocompleteFetcherDelegate
-   (void)didAutocompleteWithPredictions:(NSArray *)predictions {
  NSMutableString *resultsStr = [NSMutableString string];
  for (GMSAutocompletePrediction *prediction in predictions) {
      [resultsStr appendFormat:@"%@\n", [prediction.attributedPrimaryText string]];
  }
  _resultText.text = resultsStr;
}

-   (void)didFailAutocompleteWithError:(NSError *)error {
  _resultText.text = [NSString stringWithFormat:@"%@", error.localizedDescription];
}

@end
工作階段符記
工作階段符記會將使用者自動完成搜尋的查詢和選取階段歸入不同的工作階段,以用於計費。工作階段是從使用者輸入查詢時開始,到使用者選取地點時結束。在每個工作階段中,使用者可以輸入多筆查詢,最終選擇一個地點。工作階段結束後,符記就會失效。您的應用程式必須為每個工作階段產生新的符記。建議您在所有程式輔助自動完成工作階段使用工作階段符記 (使用全螢幕控制器或結果控制器時,API 會自動處理這項作業)。
Places SDK for iOS 會使用 GMSAutocompleteSessionToken 識別每個工作階段。應用程式應在每個新工作階段開始時傳遞新的工作階段符記,然後在後續呼叫 fetchPlacefromPlaceID: 時,傳遞相同符記和地點 ID,以擷取使用者選取地點的 Place Details。
使用下列程式碼產生新的工作階段符記:
let token: GMSAutocompleteSessionToken = GMSAutocompleteSessionToken.init()
用量限制
- 使用
GMSPlacesClient findAutocompletePredictionsFromQuery方法時,須遵守分層查詢限制。請參閱用量限制說明文件。
在應用程式中顯示出處資訊
- 如果應用程式以程式輔助方式使用自動完成服務,使用者介面必須顯示「Powered by Google」出處資訊,或顯示在 Google 品牌的 Google 地圖中。
- 如果應用程式使用自動完成 UI 控制項,則無須採取其他行動 (系統預設會顯示必要出處資訊)。
- 如果您在依 ID 取得地點後擷取並顯示其他地點資訊,也必須顯示第三方出處資訊。
詳情請參閱出處資訊說明文件。
控制網路活動指標
如要控制應用程式狀態列中的網路活動指標,您必須為使用的自動完成類別實作適當的選用委派方法,並自行開啟及關閉網路指標。
- 對於
GMSAutocompleteViewController,您必須實作委派方法didRequestAutocompletePredictions:和didUpdateAutocompletePredictions:。 - 如要使用
GMSAutocompleteResultsViewController,您必須實作委派方法didRequestAutocompletePredictionsForResultsController:和didUpdateAutocompletePredictionsForResultsController:。 - 如要使用
GMSAutocompleteTableDataSource,您必須實作委派方法didRequestAutocompletePredictionsForTableDataSource:和didUpdateAutocompletePredictionsForTableDataSource:。
實作這些方法並將 [UIApplication
sharedApplication].networkActivityIndicatorVisible 分別設為 YES 和 NO,狀態列就會正確比對自動完成 UI。
限制自動完成結果
您可以設定自動完成 UI 控制項,將結果限制在特定地理區域,及/或將結果篩選為一或多個地點類型,或特定國家/地區。如要限制結果,請採取下列做法:
- 如要偏好 (調整) 定義區域內的結果,請在
GMSAutocompleteFilter上設定locationBias(系統仍可能會傳回定義區域外的部分結果)。如果同時設定locationRestriction,系統會忽略locationBias。 如要只顯示 (限制) 定義區域內的結果,請在
GMSAutocompleteFilter上設定locationRestriction(系統只會傳回定義區域內的結果)。- 注意:這項限制只會套用至整條路線,系統可能會根據與位置限制重疊的路線,傳回超出矩形範圍的綜合結果。
如要只傳回符合特定地點類型的結果,請在
GMSAutocompleteFilter上設定types(例如,指定 kGMSPlaceTypeCollectionAddress 會導致小工具只傳回包含精確地址的結果)。如要只傳回最多五個指定國家/地區的結果,請在
GMSAutocompleteFilter上設定countries。
針對特定區域調整結果
如要偏好 (調整) 位於定義區域內的結果,請在 GMSAutocompleteFilter 上設定 locationBias,如下所示:
northEast = CLLocationCoordinate2DMake(39.0, -95.0);  southWest =
CLLocationCoordinate2DMake(37.5, -100.0);  GMSAutocompleteFilter *filter =
[[GMSAutocompleteFilter alloc] init];  filter.locationBias =
GMSPlaceRectangularLocationOption(northEast, southWest);
將結果限制在特定區域
如要只顯示 (限制) 定義區域內的結果,請在 GMSAutocompleteFilter 上設定 locationRestriction,如下所示:
northEast = CLLocationCoordinate2DMake(39.0, -95.0);  southWest =
CLLocationCoordinate2DMake(37.5, -100.0);  GMSAutocompleteFilter *filter =
[[GMSAutocompleteFilter alloc] init];  filter.locationRestriction =
GMSPlaceRectangularLocationOption(northEast, southWest);
依國家/地區篩選結果
如要篩選最多五個指定國家/地區的結果,請將 countries 設為 GMSAutocompleteFilter,如下所示:
GMSAutocompleteFilter *filter = [[GMSAutocompleteFilter alloc] init];
filter.countries = @[ @"au", @"nz" ];
依地點類型或類型集合篩選結果
如要將結果限制為特定類型或類型集合,請設定 GMSAutoCompleteFilter 的 types 屬性。使用這項屬性指定「地點類型」一文表 1、2 和 3 中列出的篩選器。如未指定,則會傳回所有類型。
如要指定類型或類型集合篩選器,請按照下列步驟操作:
使用
types屬性,從「地點類型」一文的表 1 和表 2 中,指定最多五個 type 值。類型值是由GMSPlaceType中的常數定義。使用
types屬性,從「地點類型」的表 3 中指定類型集合。類型集合值是由GMSPlaceType中的常數定義。在要求中只能使用表 3 中的一種類型。如果指定表 3 中的值,就無法指定表 1 或表 2 中的值。如果這樣做,就會發生錯誤。
舉例來說,如要只傳回符合特定地點類型的結果,請在 GMSAutocompleteFilter 上設定 types。下例說明如何設定篩選器,只傳回地址精確的結果:
GMSAutocompleteFilter *filter = [[GMSAutocompleteFilter alloc] init];
filter.types = @[ kGMSPlaceTypeAirport, kGMSPlaceTypeAmusementPark ];
Place Autocomplete (舊版) 最佳化
本節將說明最佳做法,協助您充分運用 Place Autocomplete (舊版) 服務。
以下列出幾項一般準則:
- 如要開發有效的使用者介面,最快的方法就是使用 Maps JavaScript API Place Autocomplete (舊版) 小工具、Places SDK for Android Place Autocomplete (舊版) 小工具,或 Places SDK for iOS Place Autocomplete (舊版) UI 控制項。
- 從一開始就嘗試瞭解 Place Autocomplete (舊版) 的必要資料欄位。
- 「位置自訂調整」和「位置限制」為自選欄位,但可能會對自動完成效能產生重大影響。
- 使用錯誤處理機制,可以減輕 API 傳回錯誤時對應用程式效能造成的影響。
- 確保應用程式能處理未選取任何項目的情況,以便使用者繼續操作。
費用最佳化最佳做法
基本費用最佳化
為了讓 Place Autocomplete (舊版) 服務費用發揮最大效益,請使用 Place Details (舊版) 和 Place Autocomplete (舊版) 小工具中的欄位遮罩,只傳回所需的 Place Autocomplete (舊版) 資料欄位。
進階費用最佳化
建議您透過程式輔助方式導入 Place Autocomplete (舊版),採用 SKU:Autocomplete - Per Request 計價 並要求已選地點 (而非 Place Details (舊版)) 的相關 Geocoding API 結果。如果同時符合以下兩項條件,搭配 Geocoding API 使用「按要求」計價會比使用「按工作階段」(以工作階段為準) 計價更具成本效益:
- 如果您只需要針對使用者選取的地點取得經緯度或地址,透過 Geocoding API 擷取這項資訊,支付的費用會比使用 Place Details (舊版) 呼叫更低。
- 如果使用者在平均四次以內的 Place Autocomplete (舊版) 預測結果要求選取了自動預測結果,則「按要求」計價可能會比「按工作階段」計價更符合成本效益。
除了所選預測結果的地址和經緯度,應用程式是否需要任何其他資訊?
是,需要更多詳細資料
搭配 Place Details (舊版) 使用以工作階段為準的 Place Autocomplete (舊版)。
由於應用程式需要地點詳細資料 (舊版),例如地點名稱、商家狀態或營業時間,因此 Place Autocomplete (舊版) 的實作方式應使用工作階段符記 (以程式輔助方式或內建於 JavaScript、Android 或 iOS 小工具),每個工作階段加上適用的 Places Data SKU,視您要求哪些地點資料欄位而定。1
透過小工具導入
JavaScript、Android 或 iOS 小工具自動內建工作階段管理功能,其中包含對已選取的預測結果提出的 Place Autocomplete (舊版) 要求和 Place Details (舊版) 要求。請務必指定 fields 參數,確保只要求所需的 Place Autocomplete (舊版) 資料欄位。
透過程式輔助方式導入
搭配 Place Autocomplete (舊版) 要求使用工作階段符記。要求所選預測結果的相關 Place Details (舊版) 時,請加入下列參數:
- Place Autocomplete (舊版) 回應中的地點 ID
- Place Autocomplete (舊版) 要求中使用的工作階段符記
- 指定所需 Place Autocomplete (舊版) 資料欄位的
fields參數
否,只需要地址和位置資訊
對您的應用程式而言,Geocoding API 可能比 Place Details (舊版) 更符合成本效益,視 Place Autocomplete (舊版) 使用效能而定。每個應用程式的 Place Autocomplete (舊版) 效率各不相同,可能取決於使用者輸入的內容、使用應用程式的位置,以及是否採用效能最佳化最佳做法。
為了找出以下問題的解答,請分析使用者在應用程式中選取 Place Autocomplete (舊版) 預測結果前,平均輸入的字元數量。
使用者是否會在平均四次以內的要求中選取 Place Autocomplete (舊版) 預測結果?
是
透過程式輔助方式導入 Place Autocomplete (舊版),但不使用工作階段符記,並針對已選取的地點預測結果呼叫 Geocoding API。
Geocoding API 提供地址和經緯度座標。
提出四次
Autocomplete - Per Request
要求,加上所選地點預測結果的相關 Geocoding API
呼叫,總費用會低於 Place Autocomplete (舊版) 的每個工作階段費用1。
建議您採用效能最佳做法,讓使用者以更少的字元找到需要的預測結果。
否
搭配 Place Details (舊版) 使用以工作階段為準的 Place Autocomplete (舊版)。
由於使用者選取 Place Autocomplete (舊版) 預測結果前,您預期發出的要求平均數量超過按工作階段計費的費用,因此 Place Autocomplete (舊版) 的實作應針對 Place Autocomplete (舊版) 要求和相關聯的 Place Details (舊版) 要求使用工作階段符記,按工作階段計費。
1
透過小工具導入
JavaScript、Android 或 iOS 小工具自動內建工作階段管理功能,其中包含對已選取的預測結果提出的 Place Autocomplete (舊版) 要求和 Place Details (舊版) 要求。請務必指定 fields 參數,確保您只要求所需的欄位。
透過程式輔助方式導入
搭配 Place Autocomplete (舊版) 要求使用工作階段符記。要求所選預測結果的相關 Place Details (舊版) 時,請加入下列參數:
- Place Autocomplete (舊版) 回應中的地點 ID
- Place Autocomplete (舊版) 要求中使用的工作階段符記
- 指定地址和幾何圖形等 Basic Data 欄位的
fields參數
考慮延後 Place Autocomplete (舊版) 要求
您可以運用一些策略,例如將 Place Autocomplete (舊版) 要求延後到使用者輸入三或四個字元時再開始,藉此減少應用程式提出要求數量。舉例來說,如果使用者輸入第三個字元後,您就為每個字元提出 Place Autocomplete (舊版) 要求,那麼使用者輸入七個字元後,您為所選預測結果提出一次 Geocoding API 要求,總費用就會是 4 次 Place Autocomplete (舊版) Per Request + Geocoding。1
如果延後要求可以讓平均程式輔助要求少於四次,您可以按照使用 Geocoding API 提高 Place Autocomplete (舊版) 效能的指南操作。請注意,如果使用者希望每輸入一個字就能看到預測結果,可能就會將延後要求視為時間上的延遲。
建議您採用效能最佳做法,讓使用者以更少的字元找到需要的預測結果。
-
如要瞭解費用,請參閱 Google 地圖平台價目表。
效能最佳做法
以下準則說明如何將 Place Autocomplete (舊版) 效能最佳化:
- 針對導入的 Place Autocomplete (舊版) 加入國家/地區限制、位置自訂調整和 (適用於程式輔助導入) 語言偏好設定。小工具會從使用者的瀏覽器或行動裝置選擇語言偏好設定,因此不需要設定語言偏好。
- 如果 Place Autocomplete (舊版) 附帶地圖,您就可以根據地圖可視區域進行位置自訂調整。
- 如果使用者沒有選擇任何 Place Autocomplete (舊版) 預測結果 (通常是因為這些預測結果並非他們想要的地址),您可以重複使用原始使用者輸入內容,嘗試取得更相關的結果:
- 如果您預期使用者只會輸入地址資訊,請在 Geocoding API 呼叫中重複使用原始使用者輸入內容。
- 如果您預期使用者會依名稱或地址查詢某個地點,請使用 Place Details (舊版) 要求。如果希望將結果範圍限制在特定區域,請使用位置自訂調整。
- 使用者輸入子處所地址,例如建築物內特定單位或公寓的地址。舉例來說,捷克地址「Stroupežnického 3191/17, Praha」在 Place Autocomplete (舊版) 中會產生不完整的預測結果。
- 使用者輸入的地址含有路段前置字元,例如紐約的「23-30 29th St, Queens」或夏威夷考艾島的「47-380 Kamehameha Hwy, Kaneohe」。
位置偏好設定
傳送 location 參數和 radius 參數,針對特定區域調整結果。這會指示 Place Autocomplete (舊版) 優先顯示定義區域內的結果。不過,系統還是有可能會顯示定義區域外的結果。您可以使用 includedRegionCodes 參數篩選結果,只顯示特定國家/地區內的地點。
限制位置
傳送 locationRestriction 參數,將結果限制在特定區域。
您也可以新增 strictbounds 參數,將結果限制在 location 和 radius 參數定義的區域內。這會指示 Place Autocomplete (舊版) 只傳回該區域內的結果。
疑難排解
雖然可能發生各種錯誤,但應用程式最常遇到的錯誤通常是由設定錯誤 (例如使用錯誤的 API 金鑰,或 API 金鑰設定有誤) 或配額錯誤 (應用程式超出配額) 所致。如要進一步瞭解配額,請參閱「用量限制」一文。
使用自動完成控制項時發生的錯誤,會透過各種委派通訊協定的 didFailAutocompleteWithError() 方法傳回。所提供 NSError 物件的 code 屬性會設為 GMSPlacesErrorCode 列舉的其中一個值。