
इस सेक्शन में बताया गया है कि कार के लिए Android App library के साथ Navigation SDK का इस्तेमाल करके, अपने ऐप्लिकेशन के नेविगेशन अनुभव को डैशबोर्ड में मौजूद मुख्य यूनिट पर कैसे दिखाया जा सकता है. अगर किसी व्यक्ति की कार के डैशबोर्ड सिस्टम में Android Auto काम करता है, तो वह अपने फ़ोन को यूनिट से कनेक्ट करके, सीधे तौर पर कार के डिसप्ले पर आपके ऐप्लिकेशन का इस्तेमाल कर सकता है. आवाज़ से रास्ता बताने की सुविधा, कार के स्पीकर पर भी काम करती है.
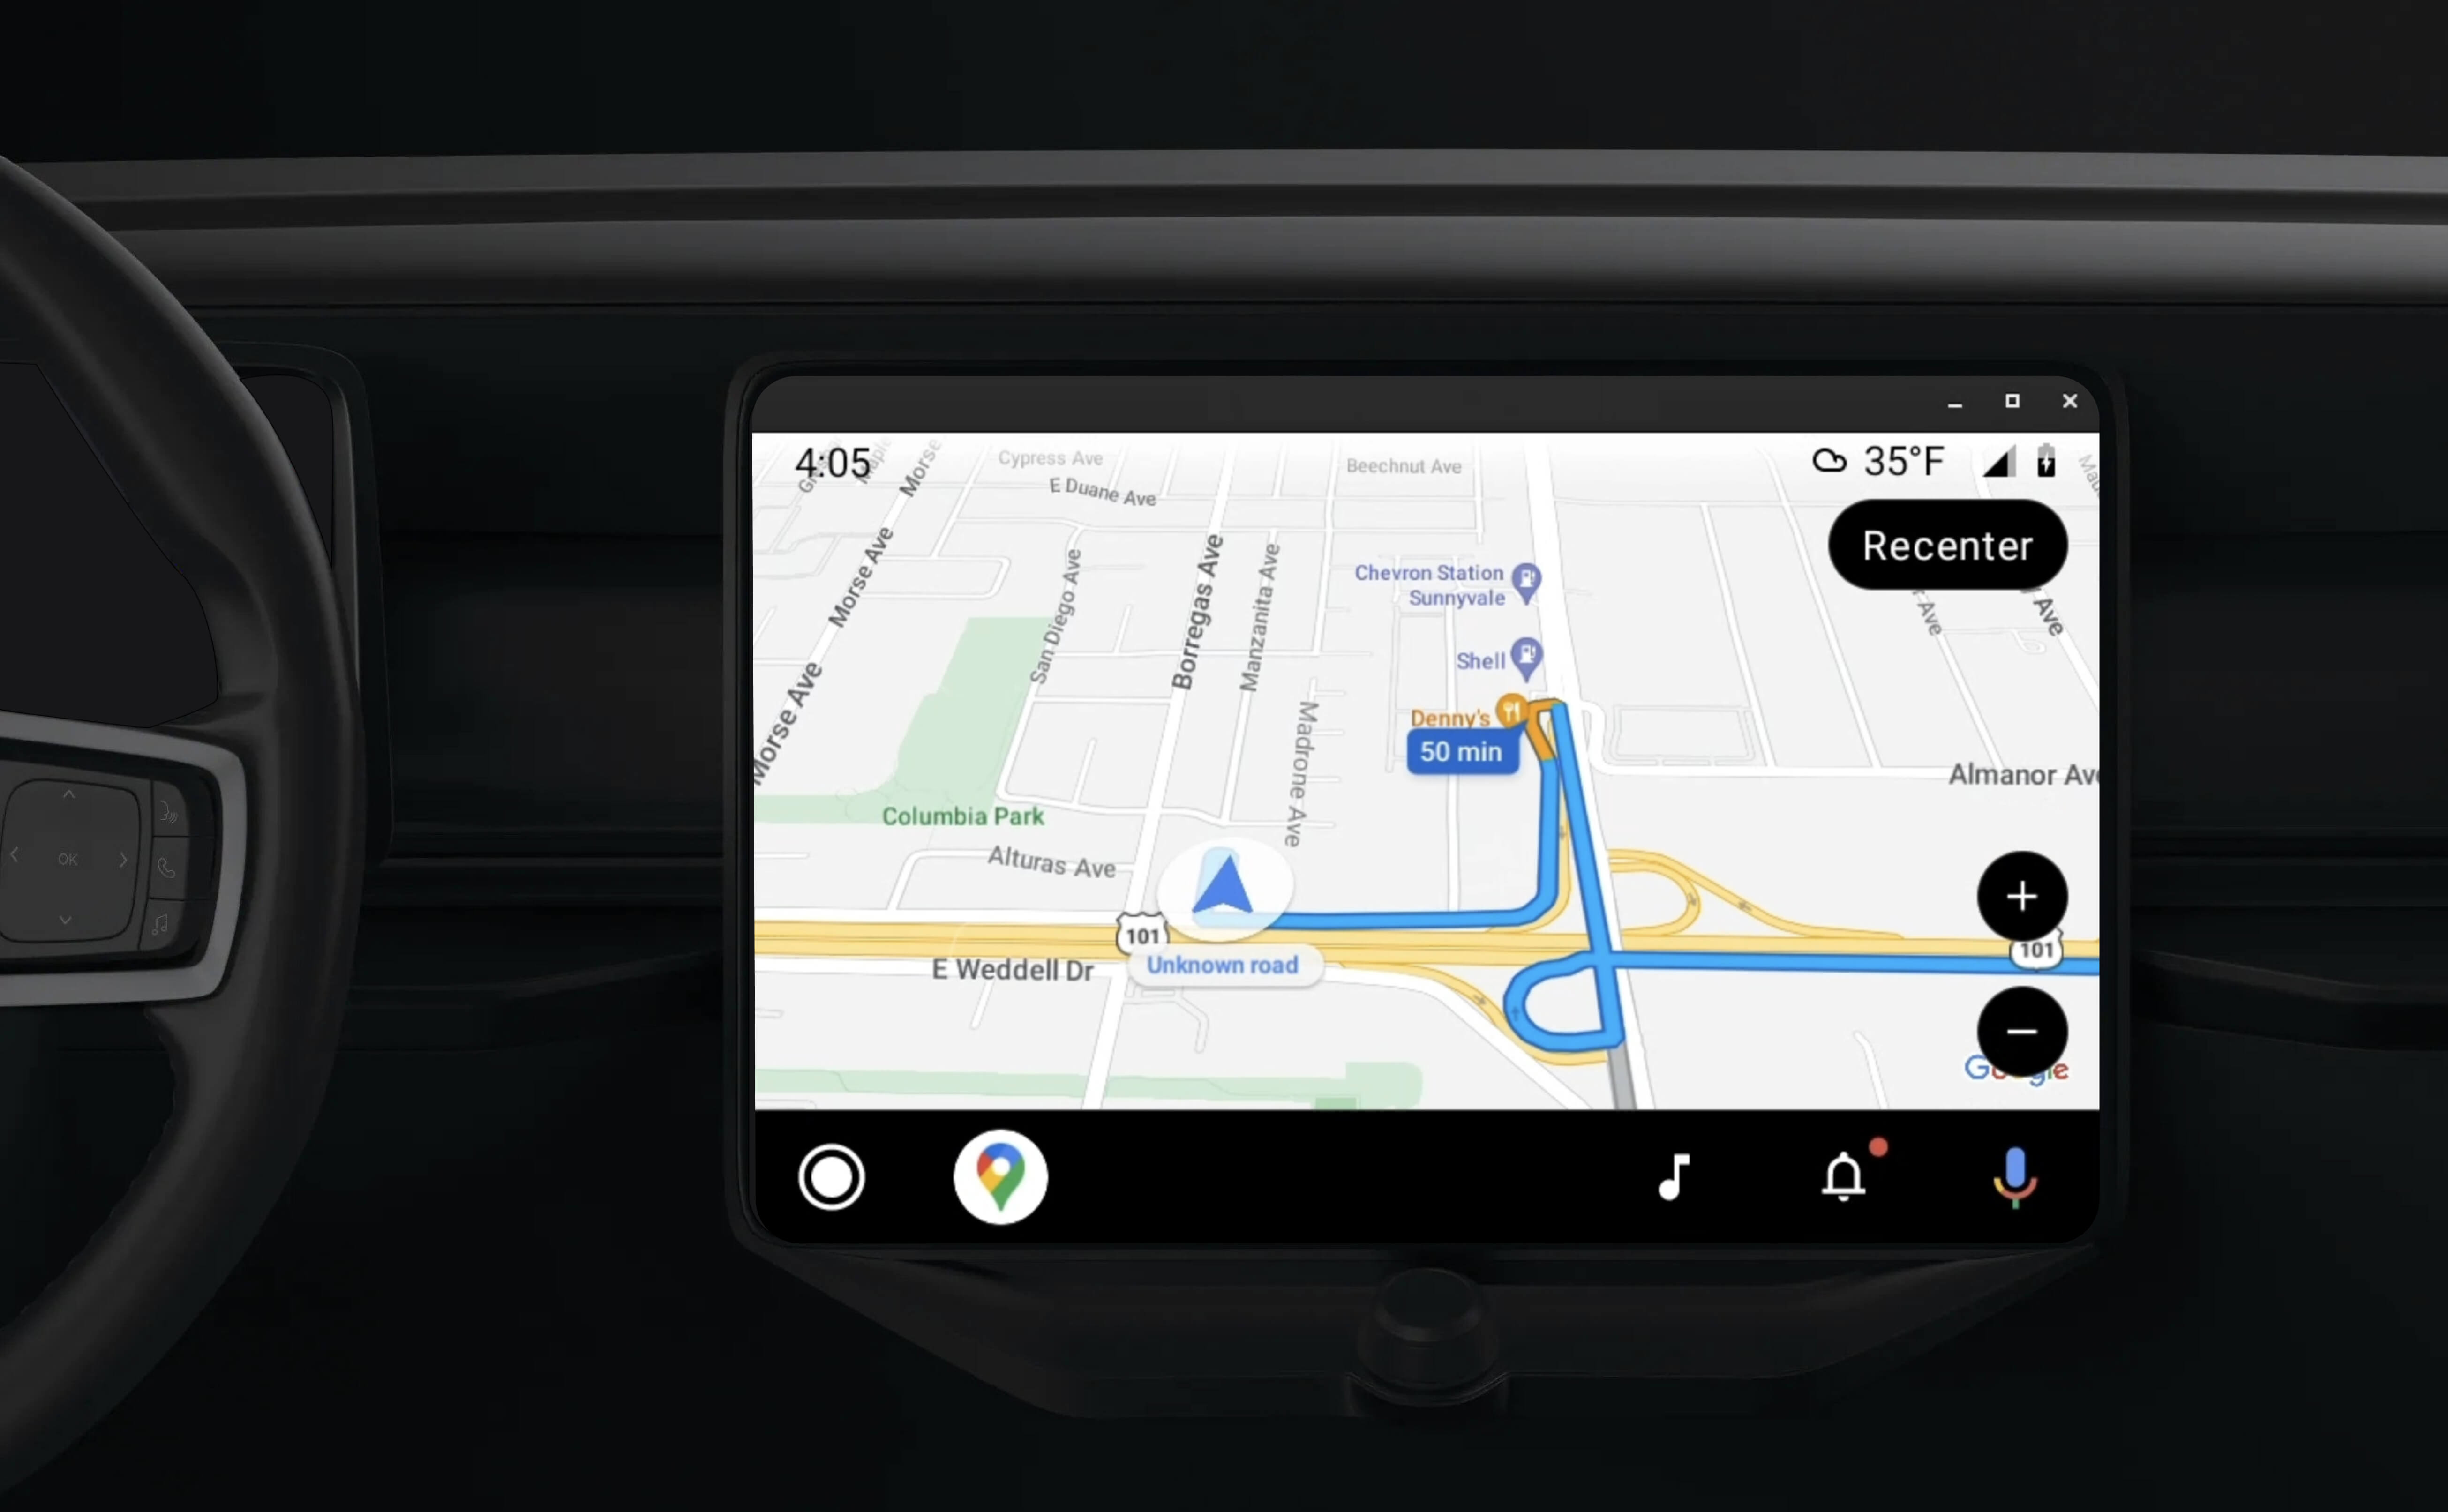
कार के लिए Android App Library, Android ऐप्लिकेशन को Android Auto पर चलाने की सुविधा देती है. इसके लिए, यह ड्राइवर की सुरक्षा के लिए मंज़ूर किए गए विज़ुअल टेंप्लेट का एक सेट उपलब्ध कराती है. इन टेंप्लेट में, डैशबोर्ड में मौजूद यूज़र इंटरफ़ेस (यूआई) कंट्रोल को फ़ोन के यूज़र इंटरफ़ेस (यूआई) कंट्रोल से अलग रखा जाता है. ऐसा ड्राइवर का ध्यान भटकने से रोकने के लिए किया जाता है.
Navigation SDK की मदद से बनाए गए ऐप्लिकेशन को Android Auto के साथ काम करने की सुविधा चालू करने पर, आपको नेविगेशन के लिए एक और व्यू मिलता है.
इससे दो मैप व्यू इस्तेमाल किए जा सकते हैं. एक फ़ोन के लिए और दूसरा मुख्य यूनिट के लिए. दोनों डिसप्ले को Navigator.java से निर्देश मिलते हैं. यह एक सिंगलटन है.
डैशबोर्ड में मौजूद सिस्टम, सुरक्षा से जुड़े मानकों को पूरा करने वाले इंटरैक्टिव एलिमेंट दिखाता है, ताकि उपयोगकर्ता बिना किसी रुकावट के सुरक्षित तरीके से अपनी मंज़िल तक पहुंच सके. उपयोगकर्ता, आपके ऐप्लिकेशन की खास सुविधाओं के साथ भी इंटरैक्ट कर सकता है. जैसे, ऑर्डर स्वीकार या अस्वीकार करना या मैप पर खरीदार की जगह की जानकारी देखना. डैशबोर्ड में मौजूद यूनिट पर भी, ऑर्डर की स्थिति के अपडेट दिख सकते हैं.
कनेक्ट किया गया फ़ोन, Navigation SDK का स्टैंडर्ड वर्शन इस्तेमाल करना जारी रख सकता है. इसके अलावा, आपके ऐप्लिकेशन में कोई अन्य व्यू या वर्कफ़्लो भी इस्तेमाल किया जा सकता है. इस सुविधा की मदद से, कस्टम फ़ंक्शनैलिटी उपलब्ध कराई जा सकती है. ऐसा हो सकता है कि यह कार की स्क्रीन पर ठीक से काम न करे.
सेट अप करें
Android Auto के साथ काम करने के लिए, सबसे पहले आपको Android Auto के साथ कार सर्विस सेट अप करनी होगी. इसके बाद, आपको अपने Navigation SDK ऐप्लिकेशन में TurnByTurn लाइब्रेरी चालू करनी होगी.
Android Auto का इस्तेमाल शुरू करना
Android Auto के साथ काम करने के लिए डिज़ाइन की गई Navigation SDK की सुविधाओं का इस्तेमाल शुरू करने से पहले, आपको अपने ऐप्लिकेशन के लिए कार सेवा सेट अप करनी होगी, ताकि Android Auto इसे ढूंढ सके.
यहां दिया गया तरीका अपनाएं. यह पूरा तरीका, Android for Cars के डेवलपर दस्तावेज़ में देखा जा सकता है:
- Android Auto की बुनियादी सुविधाओं के बारे में जानें.
- कार के लिए Android App Library इंस्टॉल करें.
- Android Auto को शामिल करने के लिए, अपने ऐप्लिकेशन की मेनिफ़ेस्ट फ़ाइल को कॉन्फ़िगर करें.
- अपने मेनिफ़ेस्ट में, कार-ऐप्लिकेशन का कम से कम लेवल 1 डिक्लेयर करें.
- अपनी
CarAppServiceऔर सेशन बनाएं.
Navigation SDK सेट अप करना
कार के ऐप्लिकेशन की सेवा सेट अप करने के बाद, Navigation SDK का इस्तेमाल किया जा सकता है.
- अगर आपने अब तक अपने ऐप्लिकेशन में Navigation SDK को इंटिग्रेट नहीं किया है, तो अपना प्रोजेक्ट सेट अप करें.
- अपने ऐप्लिकेशन के लिए, रास्ते की मोड़-दर-मोड़ जानकारी देने वाला फ़ीड चालू करें.
- ज़रूरी नहीं. Navigation SDK से जनरेट किए गए आइकॉन का इस्तेमाल करें.
- मैप बनाएं. इसके लिए,
Screenक्लास में दिए गए Android Auto Surface परNavigationViewForAutoक्लास का इस्तेमाल करें. - TurnbyTurn लाइब्रेरी से मिले डेटा को Android Auto के नेविगेशन टेंप्लेट में भरें.
अब आपके पास अपने ऐप्लिकेशन को नेविगेशन की जानकारी देने वाली एक रजिस्टर की गई सेवा है. साथ ही, आपका ऐप्लिकेशन Android Auto से कनेक्ट हो सकता है. इसलिए, अब आपके पास नेविगेशन के बाकी एलिमेंट बनाने का विकल्प है. ये एलिमेंट, Android Auto के साथ आपके ऐप्लिकेशन के ठीक से काम करने के लिए ज़रूरी हैं:
- मैप और नेविगेशन यूज़र इंटरफ़ेस (यूआई) बनाना
- मैप इंटरैक्शन की सुविधा चालू करना
- नेविगेशन के निर्देश दिखाना
- पक्का करें कि आपने सही मैन्यूवर टाइप चुने हों
मैप और नेविगेशन यूज़र इंटरफ़ेस (यूआई) को ड्रॉ करना
NavigationViewForAuto क्लास, Android Auto की स्क्रीन पर मैप और नेविगेशन यूज़र इंटरफ़ेस (यूआई) रेंडर करती है. इसमें NavigationView
फ़ोन के लिए उपलब्ध सुविधाओं में से ज़्यादातर सुविधाएं मिलती हैं. हालांकि, इसमें इंटरैक्टिविटी सीमित होती है. Android Auto की ओर से उपलब्ध कराई गई Surface पर ड्रा करने के लिए, NavigationViewForAuto का इस्तेमाल करें:
private boolean isSurfaceReady(SurfaceContainer surfaceContainer) {
  return surfaceContainer.getSurface() != null
        && surfaceContainer.getDpi() != 0
        && surfaceContainer.getHeight() != 0
        && surfaceContainer.getWidth() != 0;
}

@Override
public void onSurfaceAvailable(@NonNull SurfaceContainer surfaceContainer) {
  if (!isSurfaceReady(surfaceContainer)) {
    return;
   }
  virtualDisplay =
      getCarContext()
          .getSystemService(DisplayManager.class)
          .createVirtualDisplay(
            VIRTUAL_DISPLAY_NAME,
            surfaceContainer.getWidth(),
            surfaceContainer.getHeight(),
            surfaceContainer.getDpi(),
            surfaceContainer.getSurface(),
            DisplayManager.VIRTUAL_DISPLAY_FLAG_OWN_CONTENT_ONLY);
    presentation = new Presentation(getCarContext(), virtualDisplay.getDisplay());

    navigationView = new NavigationViewForAuto(getCarContext());
    navigationView.onCreate(null);
    navigationView.onStart();
    navigationView.onResume();

    presentation.setContentView(navigationView);
    presentation.show();

    navigationView.getMapAsync(googleMap -> this.googleMap = googleMap);
  }

@Override
public void onSurfaceDestroyed(@NonNull SurfaceContainer surfaceContainer) {
  navigationView.onPause();
  navigationView.onStop();
  navigationView.onDestroy();

  presentation.dismiss();
  virtualDisplay.release();
}
मैप इंटरैक्शन की सुविधा चालू करना
ड्राइवर की सुरक्षा के लिए, Android Auto स्क्रीन पर इंटरैक्ट करने की सुविधा को SurfaceCallback के कुछ तरीकों तक सीमित रखता है. इन कॉलबैक का इस्तेमाल करके, ड्राइवर को डैशबोर्ड पर मौजूद स्क्रीन पर मैप के साथ सीमित तौर पर इंटरैक्ट करने की सुविधा दें. उदाहरण के लिए, onClick और onScale, उपयोगकर्ता के टैप और पिंच जेस्चर से मेल खाते हैं. इंटरैक्टिविटी कॉलबैक को map
action
strip का इस्तेमाल इस तरह करना चाहिए:
मैप इंटरैक्टिविटी के कॉलबैक पाने के लिए, आपके ऐप्लिकेशन को Action.PAN बटन का इस्तेमाल करना होगा.
उपयोगकर्ता की अन्य कार्रवाइयों को सपोर्ट करने के लिए, मैप ऐक्शन स्ट्रिप में बटन जोड़ें.
सरफ़ेस पर कॉल करने की सुविधा चालू करना
@NonNull
@Override
public Template onGetTemplate() {
  return new NavigationTemplate.Builder()
    .setActionStrip(new ActionStrip.Builder().build())
    .setMapActionStrip(new ActionStrip.Builder().addAction(Action.PAN).build())
    .build();
}
पिंच करके ज़ूम करना
@Override
public void onScale(float focusX, float focusY, float scaleFactor) {
  CameraUpdate update =
      CameraUpdateFactory.zoomBy((scaleFactor - 1),
                                  new Point((int) focusX, (int) focusY));
  googleMap.animateCamera(update); // map is set in onSurfaceAvailable.
}
पैनिंग
@Override
public void onScroll(float distanceX, float distanceY) {
  googleMap.moveCamera(CameraUpdateFactory.scrollBy(distanceX, distanceY));
}
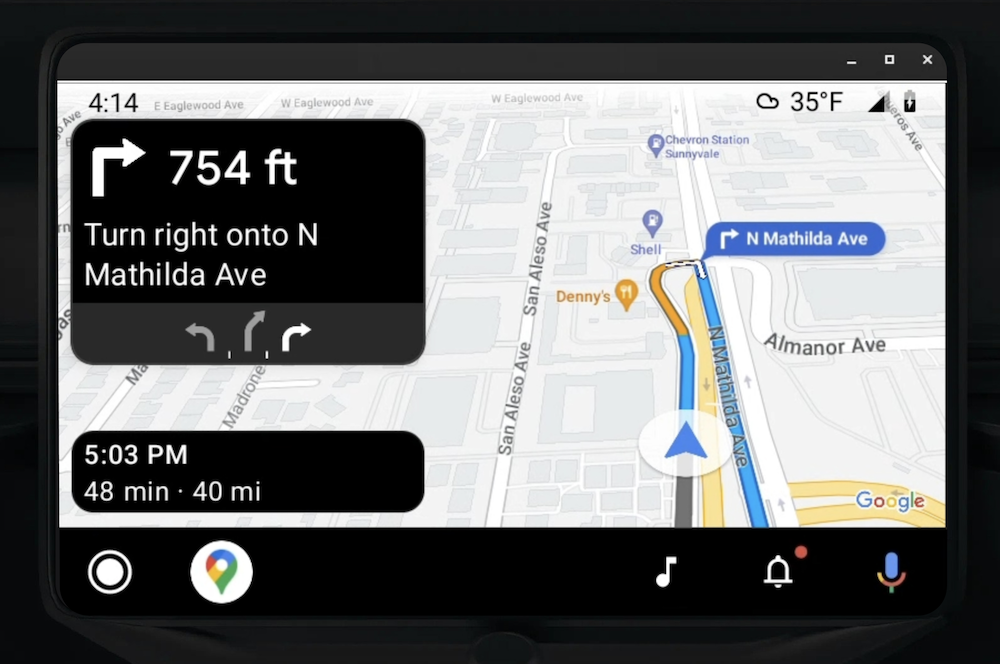
नेविगेशन के निर्देश दिखाना
इस सेक्शन में, नेविगेशन पोस्ट के लिए ऑब्ज़र्वर सेट अप करने और टर्न कार्ड टेंप्लेट में नेविगेशन के निर्देश भरने का तरीका बताया गया है.
Android Auto का नेविगेशन टेंप्लेट, मुड़ने की जानकारी देने वाला कार्ड उपलब्ध कराता है. इसमें मौजूदा यात्रा से जुड़ी नेविगेशन की जानकारी दिखती है. Navigation SDK में मौजूद TurnByTurn लाइब्रेरी, नेविगेशन की यह जानकारी देती है. आपका कोड इस जानकारी का इस्तेमाल करके, Android Auto के नेविगेशन टेंप्लेट को भरता है.
निरीक्षक के तौर पर किसी व्यक्ति को सेट अप करना
यहां दिए गए उदाहरण में, SampleApplication एक कस्टम ऐप्लिकेशन क्लास है. यह MutableLiveData<NavInfo> ऑब्जेक्ट को बनाए रखता है. जब ऑब्ज़र्वर को नेविगेटर ऑब्जेक्ट से कोई अपडेट मिलता है, तो वह इस NavInfo ऑब्जेक्ट को SampleApplication क्लास के ज़रिए मैनेज किए गए NavInfoMutableLiveData पर पोस्ट करता है.
यहां दिए गए उदाहरण में, Android Auto Screen को लागू करने के लिए, इस ऑब्जेक्ट के लिए एक ऑब्ज़र्वर रजिस्टर किया गया है.
public SampleAndroidAutoNavigationScreen(@NonNull CarContext carContext,
                                     SampleApplication application) {
  super(carContext);
  getCarContext().getCarService(AppManager.class).setSurfaceCallback(this);
  application.getNavInfoMutableLiveData().observe(this, this::processNextStep);
}
नेविगेशन की जानकारी अपने-आप भरने की सुविधा
यहां दिए गए कोड स्निपेट में, Android Auto टेंप्लेट में मौजूदा रूटिंग की जानकारी भरने का तरीका दिखाया गया है. इसमें चरण, दूरी, और आइकॉन शामिल हैं. इन डिसप्ले एलिमेंट के बारे में ज़्यादा जानने के लिए, फ़ीड डिसप्ले पॉप्युलेट करना लेख पढ़ें.
कोड का उदाहरण देखने के लिए, इसे बड़ा करें.
private RoutingInfo currentRoutingInfo;

@NonNull
@Override
public Template onGetTemplate() {
NavigationTemplate.Builder navigationTemplateBuilder =
  new NavigationTemplate.Builder()
    .setActionStrip(...)
    .setMapActionStrip(...)
  if (currentRoutingInfo != null) {
    navigationTemplateBuilder.setNavigationInfo(currentRoutingInfo);
  }
  return navigationTemplateBuilder.build();
}

private void processNextStep(NavInfo navInfo) {
  if (navInfo == null || navinfo.getCurrentStep() == null) {
    return;
  }

/**
*   Converts data received from the Navigation data feed
*   into Android-Auto compatible data structures. For more information
*   see the "Ensure correct maneuver types" below.
*/
  Step currentStep = buildStepFromStepInfo(navInfo.getCurrentStep());
  Distance distanceToStep =
              buildDistanceFromMeters(navInfo.getDistanceToCurrentStepMeters());

  currentRoutingInfo =
     new RoutingInfo.Builder().setCurrentStep(currentStep, distanceToStep).build();

  // Invalidate the current template which leads to another onGetTemplate call.
  invalidate();
}

private Step buildStepFromStepInfo(StepInfo stepInfo) {
  IconCompat maneuverIcon =
               IconCompat.createWithBitmap(stepInfo.getManeuverBitmap());
  Maneuver.Builder
            maneuverBuilder = newManeuver.Builder(
                  ManeuverConverter
                          .getAndroidAutoManeuverType(stepInfo.getManeuver()));
  CarIcon maneuverCarIcon = new CarIcon.Builder(maneuverIcon).build();
  maneuverBuilder.setIcon(maneuverCarIcon);
  Step.Builder stepBuilder =
    new Step.Builder()
       .setRoad(stepInfo.getFullRoadName())
       .setCue(stepInfo.getFullInstructionText())
       .setManeuver(maneuverBuilder.build());

  if (stepInfo.getLanes() != null
           && stepInfo.getLanesBitmap() != null) {
    for (Lane lane : buildAndroidAutoLanesFromStep(stepInfo)) {
      stepBuilder.addLane(lane);
    }
    IconCompat lanesIcon =
               IconCompat.createWithBitmap(stepInfo.getLanesBitmap());
    CarIcon lanesImage = new CarIcon.Builder(lanesIcon).build();
    stepBuilder.setLanesImage(lanesImage);
  }
    return stepBuilder.build();
}

/*
*   Constructs a {@code Distance} object in imperial measurement units.
*   In a real world scenario, units would be based on locale.
*/
private Distance buildDistanceFromMeters(int distanceMeters) {

// Distance can be negative so set the min distance to 0.
  int remainingFeet = (int) max(0, distanceMeters * DistanceConstants.FEET_PER_METER);
  double remainingMiles = ((double) remainingFeet) / DistanceConstants.FEET_PER_MILE;

// Only use the tenths place digit if distance is less than 10 miles and show
// feet if distance is less than 0.25 miles.

  if (remainingMiles >= DistanceConstants.MIN_MILES_TO_SHOW_INTEGER) {
    return Distance.create((int) round(remainingMiles), Distance.UNIT_MILES);
  } else if (remainingMiles >= 0.25) {
    return Distance.create((int) remainingMiles, Distance.UNIT_MILES);
  } else {
    return Distance.create(remainingFeet, Distance.UNIT_FEET);
  }
}
सही मैन्यूवर टाइप की पुष्टि करना
Android Auto Car लाइब्रेरी में इस्तेमाल किए गए मैन्यूवर, TurnByTurn लाइब्रेरी में दिए गए मैन्यूवर से मेल खाते हैं. हालांकि, आपको Android Auto Car लाइब्रेरी में, Navigation SDK के मैन्यूवर को मान्य एलान में बदलना होगा. यहां दी गई टेबल में, कुछ फ़ील्ड के बारे में बताया गया है. इसके बाद, आपकी सुविधा के लिए, कनवर्टर यूटिलिटी का एक सैंपल दिया गया है.
| मोड़-दर-मोड़ लाइब्रेरी में बदलाव करना | Android Auto Maneuver |
|---|---|
DEPART |
TYPE_DEPART |
DESTINATION |
TYPE_DESTINATION |
DESTINATION_LEFT |
TYPE_DESTINATION_LEFT |
DESTINATION_RIGHT |
TYPE_DESTINATION_RIGHT |
TURN_U_TURN_CLOCKWISE |
TYPE_U_TURN_RIGHT |
ON_RAMP_LEFT |
TYPE_ON_RAMP_NORMAL_LEFT |
ON_RAMP_RIGHT |
TYPE_ON_RAMP_NORMAL_RIGHT |
ON_RAMP_SLIGHT_LEFT |
TYPE_ON_RAMP_SLIGHT_LEFT |
FORK_RIGHT |
TYPE_FORK_RIGHT |
कोड का उदाहरण देखने के लिए, इसे बड़ा करें.
import com.google.android.libraries.mapsplatform.turnbyturn.model.Maneuver;
import com.google.common.collect.ImmutableMap;
import javax.annotation.Nullable;

/** Converter that converts between turn-by-turn and Android Auto Maneuvers. */
public final class ManeuverConverter {
  private ManeuverConverter() {}

  // Map from turn-by-turn Maneuver to Android Auto Maneuver.Type.
  private static final ImmutableMap<Integer, Integer> MANEUVER_TO_ANDROID_AUTO_MANEUVER_TYPE =
      ImmutableMap.<Integer, Integer>builder()
          .put(Maneuver.DEPART, androidx.car.app.navigation.model.Maneuver.TYPE_DEPART)
          .put(Maneuver.DESTINATION, androidx.car.app.navigation.model.Maneuver.TYPE_DESTINATION)
          .put(
              Maneuver.DESTINATION_LEFT,
              androidx.car.app.navigation.model.Maneuver.TYPE_DESTINATION_LEFT)
          .put(
              Maneuver.DESTINATION_RIGHT,
              androidx.car.app.navigation.model.Maneuver.TYPE_DESTINATION_RIGHT)
          .put(Maneuver.STRAIGHT, androidx.car.app.navigation.model.Maneuver.TYPE_STRAIGHT)
          .put(Maneuver.TURN_LEFT, androidx.car.app.navigation.model.Maneuver.TYPE_TURN_NORMAL_LEFT)
          .put(
              Maneuver.TURN_RIGHT,
              androidx.car.app.navigation.model.Maneuver.TYPE_TURN_NORMAL_RIGHT)
          .put(Maneuver.TURN_KEEP_LEFT, androidx.car.app.navigation.model.Maneuver.TYPE_KEEP_LEFT)
          .put(Maneuver.TURN_KEEP_RIGHT, androidx.car.app.navigation.model.Maneuver.TYPE_KEEP_RIGHT)
          .put(
              Maneuver.TURN_SLIGHT_LEFT,
              androidx.car.app.navigation.model.Maneuver.TYPE_TURN_SLIGHT_LEFT)
          .put(
              Maneuver.TURN_SLIGHT_RIGHT,
              androidx.car.app.navigation.model.Maneuver.TYPE_TURN_SLIGHT_RIGHT)
          .put(
              Maneuver.TURN_SHARP_LEFT,
              androidx.car.app.navigation.model.Maneuver.TYPE_TURN_SHARP_LEFT)
          .put(
              Maneuver.TURN_SHARP_RIGHT,
              androidx.car.app.navigation.model.Maneuver.TYPE_ON_RAMP_SHARP_RIGHT)
          .put(
              Maneuver.TURN_U_TURN_CLOCKWISE,
              androidx.car.app.navigation.model.Maneuver.TYPE_U_TURN_RIGHT)
          .put(
              Maneuver.TURN_U_TURN_COUNTERCLOCKWISE,
              androidx.car.app.navigation.model.Maneuver.TYPE_U_TURN_LEFT)
          .put(
              Maneuver.MERGE_UNSPECIFIED,
              androidx.car.app.navigation.model.Maneuver.TYPE_MERGE_SIDE_UNSPECIFIED)
          .put(Maneuver.MERGE_LEFT, androidx.car.app.navigation.model.Maneuver.TYPE_MERGE_LEFT)
          .put(Maneuver.MERGE_RIGHT, androidx.car.app.navigation.model.Maneuver.TYPE_MERGE_RIGHT)
          .put(Maneuver.FORK_LEFT, androidx.car.app.navigation.model.Maneuver.TYPE_FORK_LEFT)
          .put(Maneuver.FORK_RIGHT, androidx.car.app.navigation.model.Maneuver.TYPE_FORK_RIGHT)
          .put(
              Maneuver.ON_RAMP_UNSPECIFIED,
              androidx.car.app.navigation.model.Maneuver.TYPE_ON_RAMP_NORMAL_RIGHT)
          .put(
              Maneuver.ON_RAMP_LEFT,
              androidx.car.app.navigation.model.Maneuver.TYPE_ON_RAMP_NORMAL_LEFT)
          .put(
              Maneuver.ON_RAMP_RIGHT,
              androidx.car.app.navigation.model.Maneuver.TYPE_ON_RAMP_NORMAL_RIGHT)
          .put(
              Maneuver.ON_RAMP_KEEP_LEFT,
              androidx.car.app.navigation.model.Maneuver.TYPE_ON_RAMP_NORMAL_LEFT)
          .put(
              Maneuver.ON_RAMP_KEEP_RIGHT,
              androidx.car.app.navigation.model.Maneuver.TYPE_ON_RAMP_NORMAL_RIGHT)
          .put(
              Maneuver.ON_RAMP_SLIGHT_LEFT,
              androidx.car.app.navigation.model.Maneuver.TYPE_ON_RAMP_SLIGHT_LEFT)
          .put(
              Maneuver.ON_RAMP_SLIGHT_RIGHT,
              androidx.car.app.navigation.model.Maneuver.TYPE_ON_RAMP_SLIGHT_RIGHT)
          .put(
              Maneuver.ON_RAMP_SHARP_LEFT,
              androidx.car.app.navigation.model.Maneuver.TYPE_ON_RAMP_SHARP_LEFT)
          .put(
              Maneuver.ON_RAMP_SHARP_RIGHT,
              androidx.car.app.navigation.model.Maneuver.TYPE_ON_RAMP_SHARP_RIGHT)
          .put(
              Maneuver.ON_RAMP_U_TURN_CLOCKWISE,
              androidx.car.app.navigation.model.Maneuver.TYPE_ON_RAMP_U_TURN_RIGHT)
          .put(
              Maneuver.ON_RAMP_U_TURN_COUNTERCLOCKWISE,
              androidx.car.app.navigation.model.Maneuver.TYPE_ON_RAMP_U_TURN_LEFT)
          .put(
              Maneuver.OFF_RAMP_LEFT,
              androidx.car.app.navigation.model.Maneuver.TYPE_OFF_RAMP_NORMAL_LEFT)
          .put(
              Maneuver.OFF_RAMP_RIGHT,
              androidx.car.app.navigation.model.Maneuver.TYPE_OFF_RAMP_NORMAL_RIGHT)
          .put(
              Maneuver.OFF_RAMP_KEEP_LEFT,
              androidx.car.app.navigation.model.Maneuver.TYPE_OFF_RAMP_SLIGHT_LEFT)
          .put(
              Maneuver.OFF_RAMP_KEEP_RIGHT,
              androidx.car.app.navigation.model.Maneuver.TYPE_OFF_RAMP_SLIGHT_RIGHT)
          .put(
              Maneuver.OFF_RAMP_SLIGHT_LEFT,
              androidx.car.app.navigation.model.Maneuver.TYPE_OFF_RAMP_SLIGHT_LEFT)
          .put(
              Maneuver.OFF_RAMP_SLIGHT_RIGHT,
              androidx.car.app.navigation.model.Maneuver.TYPE_OFF_RAMP_SLIGHT_RIGHT)
          .put(
              Maneuver.OFF_RAMP_SHARP_LEFT,
              androidx.car.app.navigation.model.Maneuver.TYPE_OFF_RAMP_NORMAL_LEFT)
          .put(
              Maneuver.OFF_RAMP_SHARP_RIGHT,
              androidx.car.app.navigation.model.Maneuver.TYPE_OFF_RAMP_NORMAL_RIGHT)
          .put(
              Maneuver.ROUNDABOUT_CLOCKWISE,
              androidx.car.app.navigation.model.Maneuver.TYPE_ROUNDABOUT_ENTER_AND_EXIT_CW)
          .put(
              Maneuver.ROUNDABOUT_COUNTERCLOCKWISE,
              androidx.car.app.navigation.model.Maneuver.TYPE_ROUNDABOUT_ENTER_AND_EXIT_CCW)
          .put(
              Maneuver.ROUNDABOUT_STRAIGHT_CLOCKWISE,
              androidx.car.app.navigation.model.Maneuver.TYPE_ROUNDABOUT_ENTER_CW)
          .put(
              Maneuver.ROUNDABOUT_STRAIGHT_COUNTERCLOCKWISE,
              androidx.car.app.navigation.model.Maneuver.TYPE_ROUNDABOUT_ENTER_CCW)
          .put(
              Maneuver.ROUNDABOUT_LEFT_CLOCKWISE,
              androidx.car.app.navigation.model.Maneuver
                  .TYPE_ROUNDABOUT_ENTER_AND_EXIT_CW_WITH_ANGLE)
          .put(
              Maneuver.ROUNDABOUT_LEFT_COUNTERCLOCKWISE,
              androidx.car.app.navigation.model.Maneuver
                  .TYPE_ROUNDABOUT_ENTER_AND_EXIT_CCW_WITH_ANGLE)
          .put(
              Maneuver.ROUNDABOUT_RIGHT_CLOCKWISE,
              androidx.car.app.navigation.model.Maneuver
                  .TYPE_ROUNDABOUT_ENTER_AND_EXIT_CW_WITH_ANGLE)
          .put(
              Maneuver.ROUNDABOUT_RIGHT_COUNTERCLOCKWISE,
              androidx.car.app.navigation.model.Maneuver
                  .TYPE_ROUNDABOUT_ENTER_AND_EXIT_CCW_WITH_ANGLE)
          .put(
              Maneuver.ROUNDABOUT_SLIGHT_LEFT_CLOCKWISE,
              androidx.car.app.navigation.model.Maneuver
                  .TYPE_ROUNDABOUT_ENTER_AND_EXIT_CW_WITH_ANGLE)
          .put(
              Maneuver.ROUNDABOUT_SLIGHT_LEFT_COUNTERCLOCKWISE,
              androidx.car.app.navigation.model.Maneuver
                  .TYPE_ROUNDABOUT_ENTER_AND_EXIT_CCW_WITH_ANGLE)
          .put(
              Maneuver.ROUNDABOUT_SLIGHT_RIGHT_CLOCKWISE,
              androidx.car.app.navigation.model.Maneuver
                  .TYPE_ROUNDABOUT_ENTER_AND_EXIT_CW_WITH_ANGLE)
          .put(
              Maneuver.ROUNDABOUT_SLIGHT_RIGHT_COUNTERCLOCKWISE,
              androidx.car.app.navigation.model.Maneuver
                  .TYPE_ROUNDABOUT_ENTER_AND_EXIT_CCW_WITH_ANGLE)
          .put(
              Maneuver.ROUNDABOUT_SHARP_LEFT_CLOCKWISE,
              androidx.car.app.navigation.model.Maneuver
                  .TYPE_ROUNDABOUT_ENTER_AND_EXIT_CW_WITH_ANGLE)
          .put(
              Maneuver.ROUNDABOUT_SHARP_LEFT_COUNTERCLOCKWISE,
              androidx.car.app.navigation.model.Maneuver
                  .TYPE_ROUNDABOUT_ENTER_AND_EXIT_CCW_WITH_ANGLE)
          .put(
              Maneuver.ROUNDABOUT_SHARP_RIGHT_CLOCKWISE,
              androidx.car.app.navigation.model.Maneuver
                  .TYPE_ROUNDABOUT_ENTER_AND_EXIT_CW_WITH_ANGLE)
          .put(
              Maneuver.ROUNDABOUT_SHARP_RIGHT_COUNTERCLOCKWISE,
              androidx.car.app.navigation.model.Maneuver
                  .TYPE_ROUNDABOUT_ENTER_AND_EXIT_CCW_WITH_ANGLE)
          .put(
              Maneuver.ROUNDABOUT_U_TURN_CLOCKWISE,
              androidx.car.app.navigation.model.Maneuver
                  .TYPE_ROUNDABOUT_ENTER_AND_EXIT_CW_WITH_ANGLE)
          .put(
              Maneuver.ROUNDABOUT_U_TURN_COUNTERCLOCKWISE,
              androidx.car.app.navigation.model.Maneuver
                  .TYPE_ROUNDABOUT_ENTER_AND_EXIT_CCW_WITH_ANGLE)
          .put(
              Maneuver.ROUNDABOUT_EXIT_CLOCKWISE,
              androidx.car.app.navigation.model.Maneuver.TYPE_ROUNDABOUT_EXIT_CW)
          .put(
              Maneuver.ROUNDABOUT_EXIT_COUNTERCLOCKWISE,
              androidx.car.app.navigation.model.Maneuver.TYPE_ROUNDABOUT_EXIT_CCW)
          .put(Maneuver.FERRY_BOAT, androidx.car.app.navigation.model.Maneuver.TYPE_FERRY_BOAT)
          .put(Maneuver.FERRY_TRAIN, androidx.car.app.navigation.model.Maneuver.TYPE_FERRY_TRAIN)
          .put(Maneuver.NAME_CHANGE, androidx.car.app.navigation.model.Maneuver.TYPE_NAME_CHANGE)
          .buildOrThrow();

  /** Represents the roundabout turn angle for a slight turn in either right or left directions. */
  private static final int ROUNDABOUT_ANGLE_SLIGHT = 10;

  /** Represents the roundabout turn angle for a normal turn in either right or left directions. */
  private static final int ROUNDABOUT_ANGLE_NORMAL = 45;

  /** Represents the roundabout turn angle for a sharp turn in either right or left directions. */
  private static final int ROUNDABOUT_ANGLE_SHARP = 135;

  /** Represents the roundabout turn angle for a u-turn in either right or left directions. */
  private static final int ROUNDABOUT_ANGLE_U_TURN = 180;

  /**
   * Returns the corresponding {@link androidx.car.app.navigation.model.Maneuver.Type} for the given
   * direction {@link Maneuver}
   *
   * @throws {@link IllegalArgumentException} if the given maneuver does not have a corresponding
   *     Android Auto Maneuver type.
   */
  public static int getAndroidAutoManeuverType(@Maneuver int maneuver) {
    if (MANEUVER_TO_ANDROID_AUTO_MANEUVER_TYPE.containsKey(maneuver)) {
      return MANEUVER_TO_ANDROID_AUTO_MANEUVER_TYPE.get(maneuver);
    }
    throw new IllegalArgumentException(
        String.format(
            "Given turn-by-turn Maneuver %d cannot be converted to an Android Auto equivalent.",
            maneuver));
  }

  /**
   * Returns the corresponding Android Auto roundabout angle for the given turn {@link Maneuver}.
   * Returns {@code null} if given maneuver does not involve a roundabout with a turn.
   */
  @Nullable
  public static Integer getAndroidAutoRoundaboutAngle(@Maneuver int maneuver) {
    if (maneuver == Maneuver.ROUNDABOUT_LEFT_CLOCKWISE
        || maneuver == Maneuver.ROUNDABOUT_RIGHT_CLOCKWISE
        || maneuver == Maneuver.ROUNDABOUT_LEFT_COUNTERCLOCKWISE
        || maneuver == Maneuver.ROUNDABOUT_RIGHT_COUNTERCLOCKWISE) {
      return ROUNDABOUT_ANGLE_NORMAL;
    }
    if (maneuver == Maneuver.ROUNDABOUT_SHARP_LEFT_CLOCKWISE
        || maneuver == Maneuver.ROUNDABOUT_SHARP_RIGHT_CLOCKWISE
        || maneuver == Maneuver.ROUNDABOUT_SHARP_LEFT_COUNTERCLOCKWISE
        || maneuver == Maneuver.ROUNDABOUT_SHARP_RIGHT_COUNTERCLOCKWISE) {
      return ROUNDABOUT_ANGLE_SHARP;
    }
    if (maneuver == Maneuver.ROUNDABOUT_SLIGHT_LEFT_CLOCKWISE
        || maneuver == Maneuver.ROUNDABOUT_SLIGHT_RIGHT_CLOCKWISE
        || maneuver == Maneuver.ROUNDABOUT_SLIGHT_LEFT_COUNTERCLOCKWISE
        || maneuver == Maneuver.ROUNDABOUT_SLIGHT_RIGHT_COUNTERCLOCKWISE) {
      return ROUNDABOUT_ANGLE_SLIGHT;
    }
    if (maneuver == Maneuver.ROUNDABOUT_U_TURN_CLOCKWISE
        || maneuver == Maneuver.ROUNDABOUT_U_TURN_COUNTERCLOCKWISE) {
      return ROUNDABOUT_ANGLE_U_TURN;
    }
    return null;
  }
}
इससे जुड़ा दस्तावेज़
- मोड़-दर-मोड़ दिशा-निर्देशों का फ़ीड चालू करें: सबसे पहले, मोड़-दर-मोड़ दिशा-निर्देशों की सुविधा को इंटिग्रेट करें, ताकि आपका ऐप्लिकेशन Android Auto के साथ काम कर सके.
- फ़ीड डिसप्ले में जानकारी जोड़ें: दिशा-निर्देशों की जानकारी के लिए, डेटा फ़ील्ड ऐक्सेस करें और आइकॉन इस्तेमाल करें.