
這是 Classroom 外掛程式系列的第四個逐步操作說明。
在本逐步操作說明中,您將與 Google Classroom API 互動以建立附件。您可以為使用者提供查看附件內容的路徑。檢視畫面會因使用者在類別中的角色而異。這份逐步操作說明會介紹不需要學生提交的內容類型附件。
在這份逐步操作說明中,您將完成下列步驟:
- 擷取並使用下列外掛程式查詢參數:
addOnToken:傳遞至連結探索檢視畫面的授權權杖。itemId:用於接收外掛程式附件的 CourseWork、CourseWorkMaterial 或公告的專屬 ID。itemType:"courseWork"、"courseWorkMaterials" 或「公告」。courseId:建立作業時所在的 Google Classroom 課程的專屬 ID。attachmentId:Google Classroom 在建立後指派給外掛程式附件的不重複 ID。
- 針對內容類型附件實作永久儲存空間。
- 提供建立附件的路徑,以及提供老師檢視畫面和學生檢視畫面 iframe。
- 向 Google Classroom 外掛程式 API 發出下列要求:
- 建立新附件。
- 取得外掛程式內容,識別登入的使用者是學生或老師。
以老師身分登入後,您可以透過 Google Classroom UI 在作業中建立內容類型附件。課程中的老師和學生也可以查看課程內容。
啟用 Classroom API
如要呼叫 Classroom API,請先完成這個步驟。您必須先為 Google Cloud 專案啟用 API,才能對專案進行呼叫。前往 Google Classroom API 程式庫項目,然後選擇「啟用」。
處理附件探索檢視查詢參數
如先前所述,在 iframe 中載入附件探索檢視畫面時,Google Classroom 會傳送查詢參數:
courseId:目前 Classroom 課程的 ID。itemId:用於接收外掛程式附件的 CourseWork、CourseWorkMaterial 或公告的專屬 ID。itemType:可以是「courseWork」、「courseWorkMaterials」或「公告」。addOnToken:用於授權特定 Classroom 外掛程式動作的權杖。login_hint:目前使用者的 Google ID。
本逐步操作說明將介紹 courseId、itemId、itemType 和 addOnToken。發出呼叫 Classroom API 時保留並傳送這些記錄。
與上一個逐步操作說明步驟相同,將傳遞的查詢參數值儲存在我們的工作階段中。由於這是 Classroom 只傳遞這些查詢參數的機會,請務必在開啟附件探索檢視畫面時執行這項操作。
Python
前往提供附件探索檢視畫面路徑的 Flask 伺服器檔案 (如果您按照我們提供的範例操作,請前往 attachment-discovery-routes.py)。在外掛程式到達路徑頂端 (本範例中為 /classroom-addon) 擷取並儲存 courseId、itemId、itemType 和 addOnToken 查詢參數。
# Retrieve the itemId, courseId, and addOnToken query parameters.
if flask.request.args.get("itemId"):
    flask.session["itemId"] = flask.request.args.get("itemId")
if flask.request.args.get("itemType"):
    flask.session["itemType"] = flask.request.args.get("itemType")
if flask.request.args.get("courseId"):
    flask.session["courseId"] = flask.request.args.get("courseId")
if flask.request.args.get("addOnToken"):
    flask.session["addOnToken"] = flask.request.args.get("addOnToken")
請僅在工作階段寫入這些值;如果使用者稍後返回附件探索檢視畫面,而未關閉 iframe,系統不會再次傳送這些值。
為內容類型附件新增永久儲存空間
你需要留存任何已建立附件的本機記錄。方便您使用 Classroom 提供的 ID 查詢老師選取的內容。
設定 Attachment 的資料庫結構定義。我們提供的範例含有顯示圖片和說明文字的附件。Attachment 包含下列屬性:
attachment_id:附件的專屬 ID。由 Classroom 指派,並在建立連結時傳回回應。image_filename:要顯示的圖片本機檔案名稱。image_caption:與圖片一同顯示的說明文字。
Python
擴充先前步驟中的 SQLite 和 flask_sqlalchemy 實作項目。
前往您已定義使用者資料表的檔案 (如果您是參考我們的範例,請按 models.py)。在檔案底部的 User 類別下方新增下列程式碼。
class Attachment(db.Model):
    # The attachmentId is the unique identifier for the attachment.
    attachment_id = db.Column(db.String(120), primary_key=True)

    # The image filename to store.
    image_filename = db.Column(db.String(120))

    # The image caption to store.
    image_caption = db.Column(db.String(120))
將新的附件類別匯入伺服器檔案中,其中包含您的附件處理路徑。
設定新路徑
開始本逐步操作說明,請在應用程式中設定一些新頁面。 讓使用者透過我們的外掛程式建立及查看內容。
新增連結建立路徑
您需要讓老師選取內容並發出附件建立要求。實作 /attachment-options 路徑,顯示可供教師選取的內容選項。您也需要內容選擇和建立確認頁面的範本。我們提供的範例含有這些範本,也可以顯示來自 Classroom API 的要求和回應。
請注意,您也可以修改現有的附件探索 View 到達網頁,以顯示內容選項,而不建立新的 /attachment-options 頁面。建議您為本練習建立新頁面,以便保留第二個逐步操作說明中實作的單一登入 (SSO) 行為,例如撤銷應用程式權限。這些應有助於建構及測試外掛程式。
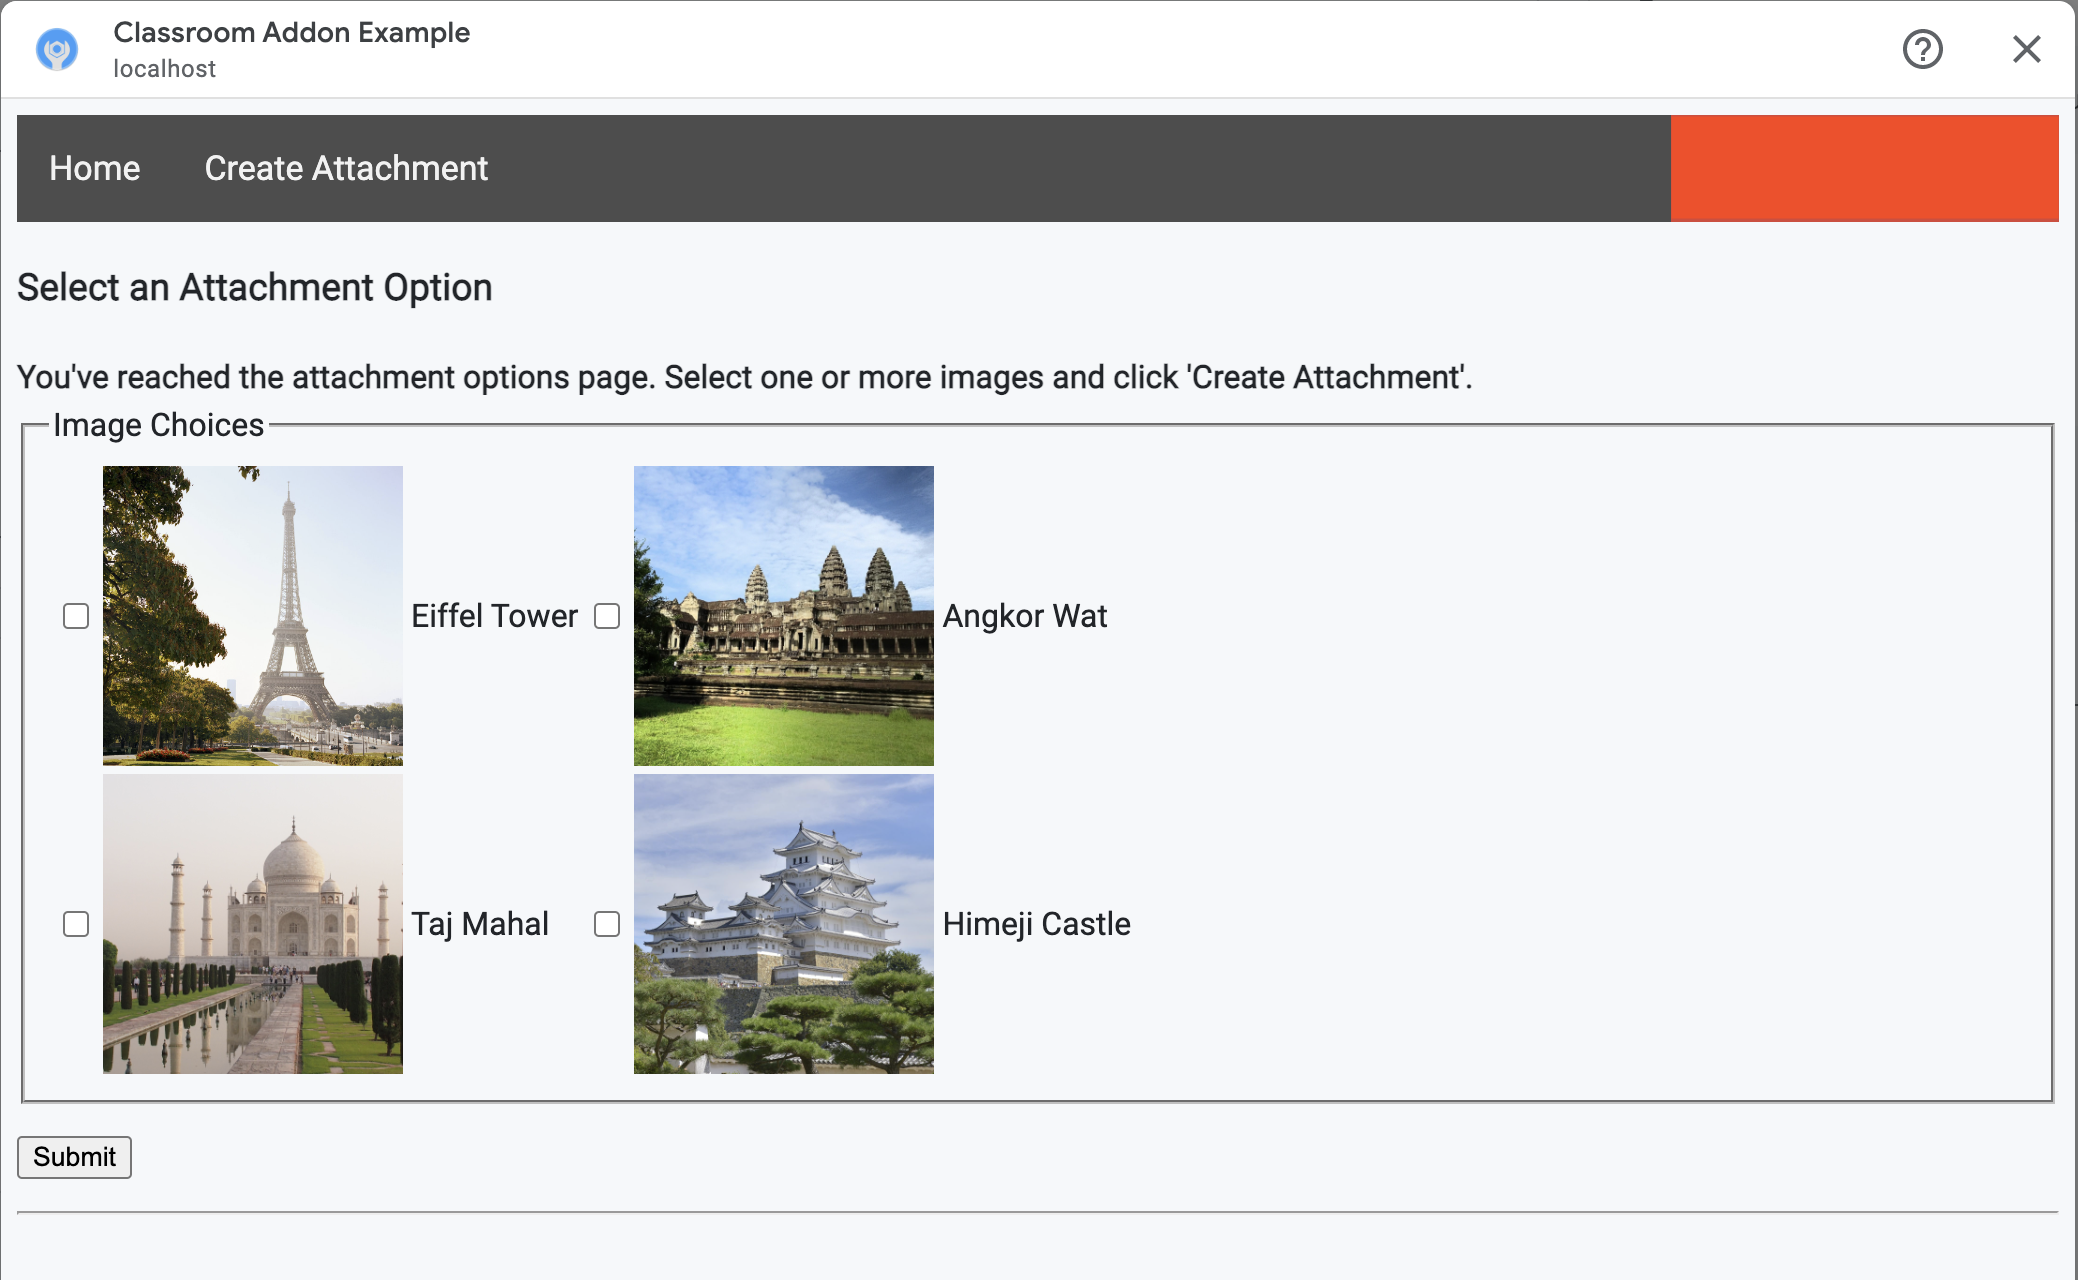
教師可以從我們提供的範例中,從一組有說明文字的圖片中加以選取。我們提供了四張知名地標圖片,其中的說明文字衍生自檔案名稱。
Python
在提供的範例中,它位於 webapp/attachment_routes.py 檔案中。
@app.route("/attachment-options", methods=["GET", "POST"])
def attachment_options():
    """
    Render the attachment options page from the "attachment-options.html"
    template.

    This page displays a grid of images that the user can select using
    checkboxes.
    """

    # A list of the filenames in the static/images directory.
    image_filenames = os.listdir(os.path.join(app.static_folder, "images"))

    # The image_list_form_builder method creates a form that displays a grid
    # of images, checkboxes, and captions with a Submit button. All images
    # passed in image_filenames will be shown, and the captions will be the
    # title-cased filenames.

    # The form must be built dynamically due to limitations in WTForms. The
    # image_list_form_builder method therefore also returns a list of
    # attribute names in the form, which will be used by the HTML template
    # to properly render the form.
    form, var_names = image_list_form_builder(image_filenames)

    # If the form was submitted, validate the input and create the attachments.
    if form.validate_on_submit():

        # Build a dictionary that maps image filenames to captions.
        # There will be one dictionary entry per selected item in the form.
        filename_caption_pairs = construct_filename_caption_dictionary_list(
            form)

        # Check that the user selected at least one image, then proceed to
        # make requests to the Classroom API.
        if len(filename_caption_pairs) > 0:
            return create_attachments(filename_caption_pairs)
        else:
            return flask.render_template(
                "create-attachment.html",
                message="You didn't select any images.",
                form=form,
                var_names=var_names)

    return flask.render_template(
        "attachment-options.html",
        message=("You've reached the attachment options page. "
                "Select one or more images and click 'Create Attachment'."),
        form=form,
        var_names=var_names,
    )
系統隨即會產生類似下方的「建立附件」頁面:
教師可以選取多張圖片,為老師在 create_attachments 方法中選取的每張圖片建立附件。
問題附件建立要求
現在,您已知道老師想附加的內容片段,請向 Classroom API 提出要求,方便我們為作業建立附件。收到 Classroom API 的回應後,請將附件詳細資料儲存在資料庫中。
先取得 Classroom 服務的執行個體:
Python
在提供的範例中,它位於 webapp/attachment_routes.py 檔案中。
def create_attachments(filename_caption_pairs):
    """
    Create attachments and show an acknowledgement page.

    Args:
        filename_caption_pairs: A dictionary that maps image filenames to
            captions.
    """
    # Get the Google Classroom service.
    classroom_service = googleapiclient.discovery.build(
        serviceName="classroom",
        version="v1",
        credentials=credentials)
向 courses.courseWork.addOnAttachments 端點發出 CREATE 要求。針對老師選取的每張圖片,先建構 AddOnAttachment 物件:
Python
在上述範例中,這是 create_attachments 方法的延續。
# Create a new attachment for each image that was selected.
attachment_count = 0
for key, value in filename_caption_pairs.items():
    attachment_count += 1

    # Create a dictionary with values for the AddOnAttachment object fields.
    attachment = {
        # Specifies the route for a teacher user.
        "teacherViewUri": {
            "uri":
                flask.url_for(
                    "load_content_attachment", _scheme='https', _external=True),
        },
        # Specifies the route for a student user.
        "studentViewUri": {
            "uri":
                flask.url_for(
                    "load_content_attachment", _scheme='https', _external=True)
        },
        # The title of the attachment.
        "title": f"Attachment {attachment_count}",
    }
每個連結至少須提供 teacherViewUri、studentViewUri 和 title 欄位。teacherViewUri 和 studentViewUri 代表特定使用者類型開啟附件時載入的網址。
將要求主體中的 AddOnAttachment 物件傳送至適當的 addOnAttachments 端點。每次發出要求時都要提供 courseId、itemId、itemType 和 addOnToken ID。
Python
在上述範例中,這是 create_attachments 方法的延續。
# Use the itemType to determine which stream item type the teacher created
match flask.session["itemType"]:
    case "announcements":
        parent = classroom_service.courses().announcements()
    case "courseWorkMaterials":
        parent = classroom_service.courses().courseWorkMaterials()
    case _:
        parent = classroom_service.courses().courseWork()

# Issue a request to create the attachment.
resp = parent.addOnAttachments().create(
    courseId=flask.session["courseId"],
    itemId=flask.session["itemId"],
    addOnToken=flask.session["addOnToken"],
    body=attachment).execute()
在本機資料庫中建立這個連結的項目,以便稍後載入正確的內容。Classroom 會在建立要求的回應中傳回專屬的 id 值,因此請使用這個值做為資料庫中的主鍵。另請注意,開啟老師和學生檢視畫面時,Classroom 會傳送 attachmentId 查詢參數:
Python
在上述範例中,這是 create_attachments 方法的延續。
# Store the value by id.
new_attachment = Attachment(
    # The new attachment's unique ID, returned in the CREATE response.
    attachment_id=resp.get("id"),
    image_filename=key,
    image_caption=value)
db.session.add(new_attachment)
db.session.commit()
此時,請考慮將使用者轉送至確認頁面,確認他們已成功建立附件。
允許透過外掛程式存取附件
建議您現在在 Google Workspace Marketplace SDK 的「App Configuration」頁面中,將任何適當的位址新增至「允許的附件 URI 前置字串」欄位。您的外掛程式只能從本頁面列出的其中一個 URI 前置字串建立連結。這項安全措施有助於降低中間人攻擊的可能性。
最簡單的方法是在這個欄位中提供頂層網域,例如 https://example.com。如果您將本機電腦做為網路伺服器使用,https://localhost:<your port number>/ 就能正常運作。
新增老師和學生檢視畫面的路徑
您可以在四個 iframe 中載入 Google Classroom 外掛程式。 因此,您只建構了提供附件探索檢視畫面 iframe 的路徑。接下來,請新增路徑,提供老師和學生檢視畫面 iframe。
您必須使用教師檢視畫面 iframe 才能預覽學生體驗,但也可以選擇加入其他資訊或編輯功能。
「學生檢視畫面」是每位學生開啟外掛程式附件時顯示的頁面。
為達成本練習的目的,請建立單一 /load-content-attachment 路徑,同時顯示老師和學生的檢視畫面。載入頁面時,請使用 Classroom API 方法判斷使用者是老師或學生。
Python
在提供的範例中,它位於 webapp/attachment_routes.py 檔案中。
@app.route("/load-content-attachment")
def load_content_attachment():
    """
    Load the attachment for the user's role."""

    # Since this is a landing page for the Teacher and Student View iframes, we
    # need to preserve the incoming query parameters.
    if flask.request.args.get("itemId"):
        flask.session["itemId"] = flask.request.args.get("itemId")
    if flask.request.args.get("itemType"):
        flask.session["itemType"] = flask.request.args.get("itemType")
    if flask.request.args.get("courseId"):
        flask.session["courseId"] = flask.request.args.get("courseId")
    if flask.request.args.get("attachmentId"):
        flask.session["attachmentId"] = flask.request.args.get("attachmentId")
請注意,您現在也應該驗證使用者。您也應該在這裡處理 login_hint 查詢參數,並視需要將使用者轉送至您的授權流程。如要進一步瞭解這個流程,請參閱前一篇逐步操作說明中討論的登入指南詳細資料。
接著,將要求傳送至與項目類型相符的 getAddOnContext 端點。
Python
在上述範例中,這是 load_content_attachment 方法的延續。
# Create an instance of the Classroom service.
classroom_service = googleapiclient.discovery.build(
    serviceName="classroom"
    version="v1",
    discoveryServiceUrl=f"https://classroom.googleapis.com/$discovery/rest?labels=ADD_ONS_ALPHA&key={GOOGLE_API_KEY}",
    credentials=credentials)

# Use the itemType to determine which stream item type the teacher created
match flask.session["itemType"]:
    case "announcements":
        parent = classroom_service.courses().announcements()
    case "courseWorkMaterials":
        parent = classroom_service.courses().courseWorkMaterials()
    case _:
        parent = classroom_service.courses().courseWork()

addon_context_response = parent.getAddOnContext(
    courseId=flask.session["courseId"],
    itemId=flask.session["itemId"]).execute()
這個方法會傳回目前使用者在類別中的角色相關資訊。根據使用者的角色,修改顯示的檢視畫面。只有一個 studentContext 或 teacherContext 欄位填入回應物件。請檢查這些問題,判斷如何回應使用者。
無論如何,使用 attachmentId 查詢參數,都知道要從我們的資料庫擷取哪個連結。開啟教師或學生檢視畫面 URI 時,系統會提供這個查詢參數。
Python
在上述範例中,這是 load_content_attachment 方法的延續。
# Determine which view we are in by testing the returned context type.
user_context = "student" if addon_context_response.get(
    "studentContext") else "teacher"

# Look up the attachment in the database.
attachment = Attachment.query.get(flask.session["attachmentId"])

# Set the text for the next page depending on the user's role.
message_str = f"I see that you're a {user_context}! "
message_str += (
    f"I've loaded the attachment with ID {attachment.attachment_id}. "
    if user_context == "teacher" else
    "Please enjoy this image of a famous landmark!")

# Show the content with the customized message text.
return flask.render_template(
    "show-content-attachment.html",
    message=message_str,
    image_filename=attachment.image_filename,
    image_caption=attachment.image_caption,
    responses=response_strings)
測試外掛程式
如要測試附件建立測試,請完成下列步驟:
- 以老師測試使用者身分登入 [Google Classroom]。
- 前往「課堂作業」分頁,然後建立新的「作業」。
- 按一下文字區域下方的「Add-ons」按鈕,然後選取外掛程式。 iframe 會開啟,外掛程式會載入您在 Google Workspace Marketplace SDK 的「App Configuration」(應用程式設定) 頁面中指定的連結設定 URI。
- 選擇要附加到作業中的一段內容。
- 附件建立流程完成後,請關閉 iframe。
您應該會在 Google Classroom 的作業建立 UI 中看到附件資訊卡。按一下資訊卡即可開啟教師檢視畫面 iframe,並確認系統顯示正確的附件。按一下「指派」按鈕。
如要測試學生的學習體驗,請完成下列步驟:
- 接著,在老師測試使用者所在的課程中,以學生測試使用者身分登入 Classroom。
- 在「課堂作業」分頁中找出測試作業。
- 展開作業,然後按一下附件資訊卡,開啟學生檢視畫面 iframe。
確認系統為學生顯示正確的附件。
恭喜!您可以繼續進行下一個步驟:建立活動類型附件。