
Dialogflow'da Actions'ı tanımlamak için Dialogflow aracınızda niyet oluşturur ve bunları İşleminize giriş noktaları olarak atarsınız. Aşağıdaki Eylem türlerini oluşturabilirsiniz:
- Varsayılan İşlem: Her Dialogflow aracısı, kullanıcılar İşleminizi adıyla istediğinde (ör. "Ok Google Doğru bilgiler ile Google" veya "Ok Google. Google Hakkında Bilgiler ile konuşayım").
- Görüşmenize derin bağlantı oluşturmak için ek amaçlar: Bu işlemler, kullanıcılar İşleminizi adıyla çağırdığında ve bir çağrı ifadesi belirttiğinde (örneğin, "Geçmişle ilgili bilgiler için Google hakkındaki bilgiler ile görüşme") tetiklenir.
Bu çağrı modellerinin işleyiş şekli hakkında daha fazla bilgi edinmek için Amaçlar ve çağrı bölümüne bakın.
Varsayılan İşlem tanımlama
Her Dialogflow aracısının GOOGLE_ASSISTANT_WELCOME etkinliğini işleyen tek bir amacı olmalıdır. Bu amaç, kullanıcılar İşleminizi adıyla çağırdığında (örneğin, "Ok Google, Google hakkındaki bilgiler ile konuş") tetiklenir.
GOOGLE_ASSISTANT_WELCOME etkinliğini aşağıdaki şekillerde tanımlayabilirsiniz:
Dialogflow konsolundaki intent düzenleyiciden:
- Gezinme menüsünde Niyetler'i tıklayın.
- Karşılama etkinliği olarak ayarlamak istediğiniz amacı seçin.
- Niyetin Etkinlikler bölümüne
GOOGLE_ASSISTANT_WELCOMEyazın. Kaydet'i tıklayın.

Şekil 1. Dialogflow niyetinin Etkinlikler bölümünün ekran görüntüsü.
Google Asistan entegrasyonu kalıcı penceresinden:
- Gezinme menüsünde Entegrasyonlar'ı ve Google Asistan'ı tıklayın.
- Açık çağrı alanındaki geçerli öğeyi kaldırmak için X simgesini tıklayın.
Karşılama amacı kutusunda, karşılama etkinliği olarak ayarlamak istediğiniz amacı seçin.
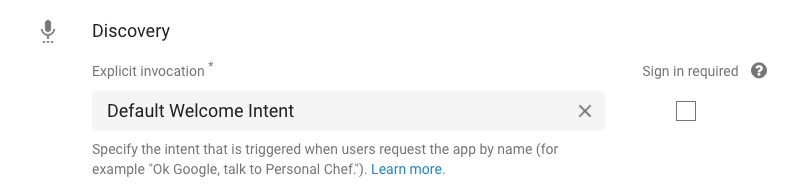
2. Şekil. Dialogflow konsolundaki Google Asistan entegrasyonu kalıcı penceresinin ekran görüntüsü.
Niyetin Etkinlikler bölümünü görüntülediğinizde, amacın artık GOOGLE_ASSISTANT_WELCOME etkinliğinin ayarlandığını görmeniz gerekir (Şekil 1'e bakın).
Sipariş karşılamayı etkinleştir
Varsayılan olarak Dialogflow niyeti, amacın Yanıt bölümünde belirtilen statik bir yanıt döndürür. Bu ayar, çağrıldığında yalnızca aynı mesajla yanıt vermesi gereken basit İşlemler için yeterli olabilir. Bununla birlikte, niyetin dinamik yanıt döndürmesini istiyorsanız karmaşık mantığı işleyebilen ve amaç için gerçek zamanlı bir yanıt oluşturabilen istek karşılama sağlamanız gerekir.
Bir amaç için istek karşılamayı etkinleştirmek üzere aşağıdakileri yapın:
- Bir amacın intent düzenleyicisinin alt kısmına gidin.
Karşılama'yı tıklayın ve Bu niyet için webhook çağrısını etkinleştir'i seçin.

3. Şekil. Dialogflow niyetinin Sipariş Karşılama bölümünün ekran görüntüsü.
Bu niyetin tetiklendiğinde nasıl ele alınacağı hakkında bilgi için Karşılama derleme bölümüne bakın.
Ek İşlemler tanımlayın
Görüşmenize giriş noktası görevi gören ek İşlemler sağlayabilirsiniz. Bu kurulum, kullanıcıların ne yapmak istedikleriyle ilgili daha fazla ayrıntı belirtmelerine olanak tanır (örneğin, "Geçmişteki bilgileri bulmak için Google hakkındaki bilgiler ile konuşun").
Dialogflow'da ek İşlemler tanımlamak için şu adımları uygulayın:
- Oluşturmak istediğiniz belirli bir işlem için amaç oluşturun.
Niyetin Eğitim ifadeleri bölümünde bu İşlemi tetikleyen kalıpları belirtin. Örneğin, İşlem'in "Geçmişle ilgili bilgileri bulmak için Google hakkındaki gerçeklerle ilgili bilgiler ile konuşun" ifadesiyle çalıştırılmasını istiyorsanız aşağıdaki Eğitim ifadelerini sağlayın:
- "Tarihle ilgili bilgileri bul"
- "Geçmişle ilgili gerçekleri araştır"
- "Şirketin tarihçesi hakkında bilgi ver"
- "Genel merkezle ilgili bilgileri oku"
- "Genel merkez hakkında biraz bilgi ver"
Niyet başına en az 10 eğitim ifadesi öneririz.
Niyetin karşılanmasını etkinleştirmek için ekranın alt kısmına gidin, Karşılama'yı tıklayın ve Bu niyet için webhook çağrısını etkinleştir'i seçin. (İstek karşılama hakkında daha fazla bilgi için Sipariş karşılama bölümüne bakın.)
Kaydet'i tıklayın.
Gezinme menüsünde Entegrasyonlar'ı ve Google Asistan'ı tıklayın. (Google Asistan kalıcı penceresi görünür.)
Dolaylı çağrı bölümünde amacı ekleyin.

4. Şekil. Google Asistan entegrasyonu kalıcı penceresindeki Dolaylı çağrı bölümünün ekran görüntüsü.
İşlemler tanımlanırken aşağıdaki kısıtlamalar ve yönergeler geçerlidir:
- Çağrı ifadelerine ayrılmış kelimeleri eklemeyin.
- Örneğin, çağrı ifadelerinizin başına "talk to" (şunla konuş) veya "biz konuşayım" ile başlamayın.
- Yalnızca
@sys.anyvarlığı içeren eğitim ifadeleri belirtmeyin.- Çok daha spesifik bir açıklama girin (örneğin,
find recipes for @sys.any).
- Çok daha spesifik bir açıklama girin (örneğin,
Tanınmayan bir işlemi işleme
Kullanıcılar, İşlemlerinizin tanımadığı bir İşlemi çağırmaya çalıştığında, Dialogflow bu durumları ele almak için bir niyet tetikleyebilir.
Bu davranışı etkinleştirmek için google_assistant_welcome giriş bağlamına sahip yeni bir intent oluşturun ve kullanıcılara uygun yanıtları belirtin:
- Gezinme menüsünde Niyetler'i tıklayın.
- Niyet Oluştur'u tıklayın ve amacınızı adlandırın.
- Bağlamlar bölümünde, giriş bağlamı olarak
google_assistant_welcomeöğesini belirtin ve Enter tuşuna basın. (Giriş bağlamı girildikten sonragoogle_assistant_welcome, çıkış bağlamı olarak görünür). Bu çıkış bağlamını kaldırmak için x simgesini tıklayın.

Eğitim ifadeleri bölümünde, kullanıcı ifadesi olarak
banana(veya başka bir isim) ifadesini ekleyin.Muz'u çift tıklayın ve
@sys.any'yi seçin. (Dialogflow'u ifadeyi yalnızca muz değil, dil bilgisine genelleştirmesini söylemek için@sys.anyvarlığını kullanırız.)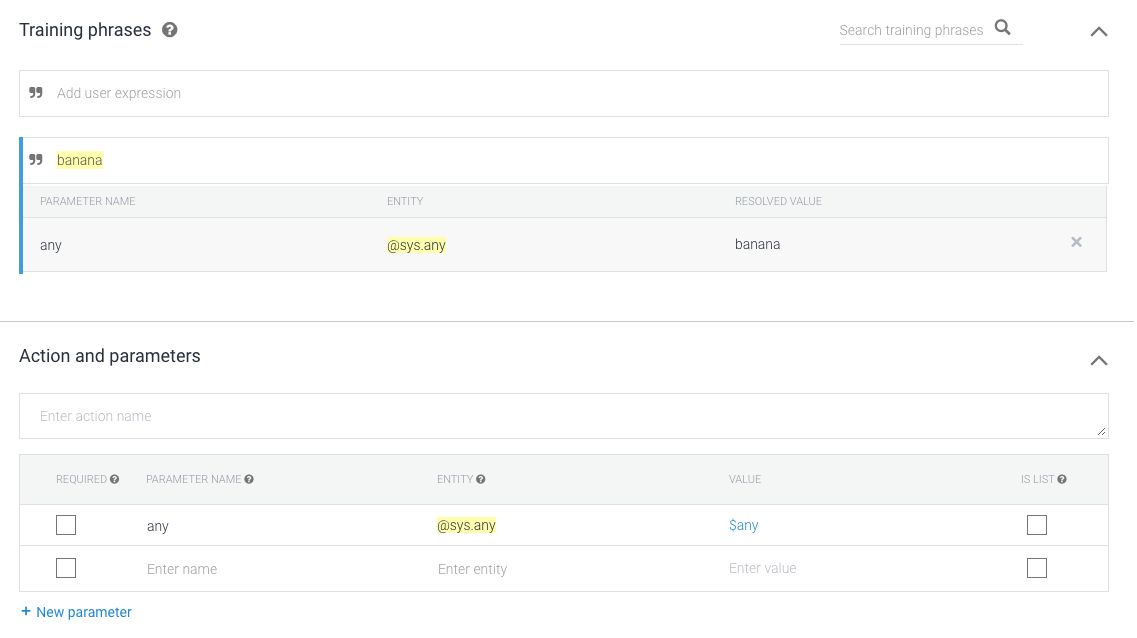
Yanıt bölümünde
$anykullanarak bir yanıt belirtin. Örneğin, aşağıdaki yanıtı kullanın:I'm sorry, I don't know how to help with $any.

Kaydet'i tıklayın.