
Page Summary
-
This guide explains how to integrate Pangle ads using Google Mobile Ads SDK mediation in Unity apps, covering both waterfall and bidding methods.
-
Supported ad formats include App Open, Banner, Interstitial, Rewarded, and Rewarded Interstitial.
-
Key requirements include the latest Google Mobile Ads SDK, Unity 5.6+, specific API levels for Android and iOS, and a configured Unity project with Google Mobile Ads SDK.
-
The integration process involves setting up configurations in the Pangle UI, setting up Pangle demand in the AdMob UI, importing the Pangle SDK and adapter, implementing privacy settings, adding required code, and testing the implementation.
-
The guide also provides error codes for troubleshooting ad loading failures and a changelog for the Pangle Unity Mediation Plugin.
This guide shows you how to use Google Mobile Ads Unity Plugin to load and display ads from Pangle using mediation, covering both waterfall and bidding integrations. It covers how to add Pangle to an ad unit's mediation configuration and how to integrate the Pangle SDK and adapter into a Unity app.
Supported integrations and ad formats
The AdMob mediation adapter for Pangle has the following capabilities:
| Integration | |
|---|---|
| Bidding | 1 |
| Waterfall | |
| Formats | |
| App Open | 2 |
| Banner | 2 |
| Interstitial | |
| Rewarded | |
| Rewarded Interstitial | |
| Native | 2 |
1 Available Pangle bidding ad sources include Pangle US, Pangle KR, and Pangle ROW.
2 This format is not supported for the following Pangle bidding ad sources: Pangle US.
Prerequisites
- Latest Google Mobile Ads Unity Plugin version.
- [For Pangle US bidding]: Use Pangle adapter version 5.1.0 or higher.
- Unity Editor version 5.6 or later.
- [For Pangle KR bidding and Pangle ROW bidding]: To integrate all supported ad formats in bidding, use Google Mobile Ads mediation plugin for Pangle 2.4.0 or later (latest version recommended).
- To deploy on Android
- Android API level 24 or later.
- To deploy on iOS
- iOS deployment target of 13.0 or later.
- A working Unity project configured with Google Mobile Ads Unity Plugin. See Set up Google Mobile Ads Unity Plugin for details.
Step 1: Set up configurations in Pangle UI
Sign up or Log in to your Pangle account.
Add a new application
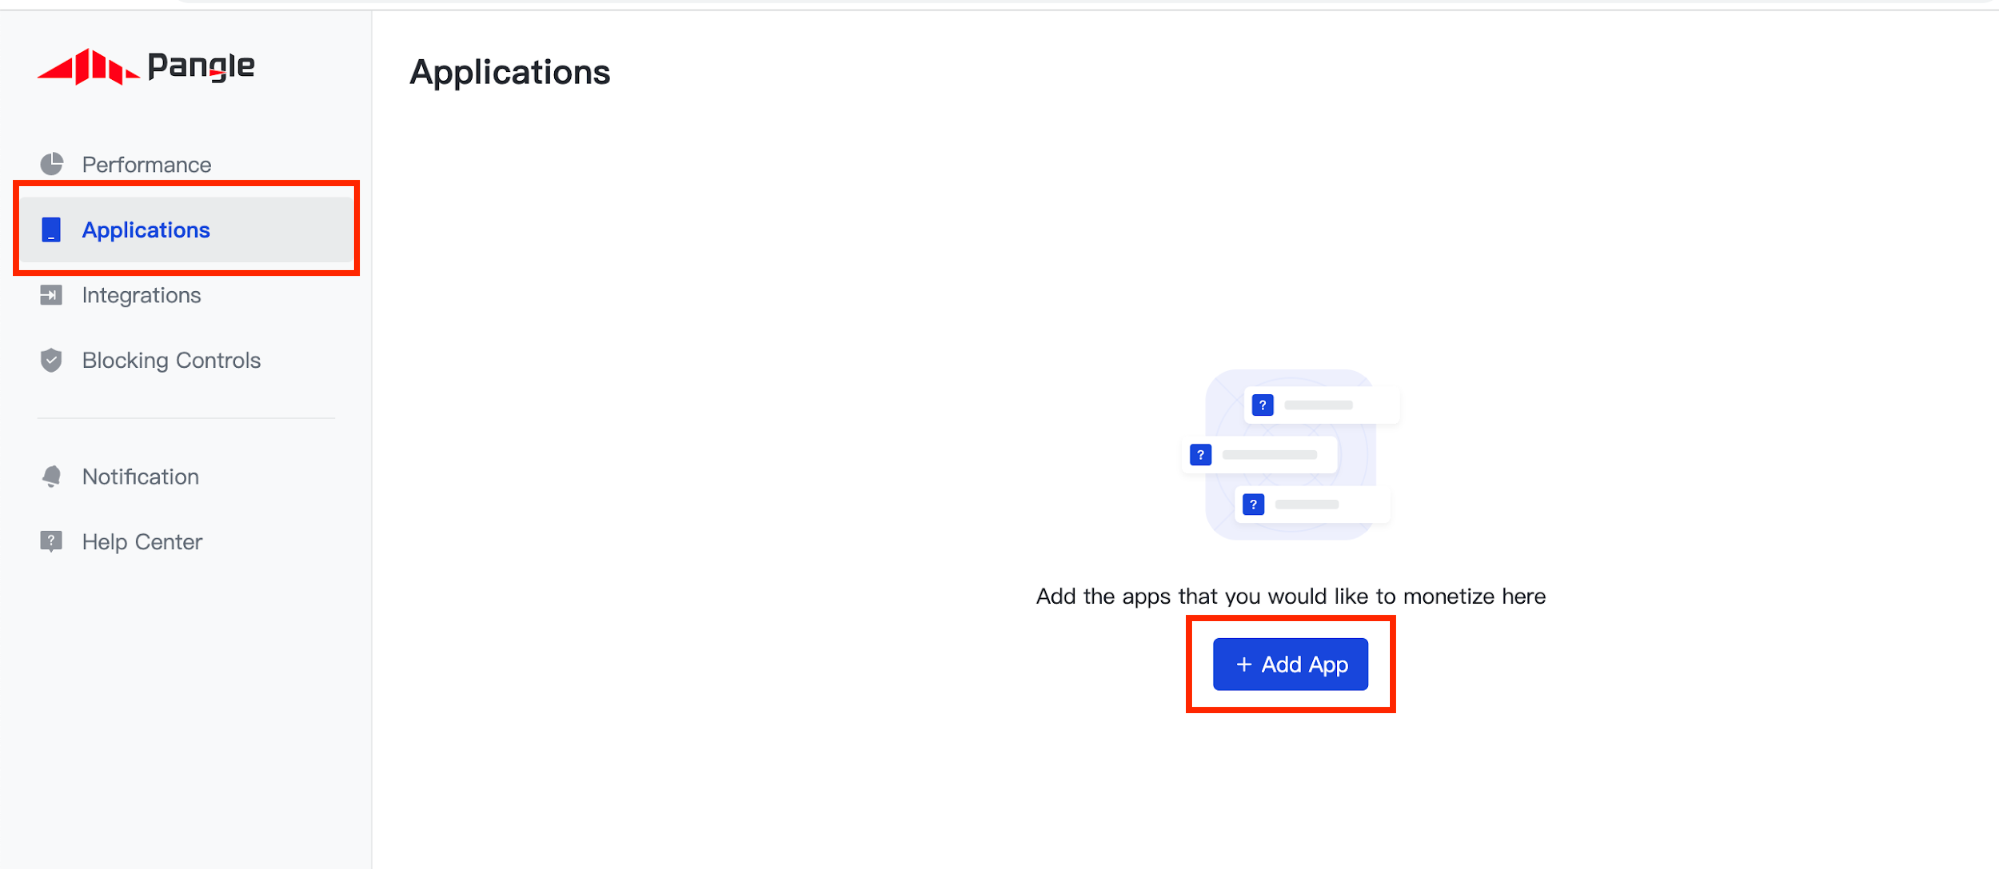
Navigate to the Applications tab and click the Add App button.
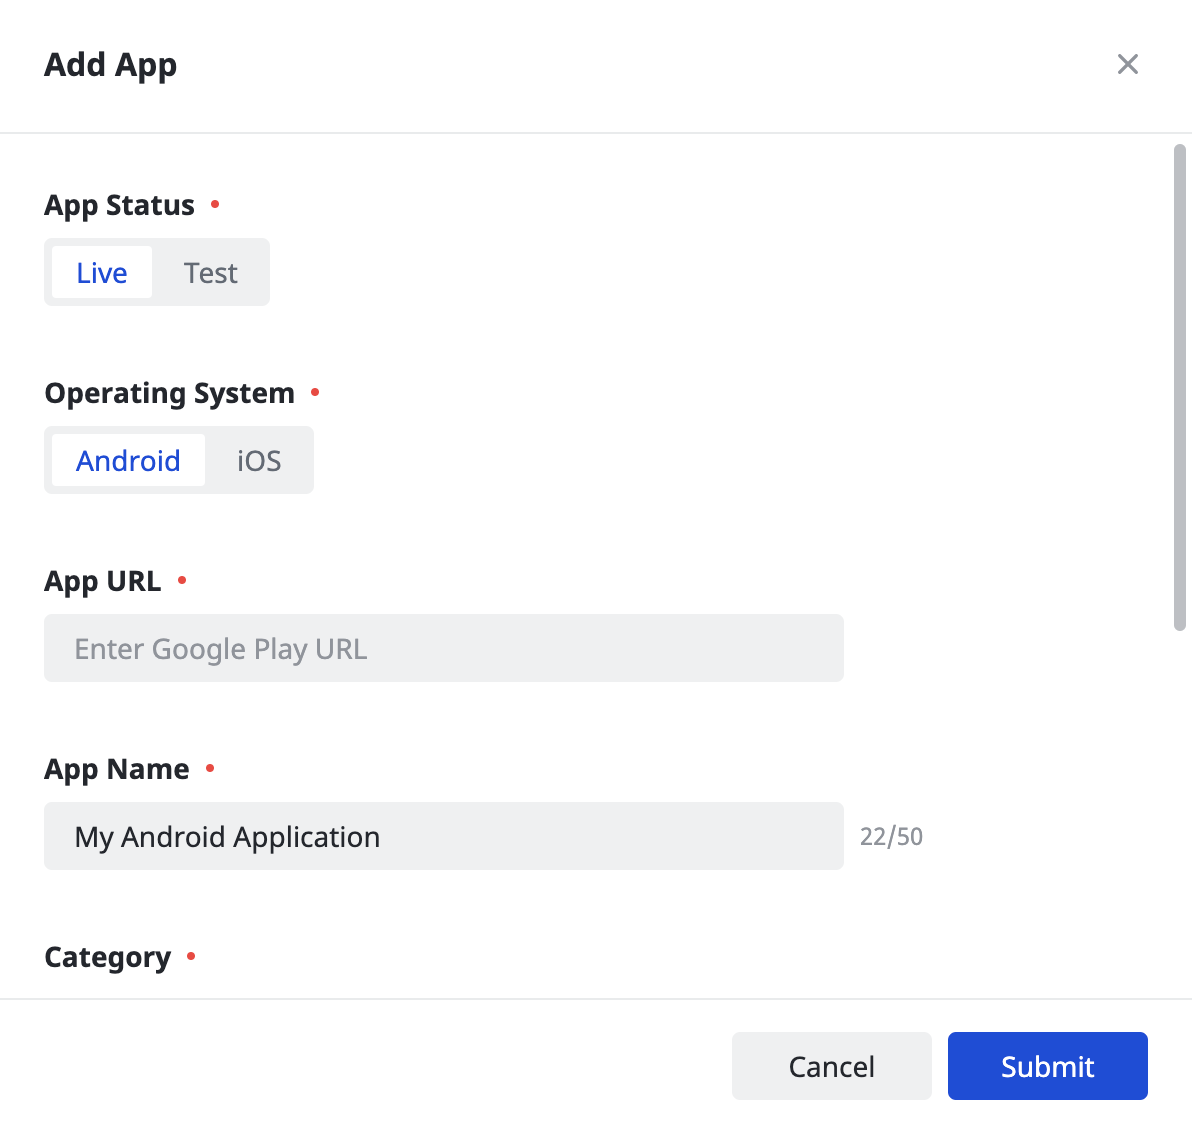
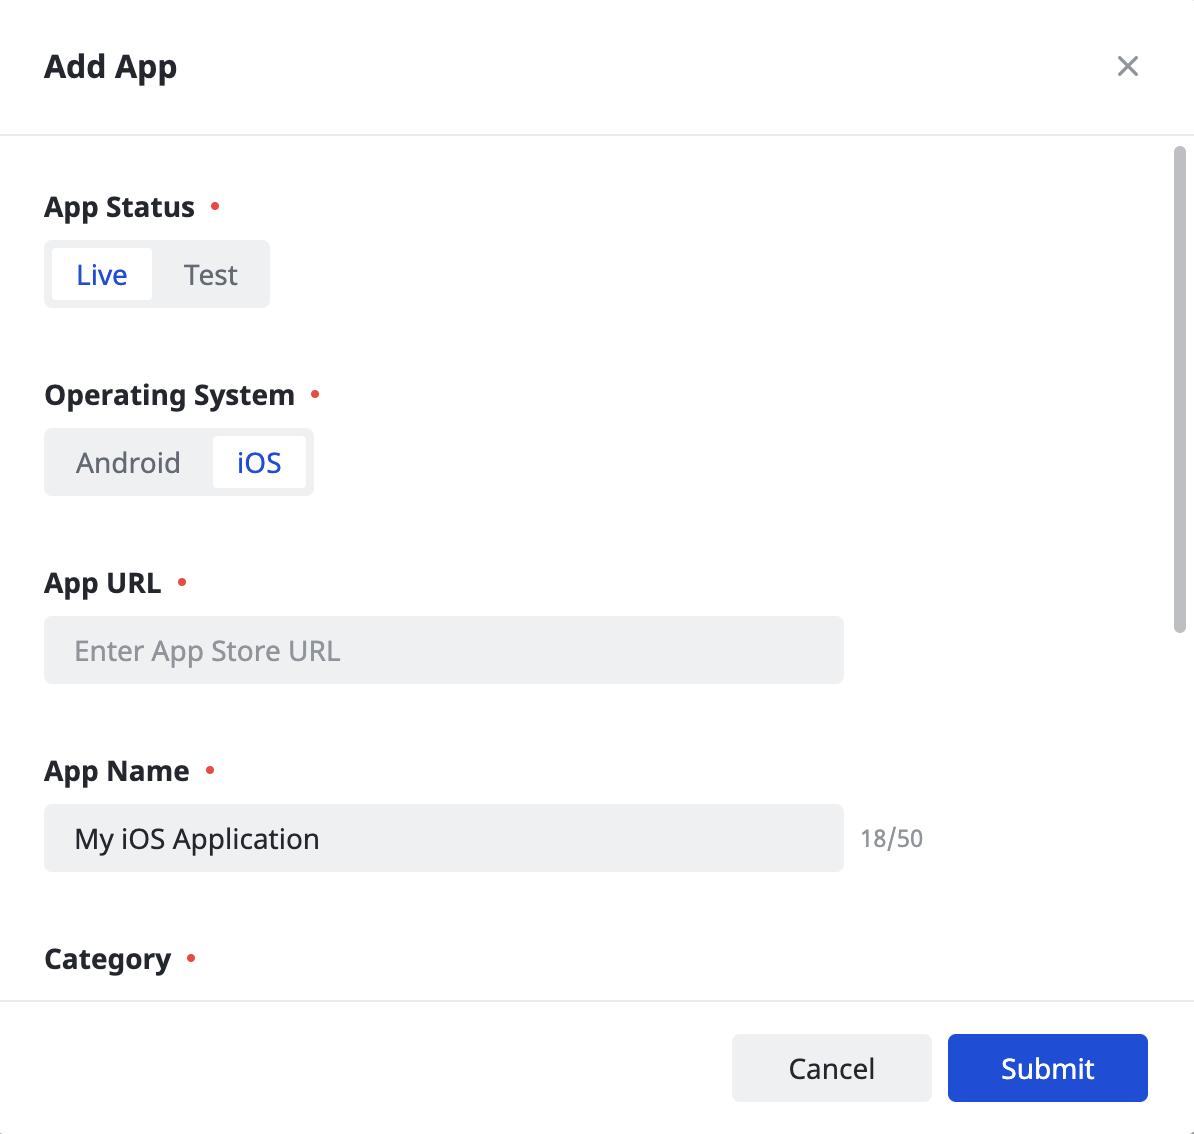
Select the Operating System you wish to create an application for and fill out the rest of the form. Then, click Submit.
Android
iOS
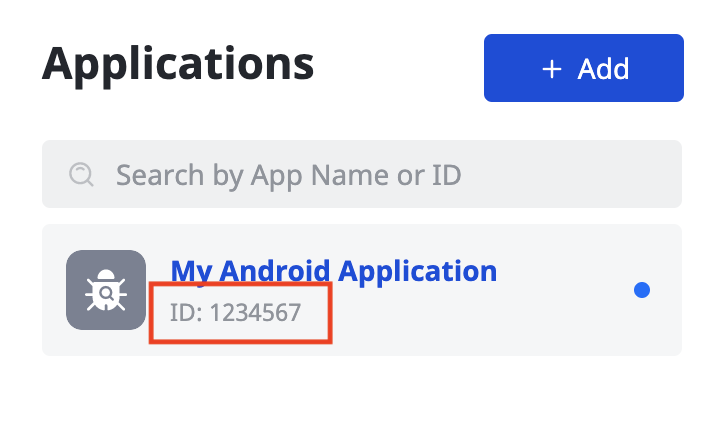
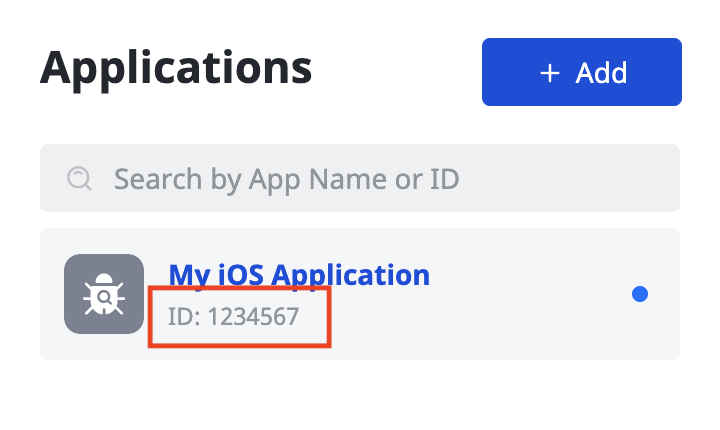
Take note of your application's App ID.
Android
iOS
Create an ad placement
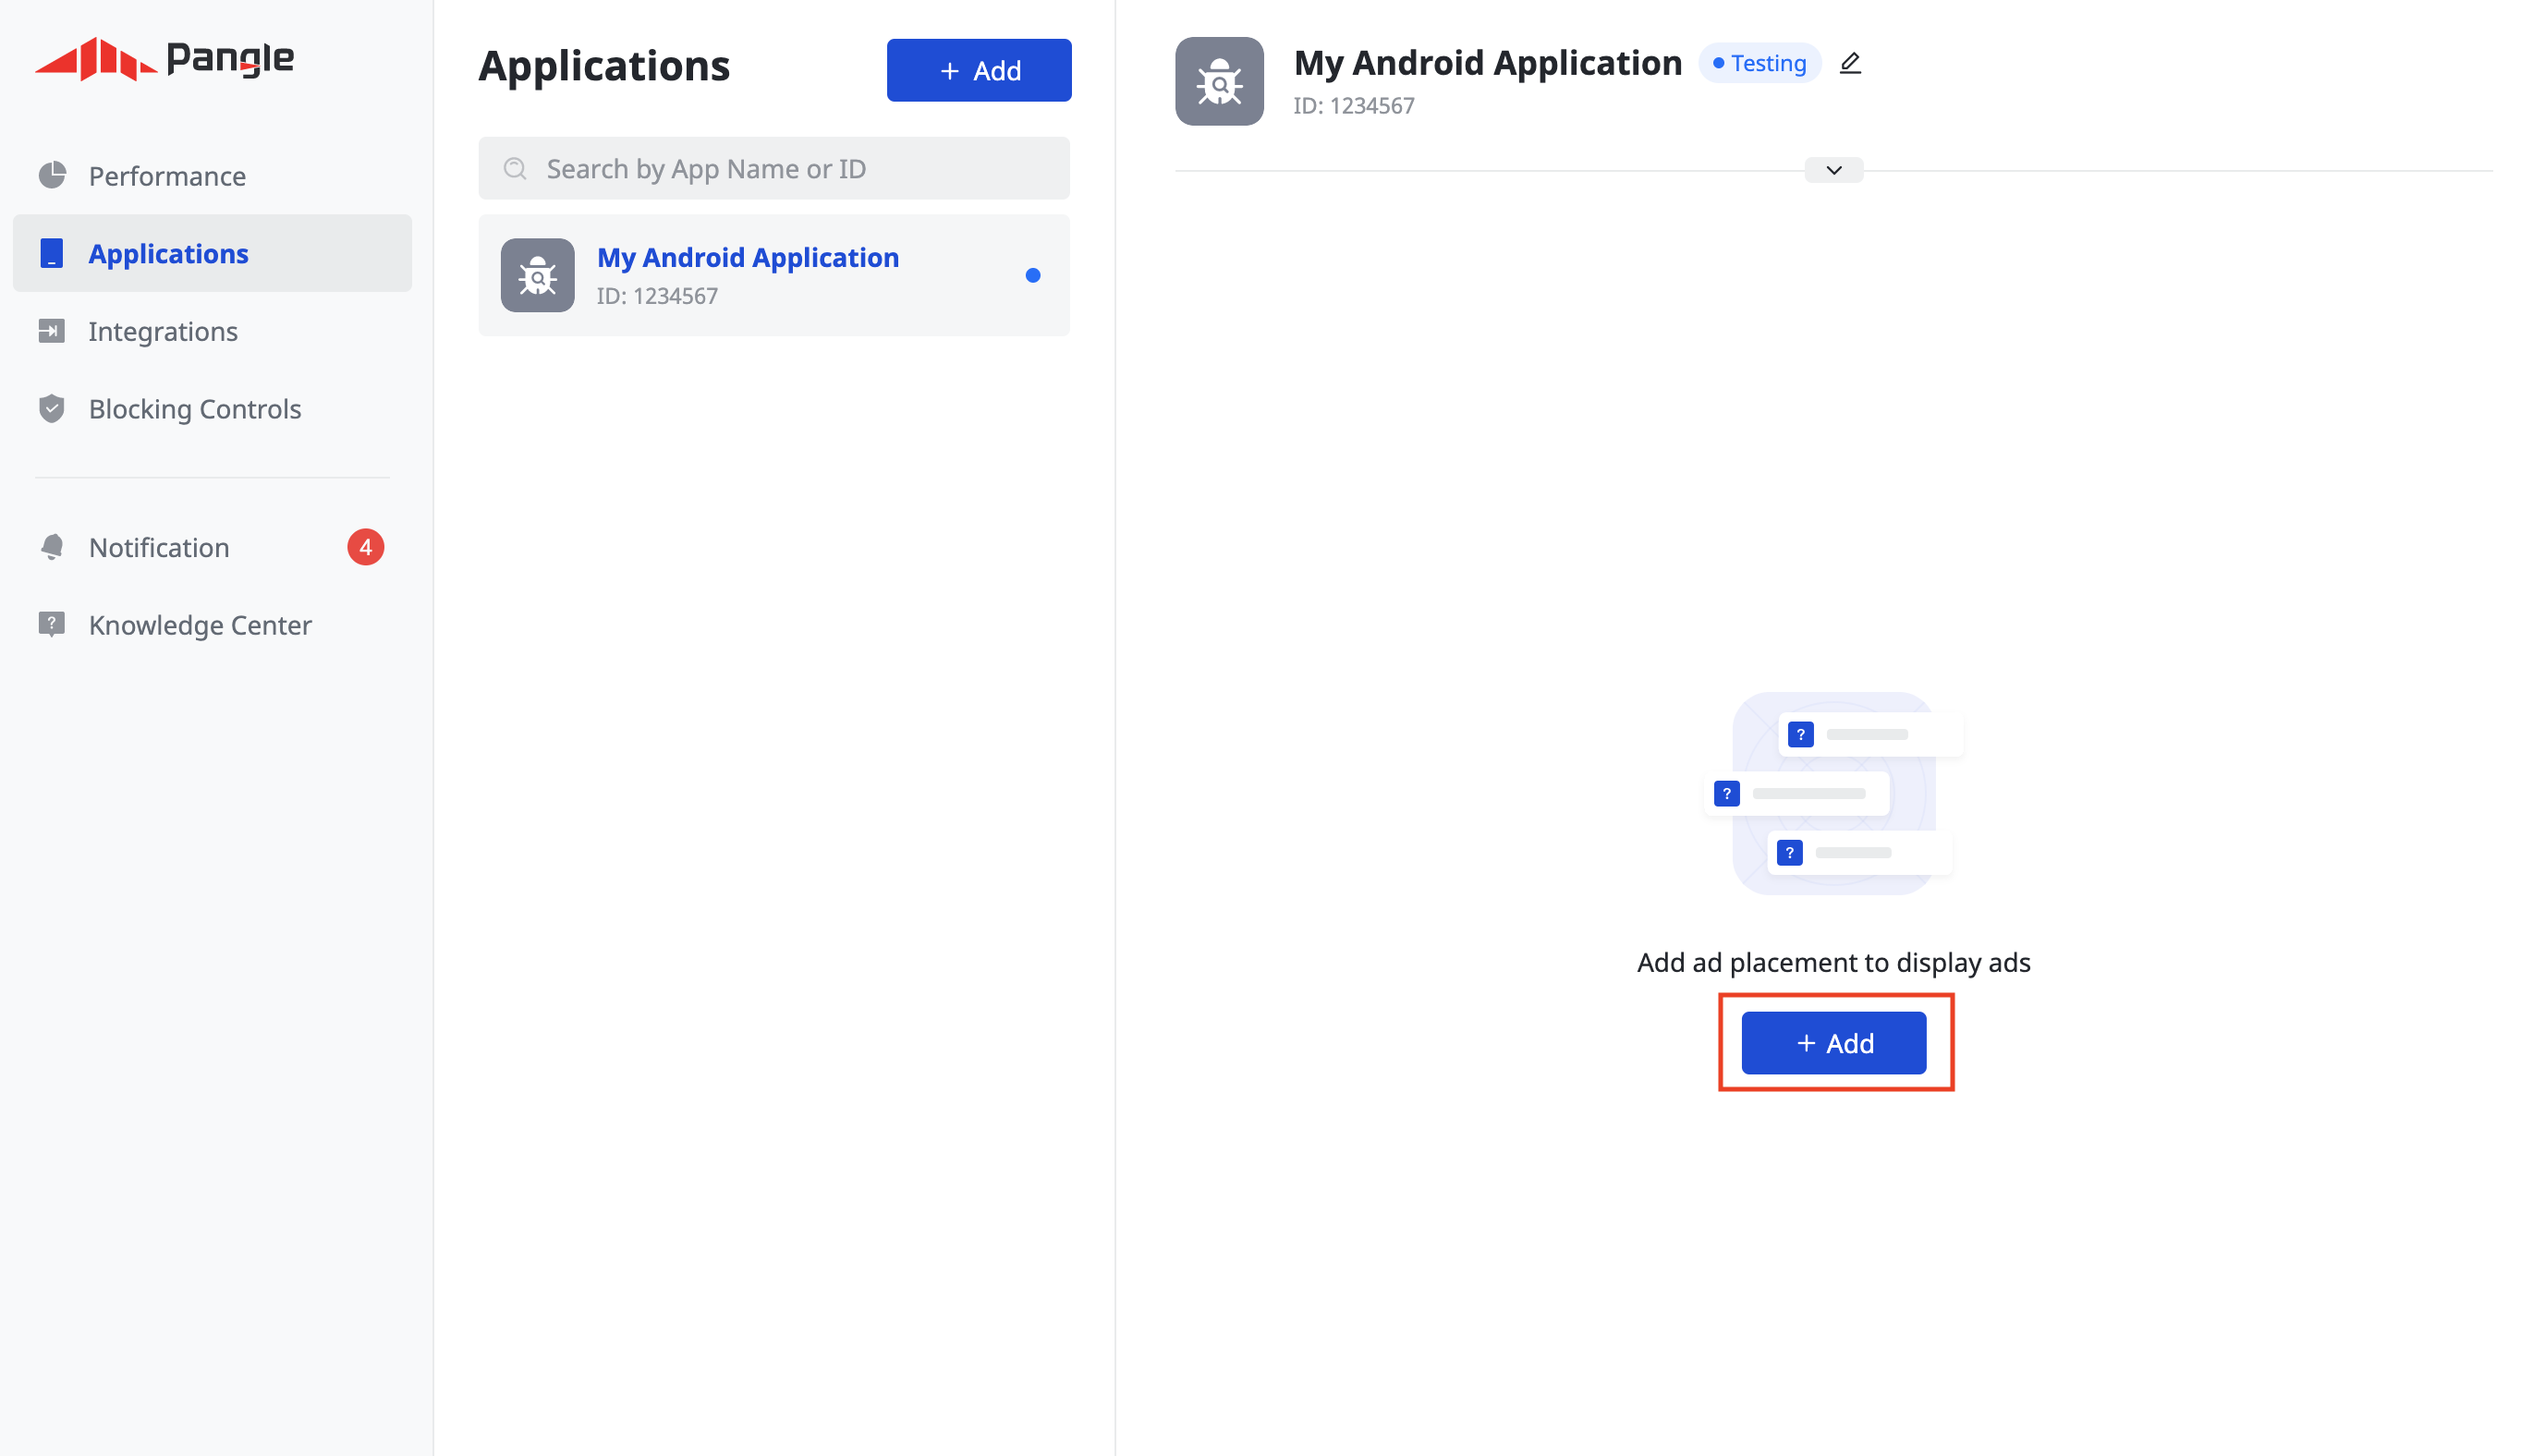
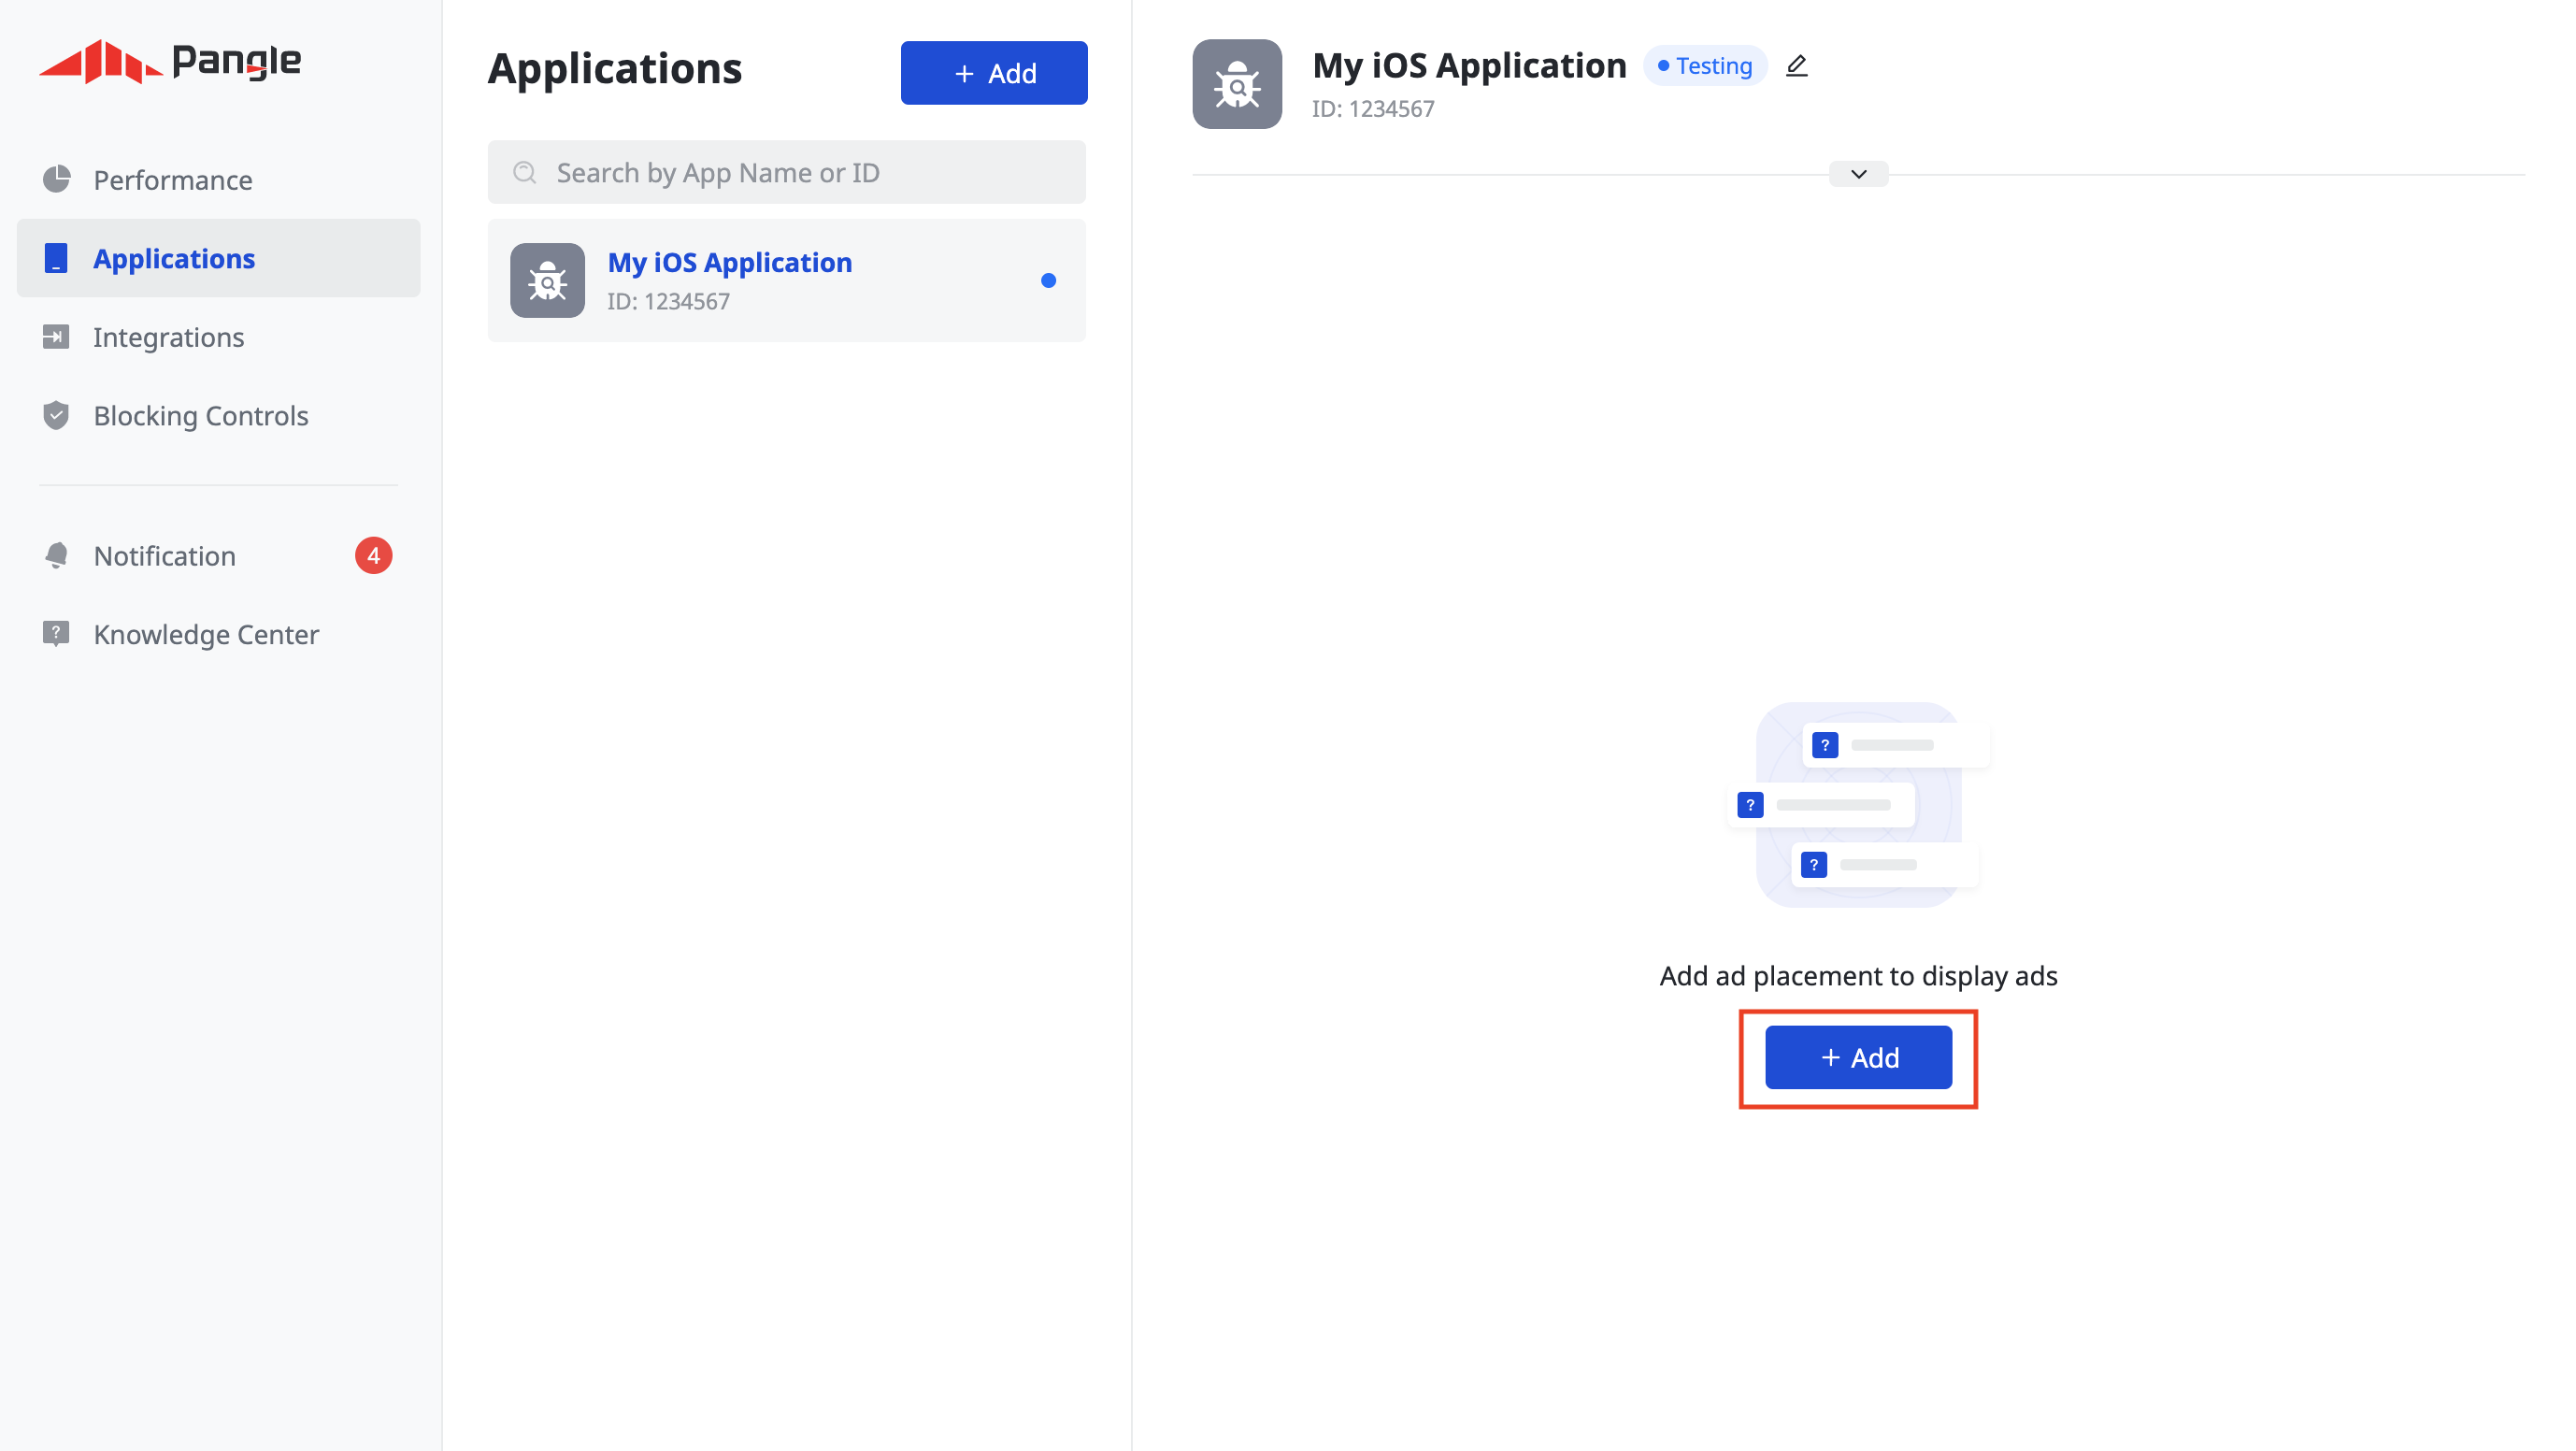
Once your application has been created, click the Add button to create your ad placement.
Android
iOS
Bidding
Select your Ad Format and Ad Placement Name, and select In-App Bidding as the Pricing Type. Fill out the rest of the form and click Submit.
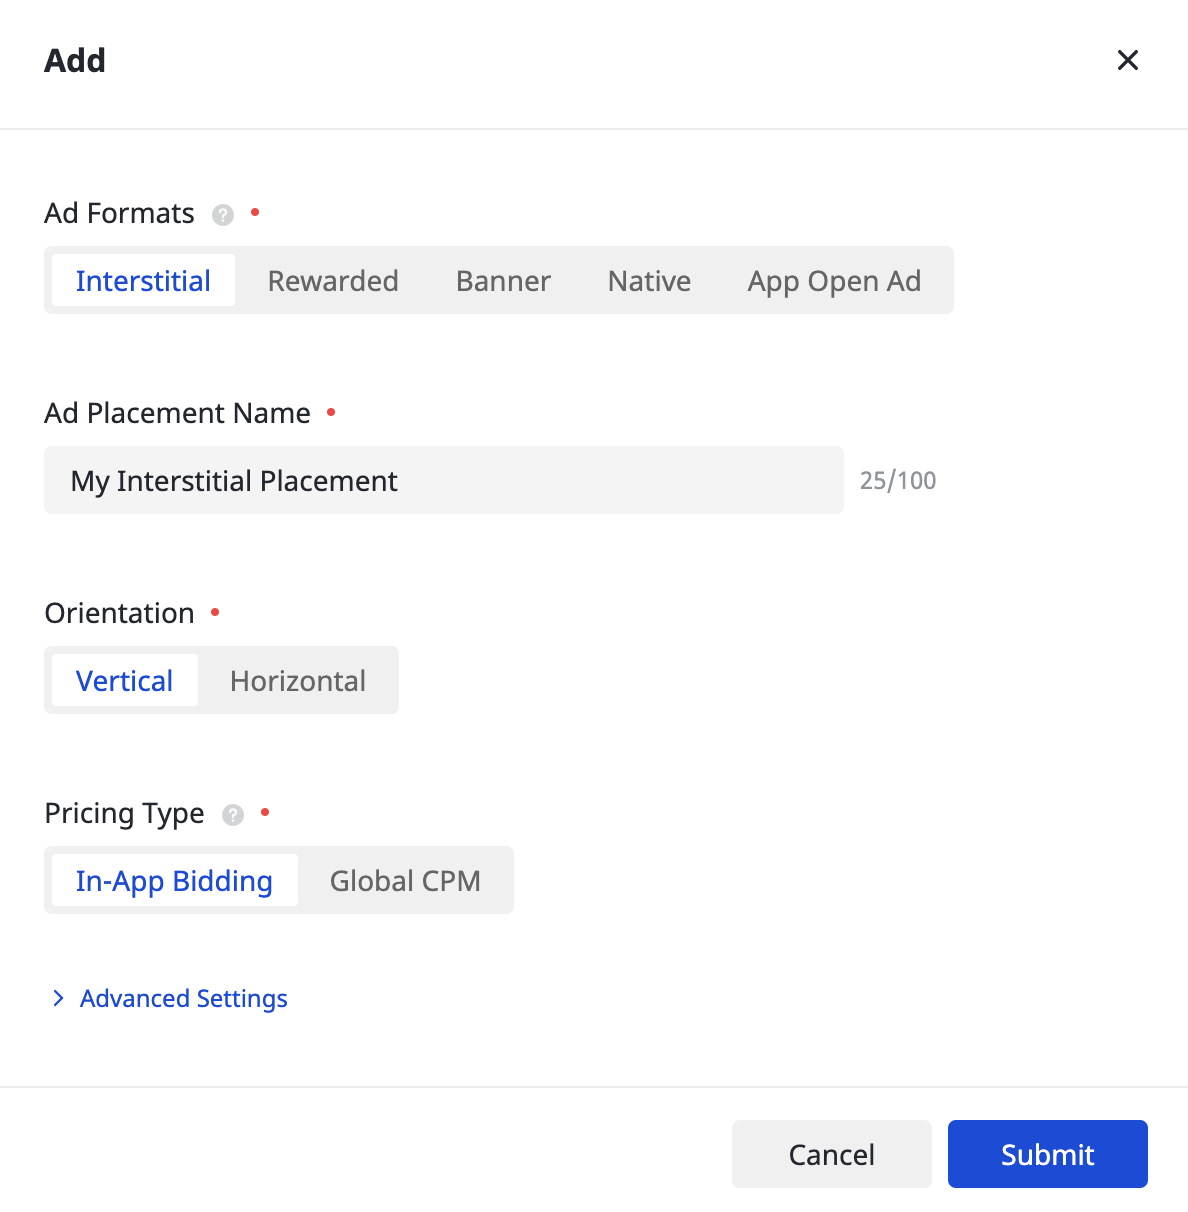
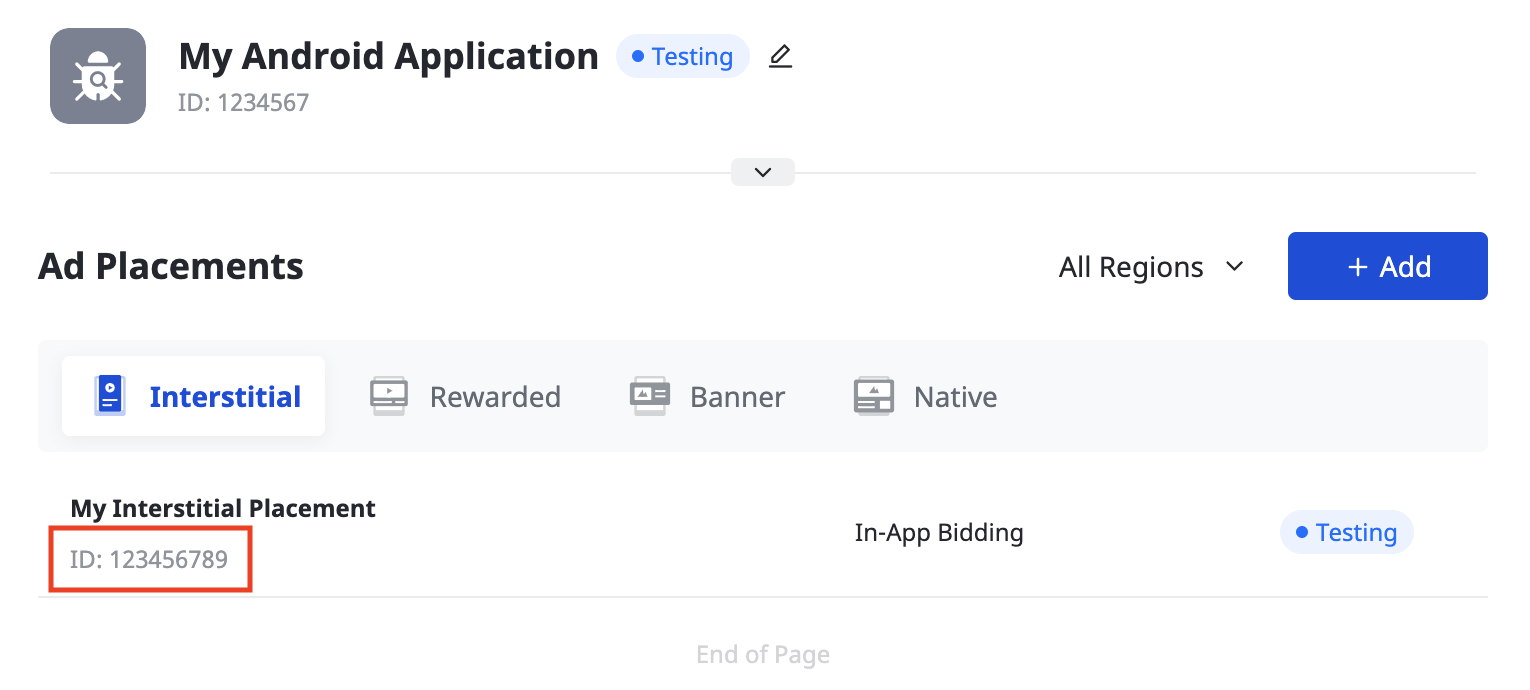
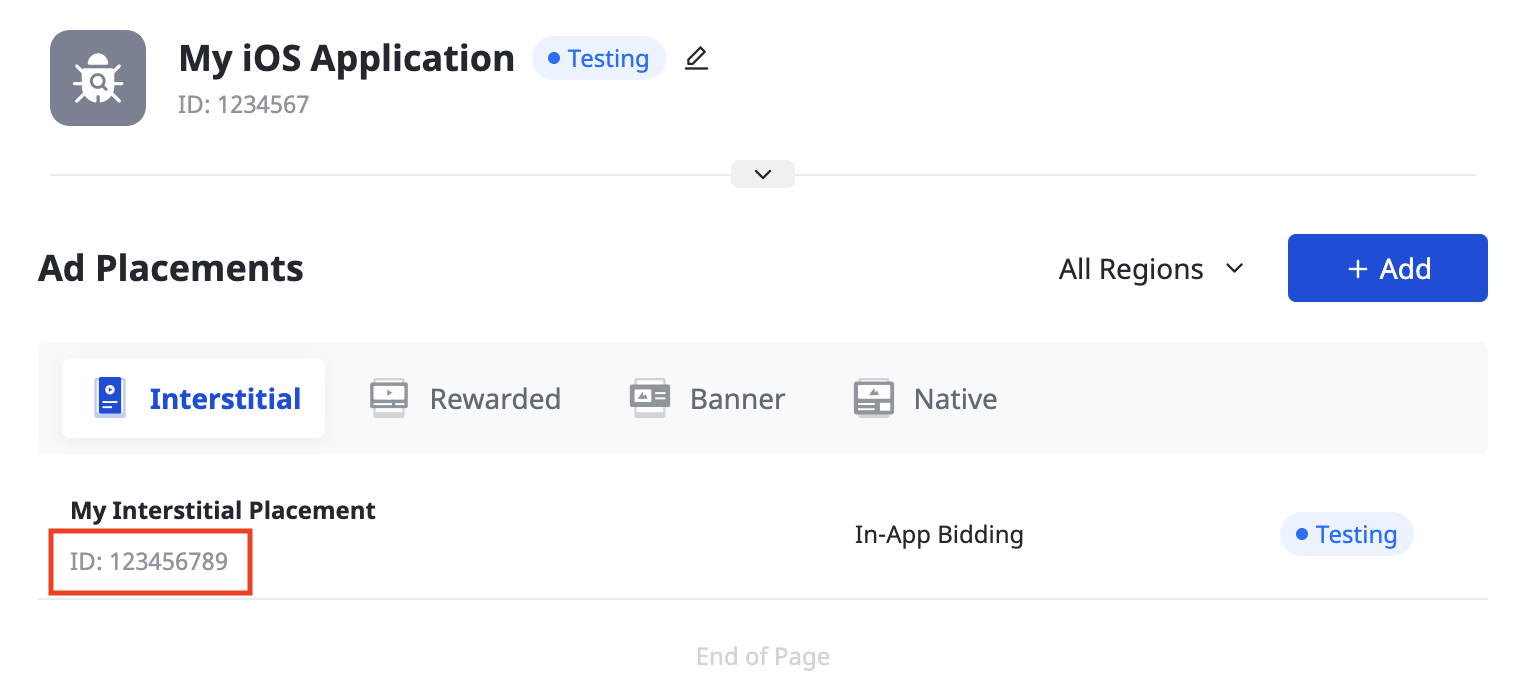
Once your ad placement is created, take note of the Ad Placement ID.
Android
iOS
Waterfall
Select your Ad Format and Ad Placement Name, and Global CPM as the Pricing Type. Fill out the rest of the form and click Submit.
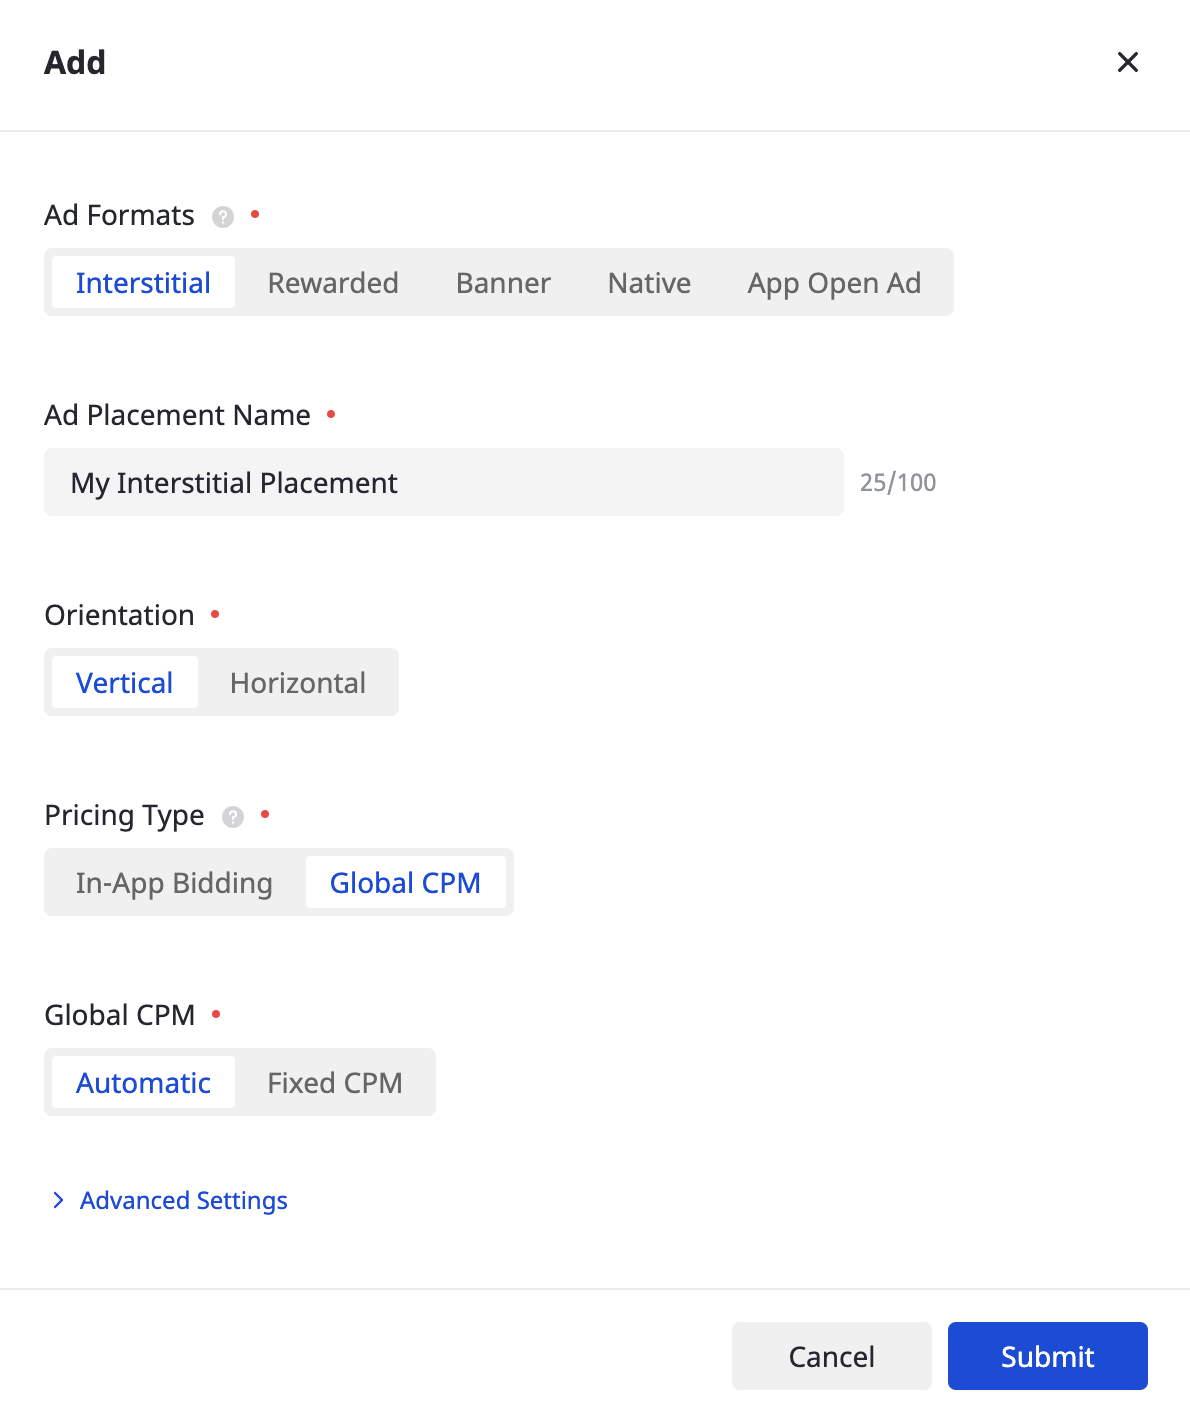
Once your ad placement is created, take note of the Ad Placement ID.
Android
iOS
Locate Pangle Reporting API key
Bidding
This step isn't required for bidding integrations.
Waterfall
Take note of the User ID at the bottom left corner of the page.
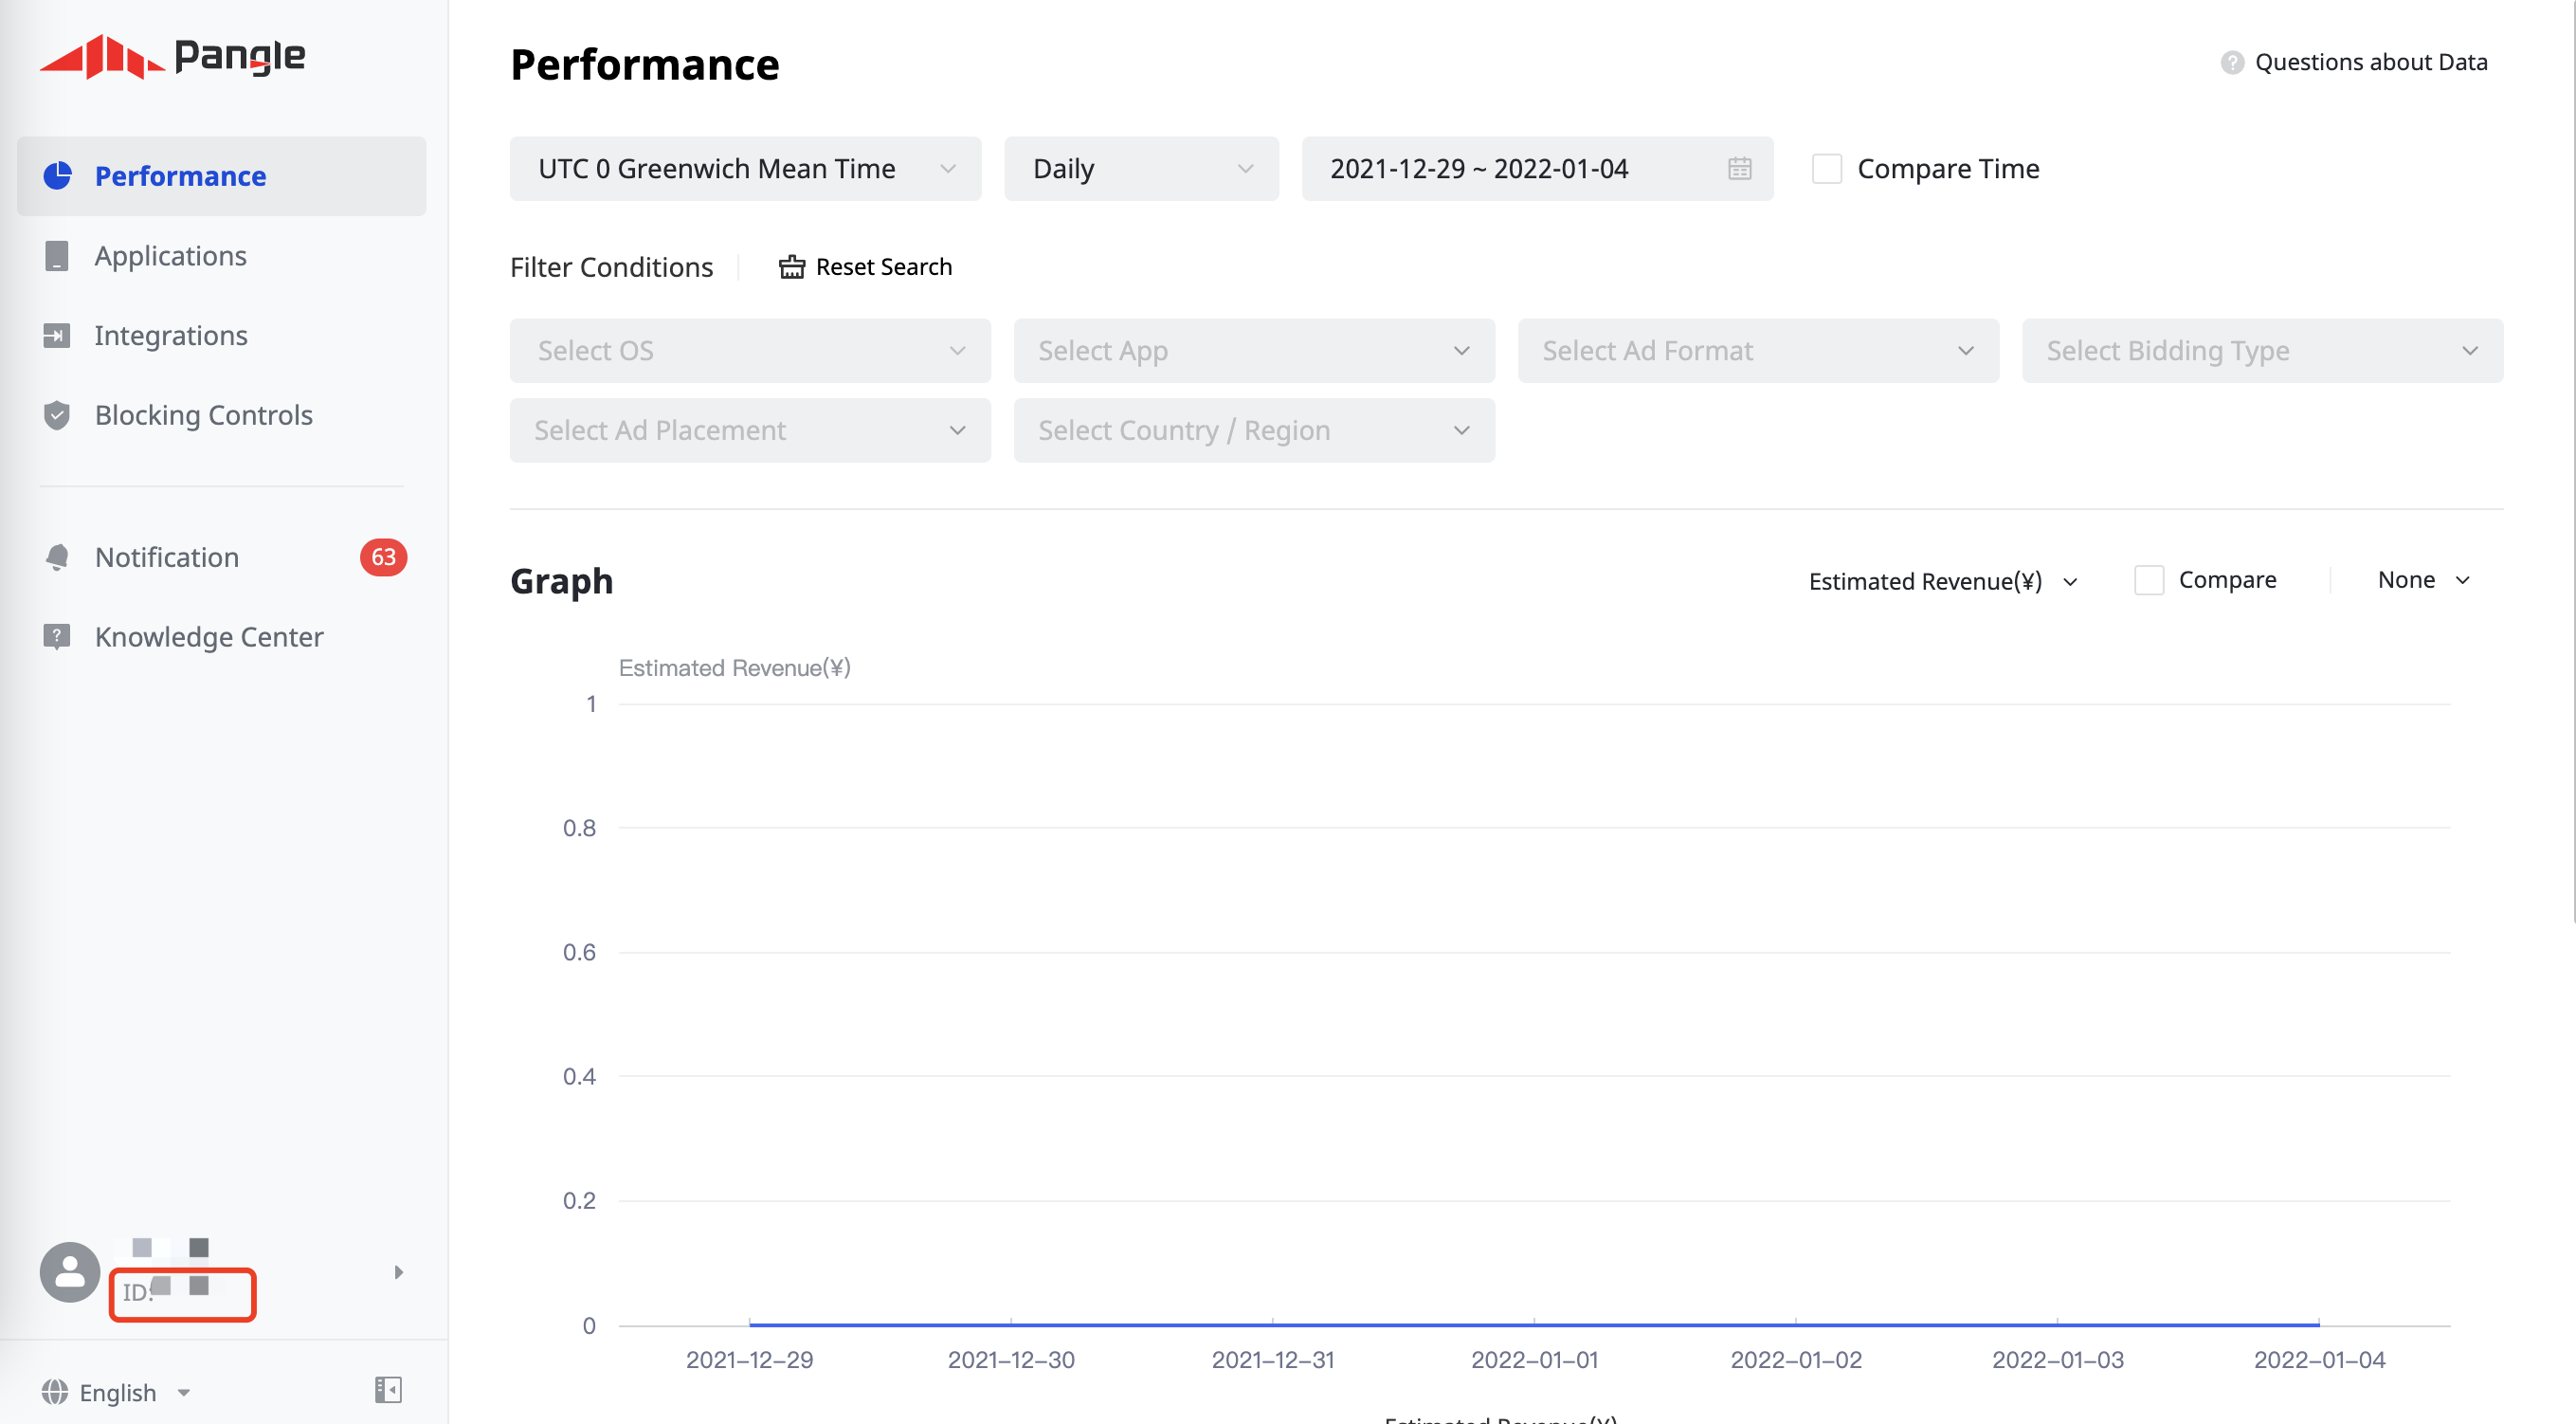
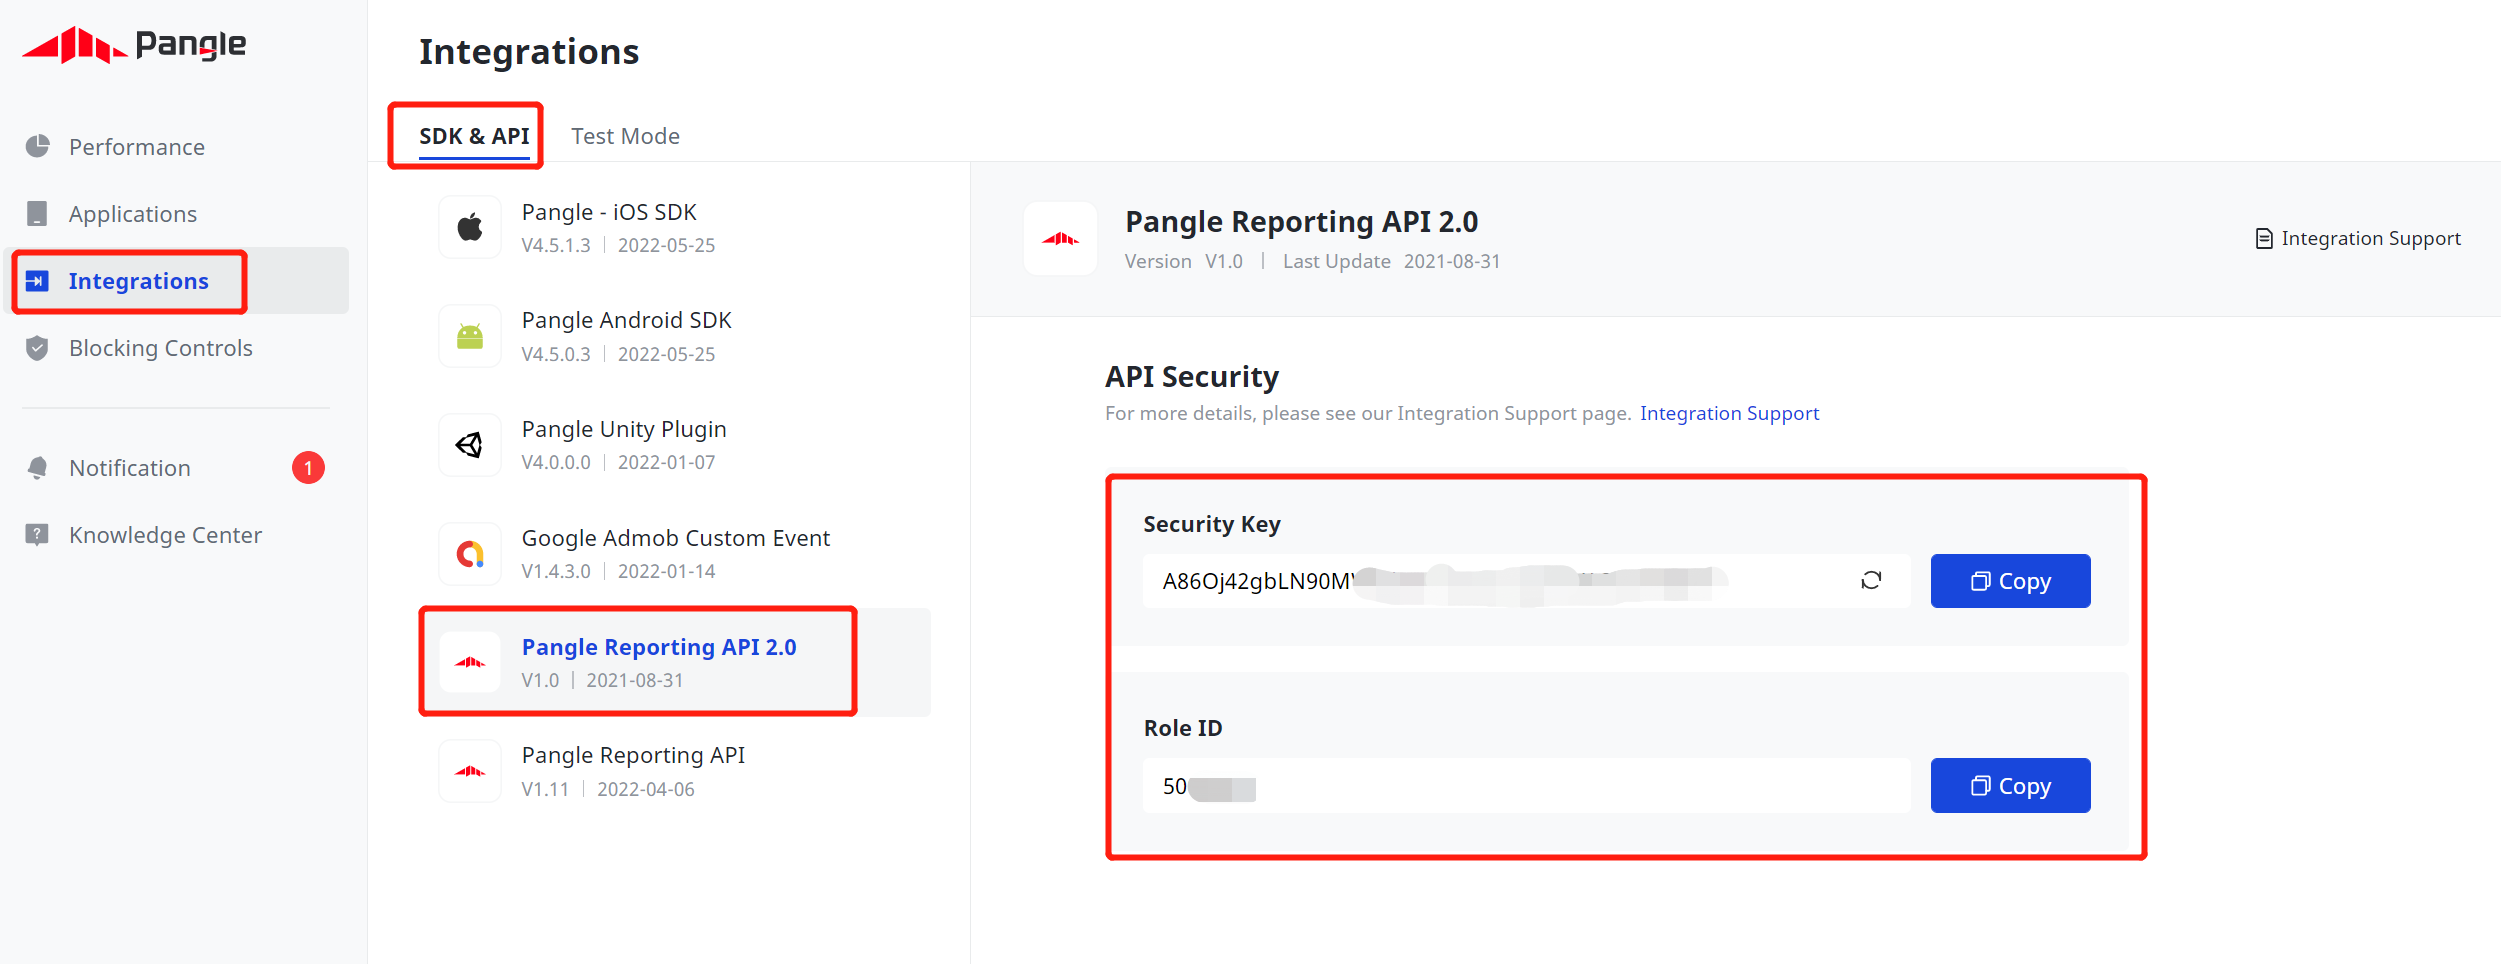
Click Integrations > SDK & API > Pangle Reporting API 2.0. Take note of Role ID and Security Key.
Update your app-ads.txt
Authorized Sellers for Apps app-ads.txt is an IAB Tech Lab initiative that helps ensure your
app ad inventory is only sold through channels you've identified as authorized. To prevent a
significant loss in ad revenue, you'll need to implement an app-ads.txt file.
If you haven't done so already,
set up an app-ads.txt file for your app.
To implement app-ads.txt for Pangle, see
How to add Pangle to your app-ads.txt file.
Turn on test mode
Follow the instructions in Pangle's How to add a Test Ad guide on how to enable Pangle test ads.
Step 2: Set up Pangle demand in AdMob UI
Configure mediation settings for your ad unit
Android
For instructions, see step 2 in the guide for Android.
iOS
For instructions, see step 2 in the guide for iOS.
Add Pangle DSP to GDPR and US state regulations ad partners list
Follow the steps in European regulations settings and US state regulations settings to add Pangle DSP to the European and US state regulations ad partners list in the AdMob UI.
Step 3: Import the Pangle SDK and adapter
OpenUPM-CLI
If you have OpenUPM-CLI installed, you can install the Google Mobile Ads Pangle Mediation Plugin for Unity to your project by running the following command from your project's root directory:
openupm add com.google.ads.mobile.mediation.pangleOpenUPM
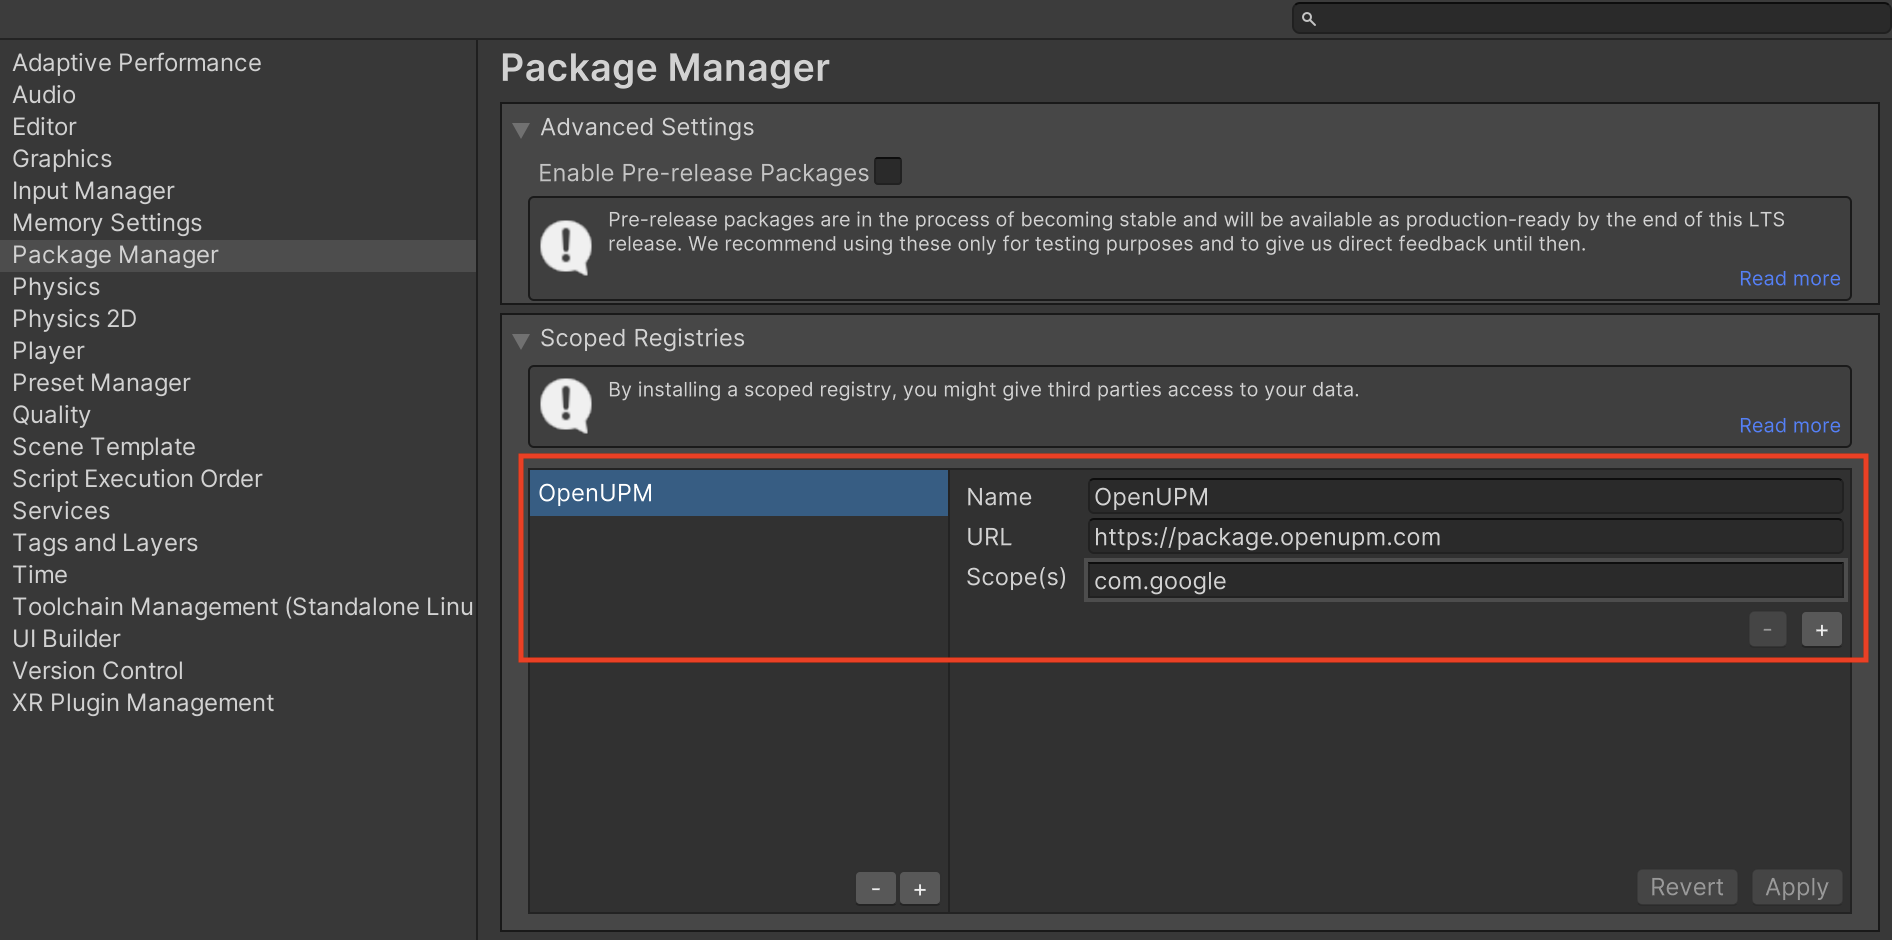
In your Unity project editor, select Edit > Project Settings > Package Manager to open the Unity Package Manager Settings.
Under the Scoped Registries tab, add OpenUPM as a scoped registry with the following details:
- Name:
OpenUPM - URL:
https://package.openupm.com - Scope(s):
com.google
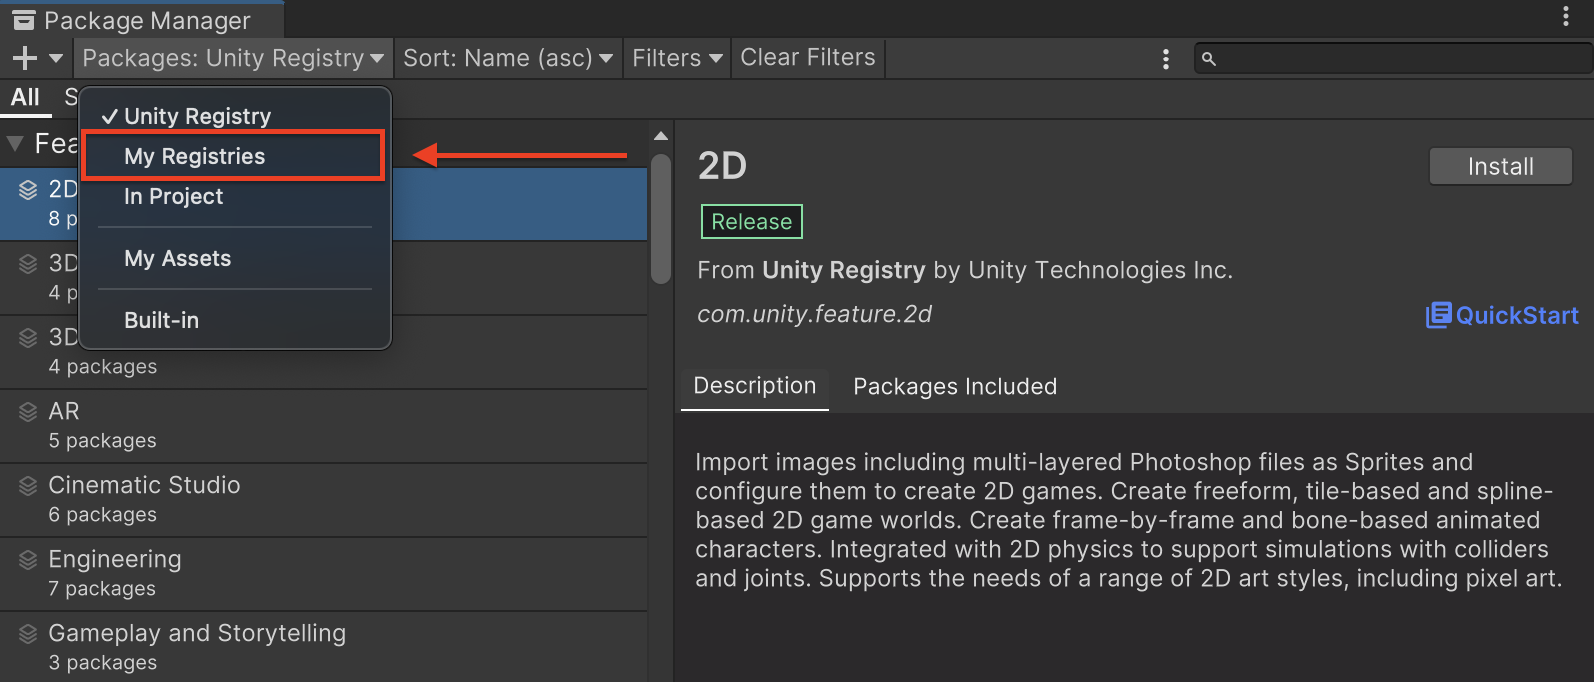
Then, navigate to Window > Package Manager to open the Unity Package Manager and select My Registries from the drop-down menu.
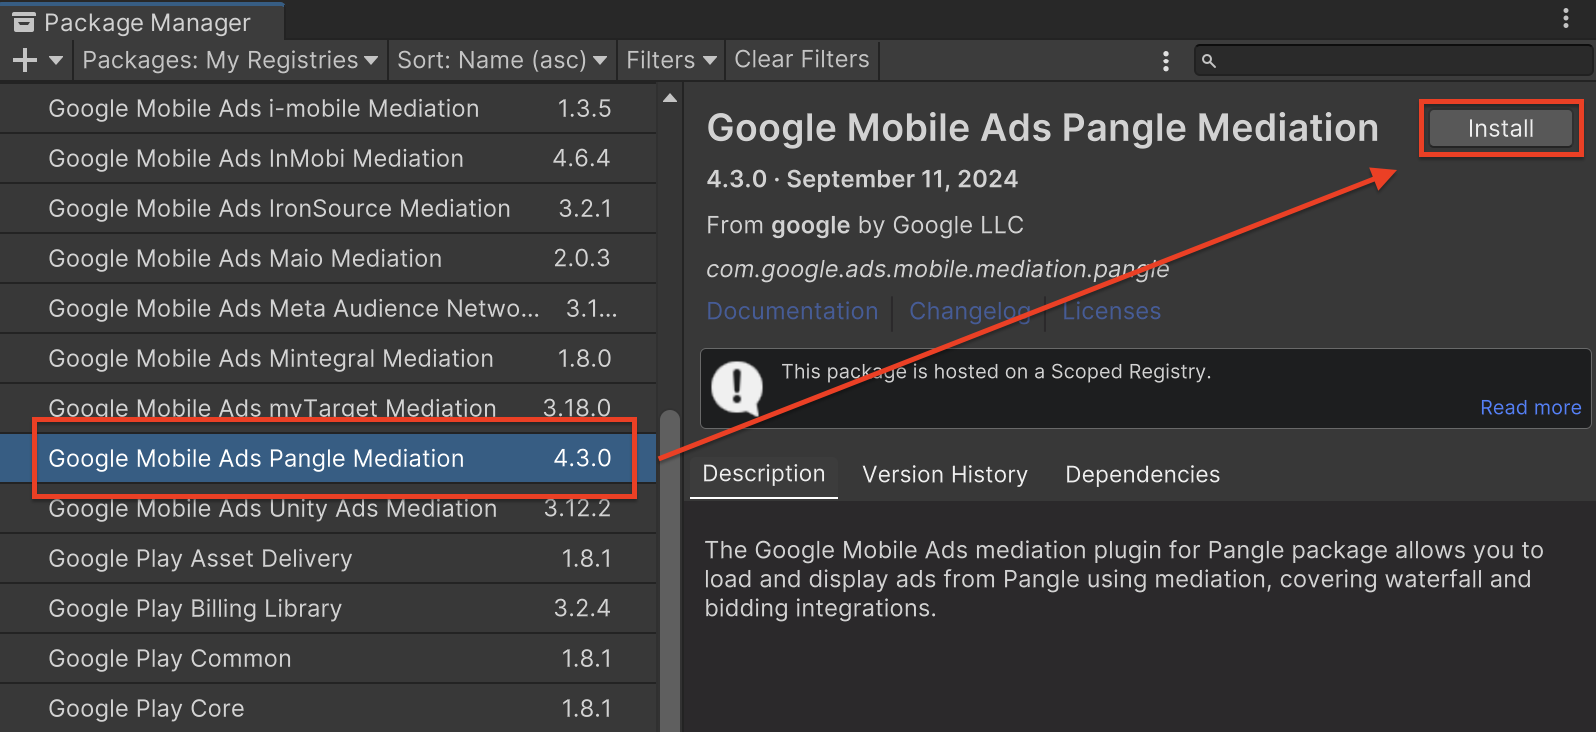
Select the Google Mobile Ads Pangle Mediation package and click Install.
Unity Package
Download the latest version of Google Mobile Ads mediation plugin for
Pangle from the download link in
the
Changelog
and extract the
GoogleMobileAdsPangleMediation.unitypackage from the zip
file.
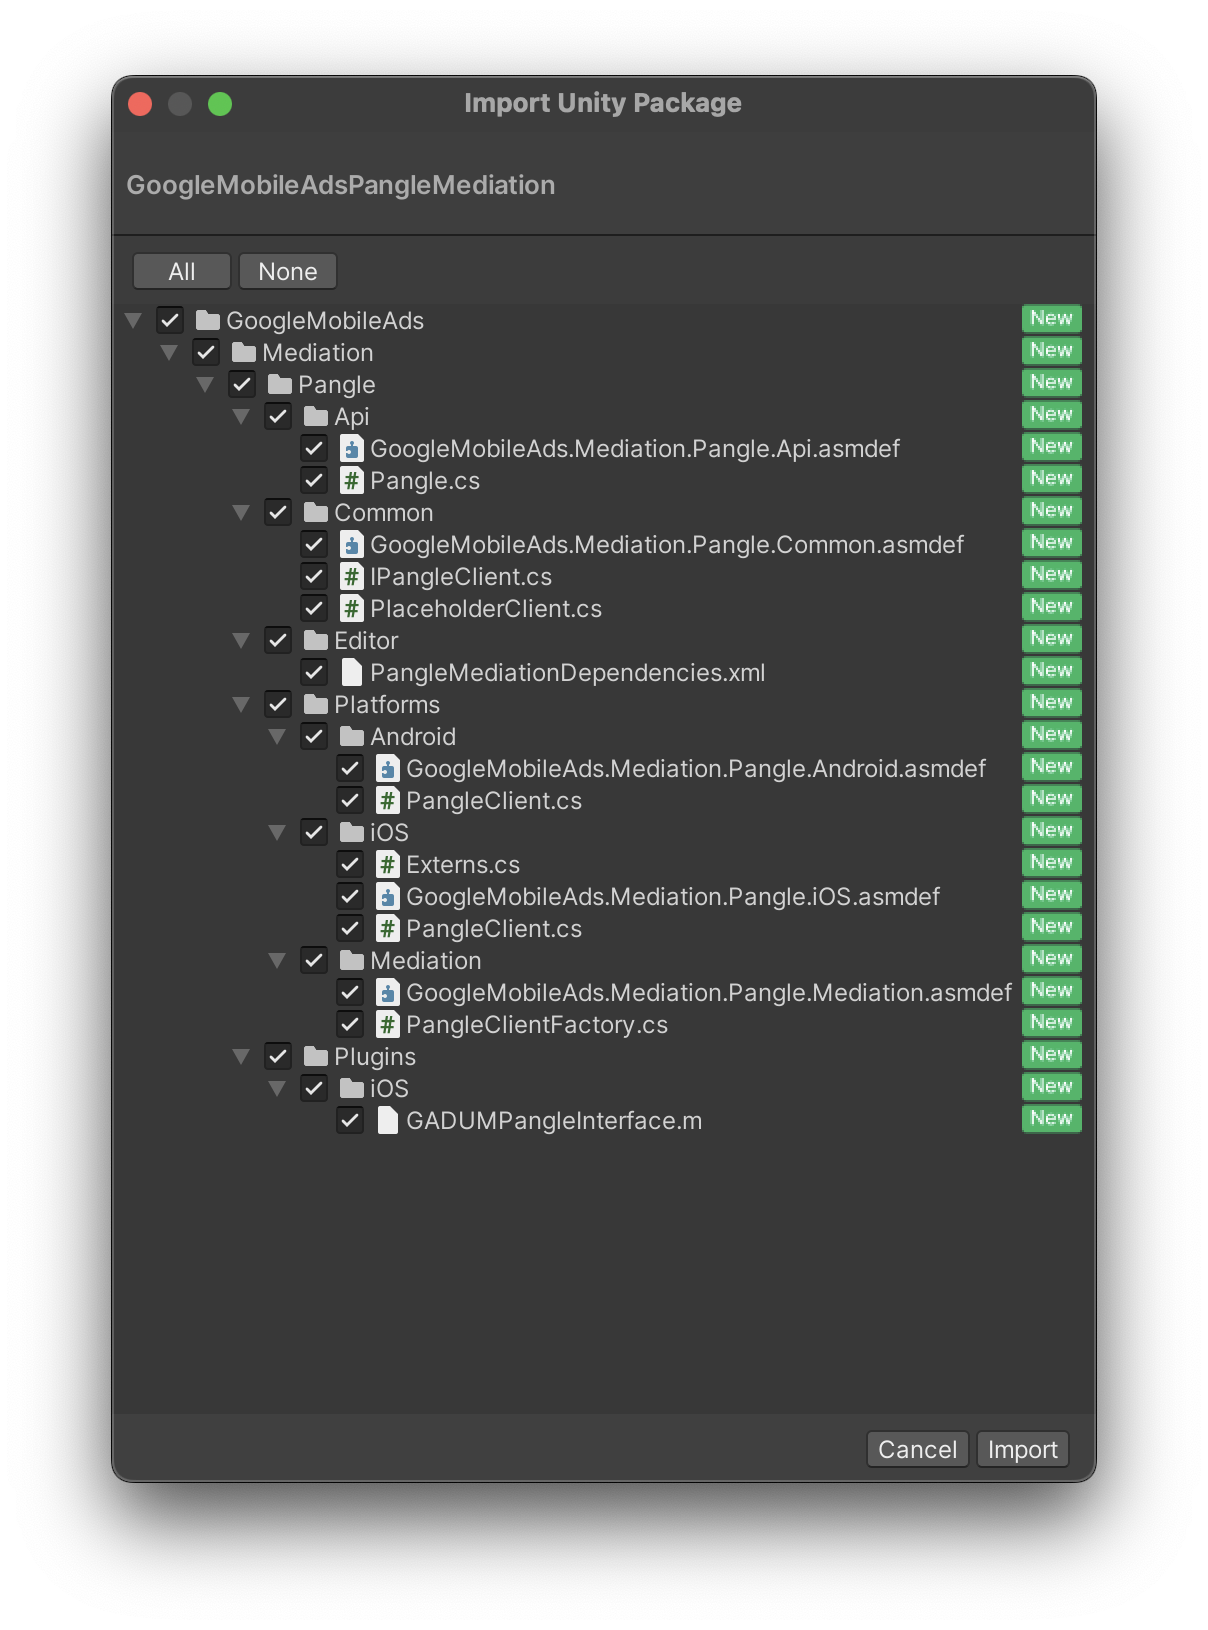
In your Unity project editor, select Assets > Import Package >
Custom Package and find the
GoogleMobileAdsPangleMediation.unitypackage
file you downloaded. Make sure that all the files are selected and click
Import.
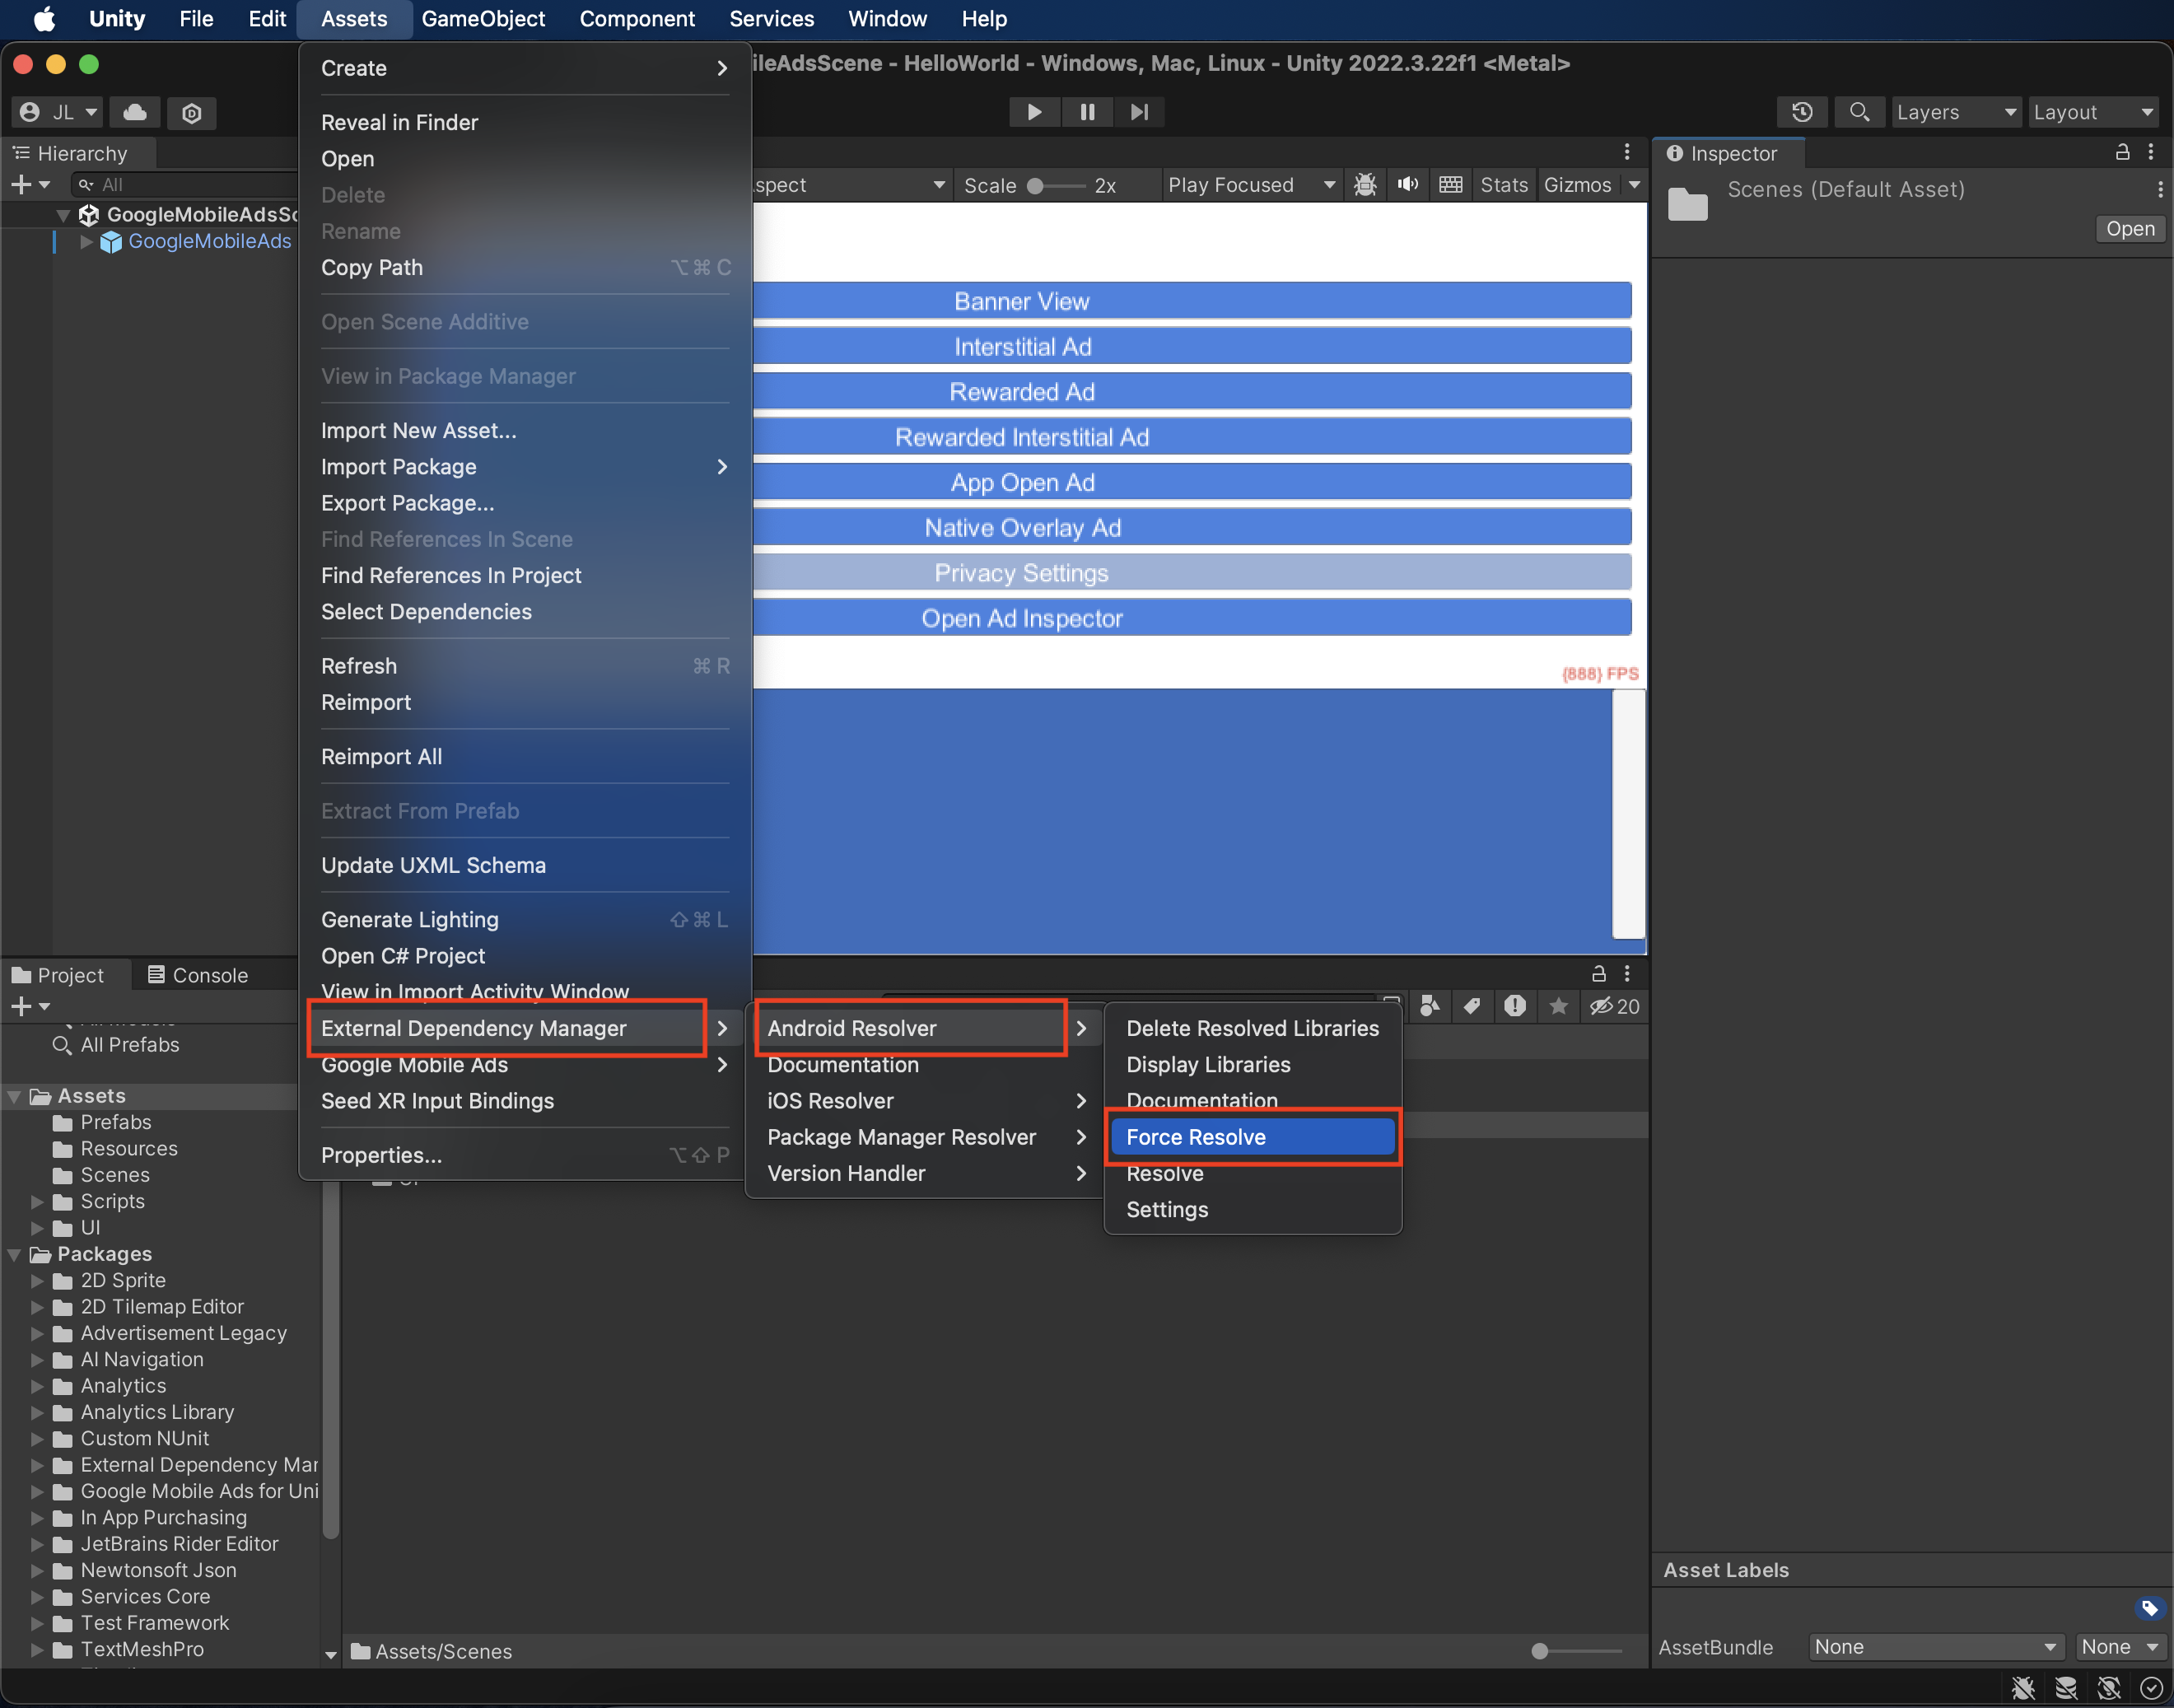
Then, select Assets > External Dependency Manager >
Android Resolver > Force Resolve. The External Dependency Manager
library will perform dependency resolution from scratch and copy the
declared dependencies into the Assets/Plugins/Android directory of your
Unity app.
Step 4: Implement privacy settings on Pangle SDK
EU consent and GDPR
To comply with the Google EU User Consent Policy, you must make certain disclosures to your users in the European Economic Area (EEA), the UK, and Switzerland, and obtain their consent for the use of cookies or other local storage where legally required, and for the collection, sharing, and use of personal data for ads personalization. This policy reflects the requirements of the EU ePrivacy Directive and the General Data Protection Regulation (GDPR). You are responsible for verifying that consent is propagated to each ad source in your mediation chain.
In the Pangle Unity adapter version 5.9.0 and later, Pangle automatically reads GDPR consent set by consent management platforms that support Google's Additional Consent specification, including the UMP SDK.
US states privacy laws
US states privacy laws require giving users the right to opt out of the "sale" of their "personal information" (as the law defines those terms), with the opt-out offered through a prominent "Do Not Sell My Personal Information" link on the "selling" party's homepage. The US states privacy laws compliance guide offers the ability to enable restricted data processing for Google ad serving, but Google is unable to apply this setting to each ad network in your mediation chain. Therefore, you must identify each ad network in your mediation chain that may participate in the sale of personal information and follow guidance from each of those networks to ensure compliance.
The following sample code shows how to pass consent information to the Pangle SDK. Set consent information before you initialize Google Mobile Ads Unity Plugin to ensure they get forwarded properly to the Pangle SDK.
using GoogleMobileAds.Api.Mediation.Pangle;
// ...

Pangle.SetPAConsent(0);
See Pangle's integration guide for more details and the values that can be provided in each method.
Step 5: Add required code
Android
No additional code required for Pangle integration.
iOS
SKAdNetwork integration
Follow Pangle's
documentation to add the
SKAdNetwork identifiers to your project's Info.plist file.
Step 6: Test your implementation
Enable test ads
Make sure you register your test device for AdMob and enable test mode in Pangle UI.
Verify test ads
To verify that you are receiving test ads from Pangle, enable single ad source testing in ad inspector using the Pangle (Waterfall), Pangle US SDK (Bidding), Pangle KR SDK (Bidding), and Pangle ROW SDK (Bidding) ad source(s).
Error codes
If the adapter fails to receive an ad from Pangle, publishers can check the
underlying error from the ad response using ResponseInfo under the following classes:
Android
com.pangle.ads
com.google.ads.mediation.pangle.PangleMediationAdapter
iOS
GADMediationAdapterPangle
Here are the codes and accompanying messages thrown by the Pangle adapter when an ad fails to load:
Android
| Error code | Domain | Reason |
|---|---|---|
| 101 | com.google.ads.mediation.pangle | Invalid server parameters (e.g. Missing app ID or placement ID). |
| 102 | com.google.ads.mediation.pangle | The requested ad size does not match a Pangle supported banner size. |
| 103 | com.google.ads.mediation.pangle | Pangle SDK does not support child users. |
| -1-60000 | com.pangle.ads | Pangle SDK returned an error. See Pangle's documentation for more details. |
iOS
| Error code | Domain | Reason |
|---|---|---|
| 101 | com.google.mediation.pangle | Invalid server parameters (e.g. Missing app ID or placement ID). |
| 102 | com.google.mediation.pangle | The requested ad size does not match a Pangle supported banner size. |
| 104 | com.google.mediation.pangle | Pangle SDK does not support child users. |
| -1-60000 | Sent by Pangle SDK | Pangle SDK returned an error. See Pangle's documentation for more details. |
Pangle Unity Mediation Plugin Changelog
Version 7.2.2 (In progress)
Version 7.2.1
- Supports Pangle Android adapter version 8.3.0.4.0.
- Supports Pangle iOS adapter version 8.3.0.7.0.
- Built and tested with the Google Mobile Ads Unity Plugin version 11.5.0.
Version 7.2.0
- Supports Pangle Android adapter version 8.3.0.3.0.
- Supports Pangle iOS adapter version 8.3.0.6.0.
- Built and tested with the Google Mobile Ads Unity Plugin version 11.5.0.
Version 7.1.1
- Supports Pangle Android adapter version 8.2.0.4.0.
- Supports Pangle iOS adapter version 8.2.1.0.0.
- Built and tested with the Google Mobile Ads Unity Plugin version 11.4.0.
Version 7.1.0
- Supports Pangle Android adapter version 8.2.0.4.0.
- Supports Pangle iOS adapter version 8.2.0.7.0.
- Built and tested with the Google Mobile Ads Unity Plugin version 11.3.0.
Version 7.0.0 (rolled back)
- Supports Pangle Android adapter version 8.1.0.4.0.
- Supports Pangle iOS adapter version 8.2.0.3.0.
- Built and tested with the Google Mobile Ads Unity Plugin version 11.1.0.
Version 6.0.1
- Supports Pangle Android adapter version 8.0.0.5.0.
- Supports Pangle iOS adapter version 7.9.1.1.1.
- Built and tested with the Google Mobile Ads Unity Plugin version 11.1.0.
Version 6.0.0
- Supports Pangle Android adapter version 8.0.0.4.0.
- Supports Pangle iOS adapter version 7.9.1.1.0.
- Built and tested with the Google Mobile Ads Unity Plugin version 11.0.0.
Version 5.9.2
- Supports Pangle Android adapter version 7.9.1.3.0.
- Supports Pangle iOS adapter version 7.9.0.8.0.
- Built and tested with the Google Mobile Ads Unity Plugin version 11.0.0.
Version 5.9.1
- Supports Pangle Android adapter version 7.9.1.2.0.
- Supports Pangle iOS adapter version 7.9.0.6.0.
- Built and tested with the Google Mobile Ads Unity Plugin version 11.0.0.
Version 5.9.0
- Deprecated the
SetGDPRConsent()method from thePangleclass. The Pangle SDK now automatically handles consent.- This method is now a no-op and will be removed in a future release.
- Supports Pangle Android adapter version 7.9.1.1.0.
- Supports Pangle iOS adapter version 7.9.0.6.0.
- Built and tested with the Google Mobile Ads Unity Plugin version 11.0.0.
Version 5.8.5
- Supports Pangle Android adapter version 7.8.5.9.0.
- Supports Pangle iOS adapter version 7.8.5.8.0.
- Built and tested with the Google Mobile Ads Unity Plugin version 10.7.0.
Version 5.8.4
- Supports Pangle Android adapter version 7.8.5.8.0.
- Supports Pangle iOS adapter version 7.8.5.6.0.
- Built and tested with the Google Mobile Ads Unity Plugin version 10.7.0.
Version 5.8.3
- Supports Pangle Android adapter version 7.8.5.2.0.
- Supports Pangle iOS adapter version 7.8.5.5.0.
- Built and tested with the Google Mobile Ads Unity Plugin version 10.6.0.
Version 5.8.2
- Supports Pangle Android adapter version 7.8.0.8.0.
- Supports Pangle iOS adapter version 7.8.0.6.0.
- Built and tested with the Google Mobile Ads Unity Plugin version 10.6.0.
Version 5.8.1
- Supports Pangle Android adapter version 7.8.0.8.0.
- Supports Pangle iOS adapter version 7.8.0.5.0.
- Built and tested with the Google Mobile Ads Unity Plugin version 10.6.0.
Version 5.8.0
- Supports Pangle Android adapter version 7.8.0.7.0.
- Supports Pangle iOS adapter version 7.8.0.3.0.
- Built and tested with the Google Mobile Ads Unity Plugin version 10.6.0.
Version 5.7.1
- Supports Pangle Android adapter version 7.7.0.2.0.
- Supports Pangle iOS adapter version 7.7.0.7.0.
- Built and tested with the Google Mobile Ads Unity Plugin version 10.6.0.
Version 5.7.0
- Supports Pangle Android adapter version 7.7.0.2.0.
- Supports Pangle iOS adapter version 7.7.0.5.0.
- Built and tested with the Google Mobile Ads Unity Plugin version 10.6.0.
Version 5.6.0
- Supports Pangle Android adapter version 7.6.0.5.0.
- Supports Pangle iOS adapter version 7.7.0.4.0.
- Built and tested with the Google Mobile Ads Unity Plugin version 10.5.0.
Version 5.5.3
- Supports Pangle Android adapter version 7.6.0.4.1.
- Supports Pangle iOS adapter version 7.6.0.6.0.
- Built and tested with the Google Mobile Ads Unity Plugin version 10.5.0.
Version 5.5.2
- Supports Pangle Android adapter version 7.6.0.4.0.
- Supports Pangle iOS adapter version 7.6.0.6.0.
- Built and tested with the Google Mobile Ads Unity Plugin version 10.5.0.
Version 5.5.1
- Supports Pangle Android adapter version 7.6.0.3.0.
- Supports Pangle iOS adapter version 7.6.0.5.0.
- Built and tested with the Google Mobile Ads Unity Plugin version 10.5.0.
Version 5.5.0
- Supports Pangle Android adapter version 7.6.0.2.0.
- Supports Pangle iOS adapter version 7.6.0.4.0.
- Built and tested with the Google Mobile Ads Unity Plugin version 10.4.2.
Version 5.4.0
- Supports Pangle Android adapter version 7.5.0.3.0.
- Supports Pangle iOS adapter version 7.5.0.7.0.
- Built and tested with the Google Mobile Ads Unity Plugin version 10.4.2.
Version 5.3.0
- Supports Pangle Android adapter version 7.5.0.2.0.
- Supports Pangle iOS adapter version 7.4.1.1.0.
- Built and tested with the Google Mobile Ads Unity Plugin version 10.4.1.
Version 5.2.2
- Supports Pangle Android adapter version 7.3.0.5.0.
- Supports Pangle iOS adapter version 7.4.1.0.0.
- Built and tested with the Google Mobile Ads Unity Plugin version 10.3.0.
Version 5.2.1
- Supports Pangle Android adapter version 7.3.0.4.0.
- Supports Pangle iOS adapter version 7.4.0.9.0.
- Built and tested with the Google Mobile Ads Unity Plugin version 10.3.0.
Version 5.2.0
- Supports Pangle Android adapter version 7.3.0.3.0.
- Supports Pangle iOS adapter version 7.4.0.8.0.
- Built and tested with the Google Mobile Ads Unity Plugin version 10.3.0.
Version 5.1.1
- Supports Pangle Android adapter version 7.2.0.6.0.
- Supports Pangle iOS adapter version 7.2.0.5.0.
- Built and tested with the Google Mobile Ads Unity Plugin version 10.2.0.
Version 5.1.0
- Supports Pangle Android adapter version 7.2.0.4.0.
- Supports Pangle iOS adapter version 7.2.0.4.0.
- Built and tested with the Google Mobile Ads Unity Plugin version 10.2.0.
Version 5.0.0
- Replaced
SetDoNotSell()withSetPAConsent()from thePangleclass.- The value passed in for
SetDoNotSell()may not the be the right value forSetPAConsent(). Please ensure the right value is passed in toSetPAConsent(). Refer to https://www.pangleglobal.com/integration/android-initialize-pangle-sdk for what values can be set for PA consent.
- The value passed in for
- Supports Pangle Android adapter version 7.1.0.8.0.
- Supports Pangle iOS adapter version 7.1.1.1.0.
- Built and tested with the Google Mobile Ads Unity Plugin version 10.1.0.
Version 4.6.2
- Supports Pangle Android adapter version 6.5.0.9.0.
- Supports Pangle iOS adapter version 6.5.0.9.0.
- Built and tested with the Google Mobile Ads Unity Plugin version 10.1.0.
Version 4.6.1
- Supports Pangle Android adapter version 6.5.0.8.0.
- Supports Pangle iOS adapter version 6.5.0.9.0.
- Built and tested with the Google Mobile Ads Unity Plugin version 10.0.0.
Version 4.6.0
- Supports Pangle Android adapter version 6.5.0.6.0.
- Supports Pangle iOS adapter version 6.5.0.9.0.
- Built and tested with the Google Mobile Ads Unity Plugin version 10.0.0.
Version 4.5.4
- Supports Pangle Android adapter version 6.4.0.6.0.
- Supports Pangle iOS adapter version 6.4.1.1.0.
- Built and tested with the Google Mobile Ads Unity Plugin version 9.5.0.
Version 4.5.3
- Supports Pangle Android adapter version 6.4.0.5.0.
- Supports Pangle iOS adapter version 6.4.1.0.0.
- Built and tested with the Google Mobile Ads Unity Plugin version 9.5.0.
Version 4.5.2
- Supports Pangle Android adapter version 6.4.0.4.0.
- Supports Pangle iOS adapter version 6.4.0.8.0.
- Built and tested with the Google Mobile Ads Unity Plugin version 9.5.0.
Version 4.5.1
- Supports Pangle Android adapter version 6.4.0.3.0.
- Supports Pangle iOS adapter version 6.4.0.7.0.
- Built and tested with the Google Mobile Ads Unity Plugin version 9.5.0.
Version 4.5.0
- Supports Pangle Android adapter version 6.4.0.2.0.
- Supports Pangle iOS adapter version 6.4.0.6.0.
- Built and tested with the Google Mobile Ads Unity Plugin version 9.5.0.
Version 4.4.2
- Supports Pangle Android adapter version 6.3.0.4.0.
- Supports Pangle iOS adapter version 6.3.1.0.0.
- Built and tested with the Google Mobile Ads Unity Plugin version 9.4.0.
Version 4.4.1
- Supports Pangle Android adapter version 6.3.0.4.0.
- Supports Pangle iOS adapter version 6.3.0.8.0.
- Built and tested with the Google Mobile Ads Unity Plugin version 9.3.0.
Version 4.4.0
- Supports Pangle Android adapter version 6.3.0.2.0.
- Supports Pangle iOS adapter version 6.3.0.6.0.
- Built and tested with the Google Mobile Ads Unity Plugin version 9.3.0.
Version 4.3.3
- Supports Pangle Android adapter version 6.2.0.7.0.
- Supports Pangle iOS adapter version 6.2.0.9.0.
- Built and tested with the Google Mobile Ads Unity Plugin version 9.2.1.
Version 4.3.2
- Supports Pangle Android adapter version 6.2.0.6.0.
- Supports Pangle iOS adapter version 6.2.0.8.0.
- Built and tested with the Google Mobile Ads Unity Plugin version 9.2.0.
Version 4.3.1
- Supports Pangle Android adapter version 6.2.0.5.0.
- Supports Pangle iOS adapter version 6.2.0.7.0.
- Built and tested with the Google Mobile Ads Unity Plugin version 9.2.0.
Version 4.3.0
- Supports Pangle Android adapter version 6.2.0.4.0.
- Supports Pangle iOS adapter version 6.2.0.5.0.
- Built and tested with the Google Mobile Ads Unity Plugin version 9.2.0.
Version 4.2.1
- Supports Pangle Android adapter version 6.1.0.7.0.
- Supports Pangle iOS adapter version 6.1.0.6.0.
- Built and tested with the Google Mobile Ads Unity Plugin version 9.2.0.
Version 4.2.0
- Renamed
DummyClienttoPlaceholderClient. - Supports Pangle Android adapter version 6.1.0.6.0.
- Supports Pangle iOS adapter version 6.1.0.5.0.
- Built and tested with the Google Mobile Ads Unity Plugin version 9.2.0.
Version 4.1.0
- Supports Pangle Android adapter version 6.0.0.8.0.
- Supports Pangle iOS adapter version 6.1.0.5.0.
- Built and tested with the Google Mobile Ads Unity Plugin version 9.1.1.
Version 4.0.1
- Supports Pangle Android adapter version 6.0.0.5.0.
- Supports Pangle iOS adapter version 6.0.0.6.0.
- Built and tested with the Google Mobile Ads Unity Plugin version 9.1.0.
Version 4.0.0
- Supports Pangle Android adapter version 6.0.0.5.0.
- Supports Pangle iOS adapter version 6.0.0.5.0.
- Built and tested with the Google Mobile Ads Unity Plugin version 9.1.0.
Version 3.0.0
- Supports Pangle Android adapter version 6.0.0.3.0.
- Supports Pangle iOS adapter version 5.9.0.9.0.
- Built and tested with the Google Mobile Ads Unity Plugin version 9.1.0.
Version 2.8.1
- Supports Pangle Android adapter version 5.9.0.6.0.
- Supports Pangle iOS adapter version 5.9.0.8.0.
- Built and tested with the Google Mobile Ads Unity Plugin version 9.1.0.
Version 2.8.0
- Supports Pangle Android adapter version 5.9.0.4.0.
- Supports Pangle iOS adapter version 5.9.0.7.0.
- Built and tested with the Google Mobile Ads Unity Plugin version 9.1.0.
Version 2.7.0
- Supports Pangle Android adapter version 5.9.0.2.0.
- Supports Pangle iOS adapter version 5.8.0.8.0.
- Built and tested with the Google Mobile Ads Unity Plugin version 9.1.0.
Version 2.6.0
- Supports Pangle Android adapter version 5.8.0.9.0.
- Supports Pangle iOS adapter version 5.8.0.8.0.
- Built and tested with the Google Mobile Ads Unity Plugin version 9.0.0.
Version 2.5.0
- Supports Pangle Android adapter version 5.7.0.1.0.
- Supports Pangle iOS adapter version 5.7.0.7.0.
- Built and tested with the Google Mobile Ads Unity Plugin version 8.6.0.
Version 2.4.0
- Supports Pangle Android adapter version 5.5.0.9.0.
- Supports Pangle iOS adapter version 5.5.0.9.0.
- Built and tested with the Google Mobile Ads Unity Plugin version 8.6.0.
Version 2.3.0
- Supports Pangle Android adapter version 5.3.0.6.0.
- Supports Pangle iOS adapter version 5.3.1.2.0.
- Built and tested with the Google Mobile Ads Unity Plugin version 8.4.1.
Version 2.2.0
- Supports Pangle Android adapter version 5.2.0.6.0.
- Supports Pangle iOS adapter version 5.2.0.9.0.
- Built and tested with the Google Mobile Ads Unity Plugin version 8.3.0.
Version 2.1.0
- Supports Pangle Android adapter version 5.1.0.9.0.
- Supports Pangle iOS adapter version 5.1.1.0.0.
- Built and tested with the Google Mobile Ads Unity Plugin version 8.1.0.
Version 2.0.0
- Moved adapter content to
GoogleMobileAds/Mediation/Pangle/. - Refactored adapter namespace to use
GoogleMobileAds.Mediation.Pangle. - Supports Pangle Android adapter version 5.0.0.7.0.
- Supports Pangle iOS adapter version 5.0.0.6.0.
- Built and tested with the Google Mobile Ads Unity Plugin version 7.4.1.
Version 1.5.1
- Supports Pangle Android adapter version 4.9.0.7.0.
- Supports Pangle iOS adapter version 4.9.0.8.0.
- Built and tested with the Google Mobile Ads Unity Plugin version 7.4.0.
Version 1.5.0
- Supports Pangle Android adapter version 4.9.0.6.0.
- Supports Pangle iOS adapter version 4.9.0.7.0.
- Built and tested with the Google Mobile Ads Unity Plugin version 7.3.1.
Version 1.4.0
- Supports Pangle Android adapter version 4.8.1.0.0.
- Supports Pangle iOS adapter version 4.8.1.0.0.
- Built and tested with the Google Mobile Ads Unity Plugin version 7.3.1.
Version 1.3.1
- Supports Pangle Android adapter version 4.7.0.6.0.
- Supports Pangle iOS adapter version 4.7.0.6.0.
- Built and tested with the Google Mobile Ads Unity Plugin version 7.2.0.
Version 1.3.0
- Renamed the following methods in the
Pangleclass:SetGDPR()->SetGDPRConsent()SetCCPA()->SetDoNotSell()
- Supports Pangle Android adapter version 4.7.0.5.0.
- Supports Pangle iOS adapter version 4.7.0.5.0.
- Built and tested with the Google Mobile Ads Unity Plugin version 7.2.0.
Version 1.2.0
- Supports Pangle Android adapter version 4.5.0.6.1.
- Supports Pangle iOS adapter version 4.5.2.8.0.
- Built and tested with the Google Mobile Ads Unity Plugin version 7.1.0.
Version 1.1.0
- Supports Pangle Android adapter version 4.5.0.3.0.
- Supports Pangle iOS adapter version 4.5.1.3.0.
- Built and tested with the Google Mobile Ads Unity Plugin version 7.0.2.
Version 1.0.0
- Initial release!
- Supports Pangle Android adapter version 4.3.0.8.0.
- Supports Pangle iOS adapter version 4.3.0.5.0.
- Built and tested with the Google Mobile Ads Unity Plugin version 7.0.0.