کیت توسعه نرمافزار (SDK) پلتفرم پیامرسانی کاربر گوگل (UMP) ابزاری برای حفظ حریم خصوصی و پیامرسانی است که به شما در مدیریت گزینههای حریم خصوصی کمک میکند. برای اطلاعات بیشتر، به «درباره حریم خصوصی و پیامرسانی» مراجعه کنید.
ایجاد نوع پیام
پیامهای کاربری را با یکی از انواع پیامهای کاربری موجود در زیر برگه حریم خصوصی و پیامرسانی حساب مدیریت تبلیغات خود ایجاد کنید. UMP SDK تلاش میکند یک پیام حریم خصوصی ایجاد شده از شناسه برنامه مدیریت تبلیغات تنظیم شده در پروژه شما را نمایش دهد.
برای جزئیات بیشتر، به «درباره حریم خصوصی و پیامرسانی» مراجعه کنید.
SDK را وارد کنید
پودر کاکائو (ترجیحاً)
سادهترین راه برای وارد کردن SDK به یک پروژه iOS استفاده از CocoaPods است. Podfile پروژه خود را باز کنید و این خط را به target برنامه خود اضافه کنید:
pod 'GoogleUserMessagingPlatform'
سپس، دستور زیر را اجرا کنید:
pod install --repo-updateاگر در CocoaPods تازهکار هستید، برای جزئیات بیشتر در مورد نحوه ایجاد و استفاده از Podfiles به بخش «استفاده از CocoaPods» مراجعه کنید.
مدیر بسته سوئیفت
UMP SDK همچنین از Swift Package Manager پشتیبانی میکند. برای وارد کردن بسته Swift، این مراحل را دنبال کنید.
در Xcode، با رفتن به مسیر File > Add Packages...، بستهی سویفت UMP SDK را نصب کنید.
در اعلانی که ظاهر میشود، مخزن گیتهاب UMP SDK Swift Package را جستجو کنید:
https://github.com/googleads/swift-package-manager-google-user-messaging-platform.gitنسخه UMP SDK Swift Package مورد نظر خود را انتخاب کنید. برای پروژههای جدید، توصیه میکنیم از Up to Next Major Version استفاده کنید.
سپس Xcode وابستگیهای بسته شما را حل کرده و آنها را در پسزمینه دانلود میکند. برای جزئیات بیشتر در مورد نحوه اضافه کردن وابستگیهای بسته، به مقاله اپل مراجعه کنید.
دانلود دستی
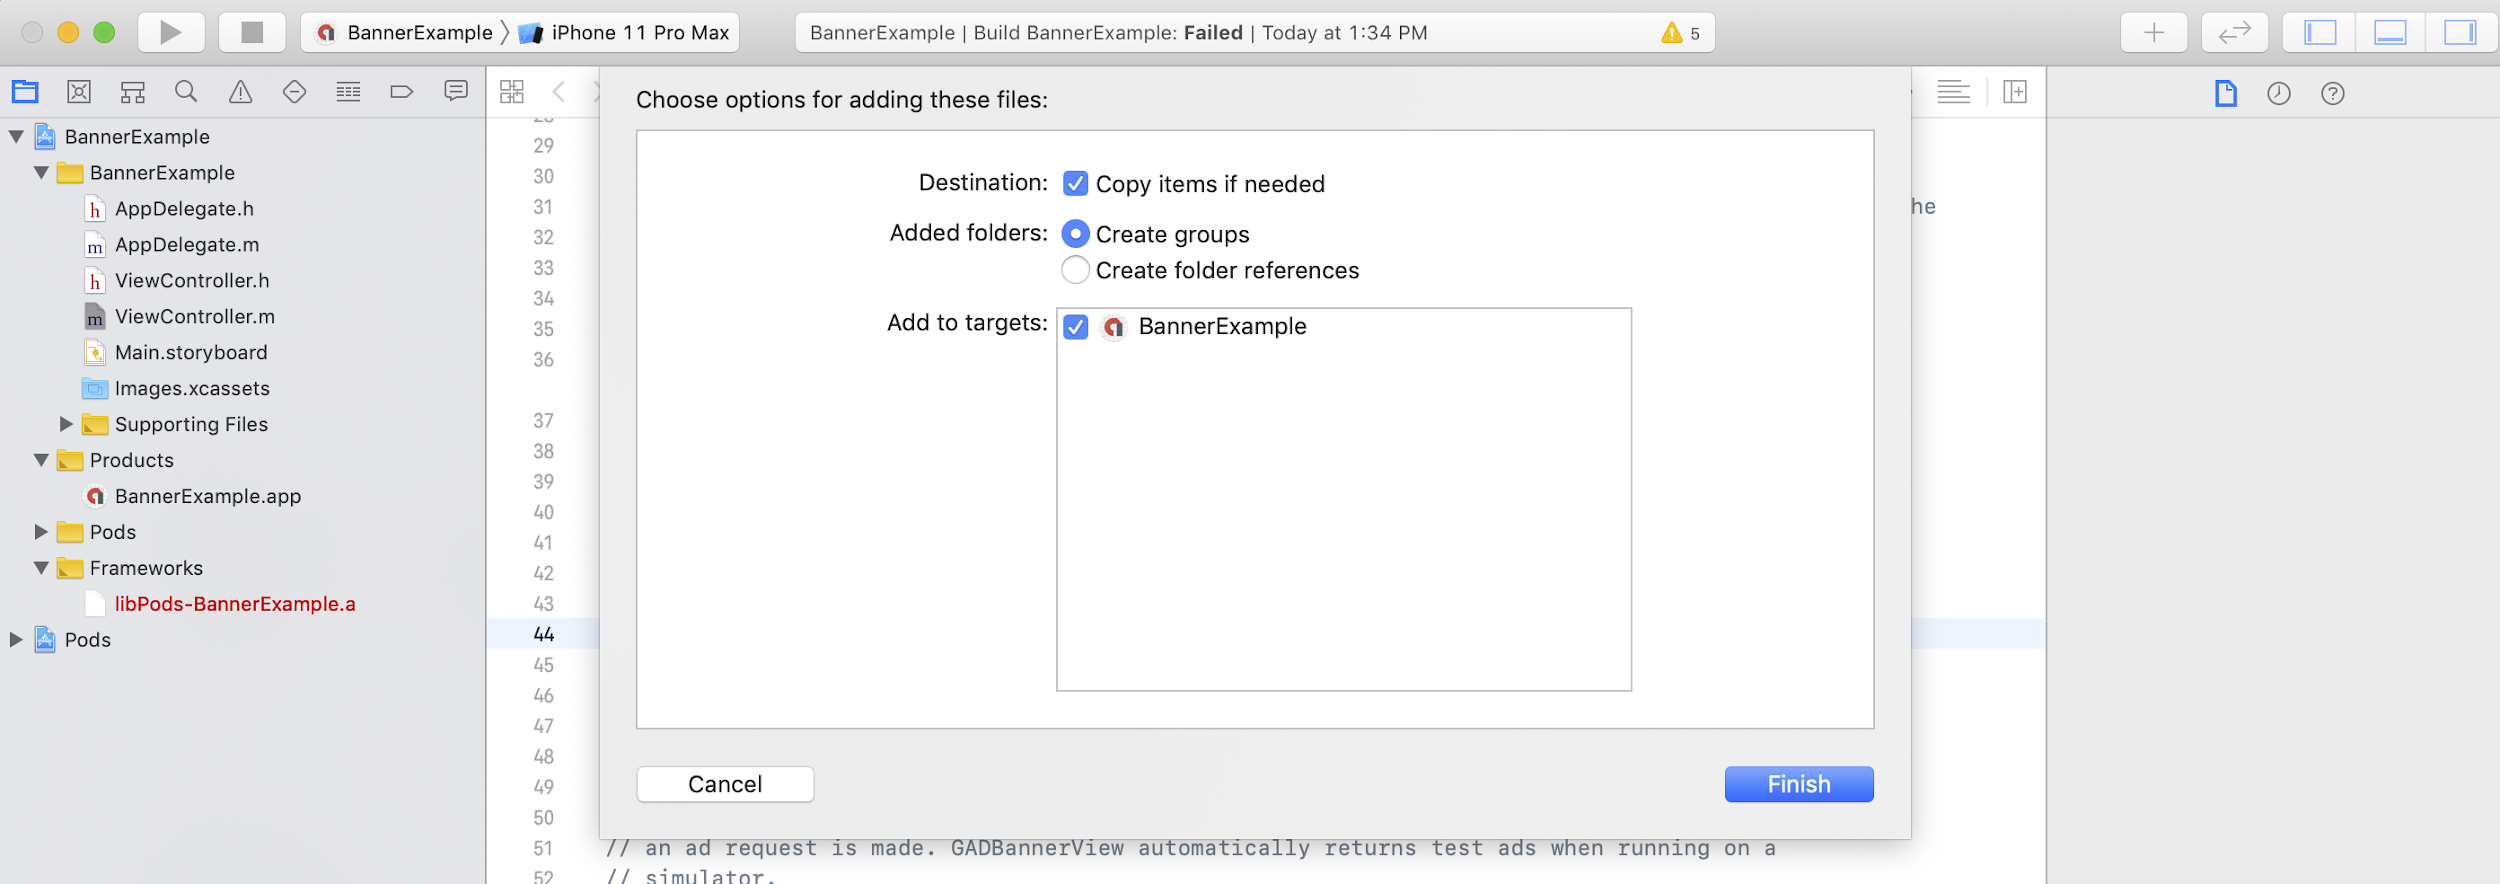
راه دیگر برای وارد کردن SDK، انجام آن به صورت دستی است.
سپس، فریمورک را به پروژه Xcode خود بکشید و در صورت نیاز، مطمئن شوید که گزینه Copy items را انتخاب کردهاید.
سپس میتوانید با استفاده از دستور زیر، چارچوب را در هر فایلی که نیاز دارید، وارد کنید:
سویفت
import UserMessagingPlatform
هدف-سی
#include <UserMessagingPlatform/UserMessagingPlatform.h>
شناسه برنامه را اضافه کنید
میتوانید شناسه برنامه خود را در رابط کاربری مدیریت تبلیغات (Ad Manager UI) پیدا کنید. شناسه را با استفاده از قطعه کد زیر به Info.plist خود اضافه کنید:
<key>GADApplicationIdentifier</key>
<string>ca-app-pub-xxxxxxxxxxxxxxxx~yyyyyyyyyy</string>
دریافت اطلاعات رضایت کاربر
شما باید در هر بار اجرای برنامه، با استفاده requestConsentInfoUpdate(with:completionHandler:) درخواست بهروزرسانی اطلاعات رضایت کاربر را بدهید. این درخواست موارد زیر را بررسی میکند:
- آیا رضایت لازم است ؟ برای مثال، آیا برای اولین بار رضایت لازم است یا تصمیم رضایت قبلی منقضی شده است.
- اینکه آیا به نقطه ورود گزینههای حریم خصوصی نیاز است یا خیر . برخی از پیامهای حریم خصوصی از برنامهها میخواهند که به کاربران اجازه دهند گزینههای حریم خصوصی خود را در هر زمانی تغییر دهند.
سویفت
// Requesting an update to consent information should be called on every app launch.
ConsentInformation.shared.requestConsentInfoUpdate(with: parameters) {
requestConsentError in
// ...
}
سویفتیوآی
// Requesting an update to consent information should be called on every app launch.
ConsentInformation.shared.requestConsentInfoUpdate(with: parameters) {
requestConsentError in
// ...
}
هدف-سی
// Requesting an update to consent information should be called on every app launch.
[UMPConsentInformation.sharedInstance
requestConsentInfoUpdateWithParameters:parameters
completionHandler:^(NSError *_Nullable requestConsentError) {
// ...
}];
فرم پیام حریم خصوصی را بارگیری و ارائه دهید
پس از دریافت آخرین وضعیت رضایت، تابع loadAndPresentIfRequired(from:) را برای بارگذاری هرگونه فرم مورد نیاز برای جمعآوری رضایت کاربر فراخوانی کنید. پس از بارگذاری، فرمها بلافاصله نمایش داده میشوند.
سویفت
try await ConsentForm.loadAndPresentIfRequired(from: viewController)
سویفتیوآی
try await ConsentForm.loadAndPresentIfRequired(from: nil)
هدف-سی
[UMPConsentForm
loadAndPresentIfRequiredFromViewController:viewController
completionHandler:^(NSError *_Nullable loadAndPresentError) {
// Consent gathering process is complete.
}];
گزینههای حریم خصوصی
برخی از فرمهای پیامهای حریم خصوصی از یک نقطه ورود گزینههای حریم خصوصی ارائه شده توسط ناشر ارائه میشوند و به کاربران اجازه میدهند گزینههای حریم خصوصی خود را در هر زمانی مدیریت کنند. برای کسب اطلاعات بیشتر در مورد اینکه کاربران شما در نقطه ورود گزینههای حریم خصوصی چه پیامی را میبینند، به انواع پیامهای موجود برای کاربر مراجعه کنید.
بررسی کنید که آیا به نقطه ورود گزینههای حریم خصوصی نیاز است یا خیر
پس از فراخوانی requestConsentInfoUpdate(with:completionHandler:) ، وضعیت UMPConsentInformation.sharedInstance.privacyOptionsRequirementStatus را بررسی کنید تا مشخص شود که آیا نقطه ورود گزینههای حریم خصوصی برای برنامه شما مورد نیاز است یا خیر. اگر نقطه ورود مورد نیاز است، یک عنصر رابط کاربری قابل مشاهده و قابل تعامل به برنامه خود اضافه کنید که فرم گزینههای حریم خصوصی را ارائه دهد. اگر نقطه ورود حریم خصوصی مورد نیاز نیست، عنصر رابط کاربری خود را طوری پیکربندی کنید که قابل مشاهده و قابل تعامل نباشد.
سویفت
var isPrivacyOptionsRequired: Bool {
return ConsentInformation.shared.privacyOptionsRequirementStatus == .required
}
هدف-سی
- (BOOL)isPrivacyOptionsRequired {
return UMPConsentInformation.sharedInstance.privacyOptionsRequirementStatus ==
UMPPrivacyOptionsRequirementStatusRequired;
}
برای فهرست کامل وضعیتهای الزامات گزینههای حریم خصوصی، به UMPPrivacyOptionsRequirementStatus مراجعه کنید.
فرم گزینههای حریم خصوصی را ارائه دهید
وقتی کاربر با عنصر شما تعامل میکند، فرم گزینههای حریم خصوصی را نمایش دهید:
سویفت
try await ConsentForm.presentPrivacyOptionsForm(from: viewController)
سویفتیوآی
try await ConsentForm.presentPrivacyOptionsForm(from: nil)
هدف-سی
[UMPConsentForm presentPrivacyOptionsFormFromViewController:viewController
completionHandler:completionHandler];
درخواست تبلیغات با رضایت کاربر
قبل از درخواست تبلیغات، از UMPConsentInformation.sharedInstance.canRequestAds برای بررسی اینکه آیا رضایت کاربر را دریافت کردهاید یا خیر، استفاده کنید:
سویفت
ConsentInformation.shared.canRequestAds
هدف-سی
UMPConsentInformation.sharedInstance.canRequestAds;
مکانهای زیر برای بررسی اینکه آیا میتوانید ضمن جمعآوری رضایت، درخواست تبلیغات دهید، فهرست شدهاند:
- پس از اینکه UMP SDK در جلسه فعلی رضایت را جمع آوری کرد.
- بلافاصله پس از اینکه
requestConsentInfoUpdate(with:completionHandler:)را فراخوانی کردید. ممکن است UMP SDK در جلسه قبلی برنامه، رضایت را دریافت کرده باشد.
اگر در طول فرآیند جمعآوری رضایت خطایی رخ داد، بررسی کنید که آیا میتوانید درخواست تبلیغات دهید یا خیر. UMP SDK از وضعیت رضایت جلسه قبلی برنامه استفاده میکند.
جلوگیری از کارهای تکراری درخواست تبلیغات
همانطور که UMPConsentInformation.sharedInstance.canRequestAds پس از جمعآوری رضایت و پس از فراخوانی requestConsentInfoUpdate(with:completionHandler:) بررسی میکنید، مطمئن شوید که منطق شما از درخواستهای تبلیغاتی تکراری که ممکن است منجر به برگرداندن true در هر دو بررسی شوند، جلوگیری میکند. برای مثال، با یک متغیر بولی.
آزمایش
اگر میخواهید در حین توسعه، ادغام را در برنامه خود آزمایش کنید، این مراحل را برای ثبت برنامهای دستگاه آزمایشی خود دنبال کنید. قبل از انتشار برنامه، حتماً کدی را که این شناسههای دستگاه آزمایشی را تنظیم میکند، حذف کنید.
- فراخوانی
requestConsentInfoUpdate(with:completionHandler:). خروجی گزارش را برای پیامی مشابه مثال زیر بررسی کنید، که شناسه دستگاه شما و نحوه اضافه کردن آن به عنوان یک دستگاه آزمایشی را نشان میدهد:
<UMP SDK>To enable debug mode for this device, set: UMPDebugSettings.testDeviceIdentifiers = @[2077ef9a63d2b398840261c8221a0c9b]شناسه دستگاه آزمایشی خود را در کلیپبورد کپی کنید.
کد خود را طوری تغییر دهید که
UMPDebugSettings().testDeviceIdentifiersفراخوانی کند و لیستی از شناسههای دستگاههای آزمایشی شما را ارسال کند.سویفت
let parameters = RequestParameters()
let debugSettings = DebugSettings()

debugSettings.testDeviceIdentifiers = ["TEST-DEVICE-HASHED-ID"]
parameters.debugSettings = debugSettings

// Include the UMPRequestParameters in your consent request.
ConsentInformation.shared.requestConsentInfoUpdate(
    with: parameters,
    completionHandler: { error in
      // ...
    })
هدف-سی
UMPRequestParameters *parameters = [[UMPRequestParameters alloc] init];
UMPDebugSettings *debugSettings = [[UMPDebugSettings alloc] init];

debugSettings.testDeviceIdentifiers = @[ @"TEST-DEVICE-HASHED-ID" ];
parameters.debugSettings = debugSettings;

// Include the UMPRequestParameters in your consent request.
[UMPConsentInformation.sharedInstance
    requestConsentInfoUpdateWithParameters:parameters
                        completionHandler:^(NSError *_Nullable error){
                          // ...
}];
یک جغرافیا را تحمیل کنید
کیت توسعه نرمافزار UMP روشی را برای آزمایش رفتار برنامه شما فراهم میکند، گویی دستگاه در مناطق مختلفی مانند منطقه اقتصادی اروپا (EEA)، بریتانیا (UK) و سوئیس با استفاده از geography قرار دارد. توجه داشته باشید که تنظیمات اشکالزدایی فقط روی دستگاههای آزمایشی کار میکنند.
سویفت
let parameters = RequestParameters()
let debugSettings = DebugSettings()

debugSettings.testDeviceIdentifiers = ["TEST-DEVICE-HASHED-ID"]
debugSettings.geography = .EEA
parameters.debugSettings = debugSettings

// Include the UMPRequestParameters in your consent request.
ConsentInformation.shared.requestConsentInfoUpdate(
    with: parameters,
    completionHandler: { error in
      // ...
    })
هدف-سی
UMPRequestParameters *parameters = [[UMPRequestParameters alloc] init];
UMPDebugSettings *debugSettings = [[UMPDebugSettings alloc] init];

debugSettings.testDeviceIdentifiers = @[ @"TEST-DEVICE-HASHED-ID" ];
debugSettings.geography = UMPDebugGeographyEEA;
parameters.debugSettings = debugSettings;

// Include the UMPRequestParameters in your consent request.
[UMPConsentInformation.sharedInstance
    requestConsentInfoUpdateWithParameters:parameters
                         completionHandler:^(NSError *_Nullable error){
                           // ...
}];
تنظیم مجدد وضعیت رضایت
هنگام آزمایش برنامه خود با UMP SDK، ممکن است تنظیم مجدد وضعیت SDK برای شبیهسازی اولین تجربه نصب کاربر مفید باشد. SDK متد reset را برای انجام این کار ارائه میدهد.
سویفت
ConsentInformation.shared.reset()
هدف-سی
[UMPConsentInformation.sharedInstance reset];
مثالها در گیتهاب
یک مثال کامل از یکپارچهسازی UMP SDK که در این صفحه پوشش داده شده است را ببینید.