
这是 Google 课堂插件演练系列中的第六篇演练。
在此演练中,您将修改上一步演练中的示例,以生成评分 activity 类型附件。您还可以通过编程方式将成绩传递回 Google 课堂,该成绩会以草稿成绩的形式显示在教师的成绩册中。
本演练与本系列中的其他演练略有不同,因为其中介绍了两种将及格分数返回给 Google 课堂的方法。这两者对开发者和用户体验都有不同的影响;在设计 Google 课堂插件时,请同时考虑这两者。如需详细了解实现选项,请参阅我们的与附件互动指南页面。
请注意,API 中的评分功能是可选的。它们可与任何活动类型的附件搭配使用。
在本演示中,您将完成以下操作:
- 修改之前针对 Classroom API 的附件创建请求,以同时设置附件的成绩分母。
- 以编程方式对学生提交的作业进行评分,并设置附件的成绩分子。
- 实现两种方法,以使用已登录或离线的教师凭据将提交的作业的成绩传递给 Google 课堂。
完成后,在触发回传行为后,成绩会显示在 Google 课堂成绩册中。确切的发生时间取决于实现方法。
在此示例中,我们将沿用上一个演练中的 activity,其中向学生展示了一张著名地标的图片,并提示学生输入地标的名称。如果学生输入了正确的名称,则为附件分配满分;否则,分配零分。
了解 Classroom Add-ons API 的评分功能
插件可以为附件设置成绩分子和成绩分母。这些值分别使用 API 中的 pointsEarned 和 maxPoints 值进行设置。如果已设置 maxPoints 值,则 Classroom 界面中的附件卡片会显示该值。
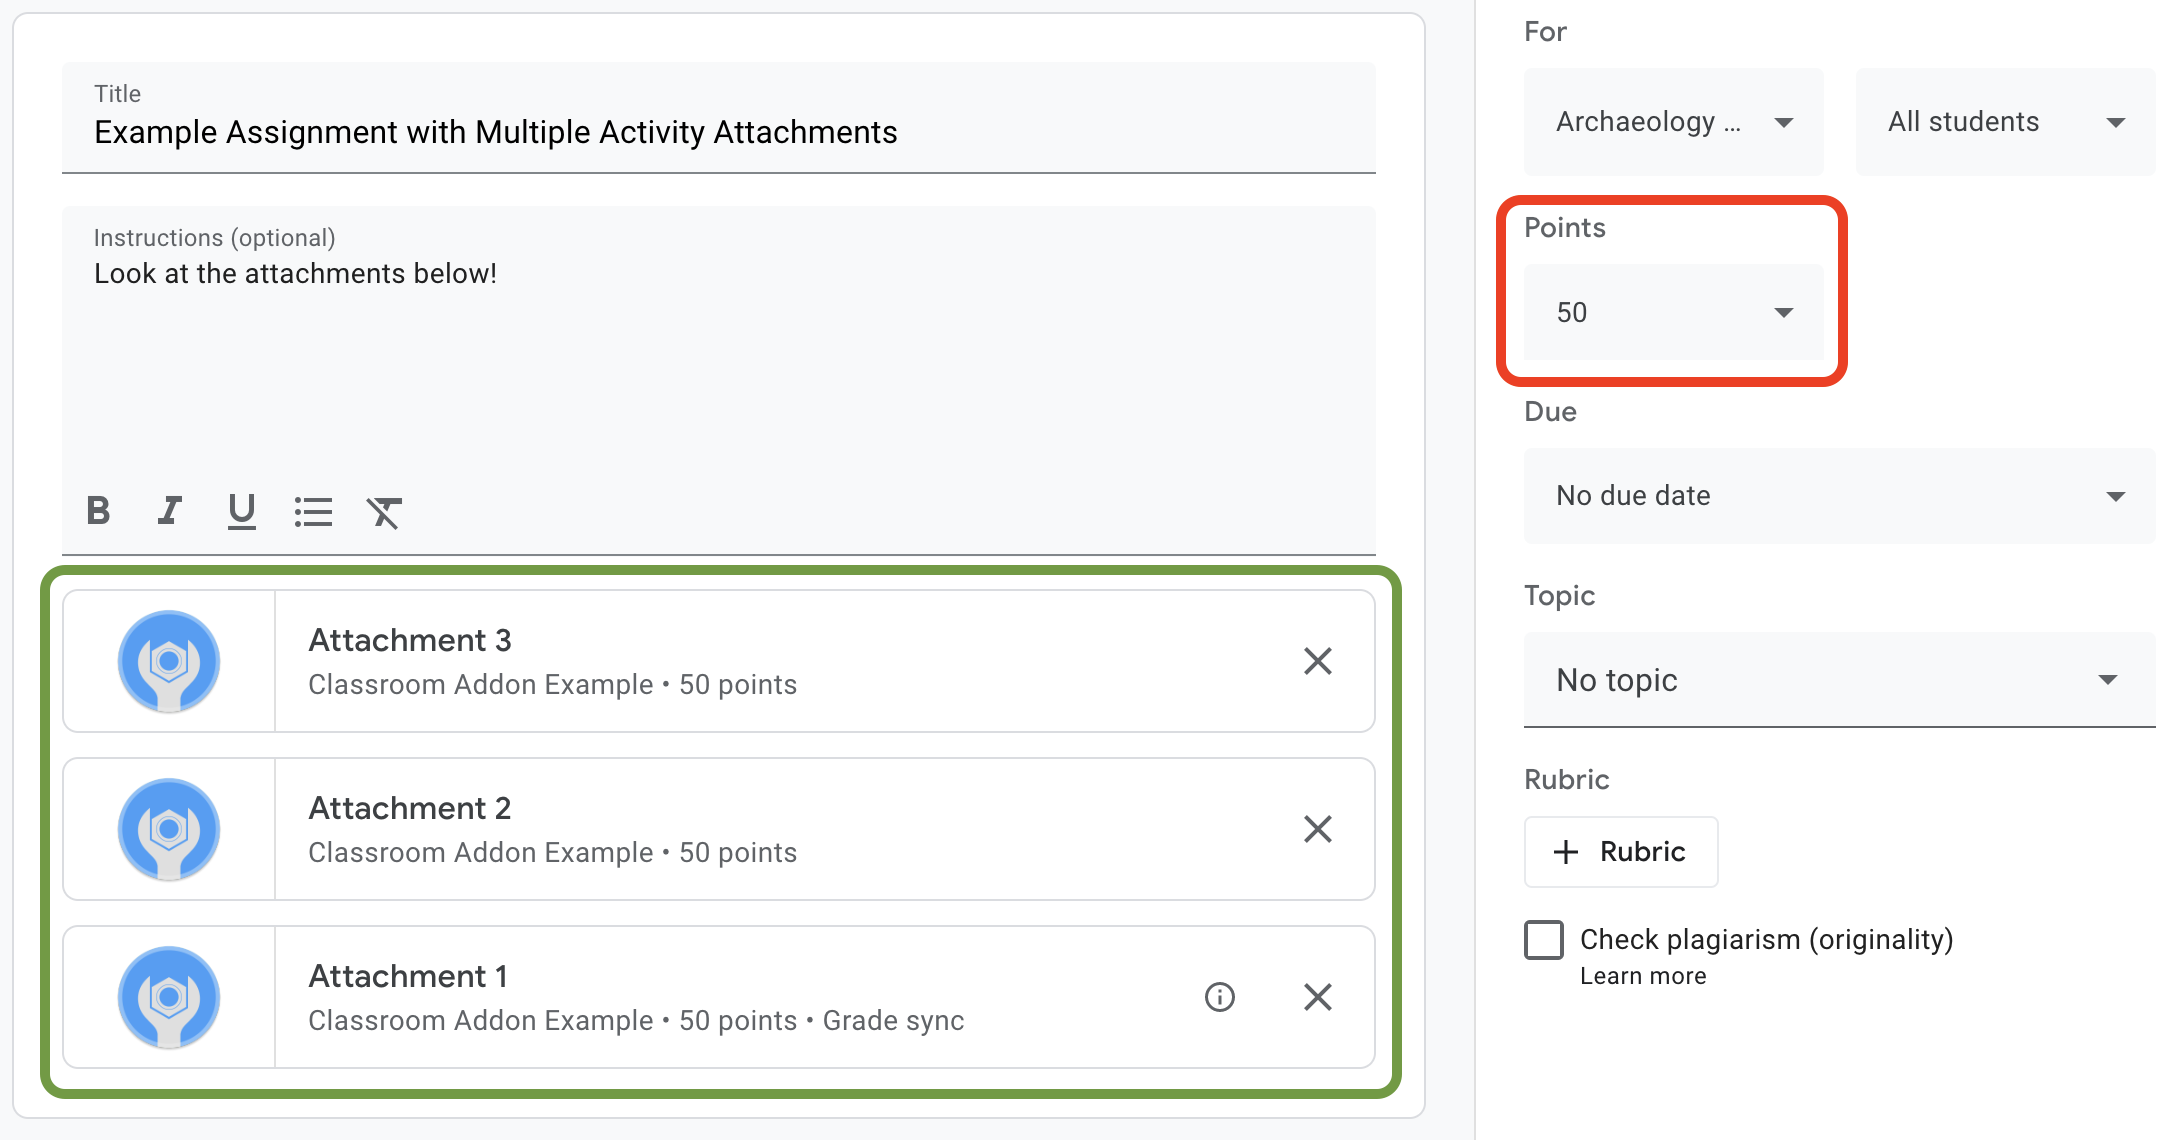
图 1. 作业创建界面,其中包含 3 张已设置 maxPoints 的插件附件卡片。
借助 Google 课堂插件 API,您可以配置附件作业的设置并设置所得分数。这些分数与作业得分不同。不过,作业成绩设置会遵循附件卡片上带有成绩同步标签的附件的附件成绩设置。当“成绩同步”附件为学生提交的作业设置 pointsEarned 时,它还会设置该作业的学生初始成绩。
通常,第一个添加到设置了 maxPoints 的作业中的附件会收到“成绩同步”标签。如需查看“成绩同步”标签的示例,请参阅图 1 中显示的作业创建界面示例。请注意,“附件 1”卡片带有“成绩同步”标签,并且红框中的作业成绩已更新为 50 分。另请注意,虽然图 1 显示了三张附件卡片,但只有一张卡片带有“成绩同步”标签。这是当前实现的一个主要限制:只有一份附件可以带有“成绩同步”标签。
如果有多个附件设置了 maxPoints,移除具有“成绩同步”不会在任何剩余附件上启用“成绩同步”。添加另一个设置了 maxPoints 的附件后,系统会在新附件上启用成绩同步,并调整作业的最高成绩以与之匹配。目前还没有任何机制可以以编程方式查看哪些附件带有“成绩同步”标签,也无法查看特定作业有多少个附件。
设置附件的最高等级
本部分介绍了如何为附件成绩设置分母,即所有学生提交的作业可获得的最高分数。为此,请设置附件的 maxPoints 值。
只需对现有实现进行小幅修改,即可启用评分功能。创建附件时,请在包含 studentWorkReviewUri、teacherViewUri 和其他附件字段的同一 AddOnAttachment 对象中添加 maxPoints 值。
请注意,新作业的默认最高得分是 100 分。我们建议您将 maxPoints 设置为 100 以外的值,以便验证成绩是否设置正确。将 maxPoints 设置为 50 作为演示:
Python
在构建 attachment 对象时(即在向 courses.courseWork.addOnAttachments 端点发出 CREATE 请求之前),添加 maxPoints 字段。如果按照我们提供的示例操作,您可以在 webapp/attachment_routes.py 文件中找到此内容。
attachment = {
    # Specifies the route for a teacher user.
    "teacherViewUri": {
        "uri":
            flask.url_for(
                "load_activity_attachment",
                _scheme='https',
                _external=True),
    },
    # Specifies the route for a student user.
    "studentViewUri": {
        "uri":
            flask.url_for(
                "load_activity_attachment",
                _scheme='https',
                _external=True)
    },
    # Specifies the route for a teacher user when the attachment is
    # loaded in the Classroom grading view.
    "studentWorkReviewUri": {
        "uri":
            flask.url_for(
                "view_submission", _scheme='https', _external=True)
    },
    # Sets the maximum points that a student can earn for this activity.
    # This is the denominator in a fractional representation of a grade.
    "maxPoints": 50,
    # The title of the attachment.
    "title": f"Attachment {attachment_count}",
}
为了便于演示,您还可以将 maxPoints 值存储在本地附件数据库中;这样一来,在稍后为学生提交的内容评分时,就不必再进行额外的 API 调用。不过请注意,教师可能会独立于您的插件更改作业成绩设置。向 courses.courseWork 端点发送 GET 请求,以查看作业级 maxPoints 值。执行此操作时,请在 CourseWork.id 字段中传递 itemId。
现在,更新数据库模型,使其也包含附件的 maxPoints 值。
我们建议使用 CREATE 响应中的 maxPoints 值:
Python
首先,向 Attachment 表中添加 max_points 字段。如果您遵循我们提供的示例,则可以在 webapp/models.py 文件中找到此内容。
# Database model to represent an attachment.
class Attachment(db.Model):
    # The attachmentId is the unique identifier for the attachment.
    attachment_id = db.Column(db.String(120), primary_key=True)

    # The image filename to store.
    image_filename = db.Column(db.String(120))

    # The image caption to store.
    image_caption = db.Column(db.String(120))

    # The maximum number of points for this activity.
    max_points = db.Column(db.Integer)
返回到 courses.courseWork.addOnAttachments CREATE 请求。存储响应中返回的 maxPoints 值。
new_attachment = Attachment(
    # The new attachment's unique ID, returned in the CREATE response.
    attachment_id=resp.get("id"),
    image_filename=key,
    image_caption=value,
    # Store the maxPoints value returned in the response.
    max_points=int(resp.get("maxPoints")))
db.session.add(new_attachment)
db.session.commit()
附件现在有最高等级。您现在应该可以测试此行为了;向新作业添加附件,并观察附件卡片是否显示“成绩同步”标签,以及作业的“分数”值是否发生变化。
在 Google 课堂中设置学生提交作业的成绩
本部分介绍了如何为附件作业设置分子,即学生在附件作业中的个人得分。为此,请设置学生附件提交的 pointsEarned 值。
现在,您需要做出一个重要决定:插件应如何发出设置 pointsEarned 的请求?
问题在于,设置 pointsEarned 需要 teacher OAuth 范围。
您不应向学生用户授予 teacher 范围;这可能会导致学生与您的插件互动时出现意外行为,例如加载教师视图 iframe 而不是学生视图 iframe。因此,您可以通过以下两种方式设置 pointsEarned:
- 使用已登录教师的凭据。
- 使用存储的(离线)教师凭据。
以下各部分将讨论每种方法的权衡取舍,然后再演示每种实现。请注意,我们提供的示例演示了向 Google 课堂传递成绩的两种方法;请参阅下方的特定语言说明,了解如何在运行提供的示例时选择一种方法:
Python
在 webapp/attachment_routes.py 文件的顶部找到 SET_GRADE_WITH_LOGGED_IN_USER_CREDENTIALS 声明。将此值设置为 True 可使用已登录教师的凭据传递成绩。将此值设置为 False,以便在学生提交作业时使用存储的凭据回传成绩。
使用已登录教师的凭据设置成绩
使用已登录用户的凭据发出设置 pointsEarned 的请求。这应该非常直观,因为它与目前为止的其余实现相呼应,并且只需很少的精力即可实现。
不过,请注意,教师仅在“学生作业审核”iframe 中与学生的提交内容互动。这会带来一些重要影响:
- 在教师在 Google 课堂界面中采取行动之前,Google 课堂中不会显示任何成绩。
- 教师可能需要打开每份学生提交的内容,才能填写所有学生的成绩。
- Google 课堂收到成绩后,成绩会过一段时间才会显示在 Google 课堂界面中。延迟时间通常为 5 到 10 秒,但最长可达 30 秒。
这些因素共同意味着,教师可能需要花费大量时间进行手动操作,才能完全填充课程的成绩。
如需实现此方法,请在现有的“学生作业检查”路由中添加一个额外的 API 调用。
在提取学生提交的作业和附件记录后,评估学生的提交内容并存储所得的分数。在 AddOnAttachmentStudentSubmission 对象的 pointsEarned 字段中设置年级。最后,向 courses.courseWork.addOnAttachments.studentSubmissions 端点发出 PATCH 请求,并在请求正文中添加 AddOnAttachmentStudentSubmission 实例。请注意,我们还需要在 PATCH 请求的 updateMask 中指定 pointsEarned:
Python
# Look up the student's submission in our database.
student_submission = Submission.query.get(flask.session["submissionId"])

# Look up the attachment in the database.
attachment = Attachment.query.get(student_submission.attachment_id)

grade = 0

# See if the student response matches the stored name.
if student_submission.student_response.lower(
) == attachment.image_caption.lower():
    grade = attachment.max_points

# Create an instance of the Classroom service.
classroom_service = ch._credential_handler.get_classroom_service()

# Build an AddOnAttachmentStudentSubmission instance.
add_on_attachment_student_submission = {
    # Specifies the student's score for this attachment.
    "pointsEarned": grade,
}

# Issue a PATCH request to set the grade numerator for this attachment.
patch_grade_response = classroom_service.courses().courseWork(
).addOnAttachments().studentSubmissions().patch(
    courseId=flask.session["courseId"],
    itemId=flask.session["itemId"],
    attachmentId=flask.session["attachmentId"],
    submissionId=flask.session["submissionId"],
    # updateMask is a list of fields being modified.
    updateMask="pointsEarned",
    body=add_on_attachment_student_submission).execute()
使用教师离线凭据设置成绩
第二种设置成绩的方法需要使用创建附件的教师的存储凭据。此实现要求您使用之前已获授权的教师的刷新令牌和访问令牌来构建凭据,然后使用这些凭据来设置 pointsEarned。
此方法的一个关键优势是,无需教师在 Google 课堂界面中执行操作即可填充成绩,从而避免了上述问题。这样一来,最终用户就会觉得评分体验顺畅高效。此外,此方法还允许您选择何时返回成绩,例如在学生完成活动时或以异步方式返回成绩。
如需实现此方法,请完成以下任务:
- 修改用户数据库记录以存储访问令牌。
- 修改附件数据库记录以存储教师 ID。
- 检索教师的凭据,并(可选)构建新的 Classroom 服务实例。
- 设置提交内容的成绩。
在此演示中,我们将在学生完成活动时设置成绩,即当学生在“学生视图”路线中提交表单时。
修改用户数据库记录以存储访问令牌
您需要两个唯一令牌才能进行 API 调用,即刷新令牌和访问令牌。如果您一直按照本演练系列操作,则 User 表架构应已存储刷新令牌。如果您仅使用已登录的用户进行 API 调用,则只需存储刷新令牌,因为您会在身份验证流程中收到访问令牌。
不过,您现在需要以已登录用户以外的身份进行调用,这意味着身份验证流程不可用。因此,您需要将访问令牌与刷新令牌一起存储。更新 User 表架构以纳入访问令牌:
Python
在提供的示例中,此文件为 webapp/models.py 文件。
# Database model to represent a user.
class User(db.Model):
    # The user's identifying information:
    id = db.Column(db.String(120), primary_key=True)
    display_name = db.Column(db.String(80))
    email = db.Column(db.String(120), unique=True)
    portrait_url = db.Column(db.Text())

    # The user's refresh token, which will be used to obtain an access token.
    # Note that refresh tokens will become invalid if:
    # - The refresh token has not been used for six months.
    # - The user revokes your app's access permissions.
    # - The user changes passwords.
    # - The user belongs to a Google Cloud organization
    #   that has session control policies in effect.
    refresh_token = db.Column(db.Text())

    # An access token for this user.
    access_token = db.Column(db.Text())
然后,更新创建或更新 User 记录的所有代码,以同时存储访问令牌:
Python
在提供的示例中,此文件为 webapp/credential_handler.py 文件。
def save_credentials_to_storage(self, credentials):
    # Issue a request for the user's profile details.
    user_info_service = googleapiclient.discovery.build(
        serviceName="oauth2", version="v2", credentials=credentials)
    user_info = user_info_service.userinfo().get().execute()
    flask.session["username"] = user_info.get("name")
    flask.session["login_hint"] = user_info.get("id")

    # See if we have any stored credentials for this user. If they have used
    # the add-on before, we should have received login_hint in the query
    # parameters.
    existing_user = self.get_credentials_from_storage(user_info.get("id"))

    # If we do have stored credentials, update the database.
    if existing_user:
        if user_info:
            existing_user.id = user_info.get("id")
            existing_user.display_name = user_info.get("name")
            existing_user.email = user_info.get("email")
            existing_user.portrait_url = user_info.get("picture")

        if credentials and credentials.refresh_token is not None:
            existing_user.refresh_token = credentials.refresh_token
            # Update the access token.
            existing_user.access_token = credentials.token

    # If not, this must be a new user, so add a new entry to the database.
    else:
        new_user = User(
            id=user_info.get("id"),
            display_name=user_info.get("name"),
            email=user_info.get("email"),
            portrait_url=user_info.get("picture"),
            refresh_token=credentials.refresh_token,
            # Store the access token as well.
            access_token=credentials.token)

        db.session.add(new_user)

    db.session.commit()
修改附件数据库记录以存储教师 ID
如需为 activity 设置成绩,请调用相应方法将 pointsEarned 设置为课程中的教师。您可以通过以下几种方式来实现此目的:
- 存储教师凭据与课程 ID 的本地映射。不过,同一位教师可能并不总是与特定课程相关联。
- 向 Classroom API
courses端点发出GET请求,以获取当前教师。然后,查询本地用户记录以查找匹配的教师凭据。 - 创建插件附件时,将教师 ID 存储在本地附件数据库中。然后,从传递给学生视图 iframe 的
attachmentId中检索教师凭据。
此示例演示了最后一种情况,因为您是在学生完成作业附件后设置成绩。
向数据库的 Attachment 表中添加教师 ID 字段:
Python
在提供的示例中,此文件为 webapp/models.py 文件。
# Database model to represent an attachment.
class Attachment(db.Model):
    # The attachmentId is the unique identifier for the attachment.
    attachment_id = db.Column(db.String(120), primary_key=True)

    # The image filename to store.
    image_filename = db.Column(db.String(120))

    # The image caption to store.
    image_caption = db.Column(db.String(120))

    # The maximum number of points for this activity.
    max_points = db.Column(db.Integer)

    # The ID of the teacher that created the attachment.
    teacher_id = db.Column(db.String(120))
然后,更新创建或更新 Attachment 记录的任何代码,以同时存储创建者的 ID:
Python
在提供的示例中,此操作位于 webapp/attachment_routes.py 文件中的 create_attachments 方法中。
# Store the attachment by id.
new_attachment = Attachment(
    # The new attachment's unique ID, returned in the CREATE response.
    attachment_id=resp.get("id"),
    image_filename=key,
    image_caption=value,
    max_points=int(resp.get("maxPoints")),
    teacher_id=flask.session["login_hint"])
db.session.add(new_attachment)
db.session.commit()
检索教师的凭据
找到用于提供学生视图 iframe 的路由。在本地数据库中存储学生的回答后,立即从本地存储空间检索教师的凭据。鉴于前两个步骤中的准备工作,这一步应该很简单。您还可以使用这些信息为教师用户构建新的 Classroom 服务实例:
Python
在提供的示例中,此操作位于 webapp/attachment_routes.py 文件中的 load_activity_attachment 方法中。
# Create an instance of the Classroom service using the tokens for the
# teacher that created the attachment.

# We're assuming that there are already credentials in the session, which
# should be true given that we are adding this within the Student View
# route; we must have had valid credentials for the student to reach this
# point. The student credentials will be valid to construct a Classroom
# service for another user except for the tokens.
if not flask.session.get("credentials"):
    raise ValueError(
        "No credentials found in session for the requested user.")

# Make a copy of the student credentials so we don't modify the original.
teacher_credentials_dict = deepcopy(flask.session.get("credentials"))

# Retrieve the requested user's stored record.
teacher_record = User.query.get(attachment.teacher_id)

# Apply the user's tokens to the copied credentials.
teacher_credentials_dict["refresh_token"] = teacher_record.refresh_token
teacher_credentials_dict["token"] = teacher_record.access_token

# Construct a temporary credentials object.
teacher_credentials = google.oauth2.credentials.Credentials(
    **teacher_credentials_dict)

# Refresh the credentials if necessary; we don't know when this teacher last
# made a call.
if teacher_credentials.expired:
    teacher_credentials.refresh(Request())

# Request the Classroom service for the specified user.
teacher_classroom_service = googleapiclient.discovery.build(
    serviceName=CLASSROOM_API_SERVICE_NAME,
    version=CLASSROOM_API_VERSION,
    credentials=teacher_credentials)
设置提交内容的成绩
从这里开始,操作流程与使用已登录教师的凭据相同。不过,请注意,您应使用在上一步中检索到的教师凭据进行调用:
Python
# Issue a PATCH request as the teacher to set the grade numerator for this
# attachment.
patch_grade_response = teacher_classroom_service.courses().courseWork(
).addOnAttachments().studentSubmissions().patch(
    courseId=flask.session["courseId"],
    itemId=flask.session["itemId"],
    attachmentId=flask.session["attachmentId"],
    submissionId=flask.session["submissionId"],
    # updateMask is a list of fields being modified.
    updateMask="pointsEarned",
    body=add_on_attachment_student_submission).execute()
测试插件
与之前的演练类似,以教师身份创建包含活动类型附件的作业,以学生身份提交回答,然后在“学生作业审核”iframe 中打开学生的提交内容。您应该能够看到,根据您的实现方法,成绩会在不同时间显示:
- 如果您选择在学生完成活动后回传成绩,则在打开“学生作业检查”iframe 之前,您应该已在界面中看到学生的草稿成绩。您还可以在打开作业时看到学生列表中的此图标,以及“学生作业审核”iframe 旁边的“成绩”框中看到此图标。
- 如果您选择在教师打开“学生作业审核”iframe 时回传成绩,则在 iframe 加载后不久,“成绩”框中应会显示成绩。如上文所述,此过程最多可能需要 30 秒。 之后,特定学生的成绩也应显示在其他 Google 课堂成绩册视图中。
确认系统会为学生显示正确的得分。
恭喜!您已准备好继续执行下一步:在 Google 课堂之外创建附件。