Layanan pelengkapan otomatis di Places SDK for iOS menampilkan tempat prediksi sebagai respons atas kueri penelusuran pengguna. Saat pengguna mengetik, layanan Autocomplete menampilkan saran untuk tempat seperti bisnis, alamat, Plus Codes, dan lokasi menarik lainnya.
Anda bisa menambahkan pelengkapan otomatis ke aplikasi dengan cara berikut:
- Tambahkan kontrol UI pelengkapan otomatis untuk menyimpan pengembangan aplikasi dan memastikan pengalaman pengguna yang konsisten.
- Mendapatkan prediksi tempat secara terprogram untuk membuat pengguna yang disesuaikan pengalaman yang lancar bagi developer.
Menambahkan kontrol UI pelengkapan otomatis
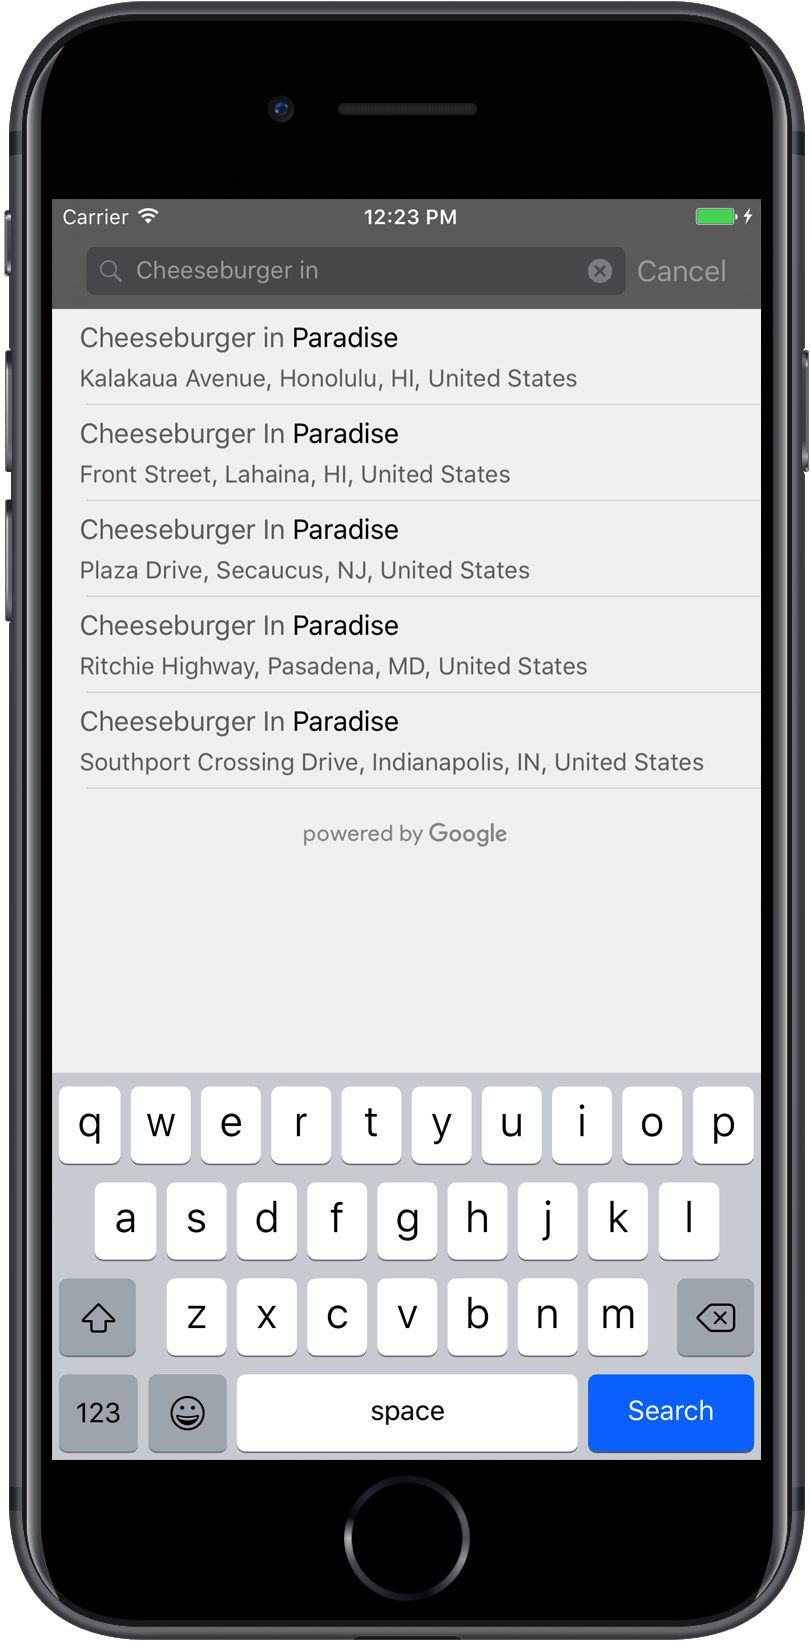
Kontrol UI pelengkapan otomatis adalah dialog penelusuran dengan pelengkapan otomatis bawaan
fungsionalitasnya. Saat pengguna memasukkan istilah penelusuran, kontrol akan menampilkan
daftar tempat yang diprediksi untuk dipilih. Ketika pengguna membuat pilihan,
GMSPlace
akan ditampilkan, yang kemudian dapat digunakan aplikasi untuk mendapatkan detail tentang
tempat yang dipilih.
Anda bisa menambahkan kontrol UI pelengkapan otomatis ke aplikasi dengan cara berikut:
Menambahkan kontrol layar penuh
Gunakan kontrol layar penuh bila Anda menginginkan konteks modal, dengan
UI pelengkapan otomatis untuk sementara menggantikan UI aplikasi Anda hingga
pengguna telah menentukan pilihannya. Fungsi ini disediakan oleh
GMSAutocompleteViewController
. Bila pengguna memilih sebuah tempat, aplikasi Anda akan menerima callback.
Untuk menambahkan kontrol layar penuh ke aplikasi Anda:
- Buat elemen UI di aplikasi utama Anda untuk meluncurkan kontrol UI pelengkapan otomatis,
misalnya pengendali sentuh pada
UIButton. - Mengimplementasikan
GMSAutocompleteViewControllerDelegatedi pengontrol tampilan induk. - Membuat instance
GMSAutocompleteViewControllerdan menetapkan pengontrol tampilan induk sebagai properti delegasi. - Membuat
GMSPlaceFielduntuk menentukan tipe data tempat yang akan dikembalikan. - Menambahkan
GMSAutocompleteFilteruntuk membatasi kueri pada jenis tempat tertentu. - Mempresentasikan
GMSAutocompleteViewControllermenggunakan[self presentViewController...]. - Menangani pilihan pengguna di
didAutocompleteWithPlacedelegasikan. - Tutup pengontrol di
didAutocompleteWithPlace, Metode delegasididFailAutocompleteWithError, danwasCancelled.
Contoh berikut menunjukkan satu kemungkinan cara untuk meluncurkan
GMSAutocompleteViewController
sebagai respons saat pengguna mengetuk tombol.
Swift
import UIKit
import GooglePlaces

class ViewController: UIViewController {

  override func viewDidLoad() {
    makeButton()
  }

  // Present the Autocomplete view controller when the button is pressed.
  @objc func autocompleteClicked(_ sender: UIButton) {
    let autocompleteController = GMSAutocompleteViewController()
    autocompleteController.delegate = self

    // Specify the place data types to return.
    let fields: GMSPlaceField = GMSPlaceField(rawValue: UInt(GMSPlaceField.name.rawValue) |
      UInt(GMSPlaceField.placeID.rawValue))!
    autocompleteController.placeFields = fields

    // Specify a filter.
    let filter = GMSAutocompleteFilter()
    filter.types = [.address]
    autocompleteController.autocompleteFilter = filter

    // Display the autocomplete view controller.
    present(autocompleteController, animated: true, completion: nil)
  }

  // Add a button to the view.
  func makeButton() {
    let btnLaunchAc = UIButton(frame: CGRect(x: 5, y: 150, width: 300, height: 35))
    btnLaunchAc.backgroundColor = .blue
    btnLaunchAc.setTitle("Launch autocomplete", for: .normal)
    btnLaunchAc.addTarget(self, action: #selector(autocompleteClicked), for: .touchUpInside)
    self.view.addSubview(btnLaunchAc)
  }

}

extension ViewController: GMSAutocompleteViewControllerDelegate {

  // Handle the user's selection.
  func viewController(_ viewController: GMSAutocompleteViewController, didAutocompleteWith place: GMSPlace) {
    print("Place name: \(place.name)")
    print("Place ID: \(place.placeID)")
    print("Place attributions: \(place.attributions)")
    dismiss(animated: true, completion: nil)
  }

  func viewController(_ viewController: GMSAutocompleteViewController, didFailAutocompleteWithError error: Error) {
    // TODO: handle the error.
    print("Error: ", error.localizedDescription)
  }

  // User canceled the operation.
  func wasCancelled(_ viewController: GMSAutocompleteViewController) {
    dismiss(animated: true, completion: nil)
  }

  // Turn the network activity indicator on and off again.
  func didRequestAutocompletePredictions(_ viewController: GMSAutocompleteViewController) {
    UIApplication.shared.isNetworkActivityIndicatorVisible = true
  }

  func didUpdateAutocompletePredictions(_ viewController: GMSAutocompleteViewController) {
    UIApplication.shared.isNetworkActivityIndicatorVisible = false
  }

}
Objective-C
#import "ViewController.h"
@import GooglePlaces;

@interface ViewController () <GMSAutocompleteViewControllerDelegate>

@end

@implementation ViewController {
  GMSAutocompleteFilter *_filter;
}

- (void)viewDidLoad {
  [super viewDidLoad];
  [self makeButton];
}

  // Present the autocomplete view controller when the button is pressed.
- (void)autocompleteClicked {
  GMSAutocompleteViewController *acController = [[GMSAutocompleteViewController alloc] init];
  acController.delegate = self;

  // Specify the place data types to return.
  GMSPlaceField fields = (GMSPlaceFieldName | GMSPlaceFieldPlaceID);
  acController.placeFields = fields;

  // Specify a filter.
  _filter = [[GMSAutocompleteFilter alloc] init];
  _filter.types = @[ kGMSPlaceTypeBank ];
  acController.autocompleteFilter = _filter;

  // Display the autocomplete view controller.
  [self presentViewController:acController animated:YES completion:nil];
}

  // Add a button to the view.
- (void)makeButton{
  UIButton *btnLaunchAc = [UIButton buttonWithType:UIButtonTypeCustom];
  [btnLaunchAc addTarget:self
             action:@selector(autocompleteClicked) forControlEvents:UIControlEventTouchUpInside];
  [btnLaunchAc setTitle:@"Launch autocomplete" forState:UIControlStateNormal];
  btnLaunchAc.frame = CGRectMake(5.0, 150.0, 300.0, 35.0);
  btnLaunchAc.backgroundColor = [UIColor blueColor];
  [self.view addSubview:btnLaunchAc];
}

  // Handle the user's selection.
- (void)viewController:(GMSAutocompleteViewController *)viewController
didAutocompleteWithPlace:(GMSPlace *)place {
  [self dismissViewControllerAnimated:YES completion:nil];
  // Do something with the selected place.
  NSLog(@"Place name %@", place.name);
  NSLog(@"Place ID %@", place.placeID);
  NSLog(@"Place attributions %@", place.attributions.string);
}

- (void)viewController:(GMSAutocompleteViewController *)viewController
didFailAutocompleteWithError:(NSError *)error {
  [self dismissViewControllerAnimated:YES completion:nil];
  // TODO: handle the error.
  NSLog(@"Error: %@", [error description]);
}

  // User canceled the operation.
- (void)wasCancelled:(GMSAutocompleteViewController *)viewController {
  [self dismissViewControllerAnimated:YES completion:nil];
}

  // Turn the network activity indicator on and off again.
- (void)didRequestAutocompletePredictions:(GMSAutocompleteViewController *)viewController {
  [UIApplication sharedApplication].networkActivityIndicatorVisible = YES;
}

- (void)didUpdateAutocompletePredictions:(GMSAutocompleteViewController *)viewController {
  [UIApplication sharedApplication].networkActivityIndicatorVisible = NO;
}

@end
Menambahkan pengontrol hasil
Gunakan pengontrol hasil bila Anda ingin kontrol yang lebih besar atas UI masukan teks. Pengontrol hasil secara dinamis mengalihkan visibilitas daftar hasil berdasarkan fokus UI input.
Untuk menambahkan pengontrol hasil ke aplikasi Anda:
- Buat
GMSAutocompleteResultsViewController. - Mengimplementasikan
GMSAutocompleteResultsViewControllerDelegatedi pengontrol tampilan induk dan tetapkan pengontrol tampilan induk sebagai properti delegasi. - Buat objek
UISearchControllerdengan meneruskanGMSAutocompleteResultsViewControllersebagai argumen pengontrol hasil. - Setel
GMSAutocompleteResultsViewControllersebagai propertisearchResultsUpdaterdariUISearchController. - Tambahkan
searchBaruntukUISearchControllerke UI aplikasi Anda. - Menangani pilihan pengguna di
didAutocompleteWithPlacedelegasikan.
Ada beberapa cara untuk menempatkan kotak penelusuran UISearchController ke dalam
UI aplikasi Anda:
- Menambahkan kotak penelusuran ke menu navigasi
- Menambahkan kotak penelusuran ke bagian atas tampilan
- Menambahkan kotak penelusuran menggunakan hasil popover
Menambahkan bilah pencarian ke {i>navigation bar<i}
Contoh kode berikut menunjukkan cara menambahkan pengontrol hasil, menambahkan atribut
searchBar ke menu navigasi, dan menangani pilihan pengguna:
Swift
class ViewController: UIViewController {

  var resultsViewController: GMSAutocompleteResultsViewController?
  var searchController: UISearchController?
  var resultView: UITextView?

  override func viewDidLoad() {
    super.viewDidLoad()

    resultsViewController = GMSAutocompleteResultsViewController()
    resultsViewController?.delegate = self

    searchController = UISearchController(searchResultsController: resultsViewController)
    searchController?.searchResultsUpdater = resultsViewController

    // Put the search bar in the navigation bar.
    searchController?.searchBar.sizeToFit()
    navigationItem.titleView = searchController?.searchBar

    // When UISearchController presents the results view, present it in
    // this view controller, not one further up the chain.
    definesPresentationContext = true

    // Prevent the navigation bar from being hidden when searching.
    searchController?.hidesNavigationBarDuringPresentation = false
  }
}

// Handle the user's selection.
extension ViewController: GMSAutocompleteResultsViewControllerDelegate {
  func resultsController(_ resultsController: GMSAutocompleteResultsViewController,
                         didAutocompleteWith place: GMSPlace) {
    searchController?.isActive = false
    // Do something with the selected place.
    print("Place name: \(place.name)")
    print("Place address: \(place.formattedAddress)")
    print("Place attributions: \(place.attributions)")
  }

  func resultsController(_ resultsController: GMSAutocompleteResultsViewController,
                         didFailAutocompleteWithError error: Error){
    // TODO: handle the error.
    print("Error: ", error.localizedDescription)
  }

  // Turn the network activity indicator on and off again.
  func didRequestAutocompletePredictions(_ viewController: GMSAutocompleteViewController) {
    UIApplication.shared.isNetworkActivityIndicatorVisible = true
  }

  func didUpdateAutocompletePredictions(_ viewController: GMSAutocompleteViewController) {
    UIApplication.shared.isNetworkActivityIndicatorVisible = false
  }
}
Objective-C
- (void)viewDidLoad {
  _resultsViewController = [[GMSAutocompleteResultsViewController alloc] init];
  _resultsViewController.delegate = self;

  _searchController = [[UISearchController alloc]
                       initWithSearchResultsController:_resultsViewController];
  _searchController.searchResultsUpdater = _resultsViewController;

  // Put the search bar in the navigation bar.
  [_searchController.searchBar sizeToFit];
  self.navigationItem.titleView = _searchController.searchBar;

  // When UISearchController presents the results view, present it in
  // this view controller, not one further up the chain.
  self.definesPresentationContext = YES;

  // Prevent the navigation bar from being hidden when searching.
  _searchController.hidesNavigationBarDuringPresentation = NO;
}

// Handle the user's selection.
- (void)resultsController:(GMSAutocompleteResultsViewController *)resultsController
  didAutocompleteWithPlace:(GMSPlace *)place {
    _searchController.active = NO;
    // Do something with the selected place.
    NSLog(@"Place name %@", place.name);
    NSLog(@"Place address %@", place.formattedAddress);
    NSLog(@"Place attributions %@", place.attributions.string);
}

- (void)resultsController:(GMSAutocompleteResultsViewController *)resultsController
didFailAutocompleteWithError:(NSError *)error {
  [self dismissViewControllerAnimated:YES completion:nil];
  // TODO: handle the error.
  NSLog(@"Error: %@", [error description]);
}

// Turn the network activity indicator on and off again.
- (void)didRequestAutocompletePredictionsForResultsController:
    (GMSAutocompleteResultsViewController *)resultsController {
  [UIApplication sharedApplication].networkActivityIndicatorVisible = YES;
}

- (void)didUpdateAutocompletePredictionsForResultsController:
    (GMSAutocompleteResultsViewController *)resultsController {
  [UIApplication sharedApplication].networkActivityIndicatorVisible = NO;
}
Menambahkan bilah penelusuran ke bagian atas tampilan
Contoh kode berikut menunjukkan penambahan searchBar ke bagian atas tampilan.
Swift
import UIKit
import GooglePlaces

class ViewController: UIViewController {

  var resultsViewController: GMSAutocompleteResultsViewController?
  var searchController: UISearchController?
  var resultView: UITextView?

  override func viewDidLoad() {
    super.viewDidLoad()

    resultsViewController = GMSAutocompleteResultsViewController()
    resultsViewController?.delegate = self

    searchController = UISearchController(searchResultsController: resultsViewController)
    searchController?.searchResultsUpdater = resultsViewController

    let subView = UIView(frame: CGRect(x: 0, y: 65.0, width: 350.0, height: 45.0))

    subView.addSubview((searchController?.searchBar)!)
    view.addSubview(subView)
    searchController?.searchBar.sizeToFit()
    searchController?.hidesNavigationBarDuringPresentation = false

    // When UISearchController presents the results view, present it in
    // this view controller, not one further up the chain.
    definesPresentationContext = true
  }
}

// Handle the user's selection.
extension ViewController: GMSAutocompleteResultsViewControllerDelegate {
  func resultsController(_ resultsController: GMSAutocompleteResultsViewController,
                         didAutocompleteWith place: GMSPlace) {
    searchController?.isActive = false
    // Do something with the selected place.
    print("Place name: \(place.name)")
    print("Place address: \(place.formattedAddress)")
    print("Place attributions: \(place.attributions)")
  }

  func resultsController(_ resultsController: GMSAutocompleteResultsViewController,
                         didFailAutocompleteWithError error: Error){
    // TODO: handle the error.
    print("Error: ", error.localizedDescription)
  }

  // Turn the network activity indicator on and off again.
  func didRequestAutocompletePredictions(forResultsController resultsController: GMSAutocompleteResultsViewController) {
    UIApplication.shared.isNetworkActivityIndicatorVisible = true
  }

  func didUpdateAutocompletePredictions(forResultsController resultsController: GMSAutocompleteResultsViewController) {
    UIApplication.shared.isNetworkActivityIndicatorVisible = false
  }
}
Objective-C
- (void)viewDidLoad {
    [super viewDidLoad];

    _resultsViewController = [[GMSAutocompleteResultsViewController alloc] init];
    _resultsViewController.delegate = self;

    _searchController = [[UISearchController alloc]
                             initWithSearchResultsController:_resultsViewController];
    _searchController.searchResultsUpdater = _resultsViewController;

    UIView *subView = [[UIView alloc] initWithFrame:CGRectMake(0, 65.0, 250, 50)];

    [subView addSubview:_searchController.searchBar];
    [_searchController.searchBar sizeToFit];
    [self.view addSubview:subView];

    // When UISearchController presents the results view, present it in
    // this view controller, not one further up the chain.
    self.definesPresentationContext = YES;
}

// Handle the user's selection.
- (void)resultsController:(GMSAutocompleteResultsViewController *)resultsController
didAutocompleteWithPlace:(GMSPlace *)place {
  [self dismissViewControllerAnimated:YES completion:nil];
  // Do something with the selected place.
  NSLog(@"Place name %@", place.name);
  NSLog(@"Place address %@", place.formattedAddress);
  NSLog(@"Place attributions %@", place.attributions.string);
}

- (void)resultsController:(GMSAutocompleteResultsViewController *)resultsController
didFailAutocompleteWithError:(NSError *)error {
  [self dismissViewControllerAnimated:YES completion:nil];
  // TODO: handle the error.
  NSLog(@"Error: %@", [error description]);
}

// Turn the network activity indicator on and off again.
- (void)didRequestAutocompletePredictionsForResultsController:
    (GMSAutocompleteResultsViewController *)resultsController {
  [UIApplication sharedApplication].networkActivityIndicatorVisible = YES;
}

- (void)didUpdateAutocompletePredictionsForResultsController:
    (GMSAutocompleteResultsViewController *)resultsController {
  [UIApplication sharedApplication].networkActivityIndicatorVisible = NO;
}
Secara default, UISearchController
menyembunyikan menu navigasi saat presentasi (ini dapat dinonaktifkan). Dalam kasus di mana
menu navigasi terlihat dan buram, UISearchController tidak disetel
menempatkan penempatan
dengan benar.
Gunakan kode berikut sebagai solusi:
Swift
navigationController?.navigationBar.translucent = false
searchController?.hidesNavigationBarDuringPresentation = false

// This makes the view area include the nav bar even though it is opaque.
// Adjust the view placement down.
self.extendedLayoutIncludesOpaqueBars = true
self.edgesForExtendedLayout = .top
Objective-C
self.navigationController.navigationBar.translucent = NO;
_searchController.hidesNavigationBarDuringPresentation = NO;

// This makes the view area include the nav bar even though it is opaque.
// Adjust the view placement down.
self.extendedLayoutIncludesOpaqueBars = YES;
self.edgesForExtendedLayout = UIRectEdgeTop;
Menambahkan kotak penelusuran menggunakan hasil popover
Contoh kode berikut menampilkan penempatan bilah penelusuran di sisi kanan menu navigasi, dan menampilkan hasilnya di popover.
Swift
import UIKit
import GooglePlaces

class ViewController: UIViewController {

  var resultsViewController: GMSAutocompleteResultsViewController?
  var searchController: UISearchController?
  var resultView: UITextView?

  override func viewDidLoad() {
    super.viewDidLoad()

    resultsViewController = GMSAutocompleteResultsViewController()
    resultsViewController?.delegate = self

    searchController = UISearchController(searchResultsController: resultsViewController)
    searchController?.searchResultsUpdater = resultsViewController

    // Add the search bar to the right of the nav bar,
    // use a popover to display the results.
    // Set an explicit size as we don't want to use the entire nav bar.
    searchController?.searchBar.frame = (CGRect(x: 0, y: 0, width: 250.0, height: 44.0))
    navigationItem.rightBarButtonItem = UIBarButtonItem(customView: (searchController?.searchBar)!)

    // When UISearchController presents the results view, present it in
    // this view controller, not one further up the chain.
    definesPresentationContext = true

    // Keep the navigation bar visible.
    searchController?.hidesNavigationBarDuringPresentation = false
    searchController?.modalPresentationStyle = .popover
  }
}
// Handle the user's selection.
extension ViewController: GMSAutocompleteResultsViewControllerDelegate {
  func resultsController(_ resultsController: GMSAutocompleteResultsViewController,
                         didAutocompleteWith place: GMSPlace) {
    searchController?.isActive = false
    // Do something with the selected place.
    print("Place name: \(place.name)")
    print("Place address: \(place.formattedAddress)")
    print("Place attributions: \(place.attributions)")
  }

  func resultsController(_ resultsController: GMSAutocompleteResultsViewController,
                         didFailAutocompleteWithError error: Error){
    // TODO: handle the error.
    print("Error: ", error.localizedDescription)
  }

  // Turn the network activity indicator on and off again.
  func didRequestAutocompletePredictions(forResultsController resultsController: GMSAutocompleteResultsViewController) {
    UIApplication.shared.isNetworkActivityIndicatorVisible = true
  }

  func didUpdateAutocompletePredictions(forResultsController resultsController: GMSAutocompleteResultsViewController) {
    UIApplication.shared.isNetworkActivityIndicatorVisible = false
  }
}
Objective-C
- (void)viewDidLoad {
  [super viewDidLoad];

  _resultsViewController = [[GMSAutocompleteResultsViewController alloc] init];
  _resultsViewController.delegate = self;

  _searchController = [[UISearchController alloc]
                           initWithSearchResultsController:_resultsViewController];
  _searchController.searchResultsUpdater = _resultsViewController;

  // Add the search bar to the right of the nav bar,
  // use a popover to display the results.
  // Set an explicit size as we don't want to use the entire nav bar.
  _searchController.searchBar.frame = CGRectMake(0, 0, 250.0f, 44.0f);
  self.navigationItem.rightBarButtonItem =
  [[UIBarButtonItem alloc] initWithCustomView:_searchController.searchBar];

  // When UISearchController presents the results view, present it in
  // this view controller, not one further up the chain.
  self.definesPresentationContext = YES;

  // Keep the navigation bar visible.
  _searchController.hidesNavigationBarDuringPresentation = NO;

  _searchController.modalPresentationStyle = UIModalPresentationPopover;
}

// Handle the user's selection.
- (void)resultsController:(GMSAutocompleteResultsViewController *)resultsController
didAutocompleteWithPlace:(GMSPlace *)place {
  [self dismissViewControllerAnimated:YES completion:nil];
  NSLog(@"Place name %@", place.name);
  NSLog(@"Place address %@", place.formattedAddress);
  NSLog(@"Place attributions %@", place.attributions.string);
}

- (void)resultsController:(GMSAutocompleteResultsViewController *)resultsController
didFailAutocompleteWithError:(NSError *)error {
  [self dismissViewControllerAnimated:YES completion:nil];
  // TODO: handle the error.
  NSLog(@"Error: %@", [error description]);
}

// Turn the network activity indicator on and off again.
- (void)didRequestAutocompletePredictionsForResultsController:
    (GMSAutocompleteResultsViewController *)resultsController {
  [UIApplication sharedApplication].networkActivityIndicatorVisible = YES;
}

- (void)didUpdateAutocompletePredictionsForResultsController:
    (GMSAutocompleteResultsViewController *)resultsController {
  [UIApplication sharedApplication].networkActivityIndicatorVisible = NO;
}
Menggunakan sumber data tabel
Jika aplikasi Anda memiliki UI teks penelusuran khusus, Anda dapat menggunakan
GMSAutocompleteTableDataSource
untuk menjalankan tampilan tabel yang menampilkan hasil pada pengontrol tampilan.
Untuk menggunakan GMSAutocompleteTableDataSource
sebagai sumber data dan delegasi UITableView
dalam pengontrol tampilan:
- Mengimplementasikan
GMSAutocompleteTableDataSourceDelegatedanUISearchBarDelegatedalam pengontrol tampilan. - Membuat
GMSAutocompleteTableDataSourcedan menetapkan pengontrol tampilan sebagai properti delegasi. - Setel
GMSAutocompleteTableDataSourcesebagai properti sumber data dan delegasiUITableViewpada pengontrol tampilan. - Dalam pengendali untuk input teks penelusuran, panggil
sourceTextHasChangedpadaGMSAutocompleteTableDataSource. - Tangani pilihan pengguna dalam metode delegasi
didAutocompleteWithPlace. - Tutup pengontrol di
didAutocompleteWithPlace,didFailAutocompleteWithError, Metode delegasiwasCancelled.
Contoh kode berikut mendemonstrasikan penggunaan
GMSAutocompleteTableDataSource
untuk mendorong tampilan tabel UIViewController saat UISearchBar ditambahkan secara terpisah.
Swift
// Copyright 2020 Google LLC
//
// Licensed under the Apache License, Version 2.0 (the "License");
// you may not use this file except in compliance with the License.
// You may obtain a copy of the License at
//
//      http://www.apache.org/licenses/LICENSE-2.0
//
// Unless required by applicable law or agreed to in writing, software
// distributed under the License is distributed on an "AS IS" BASIS,
// WITHOUT WARRANTIES OR CONDITIONS OF ANY KIND, either express or implied.
// See the License for the specific language governing permissions and
// limitations under the License.

import GooglePlaces
import UIKit

class PlaceAutocompleteViewController: UIViewController {

  private var tableView: UITableView!
  private var tableDataSource: GMSAutocompleteTableDataSource!

  override func viewDidLoad() {
    super.viewDidLoad()

    let searchBar = UISearchBar(frame: CGRect(x: 0, y: 20, width: self.view.frame.size.width, height: 44.0))
    searchBar.delegate = self
    view.addSubview(searchBar)

    tableDataSource = GMSAutocompleteTableDataSource()
    tableDataSource.delegate = self

    tableView = UITableView(frame: CGRect(x: 0, y: 64, width: self.view.frame.size.width, height: self.view.frame.size.height - 44))
    tableView.delegate = tableDataSource
    tableView.dataSource = tableDataSource

    view.addSubview(tableView)
  }
}

extension PlaceAutocompleteViewController: UISearchBarDelegate {
  func searchBar(_ searchBar: UISearchBar, textDidChange searchText: String) {
    // Update the GMSAutocompleteTableDataSource with the search text.
    tableDataSource.sourceTextHasChanged(searchText)
  }
}

extension PlaceAutocompleteViewController: GMSAutocompleteTableDataSourceDelegate {
  func didUpdateAutocompletePredictions(for tableDataSource: GMSAutocompleteTableDataSource) {
    // Turn the network activity indicator off.
    UIApplication.shared.isNetworkActivityIndicatorVisible = false
    // Reload table data.
    tableView.reloadData()
  }

  func didRequestAutocompletePredictions(for tableDataSource: GMSAutocompleteTableDataSource) {
    // Turn the network activity indicator on.
    UIApplication.shared.isNetworkActivityIndicatorVisible = true
    // Reload table data.
    tableView.reloadData()
  }

  func tableDataSource(_ tableDataSource: GMSAutocompleteTableDataSource, didAutocompleteWith place: GMSPlace) {
    // Do something with the selected place.
    print("Place name: \(place.name)")
    print("Place address: \(place.formattedAddress)")
    print("Place attributions: \(place.attributions)")
  }

  func tableDataSource(_ tableDataSource: GMSAutocompleteTableDataSource, didFailAutocompleteWithError error: Error) {
    // Handle the error.
    print("Error: \(error.localizedDescription)")
  }

  func tableDataSource(_ tableDataSource: GMSAutocompleteTableDataSource, didSelect prediction: GMSAutocompletePrediction) -> Bool {
    return true
  }
}
Objective-C
// Copyright 2020 Google LLC
//
// Licensed under the Apache License, Version 2.0 (the "License");
// you may not use this file except in compliance with the License.
// You may obtain a copy of the License at
//
//      http://www.apache.org/licenses/LICENSE-2.0
//
// Unless required by applicable law or agreed to in writing, software
// distributed under the License is distributed on an "AS IS" BASIS,
// WITHOUT WARRANTIES OR CONDITIONS OF ANY KIND, either express or implied.
// See the License for the specific language governing permissions and
// limitations under the License.

#import "PlaceAutocompleteViewController.h"
@import GooglePlaces;
@import UIKit;

@interface PlaceAutocompleteViewController () <GMSAutocompleteTableDataSourceDelegate, UISearchBarDelegate>

@end

@implementation PlaceAutocompleteViewController {
  UITableView *tableView;
  GMSAutocompleteTableDataSource *tableDataSource;
}

- (void)viewDidLoad {
  [super viewDidLoad];

  UISearchBar *searchBar = [[UISearchBar alloc] initWithFrame:CGRectMake(0, 20, self.view.frame.size.width, 44)];
  searchBar.delegate = self;

  [self.view addSubview:searchBar];

  tableDataSource = [[GMSAutocompleteTableDataSource alloc] init];
  tableDataSource.delegate = self;

  tableView = [[UITableView alloc] initWithFrame:CGRectMake(0, 64, self.view.frame.size.width, self.view.frame.size.height - 44)];
  tableView.delegate = tableDataSource;
  tableView.dataSource = tableDataSource;

  [self.view addSubview:tableView];
}

#pragma mark - GMSAutocompleteTableDataSourceDelegate

- (void)didUpdateAutocompletePredictionsForTableDataSource:(GMSAutocompleteTableDataSource *)tableDataSource {
  // Turn the network activity indicator off.
  UIApplication.sharedApplication.networkActivityIndicatorVisible = NO;

  // Reload table data.
  [tableView reloadData];
}

- (void)didRequestAutocompletePredictionsForTableDataSource:(GMSAutocompleteTableDataSource *)tableDataSource {
  // Turn the network activity indicator on.
  UIApplication.sharedApplication.networkActivityIndicatorVisible = YES;

  // Reload table data.
  [tableView reloadData];
}

- (void)tableDataSource:(GMSAutocompleteTableDataSource *)tableDataSource didAutocompleteWithPlace:(GMSPlace *)place {
  // Do something with the selected place.
  NSLog(@"Place name: %@", place.name);
  NSLog(@"Place address: %@", place.formattedAddress);
  NSLog(@"Place attributions: %@", place.attributions);
}

- (void)tableDataSource:(GMSAutocompleteTableDataSource *)tableDataSource didFailAutocompleteWithError:(NSError *)error {
  // Handle the error
  NSLog(@"Error %@", error.description);
}

- (BOOL)tableDataSource:(GMSAutocompleteTableDataSource *)tableDataSource didSelectPrediction:(GMSAutocompletePrediction *)prediction {
  return YES;
}

#pragma mark - UISearchBarDelegate

- (void)searchBar:(UISearchBar *)searchBar textDidChange:(NSString *)searchText {
  // Update the GMSAutocompleteTableDataSource with the search text.
  [tableDataSource sourceTextHasChanged:searchText];
}

@end
Menyesuaikan warna teks dan latar belakang
Anda dapat menyetel warna semua teks dan latar belakang di UI pelengkapan otomatis kontrol, untuk membuat widget lebih cocok dengan tampilan visual aplikasi Anda. dengan cermat. Ada dua cara untuk menyetel warna kontrol UI:
- Dengan menggunakan UIAppearance protocol iOS native untuk menata gaya kontrol UI secara global jika memungkinkan. Setelan ini berlaku untuk banyak, tetapi tidak semua, kontrol UI yang kurang penting.
- Dengan menggunakan metode SDK pada class widget untuk mengatur properti yang tidak didukung oleh Protokol UIAppearance.
Biasanya, aplikasi Anda akan menggunakan beberapa kombinasi UIAppearance protocol dan metode SDK. Diagram berikut menampilkan elemen mana saja yang bisa diberi gaya:
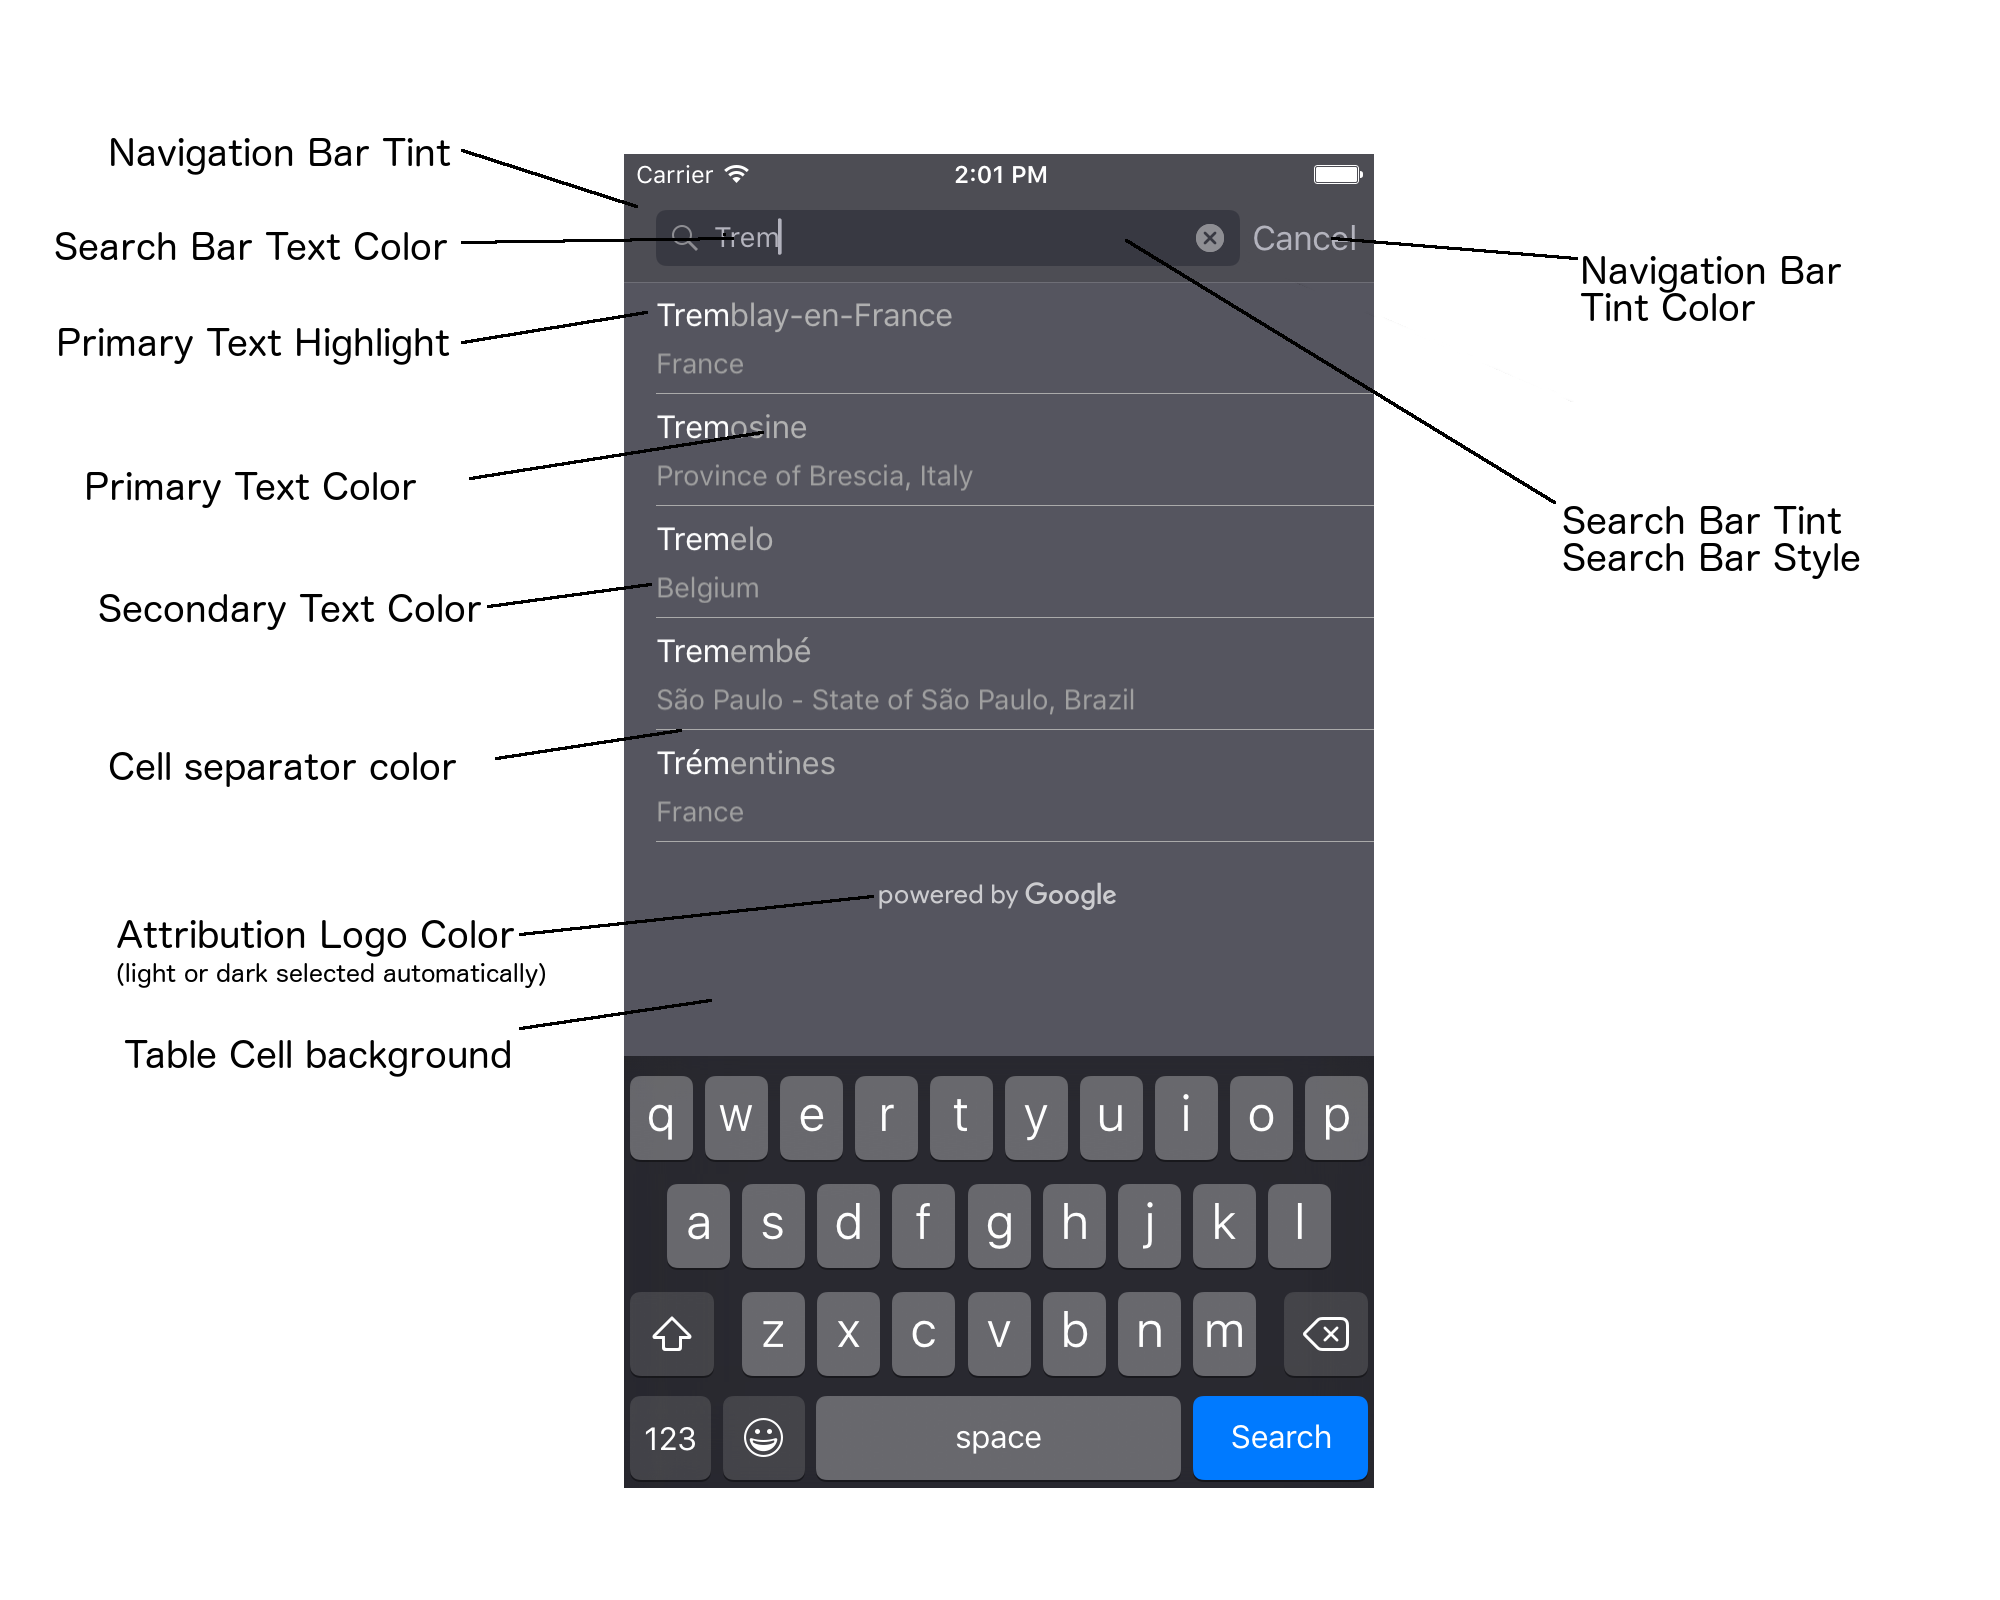
Tabel berikut mencantumkan semua elemen UI, dan menunjukkan bagaimana setiap elemen satu harus ditata gayanya (protokol UIAppearance atau metode SDK).
| Elemen UI | Metode | Cara bergaya |
|---|---|---|
| Tinta Menu Navigasi (latar belakang) | Protokol UIAppearance | Panggil setBarTintColor pada proxy UINavigationBar. |
| Warna tint Menu Navigasi (tanda sisipan teks kotak penelusuran dan tombol Batal) | Protokol UIAppearance | Panggil setTintColor pada proxy UINavigationBar. |
| Warna teks Kotak Penelusuran | Protokol UIAppearance | Setel NSForegroundColorAttributeName di searchBarTextAttributes. |
| Warna tint kotak penelusuran | T/A | Kotak penelusuran transparan dan akan ditampilkan sebagai versi berarsir dari Menu Navigasi. |
| Warna teks placeholder kotak penelusuran (teks penelusuran default) | Protokol UIAppearance | Setel NSForegroundColorAttributeName di placeholderAttributes. |
| Teks utama (juga berlaku untuk teks pesan dan error) | Metode SDK | Hubungi primaryTextColor. |
| Sorotan teks utama | Metode SDK | Hubungi primaryTextHighlightColor. |
| Teks sekunder | Metode SDK | Hubungi secondaryTextColor. |
| Error dan teks pesan | Metode SDK | Hubungi primaryTextColor. |
| Latar belakang sel tabel | Metode SDK | Hubungi tableCellBackgroundColor. |
| Warna pemisah sel tabel | Metode SDK | Hubungi tableCellSeparatorColor. |
| "Coba Lagi" tombol | Metode SDK | Hubungi tintColor. |
| Indikator aktivitas (pemindai kemajuan) | Protokol UIAppearance | Panggil setColor pada proxy UIActivityIndicatorView. |
| "Didukung oleh Google" logo, Gambar awan sedih | T/A | Versi putih atau abu-abu otomatis dipilih berdasarkan kontras latar belakang. |
| Ikon kaca pembesar dan teks bening di kolom teks Kotak Penelusuran | T/A | Untuk menata gaya, ganti gambar default dengan gambar berwarna yang diinginkan. |
Menggunakan protokol UIAppearance
Anda dapat menggunakan protokol UIAppearance
untuk mendapatkan {i>proxy<i} penampilan untuk elemen UI tertentu, yang kemudian bisa Anda gunakan
menetapkan warna untuk elemen UI. Ketika modifikasi dibuat, semua {i>instance <i}
elemen UI tertentu akan terpengaruh. Misalnya, contoh berikut secara global
mengubah warna teks class UITextField menjadi hijau saat class tersebut
terdapat dalam UISearchBar:
[[UITextField appearanceWhenContainedIn:[UISearchBar class], nil]
    setDefaultTextAttributes:@{NSForegroundColorAttributeName:[UIColor greenColor]}];
Untuk informasi selengkapnya tentang cara menentukan nilai warna, lihat Referensi Class UIColor.
Cuplikan kode berikut menunjukkan semua perintah proxy yang perlu Anda gunakan untuk
menata gaya apa saja dalam kontrol UI pelengkapan otomatis layar penuh. Tambahkan kode ini
ke metode didFinishLaunchingWithOptions di Appdelegate.m:
// Define some colors.
UIColor *darkGray = [UIColor darkGrayColor];
UIColor *lightGray = [UIColor lightGrayColor];

// Navigation bar background.
[[UINavigationBar appearance] setBarTintColor:darkGray];
[[UINavigationBar appearance] setTintColor:lightGray];

// Color of typed text in the search bar.
NSDictionary *searchBarTextAttributes = @{
                                          NSForegroundColorAttributeName: lightGray,
                                          NSFontAttributeName : [UIFont systemFontOfSize:[UIFont systemFontSize]]
                                          };
[UITextField appearanceWhenContainedInInstancesOfClasses:@[[UISearchBar class]]]
    .defaultTextAttributes = searchBarTextAttributes;

// Color of the placeholder text in the search bar prior to text entry.
NSDictionary *placeholderAttributes = @{
                                        NSForegroundColorAttributeName: lightGray,
                                        NSFontAttributeName : [UIFont systemFontOfSize:[UIFont systemFontSize]]
                                        };

// Color of the default search text.
// NOTE: In a production scenario, "Search" would be a localized string.
NSAttributedString *attributedPlaceholder =
[[NSAttributedString alloc] initWithString:@"Search"
                                attributes:placeholderAttributes];
[UITextField appearanceWhenContainedInInstancesOfClasses:@[[UISearchBar class]]]
    .attributedPlaceholder = attributedPlaceholder;

// Color of the in-progress spinner.
[[UIActivityIndicatorView appearance] setColor:lightGray];

// To style the two image icons in the search bar (the magnifying glass
// icon and the 'clear text' icon), replace them with different images.
[[UISearchBar appearance] setImage:[UIImage imageNamed:@"custom_clear_x_high"]
                  forSearchBarIcon:UISearchBarIconClear
                            state:UIControlStateHighlighted];
[[UISearchBar appearance] setImage:[UIImage imageNamed:@"custom_clear_x"]
                  forSearchBarIcon:UISearchBarIconClear
                            state:UIControlStateNormal];
[[UISearchBar appearance] setImage:[UIImage imageNamed:@"custom_search"]
                    forSearchBarIcon:UISearchBarIconSearch
                            state:UIControlStateNormal];

// Color of selected table cells.
UIView *selectedBackgroundView = [[UIView alloc] init];
selectedBackgroundView.backgroundColor = [UIColor lightGrayColor];
[UITableViewCell appearanceWhenContainedIn:[GMSAutocompleteViewController class], nil]
    .selectedBackgroundView = selectedBackgroundView;
Menetapkan properti gaya kontrol UI
Subset elemen kontrol UI memiliki properti yang tidak terpengaruh oleh
Protokol UIAppearance, dan sebagainya harus disetel secara langsung. Contoh kode berikut
menunjukkan cara menentukan warna latar depan dan latar belakang, serta menerapkannya ke UI
instance kontrol bernama acController. Tambahkan kode ini ke onLaunchClicked
dalam ViewController.m:
UIColor *darkGray = [UIColor darkGrayColor];
UIColor *lightGray = [UIColor lightGrayColor];

acController.secondaryTextColor = [UIColor colorWithWhite:1.0f alpha:0.5f];
acController.primaryTextColor = lightGray;
acController.primaryTextHighlightColor = [UIColor grayColor];
acController.tableCellBackgroundColor = darkGray;
acController.tableCellSeparatorColor = lightGray;
acController.tintColor = lightGray;
Mendapatkan prediksi tempat secara terprogram
Anda dapat membuat UI penelusuran kustom sebagai alternatif UI yang disediakan oleh widget pelengkapan otomatis. Untuk melakukannya, aplikasi Anda harus mendapatkan prediksi tempat secara terprogram. Aplikasi Anda bisa mendapatkan daftar prediksi nama tempat dan/atau alamat dengan salah satu cara berikut:
Menelepon GMSPlacesClient findAutocompletePredictionsFromQuery:
Untuk mendapatkan daftar nama tempat dan/atau alamat yang diprediksi, pertama
membuat instance GMSPlacesClient,
lalu panggil
GMSPlacesClient findAutocompletePredictionsFromQuery:
dengan parameter berikut:
- String
autocompleteQueryberisi teks yang diketik oleh pengguna. GMSAutocompleteSessionToken, yang digunakan untuk mengidentifikasi setiap sesi individu. Aplikasi Anda harus meneruskan token yang sama untuk setiap panggilan permintaan pelengkapan otomatis, lalu meneruskan token tersebut, beserta ID Tempat, pada panggilan berikutnya kefetchPlacefromPlaceID:untuk mengambil Place Details untuk tempat yang dipilih oleh pengguna.GMSAutocompleteFilteruntuk:- Membiaskan atau membatasi hasil ke wilayah tertentu.
- Batasi hasil ke jenis tempat tertentu.
- Objek
GMSPlaceLocationBias/Restriction yang membiaskan hasil ke area tertentu yang ditentukan oleh batas garis lintang dan bujur.
- Metode callback untuk menangani prediksi yang ditampilkan.
Contoh kode di bawah menunjukkan panggilan ke findAutocompletePredictionsFromQuery:.
Swift
/**
 * Create a new session token. Be sure to use the same token for calling
 * findAutocompletePredictions, as well as the subsequent place details request.
 * This ensures that the user's query and selection are billed as a single session.
 */
let token = GMSAutocompleteSessionToken.init()

// Create a type filter.
let filter = GMSAutocompleteFilter()
filter.types = [.bank]
filter.locationBias = GMSPlaceRectangularLocationOption( northEastBounds,
                                   southWestBounds);

placesClient?.findAutocompletePredictions(fromQuery: "cheesebu",

                                          filter: filter,
                                          sessionToken: token,
                                          callback: { (results, error) in
    if let error = error {
      print("Autocomplete error: \(error)")
      return
    }
    if let results = results {
      for result in results {
        print("Result \(result.attributedFullText) with placeID \(result.placeID)")
      }
    }
})
Objective-C
/**
 * Create a new session token. Be sure to use the same token for calling
 * findAutocompletePredictionsFromQuery:, as well as the subsequent place details request.
 * This ensures that the user's query and selection are billed as a single session.
 */
GMSAutocompleteSessionToken *token = [[GMSAutocompleteSessionToken alloc] init];

// Create a type filter.
GMSAutocompleteFilter *_filter = [[GMSAutocompleteFilter alloc] init];
_filter.types = @[ kGMSPlaceTypeBank ];

[_placesClient findAutocompletePredictionsFromQuery:@"cheesebu"
filter:_filter sessionToken:token callback:^(NSArray<GMSAutocompletePrediction *> * _Nullable results, NSError * _Nullable error) {
  if (error != nil) {
    NSLog(@"An error occurred %@", [error localizedDescription]);
    return;
  }
  if (results != nil) {
    for (GMSAutocompletePrediction *result in results) {
      NSLog(@"Result %@ with PlaceID %@", result.attributedFullText, result.placeID);
    }
  }
}];
API akan memanggil metode callback yang ditetapkan, dengan meneruskan array
GMSAutocompletePrediction
objek terstruktur dalam jumlah besar.
Setiap GMSAutocompletePrediction
berisi informasi berikut:
attributedFullText– Teks lengkap prediksi, dalam bentukNSAttributedString. Contoh: 'Sydney Opera House, Sydney, New South Wales, Australia. Setiap rentang teks yang sesuai dengan {i>input<i} pengguna memilikikGMSAutocompleteMatchAttribute, Anda dapat menggunakan atribut ini untuk menyorot teks yang cocok dalam kueri pengguna, misalnya, seperti yang ditunjukkan di bawah ini.placeID– ID tempat yang diprediksi. ID tempat adalah ID tekstual yang secara unik mengidentifikasi tempat. Untuk mengetahui informasi selengkapnya tentang ID tempat, lihat ringkasan ID Tempat.distanceMeters– Jarak garis lurus dari yang ditentukanoriginke tujuan. Jika propertiorigintidak ditetapkan, tidak ada jarak nilai yang akan ditampilkan.
Contoh kode berikut mengilustrasikan cara menyoroti bagian-bagian dalam teks tebal
hasil yang cocok dengan teks dalam kueri pengguna, menggunakan enumerateAttribute:
Swift
let regularFont = UIFont.systemFont(ofSize: UIFont.labelFontSize)
let boldFont = UIFont.boldSystemFont(ofSize: UIFont.labelFontSize)

let bolded = prediction.attributedFullText.mutableCopy() as! NSMutableAttributedString
bolded.enumerateAttribute(kGMSAutocompleteMatchAttribute, in: NSMakeRange(0, bolded.length), options: []) {
  (value, range: NSRange, stop: UnsafeMutablePointer<ObjCBool>) -> Void in
    let font = (value == nil) ? regularFont : boldFont
    bolded.addAttribute(NSFontAttributeName, value: font, range: range)
}

label.attributedText = bolded
Objective-C
UIFont *regularFont = [UIFont systemFontOfSize:[UIFont labelFontSize]];
UIFont *boldFont = [UIFont boldSystemFontOfSize:[UIFont labelFontSize]];

NSMutableAttributedString *bolded = [prediction.attributedFullText mutableCopy];
[bolded enumerateAttribute:kGMSAutocompleteMatchAttribute
                   inRange:NSMakeRange(0, bolded.length)
                   options:0
                usingBlock:^(id value, NSRange range, BOOL *stop) {
                  UIFont *font = (value == nil) ? regularFont : boldFont;
                  [bolded addAttribute:NSFontAttributeName value:font range:range];
                }];

label.attributedText = bolded;
Menggunakan pengambil
Jika Anda ingin membangun kontrol pelengkapan otomatis dari awal, Anda bisa menggunakan
GMSAutocompleteFetcher,
yang menggabungkan metode autocompleteQuery pada GMSPlacesClient.
Pengambil men-throttle permintaan, hanya menampilkan hasil untuk yang terbaru
memasukkan teks penelusuran. Ini tidak menyediakan elemen UI.
Untuk menerapkan GMSAutocompleteFetcher,
lakukan langkah-langkah berikut:
- Mengimplementasikan
GMSAutocompleteFetcherDelegatedan berperforma tinggi karena merupakan protokol biner. - Buat objek
GMSAutocompleteFetcher. - Panggil
sourceTextHasChangedpada pengambil saat pengguna mengetik. - Menangani prediksi dan error menggunakan
didAutcompleteWithPredictionsdandidFailAutocompleteWithErrormetode protokol.
Contoh kode berikut menunjukkan penggunaan pengambil untuk mengambil input pengguna
dan menampilkan tempat yang cocok dalam tampilan teks. Fungsi untuk memilih tempat
telah dihilangkan. FetcherSampleViewController berasal dari UIViewController
di FetcherSampleViewController.h.
Swift
import UIKit
import GooglePlaces

class ViewController: UIViewController {

  var textField: UITextField?
  var resultText: UITextView?
  var fetcher: GMSAutocompleteFetcher?

  override func viewDidLoad() {
    super.viewDidLoad()

    view.backgroundColor = .white
    edgesForExtendedLayout = []

    // Set bounds to inner-west Sydney Australia.
    let neBoundsCorner = CLLocationCoordinate2D(latitude: -33.843366,
                                                longitude: 151.134002)
    let swBoundsCorner = CLLocationCoordinate2D(latitude: -33.875725,
                                                longitude: 151.200349)

    // Set up the autocomplete filter.
    let filter = GMSAutocompleteFilter()
    filter.locationRestriction = GMSPlaceRectangularLocationOption(neBoundsCorner, swBoundsCorner)

    // Create a new session token.
    let token: GMSAutocompleteSessionToken = GMSAutocompleteSessionToken.init()

    // Create the fetcher.
    fetcher = GMSAutocompleteFetcher(bounds: nil, filter: filter)
    fetcher?.delegate = self
    fetcher?.provide(token)

    textField = UITextField(frame: CGRect(x: 5.0, y: 10.0,
                                          width: view.bounds.size.width - 5.0,
                                          height: 64.0))
    textField?.autoresizingMask = .flexibleWidth
    textField?.addTarget(self, action: #selector(textFieldDidChange(textField:)),
                         for: .editingChanged)
    let placeholder = NSAttributedString(string: "Type a query...")

    textField?.attributedPlaceholder = placeholder

    resultText = UITextView(frame: CGRect(x: 0, y: 65.0,
                                          width: view.bounds.size.width,
                                          height: view.bounds.size.height - 65.0))
    resultText?.backgroundColor = UIColor(white: 0.95, alpha: 1.0)
    resultText?.text = "No Results"
    resultText?.isEditable = false

    self.view.addSubview(textField!)
    self.view.addSubview(resultText!)
  }

  @objc func textFieldDidChange(textField: UITextField) {
    fetcher?.sourceTextHasChanged(textField.text!)
  }

}

extension ViewController: GMSAutocompleteFetcherDelegate {
  func didAutocomplete(with predictions: [GMSAutocompletePrediction]) {
    let resultsStr = NSMutableString()
    for prediction in predictions {
      resultsStr.appendFormat("\n Primary text: %@\n", prediction.attributedPrimaryText)
      resultsStr.appendFormat("Place ID: %@\n", prediction.placeID)
    }

    resultText?.text = resultsStr as String
  }

  func didFailAutocompleteWithError(_ error: Error) {
    resultText?.text = error.localizedDescription
  }
}
Objective-C
#import "FetcherSampleViewController.h"
#import <GooglePlaces/GooglePlaces.h>
#import <GoogleMapsBase/GoogleMapsBase.h>

@interface FetcherSampleViewController () <GMSAutocompleteFetcherDelegate>

@end

@implementation FetcherSampleViewController {
  UITextField *_textField;
  UITextView *_resultText;
  GMSAutocompleteFetcher* _fetcher;
}

- (void)viewDidLoad {
  [super viewDidLoad];

  self.view.backgroundColor = [UIColor whiteColor];
  self.edgesForExtendedLayout = UIRectEdgeNone;

  // Set bounds to inner-west Sydney Australia.
  CLLocationCoordinate2D neBoundsCorner = CLLocationCoordinate2DMake(-33.843366, 151.134002);
  CLLocationCoordinate2D swBoundsCorner = CLLocationCoordinate2DMake(-33.875725, 151.200349);

  GMSAutocompleteFilter *autocompleteFilter = [[GMSAutocompleteFilter alloc] init];
  autocompleteFilter.locationRestriction =
        GMSPlaceRectangularLocationOption(neBoundsCorner, swBoundsCorner);

  // Create the fetcher.
  _fetcher = [[GMSAutocompleteFetcher alloc] initWithBounds:nil
                                                     filter:filter];
  _fetcher.delegate = self;

  // Set up the UITextField and UITextView.
  _textField = [[UITextField alloc] initWithFrame:CGRectMake(5.0f,
                                                             0,
                                                             self.view.bounds.size.width - 5.0f,
                                                             44.0f)];
  _textField.autoresizingMask = UIViewAutoresizingFlexibleWidth;
  [_textField addTarget:self
                 action:@selector(textFieldDidChange:)
       forControlEvents:UIControlEventEditingChanged];
  _resultText =[[UITextView alloc] initWithFrame:CGRectMake(0,
                                                            45.0f,
                                                            self.view.bounds.size.width,
                                                            self.view.bounds.size.height - 45.0f)];
  _resultText.backgroundColor = [UIColor colorWithWhite:0.95f alpha:1.0f];
  _resultText.text = @"No Results";
  _resultText.editable = NO;
  [self.view addSubview:_textField];
  [self.view addSubview:_resultText];
}

- (void)textFieldDidChange:(UITextField *)textField {
  NSLog(@"%@", textField.text);
  [_fetcher sourceTextHasChanged:textField.text];
}

#pragma mark - GMSAutocompleteFetcherDelegate
- (void)didAutocompleteWithPredictions:(NSArray *)predictions {
  NSMutableString *resultsStr = [NSMutableString string];
  for (GMSAutocompletePrediction *prediction in predictions) {
      [resultsStr appendFormat:@"%@\n", [prediction.attributedPrimaryText string]];
  }
  _resultText.text = resultsStr;
}

- (void)didFailAutocompleteWithError:(NSError *)error {
  _resultText.text = [NSString stringWithFormat:@"%@", error.localizedDescription];
}

@end
Token sesi
Token sesi mengelompokkan fase kueri dan pemilihan dari pelengkapan otomatis pengguna menelusuri ke sesi terpisah untuk tujuan penagihan. Sesi dimulai ketika pengguna mulai mengetik kueri, dan menyimpulkan saat mereka memilih tempat. Masing-masing sesi dapat memiliki beberapa kueri, diikuti dengan satu pilihan tempat. Setelah selesai, token tidak lagi valid; aplikasi Anda harus membuat token baru untuk setiap sesi. Sebaiknya gunakan token sesi untuk semua sesi pelengkapan otomatis terprogram (saat Anda menggunakan pengontrol layar penuh, atau pengontrol hasil, API akan menanganinya secara otomatis).
Places SDK for iOS menggunakan GMSAutocompleteSessionToken
untuk mengidentifikasi setiap sesi. Aplikasi Anda harus meneruskan token sesi baru pada
memulai setiap sesi baru, lalu meneruskan token yang sama, bersama ID Tempat,
dalam panggilan berikutnya ke fetchPlacefromPlaceID:
untuk mengambil Place Details untuk tempat yang dipilih oleh pengguna.
Pelajari token sesi lebih lanjut.
Gunakan kode berikut untuk membuat token sesi baru:
let token: GMSAutocompleteSessionToken = GMSAutocompleteSessionToken.init()
Batas penggunaan
- Penggunaan
GMSPlacesClient findAutocompletePredictionsFromQueryini tunduk pada batas kueri bertingkat. Lihat dokumentasi tentang batas penggunaan.
Menampilkan atribusi dalam aplikasi Anda
- Jika aplikasi Anda menggunakan layanan pelengkapan otomatis secara terprogram, UI harus menampilkan gambar 'Didukung oleh Google' atribusi, atau muncul dalam Peta merek Google.
- Jika aplikasi Anda menggunakan kontrol UI pelengkapan otomatis, tidak diperlukan tindakan tambahan (atribusi yang diperlukan ditampilkan secara default).
- Jika Anda mengambil dan menampilkan informasi tempat tambahan setelah mendapatkan tempat berdasarkan ID, Anda juga harus menampilkan atribusi pihak ketiga.
Untuk detail selengkapnya, lihat dokumentasi di atribusi.
Mengontrol indikator aktivitas jaringan
Untuk mengontrol indikator aktivitas jaringan di {i>status bar<i} aplikasi yang harus mengimplementasikan metode delegasi opsional yang sesuai untuk pelengkapan otomatis yang Anda gunakan dan aktifkan dan nonaktifkan indikator jaringan sendiri.
- Untuk
GMSAutocompleteViewController, Anda harus mengimplementasikan metode delegasididRequestAutocompletePredictions:dandidUpdateAutocompletePredictions:. - Untuk
GMSAutocompleteResultsViewController, Anda harus mengimplementasikan metode delegasididRequestAutocompletePredictionsForResultsController:dandidUpdateAutocompletePredictionsForResultsController:. - Untuk
GMSAutocompleteTableDataSource, Anda harus mengimplementasikan metode delegasididRequestAutocompletePredictionsForTableDataSource:dandidUpdateAutocompletePredictionsForTableDataSource:.
Dengan menerapkan metode ini dan menyetel [UIApplication sharedApplication].networkActivityIndicatorVisible
ke YES dan NO masing-masing status bar akan benar-benar cocok dengan
UI pelengkapan otomatis.
Membatasi hasil pelengkapan otomatis
Anda bisa menyetel kontrol UI pelengkapan otomatis untuk membatasi hasil wilayah geografis, dan/atau memfilter hasil menurut satu atau beberapa jenis tempat, atau untuk negara tertentu. Untuk membatasi hasil, Anda dapat melakukan hal berikut:
- Untuk memilih (bias) hasil dalam wilayah yang ditentukan, tetapkan
locationBiaspadaGMSAutocompleteFilter(beberapa hasil dari luar wilayah yang ditentukan mungkin masih dikembalikan). JikalocationRestrictionjuga ditetapkan,locationBiasakan diabaikan. Untuk hanya menampilkan (membatasi) hasil dalam wilayah yang ditentukan, tetapkan
locationRestrictionpadaGMSAutocompleteFilter(hanya hasil dalam wilayah yang ditentukan akan ditampilkan).- Catatan: Pembatasan ini hanya berlaku untuk seluruh rute, sintetis hasil yang terletak di luar batas persegi panjang dapat ditampilkan berdasarkan rute yang tumpang-tindih dengan pembatasan lokasi.
Untuk hanya menampilkan hasil yang sesuai dengan jenis tempat tertentu, tetapkan
typespadaGMSAutocompleteFilter, (misalnya, menentukan TypeFilter.ADDRESS akan menyebabkan widget hanya menampilkan hasil dengan alamat yang tepat).Untuk menampilkan hasil hanya di maksimal lima negara yang ditentukan, setel
countriespadaGMSAutocompleteFilter.
Membiaskan hasil ke wilayah tertentu
Untuk memilih (bias) hasil dalam wilayah yang ditentukan, tetapkan locationBias pada
GMSAutocompleteFilter, seperti yang ditampilkan di sini:
  northEast = CLLocationCoordinate2DMake(39.0, -95.0);
  southWest = CLLocationCoordinate2DMake(37.5, -100.0);
  GMSAutocompleteFilter *filter = [[GMSAutocompleteFilter alloc] init];
  filter.locationBias = GMSPlaceRectangularLocationOption(northEast, southWest);
Membatasi hasil ke wilayah tertentu
Untuk hanya menampilkan (membatasi) hasil dalam wilayah yang ditentukan, tetapkan
locationRestriction pada GMSAutocompleteFilter, seperti yang ditampilkan di sini:
  northEast = CLLocationCoordinate2DMake(39.0, -95.0);
  southWest = CLLocationCoordinate2DMake(37.5, -100.0);
  GMSAutocompleteFilter *filter = [[GMSAutocompleteFilter alloc] init];
  filter.locationRestriction = GMSPlaceRectangularLocationOption(northEast, southWest);
Filter hasil menurut negara
Untuk memfilter hasil dalam maksimal lima negara yang ditentukan, setel countries di
GMSAutocompleteFilter, seperti yang ditampilkan di sini:
  GMSAutocompleteFilter *filter = [[GMSAutocompleteFilter alloc] init];
  filter.countries = @[ @"au", @"nz" ];
Filter hasil menurut jenis tempat atau koleksi jenis
Batasi hasil pada jenis atau kumpulan jenis tertentu dengan menyetel
types properti dari
GMSAutoCompleteFilter.
Gunakan properti ini untuk menentukan filter yang tercantum dalam Tabel 1, 2, dan 3 di
Jenis Tempat. Jika tidak ada yang ditetapkan, semua tipe akan dikembalikan.
Untuk menentukan jenis atau filter koleksi jenis:
Gunakan properti
typesuntuk menentukan hingga lima nilai type dari Tabel 1 dan Tabel 2 yang ditampilkan di Jenis Tempat. Nilai jenisnya adalah ditentukan oleh konstanta diGMSPlaceType.Gunakan properti
typesuntuk menentukan koleksi jenis dari Tabel 3 yang ditampilkan di Jenis Tempat. Nilai koleksi jenis ditentukan oleh konstanta diGMSPlaceType.Hanya satu jenis dari Tabel 3 yang diizinkan dalam permintaan. Jika Anda menentukan nilai dari Tabel 3, Anda tidak dapat menentukan nilai dari Tabel 1 atau Tabel 2. Jika yang Anda lakukan, maka terjadi kesalahan.
Misalnya, untuk mengembalikan hanya hasil yang sesuai dengan tipe tempat tertentu, tetapkan
types pada GMSAutocompleteFilter. Contoh berikut menunjukkan setelan
filter untuk hanya menampilkan hasil dengan alamat yang tepat:
  GMSAutocompleteFilter *filter = [[GMSAutocompleteFilter alloc] init];
  filter.types = @[ kGMSPlaceTypeAirport, kGMSPlaceTypeAmusementPark ];
Pengoptimalan Place Autocomplete
Bagian ini menjelaskan praktik terbaik untuk membantu Anda memaksimalkan layanan Place Autocomplete.
Berikut ini beberapa pedoman umum:
- Cara tercepat untuk membuat antarmuka pengguna yang berfungsi baik adalah dengan menggunakan widget Autocomplete Maps JavaScript API, widget Autocomplete Places SDK for Android, atau Kontrol UI Autocomplete Places SDK for iOS
- Kembangkan pemahaman tentang kolom data Place Autocomplete yang penting sejak awal.
- Kolom pembiasan lokasi dan pembatasan lokasi bersifat opsional, tetapi dapat memberikan dampak signifikan terhadap performa pelengkapan otomatis.
- Gunakan penanganan error untuk memastikan aplikasi Anda terdegrasi secara halus jika API menampilkan error.
- Pastikan aplikasi Anda menanganinya jika tidak ada pilihan dan menawarkan cara kepada pengguna untuk melanjutkan.
Praktik terbaik pengoptimalan biaya
Pengoptimalan biaya dasar
Untuk mengoptimalkan biaya penggunaan layanan Place Autocomplete, gunakan mask kolom dalam widget Place Details dan Place Autocomplete agar hanya menampilkan kolom data tempat yang Anda butuhkan.
Pengoptimalan biaya lanjutan
Pertimbangkan implementasi Place Autocomplete yang terprogram untuk mengakses Harga Per Permintaan dan meminta hasil Geocoding API tentang tempat yang dipilih, bukan Place Details. Harga Per Permintaan yang dipasangkan dengan Geocoding API lebih hemat biaya daripada harga Per Sesi (berbasis sesi) jika kondisi berikut terpenuhi:
- Jika Anda hanya memerlukan lintang/bujur atau alamat tempat yang dipilih pengguna, Geocoding API akan mengirimkan informasi ini dengan biaya yang lebih murah daripada panggilan Place Details.
- Jika pengguna memilih prediksi pelengkapan otomatis dalam rata-rata empat permintaan prediksi Autocomplete atau kurang, harga Per Permintaan mungkin lebih hemat biaya daripada harga Per Sesi.
Apakah aplikasi Anda memerlukan informasi selain alamat dan lintang/bujur dari prediksi yang dipilih?
Ya, memerlukan informasi lebih detail
Gunakan Place Autocomplete berbasis sesi dengan Place Details.
Karena aplikasi Anda memerlukan Place Details seperti nama tempat, status bisnis, atau jam buka, penerapan Place Autocomplete harus menggunakan token sesi (secara terprogram atau diintegrasikan ke widget JavaScript, Android, atau iOS) dengan total biaya sebesar $0,017 per sesi ditambah SKU Data Places yang relevan, bergantung pada kolom data tempat yang Anda minta.1
Penerapan widget
Pengelolaan sesi secara otomatis terintegrasi ke dalam widget JavaScript, Android, atau iOS. Ini mencakup permintaan Place Autocomplete dan permintaan Place Details pada prediksi yang dipilih. Pastikan untuk menentukan parameter fields untuk memastikan Anda hanya meminta
kolom data tempat yang Anda butuhkan.
Penerapan terprogram
Gunakan token sesi dengan permintaan Place Autocomplete Anda. Saat meminta Place Details tentang prediksi yang dipilih, sertakan parameter berikut:
- ID tempat dari respons Place Autocomplete
- Token sesi yang digunakan dalam permintaan Place Autocomplete
- Parameter
fieldsyang menentukan kolom data tempat yang Anda perlukan
Tidak, hanya memerlukan alamat dan lokasi
Geocoding API dapat menjadi opsi yang lebih hemat biaya daripada Place Details untuk aplikasi Anda, bergantung pada performa penggunaan Place Autocomplete. Efisiensi Autocomplete setiap aplikasi bervariasi bergantung pada apa yang dimasukkan oleh pengguna, tempat aplikasi digunakan, dan apakah praktik terbaik pengoptimalan performa telah diterapkan.
Untuk menjawab pertanyaan berikut, analisis rata-rata jumlah karakter yang diketik pengguna sebelum memilih prediksi Place Autocomplete di aplikasi Anda.
Apakah pengguna Anda rata-rata memilih prediksi Place Autocomplete dalam empat permintaan atau kurang?
Ya
Terapkan Place Autocomplete secara terprogram tanpa token sesi dan panggil Geocoding API di prediksi tempat yang dipilih.
Geocoding API memberikan alamat dan koordinat lintang/bujur dengan biaya sebesar $0,005 per permintaan. Membuat empat permintaan Place Autocomplete - Per Permintaan dikenai biaya $0,01132 sehingga total biaya empat permintaan ditambah panggilan Geocoding API tentang prediksi tempat yang dipilih adalah $0,01632, yang lebih rendah daripada harga Autocomplete - Per Session, yaitu $0,017 per sesi.1
Pertimbangkan untuk menerapkan praktik terbaik performa guna membantu pengguna mendapatkan prediksi yang mereka cari dengan lebih sedikit karakter.
Tidak
Gunakan Place Autocomplete berbasis sesi dengan Place Details.
Karena jumlah rata-rata permintaan yang harus Anda buat sebelum pengguna memilih prediksi Place Autocomplete akan melebihi biaya harga Per Sesi, penerapan Place Autocomplete harus menggunakan token sesi untuk permintaan Place Autocomplete dan permintaan Place Details yang terkait, dengan total biaya sebesar $0,017 per sesi.1
Penerapan widget
Pengelolaan sesi secara otomatis terintegrasi ke dalam widget JavaScript, Android, atau iOS. Ini mencakup permintaan Place Autocomplete dan permintaan Place Details pada prediksi yang dipilih. Pastikan untuk menentukan parameter fields untuk memastikan Anda hanya meminta kolom Basic Data.
Penerapan terprogram
Gunakan token sesi dengan permintaan Place Autocomplete Anda. Saat meminta Place Details tentang prediksi yang dipilih, sertakan parameter berikut:
- ID tempat dari respons Place Autocomplete
- Token sesi yang digunakan dalam permintaan Place Autocomplete
- Parameter
fieldsyang menentukan kolom Basic Data seperti alamat dan geometri
Pertimbangkan untuk menunda permintaan Place Autocomplete
Anda dapat menggunakan strategi seperti menunda permintaan Place Autocomplete hingga pengguna mengetik tiga atau empat karakter pertama, sehingga aplikasi Anda membuat lebih sedikit permintaan. Misalnya, membuat permintaan Place Autocomplete untuk setiap karakter setelah pengguna mengetik karakter ketiga berarti jika pengguna mengetik tujuh karakter, lalu memilih prediksi yang telah Anda buatkan untuknya satu permintaan Geocoding API, biaya total akan menjadi $0,01632 (4 * $0,00283 Autocomplete Per Request + $0,005 Geocoding).1
Jika permintaan yang tertunda dapat menghasilkan permintaan terprogram rata-rata di bawah empat, Anda dapat mengikuti panduan ini untuk penerapan Place Autocomplete yang berperforma dengan Geocoding API. Perhatikan bahwa permintaan yang tertunda dapat dianggap sebagai latensi oleh pengguna yang mungkin berharap melihat prediksi dengan setiap karakter baru yang mereka ketik.
Pertimbangkan untuk menerapkan praktik terbaik performa guna membantu pengguna Anda mendapatkan prediksi yang mereka cari dengan lebih sedikit karakter.
-
Biaya yang tercantum di sini adalah dalam USD. Lihat halaman Billing di Google Maps Platform untuk mendapatkan informasi harga selengkapnya.
Praktik terbaik performa
Panduan berikut menjelaskan cara mengoptimalkan performa Place Autocomplete:
- Tambahkan pembatasan negara, pembiasan lokasi, dan (untuk penerapan terprogram) preferensi bahasa ke penerapan Place Autocomplete Anda. Preferensi bahasa tidak diperlukan dengan widget karena widget tersebut memilih preferensi bahasa dari browser atau perangkat seluler pengguna.
- Jika Place Autocomplete disertai sebuah peta, Anda dapat membiaskan lokasi berdasarkan area pandang peta.
- Jika pengguna tidak memilih salah satu prediksi Autocomplete, umumnya karena tidak satu pun prediksi tersebut yang merupakan alamat hasil yang diinginkan, Anda dapat menggunakan kembali input pengguna yang asli untuk mendapatkan hasil yang lebih relevan:
- Jika Anda mengharapkan pengguna hanya memasukkan informasi alamat, gunakan kembali input pengguna yang asli dalam panggilan ke Geocoding API.
- Jika Anda memperkirakan pengguna akan memasukkan kueri untuk tempat tertentu berdasarkan nama atau alamat, gunakan permintaan Find Place. Jika hasil hanya diharapkan di wilayah tertentu, gunakan pembiasan lokasi.
- Pengguna memasukkan alamat subpremis di negara yang tidak memiliki dukungan lengkap untuk Place Autocomplete, misalnya Republik Ceko, Estonia, dan Lituania. Misalnya, alamat Ceko "Stroupežnického 3191/17, Praha" akan menghasilkan prediksi parsial di Place Autocomplete.
- Pengguna memasukkan alamat dengan awalan segmen jalan seperti "23-30 29th St, Queens" di New York City atau "47-380 Kamehameha Hwy, Kaneohe" di pulau Kauai di Hawai'i.
Pemecahan masalah
Meskipun berbagai macam kesalahan dapat terjadi, sebagian besar kesalahan yang kemungkinan besar dialami aplikasi biasanya disebabkan oleh kesalahan konfigurasi (untuk contoh, kunci API yang digunakan salah, atau kunci API dikonfigurasi tidak benar), atau error kuota (aplikasi Anda melebihi kuota). Lihat Batas Penggunaan untuk mengetahui informasi selengkapnya tentang kuota.
Error yang terjadi dalam penggunaan kontrol pelengkapan otomatis ditampilkan di bagian
Metode didFailAutocompleteWithError() untuk berbagai protokol delegasi. Tujuan
Properti code dari objek NSError yang disediakan disetel ke salah satu nilai
enumerasi GMSPlacesErrorCode.