

يوضّح لك هذا البرنامج التعليمي كيفية إضافة خريطة Google إلى تطبيق Android، واستخدام الخطوط المتعدّدة والمضلّعات لتمثيل المسارات والمناطق على الخريطة.
اتّبِع البرنامج التعليمي لإنشاء تطبيق Android باستخدام "حزمة تطوير البرامج بالاستناد إلى بيانات خرائط Google للتطبيقات المتوافقة مع Android". بيئة التطوير المقترَحة هي استوديو Android.
الحصول على الشفرة
استنسِخ أو نزِّل مستودع عيّنات الإصدار 2 من Google Maps Android API من GitHub.
عرض إصدار Java من النشاط:
    // Copyright 2020 Google LLC
//
// Licensed under the Apache License, Version 2.0 (the "License");
// you may not use this file except in compliance with the License.
// You may obtain a copy of the License at
//
//      http://www.apache.org/licenses/LICENSE-2.0
//
// Unless required by applicable law or agreed to in writing, software
// distributed under the License is distributed on an "AS IS" BASIS,
// WITHOUT WARRANTIES OR CONDITIONS OF ANY KIND, either express or implied.
// See the License for the specific language governing permissions and
// limitations under the License.

package com.example.polygons;

import android.os.Bundle;
import android.widget.Toast;
import androidx.appcompat.app.AppCompatActivity;
import com.google.android.gms.maps.CameraUpdateFactory;
import com.google.android.gms.maps.GoogleMap;
import com.google.android.gms.maps.OnMapReadyCallback;
import com.google.android.gms.maps.SupportMapFragment;
import com.google.android.gms.maps.model.BitmapDescriptorFactory;
import com.google.android.gms.maps.model.CustomCap;
import com.google.android.gms.maps.model.Dash;
import com.google.android.gms.maps.model.Dot;
import com.google.android.gms.maps.model.Gap;
import com.google.android.gms.maps.model.JointType;
import com.google.android.gms.maps.model.LatLng;
import com.google.android.gms.maps.model.PatternItem;
import com.google.android.gms.maps.model.Polygon;
import com.google.android.gms.maps.model.PolygonOptions;
import com.google.android.gms.maps.model.Polyline;
import com.google.android.gms.maps.model.PolylineOptions;
import com.google.android.gms.maps.model.RoundCap;
import java.util.Arrays;
import java.util.List;

/**
 * An activity that displays a Google map with polylines to represent paths or routes, and polygons
 * to represent areas.
 */
public class PolyActivity extends AppCompatActivity
        implements OnMapReadyCallback,
                GoogleMap.OnPolylineClickListener,
                GoogleMap.OnPolygonClickListener {

    @Override
    protected void onCreate(Bundle savedInstanceState) {
        super.onCreate(savedInstanceState);

        // Retrieve the content view that renders the map.
        setContentView(R.layout.activity_maps);

        // Get the SupportMapFragment and request notification when the map is ready to be used.
        SupportMapFragment mapFragment =
                (SupportMapFragment) getSupportFragmentManager().findFragmentById(R.id.map);
        mapFragment.getMapAsync(this);
    }


    /**
     * Manipulates the map when it's available. The API invokes this callback when the map is ready
     * to be used. This is where we can add markers or lines, add listeners or move the camera. In
     * this tutorial, we add polylines and polygons to represent routes and areas on the map.
     */
    @Override
    public void onMapReady(GoogleMap googleMap) {

        // Add polylines to the map.
        // Polylines are useful to show a route or some other connection between points.
        Polyline polyline1 =
                googleMap.addPolyline(
                        new PolylineOptions()
                                .clickable(true)
                                .add(
                                        new LatLng(-35.016, 143.321),
                                        new LatLng(-34.747, 145.592),
                                        new LatLng(-34.364, 147.891),
                                        new LatLng(-33.501, 150.217),
                                        new LatLng(-32.306, 149.248),
                                        new LatLng(-32.491, 147.309)));
        // Store a data object with the polyline, used here to indicate an arbitrary type.
        polyline1.setTag("A");
        // Style the polyline.
        stylePolyline(polyline1);

        Polyline polyline2 =
                googleMap.addPolyline(
                        new PolylineOptions()
                                .clickable(true)
                                .add(
                                        new LatLng(-29.501, 119.700),
                                        new LatLng(-27.456, 119.672),
                                        new LatLng(-25.971, 124.187),
                                        new LatLng(-28.081, 126.555),
                                        new LatLng(-28.848, 124.229),
                                        new LatLng(-28.215, 123.938)));
        polyline2.setTag("B");
        stylePolyline(polyline2);

        // Add polygons to indicate areas on the map.
        Polygon polygon1 =
                googleMap.addPolygon(
                        new PolygonOptions()
                                .clickable(true)
                                .add(
                                        new LatLng(-27.457, 153.040),
                                        new LatLng(-33.852, 151.211),
                                        new LatLng(-37.813, 144.962),
                                        new LatLng(-34.928, 138.599)));
        // Store a data object with the polygon, used here to indicate an arbitrary type.
        polygon1.setTag("alpha");
        // Style the polygon.
        stylePolygon(polygon1);

        Polygon polygon2 =
                googleMap.addPolygon(
                        new PolygonOptions()
                                .clickable(true)
                                .add(
                                        new LatLng(-31.673, 128.892),
                                        new LatLng(-31.952, 115.857),
                                        new LatLng(-17.785, 122.258),
                                        new LatLng(-12.4258, 130.7932)));
        polygon2.setTag("beta");
        stylePolygon(polygon2);

        // Position the map's camera near Alice Springs in the center of Australia,
        // and set the zoom factor so most of Australia shows on the screen.
        googleMap.moveCamera(CameraUpdateFactory.newLatLngZoom(new LatLng(-23.684, 133.903), 4));

        // Set listeners for click events.
        googleMap.setOnPolylineClickListener(this);
        googleMap.setOnPolygonClickListener(this);
    }


    private static final int COLOR_BLACK_ARGB = 0xff000000;
    private static final int POLYLINE_STROKE_WIDTH_PX = 12;

    /**
     * Styles the polyline, based on type.
     *
     * @param polyline The polyline object that needs styling.
     */
    private void stylePolyline(Polyline polyline) {
        String type = "";
        // Get the data object stored with the polyline.
        if (polyline.getTag() != null) {
            type = polyline.getTag().toString();
        }

        switch (type) {
            // If no type is given, allow the API to use the default.
            case "A":
                // Use a custom bitmap as the cap at the start of the line.
                polyline.setStartCap(
                        new CustomCap(
                                BitmapDescriptorFactory.fromResource(R.drawable.ic_arrow), 10));
                break;
            case "B":
                // Use a round cap at the start of the line.
                polyline.setStartCap(new RoundCap());
                break;
        }

        polyline.setEndCap(new RoundCap());
        polyline.setWidth(POLYLINE_STROKE_WIDTH_PX);
        polyline.setColor(COLOR_BLACK_ARGB);
        polyline.setJointType(JointType.ROUND);
    }


    private static final int PATTERN_GAP_LENGTH_PX = 20;
    private static final PatternItem DOT = new Dot();
    private static final PatternItem GAP = new Gap(PATTERN_GAP_LENGTH_PX);

    // Create a stroke pattern of a gap followed by a dot.
    private static final List<PatternItem> PATTERN_POLYLINE_DOTTED = Arrays.asList(GAP, DOT);

    /**
     * Listens for clicks on a polyline.
     *
     * @param polyline The polyline object that the user has clicked.
     */
    @Override
    public void onPolylineClick(Polyline polyline) {
        // Flip from solid stroke to dotted stroke pattern.
        if ((polyline.getPattern() == null) || (!polyline.getPattern().contains(DOT))) {
            polyline.setPattern(PATTERN_POLYLINE_DOTTED);
        } else {
            // The default pattern is a solid stroke.
            polyline.setPattern(null);
        }

        Toast.makeText(this, "Route type " + polyline.getTag().toString(), Toast.LENGTH_SHORT)
                .show();
    }


    /**
     * Listens for clicks on a polygon.
     *
     * @param polygon The polygon object that the user has clicked.
     */
    @Override
    public void onPolygonClick(Polygon polygon) {
        // Flip the values of the red, green, and blue components of the polygon's color.
        int color = polygon.getStrokeColor() ^ 0x00ffffff;
        polygon.setStrokeColor(color);
        color = polygon.getFillColor() ^ 0x00ffffff;
        polygon.setFillColor(color);

        Toast.makeText(this, "Area type " + polygon.getTag().toString(), Toast.LENGTH_SHORT).show();
    }

    private static final int COLOR_WHITE_ARGB = 0xffffffff;
    private static final int COLOR_DARK_GREEN_ARGB = 0xff388E3C;
    private static final int COLOR_LIGHT_GREEN_ARGB = 0xff81C784;
    private static final int COLOR_DARK_ORANGE_ARGB = 0xffF57F17;
    private static final int COLOR_LIGHT_ORANGE_ARGB = 0xffF9A825;

    private static final int POLYGON_STROKE_WIDTH_PX = 8;
    private static final int PATTERN_DASH_LENGTH_PX = 20;
    private static final PatternItem DASH = new Dash(PATTERN_DASH_LENGTH_PX);

    // Create a stroke pattern of a gap followed by a dash.
    private static final List<PatternItem> PATTERN_POLYGON_ALPHA = Arrays.asList(GAP, DASH);

    // Create a stroke pattern of a dot followed by a gap, a dash, and another gap.
    private static final List<PatternItem> PATTERN_POLYGON_BETA =
            Arrays.asList(DOT, GAP, DASH, GAP);

    /**
     * Styles the polygon, based on type.
     *
     * @param polygon The polygon object that needs styling.
     */
    private void stylePolygon(Polygon polygon) {
        String type = "";
        // Get the data object stored with the polygon.
        if (polygon.getTag() != null) {
            type = polygon.getTag().toString();
        }

        List<PatternItem> pattern = null;
        int strokeColor = COLOR_BLACK_ARGB;
        int fillColor = COLOR_WHITE_ARGB;

        switch (type) {
            // If no type is given, allow the API to use the default.
            case "alpha":
                // Apply a stroke pattern to render a dashed line, and define colors.
                pattern = PATTERN_POLYGON_ALPHA;
                strokeColor = COLOR_DARK_GREEN_ARGB;
                fillColor = COLOR_LIGHT_GREEN_ARGB;
                break;
            case "beta":
                // Apply a stroke pattern to render a line of dots and dashes, and define colors.
                pattern = PATTERN_POLYGON_BETA;
                strokeColor = COLOR_DARK_ORANGE_ARGB;
                fillColor = COLOR_LIGHT_ORANGE_ARGB;
                break;
        }

        polygon.setStrokePattern(pattern);
        polygon.setStrokeWidth(POLYGON_STROKE_WIDTH_PX);
        polygon.setStrokeColor(strokeColor);
        polygon.setFillColor(fillColor);
    }
}
عرض نسخة Kotlin من النشاط:
    // Copyright 2026 Google LLC
//
// Licensed under the Apache License, Version 2.0 (the "License");
// you may not use this file except in compliance with the License.
// You may obtain a copy of the License at
//
//      http://www.apache.org/licenses/LICENSE-2.0
//
// Unless required by applicable law or agreed to in writing, software
// distributed under the License is distributed on an "AS IS" BASIS,
// WITHOUT WARRANTIES OR CONDITIONS OF ANY KIND, either express or implied.
// See the License for the specific language governing permissions and
// limitations under the License.
package com.example.polygons

import android.os.Bundle
import android.widget.Toast
import androidx.appcompat.app.AppCompatActivity
import com.google.android.gms.maps.CameraUpdateFactory
import com.google.android.gms.maps.GoogleMap
import com.google.android.gms.maps.GoogleMap.OnPolygonClickListener
import com.google.android.gms.maps.GoogleMap.OnPolylineClickListener
import com.google.android.gms.maps.OnMapReadyCallback
import com.google.android.gms.maps.SupportMapFragment
import com.google.android.gms.maps.model.BitmapDescriptorFactory
import com.google.android.gms.maps.model.CustomCap
import com.google.android.gms.maps.model.Dash
import com.google.android.gms.maps.model.Dot
import com.google.android.gms.maps.model.Gap
import com.google.android.gms.maps.model.JointType
import com.google.android.gms.maps.model.LatLng
import com.google.android.gms.maps.model.PatternItem
import com.google.android.gms.maps.model.Polygon
import com.google.android.gms.maps.model.PolygonOptions
import com.google.android.gms.maps.model.Polyline
import com.google.android.gms.maps.model.PolylineOptions
import com.google.android.gms.maps.model.RoundCap

/**
 * An activity that displays a Google map with polylines to represent paths or routes,
 * and polygons to represent areas.
 */
class PolyActivity :
    AppCompatActivity(),
    OnMapReadyCallback,
    OnPolylineClickListener,
    OnPolygonClickListener {

    override fun onCreate(savedInstanceState: Bundle?) {
        super.onCreate(savedInstanceState)

        // Retrieve the content view that renders the map.
        setContentView(R.layout.activity_maps)

        // Get the SupportMapFragment and request notification when the map is ready to be used.
        val mapFragment = supportFragmentManager
            .findFragmentById(R.id.map) as SupportMapFragment?
        mapFragment?.getMapAsync(this)
    }

    /**
     * Manipulates the map when it's available.
     * The API invokes this callback when the map is ready to be used.
     * This is where we can add markers or lines, add listeners or move the camera.
     * In this tutorial, we add polylines and polygons to represent routes and areas on the map.
     */
    override fun onMapReady(googleMap: GoogleMap) {
        // Add polylines to the map.
        // Polylines are useful to show a route or some other connection between points.
        val polyline1 = googleMap.addPolyline(
            PolylineOptions()
                .clickable(true)
                .add(
                    LatLng(-35.016, 143.321),
                    LatLng(-34.747, 145.592),
                    LatLng(-34.364, 147.891),
                    LatLng(-33.501, 150.217),
                    LatLng(-32.306, 149.248),
                    LatLng(-32.491, 147.309),
                ),
        )
        // Store a data object with the polyline, used here to indicate an arbitrary type.
        polyline1.tag = "A"
        // Style the polyline.
        stylePolyline(polyline1)

        val polyline2 = googleMap.addPolyline(
            PolylineOptions()
                .clickable(true)
                .add(
                    LatLng(-29.501, 119.700),
                    LatLng(-27.456, 119.672),
                    LatLng(-25.971, 124.187),
                    LatLng(-28.081, 126.555),
                    LatLng(-28.848, 124.229),
                    LatLng(-28.215, 123.938),
                ),
        )
        polyline2.tag = "B"
        stylePolyline(polyline2)

        // Add polygons to indicate areas on the map.
        val polygon1 = googleMap.addPolygon(
            PolygonOptions()
                .clickable(true)
                .add(
                    LatLng(-27.457, 153.040),
                    LatLng(-33.852, 151.211),
                    LatLng(-37.813, 144.962),
                    LatLng(-34.928, 138.599),
                ),
        )
        // Store a data object with the polygon, used here to indicate an arbitrary type.
        polygon1.tag = "alpha"
        // Style the polygon.
        stylePolygon(polygon1)

        val polygon2 = googleMap.addPolygon(
            PolygonOptions()
                .clickable(true)
                .add(
                    LatLng(-31.673, 128.892),
                    LatLng(-31.952, 115.857),
                    LatLng(-17.785, 122.258),
                    LatLng(-12.4258, 130.7932),
                ),
        )
        polygon2.tag = "beta"
        stylePolygon(polygon2)

        // Position the map's camera near Alice Springs in the center of Australia,
        // and set the zoom factor so most of Australia shows on the screen.
        googleMap.moveCamera(CameraUpdateFactory.newLatLngZoom(LatLng(-23.684, 133.903), 4f))

        // Set listeners for click events.
        googleMap.setOnPolylineClickListener(this)
        googleMap.setOnPolygonClickListener(this)
    }

    private val COLOR_BLACK_ARGB = -0x1000000
    private val POLYLINE_STROKE_WIDTH_PX = 12

    /**
     * Styles the polyline, based on type.
     * @param polyline The polyline object that needs styling.
     */
    private fun stylePolyline(polyline: Polyline) {
        // Get the data object stored with the polyline.
        val type = polyline.tag?.toString() ?: ""
        when (type) {
            "A" -> {
                // Use a custom bitmap as the cap at the start of the line.
                polyline.startCap = CustomCap(BitmapDescriptorFactory.fromResource(R.drawable.ic_arrow), 10f)
            }

            "B" -> {
                // Use a round cap at the start of the line.
                polyline.startCap = RoundCap()
            }
        }
        polyline.endCap = RoundCap()
        polyline.width = POLYLINE_STROKE_WIDTH_PX.toFloat()
        polyline.color = COLOR_BLACK_ARGB
        polyline.jointType = JointType.ROUND
    }

    private val PATTERN_GAP_LENGTH_PX = 20
    private val DOT: PatternItem = Dot()
    private val GAP: PatternItem = Gap(PATTERN_GAP_LENGTH_PX.toFloat())

    // Create a stroke pattern of a gap followed by a dot.
    private val PATTERN_POLYLINE_DOTTED = listOf(GAP, DOT)

    /**
     * Listens for clicks on a polyline.
     * @param polyline The polyline object that the user has clicked.
     */
    override fun onPolylineClick(polyline: Polyline) {
        // Flip from solid stroke to dotted stroke pattern.
        if (polyline.pattern == null || !polyline.pattern!!.contains(DOT)) {
            polyline.pattern = PATTERN_POLYLINE_DOTTED
        } else {
            // The default pattern is a solid stroke.
            polyline.pattern = null
        }
        Toast.makeText(
            this,
            "Route type ${polyline.tag}",
            Toast.LENGTH_SHORT,
        ).show()
    }

    /**
     * Listens for clicks on a polygon.
     * @param polygon The polygon object that the user has clicked.
     */
    override fun onPolygonClick(polygon: Polygon) {
        // Flip the values of the red, green, and blue components of the polygon's color.
        var color = polygon.strokeColor xor 0x00ffffff
        polygon.strokeColor = color
        color = polygon.fillColor xor 0x00ffffff
        polygon.fillColor = color
        Toast.makeText(this, "Area type ${polygon.tag?.toString()}", Toast.LENGTH_SHORT).show()
    }

    private val COLOR_WHITE_ARGB = -0x1
    private val COLOR_DARK_GREEN_ARGB = -0xc771c4
    private val COLOR_LIGHT_GREEN_ARGB = -0x7e387c
    private val COLOR_DARK_ORANGE_ARGB = -0xa80e9
    private val COLOR_LIGHT_ORANGE_ARGB = -0x657db
    private val POLYGON_STROKE_WIDTH_PX = 8
    private val PATTERN_DASH_LENGTH_PX = 20

    private val DASH: PatternItem = Dash(PATTERN_DASH_LENGTH_PX.toFloat())

    // Create a stroke pattern of a gap followed by a dash.
    private val PATTERN_POLYGON_ALPHA = listOf(GAP, DASH)

    // Create a stroke pattern of a dot followed by a gap, a dash, and another gap.
    private val PATTERN_POLYGON_BETA = listOf(DOT, GAP, DASH, GAP)

    /**
     * Styles the polygon, based on type.
     * @param polygon The polygon object that needs styling.
     */
    private fun stylePolygon(polygon: Polygon) {
        // Get the data object stored with the polygon.
        val type = polygon.tag?.toString() ?: ""
        var pattern: List<PatternItem>? = null
        var strokeColor = COLOR_BLACK_ARGB
        var fillColor = COLOR_WHITE_ARGB
        when (type) {
            "alpha" -> {
                // Apply a stroke pattern to render a dashed line, and define colors.
                pattern = PATTERN_POLYGON_ALPHA
                strokeColor = COLOR_DARK_GREEN_ARGB
                fillColor = COLOR_LIGHT_GREEN_ARGB
            }

            "beta" -> {
                // Apply a stroke pattern to render a line of dots and dashes, and define colors.
                pattern = PATTERN_POLYGON_BETA
                strokeColor = COLOR_DARK_ORANGE_ARGB
                fillColor = COLOR_LIGHT_ORANGE_ARGB
            }
        }
        polygon.strokePattern = pattern
        polygon.strokeWidth = POLYGON_STROKE_WIDTH_PX.toFloat()
        polygon.strokeColor = strokeColor
        polygon.fillColor = fillColor
    }
}
إعداد مشروع التطوير
اتّبِع الخطوات التالية لإنشاء مشروع البرنامج التعليمي في "استوديو Android".
- نزِّل "استوديو Android" وثبِّته.
- أضِف حزمة خدمات Google Play إلى Android Studio.
- استنسِخ أو نزِّل مستودع نماذج Google Maps Android API v2 إذا لم تكن قد فعلت ذلك عند بدء قراءة هذا الدليل التعليمي.
استيراد مشروع الدليل التوجيهي:
- في "استوديو Android"، انقر على ملف > جديد > استيراد مشروع.
- انتقِل إلى الموقع الجغرافي الذي حفظت فيه مستودع نماذج الإصدار 2 من Google Maps Android API بعد تنزيله.
- ابحث عن مشروع Polygons في هذا الموقع:
PATH-TO-SAVED-REPO/android-samples/tutorials/java/Polygons(Java) أو
PATH-TO-SAVED-REPO/android-samples/tutorials/kotlin/Polygons(Kotlin) - اختَر دليل المشروع، ثم انقر على فتح. ينشئ "استوديو Android" الآن مشروعك باستخدام أداة الإصدار Gradle.
تفعيل واجهات برمجة التطبيقات اللازمة والحصول على مفتاح واجهة برمجة التطبيقات
لإكمال هذا الدليل التعليمي، تحتاج إلى مشروع على Google Cloud مع تفعيل واجهات برمجة التطبيقات اللازمة ومفتاح واجهة برمجة تطبيقات مصرَّح له باستخدام حزمة تطوير البرامج بالاستناد إلى بيانات خرائط Google للتطبيقات المتوافقة مع Android. لمزيد من التفاصيل، يُرجى الاطّلاع على:
إضافة مفتاح واجهة برمجة التطبيقات إلى تطبيقك
- افتح ملف
local.propertiesالخاص بمشروعك. أضِف السلسلة التالية ثم استبدِل
YOUR_API_KEYبقيمة مفتاح واجهة برمجة التطبيقات:MAPS_API_KEY=YOUR_API_KEYعند إنشاء تطبيقك، سيقوم المكوّن الإضافي Secrets Gradle لأجهزة Android بنسخ مفتاح واجهة برمجة التطبيقات وإتاحته كمتغيّر تنويعة التصميم في ملف Android manifest، كما هو موضّح أدناه.
إنشاء تطبيقك وتشغيله
لإنشاء التطبيق وتشغيله:
وصِّل جهاز Android بالكمبيوتر. اتّبِع التعليمات لتفعيل خيارات المطوّرين على جهاز Android وضبط النظام لرصد الجهاز.
بدلاً من ذلك، يمكنك استخدام أداة إدارة أجهزة Android الافتراضية (AVD) لضبط جهاز افتراضي. عند اختيار محاكي، تأكد من اختيار صورة تتضمن واجهات برمجة تطبيقات Google. لمزيد من التفاصيل، يُرجى الاطّلاع على إعداد مشروع في "استوديو Android" .
في استوديو Android، انقر على خيار القائمة تشغيل (أو رمز زر التشغيل). اختَر جهازًا كما هو مطلوب.
يستدعي "استوديو Android" أداة Gradle لإنشاء التطبيق، ثم يشغّل التطبيق على الجهاز أو على المحاكي.
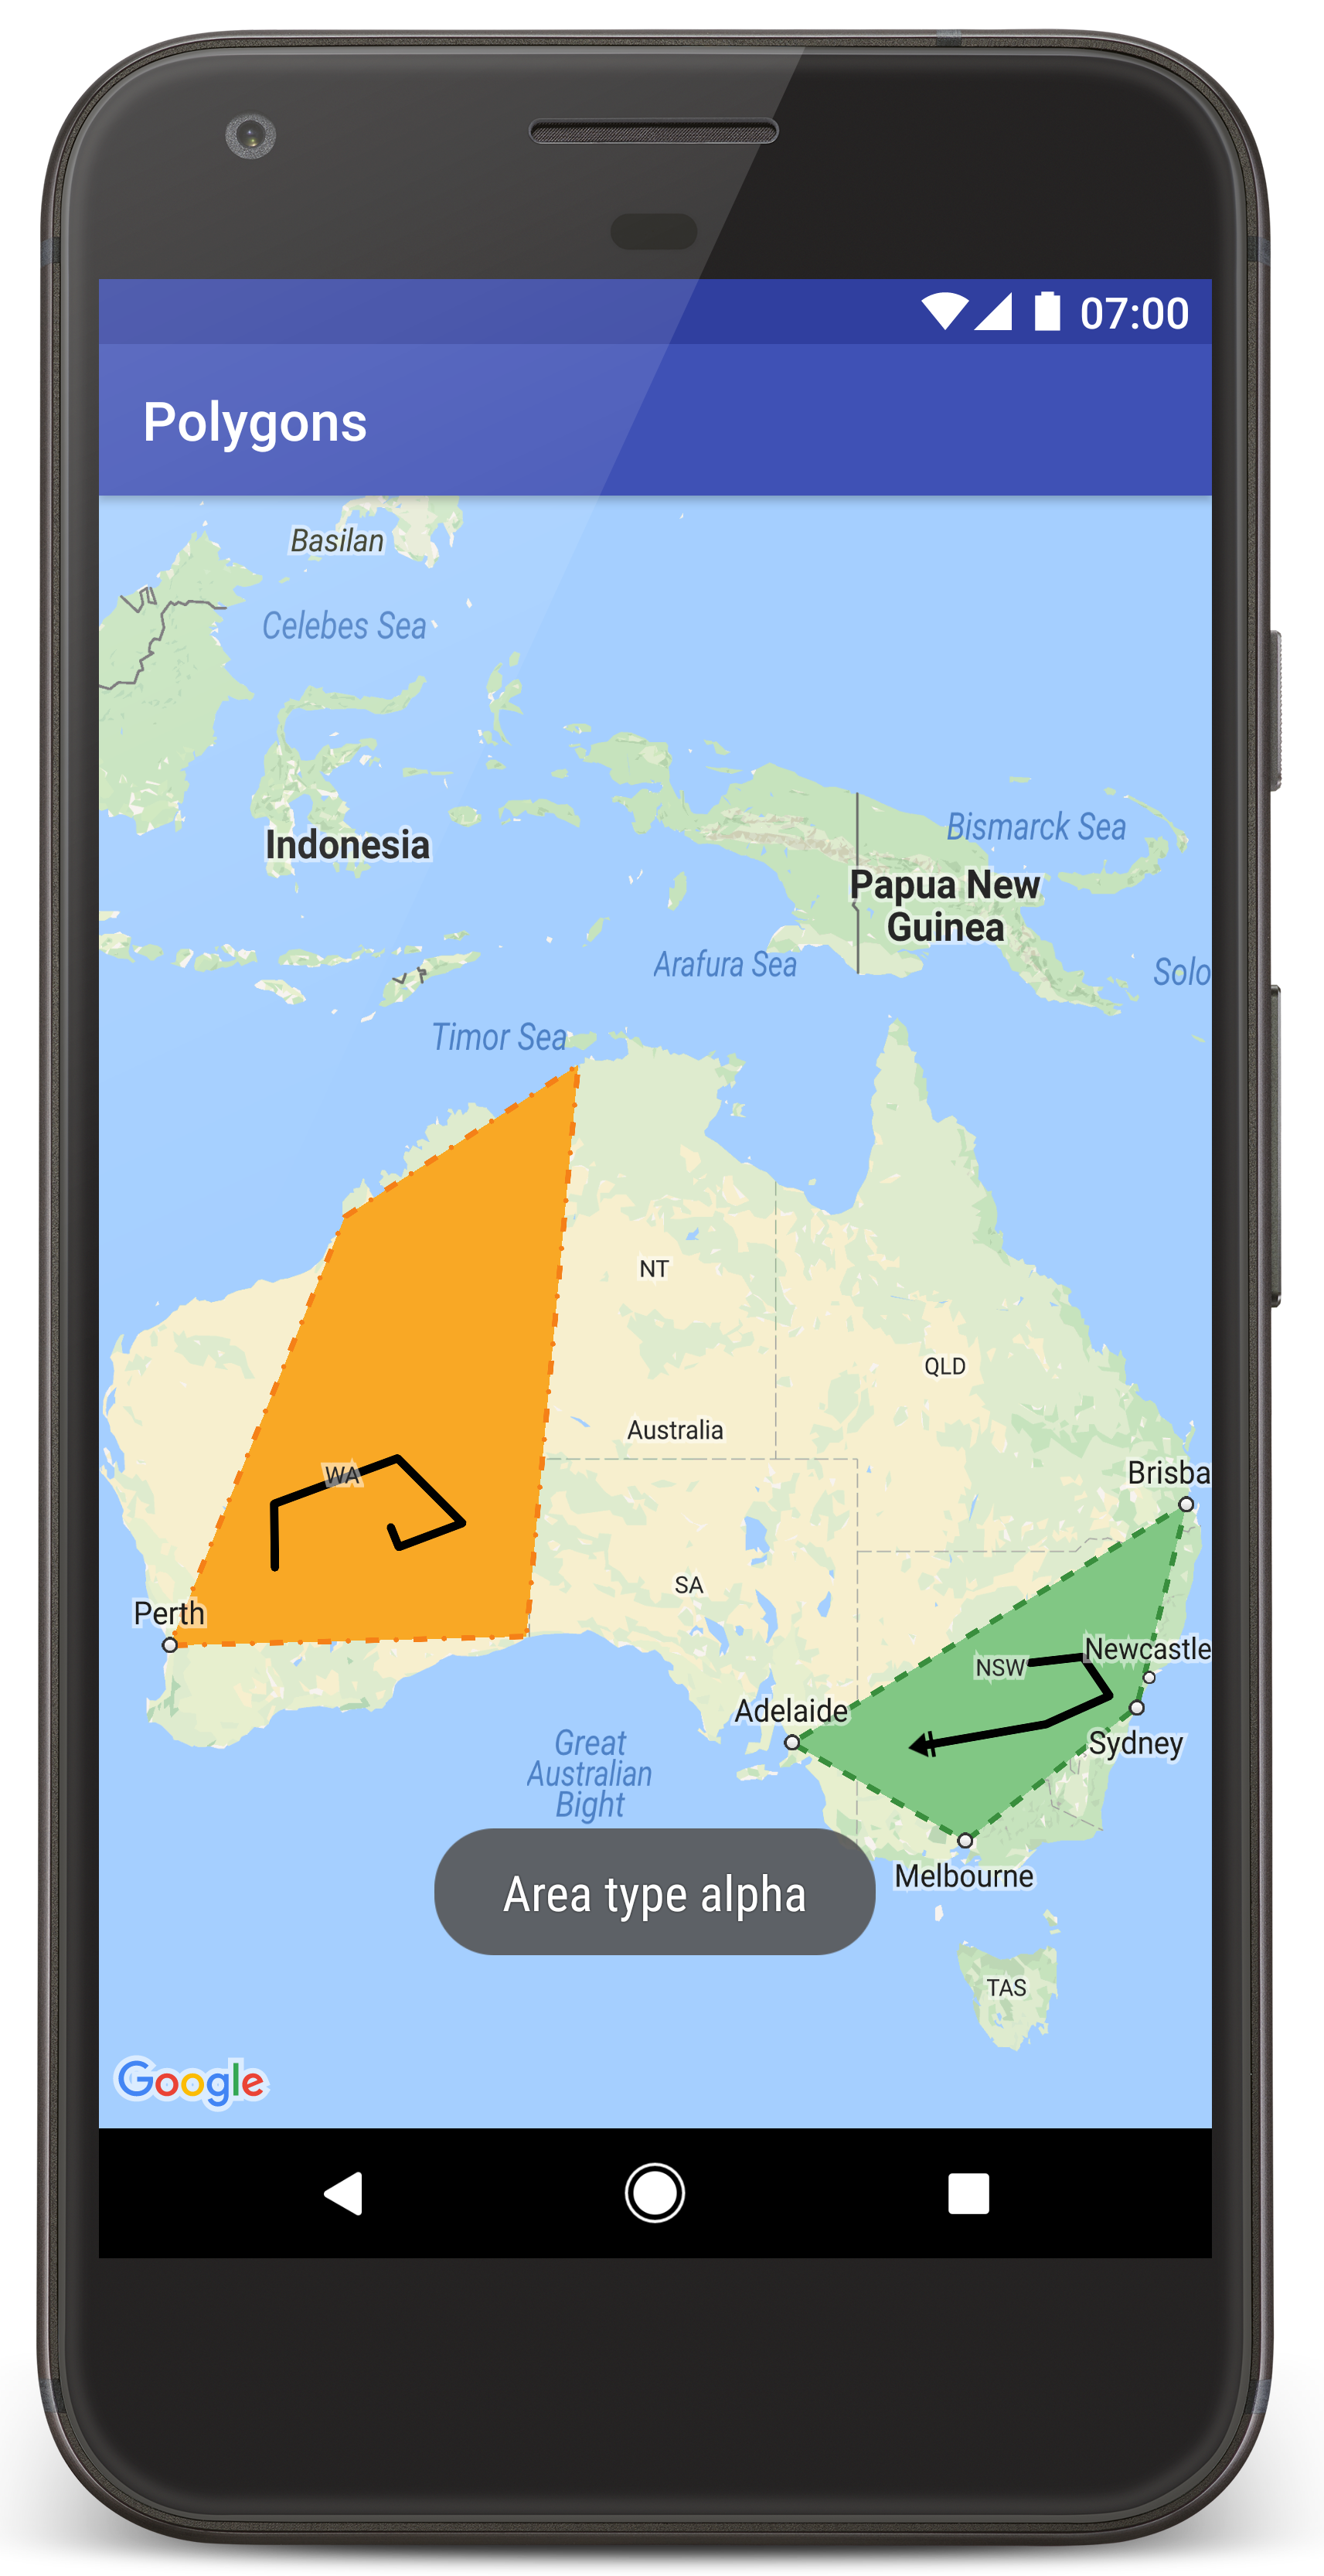
من المفترض أن تظهر لك خريطة تحتوي على مضلّعَين متراكبَين فوق أستراليا، على غرار الصورة في هذه الصفحة.
تحرّي الخلل وإصلاحه:
- إذا لم تظهر لك خريطة، تأكَّد من حصولك على مفتاح واجهة برمجة التطبيقات وإضافته إلى التطبيق، كما هو موضّح أعلاه. اطّلِع على السجلّ في Android Monitor في Android Studio بحثًا عن رسائل خطأ حول مفتاح واجهة برمجة التطبيقات.
- استخدِم أدوات تصحيح الأخطاء في "استوديو Android" لعرض السجلّات وتصحيح أخطاء التطبيق.
فهم الرمز البرمجي
يشرح هذا الجزء من البرنامج التعليمي أهم أجزاء تطبيق Polygons، لمساعدتك في فهم كيفية إنشاء تطبيق مماثل.
التحقّق من ملف بيان Android
يُرجى ملاحظة العناصر التالية في ملف AndroidManifest.xml الخاص بتطبيقك:
أضِف عنصر
meta-dataلتضمين إصدار "خدمات Google Play" الذي تم تجميع التطبيق باستخدامه.<meta-data android:name="com.google.android.gms.version" android:value="@integer/google_play_services_version" />أضِف عنصر
meta-dataيحدّد مفتاح واجهة برمجة التطبيقات. يربط النموذج المصاحب لهذا الدليل التعليمي قيمة مفتاح واجهة برمجة التطبيقات بمتغيّر إصدار يتطابق مع اسم المفتاح الذي حدّدته سابقًا، وهوMAPS_API_KEY. عند إنشاء تطبيقك، سيجعل المكوّن الإضافي Secrets Gradle لأجهزة Android المفاتيح في ملفlocal.propertiesمتاحة كمتغيّرات تنويعة التصميم.<meta-data android:name="com.google.android.geo.API_KEY" android:value="${MAPS_API_KEY}" />في ملف
build.gradle، يمرّر السطر التالي مفتاح واجهة برمجة التطبيقات إلى ملف بيان Android.id 'com.google.android.libraries.mapsplatform.secrets-gradle-plugin'
في ما يلي مثال كامل لملف بيان:
  <?xml version="1.0" encoding="utf-8"?>
<!--
 Copyright 2020 Google LLC

 Licensed under the Apache License, Version 2.0 (the "License");
 you may not use this file except in compliance with the License.
 You may obtain a copy of the License at

      http://www.apache.org/licenses/LICENSE-2.0

 Unless required by applicable law or agreed to in writing, software
 distributed under the License is distributed on an "AS IS" BASIS,
 WITHOUT WARRANTIES OR CONDITIONS OF ANY KIND, either express or implied.
 See the License for the specific language governing permissions and
 limitations under the License.
-->

<manifest xmlns:android="http://schemas.android.com/apk/res/android">

    <application
        android:allowBackup="true"
        android:icon="@mipmap/ic_launcher"
        android:label="@string/app_name"
        android:supportsRtl="true"
        android:theme="@style/AppTheme">

        <meta-data
            android:name="com.google.android.gms.version"
            android:value="@integer/google_play_services_version" />

        <!--
             The API key for Google Maps-based APIs.
        -->
        <meta-data
            android:name="com.google.android.geo.API_KEY"
            android:value="${MAPS_API_KEY}" />

        <activity
            android:name="com.example.polygons.PolyActivity"
            android:exported="true"
            android:label="@string/title_activity_maps">
            <intent-filter>
                <action android:name="android.intent.action.MAIN" />
                <category android:name="android.intent.category.LAUNCHER" />
            </intent-filter>
        </activity>
    </application>
</manifest>
إضافة خريطة
عرض خريطة باستخدام حزمة تطوير البرامج بالاستناد إلى بيانات "خرائط Google" للتطبيقات المتوافقة مع Android
أضِف عنصر
<fragment>إلى ملف تنسيق نشاطك،activity_maps.xml. يحدّد هذا العنصرSupportMapFragmentليكون بمثابة حاوية للخريطة ويوفّر إمكانية الوصول إلى عنصرGoogleMap. يستخدم البرنامج التعليمي إصدار مكتبة دعم Android من جزء الخريطة لضمان التوافق مع الأنظمة القديمة مع الإصدارات السابقة من إطار عمل Android.<!-- Copyright 2020 Google LLC Licensed under the Apache License, Version 2.0 (the "License"); you may not use this file except in compliance with the License. You may obtain a copy of the License at http://www.apache.org/licenses/LICENSE-2.0 Unless required by applicable law or agreed to in writing, software distributed under the License is distributed on an "AS IS" BASIS, WITHOUT WARRANTIES OR CONDITIONS OF ANY KIND, either express or implied. See the License for the specific language governing permissions and limitations under the License. --> <fragment xmlns:android="http://schemas.android.com/apk/res/android" xmlns:tools="http://schemas.android.com/tools" android:id="@+id/map" android:name="com.google.android.gms.maps.SupportMapFragment" android:layout_width="match_parent" android:layout_height="match_parent" tools:context="com.example.polygons.PolyActivity" />
في إجراء
onCreate()الخاص بالنشاط، اضبط ملف التنسيق كعرض المحتوى. احصل على مؤشر إلى جزء الخريطة من خلال استدعاءFragmentManager.findFragmentById(). بعد ذلك، استخدِمgetMapAsync()للتسجيل في دالّة ردّ الاتصال بالخريطة:جافا
@Override protected void onCreate(Bundle savedInstanceState) { super.onCreate(savedInstanceState); // Retrieve the content view that renders the map. setContentView(R.layout.activity_maps); // Get the SupportMapFragment and request notification when the map is ready to be used. SupportMapFragment mapFragment = (SupportMapFragment) getSupportFragmentManager().findFragmentById(R.id.map); mapFragment.getMapAsync(this); }
Kotlin
override fun onCreate(savedInstanceState: Bundle?) { super.onCreate(savedInstanceState) // Retrieve the content view that renders the map. setContentView(R.layout.activity_maps) // Get the SupportMapFragment and request notification when the map is ready to be used. val mapFragment = supportFragmentManager .findFragmentById(R.id.map) as SupportMapFragment? mapFragment?.getMapAsync(this) }
نفِّذ واجهة
OnMapReadyCallbackوتجاوز طريقةonMapReady(). تستدعي واجهة برمجة التطبيقات دالة الاستدعاء هذه عندما يكون الكائنGoogleMapمتاحًا، حتى تتمكّن من إضافة كائنات إلى الخريطة وتخصيصها بشكل أكبر لتطبيقك:جافا
public class PolyActivity extends AppCompatActivity implements OnMapReadyCallback, GoogleMap.OnPolylineClickListener, GoogleMap.OnPolygonClickListener { @Override protected void onCreate(Bundle savedInstanceState) { super.onCreate(savedInstanceState); // Retrieve the content view that renders the map. setContentView(R.layout.activity_maps); // Get the SupportMapFragment and request notification when the map is ready to be used. SupportMapFragment mapFragment = (SupportMapFragment) getSupportFragmentManager().findFragmentById(R.id.map); mapFragment.getMapAsync(this); } /** * Manipulates the map when it's available. The API invokes this callback when the map is ready * to be used. This is where we can add markers or lines, add listeners or move the camera. In * this tutorial, we add polylines and polygons to represent routes and areas on the map. */ @Override public void onMapReady(GoogleMap googleMap) { // Add polylines to the map. // Polylines are useful to show a route or some other connection between points. Polyline polyline1 = googleMap.addPolyline( new PolylineOptions() .clickable(true) .add( new LatLng(-35.016, 143.321), new LatLng(-34.747, 145.592), new LatLng(-34.364, 147.891), new LatLng(-33.501, 150.217), new LatLng(-32.306, 149.248), new LatLng(-32.491, 147.309))); // Position the map's camera near Alice Springs in the center of Australia, // and set the zoom factor so most of Australia shows on the screen. googleMap.moveCamera(CameraUpdateFactory.newLatLngZoom(new LatLng(-23.684, 133.903), 4)); // Set listeners for click events. googleMap.setOnPolylineClickListener(this); googleMap.setOnPolygonClickListener(this); }
Kotlin
class PolyActivity : AppCompatActivity(), OnMapReadyCallback, OnPolylineClickListener, OnPolygonClickListener { override fun onCreate(savedInstanceState: Bundle?) { super.onCreate(savedInstanceState) // Retrieve the content view that renders the map. setContentView(R.layout.activity_maps) // Get the SupportMapFragment and request notification when the map is ready to be used. val mapFragment = supportFragmentManager .findFragmentById(R.id.map) as SupportMapFragment? mapFragment?.getMapAsync(this) } /** * Manipulates the map when it's available. * The API invokes this callback when the map is ready to be used. * This is where we can add markers or lines, add listeners or move the camera. * In this tutorial, we add polylines and polygons to represent routes and areas on the map. */ override fun onMapReady(googleMap: GoogleMap) { // Add polylines to the map. // Polylines are useful to show a route or some other connection between points. val polyline1 = googleMap.addPolyline( PolylineOptions() .clickable(true) .add( LatLng(-35.016, 143.321), LatLng(-34.747, 145.592), LatLng(-34.364, 147.891), LatLng(-33.501, 150.217), LatLng(-32.306, 149.248), LatLng(-32.491, 147.309), ), ) // Position the map's camera near Alice Springs in the center of Australia, // and set the zoom factor so most of Australia shows on the screen. googleMap.moveCamera(CameraUpdateFactory.newLatLngZoom(LatLng(-23.684, 133.903), 4f)) // Set listeners for click events. googleMap.setOnPolylineClickListener(this) googleMap.setOnPolygonClickListener(this) }
إضافة خطوط متعدّدة لرسم خط على الخريطة
Polyline هو سلسلة من مقاطع الخطوط المتصلة. تُعدّ الخطوط المتعدّدة مفيدة لتمثيل المسارات أو الطرق أو الروابط الأخرى بين المواقع الجغرافية على الخريطة.
أنشئ عنصر
PolylineOptionsوأضِف نقاطًا إليه. وتمثّل كل نقطة موقعًا جغرافيًا على الخريطة، والذي تحدّده باستخدام عنصرLatLngيحتوي على قيم خطوط العرض والطول. تنشئ عينة التعليمات البرمجية أدناه خطوطًا متعدّدة تتضمّن 6 نقاط.استخدِم
GoogleMap.addPolyline()لإضافة الشكل المتعدّد الخطوط إلى الخريطة.جافا
Polyline polyline1 = googleMap.addPolyline( new PolylineOptions() .clickable(true) .add( new LatLng(-35.016, 143.321), new LatLng(-34.747, 145.592), new LatLng(-34.364, 147.891), new LatLng(-33.501, 150.217), new LatLng(-32.306, 149.248), new LatLng(-32.491, 147.309)));
Kotlin
val polyline1 = googleMap.addPolyline( PolylineOptions() .clickable(true) .add( LatLng(-35.016, 143.321), LatLng(-34.747, 145.592), LatLng(-34.364, 147.891), LatLng(-33.501, 150.217), LatLng(-32.306, 149.248), LatLng(-32.491, 147.309), ), )
اضبط خيار clickable للشكل المتعدّد الخطوط على true إذا أردت معالجة أحداث النقر على الشكل المتعدّد الخطوط. سنتناول المزيد من المعلومات حول معالجة الأحداث لاحقًا في هذا البرنامج التعليمي.
تخزين بيانات عشوائية باستخدام خطوط متعدّدة
يمكنك تخزين عناصر بيانات عشوائية باستخدام خطوط متعدّدة وعناصر هندسية أخرى.
استخدِم
Polyline.setTag()لتخزين عنصر بيانات مع الخطوط المتعدّدة. يحدّد الرمز أدناه علامة عشوائية (A) تشير إلى نوع من الخطوط المتعدّدة.جافا
Polyline polyline1 = googleMap.addPolyline(new PolylineOptions()
    .clickable(true)
    .add(
            new LatLng(-35.016, 143.321),
            new LatLng(-34.747, 145.592),
            new LatLng(-34.364, 147.891),
            new LatLng(-33.501, 150.217),
            new LatLng(-32.306, 149.248),
            new LatLng(-32.491, 147.309)));
// Store a data object with the polyline, used here to indicate an arbitrary type.
polyline1.setTag("A");
Kotlin
val polyline1 = googleMap.addPolyline(PolylineOptions()
.clickable(true)
.add(
    LatLng(-35.016, 143.321),
    LatLng(-34.747, 145.592),
    LatLng(-34.364, 147.891),
    LatLng(-33.501, 150.217),
    LatLng(-32.306, 149.248),
    LatLng(-32.491, 147.309)))
// Store a data object with the polyline, used here to indicate an arbitrary type.
polyline1.tag = "A
استرداد البيانات باستخدام
Polyline.getTag()، كما هو موضّح في القسم التالي
إضافة نمط مخصّص إلى الخطوط المتعدّدة
يمكنك تحديد سمات تصميم مختلفة في عنصر PolylineOptions. تشمل خيارات التصميم لون الخط وعرضه ونمطه وأنواع الوصلات وأغطية البداية والنهاية. إذا لم تحدّد سمة معيّنة، ستستخدم واجهة برمجة التطبيقات قيمة تلقائية لهذه السمة.
يطبّق الرمز التالي غطاءً دائريًا على نهاية الخط، وغطاءً مختلفًا على البداية استنادًا إلى نوع الخطوط المتعدّدة، حيث يكون النوع سمة عشوائية مخزّنة في عنصر البيانات للخطوط المتعدّدة. يحدّد النموذج أيضًا عرض الخط ولونه ونوع الوصلة:
جافا
private static final int COLOR_BLACK_ARGB = 0xff000000; private static final int POLYLINE_STROKE_WIDTH_PX = 12; /** * Styles the polyline, based on type. * * @param polyline The polyline object that needs styling. */ private void stylePolyline(Polyline polyline) { String type = ""; // Get the data object stored with the polyline. if (polyline.getTag() != null) { type = polyline.getTag().toString(); } switch (type) { // If no type is given, allow the API to use the default. case "A": // Use a custom bitmap as the cap at the start of the line. polyline.setStartCap( new CustomCap( BitmapDescriptorFactory.fromResource(R.drawable.ic_arrow), 10)); break; case "B": // Use a round cap at the start of the line. polyline.setStartCap(new RoundCap()); break; } polyline.setEndCap(new RoundCap()); polyline.setWidth(POLYLINE_STROKE_WIDTH_PX); polyline.setColor(COLOR_BLACK_ARGB); polyline.setJointType(JointType.ROUND); }
Kotlin
private val COLOR_BLACK_ARGB = -0x1000000 private val POLYLINE_STROKE_WIDTH_PX = 12 /** * Styles the polyline, based on type. * @param polyline The polyline object that needs styling. */ private fun stylePolyline(polyline: Polyline) { // Get the data object stored with the polyline. val type = polyline.tag?.toString() ?: "" when (type) { "A" -> { // Use a custom bitmap as the cap at the start of the line. polyline.startCap = CustomCap(BitmapDescriptorFactory.fromResource(R.drawable.ic_arrow), 10f) } "B" -> { // Use a round cap at the start of the line. polyline.startCap = RoundCap() } } polyline.endCap = RoundCap() polyline.width = POLYLINE_STROKE_WIDTH_PX.toFloat() polyline.color = COLOR_BLACK_ARGB polyline.jointType = JointType.ROUND }
يحدّد الرمز أعلاه صورة نقطية مخصّصة للغطاء العلوي للخط المتعدّد من النوع A، ويحدّد عرض خط مرجعي يبلغ 10 بكسل. وتعمل واجهة برمجة التطبيقات على تغيير حجم الصورة النقطية استنادًا إلى عرض الخط المرجعي. عند تحديد عرض الخط المرجعي، أدخِل العرض الذي استخدمته عند تصميم صورة نقطية، بالبُعد الأصلي للصورة. تلميح: افتح صورة نقطية بنسبة تكبير% 100 في محرِّر صور، وارسم العرض المطلوب لخط الرسم بالنسبة إلى الصورة.
يمكنك الاطّلاع على مزيد من المعلومات حول نهايات الخطوط والخيارات الأخرى المتاحة من أجل تخصيص الأشكال.
التعامل مع الأحداث الناتجة عن النقر على الخطوط المتعدّدة
اجعل الخطوط المتعدّدة قابلة للنقر من خلال استدعاء
Polyline.setClickable(). (بشكل تلقائي، لا يمكن النقر على الخطوط المتعدّدة ولن يتلقّى تطبيقك إشعارًا عندما ينقر المستخدم على خط متعدّد).نفِّذ واجهة
OnPolylineClickListenerواستدعِGoogleMap.setOnPolylineClickListener()لضبط المستمع على الخريطة:جافا
public class PolyActivity extends AppCompatActivity implements OnMapReadyCallback, GoogleMap.OnPolylineClickListener, GoogleMap.OnPolygonClickListener { @Override protected void onCreate(Bundle savedInstanceState) { super.onCreate(savedInstanceState); // Retrieve the content view that renders the map. setContentView(R.layout.activity_maps); // Get the SupportMapFragment and request notification when the map is ready to be used. SupportMapFragment mapFragment = (SupportMapFragment) getSupportFragmentManager().findFragmentById(R.id.map); mapFragment.getMapAsync(this); } /** * Manipulates the map when it's available. The API invokes this callback when the map is ready * to be used. This is where we can add markers or lines, add listeners or move the camera. In * this tutorial, we add polylines and polygons to represent routes and areas on the map. */ @Override public void onMapReady(GoogleMap googleMap) { // Add polylines to the map. // Polylines are useful to show a route or some other connection between points. Polyline polyline1 = googleMap.addPolyline( new PolylineOptions() .clickable(true) .add( new LatLng(-35.016, 143.321), new LatLng(-34.747, 145.592), new LatLng(-34.364, 147.891), new LatLng(-33.501, 150.217), new LatLng(-32.306, 149.248), new LatLng(-32.491, 147.309))); // Position the map's camera near Alice Springs in the center of Australia, // and set the zoom factor so most of Australia shows on the screen. googleMap.moveCamera(CameraUpdateFactory.newLatLngZoom(new LatLng(-23.684, 133.903), 4)); // Set listeners for click events. googleMap.setOnPolylineClickListener(this); googleMap.setOnPolygonClickListener(this); }
Kotlin
class PolyActivity : AppCompatActivity(), OnMapReadyCallback, OnPolylineClickListener, OnPolygonClickListener { override fun onCreate(savedInstanceState: Bundle?) { super.onCreate(savedInstanceState) // Retrieve the content view that renders the map. setContentView(R.layout.activity_maps) // Get the SupportMapFragment and request notification when the map is ready to be used. val mapFragment = supportFragmentManager .findFragmentById(R.id.map) as SupportMapFragment? mapFragment?.getMapAsync(this) } /** * Manipulates the map when it's available. * The API invokes this callback when the map is ready to be used. * This is where we can add markers or lines, add listeners or move the camera. * In this tutorial, we add polylines and polygons to represent routes and areas on the map. */ override fun onMapReady(googleMap: GoogleMap) { // Add polylines to the map. // Polylines are useful to show a route or some other connection between points. val polyline1 = googleMap.addPolyline( PolylineOptions() .clickable(true) .add( LatLng(-35.016, 143.321), LatLng(-34.747, 145.592), LatLng(-34.364, 147.891), LatLng(-33.501, 150.217), LatLng(-32.306, 149.248), LatLng(-32.491, 147.309), ), ) // Position the map's camera near Alice Springs in the center of Australia, // and set the zoom factor so most of Australia shows on the screen. googleMap.moveCamera(CameraUpdateFactory.newLatLngZoom(LatLng(-23.684, 133.903), 4f)) // Set listeners for click events. googleMap.setOnPolylineClickListener(this) googleMap.setOnPolygonClickListener(this) }
تجاوز طريقة رد الاتصال
onPolylineClick(). يؤدي المثال التالي إلى تبديل نمط الخط بين خط متصل وخط منقط، في كل مرة ينقر فيها المستخدم على الخط المتعدد:جافا
private static final int PATTERN_GAP_LENGTH_PX = 20; private static final PatternItem DOT = new Dot(); private static final PatternItem GAP = new Gap(PATTERN_GAP_LENGTH_PX); // Create a stroke pattern of a gap followed by a dot. private static final List<PatternItem> PATTERN_POLYLINE_DOTTED = Arrays.asList(GAP, DOT); /** * Listens for clicks on a polyline. * * @param polyline The polyline object that the user has clicked. */ @Override public void onPolylineClick(Polyline polyline) { // Flip from solid stroke to dotted stroke pattern. if ((polyline.getPattern() == null) || (!polyline.getPattern().contains(DOT))) { polyline.setPattern(PATTERN_POLYLINE_DOTTED); } else { // The default pattern is a solid stroke. polyline.setPattern(null); } Toast.makeText(this, "Route type " + polyline.getTag().toString(), Toast.LENGTH_SHORT) .show(); }
Kotlin
private val PATTERN_GAP_LENGTH_PX = 20 private val DOT: PatternItem = Dot() private val GAP: PatternItem = Gap(PATTERN_GAP_LENGTH_PX.toFloat()) // Create a stroke pattern of a gap followed by a dot. private val PATTERN_POLYLINE_DOTTED = listOf(GAP, DOT) /** * Listens for clicks on a polyline. * @param polyline The polyline object that the user has clicked. */ override fun onPolylineClick(polyline: Polyline) { // Flip from solid stroke to dotted stroke pattern. if (polyline.pattern == null || !polyline.pattern!!.contains(DOT)) { polyline.pattern = PATTERN_POLYLINE_DOTTED } else { // The default pattern is a solid stroke. polyline.pattern = null } Toast.makeText( this, "Route type ${polyline.tag}", Toast.LENGTH_SHORT, ).show() }
إضافة مضلّعات لتمثيل المناطق على الخريطة
Polygon هو شكل يتكوّن من سلسلة من الإحداثيات في تسلسل مرتّب، وهو مشابه لـ Polyline. يكمن الفرق في أنّ المضلّع يحدّد مساحة مغلقة يمكن ملء داخلها، بينما الخطوط المتعدّدة تكون مفتوحة.
أنشئ عنصر
PolygonOptionsوأضِف نقاطًا إليه. وتمثّل كل نقطة موقعًا جغرافيًا على الخريطة، والذي تحدّده باستخدام عنصرLatLngيحتوي على قيم خطوط العرض والطول. تنشئ عينة التعليمات البرمجية أدناه مضلّعًا يتضمّن 4 نقاط.اجعل المضلّع قابلاً للنقر من خلال استدعاء
Polygon.setClickable(). (بشكل تلقائي، لا يمكن النقر على المضلّعات ولن يتلقّى تطبيقك إشعارًا عندما ينقر المستخدم على مضلّع). تتشابه معالجة الأحداث الناتجة عن النقر على المضلّعات مع معالجة الأحداث الناتجة عن النقر على الخطوط المتعدّدة، والتي تم شرحها سابقًا في هذا الدليل التعليمي.استخدِم
GoogleMap.addPolygon()لإضافة المضلّع إلى الخريطة.استخدِم الدالة
Polygon.setTag()لتخزين عنصر بيانات مع المضلّع. يحدّد الرمز أدناه نوعًا عشوائيًا (alpha) للمضلّع.جافا
// Add polygons to indicate areas on the map. Polygon polygon1 = googleMap.addPolygon( new PolygonOptions() .clickable(true) .add( new LatLng(-27.457, 153.040), new LatLng(-33.852, 151.211), new LatLng(-37.813, 144.962), new LatLng(-34.928, 138.599))); // Store a data object with the polygon, used here to indicate an arbitrary type. polygon1.setTag("alpha");
Kotlin
// Add polygons to indicate areas on the map. val polygon1 = googleMap.addPolygon( PolygonOptions() .clickable(true) .add( LatLng(-27.457, 153.040), LatLng(-33.852, 151.211), LatLng(-37.813, 144.962), LatLng(-34.928, 138.599), ), ) // Store a data object with the polygon, used here to indicate an arbitrary type. polygon1.tag = "alpha" // Style the polygon.
إضافة نمط مخصّص إلى المضلّع
يمكنك تحديد عدد من سمات الأنماط في العنصر PolygonOptions. وتشمل خيارات التصميم لون الخط وعرضه ونمطه وأنواع وصلاته ولون التعبئة. إذا لم تحدّد سمة معيّنة، ستستخدم واجهة برمجة التطبيقات قيمة تلقائية لهذه السمة.
يطبّق الرمز التالي ألوانًا وأنماط خطوط محددة استنادًا إلى نوع المضلّع، حيث يكون النوع سمة عشوائية مخزّنة في كائن البيانات للمضلّع:
جافا
private static final int COLOR_WHITE_ARGB = 0xffffffff; private static final int COLOR_DARK_GREEN_ARGB = 0xff388E3C; private static final int COLOR_LIGHT_GREEN_ARGB = 0xff81C784; private static final int COLOR_DARK_ORANGE_ARGB = 0xffF57F17; private static final int COLOR_LIGHT_ORANGE_ARGB = 0xffF9A825; private static final int POLYGON_STROKE_WIDTH_PX = 8; private static final int PATTERN_DASH_LENGTH_PX = 20; private static final PatternItem DASH = new Dash(PATTERN_DASH_LENGTH_PX); // Create a stroke pattern of a gap followed by a dash. private static final List<PatternItem> PATTERN_POLYGON_ALPHA = Arrays.asList(GAP, DASH); // Create a stroke pattern of a dot followed by a gap, a dash, and another gap. private static final List<PatternItem> PATTERN_POLYGON_BETA = Arrays.asList(DOT, GAP, DASH, GAP); /** * Styles the polygon, based on type. * * @param polygon The polygon object that needs styling. */ private void stylePolygon(Polygon polygon) { String type = ""; // Get the data object stored with the polygon. if (polygon.getTag() != null) { type = polygon.getTag().toString(); } List<PatternItem> pattern = null; int strokeColor = COLOR_BLACK_ARGB; int fillColor = COLOR_WHITE_ARGB; switch (type) { // If no type is given, allow the API to use the default. case "alpha": // Apply a stroke pattern to render a dashed line, and define colors. pattern = PATTERN_POLYGON_ALPHA; strokeColor = COLOR_DARK_GREEN_ARGB; fillColor = COLOR_LIGHT_GREEN_ARGB; break; case "beta": // Apply a stroke pattern to render a line of dots and dashes, and define colors. pattern = PATTERN_POLYGON_BETA; strokeColor = COLOR_DARK_ORANGE_ARGB; fillColor = COLOR_LIGHT_ORANGE_ARGB; break; } polygon.setStrokePattern(pattern); polygon.setStrokeWidth(POLYGON_STROKE_WIDTH_PX); polygon.setStrokeColor(strokeColor); polygon.setFillColor(fillColor); }
Kotlin
private val COLOR_WHITE_ARGB = -0x1 private val COLOR_DARK_GREEN_ARGB = -0xc771c4 private val COLOR_LIGHT_GREEN_ARGB = -0x7e387c private val COLOR_DARK_ORANGE_ARGB = -0xa80e9 private val COLOR_LIGHT_ORANGE_ARGB = -0x657db private val POLYGON_STROKE_WIDTH_PX = 8 private val PATTERN_DASH_LENGTH_PX = 20 private val DASH: PatternItem = Dash(PATTERN_DASH_LENGTH_PX.toFloat()) // Create a stroke pattern of a gap followed by a dash. private val PATTERN_POLYGON_ALPHA = listOf(GAP, DASH) // Create a stroke pattern of a dot followed by a gap, a dash, and another gap. private val PATTERN_POLYGON_BETA = listOf(DOT, GAP, DASH, GAP) /** * Styles the polygon, based on type. * @param polygon The polygon object that needs styling. */ private fun stylePolygon(polygon: Polygon) { // Get the data object stored with the polygon. val type = polygon.tag?.toString() ?: "" var pattern: List<PatternItem>? = null var strokeColor = COLOR_BLACK_ARGB var fillColor = COLOR_WHITE_ARGB when (type) { "alpha" -> { // Apply a stroke pattern to render a dashed line, and define colors. pattern = PATTERN_POLYGON_ALPHA strokeColor = COLOR_DARK_GREEN_ARGB fillColor = COLOR_LIGHT_GREEN_ARGB } "beta" -> { // Apply a stroke pattern to render a line of dots and dashes, and define colors. pattern = PATTERN_POLYGON_BETA strokeColor = COLOR_DARK_ORANGE_ARGB fillColor = COLOR_LIGHT_ORANGE_ARGB } } polygon.strokePattern = pattern polygon.strokeWidth = POLYGON_STROKE_WIDTH_PX.toFloat() polygon.strokeColor = strokeColor polygon.fillColor = fillColor }
يمكنك الاطّلاع على مزيد من المعلومات حول أنماط الخطوط والخيارات الأخرى المتاحة من أجل تخصيص الأشكال.
الخطوات التالية
تعرَّف على عنصر الدائرة. تشبه الدوائر المضلّعات ولكنّها تتضمّن خصائص تعكس شكل الدائرة.