
บทแนะนำนี้จะแสดงวิธีเพิ่ม Google Maps ลงในแอป Android รวมถึงวิธีใช้เส้นหลายเส้นและรูปหลายเหลี่ยมเพื่อแสดงเส้นทางและพื้นที่บนแผนที่
ทำตามบทแนะนำเพื่อสร้างแอป Android โดยใช้ Maps SDK สำหรับ Android สภาพแวดล้อมในการพัฒนาที่แนะนำคือ Android Studio
รับโค้ด
โคลนหรือดาวน์โหลดที่เก็บตัวอย่าง Google Maps Android API v2 จาก GitHub
ดูเวอร์ชัน Java ของกิจกรรม
    // Copyright 2020 Google LLC
//
// Licensed under the Apache License, Version 2.0 (the "License");
// you may not use this file except in compliance with the License.
// You may obtain a copy of the License at
//
//      http://www.apache.org/licenses/LICENSE-2.0
//
// Unless required by applicable law or agreed to in writing, software
// distributed under the License is distributed on an "AS IS" BASIS,
// WITHOUT WARRANTIES OR CONDITIONS OF ANY KIND, either express or implied.
// See the License for the specific language governing permissions and
// limitations under the License.

package com.example.polygons;

import android.os.Bundle;
import android.widget.Toast;
import androidx.appcompat.app.AppCompatActivity;
import com.google.android.gms.maps.CameraUpdateFactory;
import com.google.android.gms.maps.GoogleMap;
import com.google.android.gms.maps.OnMapReadyCallback;
import com.google.android.gms.maps.SupportMapFragment;
import com.google.android.gms.maps.model.BitmapDescriptorFactory;
import com.google.android.gms.maps.model.CustomCap;
import com.google.android.gms.maps.model.Dash;
import com.google.android.gms.maps.model.Dot;
import com.google.android.gms.maps.model.Gap;
import com.google.android.gms.maps.model.JointType;
import com.google.android.gms.maps.model.LatLng;
import com.google.android.gms.maps.model.PatternItem;
import com.google.android.gms.maps.model.Polygon;
import com.google.android.gms.maps.model.PolygonOptions;
import com.google.android.gms.maps.model.Polyline;
import com.google.android.gms.maps.model.PolylineOptions;
import com.google.android.gms.maps.model.RoundCap;
import java.util.Arrays;
import java.util.List;


/**
 * An activity that displays a Google map with polylines to represent paths or routes,
 * and polygons to represent areas.
 */
public class PolyActivity extends AppCompatActivity
        implements
                OnMapReadyCallback,
                GoogleMap.OnPolylineClickListener,
                GoogleMap.OnPolygonClickListener {

    @Override
    protected void onCreate(Bundle savedInstanceState) {
        super.onCreate(savedInstanceState);

        // Retrieve the content view that renders the map.
        setContentView(R.layout.activity_maps);

        // Get the SupportMapFragment and request notification when the map is ready to be used.
        SupportMapFragment mapFragment = (SupportMapFragment) getSupportFragmentManager()
                .findFragmentById(R.id.map);
        mapFragment.getMapAsync(this);
    }

    /**
     * Manipulates the map when it's available.
     * The API invokes this callback when the map is ready to be used.
     * This is where we can add markers or lines, add listeners or move the camera.
     * In this tutorial, we add polylines and polygons to represent routes and areas on the map.
     */
    @Override
    public void onMapReady(GoogleMap googleMap) {

        // Add polylines to the map.
        // Polylines are useful to show a route or some other connection between points.
        Polyline polyline1 = googleMap.addPolyline(new PolylineOptions()
                .clickable(true)
                .add(
                        new LatLng(-35.016, 143.321),
                        new LatLng(-34.747, 145.592),
                        new LatLng(-34.364, 147.891),
                        new LatLng(-33.501, 150.217),
                        new LatLng(-32.306, 149.248),
                        new LatLng(-32.491, 147.309)));
        // Store a data object with the polyline, used here to indicate an arbitrary type.
        polyline1.setTag("A");
        // Style the polyline.
        stylePolyline(polyline1);

        Polyline polyline2 = googleMap.addPolyline(new PolylineOptions()
                .clickable(true)
                .add(
                        new LatLng(-29.501, 119.700),
                        new LatLng(-27.456, 119.672),
                        new LatLng(-25.971, 124.187),
                        new LatLng(-28.081, 126.555),
                        new LatLng(-28.848, 124.229),
                        new LatLng(-28.215, 123.938)));
        polyline2.setTag("B");
        stylePolyline(polyline2);

        // Add polygons to indicate areas on the map.
        Polygon polygon1 = googleMap.addPolygon(new PolygonOptions()
                .clickable(true)
                .add(
                        new LatLng(-27.457, 153.040),
                        new LatLng(-33.852, 151.211),
                        new LatLng(-37.813, 144.962),
                        new LatLng(-34.928, 138.599)));
        // Store a data object with the polygon, used here to indicate an arbitrary type.
        polygon1.setTag("alpha");
        // Style the polygon.
        stylePolygon(polygon1);

        Polygon polygon2 = googleMap.addPolygon(new PolygonOptions()
                .clickable(true)
                .add(
                        new LatLng(-31.673, 128.892),
                        new LatLng(-31.952, 115.857),
                        new LatLng(-17.785, 122.258),
                        new LatLng(-12.4258, 130.7932)));
        polygon2.setTag("beta");
        stylePolygon(polygon2);

        // Position the map's camera near Alice Springs in the center of Australia,
        // and set the zoom factor so most of Australia shows on the screen.
        googleMap.moveCamera(CameraUpdateFactory.newLatLngZoom(new LatLng(-23.684, 133.903), 4));

        // Set listeners for click events.
        googleMap.setOnPolylineClickListener(this);
        googleMap.setOnPolygonClickListener(this);
    }

    private static final int COLOR_BLACK_ARGB = 0xff000000;
    private static final int POLYLINE_STROKE_WIDTH_PX = 12;

    /**
     * Styles the polyline, based on type.
     * @param polyline The polyline object that needs styling.
     */
    private void stylePolyline(Polyline polyline) {
        String type = "";
        // Get the data object stored with the polyline.
        if (polyline.getTag() != null) {
            type = polyline.getTag().toString();
        }

        switch (type) {
            // If no type is given, allow the API to use the default.
            case "A":
                // Use a custom bitmap as the cap at the start of the line.
                polyline.setStartCap(
                        new CustomCap(
                                BitmapDescriptorFactory.fromResource(R.drawable.ic_arrow), 10));
                break;
            case "B":
                // Use a round cap at the start of the line.
                polyline.setStartCap(new RoundCap());
                break;
        }

        polyline.setEndCap(new RoundCap());
        polyline.setWidth(POLYLINE_STROKE_WIDTH_PX);
        polyline.setColor(COLOR_BLACK_ARGB);
        polyline.setJointType(JointType.ROUND);
    }

    private static final int PATTERN_GAP_LENGTH_PX = 20;
    private static final PatternItem DOT = new Dot();
    private static final PatternItem GAP = new Gap(PATTERN_GAP_LENGTH_PX);

    // Create a stroke pattern of a gap followed by a dot.
    private static final List<PatternItem> PATTERN_POLYLINE_DOTTED = Arrays.asList(GAP, DOT);

    /**
     * Listens for clicks on a polyline.
     * @param polyline The polyline object that the user has clicked.
     */
    @Override
    public void onPolylineClick(Polyline polyline) {
        // Flip from solid stroke to dotted stroke pattern.
        if ((polyline.getPattern() == null) || (!polyline.getPattern().contains(DOT))) {
            polyline.setPattern(PATTERN_POLYLINE_DOTTED);
        } else {
            // The default pattern is a solid stroke.
            polyline.setPattern(null);
        }

        Toast.makeText(this, "Route type " + polyline.getTag().toString(),
                Toast.LENGTH_SHORT).show();
    }

    /**
     * Listens for clicks on a polygon.
     * @param polygon The polygon object that the user has clicked.
     */
    @Override
    public void onPolygonClick(Polygon polygon) {
        // Flip the values of the red, green, and blue components of the polygon's color.
        int color = polygon.getStrokeColor() ^ 0x00ffffff;
        polygon.setStrokeColor(color);
        color = polygon.getFillColor() ^ 0x00ffffff;
        polygon.setFillColor(color);

        Toast.makeText(this, "Area type " + polygon.getTag().toString(), Toast.LENGTH_SHORT).show();
    }

    private static final int COLOR_WHITE_ARGB = 0xffffffff;
    private static final int COLOR_DARK_GREEN_ARGB = 0xff388E3C;
    private static final int COLOR_LIGHT_GREEN_ARGB = 0xff81C784;
    private static final int COLOR_DARK_ORANGE_ARGB = 0xffF57F17;
    private static final int COLOR_LIGHT_ORANGE_ARGB = 0xffF9A825;

    private static final int POLYGON_STROKE_WIDTH_PX = 8;
    private static final int PATTERN_DASH_LENGTH_PX = 20;
    private static final PatternItem DASH = new Dash(PATTERN_DASH_LENGTH_PX);

    // Create a stroke pattern of a gap followed by a dash.
    private static final List<PatternItem> PATTERN_POLYGON_ALPHA = Arrays.asList(GAP, DASH);

    // Create a stroke pattern of a dot followed by a gap, a dash, and another gap.
    private static final List<PatternItem> PATTERN_POLYGON_BETA =
        Arrays.asList(DOT, GAP, DASH, GAP);

    /**
     * Styles the polygon, based on type.
     * @param polygon The polygon object that needs styling.
     */
    private void stylePolygon(Polygon polygon) {
        String type = "";
        // Get the data object stored with the polygon.
        if (polygon.getTag() != null) {
            type = polygon.getTag().toString();
        }

        List<PatternItem> pattern = null;
        int strokeColor = COLOR_BLACK_ARGB;
        int fillColor = COLOR_WHITE_ARGB;

        switch (type) {
            // If no type is given, allow the API to use the default.
            case "alpha":
                // Apply a stroke pattern to render a dashed line, and define colors.
                pattern = PATTERN_POLYGON_ALPHA;
                strokeColor = COLOR_DARK_GREEN_ARGB;
                fillColor = COLOR_LIGHT_GREEN_ARGB;
                break;
            case "beta":
                // Apply a stroke pattern to render a line of dots and dashes, and define colors.
                pattern = PATTERN_POLYGON_BETA;
                strokeColor = COLOR_DARK_ORANGE_ARGB;
                fillColor = COLOR_LIGHT_ORANGE_ARGB;
                break;
        }

        polygon.setStrokePattern(pattern);
        polygon.setStrokeWidth(POLYGON_STROKE_WIDTH_PX);
        polygon.setStrokeColor(strokeColor);
        polygon.setFillColor(fillColor);
    }
}
ดูเวอร์ชัน Kotlin ของกิจกรรม
    // Copyright 2020 Google LLC
//
// Licensed under the Apache License, Version 2.0 (the "License");
// you may not use this file except in compliance with the License.
// You may obtain a copy of the License at
//
//      http://www.apache.org/licenses/LICENSE-2.0
//
// Unless required by applicable law or agreed to in writing, software
// distributed under the License is distributed on an "AS IS" BASIS,
// WITHOUT WARRANTIES OR CONDITIONS OF ANY KIND, either express or implied.
// See the License for the specific language governing permissions and
// limitations under the License.
package com.example.polygons

import android.os.Bundle
import android.widget.Toast
import androidx.appcompat.app.AppCompatActivity
import com.google.android.gms.maps.CameraUpdateFactory
import com.google.android.gms.maps.GoogleMap
import com.google.android.gms.maps.GoogleMap.OnPolygonClickListener
import com.google.android.gms.maps.GoogleMap.OnPolylineClickListener
import com.google.android.gms.maps.OnMapReadyCallback
import com.google.android.gms.maps.SupportMapFragment
import com.google.android.gms.maps.model.BitmapDescriptorFactory
import com.google.android.gms.maps.model.CustomCap
import com.google.android.gms.maps.model.Dash
import com.google.android.gms.maps.model.Dot
import com.google.android.gms.maps.model.Gap
import com.google.android.gms.maps.model.JointType
import com.google.android.gms.maps.model.LatLng
import com.google.android.gms.maps.model.PatternItem
import com.google.android.gms.maps.model.Polygon
import com.google.android.gms.maps.model.PolygonOptions
import com.google.android.gms.maps.model.Polyline
import com.google.android.gms.maps.model.PolylineOptions
import com.google.android.gms.maps.model.RoundCap

/**
 * An activity that displays a Google map with polylines to represent paths or routes,
 * and polygons to represent areas.
 */
class PolyActivity : AppCompatActivity(), OnMapReadyCallback, OnPolylineClickListener, OnPolygonClickListener {

    override fun onCreate(savedInstanceState: Bundle?) {
        super.onCreate(savedInstanceState)

        // Retrieve the content view that renders the map.
        setContentView(R.layout.activity_maps)

        // Get the SupportMapFragment and request notification when the map is ready to be used.
        val mapFragment = supportFragmentManager
            .findFragmentById(R.id.map) as SupportMapFragment?
        mapFragment?.getMapAsync(this)
    }

    /**
     * Manipulates the map when it's available.
     * The API invokes this callback when the map is ready to be used.
     * This is where we can add markers or lines, add listeners or move the camera.
     * In this tutorial, we add polylines and polygons to represent routes and areas on the map.
     */
    override fun onMapReady(googleMap: GoogleMap) {

        // Add polylines to the map.
        // Polylines are useful to show a route or some other connection between points.
        val polyline1 = googleMap.addPolyline(PolylineOptions()
            .clickable(true)
            .add(
                LatLng(-35.016, 143.321),
                LatLng(-34.747, 145.592),
                LatLng(-34.364, 147.891),
                LatLng(-33.501, 150.217),
                LatLng(-32.306, 149.248),
                LatLng(-32.491, 147.309)))
        // Store a data object with the polyline, used here to indicate an arbitrary type.
        polyline1.tag = "A"
        // Style the polyline.
        stylePolyline(polyline1)

        val polyline2 = googleMap.addPolyline(PolylineOptions()
            .clickable(true)
            .add(
                LatLng(-29.501, 119.700),
                LatLng(-27.456, 119.672),
                LatLng(-25.971, 124.187),
                LatLng(-28.081, 126.555),
                LatLng(-28.848, 124.229),
                LatLng(-28.215, 123.938)))
        polyline2.tag = "B"
        stylePolyline(polyline2)

        // Add polygons to indicate areas on the map.
        val polygon1 = googleMap.addPolygon(PolygonOptions()
            .clickable(true)
            .add(
                LatLng(-27.457, 153.040),
                LatLng(-33.852, 151.211),
                LatLng(-37.813, 144.962),
                LatLng(-34.928, 138.599)))
        // Store a data object with the polygon, used here to indicate an arbitrary type.
        polygon1.tag = "alpha"
        // Style the polygon.
        stylePolygon(polygon1)

        val polygon2 = googleMap.addPolygon(PolygonOptions()
            .clickable(true)
            .add(
                LatLng(-31.673, 128.892),
                LatLng(-31.952, 115.857),
                LatLng(-17.785, 122.258),
                LatLng(-12.4258, 130.7932)))
        polygon2.tag = "beta"
        stylePolygon(polygon2)

        // Position the map's camera near Alice Springs in the center of Australia,
        // and set the zoom factor so most of Australia shows on the screen.
        googleMap.moveCamera(CameraUpdateFactory.newLatLngZoom(LatLng(-23.684, 133.903), 4f))

        // Set listeners for click events.
        googleMap.setOnPolylineClickListener(this)
        googleMap.setOnPolygonClickListener(this)
    }

    private val COLOR_BLACK_ARGB = -0x1000000
    private val POLYLINE_STROKE_WIDTH_PX = 12

    /**
     * Styles the polyline, based on type.
     * @param polyline The polyline object that needs styling.
     */
    private fun stylePolyline(polyline: Polyline) {
        // Get the data object stored with the polyline.
        val type = polyline.tag?.toString() ?: ""
        when (type) {
            "A" -> {
                // Use a custom bitmap as the cap at the start of the line.
                polyline.startCap = CustomCap(
                    BitmapDescriptorFactory.fromResource(R.drawable.ic_arrow), 10f)
            }
            "B" -> {
               // Use a round cap at the start of the line.
                polyline.startCap = RoundCap()
            }
        }
        polyline.endCap = RoundCap()
        polyline.width = POLYLINE_STROKE_WIDTH_PX.toFloat()
        polyline.color = COLOR_BLACK_ARGB
        polyline.jointType = JointType.ROUND
    }

    private val PATTERN_GAP_LENGTH_PX = 20
    private val DOT: PatternItem = Dot()
    private val GAP: PatternItem = Gap(PATTERN_GAP_LENGTH_PX.toFloat())

    // Create a stroke pattern of a gap followed by a dot.
    private val PATTERN_POLYLINE_DOTTED = listOf(GAP, DOT)

    /**
     * Listens for clicks on a polyline.
     * @param polyline The polyline object that the user has clicked.
     */
    override fun onPolylineClick(polyline: Polyline) {
        // Flip from solid stroke to dotted stroke pattern.
        if (polyline.pattern == null || !polyline.pattern!!.contains(DOT)) {
            polyline.pattern = PATTERN_POLYLINE_DOTTED
        } else {
            // The default pattern is a solid stroke.
            polyline.pattern = null
        }
        Toast.makeText(this, "Route type " + polyline.tag.toString(),
            Toast.LENGTH_SHORT).show()
    }

    /**
     * Listens for clicks on a polygon.
     * @param polygon The polygon object that the user has clicked.
     */
    override fun onPolygonClick(polygon: Polygon) {
        // Flip the values of the red, green, and blue components of the polygon's color.
        var color = polygon.strokeColor xor 0x00ffffff
        polygon.strokeColor = color
        color = polygon.fillColor xor 0x00ffffff
        polygon.fillColor = color
        Toast.makeText(this, "Area type ${polygon.tag?.toString()}", Toast.LENGTH_SHORT).show()
    }

    private val COLOR_WHITE_ARGB = -0x1
    private val COLOR_DARK_GREEN_ARGB = -0xc771c4
    private val COLOR_LIGHT_GREEN_ARGB = -0x7e387c
    private val COLOR_DARK_ORANGE_ARGB = -0xa80e9
    private val COLOR_LIGHT_ORANGE_ARGB = -0x657db
    private val POLYGON_STROKE_WIDTH_PX = 8
    private val PATTERN_DASH_LENGTH_PX = 20

    private val DASH: PatternItem = Dash(PATTERN_DASH_LENGTH_PX.toFloat())

    // Create a stroke pattern of a gap followed by a dash.
    private val PATTERN_POLYGON_ALPHA = listOf(GAP, DASH)

    // Create a stroke pattern of a dot followed by a gap, a dash, and another gap.
    private val PATTERN_POLYGON_BETA = listOf(DOT, GAP, DASH, GAP)

    /**
     * Styles the polygon, based on type.
     * @param polygon The polygon object that needs styling.
     */
    private fun stylePolygon(polygon: Polygon) {
        // Get the data object stored with the polygon.
        val type = polygon.tag?.toString() ?: ""
        var pattern: List<PatternItem>? = null
        var strokeColor = COLOR_BLACK_ARGB
        var fillColor = COLOR_WHITE_ARGB
        when (type) {
            "alpha" -> {
                // Apply a stroke pattern to render a dashed line, and define colors.
                pattern = PATTERN_POLYGON_ALPHA
                strokeColor = COLOR_DARK_GREEN_ARGB
                fillColor = COLOR_LIGHT_GREEN_ARGB
            }
            "beta" -> {
                // Apply a stroke pattern to render a line of dots and dashes, and define colors.
                pattern = PATTERN_POLYGON_BETA
                strokeColor = COLOR_DARK_ORANGE_ARGB
                fillColor = COLOR_LIGHT_ORANGE_ARGB
            }
        }
        polygon.strokePattern = pattern
        polygon.strokeWidth = POLYGON_STROKE_WIDTH_PX.toFloat()
        polygon.strokeColor = strokeColor
        polygon.fillColor = fillColor
    }
}
ตั้งค่าโปรเจ็กต์การพัฒนา
ทำตามขั้นตอนต่อไปนี้เพื่อสร้างโปรเจ็กต์บทแนะนำใน Android Studio
- ดาวน์โหลดและติดตั้ง Android Studio
- เพิ่มแพ็กเกจ บริการ Google Play ลงใน Android Studio
- โคลนหรือดาวน์โหลดที่เก็บตัวอย่าง Google Maps Android API v2 หากคุณยังไม่ได้ดำเนินการเมื่อเริ่มอ่านบทแนะนำนี้
นำเข้าโปรเจ็กต์บทแนะนำโดยทำดังนี้
- ใน Android Studio ให้เลือก File > New > Import Project
- ไปที่ตำแหน่งที่คุณบันทึกที่เก็บตัวอย่าง Google Maps Android API v2 หลังจากดาวน์โหลด
- ค้นหาโปรเจ็กต์ Polygons ในตำแหน่งต่อไปนี้
PATH-TO-SAVED-REPO/android-samples/tutorials/java/Polygons(Java) หรือ
PATH-TO-SAVED-REPO/android-samples/tutorials/kotlin/Polygons(Kotlin) - เลือกไดเรกทอรีโปรเจ็กต์ แล้วคลิก Open ตอนนี้ Android Studio จะสร้างโปรเจ็กต์โดยใช้เครื่องมือสร้าง Gradle
เปิดใช้ API ที่จำเป็นและรับคีย์ API
หากต้องการทำตามบทแนะนำนี้ให้เสร็จสมบูรณ์ คุณต้องมีโปรเจ็กต์ที่อยู่ในระบบคลาวด์ของ Google Cloud ที่เปิดใช้ API ที่จำเป็นและคีย์ API ที่ได้รับอนุญาตให้ใช้ Maps SDK สำหรับ Android ดูรายละเอียดเพิ่มเติมได้ที่
เพิ่มคีย์ API ลงในแอป
- เปิดไฟล์
local.propertiesของโปรเจ็กต์ เพิ่มสตริงต่อไปนี้ แล้วแทนที่
YOUR_API_KEYด้วยค่าคีย์ APIMAPS_API_KEY=YOUR_API_KEYเมื่อคุณสร้างแอป ปลั๊กอินข้อมูลลับ Gradle สำหรับ Android จะคัดลอกคีย์ API และทำให้คีย์ดังกล่าวพร้อมใช้งานเป็นตัวแปรบิลด์ในไฟล์ Manifest ของ Android ตามที่อธิบายไว้ด้านล่าง
สร้างและเรียกใช้แอป
วิธีสร้างและเรียกใช้แอป
เชื่อมต่ออุปกรณ์ Android กับคอมพิวเตอร์ ทำตาม วิธีการเพื่อเปิดใช้ตัวเลือกสำหรับนักพัฒนาแอปในอุปกรณ์ Android และกำหนดค่าระบบให้ตรวจหาอุปกรณ์
หรือคุณจะใช้เครื่องมือจัดการอุปกรณ์เสมือน Android (AVD) เพื่อกำหนดค่าอุปกรณ์เสมือนจริงก็ได้ เมื่อเลือกโปรแกรมจำลอง ให้เลือกรูปภาพที่มี Google API ดูรายละเอียดเพิ่มเติมได้ที่ ตั้งค่าโปรเจ็กต์ Android Studio
ใน Android Studio ให้คลิกตัวเลือกเมนู Run (หรือไอคอนปุ่มเล่น) เลือกอุปกรณ์ตามที่ระบบแจ้ง
Android Studio จะเรียกใช้ Gradle เพื่อสร้างแอป แล้วเรียกใช้แอปในอุปกรณ์หรือในโปรแกรมจำลอง
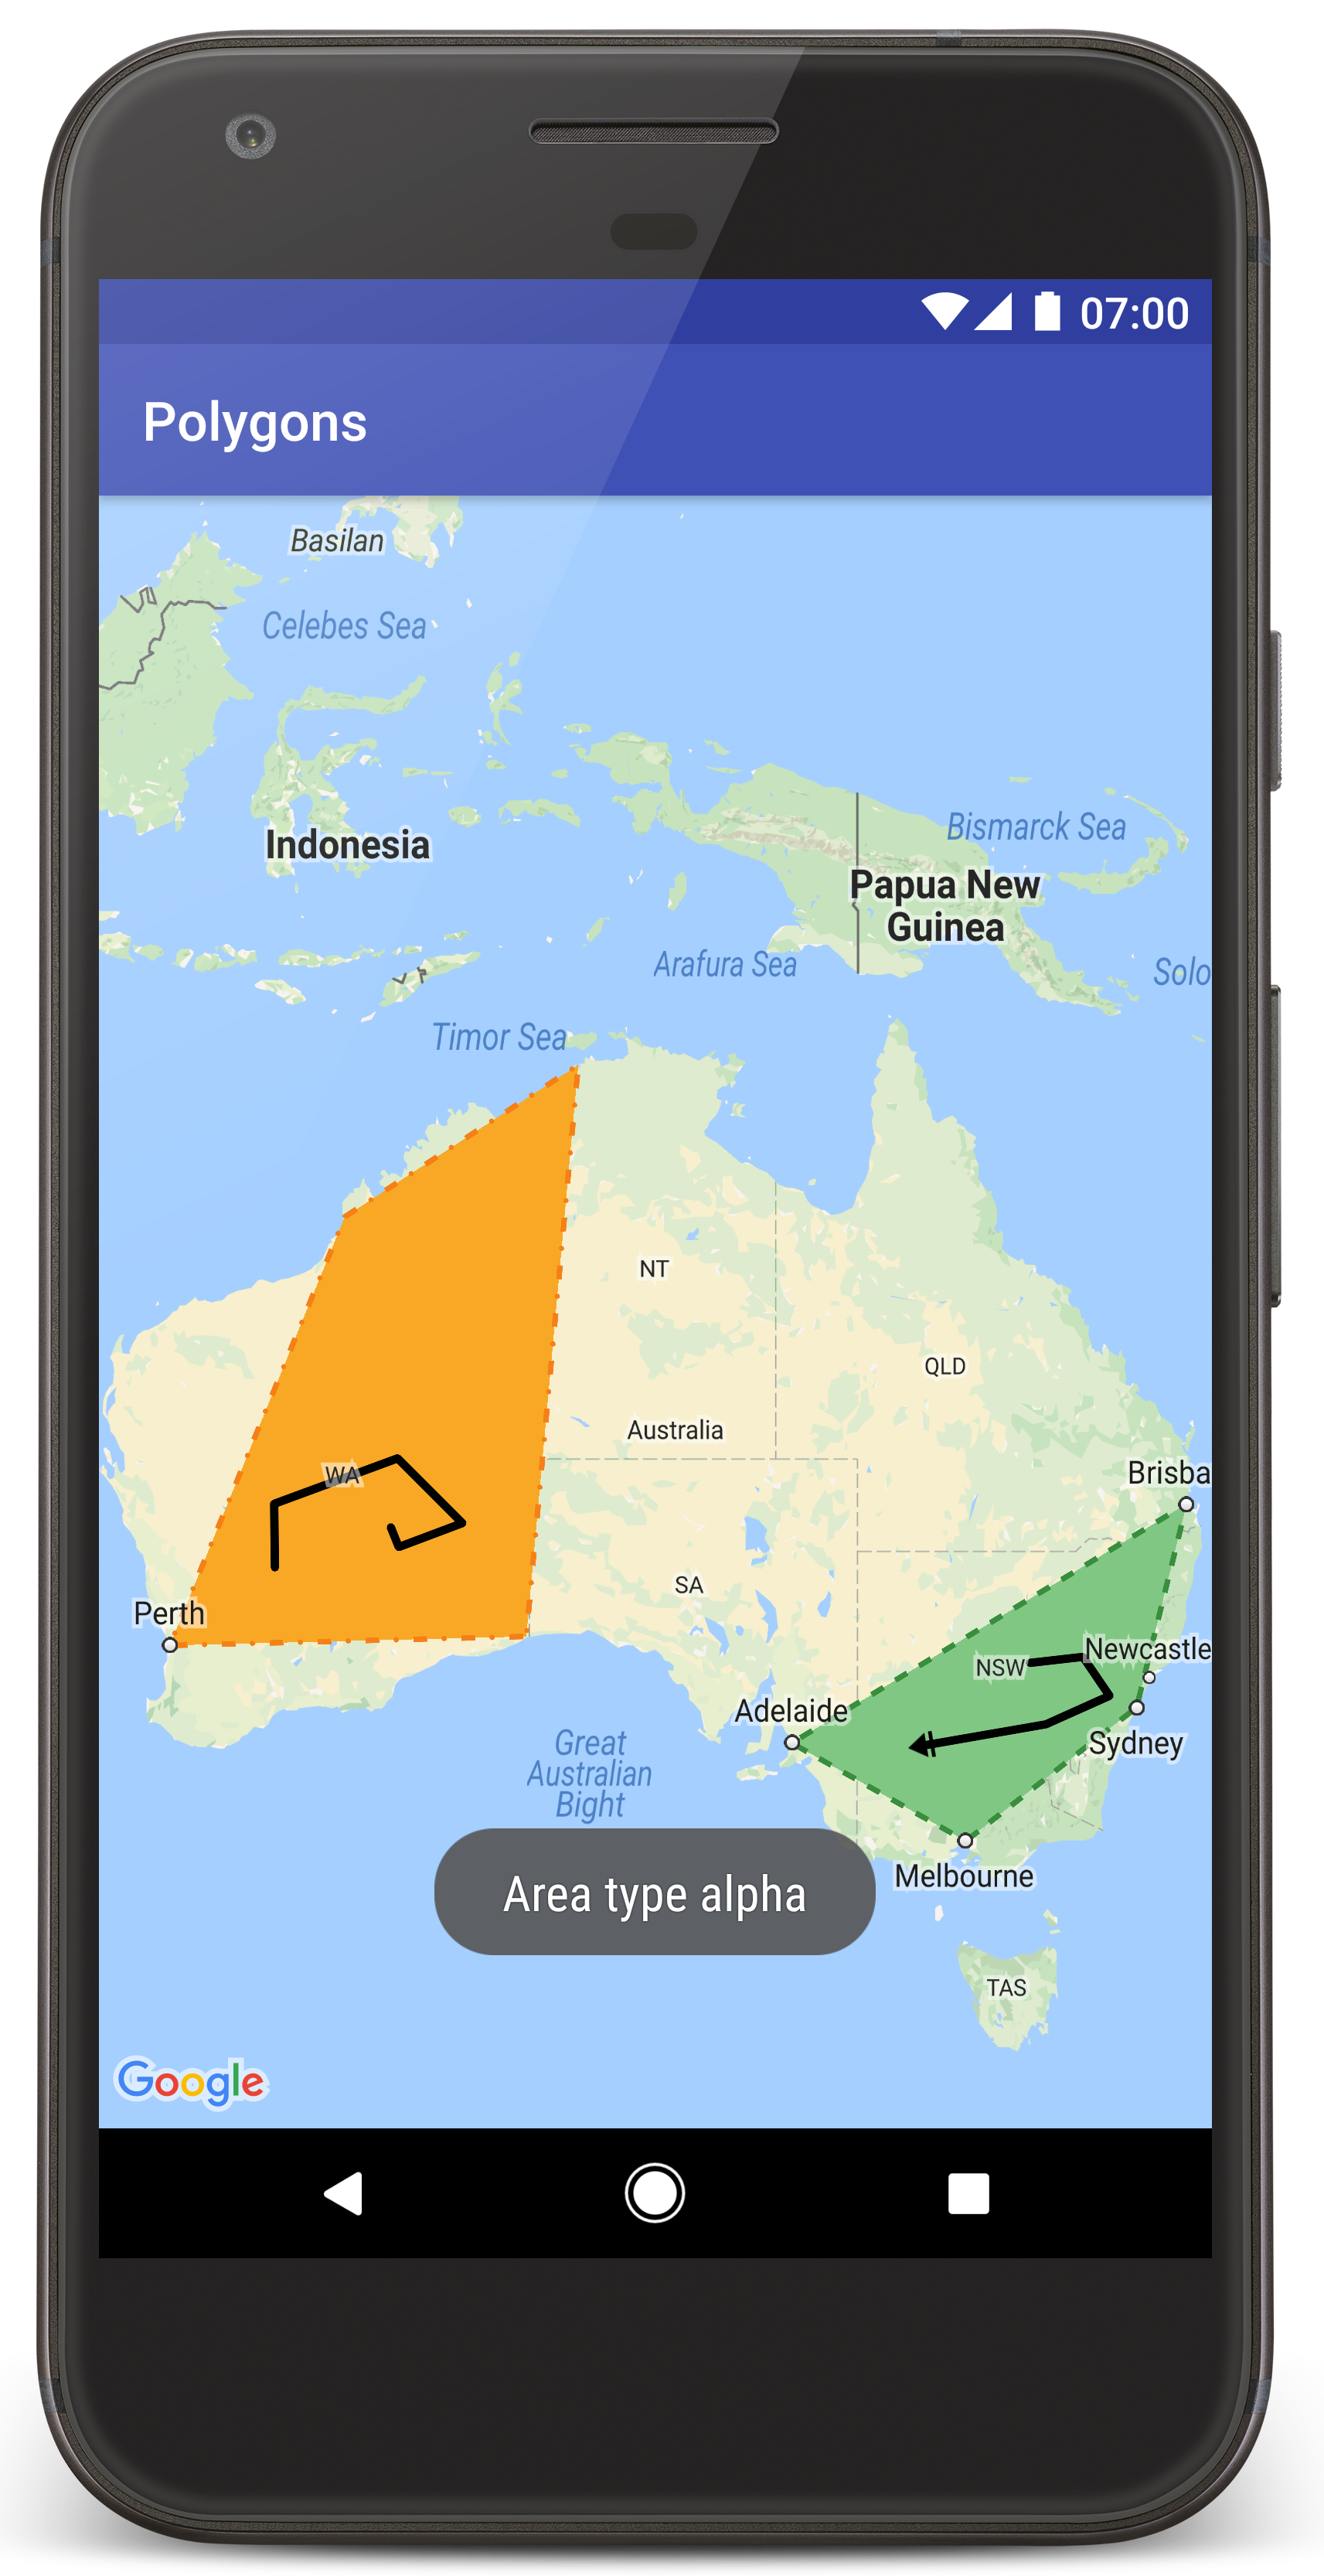
คุณควรเห็นแผนที่ที่มีรูปหลายเหลี่ยม 2 รูปซ้อนทับอยู่บนออสเตรเลีย ซึ่งคล้ายกับรูปภาพในหน้านี้
การแก้ปัญหา:
- หากไม่เห็นแผนที่ ให้ตรวจสอบว่าคุณได้รับคีย์ API และเพิ่มคีย์ดังกล่าวลงใน แอป ตามที่อธิบายไว้ข้างต้น ตรวจสอบบันทึกใน Android Studio's Android Monitor เพื่อดูข้อความแสดงข้อผิดพลาดเกี่ยวกับคีย์ API
- ใช้เครื่องมือแก้ไขข้อบกพร่องของ Android Studio เพื่อดูบันทึกและแก้ไขข้อบกพร่อง ของแอป
ทำความเข้าใจโค้ด
ส่วนนี้ของบทแนะนำจะอธิบายส่วนที่สำคัญที่สุดของแอป Polygons เพื่อช่วยให้คุณเข้าใจวิธีสร้างแอปที่คล้ายกัน
ตรวจสอบไฟล์ Manifest ของ Android
โปรดสังเกตองค์ประกอบต่อไปนี้ในไฟล์ AndroidManifest.xml ของแอป
เพิ่มองค์ประกอบ
meta-dataเพื่อฝังเวอร์ชันของบริการ Google Play ที่ใช้คอมไพล์แอป<meta-data android:name="com.google.android.gms.version" android:value="@integer/google_play_services_version" />เพิ่มองค์ประกอบ
meta-dataที่ระบุคีย์ API ตัวอย่างที่มาพร้อมกับบทแนะนำนี้จะแมปค่าคีย์ API กับตัวแปรการสร้างที่ตรงกับชื่อคีย์ที่คุณกำหนดไว้ก่อนหน้านี้MAPS_API_KEYเมื่อคุณสร้างแอป ปลั๊กอินข้อมูลลับ Gradle สำหรับ Android จะทำให้คีย์ในไฟล์local.propertiesพร้อมใช้งานเป็นตัวแปรบิลด์ไฟล์ Manifest<meta-data android:name="com.google.android.geo.API_KEY" android:value="${MAPS_API_KEY}" />ในไฟล์
build.gradleบรรทัดต่อไปนี้จะส่งคีย์ API ไปยังไฟล์ Manifest ของ Androidid 'com.google.android.libraries.mapsplatform.secrets-gradle-plugin'
ด้านล่างนี้คือตัวอย่างไฟล์ Manifest ที่สมบูรณ์
  <?xml version="1.0" encoding="utf-8"?>
<!--
 Copyright 2020 Google LLC

 Licensed under the Apache License, Version 2.0 (the "License");
 you may not use this file except in compliance with the License.
 You may obtain a copy of the License at

      http://www.apache.org/licenses/LICENSE-2.0

 Unless required by applicable law or agreed to in writing, software
 distributed under the License is distributed on an "AS IS" BASIS,
 WITHOUT WARRANTIES OR CONDITIONS OF ANY KIND, either express or implied.
 See the License for the specific language governing permissions and
 limitations under the License.
-->

<manifest xmlns:android="http://schemas.android.com/apk/res/android">

    <application
        android:allowBackup="true"
        android:icon="@mipmap/ic_launcher"
        android:label="@string/app_name"
        android:supportsRtl="true"
        android:theme="@style/AppTheme">

        <meta-data
            android:name="com.google.android.gms.version"
            android:value="@integer/google_play_services_version" />

        <!--
             The API key for Google Maps-based APIs.
        -->
        <meta-data
            android:name="com.google.android.geo.API_KEY"
            android:value="${MAPS_API_KEY}" />

        <activity
            android:name="com.example.polygons.PolyActivity"
            android:exported="true"
            android:label="@string/title_activity_maps">
            <intent-filter>
                <action android:name="android.intent.action.MAIN" />
                <category android:name="android.intent.category.LAUNCHER" />
            </intent-filter>
        </activity>
    </application>
</manifest>
เพิ่มแผนที่
แสดงแผนที่โดยใช้ Maps SDK สำหรับ Android
เพิ่มองค์ประกอบ
<fragment>ลงในไฟล์เลย์เอาต์ของกิจกรรมactivity_maps.xmlองค์ประกอบนี้จะกำหนดSupportMapFragmentให้ทำหน้าที่เป็นคอนเทนเนอร์สำหรับแผนที่ และให้สิทธิ์เข้าถึงออบเจ็กต์GoogleMapบทแนะนำนี้ใช้ Map Fragment เวอร์ชันไลบรารีการสนับสนุนของ Android เพื่อให้มั่นใจว่าสามารถใช้งานร่วมกับเฟรมเวิร์ก Android เวอร์ชันก่อนหน้าได้<!-- Copyright 2020 Google LLC Licensed under the Apache License, Version 2.0 (the "License"); you may not use this file except in compliance with the License. You may obtain a copy of the License at http://www.apache.org/licenses/LICENSE-2.0 Unless required by applicable law or agreed to in writing, software distributed under the License is distributed on an "AS IS" BASIS, WITHOUT WARRANTIES OR CONDITIONS OF ANY KIND, either express or implied. See the License for the specific language governing permissions and limitations under the License. --> <fragment xmlns:android="http://schemas.android.com/apk/res/android" xmlns:tools="http://schemas.android.com/tools" android:id="@+id/map" android:name="com.google.android.gms.maps.SupportMapFragment" android:layout_width="match_parent" android:layout_height="match_parent" tools:context="com.example.polygons.PolyActivity" />
ในเมธอด
onCreate()ของกิจกรรม ให้ตั้งค่าไฟล์เลย์เอาต์ เป็นมุมมองเนื้อหา รับแฮนเดิลไปยัง Map Fragment โดยเรียกใช้FragmentManager.findFragmentById()จากนั้นใช้getMapAsync()เพื่อลงทะเบียนสำหรับการเรียกกลับของแผนที่Java
@Override protected void onCreate(Bundle savedInstanceState) { super.onCreate(savedInstanceState); // Retrieve the content view that renders the map. setContentView(R.layout.activity_maps); // Get the SupportMapFragment and request notification when the map is ready to be used. SupportMapFragment mapFragment = (SupportMapFragment) getSupportFragmentManager() .findFragmentById(R.id.map); mapFragment.getMapAsync(this); }
Kotlin
override fun onCreate(savedInstanceState: Bundle?) { super.onCreate(savedInstanceState) // Retrieve the content view that renders the map. setContentView(R.layout.activity_maps) // Get the SupportMapFragment and request notification when the map is ready to be used. val mapFragment = supportFragmentManager .findFragmentById(R.id.map) as SupportMapFragment? mapFragment?.getMapAsync(this) }
ใช้ อินเทอร์เฟซ
OnMapReadyCallbackและ ลบล้างเมธอดonMapReady()API จะเรียกใช้การเรียกกลับนี้เมื่อออบเจ็กต์GoogleMapพร้อมใช้งาน เพื่อให้คุณเพิ่มออบเจ็กต์ลงในแผนที่และปรับแต่งแผนที่เพิ่มเติมสำหรับแอปได้Java
public class PolyActivity extends AppCompatActivity implements OnMapReadyCallback, GoogleMap.OnPolylineClickListener, GoogleMap.OnPolygonClickListener { @Override protected void onCreate(Bundle savedInstanceState) { super.onCreate(savedInstanceState); // Retrieve the content view that renders the map. setContentView(R.layout.activity_maps); // Get the SupportMapFragment and request notification when the map is ready to be used. SupportMapFragment mapFragment = (SupportMapFragment) getSupportFragmentManager() .findFragmentById(R.id.map); mapFragment.getMapAsync(this); } /** * Manipulates the map when it's available. * The API invokes this callback when the map is ready to be used. * This is where we can add markers or lines, add listeners or move the camera. * In this tutorial, we add polylines and polygons to represent routes and areas on the map. */ @Override public void onMapReady(GoogleMap googleMap) { // Add polylines to the map. // Polylines are useful to show a route or some other connection between points. Polyline polyline1 = googleMap.addPolyline(new PolylineOptions() .clickable(true) .add( new LatLng(-35.016, 143.321), new LatLng(-34.747, 145.592), new LatLng(-34.364, 147.891), new LatLng(-33.501, 150.217), new LatLng(-32.306, 149.248), new LatLng(-32.491, 147.309))); // Position the map's camera near Alice Springs in the center of Australia, // and set the zoom factor so most of Australia shows on the screen. googleMap.moveCamera(CameraUpdateFactory.newLatLngZoom(new LatLng(-23.684, 133.903), 4)); // Set listeners for click events. googleMap.setOnPolylineClickListener(this); googleMap.setOnPolygonClickListener(this); }
Kotlin
class PolyActivity : AppCompatActivity(), OnMapReadyCallback, OnPolylineClickListener, OnPolygonClickListener { override fun onCreate(savedInstanceState: Bundle?) { super.onCreate(savedInstanceState) // Retrieve the content view that renders the map. setContentView(R.layout.activity_maps) // Get the SupportMapFragment and request notification when the map is ready to be used. val mapFragment = supportFragmentManager .findFragmentById(R.id.map) as SupportMapFragment? mapFragment?.getMapAsync(this) } /** * Manipulates the map when it's available. * The API invokes this callback when the map is ready to be used. * This is where we can add markers or lines, add listeners or move the camera. * In this tutorial, we add polylines and polygons to represent routes and areas on the map. */ override fun onMapReady(googleMap: GoogleMap) { // Add polylines to the map. // Polylines are useful to show a route or some other connection between points. val polyline1 = googleMap.addPolyline(PolylineOptions() .clickable(true) .add( LatLng(-35.016, 143.321), LatLng(-34.747, 145.592), LatLng(-34.364, 147.891), LatLng(-33.501, 150.217), LatLng(-32.306, 149.248), LatLng(-32.491, 147.309))) // Position the map's camera near Alice Springs in the center of Australia, // and set the zoom factor so most of Australia shows on the screen. googleMap.moveCamera(CameraUpdateFactory.newLatLngZoom(LatLng(-23.684, 133.903), 4f)) // Set listeners for click events. googleMap.setOnPolylineClickListener(this) googleMap.setOnPolygonClickListener(this) }
เพิ่มเส้นประกอบเพื่อวาดเส้นบนแผนที่
A Polyline คือชุดของส่วนของเส้นที่เชื่อมต่อกัน เส้นหลายเส้นมีประโยชน์ในการแสดงเส้นทาง ทางเดิน หรือการเชื่อมต่ออื่นๆ ระหว่างสถานที่ต่างๆ บนแผนที่
สร้างออบเจ็กต์
PolylineOptionsแล้วเพิ่มจุดลงในออบเจ็กต์ แต่ละจุดแสดงถึงสถานที่บนแผนที่ ซึ่งคุณกำหนดด้วยออบเจ็กต์LatLngที่มีค่าละติจูดและลองจิจูด ตัวอย่างโค้ดด้านล่างสร้างเส้นหลายเส้นที่มี 6 จุดเรียกใช้
GoogleMap.addPolyline()เพื่อเพิ่มเส้นหลายเส้นลงในแผนที่Java
Polyline polyline1 = googleMap.addPolyline(new PolylineOptions() .clickable(true) .add( new LatLng(-35.016, 143.321), new LatLng(-34.747, 145.592), new LatLng(-34.364, 147.891), new LatLng(-33.501, 150.217), new LatLng(-32.306, 149.248), new LatLng(-32.491, 147.309)));
Kotlin
val polyline1 = googleMap.addPolyline(PolylineOptions() .clickable(true) .add( LatLng(-35.016, 143.321), LatLng(-34.747, 145.592), LatLng(-34.364, 147.891), LatLng(-33.501, 150.217), LatLng(-32.306, 149.248), LatLng(-32.491, 147.309)))
ตั้งค่าตัวเลือก clickable ของเส้นประกอบเป็น true หากต้องการจัดการกิจกรรมการคลิกบนเส้นประกอบ ดูข้อมูลเพิ่มเติมเกี่ยวกับการจัดการเหตุการณ์ได้ในส่วนอื่นๆ ของบทแนะนำนี้
จัดเก็บข้อมูลที่กำหนดเองด้วยเส้นประกอบ
คุณสามารถจัดเก็บออบเจ็กต์ข้อมูลที่กำหนดเองด้วยเส้นหลายเส้นและออบเจ็กต์รูปทรงเรขาคณิตอื่นๆ
เรียกใช้
Polyline.setTag()เพื่อจัดเก็บออบเจ็กต์ข้อมูลด้วย เส้นหลายเส้น โค้ดด้านล่างกำหนดแท็กที่กำหนดเอง (A) ซึ่งระบุประเภทของเส้นหลายเส้นJava
Polyline polyline1 = googleMap.addPolyline(new PolylineOptions()
    .clickable(true)
    .add(
            new LatLng(-35.016, 143.321),
            new LatLng(-34.747, 145.592),
            new LatLng(-34.364, 147.891),
            new LatLng(-33.501, 150.217),
            new LatLng(-32.306, 149.248),
            new LatLng(-32.491, 147.309)));
// Store a data object with the polyline, used here to indicate an arbitrary type.
polyline1.setTag("A");
Kotlin
val polyline1 = googleMap.addPolyline(PolylineOptions()
.clickable(true)
.add(
    LatLng(-35.016, 143.321),
    LatLng(-34.747, 145.592),
    LatLng(-34.364, 147.891),
    LatLng(-33.501, 150.217),
    LatLng(-32.306, 149.248),
    LatLng(-32.491, 147.309)))
// Store a data object with the polyline, used here to indicate an arbitrary type.
polyline1.tag = "A
ดึงข้อมูลโดยใช้
Polyline.getTag()ตามที่แสดงใน ส่วนถัดไป
เพิ่มสไตล์ที่กำหนดเองลงในเส้นหลายเส้น
คุณสามารถระบุพร็อพเพอร์ตี้การจัดสไตล์ต่างๆ ใน
PolylineOptions ออบเจ็กต์ได้ ตัวเลือกการจัดสไตล์ ได้แก่ สีเส้น ความกว้างของเส้น รูปแบบเส้น ประเภทการเชื่อม และส่วนเริ่มต้นและส่วนสิ้นสุด หากคุณไม่ระบุพร็อพเพอร์ตี้ใด API จะใช้ค่าเริ่มต้นสำหรับพร็อพเพอร์ตี้นั้น
โค้ดต่อไปนี้ใช้ส่วนสิ้นสุดแบบกลมกับส่วนสิ้นสุดของเส้น และส่วนเริ่มต้นที่แตกต่างกัน โดยขึ้นอยู่กับ ประเภท ของเส้นหลายเส้น โดยประเภทจะเป็นพร็อพเพอร์ตี้ที่กำหนดเอง ซึ่งจัดเก็บไว้ในออบเจ็กต์ข้อมูลสำหรับเส้นหลายเส้น ตัวอย่างยังระบุความกว้างของเส้น สีเส้น และประเภทการเชื่อมด้วย
Java
private static final int COLOR_BLACK_ARGB = 0xff000000; private static final int POLYLINE_STROKE_WIDTH_PX = 12; /** * Styles the polyline, based on type. * @param polyline The polyline object that needs styling. */ private void stylePolyline(Polyline polyline) { String type = ""; // Get the data object stored with the polyline. if (polyline.getTag() != null) { type = polyline.getTag().toString(); } switch (type) { // If no type is given, allow the API to use the default. case "A": // Use a custom bitmap as the cap at the start of the line. polyline.setStartCap( new CustomCap( BitmapDescriptorFactory.fromResource(R.drawable.ic_arrow), 10)); break; case "B": // Use a round cap at the start of the line. polyline.setStartCap(new RoundCap()); break; } polyline.setEndCap(new RoundCap()); polyline.setWidth(POLYLINE_STROKE_WIDTH_PX); polyline.setColor(COLOR_BLACK_ARGB); polyline.setJointType(JointType.ROUND); }
Kotlin
private val COLOR_BLACK_ARGB = -0x1000000 private val POLYLINE_STROKE_WIDTH_PX = 12 /** * Styles the polyline, based on type. * @param polyline The polyline object that needs styling. */ private fun stylePolyline(polyline: Polyline) { // Get the data object stored with the polyline. val type = polyline.tag?.toString() ?: "" when (type) { "A" -> { // Use a custom bitmap as the cap at the start of the line. polyline.startCap = CustomCap( BitmapDescriptorFactory.fromResource(R.drawable.ic_arrow), 10f) } "B" -> { // Use a round cap at the start of the line. polyline.startCap = RoundCap() } } polyline.endCap = RoundCap() polyline.width = POLYLINE_STROKE_WIDTH_PX.toFloat() polyline.color = COLOR_BLACK_ARGB polyline.jointType = JointType.ROUND }
โค้ดด้านบนระบุบิตแมปที่กำหนดเองสำหรับส่วนเริ่มต้นของเส้นหลายเส้นประเภท A และระบุความกว้างของเส้นอ้างอิงเป็น 10 พิกเซล API จะปรับขนาดบิตแมปตามความกว้างของเส้นอ้างอิง เมื่อระบุความกว้างของเส้นอ้างอิง ให้ระบุความกว้างที่คุณใช้เมื่อออกแบบรูปภาพบิตแมปที่ขนาดเดิมของรูปภาพ เคล็ดลับ: เปิดรูปภาพบิตแมปที่การซูม 100% ในโปรแกรมแก้ไขรูปภาพ แล้วกำหนดความกว้างที่ต้องการของเส้นเทียบกับรูปภาพ
อ่านเพิ่มเติมเกี่ยวกับส่วนสิ้นสุดของเส้นและตัวเลือกอื่นๆ สำหรับ การปรับแต่งรูปร่าง
จัดการเหตุการณ์การคลิกบนเส้นหลายเส้น
ทำให้เส้นประกอบคลิกได้โดยเรียกใช้
Polyline.setClickable()(โดยค่าเริ่มต้น เส้นหลายเส้นจะคลิกไม่ได้และแอปจะไม่ได้รับการแจ้งเตือนเมื่อผู้ใช้แตะเส้นหลายเส้น)ใช้
OnPolylineClickListenerอินเทอร์เฟซ และเรียกใช้GoogleMap.setOnPolylineClickListener()เพื่อตั้งค่า Listener บนแผนที่Java
public class PolyActivity extends AppCompatActivity implements OnMapReadyCallback, GoogleMap.OnPolylineClickListener, GoogleMap.OnPolygonClickListener { @Override protected void onCreate(Bundle savedInstanceState) { super.onCreate(savedInstanceState); // Retrieve the content view that renders the map. setContentView(R.layout.activity_maps); // Get the SupportMapFragment and request notification when the map is ready to be used. SupportMapFragment mapFragment = (SupportMapFragment) getSupportFragmentManager() .findFragmentById(R.id.map); mapFragment.getMapAsync(this); } /** * Manipulates the map when it's available. * The API invokes this callback when the map is ready to be used. * This is where we can add markers or lines, add listeners or move the camera. * In this tutorial, we add polylines and polygons to represent routes and areas on the map. */ @Override public void onMapReady(GoogleMap googleMap) { // Add polylines to the map. // Polylines are useful to show a route or some other connection between points. Polyline polyline1 = googleMap.addPolyline(new PolylineOptions() .clickable(true) .add( new LatLng(-35.016, 143.321), new LatLng(-34.747, 145.592), new LatLng(-34.364, 147.891), new LatLng(-33.501, 150.217), new LatLng(-32.306, 149.248), new LatLng(-32.491, 147.309))); // Position the map's camera near Alice Springs in the center of Australia, // and set the zoom factor so most of Australia shows on the screen. googleMap.moveCamera(CameraUpdateFactory.newLatLngZoom(new LatLng(-23.684, 133.903), 4)); // Set listeners for click events. googleMap.setOnPolylineClickListener(this); googleMap.setOnPolygonClickListener(this); }
Kotlin
class PolyActivity : AppCompatActivity(), OnMapReadyCallback, OnPolylineClickListener, OnPolygonClickListener { override fun onCreate(savedInstanceState: Bundle?) { super.onCreate(savedInstanceState) // Retrieve the content view that renders the map. setContentView(R.layout.activity_maps) // Get the SupportMapFragment and request notification when the map is ready to be used. val mapFragment = supportFragmentManager .findFragmentById(R.id.map) as SupportMapFragment? mapFragment?.getMapAsync(this) } /** * Manipulates the map when it's available. * The API invokes this callback when the map is ready to be used. * This is where we can add markers or lines, add listeners or move the camera. * In this tutorial, we add polylines and polygons to represent routes and areas on the map. */ override fun onMapReady(googleMap: GoogleMap) { // Add polylines to the map. // Polylines are useful to show a route or some other connection between points. val polyline1 = googleMap.addPolyline(PolylineOptions() .clickable(true) .add( LatLng(-35.016, 143.321), LatLng(-34.747, 145.592), LatLng(-34.364, 147.891), LatLng(-33.501, 150.217), LatLng(-32.306, 149.248), LatLng(-32.491, 147.309))) // Position the map's camera near Alice Springs in the center of Australia, // and set the zoom factor so most of Australia shows on the screen. googleMap.moveCamera(CameraUpdateFactory.newLatLngZoom(LatLng(-23.684, 133.903), 4f)) // Set listeners for click events. googleMap.setOnPolylineClickListener(this) googleMap.setOnPolygonClickListener(this) }
ลบล้างเมธอด Callback
onPolylineClick()ตัวอย่างต่อไปนี้จะสลับรูปแบบเส้นระหว่างเส้นทึบและเส้นประทุกครั้งที่ผู้ใช้คลิกเส้นหลายเส้นJava
private static final int PATTERN_GAP_LENGTH_PX = 20; private static final PatternItem DOT = new Dot(); private static final PatternItem GAP = new Gap(PATTERN_GAP_LENGTH_PX); // Create a stroke pattern of a gap followed by a dot. private static final List<PatternItem> PATTERN_POLYLINE_DOTTED = Arrays.asList(GAP, DOT); /** * Listens for clicks on a polyline. * @param polyline The polyline object that the user has clicked. */ @Override public void onPolylineClick(Polyline polyline) { // Flip from solid stroke to dotted stroke pattern. if ((polyline.getPattern() == null) || (!polyline.getPattern().contains(DOT))) { polyline.setPattern(PATTERN_POLYLINE_DOTTED); } else { // The default pattern is a solid stroke. polyline.setPattern(null); } Toast.makeText(this, "Route type " + polyline.getTag().toString(), Toast.LENGTH_SHORT).show(); }
Kotlin
private val PATTERN_GAP_LENGTH_PX = 20 private val DOT: PatternItem = Dot() private val GAP: PatternItem = Gap(PATTERN_GAP_LENGTH_PX.toFloat()) // Create a stroke pattern of a gap followed by a dot. private val PATTERN_POLYLINE_DOTTED = listOf(GAP, DOT) /** * Listens for clicks on a polyline. * @param polyline The polyline object that the user has clicked. */ override fun onPolylineClick(polyline: Polyline) { // Flip from solid stroke to dotted stroke pattern. if (polyline.pattern == null || !polyline.pattern!!.contains(DOT)) { polyline.pattern = PATTERN_POLYLINE_DOTTED } else { // The default pattern is a solid stroke. polyline.pattern = null } Toast.makeText(this, "Route type " + polyline.tag.toString(), Toast.LENGTH_SHORT).show() }
เพิ่มรูปหลายเหลี่ยมเพื่อแสดงพื้นที่บนแผนที่
A Polygon คือรูปร่างที่ประกอบด้วยชุดพิกัดในลำดับที่
กำหนด ซึ่งคล้ายกับ Polyline ความแตกต่างคือรูปหลายเหลี่ยมกำหนดพื้นที่ปิดที่มีภายในที่เติมได้ ในขณะที่เส้นประกอบเป็นแบบเปิด
สร้างออบเจ็กต์
PolygonOptionsแล้วเพิ่มจุดลงในออบเจ็กต์ แต่ละจุดแสดงถึงสถานที่บนแผนที่ ซึ่งคุณกำหนดด้วยออบเจ็กต์LatLngที่มีค่าละติจูดและลองจิจูด ตัวอย่างโค้ดด้านล่างสร้างรูปหลายเหลี่ยมที่มี 4 จุดทำให้รูปหลายเหลี่ยมคลิกได้โดยเรียกใช้
Polygon.setClickable()(โดยค่าเริ่มต้น รูปหลายเหลี่ยมจะคลิกไม่ได้และแอปจะไม่ได้รับการแจ้งเตือนเมื่อผู้ใช้แตะรูปหลายเหลี่ยม) การจัดการเหตุการณ์การคลิกรูปหลายเหลี่ยมจะคล้ายกับการจัดการเหตุการณ์บนเส้นหลายเส้นที่อธิบายไว้ก่อนหน้านี้ในบทแนะนำนี้เรียกใช้
GoogleMap.addPolygon()เพื่อเพิ่มรูปหลายเหลี่ยมลงในแผนที่เรียกใช้
Polygon.setTag()เพื่อจัดเก็บออบเจ็กต์ข้อมูลด้วย รูปหลายเหลี่ยม โค้ดด้านล่างกำหนดประเภทที่กำหนดเอง (alpha) สำหรับรูปหลายเหลี่ยมJava
// Add polygons to indicate areas on the map. Polygon polygon1 = googleMap.addPolygon(new PolygonOptions() .clickable(true) .add( new LatLng(-27.457, 153.040), new LatLng(-33.852, 151.211), new LatLng(-37.813, 144.962), new LatLng(-34.928, 138.599))); // Store a data object with the polygon, used here to indicate an arbitrary type. polygon1.setTag("alpha");
Kotlin
// Add polygons to indicate areas on the map. val polygon1 = googleMap.addPolygon(PolygonOptions() .clickable(true) .add( LatLng(-27.457, 153.040), LatLng(-33.852, 151.211), LatLng(-37.813, 144.962), LatLng(-34.928, 138.599))) // Store a data object with the polygon, used here to indicate an arbitrary type. polygon1.tag = "alpha" // Style the polygon.
เพิ่มสไตล์ที่กำหนดเองลงในรูปหลายเหลี่ยม
คุณสามารถระบุพร็อพเพอร์ตี้การจัดสไตล์จำนวนมากในออบเจ็กต์
PolygonOptions ได้ ตัวเลือกการจัดสไตล์ ได้แก่ สีเส้น ความกว้างของเส้น รูปแบบเส้น ประเภทการเชื่อมเส้น และสีเติม หากคุณไม่ระบุพร็อพเพอร์ตี้ใด API จะใช้ค่าเริ่มต้นสำหรับพร็อพเพอร์ตี้นั้น
โค้ดต่อไปนี้ใช้สีและรูปแบบเส้นที่เฉพาะเจาะจงโดยขึ้นอยู่กับ ประเภทของรูปหลายเหลี่ยม โดยประเภทจะเป็นพร็อพเพอร์ตี้ที่กำหนดเองซึ่งจัดเก็บไว้ในออบเจ็กต์ข้อมูลสำหรับรูปหลายเหลี่ยม
Java
private static final int COLOR_WHITE_ARGB = 0xffffffff; private static final int COLOR_DARK_GREEN_ARGB = 0xff388E3C; private static final int COLOR_LIGHT_GREEN_ARGB = 0xff81C784; private static final int COLOR_DARK_ORANGE_ARGB = 0xffF57F17; private static final int COLOR_LIGHT_ORANGE_ARGB = 0xffF9A825; private static final int POLYGON_STROKE_WIDTH_PX = 8; private static final int PATTERN_DASH_LENGTH_PX = 20; private static final PatternItem DASH = new Dash(PATTERN_DASH_LENGTH_PX); // Create a stroke pattern of a gap followed by a dash. private static final List<PatternItem> PATTERN_POLYGON_ALPHA = Arrays.asList(GAP, DASH); // Create a stroke pattern of a dot followed by a gap, a dash, and another gap. private static final List<PatternItem> PATTERN_POLYGON_BETA = Arrays.asList(DOT, GAP, DASH, GAP); /** * Styles the polygon, based on type. * @param polygon The polygon object that needs styling. */ private void stylePolygon(Polygon polygon) { String type = ""; // Get the data object stored with the polygon. if (polygon.getTag() != null) { type = polygon.getTag().toString(); } List<PatternItem> pattern = null; int strokeColor = COLOR_BLACK_ARGB; int fillColor = COLOR_WHITE_ARGB; switch (type) { // If no type is given, allow the API to use the default. case "alpha": // Apply a stroke pattern to render a dashed line, and define colors. pattern = PATTERN_POLYGON_ALPHA; strokeColor = COLOR_DARK_GREEN_ARGB; fillColor = COLOR_LIGHT_GREEN_ARGB; break; case "beta": // Apply a stroke pattern to render a line of dots and dashes, and define colors. pattern = PATTERN_POLYGON_BETA; strokeColor = COLOR_DARK_ORANGE_ARGB; fillColor = COLOR_LIGHT_ORANGE_ARGB; break; } polygon.setStrokePattern(pattern); polygon.setStrokeWidth(POLYGON_STROKE_WIDTH_PX); polygon.setStrokeColor(strokeColor); polygon.setFillColor(fillColor); }
Kotlin
private val COLOR_WHITE_ARGB = -0x1 private val COLOR_DARK_GREEN_ARGB = -0xc771c4 private val COLOR_LIGHT_GREEN_ARGB = -0x7e387c private val COLOR_DARK_ORANGE_ARGB = -0xa80e9 private val COLOR_LIGHT_ORANGE_ARGB = -0x657db private val POLYGON_STROKE_WIDTH_PX = 8 private val PATTERN_DASH_LENGTH_PX = 20 private val DASH: PatternItem = Dash(PATTERN_DASH_LENGTH_PX.toFloat()) // Create a stroke pattern of a gap followed by a dash. private val PATTERN_POLYGON_ALPHA = listOf(GAP, DASH) // Create a stroke pattern of a dot followed by a gap, a dash, and another gap. private val PATTERN_POLYGON_BETA = listOf(DOT, GAP, DASH, GAP) /** * Styles the polygon, based on type. * @param polygon The polygon object that needs styling. */ private fun stylePolygon(polygon: Polygon) { // Get the data object stored with the polygon. val type = polygon.tag?.toString() ?: "" var pattern: List<PatternItem>? = null var strokeColor = COLOR_BLACK_ARGB var fillColor = COLOR_WHITE_ARGB when (type) { "alpha" -> { // Apply a stroke pattern to render a dashed line, and define colors. pattern = PATTERN_POLYGON_ALPHA strokeColor = COLOR_DARK_GREEN_ARGB fillColor = COLOR_LIGHT_GREEN_ARGB } "beta" -> { // Apply a stroke pattern to render a line of dots and dashes, and define colors. pattern = PATTERN_POLYGON_BETA strokeColor = COLOR_DARK_ORANGE_ARGB fillColor = COLOR_LIGHT_ORANGE_ARGB } } polygon.strokePattern = pattern polygon.strokeWidth = POLYGON_STROKE_WIDTH_PX.toFloat() polygon.strokeColor = strokeColor polygon.fillColor = fillColor }
อ่านเพิ่มเติมเกี่ยวกับรูปแบบเส้นและตัวเลือกอื่นๆ สำหรับ การปรับแต่งรูปร่าง
ขั้นตอนถัดไป
ดูข้อมูลเกี่ยวกับออบเจ็กต์วงกลม วงกลมคล้ายกับรูปหลายเหลี่ยม แต่มีพร็อพเพอร์ตี้ที่แสดงรูปร่างของวงกลม